Clementoni Science & Play Cyber-Arm Robotic Blaster User manual

Authorised
representative
for GB market:
Clementoni UK LTD
Unit 9 - Brook Business Centre -
Cowley Mill Road - UXBRIDGE - UB8 2FX
ENGLAND - P. +44 203 383 2020
https://en.clementoni.com/pages/assistance
Manufacturer : Clementoni S.p.A.
Zona Industriale Fontenoce s.n.c.
62019 Recanati (MC) - Italy
Tel.: +39 071 75811
www.clementoni.com
WARNING!
Do not aim at the eyes or face.
Do not use the grippers to grasp
parts of the body.
WARNING!
Only for children aged 8 years and older.The instructions
for adults are included and must be observed.
ASSEMBLY INSTRUCTIONS
V70091
Read and keep for future reference.

REMOVING AND INSTALLING THE BATTERIES
1. Make sure that the toy is switched o.
2. Use a multi-purpose screwdriver to loosen the screw fastening the
cover to the battery compartment.
3. Remove the at batteries.
4. Insert the batteries (4 x 1.5V AA/LR6) by ensuring that their pole
marks match those indicated on the battery compartment.
5. The batteries must be inserted by an adult.
6. Close the battery compartment and tighten the screw.
7. Make sure that the device works.
HOW TO INSERT THE BATTERIES:
ASK AN ADULT TO HELP YOU!
INTRODUCTION
Leap into the future with your Robotic Arm!
With this experimental kit you can assemble a
robotic arm that can be worn. You will be able
to clutch objects and hurl discs thanks to its 2
electric motors and the mechanisms present
inside it.
Power supply: 6 VDC; batteries: 4 x 1.5V AA/LR6
Batteries not included.
ASSEMBLY TIME: the time estimated for mounting this kit is 15 to
20minutes.
INSTRUCTIONS FOR SUPERVISING ADULTS:
This toy is suitable for children aged 8 years and older.
An adult should be present when the instrument is assembled and
during handling and installation of the electrical parts.
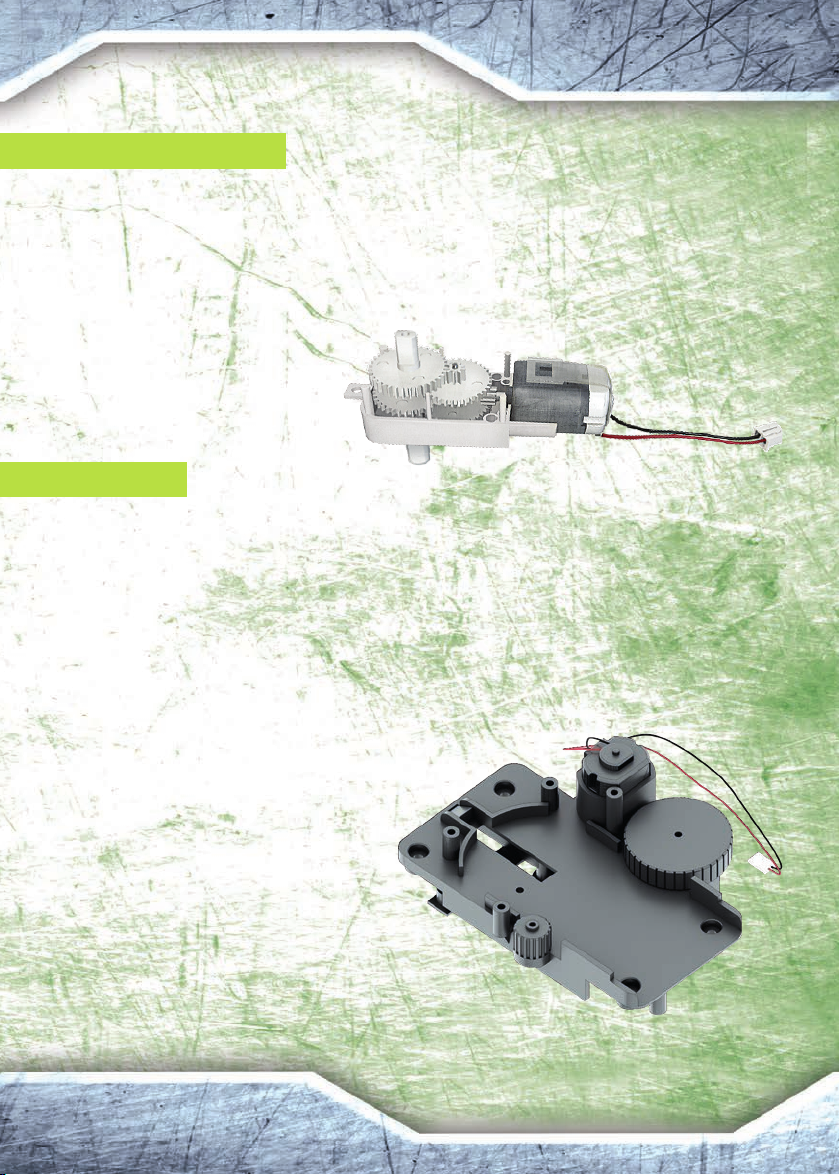
THE MOTOR OF THE GRIPPERS
The motor that drives the grippers is made up (as you can see in the image below) of two distinct parts: the
motor and the plastic block that contains a cascade of gears, namely the reducer.
A reducer is used to reduce the output rotation speed on the axis: without it, the motor would rotate too
quickly, making it impossible to use. However, this is not the only function of the reducer!
A cascade of gears like the one that we are using, by slowing down rotation, allows the motor to exert a
greater force. In this way, the Robotic Arm can also clutch heavy objects.
DISC LAUNCHER
The disc launcher has a very special combination of gears: a spring-based rack and an axis of rotation. The
rack mechanism consists of two parts: a toothed rod paired with a cogwheel.When it turns, the cogwheel
will move the toothed rod in a certain direction, transforming its rotary motion into linear motion.
At every drive, thanks to the spring, it shifts 1 disc from the loader to the launch zone in front of it, where
it will encounter the rotary axis.The cogwheel on the upper part (or rotary axis), by turning at the same
speed as the motor, will impart an induced rotation on the disc that will launch it and make it glide for 1 or
2 meters.
But why is the disc launched with a rotary
motion? Imagine the disc were a ying disc.
A ying disc does not travel very far without
rotation. It is the rotation speed that allows it to
y and keep stable, according to the so-called
gyroscope eect. The faster the rotations, the
more stable its path. We can observe this when
we climb on a bicycle: it stays upright only if we
pedal.
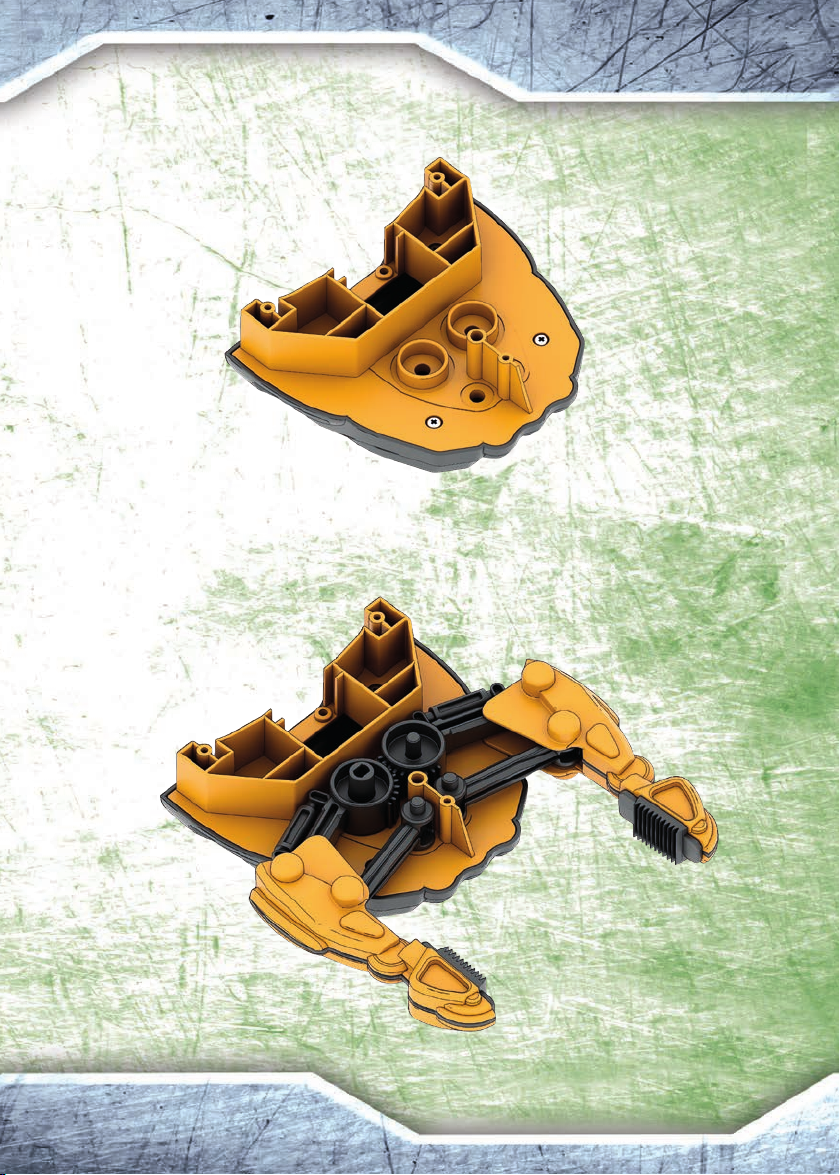
ASSEMBLY:
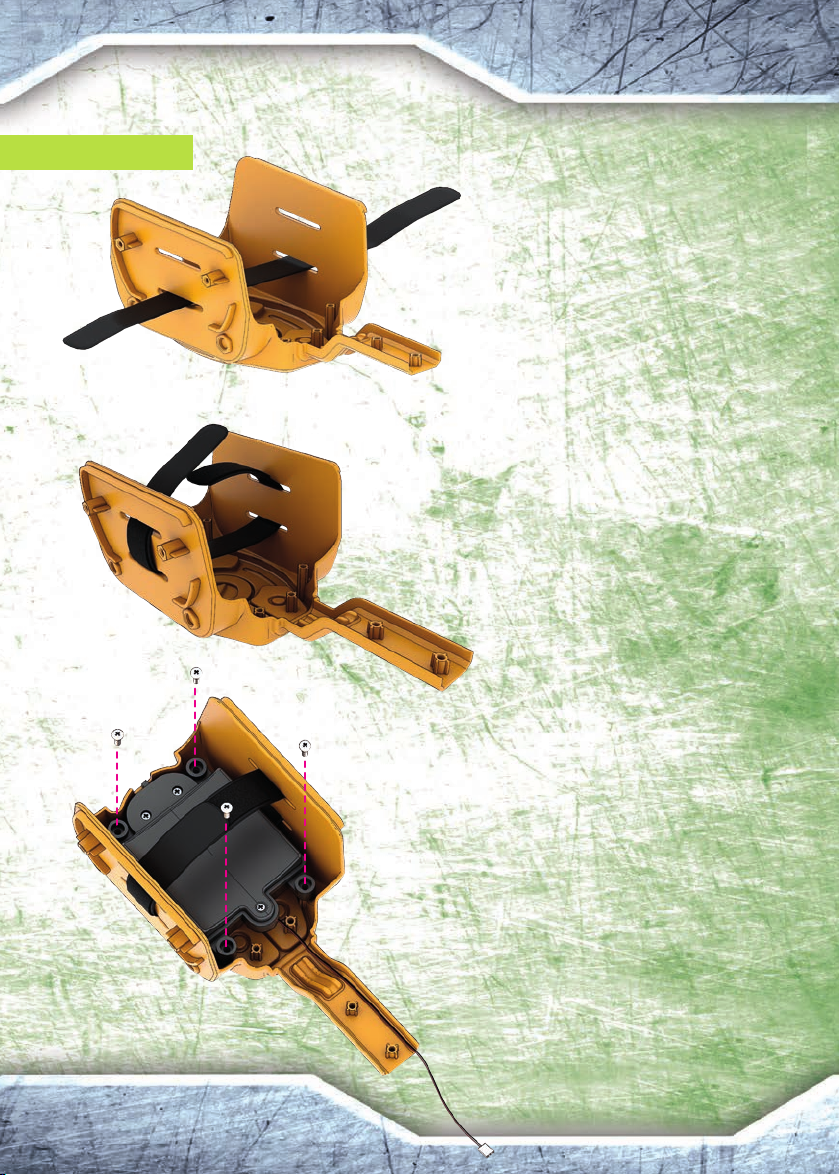
Insert the band with the velcro
as shown in the image on part 1,
while keeping the rough part facing
upwards.
Mount the battery compartment by
gently folding the cable and passing
it under as shown in the image.
Note: make sure that the
elastic band passes under the
compartment and that the velcro
closure is on top.
Insert part 3one ap at a time and
secure all the elements with two
screws.
Take part 2, and put it in place by
inclining it as shown in the image.
Fasten the two parts with two screws.
Note: make sure that the battery
cables do not get crushed during the
operation.

Note: tighten the screws properly.
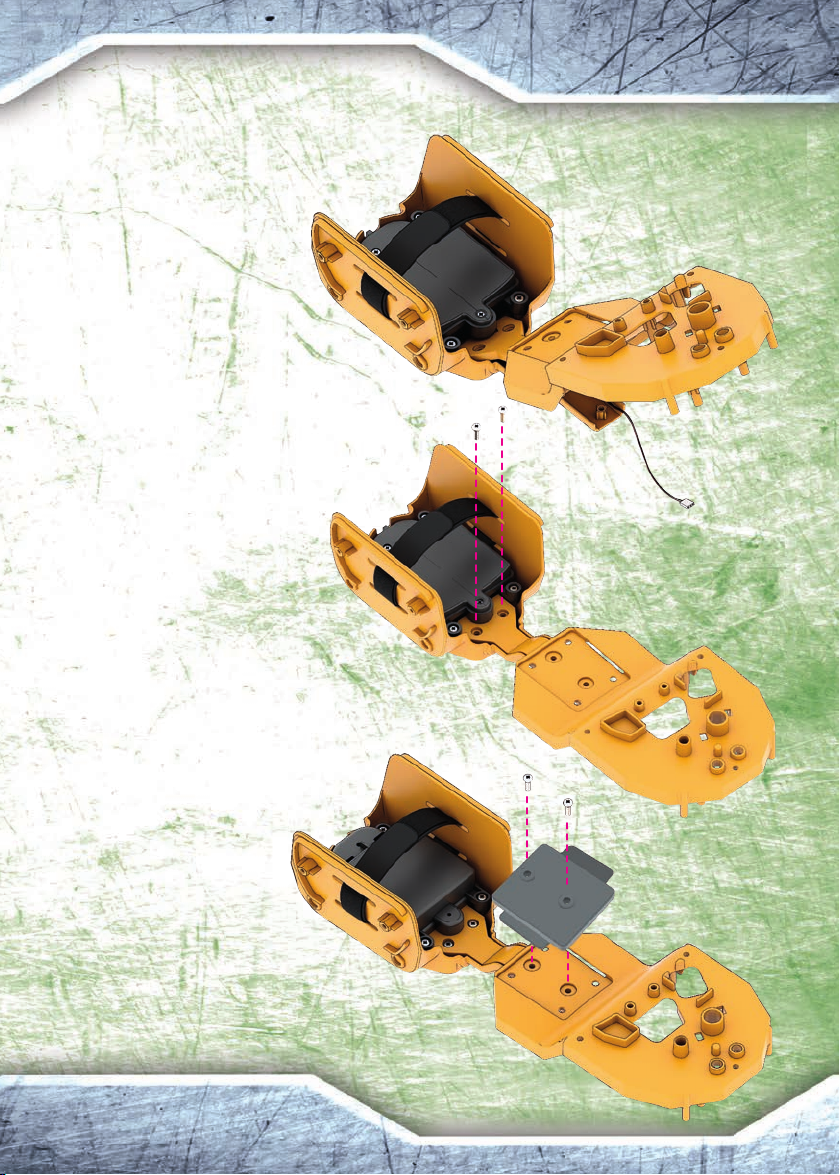
4B
4A
Note: do not confuse parts A with parts B.
Mount the arm by keeping the large pin
outside and the small pin on the gripper.
8A
10A
9A
7A
Perform the same procedure for
parts 7B, 8B, 9B and 10B.
Close without tightening the screws too much,
so as to avoid hindering the movement of the
arms.

5
6
Mount the grippers with the maximum possible opening, making sure that the sides with the screws face
downwards and the pin with the rectangular hole faces upwards.
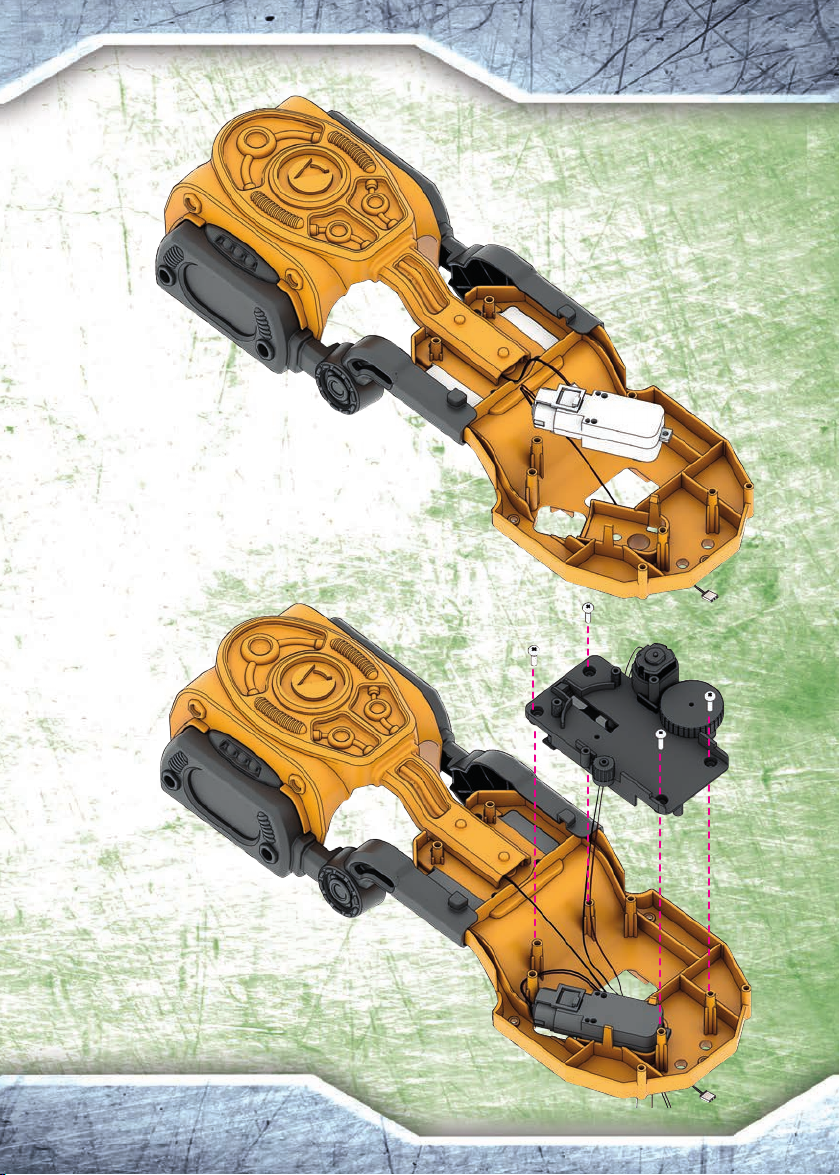
Mount the motor as shown in the
image, while keeping the rotary axis
facing downwards and making sure
that the aps secure it correctly.
Pass the cables of the motor, the disc launcher
and the battery compartment through the
central hole.
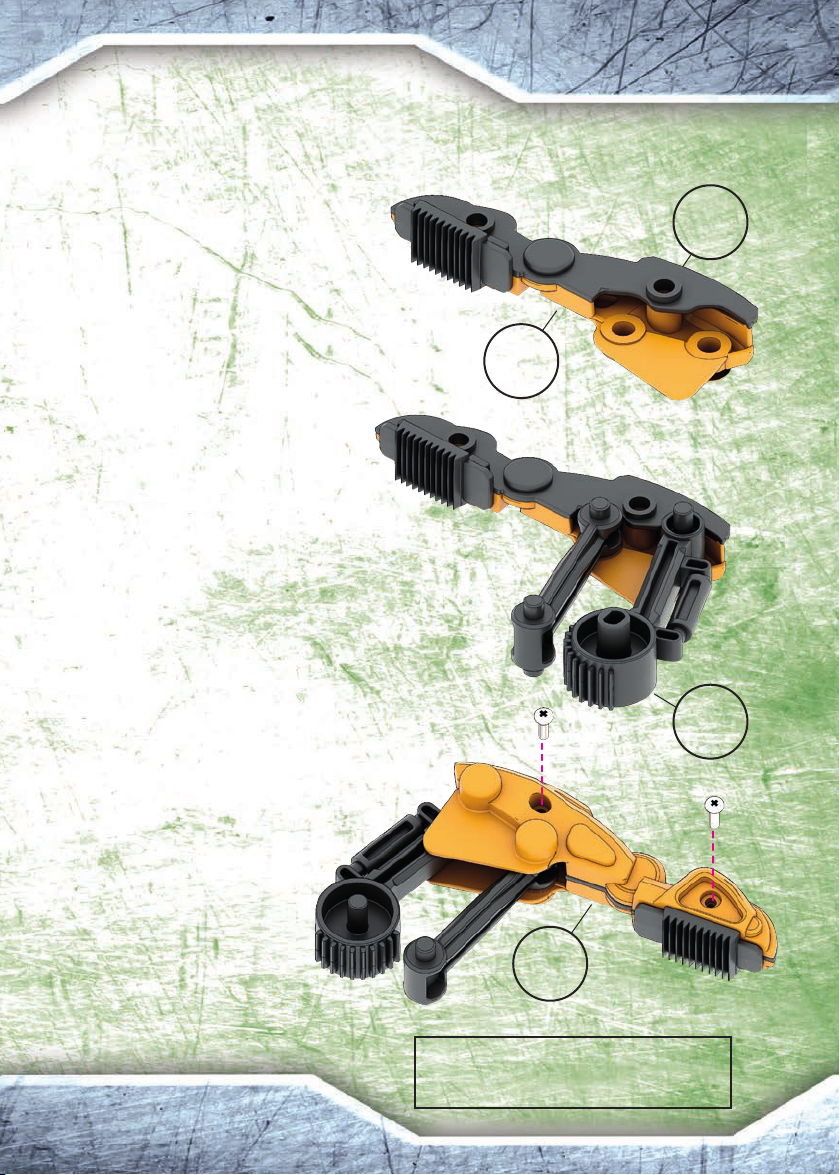
Mount the disc launcher taking care not to shift or damage
the spring or the underlying gears.
WARNING: the disc launcher will have moving
parts once it starts working, so make sure that the
underlying gears do not touch the wires, as this
could prevent the device from working properly.

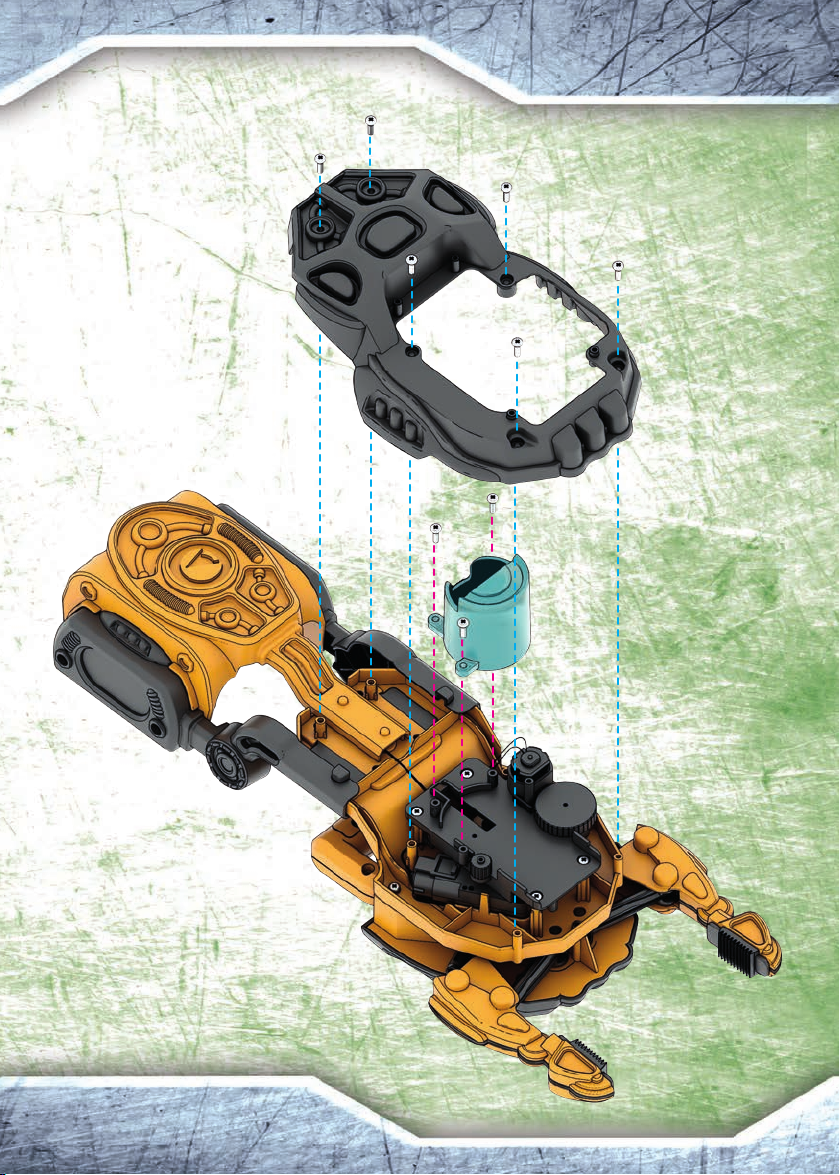
The handle can be mounted in two dierent
directions: if you are right-handed, mount it as
shown in the picture with the side button facing
left, while if you are left-handed, mount the
handle with the button towards the right.
Connect the Molex
connector according to
the following scheme:
P. Gripper motor
B. Batteries
D. Disc launcher
D. B. P.
WARNING: insert the excess cables through
the indicated hole to prevent them from
getting crushed during the assembly.
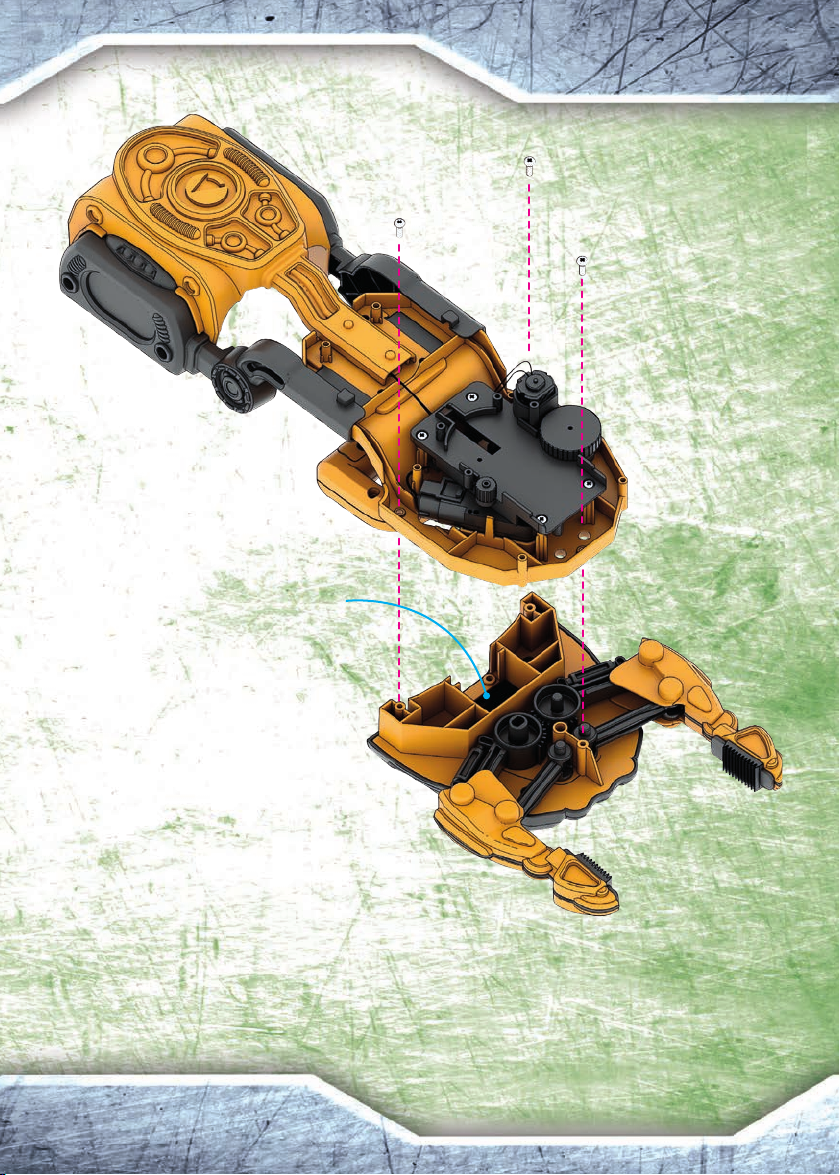
Assemble the two parts, while ensuring that the motor’s axis is perfectly aligned with the pin with the
rectangular hole; should this not be the case, slightly move the grippers until the part goes into place
properly; then, once it has been assembled, gently put it back into the maximum opening position.
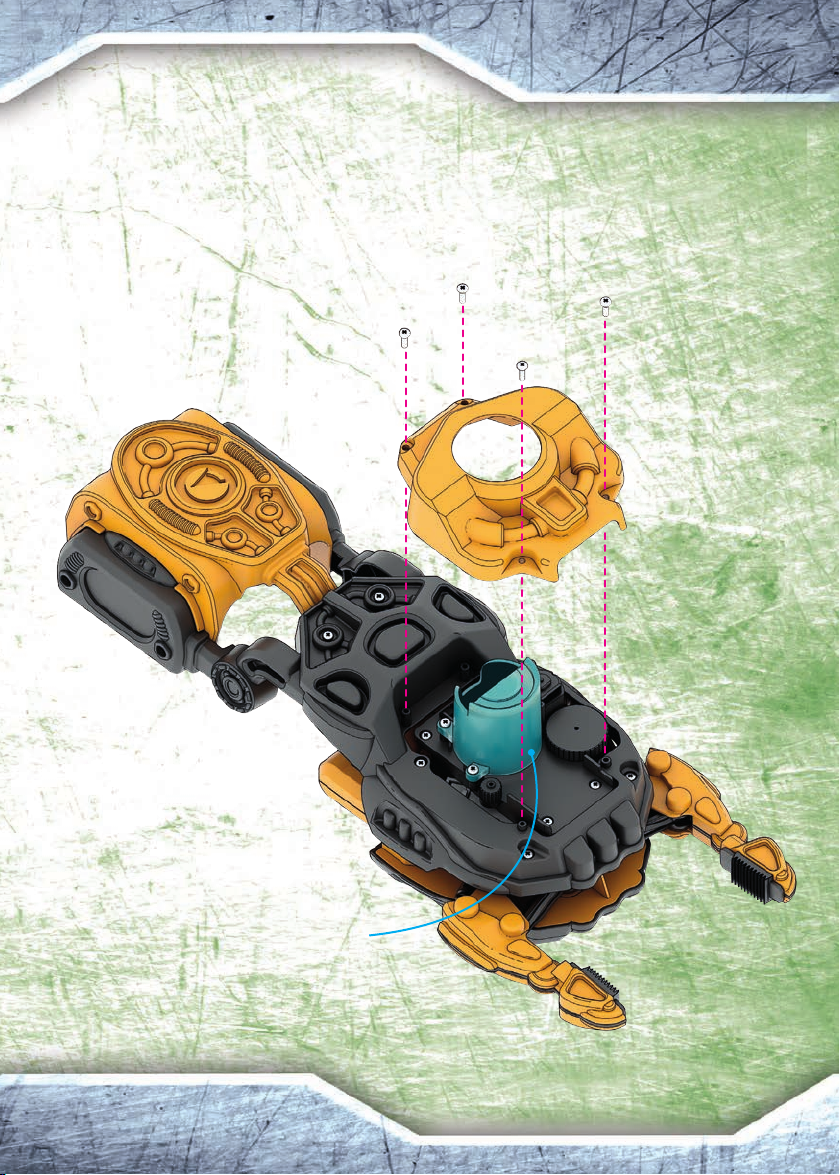
WARNING: before assembling part 12, make sure that there is enough space between the transparent
loader and the disc launcher (where specied), so that at least one sponge disc can pass. *
*
Insert the discs one at a time through the
transparent loader slit.
Make sure that the disc enters at and that
it makes contact with the base of the disc
launcher or with the underlying disc.
WARNING! The disc launcher will not be
able to work unless the discs are stacked
properly; if they enter the launcher crooked
or diagonally, use your nger or a pen to
arrange them at.
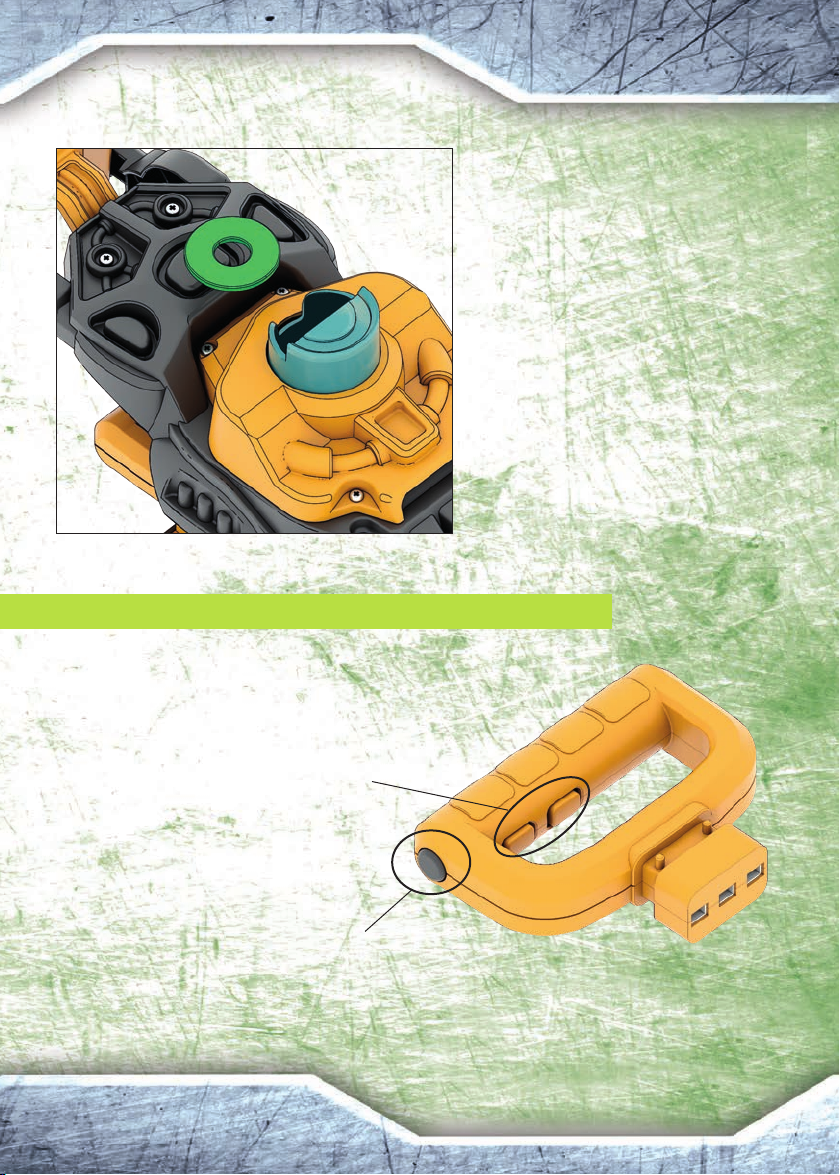
Wear your robotic arm and grip the handle!
Here’s how to control it:
ROBOTIC GRIP: to control the movement of
the grippers, press the two buttons on the
inner side of the handle.
The innermost button closes the grippers, the
outermost one opens them.
P.S.: here’s a tip! For a stronger grip or to lift
heavy objects, once you have grasped them,
hold down the button that closes the grippers.
AIM AND ... PLAY!
DISC LAUNCHER: aim properly and keep the third button
pressed down; the arm will start launching discs at regular
intervals! Keep the button pressed down for a volley eect!
INSTRUCTIONS FOR CORRECT USE OF TOYS/GAMES WITH REPLACEABLE BATTERIES
WARNING!
• Batteries must be installed by an adult. • The +
and - symbols on the batteries must be lined up
correctly. • Old batteries must be removed from
the toy. • The power terminal block must not be
short-circuited. • Never touch the contacts inside
the battery compartment, as this could cause a
short circuit. • The rechargeable batteries must
be removed prior to being charged. Only recharge
under adult supervision. • Never attempt to
recharge non-rechargeable batteries. • Dierent
types of batteries or new and used batteries should
not be used at the same time.
OTHER RECOMMENDATIONS:
• Batteries are dangerous if swallowed; keep away
from children. • Always remove batteries prior
to long-term storage. • Do not try to open the
batteries. • Do not throw batteries into a re.
INSTRUCTIONS FOR BATTERY DISPOSAL
The symbol indicates that worn-out
batteries must be disposed of in
accordance with current regulations
on waste disposal. Chemical symbols
for mercury (Hg), cadmium (Cd) and/or lead (Pb)
which appear below the crossed out wheeled
recycling bin symbol indicate that there is a
signicant percentage of the relative substance in
the battery. These substances are highly damaging
to the environment and human health. The correct
disposal of batteries allows their isolation and the
targeted treatment of harmful substances, and
allows recycling of precious primary materials,
reducing negative eects on persons and the
environment. The disposal of worn-out batteries in
landlls or the environment signicantly increases
the risk of water pollution. Pursuant to European
Directive 2013/56/EU, it is prohibited to dispose of
batteries and accumulators as household waste and
consumers are obliged to participate in separated
waste collection so as to facilitate the treatment
and recycling of the same.
HOW TO DISPOSE OF THE BATTERIES
Discharge the batteries completely by leaving the
device on until the batteries have fully run out.
Remove the batteries from the toy before disposal.
Dispose of all batteries in accordance with current
regulations, by using the appropriate containers at an
authorized recycling center or by returning them to
the shop where they were purchased. Returning them
is free! Penalties are applied for incorrect disposal.
INSTRUCTIONS FOR THE DISPOSAL OF
ELECTRICAL AND ELECTRONIC DEVICES
SUBJECT TO SEPARATE WASTE DISPOSAL
IMPORTANT! The crossed out wheeled recycling bin
symbol indicates that in European Union member
states (Directive 2012/19/EU) and in those that
adopt separated waste collection systems, all
components of the product marked with this
symbol (or indicated as such in the instructions) are
subject to separated waste collection laws at the
end of their life. It is prohibited to dispose of such
components as mixed household waste.
HOW TO DISPOSE OF ELECTRICAL AND
ELECTRONIC WASTE
It is mandatory to separately collect those
components marked with the symbol (or indicated
as such in the relevant documentation) and deliver
them to authorized recycling centers for the
purposes established, or where possible, to return
the product for disposal back to the shop when
a similar product is purchased, or for free if the
product’s external dimensions are below 25 cm.The
users of the product play a critical role in ensuring
the correct disposal of electrical and electronic
equipment that has reached the end of its life. It
is therefore important for each user to be aware
of their role and to always dispose of electrical/
electronic waste in accordance with current
legislation, thereby contributing to the correct
management of waste and encouraging its reuse,
recycling and/or recovery.
WARNING! Components marked
by the symbol contain substances
that are harmful to the environment
and human health. It is therefore
prohibited to dispose of them as mixed
household waste or together with other domestic
waste. Incorrect disposal may result in damage to
the environment and may be punishable by law.
These components should not be used improperly.
In particular, it is forbidden to remove the electrical
and electronic parts from the toy or use the toy if
it is damaged. These actions could cause health
hazards. Note: the above information only relates
to the parts of the toy marked with the symbol
(or those parts indicated in the documentation
as being subject to this restriction). Other
components of the toy (cards, accessories, etc.)
and their packaging are not subject to the above-
mentioned indications and must be disposed of
according to the METHODS specied in the current
standards. These other components do not need
to be delivered to authorized recycling centers for
electrical and electronic equipment or returned
to the shop when a new product is purchased.
Domestic (non-professional) users are invited to
contact their local retailer, the public waste disposal
authorities or the Customer Service department
of: CLEMENTONI S.p.A. (Tel. +39 071 75811; fax
for further information about the correct way to
dispose of the product.
OPERATING TIPS
In case of anomalies occurring during use, the
following simple checks should be carried out:
The toy is not working properly.
Are the batteries inserted correctly?
Do the batteries need to be replaced?
The toy switches o or seizes up. Reset the toy
in one of the following ways, or try both:
a) switch the toy o and then back on again;
b) remove the batteries for at least 10 seconds
before putting them back in.
Maintenance
• Use a soft damp cloth to clean the toy, without
any type of detergent. • Do not use chemical
solvents. • Do not expose it to direct sunlight or to
any other source of heat. • Do not pour liquids onto
the toy or immerse it in water. • Do not dismantle
it or allow it to fall. • Remove the batteries from the
toy if it is not used for extended periods of time.
If any malfunctions occur due to an electrostatic
discharge, the toy should be switched o and then
back on again to restore its correct operation. If the
problem persists, use the toy in another location.
WARNING:
this toy is fragile; be careful not to let it
fall and do not force the movement of the
motors manually (for example, by forcing
the grippers by hand), otherwise it may
break.
WARNING:
all packaging materials, such as adhesive tapes, bags,
plastic sheets, metal wires and labels, are not part of
the toy and must be kept out of reach of children.
Should the operating problems persist, contact the
Courtesy Service from Monday to Friday between
2p.m. and 6p.m. at the toll-free number appearing
below.
MADE IN ITALY
Designed, developed and tested in Italy.
Clementoni S.p.A.
Zona Industriale Fontenoce s.n.c.
62019 Recanati (MC) – Italy
Phone: +39 071 75811 / www.clementoni.com
Registered on the
electronic and electrical manufacturers’
register: REGISTRATION IN PROGRESS.
Other Clementoni Robotics manuals


