Cleral REFLEX Basic User manual

1
REFLEXBasic
Stand alone weighing system edition
for truck or semi-trailer
Version 1 to XXX
User Manual
Revision manual 02/17
BASIC

Caution
Your Cleral onboard weighing system is
a tool. Learning to work with it can only
make it more efficient. Read this manual
before using your Kiload.
Weigh bridge (certified)
Acquire the weights needed to calibrate
using a certified weigh bridge (Platform
scale). Whenever possible, record the
weights while sitting on the weigh
bridge.
Pneumatic connections
Make sure that all air connections are
made according to the installation dia-
grams.
Lift Axles
Lift axles should always be in the UP
position while acquiring and recording
the weights in the Kiload. If the vehicle
is equipped with an automatic lift axle
activation device, then you must acquire
and record the weights while the lift axle
is engaged (touching the ground) for
both empty and heavy calibration. And
use the system with lift axle down.
Fuel
To enhance the performance of your
Kiload, fuel tanks must be full to acquire
and record the weights.
Air leaks
A leak in the pneumatic system will fal-
sify the pressure readings for calibra-
tion. Thus , you will end up with erratic
and false weight readings. You most
likely have a leak if the readings are not
stable while your vehicle is stationary. A
frequent start of the compressor is a
good indication of an air leak.
Recalibration
Recalibration is necessary if you have
adjusted or replaced a leveling valve or
if you’ve replaced a mechanical sensor,
air transducer, or flexmeter.
Slopes
A slightly sloped terrain will not affect
the accuracy of your scale, but the big-
ger the inclination the higher the error
margin. Learning to work with your
Cleral system will ultimately give you
better precision in these conditions.
Technical Support
For technical help, consult your local
authorized Cleral dealer.
Warranty
Cleral products are warranted against
defects in workmanship for a period of
one year from the original date of pur-
chase. The defective covered product
will be repaired or replaced by the
manufacturer. The defective product
needs to be sent by your local dealer to
Cleral with proof of purchase. This war-
ranty does not cover injury or damages
caused by the use of this product. It also
does not cover all costs connected with
the replacement part ( labor, shipping
and handling or other). Cleral will not be
liable for fines issued for overweight
violations while using its products.
Contact your local Cleral dealer for re-
pairs and replacement parts.
Thank you for choosing and trusting
CLERAL CANADA
To contact Cleral Inc.
CLERAL INC.
90, des Distributeurs
Val-d’Or (Québec) Canada
J9P 6Y1
Tél. : (819) 825-5553
Fax : (819) 825-5556
Web : www.cleral.com
2

Keypad description 5
Reflex’s Flow chart 6
Turning the unit On 7
Calibration menu 8
Acquiring straight body truck weights 4X2 6X4 and 8X4 9
Acquiring tractor-trailer weights 10
Acquiring additional trailer weight 10
Acquiring steering axle weight (Instrumented or Virtual) 10
Wireless Sensor Acquisition 11
Automatic sensor acquiring 11
Selecting and Validating the channel 12
Changing channel 12
Calibration 4X2 6X4 8X4 - Empty vehicle 13
Calibration 4X2 6X4 8X4 - Full weights 14
Calibration 8(2)X4 or 8X(2)4 - Empty Weights 15
Calibration 8(2)X4 or 8x(2)4 - Full Weights 16
Calibration 8(2)X4 or 8x(2)4 - Lift Axle 17
Calibration - Empty Semi- trailer (Auxiliary instrumented) 18
Calibration - FULL Semi-trailer (Auxiliary instrumented) 19
Calibration - Semi-Trailer (Non-instrumented Auxiliary Axle INCLUDED) 20
Calibration - Semi-trailer (Auxiliary axle not instrumented EXCLUDED) 21
Multi point calibration 22
Tare 25
Freeze 26
Options menu 27
Language 28
Net weight 28
Measure units 28
Increments 28
Ton display 29
Cycle time 29
Time off 29
Hide MinAir 29
Hide N/A 30
Pause Option 30
Tare?default choice 30
Target 31
To access target weight 31
Adjust target weight 31
Configuration Menu 32
Printer 33
232 Printer 33
Wireless Printer 33
Wireless ID 33
Nb Ticket 33
3
Contents

Unit name 34
Print Header 34
Print ticket 34
Suspension 35
Maximum channel 35
Virtual steer 35
Active channels 35
Limit sensor 36
Min Air or Mec 36
MaxAir 36
M/D/Y 36
Time 37
Safety Menu 37
Password 37
Cal/Opt/Cfg/Tek 38
Tare 38
On/Off 38
Acquire 38
Acquire change address channel 39
System violation protection 39
New password 39
Multi zones 40
Technicien mode 41
Gauge A / B / C / D / E 42
Zero A / B / C / D ( or Tare) 43
Factors 44
Factor Multi-point 45
Tare 45
Error Calibration 46
Protection Calibration 46
Plucker 46
Status 47
System status 47
Channels status 47
ERROR CODES 48
Reflex connector types 49
Precision problems 50
4

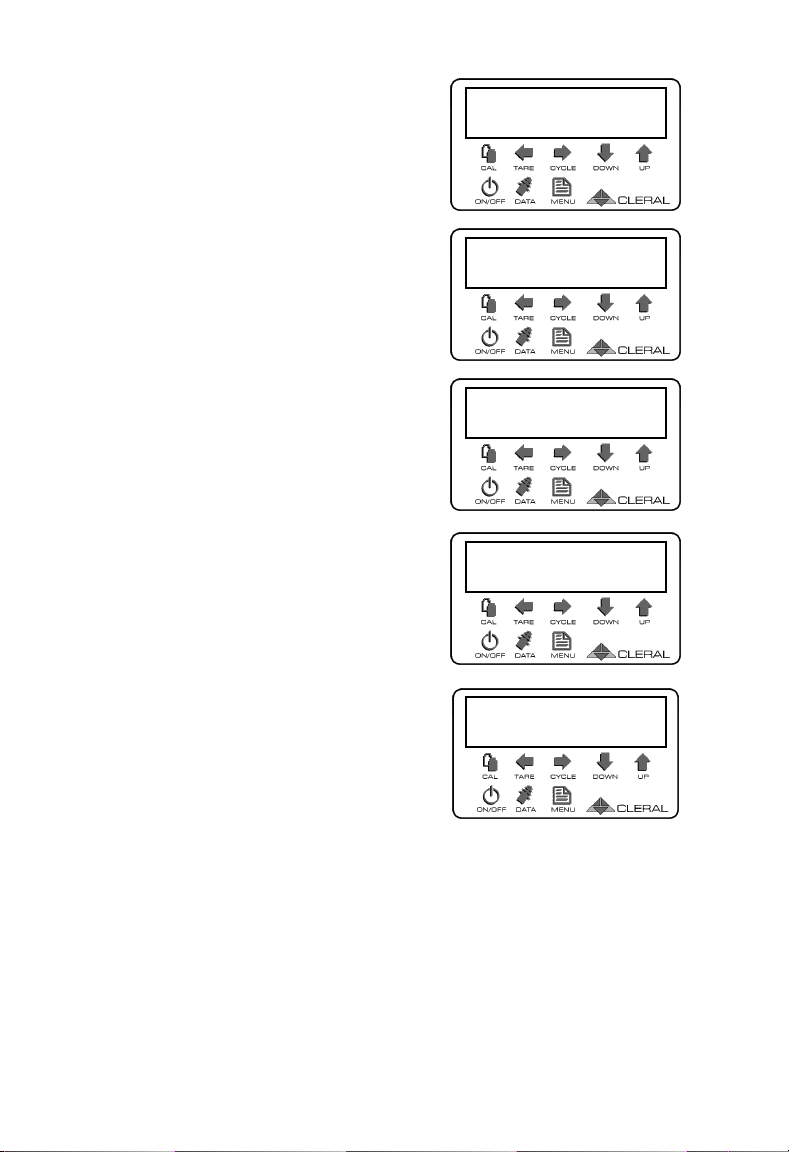
Keypad description
On/Off main power
Access to the calibration menu
To perform empty Tare or To back up while in menus
Lower values or Down while in the menu
Raise values or Up while in the menu
Change channel, right in the menu or confirm
Transmit data by RS232 or print, EXIT
Access to menu
Quick click will Freeze while in Total mode (Main screen)
Click and hold will Pause while in Total mode (Main screen)
Quick click, while in calibration mode, resets to 0,00
Letter A followed by a colon (:) Represents channel A
Letter B followed by a colon (:) Represents channel B
Letter C followed by a colon (:) Represents channel B
Letter T followed by a colon (:) Represents the total of all activated channels
5
A :
B :
C :
T :

Reflex’s Flow chart
Menus and sub-menus.
6
10.11.J & +
On/Off
Weight display
CAL ibration Empty
Full
Calibration Multi point
Indivudual tare
Adjuste
TARE
CYCLE
DATA
MENU
Wireless
Acquire (If wireless connected)
Options Language
Net weight
Measure unit
Increments
RS232 printer (If printer connected with wire)
Ton display
Wireless printer (If connected wired and RS232 printer disabled)
Cycle time
Wireless ID (If wireless printer is enabled)
Time off
Nb Ticket (If an active printer)
Hide MinAir
Unit name (If an active printer)
Hide N/A
Pause option Maximum channel
Tare? Default choice Virtual steer
Target Active channels
Configuration Printer Cal/Opt/Tek
Suspension Tare
LimitSensor On/Off
M/D/Y 12/30/16 Acquire(If active wireless)
Time 00:00:00
Acquire change adress channel (If active wireless)
Safety menu System violation protection
Multi zones New password
Technician Gage
Zeros
Factors
Tare
Error calibration
Protection calibration System status
Plucker Channels status
Status
Manufacturer(Access with code)
Production (Access with code)
Turning the unit On
When turning the Reflex On, the
software version is displayed.
Thereafter, the system indicates that
it initializes its memory.
If a wireless device is powered, it
indicates Wireless OK. If there are
no wireless devices powered, the
message is not indicated.
Thereafter, the serial number of the
unit will appear.
When initialization is complete, the
device returns to the weight display
mode.
7
Reflex
10.11.J
Initialize memory
Serie # 99999
Wireless OK
T : 13400 Gross
A : 5400 B: 8000

Calibration menu
Enter the Calibration menu to calibrate your Reflex.
Once in Calibration, here is what you will see by scrolling down:
Navigating in the Calibration menu :
8
T : 5000 Gross
C : 5000
Empty
➔Full
➔Empty
Full
To enter the Calibration
menu, press CAL
To reach a sub-menu,
press on down arrow.
When the cursor points to
the desired sub-menu,
press right arrow to enter
T : 5000 Gross
C : 5000
T : 5000 Gross
C : 5000
T : 5000 Gross
C : 5000
Arrow up or down:
Moving up or down.
Increase or decrease the
values.
Left arrow:
To back up and confirm.
DATA : To confirm and exit at
any time.
Right arrow:
Enter a menu.
Select an editable value, it
will start flashing.
Confirms the edited value,
stops flashing.
Exit
CAL ibration Empty
Full
Calibration Multi point
Indivudual tare
Adjuste
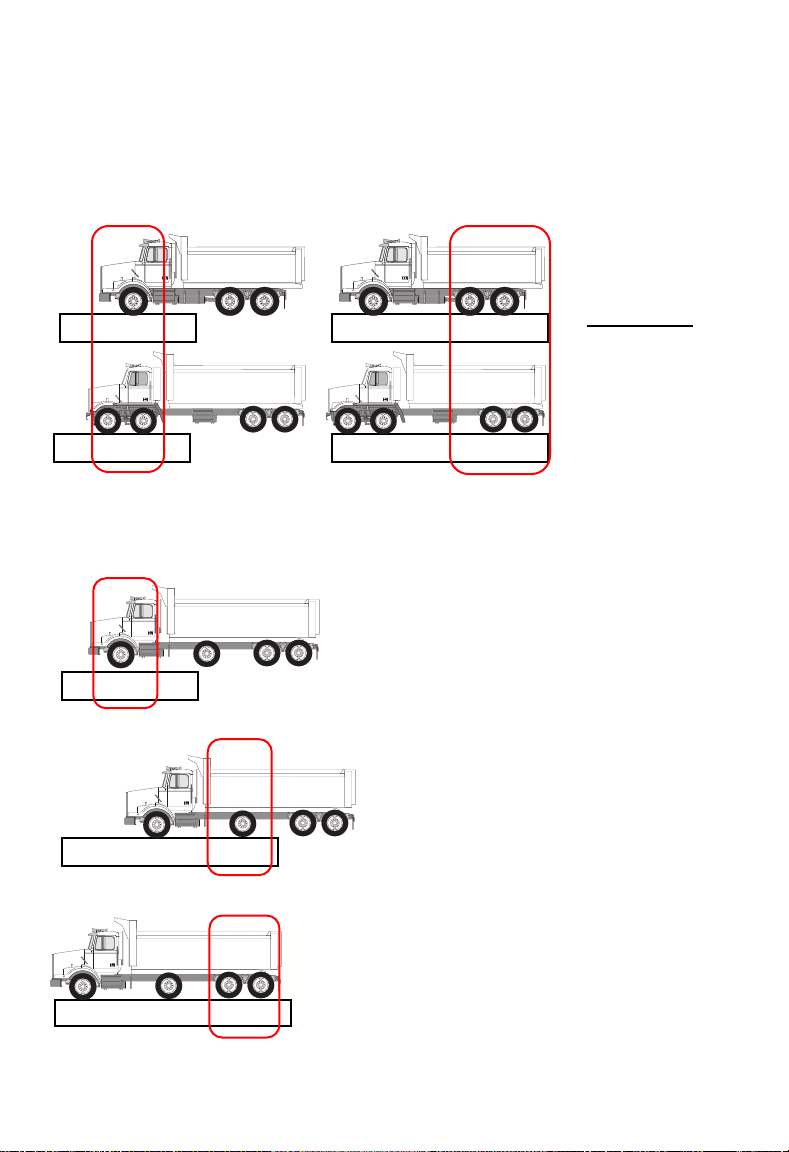
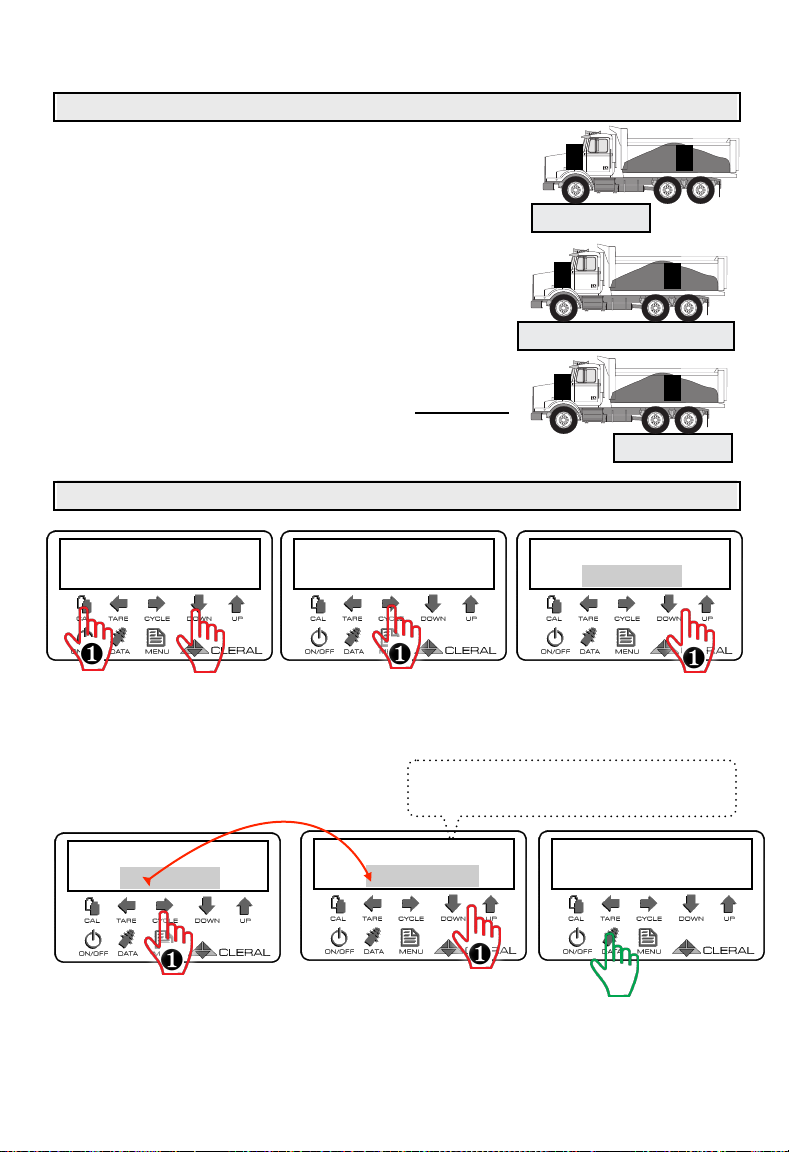
Acquiring straight body truck weights 4X2 6X4 and 8X4
The first step in the calibration of a straight body truck is to weigh the steer-
ing axle (Channel A). The next step is to weigh the entire vehicle (Total
weight) Then determine the weight of the drive axle(s) (ChannelB) by doing
the math.
In the case of a vehicle with an auxiliary axle, liftable or fixed.
9
Weigh BridgeWeigh Bridge
Weigh Bridge Weigh Bridge
CHANNEL «A» CHANNEL «B»
Weigh Bridge
CHANNEL «A»
Weigh Bridge
CHANNEL «B»
Weigh Bridge
CHANNEL «C»
Advance the truck to weigh the steering
axle only to get the weight of channel
A.
Advance the vehicle to weigh the
steering and auxiliary axles then
subtract the weight of the steer axle.
You get the weight of channel B.
(A + B) -A) = B
Advance the entire vehicle on the
weighbridge then subtract the weight of
channels A and B from the Total weight.
You get the weight of channel C.
T - (A+B) = C
Total
- Channel A
= Channel B
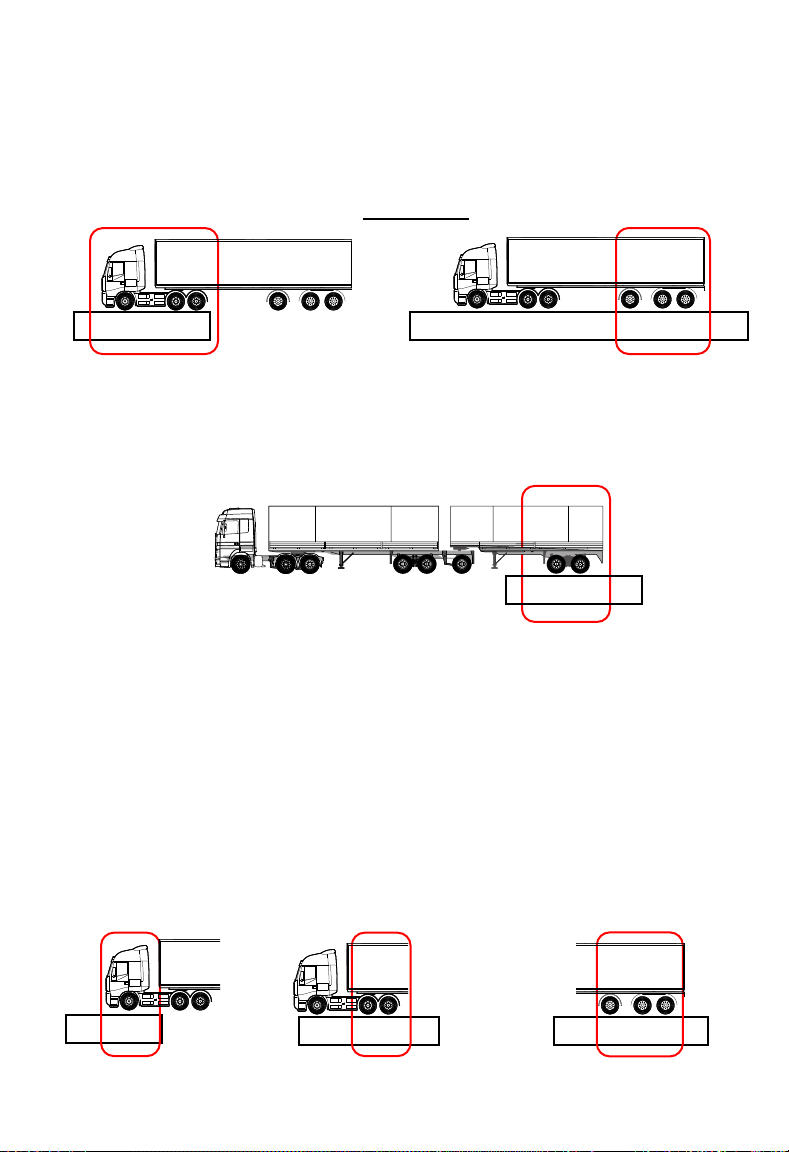
Acquiring tractor-trailer weights
The first step is to weigh the tractor (Channel A) then weigh the entire rig
(Total). The difference between the total weight and the weight of channel A
is the weight of the semi-trailer (Channel B).
Acquiring additional trailer weight
Simply weigh the additional trailer alone (Channel C)
Acquiring steering axle weight (Instrumented or Virtual)
The first step is to determine the weight of the steering axle (Channel A or S)
and then weigh the tractor. The tractor weight minus the weight of the steer-
ing axle gives you the weight of the drive axle(s) (Channel B). The weight of
the trailer is acquired by weighing only the semi-trailer or by taking the total
weight of the rig and subtracting the total weight of the tractor.
If the steering axle is instrumented : CHANNEL A B C
If the steering axle is virtual : CHANNEL S A B
10
Weigh Bridge
CHANNEL «C»
Weigh Bridge Weigh Bridge
CHANNEL «B»
CHANNEL «A»
Weigh Weigh Bridge Weigh Bridge
CHANNEL «B or «A» CHANNEL «C» or «B»
CHANNEL «A» or «S»
Total
- Channel A
= Channel B

Wireless Sensor Acquisition
If you have a wireless sensor, this
function allows you to acquire and
pair it with the Reflex. It must be
associated before calibration.
Before calibrating the instrument, a
sensor must be associated for each
channel. To do this, you must ac-
quire the sensors and anchor them.
Each sensor has a unique address.
Automatic sensor acquiring
*** Operate the brake or backup
lights. *** (depending on the white
wire power source)
Press Menu to enter.
The Acquire message appears.
Press right arrow to confirm.
➔Wireless
Options ↓
❶
➔Acquire
❶
The monitor displays "Search".
Search
Here is an example of what the Re-
flex will have found. The curser
points to the first device found. Dis-
played is the type of device (Air-
mechanical-or flexmeter), the «ID»
and the channel associated with the
given device.
Explanation:
Sensor channel (a/b/c/d/e/f/g/h/x)
Sensor «ID»
Curser
Type of sensor(Air/Mec/Flx)
➔1: Air 01872F B
Order of reception
Note!
If the PS2 displays «None» this
means that it has not found any de-
vice. If this happens, try an auto-
matic acquiring again. If this fails, try
a manual acquiring. In case nothing
has changed, refer to the Acquiring
problems section.
➔1: Air 4BCE56 A
2: Mec 4A11F8 C
3: Flx DD1258 X
11

Important!
If a sensor is Fixed on a channel, it
does not appear in the search re-
sults when acquiring. To see if your
channel is fixed, refer to the section
Fixing a channel.
Acquiring procedures:
↳Validate and anchor the channel
↳Changing the channel
↳Exit
Selecting and Validating the
channel
If the sensor is on the correct chan-
nel, anchor. Press right arrow to con-
firm. The sensor line becomes high-
lighted and the cursor moves down.
Do this for each sensor to be an-
chored. To move to the next address
press the down arrow. To move up-
wards press the up arrow.
1: Air 4BCE56 A
➔2: Mec 4A11F8 C
3: Flx DD1258 X
➔1: Mec 4A11F8 C
➔Ancrer capteur
Changing channel
When the cursor points to the ad-
dress, press Data. The Channel
flashes indicating that it can be
changed. Up or Down arrow to
change the channel. To confirm,
press the Right arrow.
If you try to confirm a channel that is
already configured inside the Reflex
the INT message will be indicated.
If you try to configure a sensor with
a fixed address, the Reflex will not
change the channel.
Note!
12 channel possibilities (A B C D E
F G H I J K L).
Important!
There is only one channel available
on a truck configuration. It is not
possible to anchor the same chan-
nel twice in the monitor.
12
1: Air 4BCE56 A
➔2: Mec 4A11F8 C
3: Flx DD1258 X
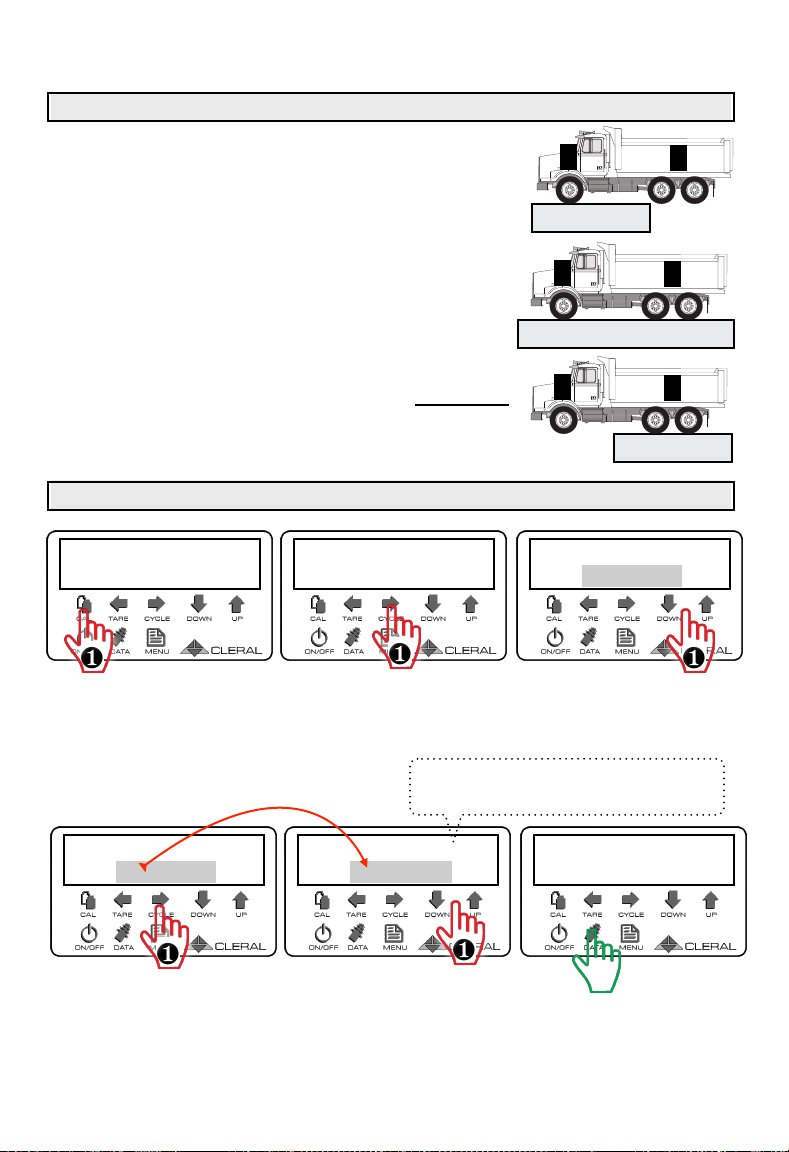
Calibration 4X2 6X4 8X4 - Empty vehicle
Acquiring empty vehicle weights
Move the empty truck onto the weigh bridge. The
wheels of the drive axles must not touch the plat-
form of the weigh bridge.
Note the empty Axle Weight "A".
Move the Total truck on the platform.
Note the total weight of the truck.
Subtract the Channel A weight from
the Total. You get the weight of chan-
nel B.
Go to the calibration menu
13
➔Empty
Full
❶
Empty T : 4000
A : 4000
❶
Empty T : 5400
A : 5400
❶
A: 5400 kg
AB
Empty T : 5400
A : 5400
❶
Empty T :13400
B : 8000
❶
B: 8000 kg
AB
T : 13400
AB
Press CAL to enter the
calibration mode
The cursor shows empty,
press Right Arrow to en-
ter the menu
«A:» flashes. Use the
arrows to record channel
A empty weight.
Press Right arrow to go
to «B:». Press Data to exit.
«B» flashes. Use the
arrows to record channel
B empty weight.
T : 13400 Gross
A : 5400 B: 8000
EXIT
Note!
If the weight of Channel A is correct; You can
adjust the weight of channel B with Total.
Total weight
- Channel A
= Channel B
Calibration 4X2 6X4 8X4 - Full weights
Acquiring Full vehicle weights
Move the Full truck onto the platform. The wheels
of the drive axles must not touch the platform of
the weigh bridge.
Note the full Axle Weight "A".
Move the entire vehicle onto the weigh bridge.
Note the total weight of the truck.
Subtract the Channel A weight from
the Total. You get the weight of chan-
nel B.
Recording Full weight values
14
Full T : 4000
A : 4000
❶
Full T : 14400
A : 9000
❶
B: 18000 kg
AB
Press CAL to enter in
calibration mode and
down arrow to go to Full
menu.
«A» flashes. Use the
arrows to record Chan-
nel A Full weight.
Press Data to exit.
«B» flashes. Use the
arrows to record channel
B full weight.
T : 27000 Gross
A : 5400 B:18000
EXIT
T: 27000
AB
A: 9000 kg
AB
Note!
If the weight of Channel A is correct; You can
adjust the weight of channel B with Total weight.
Press right arrow to go
to channel A.
Empty
➔Full
❶
➋
Full T :27000
B : 18000
❶
Full T : 14400
A : 9000
❶
Press Right arrow to go
to «B:».
Total weight
- Channel A
= Channel B

Calibration 8(2)X4 or 8X(2)4 - Empty Weights
Acquiring empty vehicle weights
Move the empty truck onto the platform. The
wheels of the drive axles must not touch the plat-
form of the weigh bridge. The lift axle must be in
the raised position.
Note the empty Axle Weight "A".
Move the entire vehicle over the weigh bridge.
Note the total weight of the truck.
The Total weight minus the weight
of Channel A. You get the weight of
Channel C.
Recording empty weight values
15
➔Empty
Full
❶
Empty T : 4000
A : 4000
❶
Empty T : 5900
A : 5900
❶
A: 5900 kg
Empty T : 5900
A : 5900
❶
Empty T :14400
C: 8500
❶
T: 14400
Press CAL to enter in
calibration mode.
The cursor shows empty,
press Right Arrow to en-
ter the menu.
«A:» flashes. Use the
arrows to record channel
A empty weight.
Press Right arrow to go
to «C:». Press Data to exit.
«C» flashes. Use the
arrows to record channel
B empty weight.
T : 14400 Gross
A : 5900 C: 8500
EXIT
Note!
If the weight of Channel A is correct; You can
adjust the weight of channel C with Total weight.
C: 8500 kg
AC
➲
B
AC
➲
B
AC
➲
B
Total weight
- Channel A
= Cahnnel C

Calibration 8(2)X4 or 8x(2)4 - Full Weights
Acquiring full vehicle weights
Advance the full truck on the weigh bridge. The
wheels of the drive axles must not touch the plat-
form of the weigh bridge.
Note the Full Axle Weight "A".
Move the entire vehicle over the weigh bridge.
Note the total weight of the truck.
The Total weight minus the weight
of Channel A. You get the weight of
Channel C.
Recording Full weight values
16
Full T : 4000
A : 4000
❶
Full T : 20900
A : 12400
❶
C: 22000 kg
Press CAL to enter in
calibration mode and
down arrow to go to Full
menu.
«A» flashes. Use the
arrows to record Chan-
nel A Full
Press sur Data to Exit.
«C» flashes. Use the
arrows to record channel
C full weight.
T : 34400 Gross
A : 12400 C: 22000
EXIT
Note!
f the weight of Channel A is correct; You can
adjust the weight of channel C with Total
Press right arrow to go
to channel A.
Empty
➔Full
❶
➋
Full T :34400
C: 22000
❶
Full T : 20900
A : 12400
❶
Press Right arrow to go
to «C:».
A: 12400 kg
A
➲
BC
T: 34400
A
➲
BC
A
➲
BC
Total weight
- Channel A
= Channel C
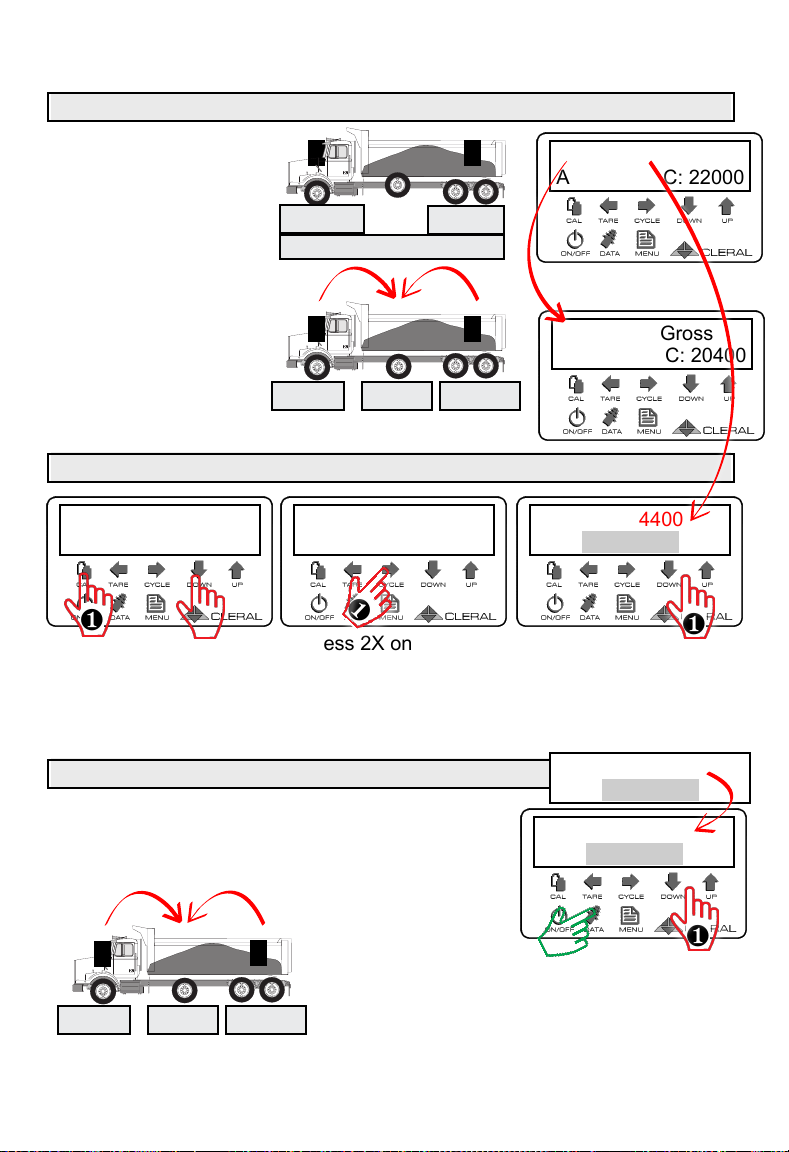
Calibration 8(2)X4 or 8x(2)4 - Lift Axle
Acquiring full vehicle weights
On the weigh bridge,
note the Total weight
on the Reflex.
Deploy the auxiliary
axle and adjust its
pressure gauge to 30
psi. The weight trans-
f e r r e d t o a x l e B
changes the total
weight.
Step 1- Calibration at 30 PSI to determine empty weight
Step 2- Calibration at 90 PSI to determine full weight
Adjust the pressure to 90 psi. Weight transferred
to axle B modifies the total weight. Adjust the
weight of Channel B in reference to the Total Full
weight.
17
Empty T : 34400
B : 3100
❶
Press CAL to go to
calibration and right
arrow to go to empty
calibration.
«B» Flashes, Adjust the
weight of this Channel by
bringing the total weight
back to the one noted
Press 2X on the right
arrow to go to channel B.
➔Empty
Full
❶
➋
T : 31300 Gross
A : 10900 C: 20400
T : 34400 Gross
A : 12400 C: 22000
C: 20400A:10900
AC
➲
B
B: 3100
A
➲
BC
A:12400 C:22000
T: 34400
Empty T : 4000
B : 4000
❶
C: 18000A:9000
AC
➲
B
B: 7400
Full T : 34400
B : 7400
❶
1-Go to Calibration Full on Channel B.
2- When it flashes, adjust the weight
of this Channel in reference to the
Tot a l fu l l we i gh t .
Full T : 30100
B : 3100
EXIT
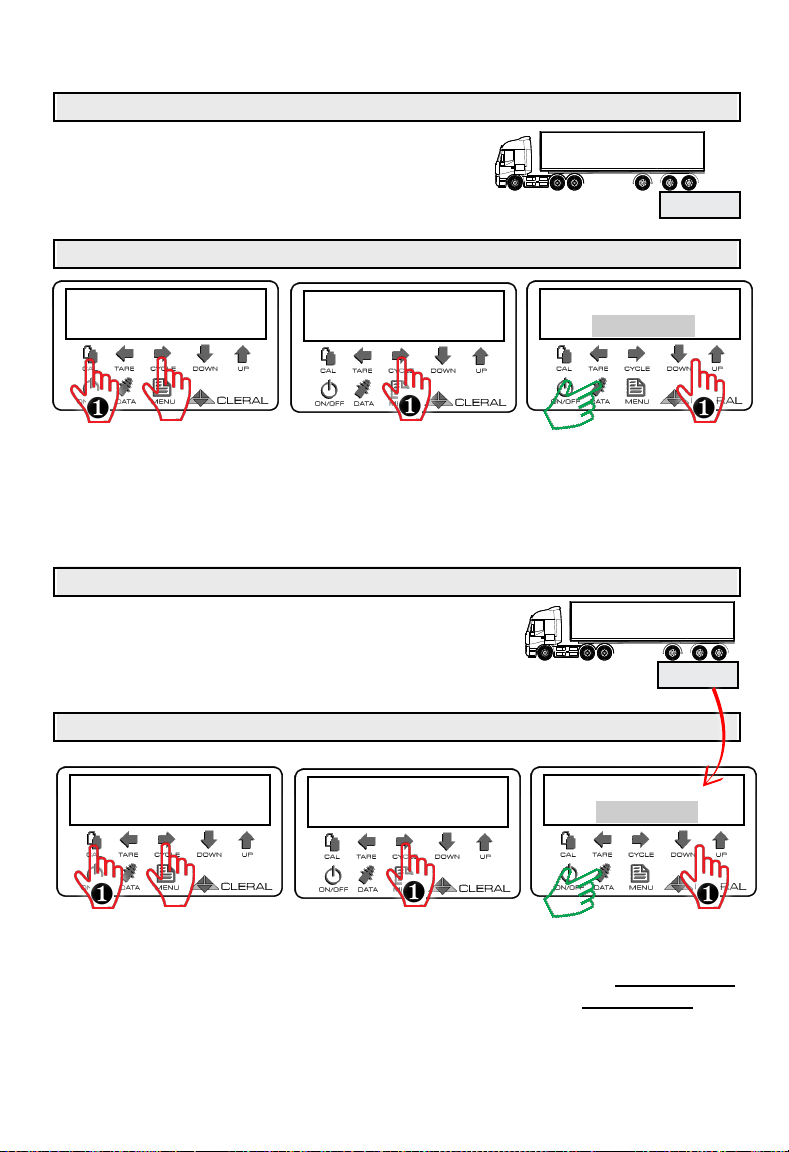
Calibration - Empty Semi- trailer (Auxiliary instrumented)
Acquiring primary axle weight
Advance the empty semitrailer on the weigh
bridge. The wheels of the auxiliary axle must not
touch the platform of the weigh bridge.
Calibration of primary axle weight
Acquiring auxiliary axle weight
Move the empty semitrailer on the weigh bridge.
The wheels of the auxiliary axle must be on the
weigh bridge.
Calibration of auxiliary axle
18
Empty T : 4000
C : 4000
❶
Empty T : 6000
C : 6000
❶
Press CAL to go to
calibration and right
arrow to go to Empty
calibration.
Press 2X on Right Arrow
to go to Channel C
"C" flashes, Adjust the
weight of this channel.
DATA to exit
➔Empty
Full
❶
➋
Empty T : 6000
B : 1500
❶
Empty T : 8000
B : 2000
❶
Press CAL to go to
calibration and right
arrow to go to Empty
calibration.
Press Right Arrow to go
to Channel B
Channel B flashes,
Adjust the weight of this
channel relative to the
Tot a l we i gh t .
➔Empty
Full
❶
➋
6000 kg
AC
➲
B
AC
➲
B
8000 kg
EXIT
EXIT
Calibration - FULL Semi-trailer (Auxiliary instrumented)
Acquiring primary axle weight
Move the Full trailer to on the weigh bridge.
The wheels of the auxiliary axle must not touch
the platform of the weigh bridge.
Calibration of primary axles
Acquiring the weight of the auxiliary axle
Move the FULL trailer on the weigh bridge. The
wheels of the auxiliary axle must be on the weigh
bridge.
Calibration of auxiliary axle
19
Full T : 21000
B : 3000
❶
Full T : 23000
B : 5000
❶
Press Right Arrow to go
to Channel B.
"B" flashes, Adjust the
weight of this Channel
relative to the Total
weight.
1- Press CAL to go to
calibration.
2- Down Arrow to go to
Full.
3- Right Arrow to enter
Full Calibration.
Empty
➔Full
❶
➋
❸
Full T : 17000
C : 14000
❶
Full T : 21000
C : 18000
❶
Press 2X on Right Arrow
to go to Channel C.
"C" flashes, Adjust the
weight of this channel.
DATA to exit.
1- Press CAL to go to
calibration.
2- Down Arrow to go to
Full.
3- Right Arrow to enter
Full Calibration.
Empty
➔Full
❶
➋
❸
➲
B
A
C
23000 kg
➲
B
A
C
18000 kg
EXIT
EXIT
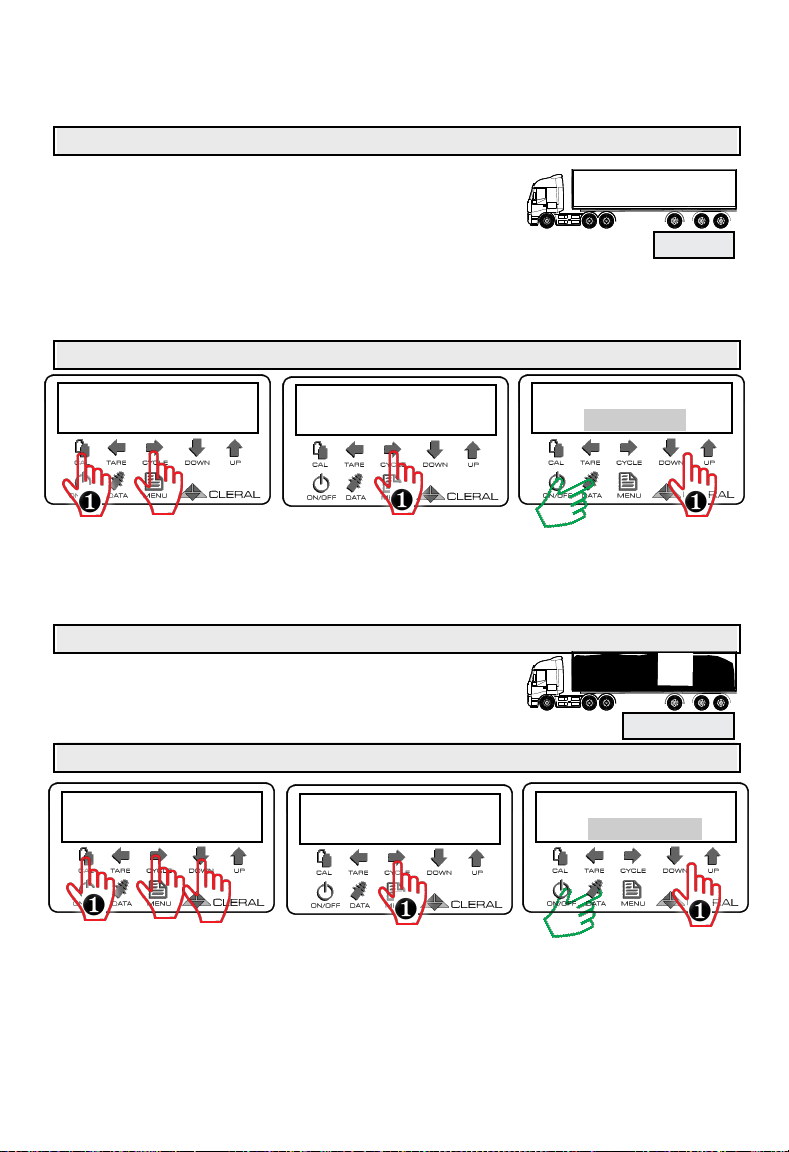
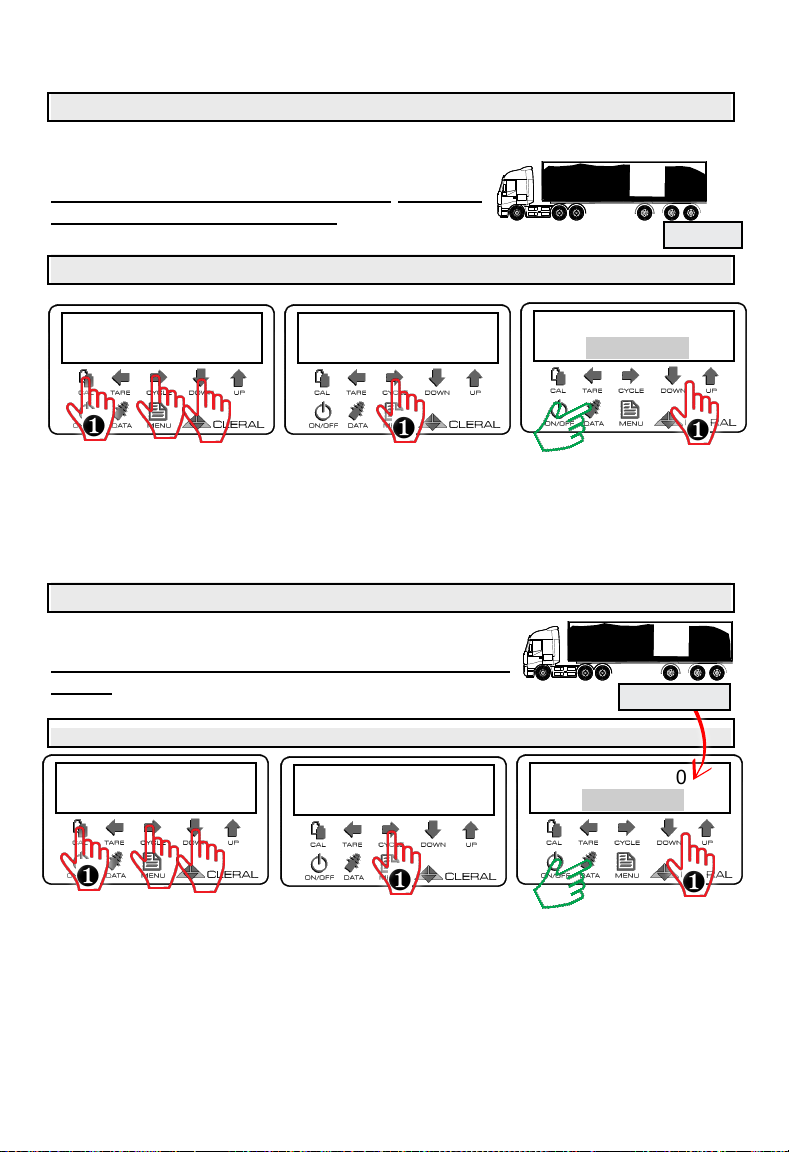
Calibration - Semi-Trailer (Non-instrumented Auxil-
iary Axle INCLUDED)
Acquiring Empty weight
Method Included Auxiliary: The weight of the auxil-
iary axle is INCLUDED in the weight of the semi-
trailer; The calibration is carried out with the auxil-
iary axle DEPLOYED.
Move the empty semitrailer on the weigh bridge. The tractor wheels must not
touch the weigh bridge platform.
Calibration of the empty semi-trailer
Acquiring Full weight
Advance the empty semitrailer on the weigh
bridge. The wheels of the auxiliary axle must be on
the weigh bridge.
Calibration of the loaded semi-trailer
20
Empty T : 4000
B : 4000
❶
Empty T : 8000
B : 8000
❶
Press CAL to go to
calibration and right
arrow to enter Empty
Calibration.
Press Right Arrow to go
to Channel B
Channel B flashes,
Adjust the weight of this
Channel.DATA to Exit.
➔Empty
Full
❶
➋
EXIT
EXIT
➲
X
A
B
23000 kg
Full T : 8000
B : 8000
❶
Full T : 23000
B : 23000
❶
Press Right Arrow to go
to Channel B
"B" flashes, Adjust the
weight of this Channel
relative to the Total
weight.
1- Press CAL to go to
calibration.
2- Arrow down to go to
Full.
3- Right Arrow to enter
Full Calibration.
Empty
➔Full
❶
➋
❸
AB
➲
X
8000 kg
Table of contents
Popular Accessories manuals by other brands


M&C
M&C EC Series instruction manual

Lutron Electronics
Lutron Electronics Maestro MS-B102 Series manual

Eriez
Eriez HS-5 Installation, operation and maintenance instructions

SKF
SKF CMSS 60 User's & technical manual

Carrier
Carrier WIRELESS STANDARD SENSOR installation guide

Dell
Dell 53P6J installation instructions