Climate King HCK-BX2UK Manual
CLIMATE
KING
User’s Manual and
Operating
Instructions
PREMIUM
QUALITY
FAN HEATERS
READ INSTRUCTIONS CAREFULLY Read and follow all instructions.
Place instructions in a safe lace for future reference. Do not allow anyone
who has not read these instructions to assemble, turn on, adjust or o erate
the heater.
Models HCK-BX2UK; HCK-BX3UK
1.1 Disconnect the heater from the mains power supply, before servicing or
performing any cleaning or maintenance. Servicing or maintenance must
only be carried out by a qualified electrician or service agent
1.2 WARNING: In order to avoid overheating, do not cover the heater.
1.3 CAUTION-some parts of this prod ct can become very hot and ca se b rns.
Partic lar attention has to be given where children and v lnerable people are
present.
2. Introduction
2.1 . This unit is designed to raise the ambient tem erature of an entire room, the
tem erature of the air coming out of the front of the heater will be warmer than the
general tem erature of the room, but there may not be a significant increase due
to the large volume of air assing over the element. For the same reason, the
element is hot during o eration, but does not glow visibly. The room tem erature
de ends on room size, insulation and the ambient tem erature, which will
increase as the room gets warmer.
2.2 The unit incor orates a thermostat and a self-resetting thermal cut-out to
control the heating elements. The thermostat feels the air tem erature and
controls the surrounding tem erature. The fan motor is not controlled by the
thermostat and it kee s on working when the thermostat cuts off the heating
element. The self-resetting thermal cut-out will switch off the heater to ensure the
safety in the event of overheating.
1
2.3 When using the heater for the first time, you may notice a slight emission of
smoke. This is quite normal and it sto s after a short time. The heating element is
made of stainless steel and was coated with rotection oil during roduction. The
smoke is caused by the residual oil burning off when heated .
3. Technical specifications
Model HCK-BX2UK HCK-BX3UK
Water roof Class IPX4 IPX4
Voltage 220-240V 220-240V
required ower 2KW 3KW
current 8.3-9.1A 12A
Required Fuse 10-13 A 13A
Setting 25/1.0KW/2.0KW 25/1.5KW/3KW
Self-resetting Thermostat 65°C 65°C
Size of heater ( mm) 235x225x330 270x255x400
N.W.( KG) 3.5KGS 4.6KGS
3.1 Housing of steel late and coated by heat-resistant owder .
3.2 Su lied com lete with cord and lug .
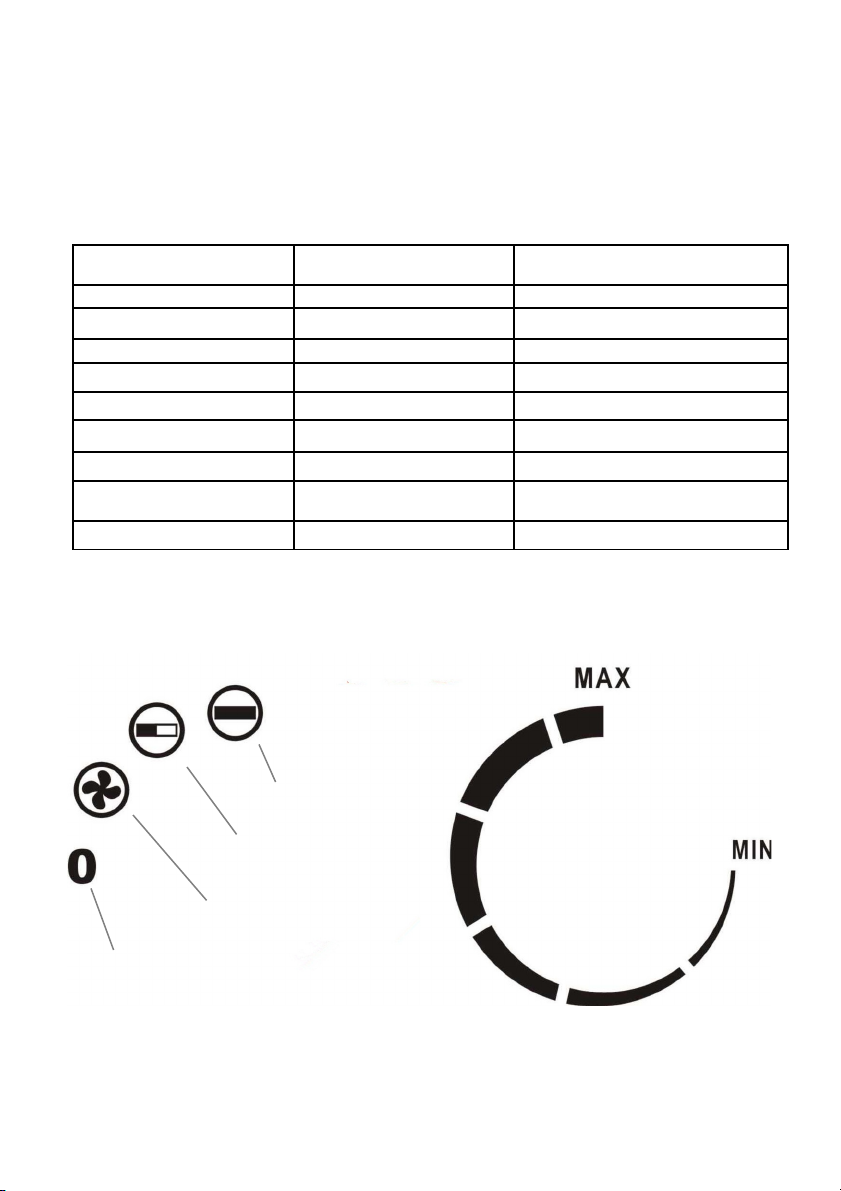
4. Description of Control Panel
4.1 Left Knob selector with heat setting
4.2 Right Knob Thermostat dial
2
F ll heat
Half Heat
Fan Only
OFF

5. Safety regulations
5.1
It is the res onsibility of the owner and the o erator to read, understand and
com ly with the following:
You must check all electrical roducts, before use, to ensure that they are safe.
You must ins ect ower cables, lugs, sockets and any other connectors for wear
or damage. You must ensure that the risk of electric shock is minimised by the
installation of a ro riate safety devices. A Residual Current Circuit Breaker
(RCCB) should be incor orated in the main distribution board. We also
recommend that a Residual Current Device (RCD) is used. It is articularly
im ortant to use an RCD with ortable roducts that are lugged into a su ly
which is not rotected by an RCCB. If in any doubt consult a qualified electrician.
You must also read and understand the following instructions concerning
electrical safety.
5.1.1. The Electricity at Work Act 1989 requires that all ortable electrical
a liances, if used on business remises, are tested by a qualified electrician,
using a Portable A liance Tester (PAT), at least once a year.
5.1.2. The Health & Safety at Work Act 1974 makes owners of electrical
a liances res onsible for the safe condition of those a liances and the safety
of the a liance o erators. If in any doubt about electrical safety, contact a
qualified electrician.
5.1.3. Ensure that the insulation on all cables and on the a liance is safe before
connecting it to the ower su ly. See 5.1.1. and 51.2. and use a Portable
A liance Tester.
5.1.4. Ensure that cables are always rotected against short circuit and overload.
5.1.5. Regularly ins ect ower su ly cables and lugs for wear or damage and
check all connections to ensure that none are loose.
5.1.6. Im ortant: Ensure that the voltage marked on the a liance matches the
ower su ly
to be used and that the lug is fitted with the correct fuse .
5.1.7. DO NOT ull or carry the a liance by the ower cable.
5.1.8. DO NOT ull the lug from the socket by the cable.
5.1.9. DO NOT use worn or damaged cables, lugs or connectors. Immediately
have any faulty item re aired or re laced by a qualified electrician.
5.2 When using electrical a liance basic recautions should always be followed
including below :
5.2.1 The fan heater is not suitable for use outdoors in dam weather, in
bathrooms or in other wet or dam environments.
5.2.2 Please note that the fan heater can become very hot and should, therefore,
be laced at a safe distance from flammable objects such as furniture, curtains
3

and similar.
5.2.3 Do not cover the fan heater.
5.2.4 The fan heater must not be located immediately below a wall socket.
5.2.5 Do not connect the fan heater using an on/off timer or other equi ment
which can automatically switch the device on.
5.2.6 The fan heater must not be laced in rooms where flammable liquids or
gases are used or stored or where industrial owders or chemicals are used that
could block the heater or any of its arts.
5.2.7 This roduct should not be used with an extension lead.
5.2.8 You must not connect other a liances to the same mains socket as the fan
heater.
5.2.9 Do not use this fan heater in the immediate surroundings of a bath, a
shower or a swimming ool
5.2.10 If the su ly cord is damaged, it must be re laced by the manufacturer, its
service agent or similarly qualified ersons in order to avoid a hazard.
5.2.11 Make sure heater is always under surveillance and kee children and
animals away from it;
5.2.12 Do not lace the a liance on moving vehicles or some where easy to be
ti ed over .
5.2.13 When you don’t use the a liance for a long time, un lug the a liance
.Don’t leave the heater for a considerable amount of time when in use. Pull the
lug straight out ,never remove the lug by ulling on the cord .
5.2.14 Kee the heater far from curtain or laces where the air inlet can easily be
blocked.
5.2.15 In order to revent ossible electric shock,never use the a liance with
wet hands or o erate the a liance when there is water on the ower cord.
5.2.16 Do not dis ose of electrical a liances as unsorted munici al waste,use
se arate collection facilities. Contact you local government for information
regarding the collection systems available. If electrical a liance are dis osed of
in landfills or dum s, hazardous substances can leak into the groundwater and
get into the food chain,damaging your health and well-being.
5.2.17 This a liance is not intended for use by ersons (including children) with
reduced hysical, sensory or mental ca abilities, or lack of ex erience and
knowledge, unless they have been given su ervision or instruction concerning
use of the a liance by a erson res onsible for their safety.
Children sho ld be s pervised to ens re that they do not play with the appliance.
4

This a liance can be used by children aged from 8 years and above and
ersons with reduced hysical, sensory or mental ca abilities or lack of
ex erience and knowledge if they have been given su ervision or
instruction concerning use of the a liance in a safe way and understand
the hazards involved. Children shall not lay with the a liance. Cleaning
and user maintenance shall not be made by children without su ervision.
6. Instructions For Use
6.1 Position the fan heater so that it stands u right on a firm surface and at a safe
distance from wet environments and flammable objects.
6.2 Connect the fan heater to the mains.
6.3 Set the thermostat dial to the maximum setting (fully clockwise).
6.4 The heater will switch on when the ower setting selector is set to one of the
two ower settings.
NOTE It will take u to three minutes for the heater to reach o timum
tem erature.
6.5 Once the room reaches the required tem erature, turn the thermostat dial
slowly counter-clockwise until the thermostat clicks, leave the dial in this osition
and the room tem erature will be maintained at this setting. The heater will
continue to o erate until the ower switch is turned to the OFF osition.
6.6 For fan only o eration, turn the ower/fan selector to the fan only setting and
set the thermostat to its minimum setting.
6.7 there is an additional thermostat to control the fan motor. If the tem erature
inside the heater is high after the heater is turned off, the fan motor will still
o erate to cool down the tem erature inside.
7. Cleaning and Storage
7.1 Before cleaning the a liance,disconnect it from the socket and let it cool
down. The enclosure can easily o get dirty, wi e it often with a soft s onge. For
very dirty arts, wi e with a s onge di ed in <50°C water and mild
detergent,then dry the heater enclosure with a clean cloth. Be careful not to let the
water enter the a liance . Don’t s lash water onto the heater,never use solvent
like gasoline etc. to clean the heater,in order to rotect the enclosure.
7.2 Clean the cord and lug,dry and ack it in a lastic bag.
7.3 When you store the heater, let it cool down first, kee it dry. Then cover it with
a lastic bag, ut in a acking box and store it in a dry, ventilated lace.
8. Trouble shooting
You can solve many common roblems easily, saving you the cost of a ossible
service call. Try the suggestions below to see if you can solve the roblem before
calling the service centre.
5

Problem Possible cause Treatment
The heater does not
o erate,even when
it is lugged in and
the switch,
thermostat are
switched on .
The lug is loose, bad
connection
Pull out the lug, check the
connection of the lug and
socket. Then connect again.
No ower in socket outlet Insert the lug in a ro er
socket
The heating
element glowing
The in ut voltage is too
high or too low
Use ower su ly according
to the rating on the label
The air inlet grill is blocked Kee the heater far way from
articles like curtain, lastic
bag, a er and other things
which can be easily cover
the air inlet
The a liance
didn’t heat u , only
ventilator worked
The switch was not ut at
heating setting
Turn the switch to heat setting
The thermostat o erated Turn the thermostat u and
listen if there is a click. If there
is no click and the thermostat
is not damaged, the heater
will automatic switch on when
the a liance cools down
The self vetting cut-out
o erated
Turn the heater off and
ins ect the blockage of inlet or
outlet. Disconnect the plug
and wait at least 10 minutes
for the rotection system to
reset before attem ting to
restart the heater.
Abnormal noise The a liance is not stands
u right
Put the heater on a level
surface
Disposal
Environmental Protection
Waste electrical roduction should not be dis osed of with
household waste. Please recycle where facilities exist. Check
with your Local Authority or retailer for recycling advice.
SERVICE WARRANTY
6

Cottage Stores LLP guarantees the roduct free from defects in materials
and workmanshi for a eriod of twelve months after urchase. Proof of urchase
will be required.
Should this unit be o erated under conditions other than those
recommended, at voltages other than the voltage indicated on the unit, or
any attem ts made to service or modify the unit, then the warranty will be
rendered void.
The roduct you buy may sometimes differ slightly from illustrations. This
warranty is in addition to, and does not affect, your statutory rights. If you
have any roblems with this roduct, lease in the first instance call the
retailer from whom you purchased it.
Climate King
Cottage Stores LLP
7 Harris Drive
Rugby CV22 6DX
United Kingdom
Kee box and ackaging until the end of the warranty eriod
7
This manual suits for next models
1
Table of contents
Other Climate King Heater manuals


Popular Heater manuals by other brands

Omega Altise
Omega Altise OCON203B Operation, maintenance and safety instructions

Wetekom
Wetekom 81 50 10 instruction manual

Rowenta
Rowenta TURBO EXCEL SO9070 instructions

cecotec
cecotec READY WARM 9600 SMART ROTATE instruction manual

ESA
ESA VN18 Safety information and installation manual

HeatStar
HeatStar MH18CH Operating instructions and owner's manual


AREBOS
AREBOS AR-HE-HS2500FB user manual

ASKOMA
ASKOMA ASKOHEAT-EO Fitting instructions, user manual and service

Plein Air
Plein Air R-1200 instruction manual

Claudgen
Claudgen HE7433 Installation & operation guide

Frico
Frico Elektra V Mounting and assembly instruction

BIEMMEDUE
BIEMMEDUE GP 10M instruction manual