Climax Technology PSS-29 User manual

PSS-29 Power Switch
Introduction
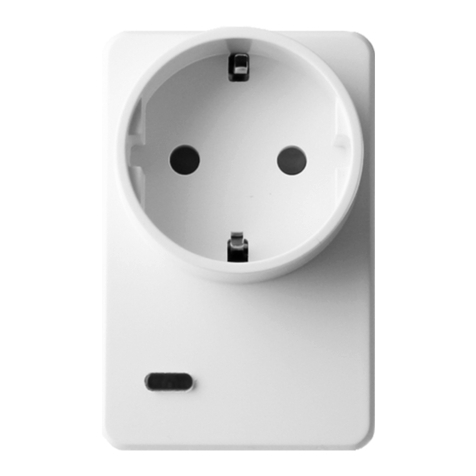
The Power Switch PSS-29 is designed for the user to remotely turn on/off an appliance that is attached to it. The
integration of the Power Switch into your home automation system will allow you to conveniently control home
appliances for comfort or energy-saving purposes.
Parts Identification
1. Test Button aka LED indicator
The Test Button also doubles as the LED Indicator. The test
button is used to control the Power Switch. The LED indicator is
used to indicate Power Switch status.
LED Indication:
The LED indicator lights up in the following conditions:
- On: The Power Switch is turned on.
- Off: The Power Switch is turned off.
- Flashes twice: When powered on.
- Flashes 3 times: When receiving acknowledgement from
..the Control Panel.
- Flashes slowly: Under learning mode.
- Flashes three times: When learning is successful.
- Flashes briefly: RF signal transmitting
Test Button Usage:
- Press the button to toggle on/off the Power Switch
- Press and hold the button for 3 seconds to send a learn
code.
- Press and hold the button while powering on the Power
Switch, then release the button when the LED lights up to
factory reset
Getting Started
Step 1: Plug the Power Switch into the power outlet.
Step 2: Put the Control Panel into learning mode.
Step 3: Press and hold the Test button on the Power Switch for
3 seconds to send a learn code.
Step 4: The LED will start to flash slowly, indicating that the
Power Switch is in learning mode.
Step 5: If the Control Panel receives the signal from the power switch, it will display the information accordingly.
Refer to the Control Panel manual to complete the learn-in process.
Step 6: When the Power Switch receives the learning code from the Control Panel, the LED of the Power
Switch will flash 3 times and then turn off to indicate that learning process is complete.
<NOTE>
After entering learning mode, the Power Switch will not automatically leave learning mode unlesss it
receives acknowledgement from the Control Panel, or unless the Test button is pressed.
If the Power Switch already exists in a Control Panel system, you will need to first remove the Power
Switch from the Control Panel before you can learn it into a different Control Panel.
Walk Test
To test whether the Power Switch is able to communicate with the Control Panel:
Put the Control Panel into Walk Test mode.
Press the Test Button on the Power Switch.
1

The Control Panel should display if the Power Switch is within the operation range (please refer
to the operation manual of the Control Panel).
Supervision
After the Power Switch is successfully learned in to the Control Panel, the device will automatically
transmit supervisory signal along with ON/Off status to the Control Panel at random intervals of 15 to 18
minutes.
If the Control Panel has not received the signal from the Power Switch for the preset period of time, the
Control Panel will indicate on its display that the particular Power Switch is experiencing an out-of-signal
problem.
Operation
Installation
Plug the Power Switch into a power outlet, then plug the appliance into the socket of the Power Switch.
The appliance must be in ON status.
Appliance Control
After the Power Switch is successfully learned in to the Control Panel, the Control Panel can remotely
turn on/off the Power Switch to control the appliance. Please refer to your Control Panel manual for
details.
You can also press the button on the Power Switch to toggle its on/off status
If the Power Switch is removed from power outlet, after re-plugging the Power Switch, its previous on/off
status will be transmitted to the Control Panel.
Maximum Operation Load
For 110V: the maximum operation load is 1760W and 16A.
For 230V: the maximum operation load is 3680W and 16A.
If the Power Switch is overheating, it will cut off power automatically as a safety measure. The LED
indicator will flash quickly. The Power Switch must be unplugged and re-plugged after cut off to resume
normal operation.
Factory Reset
Factory resetting the Power Switch will clear its memory and restore it to factory default settings.
Press and hold the test button while powering on the Power Switch, then release the button when the
LED lights up to factory reset.
2

Federal Communication Commission Interference Statement
This equipment has been tested and found to comply with the limits for a Class B digital
device, pursuant to Part 15 of the FCC Rules. These limits are designed to provide reasonable
protection against harmful interference in a residential installation.
This equipment generates, uses and can radiate radio frequency energy and, if not installed
and used in accordance with the instructions, may cause harmful interference to radio
communications. However, there is no guarantee that interference will not occur in a
particular installation. If this equipment does cause harmful interference to radio or television
reception, which can be determined by turning the equipment off and on, the user is
encouraged to try to correct the interference by one of the following measures:
. Reorient or relocate the receiving antenna.
. Increase the separation between the equipment and receiver.
. Connect the equipment into an outlet on a circuit different from that to which the receiver is
connected.
. Consult the dealer or an experienced radio/TV technician for help.
FCC Caution: To assure continued compliance, any changes or modifications not expressly
approved by the party responsible for compliance could void the user's authority to operate
this equipment. (Example - use only shielded interface cables when connecting to computer or
peripheral devices).
FCC Radiation Exposure Statement
This equipment complies with FCC RF radiation exposure limits set forth for an uncontrolled
environment. This equipment should be installed and operated with a minimum distance of 20
centimeters between the radiator and your body.
This transmitter must not be co-located or operating in conjunction with any other antenna or
transmitter.
The antennas used for this transmitter must be installed to provide a separation distance of at
least 20 cm from all persons and must not be co-located or operating in conjunction with any
other antenna or transmitter.
This device complies with Part 15 of the FCC Rules. Operation is subject to the following two
conditions:
(1) This device may not cause harmful interference, and (2) This device must accept any
interference received, including interference that may cause undesired operation.
3
Table of contents
Other Climax Technology Switch manuals
Popular Switch manuals by other brands
HP
HP STORAGEWORKS A7540-96010 installation guide

GRASS VALLEY
GRASS VALLEY zodiak user manual
HP
HP 3600 EI series Specifications

HP
HP 6127XLG Blade Series Command reference
Alcatel-Lucent
Alcatel-Lucent 7210 SAS E OS Configuration guide
Planet Networking & Communication
Planet Networking & Communication GS-5220 Series user manual
