Climax Vesta VDP-A1 User manual

Aug 5, 2016

Table of Contents
1. INTRODUCTION __________________________________________________________________ 8
2. APPLICATION OVERVIEW _________________________________________________________ 9
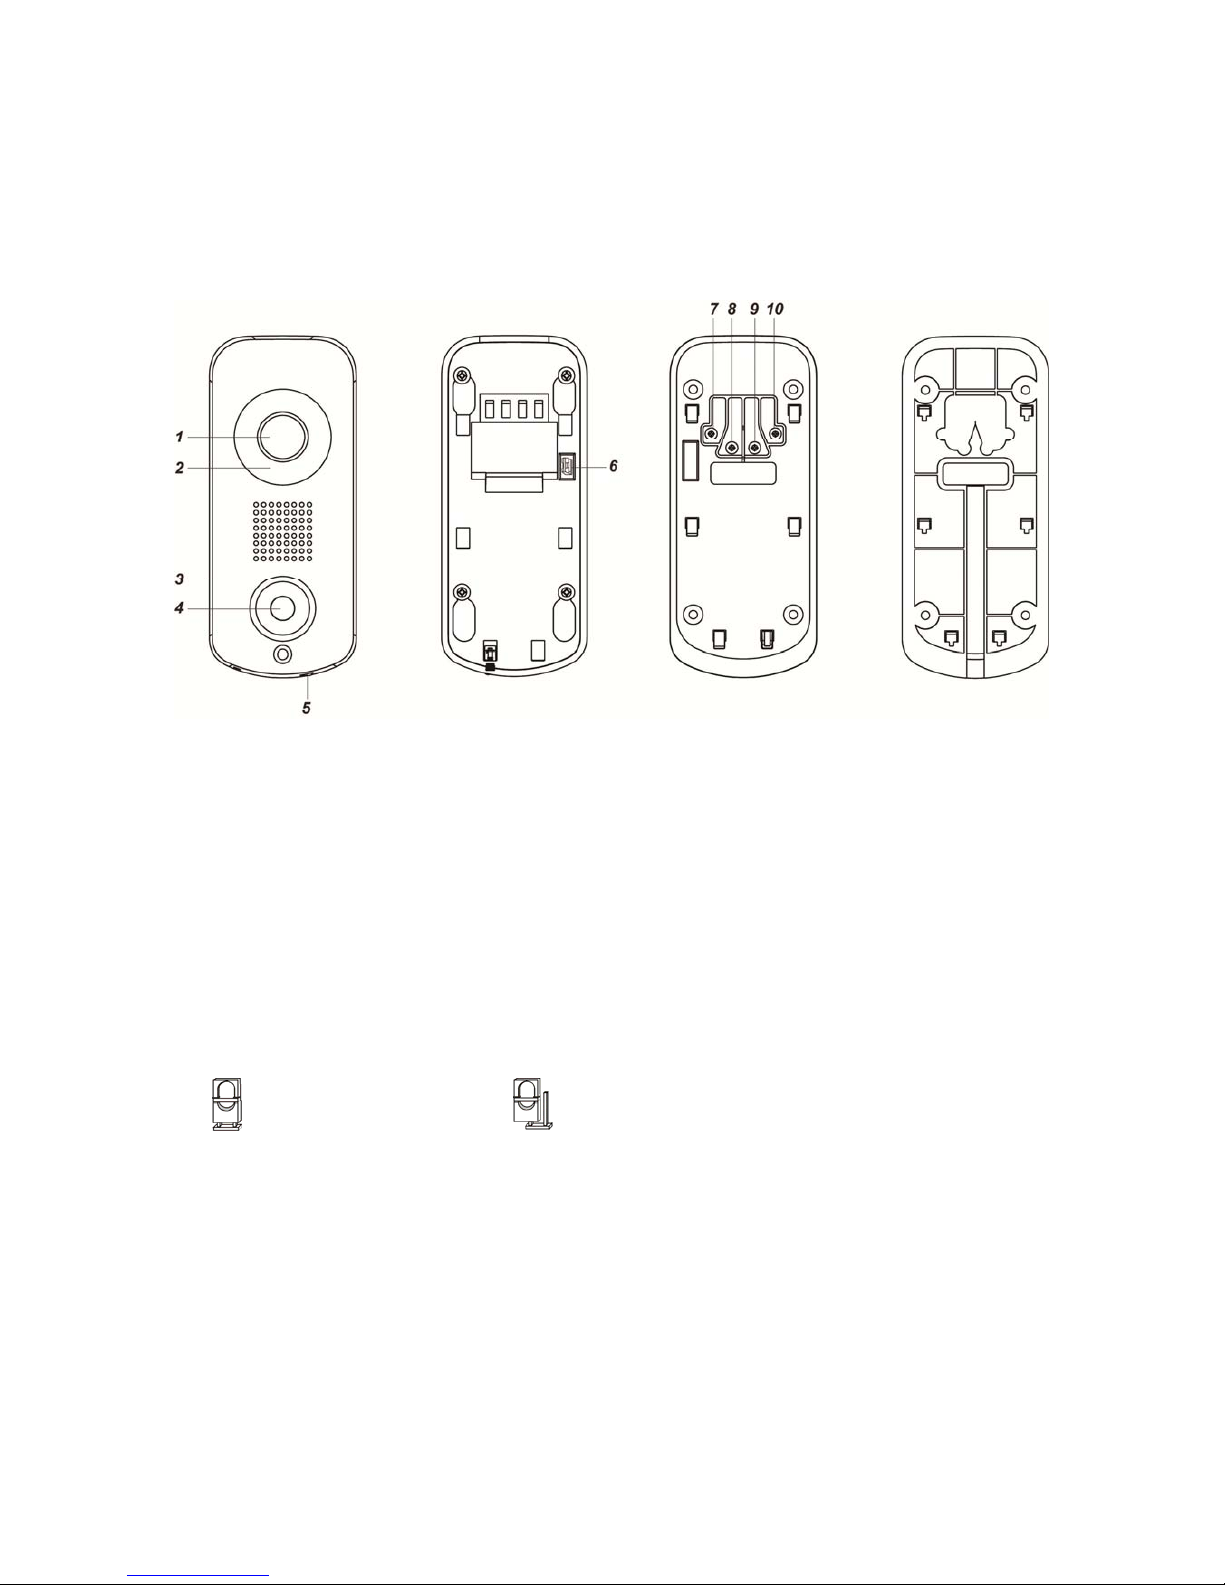
2.1. PARTS IDENTIFICATION __________________________________________________________ 9
2.2. LED INDICATOR _______________________________________________________________ 10
2.3. THE POWER SUPPLY ___________________________________________________________ 10
3. GETTING STARTED ______________________________________________________________ 11
3.1. EQUIPMENT REQUIRED __________________________________________________________ 11
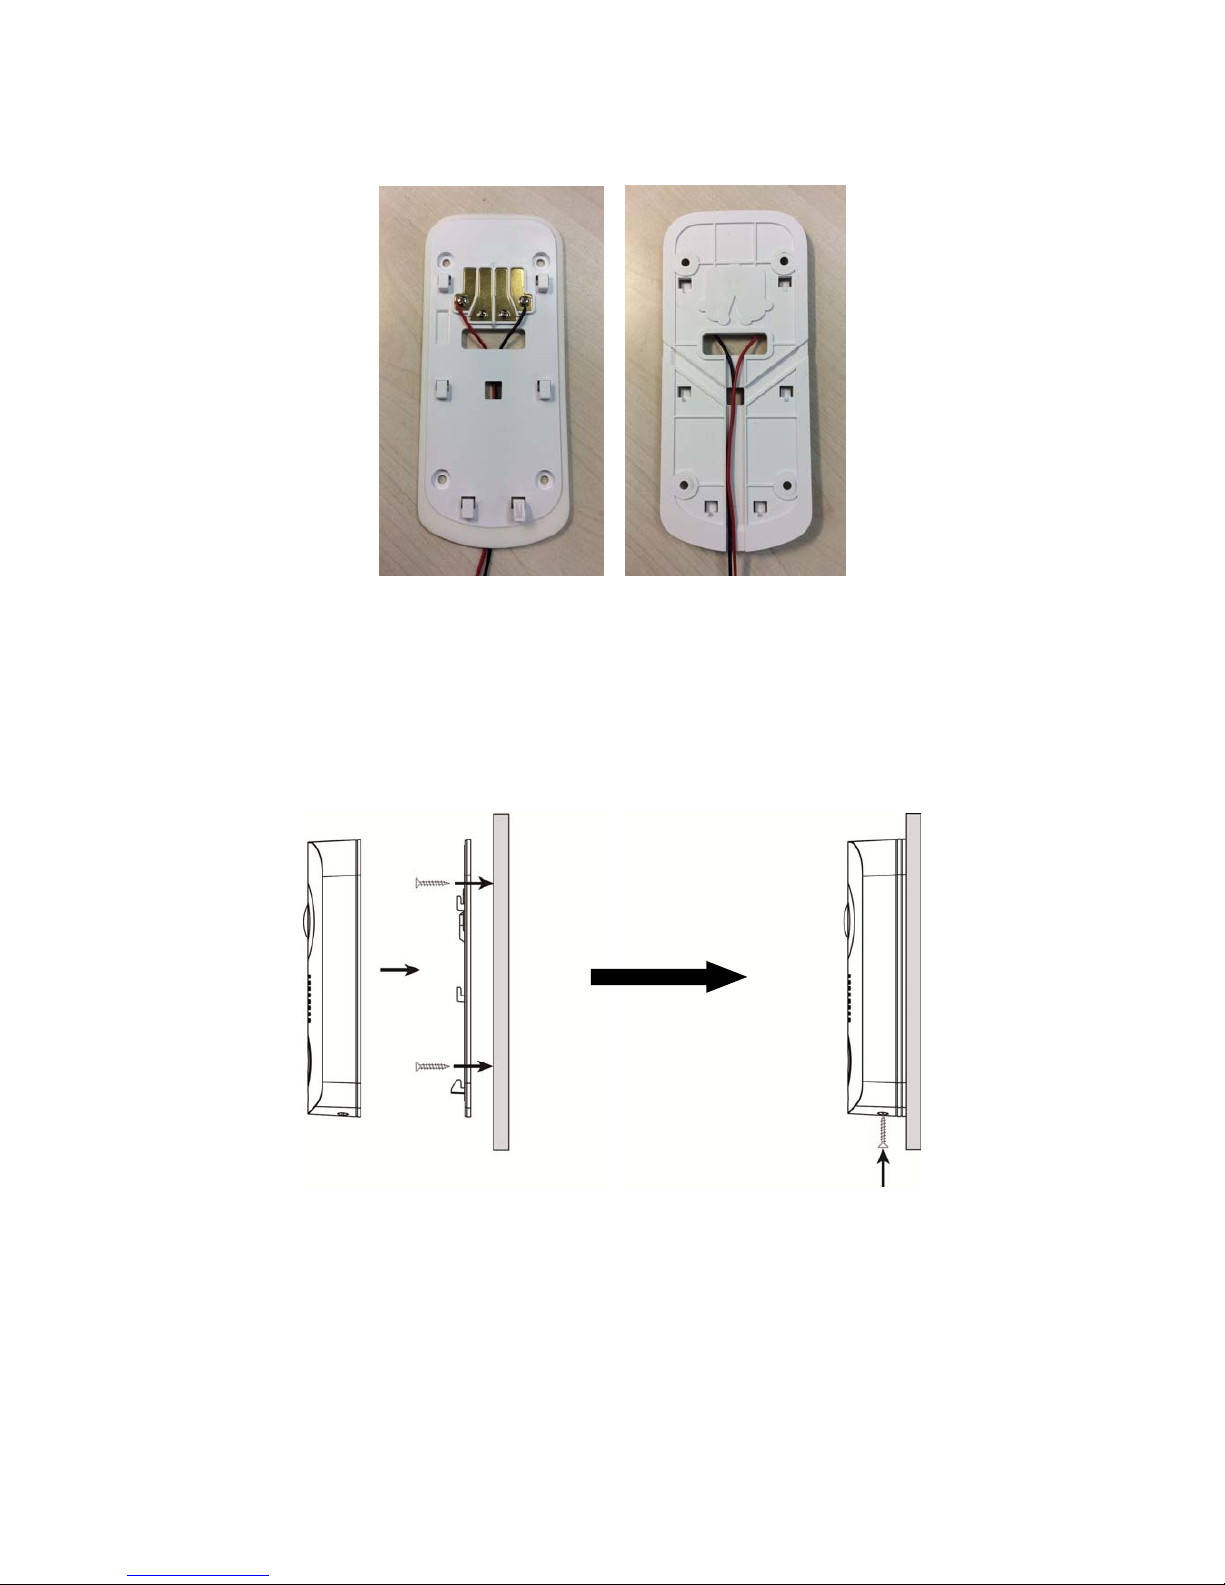
3.2. HARDWARE INSTALLATION _______________________________________________________ 11
3.3. WI-FI SETUP AND LEARNING ______________________________________________________ 13
4. OPERATION ____________________________________________________________________ 16
4.1. WEB BROWSER ACCESS ________________________________________________________ 16
4.2. SMARTPHONE ACCESS __________________________________________________________ 17
4.3. DOORBELL NOTIFICATION ________________________________________________________ 18
4.4. VIDEO / PICTURE CAPTURE _______________________________________________________ 19
5. PROGRAMMING ________________________________________________________________ 20
5.1. VIDEO SETTING _______________________________________________________________ 20
5.2. VDP SETTING ________________________________________________________________ 23
6. LOCAL PROGRAMMING WEBPAGE ________________________________________________ 28
6.1. CONNECTING TO WEBPAGE ______________________________________________________ 30
7. IP CAMERA ____________________________________________________________________ 31
7.1. IMAGE TUNING ________________________________________________________________ 31
7.2. TIME STAMP _________________________________________________________________ 32
7.3. STREAM SETTING ______________________________________________________________ 33
7.4. RECORDED FILES ______________________________________________________________ 34
7.5. ALARM SETTING ______________________________________________________________ 35
8. NETWORK SETTING _____________________________________________________________ 36
8.1. NETWORK ___________________________________________________________________ 36
8.2. WIRELESS ___________________________________________________________________ 37
8.3. UPNP ______________________________________________________________________ 38
9. SYSTEM SETTING _______________________________________________________________ 39
9.1. CHANGE PASSWORD ___________________________________________________________ 39

9.2. REPORT_____________________________________________________________________ 40
9.3. MEDIA UPLOAD _______________________________________________________________ 41
9.4. XMPP ______________________________________________________________________ 42
9.5. DATE & TIME _________________________________________________________________ 43
9.6. DYNAMIC DNS ________________________________________________________________ 44
9.7. FIRMWARE ___________________________________________________________________ 45
9.8. FACTORY RESET ______________________________________________________________ 46
9.9. BACKUP & RESTORE ___________________________________________________________ 47
9.10. SYSTEM LOG _________________________________________________________________ 48
9.11. LOGOUT ____________________________________________________________________ 49
9.12. REBOOT ____________________________________________________________________ 49
10. HISTORY _______________________________________________________________________ 50
10.1. EVENT LOG __________________________________________________________________ 50
10.2. REPORTED EVENTS ____________________________________________________________ 50

8
1. Introduction
VDP-A1 Video Door Phone is designed to replace conventional doorbell by providing
remote video streaming access, two-way communication via WiFi network. The Video
Door Phone functions as part of Climax alarm system and must be connected with a
Climax security system Control Panel. Setup and remote access of Video Door Phone is
performed via Climax Home Portal Server, using provided smartphone application.

9
2. Application Overview
2.1. Parts Identification
1. Camera Lens
2. Night Light LED
3. LED Indicator (Blue / Amber)
4. Function Button
5. Bottom Screw
The bottom screw should be loosened before hooking the VDP onto mounting bracket, and
tightened after VDP is hooked to bracket.
When tightened, the bottom screw fixes VDP to mounting bracket. VDP cannot be detached
from bracket as long as screw is tightened.
6. Doorbell Jumper Switch
Jumper ON: Connect the Jumper Switch when using VDP with hardware doorbell.
Jumper OFF: Disconnect the Jumper Switch when not using VDP with hardware Doorbell.
7. 24V ADC Power Input
8. Doorbell Terminal
9. Doorbell Terminal
10. 24V ADC Power Input
Front View
Back View
(
Without Bracket
)
Bracket (Inside) Bracket (Outside)
Jumper On
The jumper link is inserted
connecting the two pins.
Jumper Off
If the jumper link is removed or
“parked” on one pin.

10
2.2. LED Indicator
The Video Door Phone has 2 sets of LED in Blue and Amber color, arranged in circular
pattern around the button to indicate device status.
LED Color Behavior Indication
Blue
Flash every 3 seconds VDP under Wi-Fi setup mode (AP mode)
Spinning VDP button pressed, waiting for answer
ON VDP under video streaming and two-way
communication
Amber
ON for 3 seconds VDP finish warm up upon power on,
entering normal operation.
Flash every 3 seconds Wi-Fi connectivity problem*
Flash every second VDP unable to connect to server
3 Flash then ON for 6
seconds
VDP reset to factory default
*Note: It takes about 1 minute for VDP to connect to Wi-Fi after power on. Before the
Wi-Fi connection is established, the Amber LED may flash momentarily.
2.3. The Power Supply
The VDP uses 24V±10% AC or DC power as power source. Connect power to the
connector on the bracket, install the VDP on the bracket to power on the device.

11
3. Getting Started
3.1. Equipment required
The following equipment is required to use VDP:
A Climax IP based security system alarm panel – The panel must be registered in
Climax Home Portal Server with a valid user account. Refer to panel and Home
Portal Server user guide to complete panel setup and registration process.
A router supporting 2.4 GHz Wi-Fi network. The Climax panel should be connected
to this router with access to internet and Home Portal Server.
An iPhone or Android smartphone with Climax Vesta Home 2 app installed.
Android version requirement: Android 5.1 or over.
iPhone version requirement: iOS 8 or over
3.2. Hardware Installation
1. Determine whether the VDP would be connected to a conventional doorbell.
If doorbell is used, connect the Jumper Switch.
If doorbell is not used, do NOT connect the Jumper Switch.
Warning
The Jumper Switch setting MUST be adjusted according to doorbell usage. Make sure
the jumper setting is correct before proceeding with installation. Incorrect setting may
cause damage to VDP when wiring.
2. Find the wall mounting bracket, connect 24V±10% ADC power to the connector on
the bracket. If doorbell is used, also connect the door bell.

12
The wiring should connect to the connector on the inside of bracket, pass through
the opening on the bracket and tucked into the bracket’s central cavity on the back.
3. The wall mounting bracket has 4 mounting holes. Use the mounting holes as
template, mark mounting location on the wall, drill holes and insert wall plug if
needed.
4. Screw the mounting bracket onto marked location.
5. Hook VDP onto the bracket. When VDP is hooked on the bracket, the connect come
in contact with the device and VDP is powered on.
6. Tighten the bottom screw to lock VDP onto bracket.

13
3.3. Wi-Fi Setup and Learning
1 Use your smartphone to open Vesta Home 2 app and log into the user account
registered by the control panel.
2 Select the Camera tab in the app. Press “New Video Doorbell” to begin setting.
3 Power up the Video Doorbell by applying AC power. The device will first warm up
for about 30 seconds, then the Blue LED will begin to flash.
Flashing Blue LED indicates the Video Doorbell does not have a working Wi-Fi
setting and it enter Wi-Fi setup mode (AP mode) automatically upon power up.
4 If the VDP has already finished Wi-Fi setting, it will not enter Wi-Fi setup mode upon
power up and must be reset to factory default. Follow procedure below to factory
reset:
a. Disconnect and reconnect AC power.
b. Press and hold VDP button as soon as AC power is reconnected. Do NOT wait
for warm up to complete.
c. Keep holding the button for about 25 seconds until VDP Amber LED flashes 3
times, then stays ON, then release the button.
d. Factory Reset is complete, VDP will reboot and enter W-Fi setup mode.

14
5 Leave the Vesta Home 2 TW app in the background and access your Smartphone’s
Wi-Fi setting function. Look for wireless network named VDP_XXXXXXXXXXXX.
(XXXXXXXXXXXX = device MAC address) Connect to this wire network, then
return to Vesta Home 2 TW app and continue.
If your smartphone warns the network has no internet access, ignore the warning
and proceed.
6 The app will search for available wireless network and display search result. Select
the wireless network desired and enter password to join the network.
If you encounter error message, check your smartphone wireless setting to make
sure the smartphone is still connected to the same VDP_XXXXXXXXXXXX network

15
previously selected, then return to app and search the available network again.
7 After successfully joining network, the app proceeds to learn the Video Doorbell into
the control panel. Enter the device name and proceed. When learning is complete,
the app displays success message. Press Done and re-login to the app to start
using Video Doorbell (The device will reboot upon complete learning, you may need
to wait a short time for it to restart.)

16
4. Operation
Operation of VDP should be performed via Climax Home Portal Server, using the
account registered by the Control Panel which VDP is learnt into.
4.1. Web Browser Access
When accessing the Home Portal Server account using a web browser, VDP is located
under the Camera page and has the same function of a Climax IP Camera.
Two-way voice and doorbell functions are not enabled for web browser access. To uses
these functions, a smartphone app is required. Please see 4.2. Smartphone Access for
detail.
Press the Record Video button to record a video clip.
.

17
4.2. Smartphone Access
Smartphone application access to VDP provides two-way voice and doorbell push
notification function.
Log into Home Portal Account and select Cam page to display VDP streaming thumbnail.
Press the thumbnail image to enlarge to full screen.
The VDP full screen has 4 function buttons:
Press the Record Video button to record a video clip.
The video clip length is set to 30 seconds by default, composed of 10 seconds
before button press and 20 seconds after button press.
Press the Camera button to take a single picture.
Press the Microphone button to toggle smartphone microphone.
Full screen VDP streaming will open voice channels automatically, allowing
smartphone user to converse with VDP. Use the microphone button to control
smartphone microphone and switch between one-way and two-way voice channel.
: Smartphone microphone OFF – One-way listen-in only.
: Smartphone Microphone ON – Two-way voice communication.
Press the Return button to return to camera thumbnail page.

18
4.3. Doorbell Notification
The Doorbell Notification function allows VDP to inform the user remotely when its
doorbell button is pressed. With Doorbell Notification, the user will be able to answer the
doorbell remotely and converse with the guest via VDP using the smartphone even
when away from home.
Before using the Doorbell Notification, the following settings should be completed:
The VDP must be properly setup and learnt into Control Panel, as described in
previous chapter.
The Control Panel Home Portal Server account should be registered and working
properly.
The Control Panel Home Portal Server account’s push notification setting must be
enabled. To enable push notification function, Log into the Home Portal Server
account and select Notification setting.
1 Press the doorbell button on VDP, VDP will sound a door chime. If any hard wired
doorbell is connected to VDP, the doorbell will also be activated; the Blue LED will
start spinning.
2 The user will receive a push notification message from its panel Home Portal Server
Account, titled “Doorbell”
3 Press on the push notification message, the smartphone will launch Vesta Home 2
TW app and log into registered account automatically. After login, the app will
automatically jump to VDP page. VDP Blue LED will turn to steady ON to indicate.
4 After finishing conversation, press the return button to return to camera thumbnail
page.
<
<N
NO
OT
TE
E>
>
If the Doorbell Notification is not answered within 1 minute after button press,
the VDP will time out and the Blue LED will stop spinning
When the button is pressed, VDP will take a picture which will be uploaded to
the Home Portal Server.

19
4.4. Video / Picture Capture
VDP will take a picture or video during following occasions. All pictures and video clips
taken will be uploaded to the server.
Picture
Press the function button in front of VDP to take a picture
Press the camera icon on the app when streaming video to take a picture
Video
Press the record video icon on the app or server webpage UI to record a video
Whenever an alarm is activated by the Control Panel, VDP will record a video
immediately.

20
5.Programming
VDP setting program should be programmed via Home Portal Server web browser UI.
5.1. Video Setting
Video Setting options are accessed on the Home Portal Server web UI’s Camera page.
Press the Video Setting icon to adjust video configuration:

21
Video Adjustment: For image tuning.

22
Time Stamp: Select the time stamp location on video.
Press the Record icon to record a video clip

23
5.2. VDP Setting
VDP’s own setting options are accessed on the Home Portal Server web UI’s Edit
Device page.

24
Setting
The setting page is used to set VDP zone number, device name and time zone
setting. Please refer to your Control Panel’s configuration webpage for option detail.
This manual suits for next models
1
Table of contents
Popular Telephone manuals by other brands

Nokia
Nokia RH-27 Series Service manual

jotron
jotron Tron TR20 GMDSS Technical handbook

Bell
Bell 851 Series Identification, Installation, Connections, and Maintenance

Panasonic
Panasonic Easy-Phone Auto-Logic KX-T1450 operating instructions

Alcatel
Alcatel TEMPORIS 300 user guide

Uniden
Uniden WDECT 2345+1 owner's manual