ATON CLT321 User manual

Aton CLT321
User Guide

20407785en_ba_b0
Safety Instructions
So that you can quickly set up and safely use your device, please read the following safe-
ty instructions and the chapter Setting Up your Telephone (Page 7) thoroughly. Store
this operating manual somewhere ready to hand. It is essential that you observe the fol-
lowing instructions when installing, connecting and operating the telephone:
• During power outages this telephone cannot be used to place emergency calls.
Make sure that you have other options for placing calls at your disposal, when
the need arises.
• Place the device on a non-slip underlay. Lacquer or other plastic coatings can attack
and soften the plastic feet of the device. If the feet are damaged in this way, they
can leave stains on the surfaces of furniture. The manufacturer accepts no liability for
this type of damage.
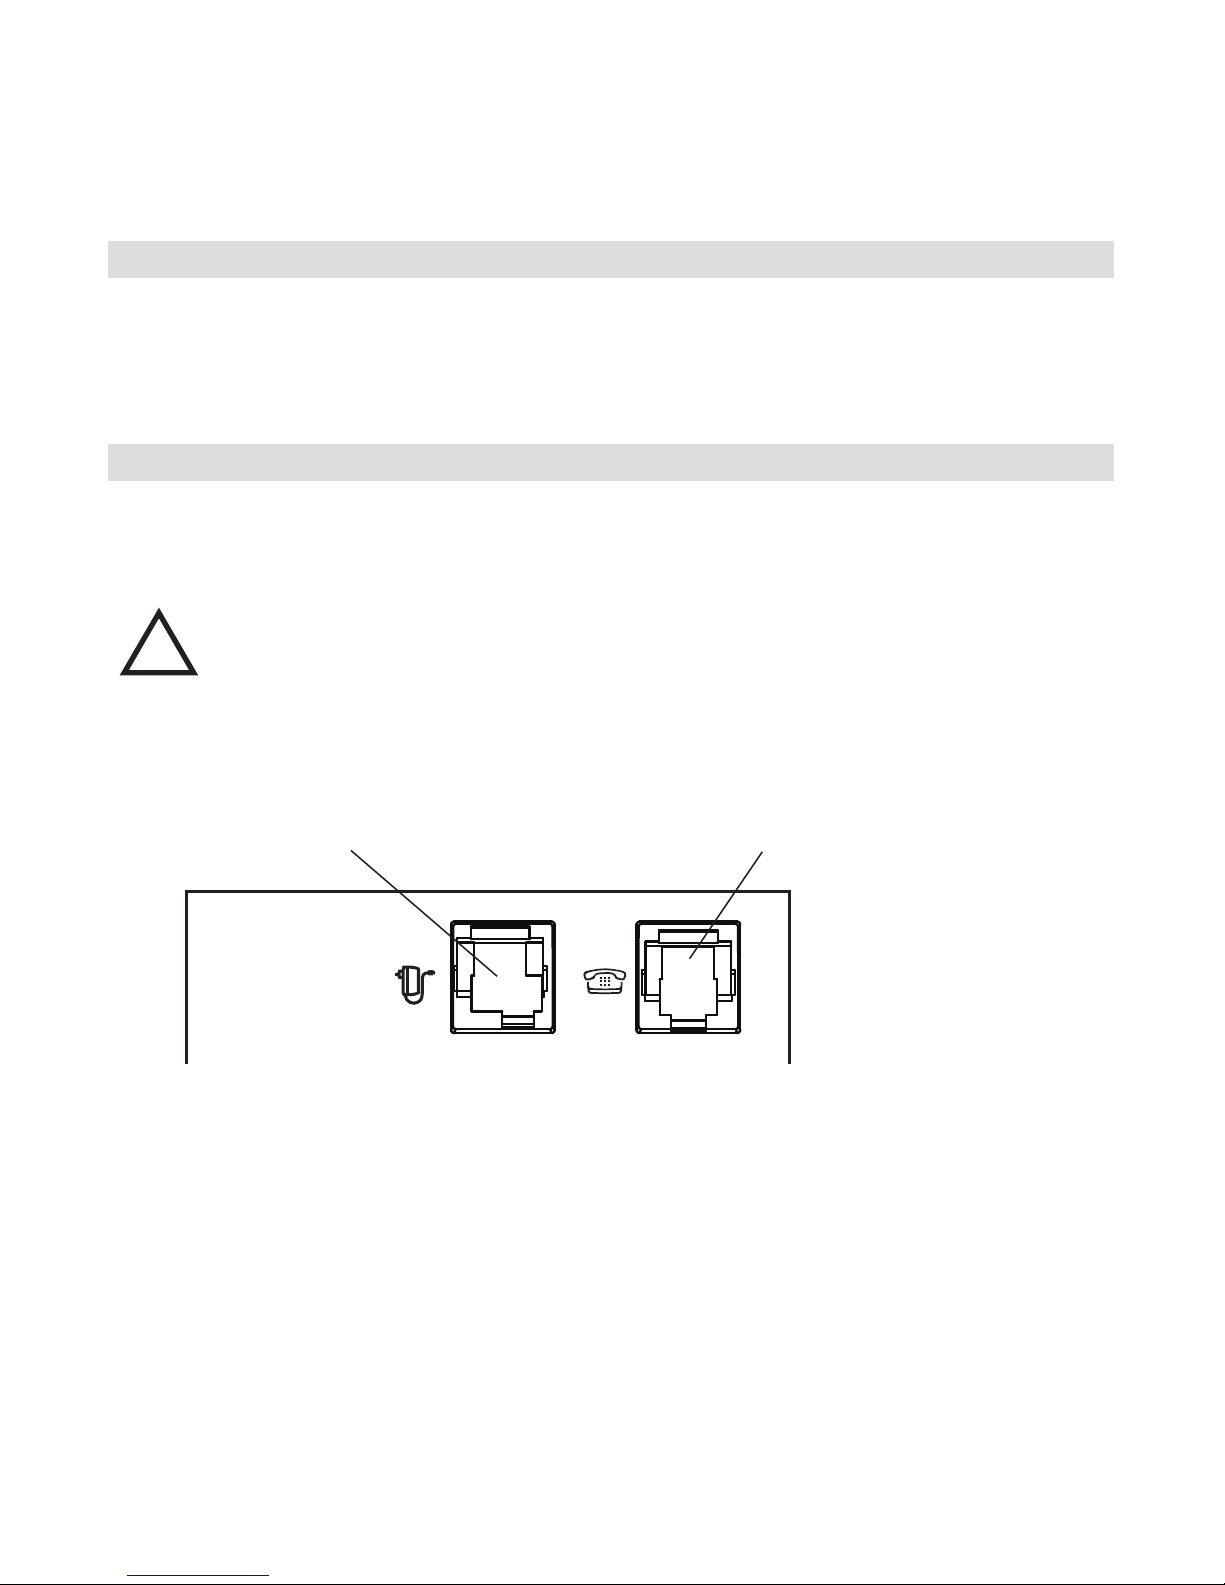
• Lay the connecting cords in an accident-proof manner!
• Only connect the cords to the designated jack/socket.
• For the base use only the AC adaptor provided.
• For the charging cradle use only the AC adaptor provided.
• You must not obstruct access to the AC adaptor with furniture or other objects.
• Connect only approved accessories.
• Never expose the device to the following influences: Heat sources, direct sunlight,
dampness (e.g. in the bathroom), and other electrical devices.
• Protect your device from moisture, dust, aggressive fluids and steam.
• Do not expose the telephone to any strong magnetic fields (electromotors, television
sets, video recorders, HiFi systems, electrical household appliances), since these can
cause disturbances, impair range or cause malfunctions.
• Only clean your device with a lightly dampened or antistatic cloth. Do not use clea-
ning agents or chemical products.
• Never open the handset or base by yourself!
• Never carry the device by the connecting cords!
• Never touch the contacts with pointed, metallic or damp objects.
• If you have questions please contact a professional. Repairs may only be carried out
by a specialist.

1
20407785en_ba_b0
Safety Instructions
Introduction……………………………………………………………………………………5
Welcome ……………………………………………………………………………………5
ECO Mode (Ecomode plus / Automatic regulation of the power level) ………………6
Setting Up Your Telephone …………………………………………………………………7
Unpacking the telephone …………………………………………………………………7
Installation site ……………………………………………………………………………7
Minimisation of electrical energy consumption during prolonged absences …………8
Connecting the telephone…………………………………………………………………8
Disconnecting the cords …………………………………………………………………9
Activating the handset……………………………………………………………………10
Exchanging the battery …………………………………………………………………11
Registering a handset ……………………………………………………………………12
Setting the date / time……………………………………………………………………12
Getting to Know Your Telephone ………………………………………………………13
Display indicators, keys, symbols ………………………………………………………13
Keys on the handset ……………………………………………………………………15
Controls on the base station ……………………………………………………………17
The main menu …………………………………………………………………………18
Electricity consumption of the base ……………………………………………………18
Switching the handset on / off …………………………………………………………19
Switching the keypad lock on / off ……………………………………………………19
Paging: Searching for a misplaced handset ……………………………………………20
Dialling internal and external phone numbers …………………………………………21
Transmission of phone number …………………………………………………………21
Making a Call ………………………………………………………………………………21
Call indicator with CLIP/CLI………………………………………………………………22
Placing an anonymous call ………………………………………………………………22
Answering a call …………………………………………………………………………22
Recording a conversation ………………………………………………………………23
Table of Contents

2
20407785en_ba_b0
Callback on busy (CCBS) …………………………………………………………………24
Setting the earpiece / loudspeaker volume ……………………………………………24
Muting the handset ………………………………………………………………………25
Redialling …………………………………………………………………………………25
Contacts …………………………………………………………………………………27
Miscellaneous ……………………………………………………………………………31
Message key …………………………………………………………………………………31
Call list ………………………………………………………………………………………32
SMS Service (Text Messages) ……………………………………………………………35
Explanatory note about the “SMS on fixed-line” service ……………………………35
SMS centre ………………………………………………………………………………36
Sending/receiving an SMS ………………………………………………………………36
Inputting and modifying the phone number of the SMS centres ……………………37
SMS notifications …………………………………………………………………………37
Writing, sending, and storing SMS messages …………………………………………38
Inputting SMS text and sending…………………………………………………………38
Storing an SMS as a draft ………………………………………………………………39
Editing / sending an SMS draft …………………………………………………………39
Inbox ………………………………………………………………………………………40
Outbox ……………………………………………………………………………………42
SMS on a PABX …………………………………………………………………………43
Calling Multiple People.……………………………………………………………………44
Calling another call partner during an external call ……………………………………45
Transferring an external call internally …………………………………………………46
Switching between two call partners (brokering)………………………………………47
Speaking simultaneously with two call partners (three-way conference call) ………48
Switching call waiting on / off …………………………………………………………48
Accepting / rejecting a waiting call ……………………………………………………49
Setting the Telephone. ……………………………………………………………………50
Setting an alarm …………………………………………………………………………50
Call forwarding (CF)………………………………………………………………………50
Table of Contents

3
20407785en_ba_b0
Setting the date / time……………………………………………………………………52
Setting the display ………………………………………………………………………52
Setting the ringer ………………………………………………………………………53
Switching the indicator tones on or off…………………………………………………55
Switching vibrating alert on or off ………………………………………………………56
Setting the display language ……………………………………………………………56
Direct call / baby call ……………………………………………………………………57
Selecting a base station …………………………………………………………………57
Automatic call answering ………………………………………………………………58
Room monitor (baby phone) ……………………………………………………………58
Managing the codes for network functions ……………………………………………60
VoiceBox (Combox) ………………………………………………………………………61
Registering / deregistering a handset……………………………………………………61
Changing the PIN ………………………………………………………………………63
Setting ECO Mode (Ecomode Plus) ……………………………………………………64
Call priority. ………………………………………………………………………………64
Inputting the exchange code ……………………………………………………………65
Setting the function of the end call key ………………………………………………66
Setting the inquiry call function …………………………………………………………66
Setting the flash time ……………………………………………………………………67
First ring …………………………………………………………………………………67
Setting the dial mode ……………………………………………………………………68
Switching call waiting on / off …………………………………………………………68
Resetting to default settings ……………………………………………………………69
Answering machine ………………………………………………………………………70
Miscellaneous ……………………………………………………………………………70
Operating the answering machine on the base ………………………………………72
Switching the answering machine on / off from the handset ………………………72
Editing outgoing message ………………………………………………………………72
Hearing / deleting outgoing message …………………………………………………73
Hearing / deleting messages on the handset …………………………………………73
Recording a memo ………………………………………………………………………74
Table of Contents

4
20407785en_ba_b0
CareMemo ………………………………………………………………………………74
Screening messages on the handset ……………………………………………………75
Answering a call …………………………………………………………………………76
Setting up the answering machine ……………………………………………………76
Remote access / remote setting of the answering machine …………………………77
Menu options (remote access) …………………………………………………………78
Bluetooth ……………………………………………………………………………………79
Pairing a Bluetooth device (only on the base station) …………………………………79
Answering a fixed-line call with the headset …………………………………………80
Conducting a call over a mobile phone network (GSM) ………………………………80
Managing bluetooth devices ……………………………………………………………81
Appendix ……………………………………………………………………………………82
Basic settings on delivery (default settings) ……………………………………………82
Menu structure……………………………………………………………………………83
Important advice on the use of batteries ………………………………………………85
Return and recycling of batteries ………………………………………………………86
Troubleshooting disruptions ……………………………………………………………87
Hotline ……………………………………………………………………………………88
The editor (creating or changing entries / writing SMS messages) …………………89
Table of available characters (phone book entries) ……………………………………90
Tableau des signes disponibles (SMS) …………………………………………………91
Note for people with hearing aids ………………………………………………………92
Support ……………………………………………………………………………………92
Warranty …………………………………………………………………………………92
Accreditation / compliance ………………………………………………………………93
Care instructions …………………………………………………………………………93
Deleting personal data……………………………………………………………………93
Note on disposal …………………………………………………………………………94
Technical data ……………………………………………………………………………94
Table of Contents

5
20407785en_ba_b0
Welcome
Congratulations on choosing the Aton CLT321, a cordless telephone for connecting to
the analogue telephone network in Switzerland or an analogue extension of a telecom-
munications system. With the digital DECT standard the devices are more bug-proof than
the analogue devices designed in accordance with the CT1+ standard (operation no lon-
ger allowed since Jan 2009), which it was possible to bug using commercially available
scanners. But even DECT devices do not offer 100% protection. Greater bugging
defences than those offered by the DECT standard are guaranteed at the present time
only by corded devices.
You can operate up to 5 handsets from one base station and conduct internal calls bet-
ween these handsets free of charge. One handset can be registered on up to 4 base sta-
tions.
Your Aton CLT321 supports the CLIP feature (display of caller’s number), provided that
the information is available on your connection and the caller has not suppressed his
number. Thus, in conjunction with the call list, you will be informed about every call you
receive, even while you are absent.
With your Aton CLT321 you can use the Swisscom SMS service to send SMS messages to
or receive them from SMS-enabled terminal devices, e.g. mobile phones, PCs or other
fixed-line telephones.
Your Aton CLT321 is equipped with a digital answering machine, which can be comfor-
tably operated from the handset and the base.
We hope you enjoy your Aton CLT321.
Introduction

6
20407785en_ba_b0
ECO Mode (Ecomode plus / Automatic regulation of the power level)
“ECO Mode” is already activated by default, i.e. the transmission signals will
be switched off in stand-by mode. This setting can be restored at any time by
resetting the base station (see page 69).
When inactive the transmitters on the base as well as on the handset are switched off
completely, the radiation load is thus reduced to zero.
During a call the power level is demand-actuated, i.e. the closer the handset is located to
the base, the lower is the power level. The maximum available power level can be set to
three different levels (see page 64 / [ECO Mode]) :
- [Full range] = max. power level: 100% (default setting)
- [Half range] = max. power level: approx. 45%
- [One room] = max. power level: approx. 20%
- [Desk] = max. power level: approx. 10%
- [Off] = Switched off
This function is only guaranteed to work when Aton CLT321 handsets are
registered on the base station. Registering other handsets, such as previous
model ranges, is possible, in which case, however, the aforementioned
requirements will not be fulfilled.
!
!
Introduction

7
20407785en_ba_b0
Unpacking the telephone
The package contains:
➭1 Handset
➭1 Base station
➭1 AC adaptor (type SNG 24 ea)
➭1 Telephone connecting cord (cable RJ11 / RJ11, adaptor TT83 / RJ11)
➭1 Battery (Li-Ion)
➭3 User manuals (German, French, Italian)
Installation site
In order to keep exposure to radiation from the base station as low as possible, you
should not install the base in immediate proximity to bedrooms or children’s rooms.
For the best range possible we recommend a central installation site for the base station,
in the middle of your sphere of activity. Avoid installing it in niches, small rooms and
behind steel doors.
The maximum range between the base station and the handset is approx. 820 ft (250
m). Depending on environmental conditions, as well as the spatial and structural situati-
on, the range can be lower. In buildings the range is, as a rule, lower than in the open.
As a consequence of digital transmission in the frequency range being used, dead zones
can appear depending on the structural setting within that range. In this case the trans-
mission quality can be reduced by additional, brief transmission gaps. By a slight move-
ment out of the dead zone the usual transmission quality will be regained. When the
transmission range is exceeded the connection will be severed if you do not return to the
range area within ten seconds.
In order to prevent radio-induced coupling with other electronic devices, we recommend
as large a distance as possible (min. 3.3 ft (1 m)) between the base station or handset
and other devices.
Setting Up Your Telephone

8
20407785en_ba_b0
Minimisation of electrical energy consumption during prolonged absences
During prolonged absences you should switch the handset off (see page 19) and avoid
placing it on a charging station (base station / charging cradle) in order to conserve the
environment and to minimise the uptake of electrical energy.
Connecting the telephone
So that you can operate your telephone, you have to plug in the connecting cord for the
telephone connection as well as the power cable.
For the base station use only the power adaptor provided (type SNG 24 ea).
Telephone – connecting cord
The telephone connecting cable consists of two parts
• Connecting cable with RJ 11 plugs at both ends
• Adaptor TT83 / RJ11-socket
Plug the adaptor into the TT jack, then plug one end of the connecting cable into the
RJ11 socket of the adaptor, and finally plug the other end into the socket labelled with a
telephone symbol.
!
Setting Up Your Telephone
Connecting socket
for power cable
Connecting socket for
telephone – connecting cord
(Euro / F-coded)

9
20407785en_ba_b0
Whenever possible use the connecting cord provided. Should this be defective
or should you require a longer connecting cord (19.7 ft (6 m)), please use only
the item 10034600 (Swisscom “accessories”).
Power cable
The power cable is first plugged into the socket labelled with a symbol of a power plug
on the underside of the base station. Then stick the AC adaptor into the 230 V outlet.
Make sure the socket to which the AC adaptor is connected is always freely accessible,
so that you can disconnect the device from the power supply.
If the AC adaptor is unplugged or there is a power outage, your telephone
will not work.
Connect the telephone to the telephone network only after the battery has
been completely charged. This guarantees proper functioning.
Disconnecting the cords
First pull the adaptor plug out of the 230 V outlet and the TT adaptor out of the TT jack
of your telephone connection.
To disconnect a plug on the device press down on the locking hook in the direction of
the plug body. At the same time pull out the plug attached to the cord.
!
!
Setting Up Your Telephone

10
20407785en_ba_b0
Activating the handset
Only after the initial charging of the battery is completed will your handset be ready for
use. Only then can calls be received or made using this handset.
Charging the battery
When you have unpacked the device, the battery is still uncharged. To charge it, place
the handset on the base station. The animated battery symbol on the handset indicates
that the battery is charging. The charging time of the battery is approx. 10 hours.
The charge status can be read off the indicator on the handset display.
The indicator statuses are:
- empty
- approx. 1/4 full
- approx. 1/2 full
- approx. 3/4 full
- full
After inserting a new battery the indicator on the handset only corresponds to the actual
battery charge status after the battery has been completely charged.
When the battery symbol is no longer blinking, stick the telephone plug into the telepho-
ne jack. Your telephone is now ready for use.
Use only the batteries provided (3.7 V, 1000 mAh, Li-Ion) (see page 85).
Never place the handset on the base station without the battery compartment
cover!
!
Setting Up Your Telephone

11
20407785en_ba_b0
Please note: Following the insertion of a new battery, the battery indicator
needs a complete charging cycle in order to be able to provide you with
correct information about the charge status.
You can place your handset back onto the base station after every call. Charging is elect-
ronically controlled so that the battery will be optimally charged to conserve energy even
under the most varied charge states. Avoid taking the battery out of the handset for no
particular reason, since this will interfere with the optimal charging process.
The capacity of the battery inserted into the handset can be improved if after long
periods of use it is completely discharged and subsequently completely recharged.
With a fully charged battery you can use your telephone for up to 20 hours. The stand-
by time is up to 300 hours. When the ECO Mode is activated, the stand-by time is redu-
ced by as much as 50%.
When the charge of the battery reaches its lower limit, the battery symbol blinks on the
display and you will hear a battery warning tone (provided the battery warning tone is
activated).
Exchanging the battery
A battery compartment which accepts a Li-Ion battery (3.7 V / 1000 mA) is located on
the underside of the handset. You will find important information relating to battery
handling in the appendix (see page 85).
Removing the battery compartment cover
At the indentation gently press the battery compartment cover downwards, then slide
the cover downwards and remove.
Setting Up Your Telephone

12
20407785en_ba_b0
Inserting the battery (pay attention to the polarity!)
Insert the battery into the battery compartment. Take care to
position the battery contacts correctly with respect to
the contacts in the battery compartment.
Then put the battery compartment cover back on
and slide it upwards until it snaps into place.
Registering a handset
The handset provided is already registered on the base station. Every additional handset
must first be registered on the base station. You can run a max. of five handsets off the
base station.
Find out how to register your handsets on page 61.
Setting the date / time
After setting up your phone, the date and time remain unset. To set the date and time,
see page 52.
Contacts
Setting Up Your Telephone

13
20407785en_ba_b0
This symbol displays the strength of the receiving signal in multiple levels. If
the range limit is reached, the symbol blinks.
Bluetooth is active.
Internal phone number of handset.
You have switched off the ringer (see also page 53).
Shows the charge status of the battery. Four segments represent a full or
nearly full battery. If only one segment is visible or the empty outline is
blinking, you should place your handset on the base station to charge.
You have activated an alarm.
A headset is connected.
The answering machine is activated.
The microphone is muted.
A voice message in the Combox.
The keypad is locked.
Eco Mode is activated.
Indicator of current power level during conversation.
= 100% / = 45% / = 20% / = 10%
This symbol shows the pre-set level when the handset is idle.
= [Full Range] = [Half Range]
= [One Room] = [Desk]
= [Off]
Display indicators, keys, symbols
Getting to Know Your Telephone

14
20407785en_ba_b0
Afficheur
rétro-éclairé
Headset connection
Left softkey
Handsfree key
Call key (R-key
when in call state)
Numerical
keys
Earpiece
Loudspeaker (reverse
side)
Navigation key
Right softkey
Message key
End call key
Ringer off
Keypad lock key
Microphone
Getting to Know Your Telephone

15
20407785en_ba_b0
Keys on the handset
Softkeys, left and right, the respective functions of which will be shown each time on
the display. In the following operating procedures a softkey may be recognised in that its
function is placed in square brackets and in bold, e.g. [Settings].
Message key, lights up with new messages and offers direct access to new entries in the
call list, new SMS, messages in voicemail or on the answering machine.
Navigation key for scrolling in menus and lists or to control the input cursor.
In conversation
- †π Earpiece / loudspeaker volume setting
Call key. Accepting a call.
By short pressing this key when the phone is idle, the redial list will be shown.
Handsfree key. Accepting a call in handsfree mode.
By short pressing this key when the phone is idle, handsfree will be activated.
End Call key. Is equivalent to “hang up handset”. Short pressing this key when the
phone is idle will, depending on the initial state, change the backlighting. The handset
will be switched off by long pressing this key. If the handset is switched off, long pressing
this key will switch it back on.
In menus
Return to idle (programming interruption).
Numerical keys for directly entering phone numbers and names.
Key 1: Long pressing this key when the phone is idle dials the VoiceBox (Combox)
phone number.
Key 0: Long pressing this key inserts a dialling pause.
Key 2…9: Long pressing these keys dials the phone number stored for speed-dialling.
Getting to Know Your Telephone

16
20407785en_ba_b0
Hash key for inputting the “hash” sign.
Long pressing this key when the phone is idle switches the keypad lock on/off.
Star key for inputting the star (*) character.
Long pressing this key while the phone is idle switches the ringer on or off.
Short pressing this key while entering text (Editor) switches between upper- and lower-
case letters.
Headset connection for connecting a commercially available headset with a 0.1"
(2.5 mm) audio jack (mono).
(Swisscom Universal Headset, article number 117959)
Getting to Know Your Telephone

17
20407785en_ba_b0
Controls on the base station
The call button on the base station is used to activate a paging call (collective call) and to
register further handsets.
With the other buttons you can operate the answering machine. For details see page 72.
Loudspeaker
(reverse side)
Call button
Charging cradle
for the handset
Getting to Know Your Telephone

18
20407785en_ba_b0
The main menu
The following menu items may be selected:
Contacts Call list Settings
Answering machine SMS Bluetooth
Choose a menu item using the Navigation key; in doing this the corresponding name
will be shown above the right softkey (e.g. [Settings]).
Press the right softkey to open the menu.
For more exact descriptions please refer to the corresponding chapter.
Electricity consumption of the base
The telephone is equipped with an energy efficient switched-mode power supply. The
following power consumption is given:
In stand-by mode: approx. 0.73 watts (without handset)
approx. 1.95 watts (when charging)
During a call: approx. 0.81 watts
Getting to Know Your Telephone
Table of contents
Other ATON Telephone manuals