manuals.online logo
Brands
  1. Home
  2. •
  3. Brands
  4. •
  5. CLIVET
  6. •
  7. Chiller
  8. •
  9. CLIVET WSAT-XEM 50.4 User manual

CLIVET WSAT-XEM 50.4 User manual

M0L240E16-01 06-06-16
WSAT-XEM 50.4-120.4
Installation and
operating manual
Air cooled water chiller for outdoor installation
Dear Customer,
We congratulate you on choosing this product
For many years Clivet has been oering systems that provide maximum comfort, together with high
reliability, eciency, quality and safety.
The aim of the company is to oer advanced systems, that assure the best comfort, reduce energy
consumption and the installation and maintenance cost for the life cycle of the system.
The purpose of this manual is to provide you with information that is useful from reception of
the equipment, through installation, operational usage and nally disposal so that this advanced
system oers the beat solution.
Yours faithfully.
CLIVET Spa
The data contained in this manual is not binding and may be changed by the manufacturer without
prior notice.
Reproduction, even is part, is FORBIDDEN © Copyright - CLIVET S.p.A. - Feltre (BL) - Italia
M0L240E16-01 WSAT-XEM 50.4-120.4 3
Index of contents
1 General description 4
2 Reception 6
3 Positioning 8
4 Water connections 9
5 Electrical connections 12
6 Start-up 19
7 Control 27
8 Maintenance 39
9 Accessories 43
10 Decommissioning 48
11 Residual risks 49
12 Technical information 50
13 Dimensional drawings 5
4 WSAT-XEM 50.4-120.4 M0L240E16-01
1 General description
The manual provides correct unit installation, use and maintenance.
Pay particular attention to:
Warning, identies particularly important operations or information.
Prohibited operations that must not be carried out, that compromise the operating of the unit or may cause damage to persons or things.
• It is advisable to read it carefully so you will save time during operations.
• Follow the written indications so you will not cause damages to things and injuries people.
1.1 Manual
1.2 Preliminaries
Only qualied personnel can operate on the unit, as required by the regulation in force.
1.3 Risk situations
The unit has been designed and created to prevent injures to people.
During designing it is not possible to plane and operate on all risk situation.
Read carefully “Residual risk” section where all situation which may cause damages to things and injuries to people are reported.
Installation, starting, maintenance and repair required specic knowledge; if they are carried out by inexperienced personnel, they may cause
damages to things and injuries people.
1.4 Intended use
Use the unit only:
• for cooling/heating water or a water and glycol mix for air-conditioning only
• keep to the limits foreseen in the technical schedule and in this manual
The manufacturer accepts no responsibility if the equipment is used for any purpose other than the intended use.
1.5 Installation
The positioning, hydraulic system, refrigerating, electrics and the ducting of the air must be determined by the system designer in accordance
with local regulations in force.
Follow local safety regulations.
Verify that the electrical line characteristics are in compliance with data quotes on the unit serial number label.
1.6 Maintenance
Plan periodic inspection and maintenance in order to avoid or reduce repairing costs.
Turn the unit o before any operation.
1.7 Modication
All unit modications will end the warranty coverage and the manufacturer responsibility.
1.8 Breakdown/Malfuction
Disable the unit immediately in case of breakdown or malfunction.
Contact a certied service agent.
Use original spares parts only.
Using the unit in case of breakdown or malfunction:
• voids the warranty
• it may compromise the safety of the unit
• may increase time and repair costs
M0L240E16-01 WSAT-XEM 50.4-120.4 5
1.9 User training
The installer has to train the user on:
• Start-up/shutdown
• Set points change
• Standby mode
• Maintenance
• What to do / what not to do in case of breakdown
1.10 Data update
Continual product improvements may imply manual data changes.
Visit manufacturer web site for updated data.
1.11 Indications for the User
Keep this manual with the wiring diagram in an accessible place for the operator.
Note the unit data label so you can provide them to the assistance centre in case of intervention (see “Unit identication”section).
Provide a unit notebook that allows any interventions carried out on the unit to be noted and tracked making it easier to suitably note the
various interventions and aids the search for any breakdowns.
In case of breakdown or malfunction:
• Immediately deactivate the unit
• Contact a service centre authorized by the manufacturer
The installer must train the user, particularly on:
• Start-up/shutdown
• Set points change
• Standby mode
• Maintenance
• What to do / what not to do in case of breakdown
1.12 Unit indentication
The serial number label is positioned on the unit and allows to indentify all the unit features.
The matriculation plate must never be removed.
The matriculation plate shows the indications foreseen by the standards, in particular:
• unit type
• serial number (12 characters)
• year of manufacture
• wiring diagram number
• electrical data
• manufacturer logo and address
1.13 Serial number
It identies uniquely each unit.
Must be quoted when ordering spare parts.
1.14 Assistance request
Note data from the serial number label and write them in the chart on side, so you will nd them easily when needed.
Series
Size
Serial number
Year of manufacture
Electrical wiringdiagram
6 WSAT-XEM 50.4-120.4 M0L240E16-01
2 Reception
You have to check before accepting the delivery:
• That the unit hasn’t been damaged during transport
• That the materials delivered correspond with that indicated on the transport document comparing the data with the identication label
positioned on the packaging.
In case of damage or anomaly:
• Write down on the transport document the damage you found and quote this sentence: “Conditional acceptance clear evidence of
deciencies/damages during transport”
• Contact by fax and registered mail with advice of receipt to supplier and the carrier.
Any disputes must be made within 8 days from the date of the delivery. Complaints after this period are invalid.
2.1 Storage
Observe external packaging instructions.
2.2 Handling
1. Verify unit weight and handling equipment lifting capacity.
2. Identify critical points during handling (disconnected routes, ights, steps, doors).
3. Suitably protect the unit to prevent damage.
4. lifting brackets
5. Lifting with balance
6. Lifting with spacer bar
7. Align the barycenter to the lifting point
8. Use all the lifting brackets (see the dimensional section)
9. Gradually bring the lifting belts under tension, making sure they are positioned correctly.
10. Before starting the handling, make sure that the unit is stable.
M0L240E16-01 WSAT-XEM 50.4-120.4 7
2.3 Packaging removing
Be careful not to damage the unit.
Keep packing material out of children’s reach it may be dangerous.
Recycle and dispose of the packaging material in conformity with local regulations.
A Supports for handling: remove after the handling.
B Remove the coil protective mesh before the start-up
2.4 Anti-vibration mount support
Option
For details see:
9 Accessoriesp.43
8 WSAT-XEM 50.4-120.4 M0L240E16-01
3 Positioning
During positioning consider these elements:
• Technical spaces requested by the unit
• Electrical connections
• Water connections
• Spaces for air exhaust and intake
3.1 Functional spaces
Functional spaces are designed to:
• guarantee good unit operation
• carry out maintenance operations
• protect authorized operators and exposed people
Respect all functional spaces indicated in the DIMENSIONS section.
Double all functional spaces if two or more unit are aligned.
3.2 Positioning
Units are designed to be installed:
• EXTERNAL
• in xed positions
Limit vibration transmission:
• use antivibration devices on unit bearing points
• install exible joints on the hydraulic connections
Choose the installation place according to the following criteria:
• Customer approval
• safe accessible position
• technical spaces requested by the unit
• spaces for the air intake/exhaust
• max. distance allowed by the electrical connections
• avoid ood-prone places
• verify unit weight and bearing point capacity
• verify that all bearing points are aligned and leveled
• install the unit raised from the ground
• consider the maximum possible snow level
A correct circulation of the air is mandatory to guarantee the good unit operating.
Protect the unit with suitable fence in order to avoid access to unauthorised personnel (children, vandals, etc.)
Avoid therefore:
• obstacles to the airow
• diculty of exchange
• leaves or other foreign bodies that can obstruct the air coil
• winds that hinder or favour the airow
• heat or pollution sources close to the unit (chimneys, extractors etc..)
• stratication (cold air that stagnates at the bottom)
• recirculation (expelled air that is sucked in again)
• incorrect positioning, close to very high walls, attics or in angles that could give rise to stratication or recirculation phenomenons
Ignoring the previous indications could:
• reduce energy eciency
• alarm lockout due to HIGH PRESSURE (in summer) or LOW PRESSURE (in winter)
3.3 Saftey valve gas side
The installer is responsible for evaluating the opportunity of installing drain tubes, in conformity with the local regulations in force (EN 378).
3.4 Power input
For details see:
5.4 Power inputp.13
M0L240E16-01 WSAT-XEM 50.4-120.4 9
4 Water connections
4.1 Water quality
Water features
• conrming to local regulations
• total hardness < 14°fr
• within the limits indicated by table
The water quality must be checked by qualied personnel.
Water with inadequate characteristics can cause:
• pressure drop increase
• reduces energy eciency
• increased corrosion potential
SO
42-
HCO
3-
/SO
42-
Total Hardness
Cl
-
PO
43-
< 100
> 1
4,5 ÷8,5
< 50
< 2,0
NH3 < 0,5
PH 7,5 ÷9,0
ppm
dH
ppm
ppm
ppm
Fe
3+
Mn
++
CO
2
H
2
S
Temperature
< 0,5
< 0,05
< 50
< 50
< 65
Oxygen content < 0,1
Free Chlorine < 0,5
ppm
ppm
ppb
°C
ppm
ppm
ppm
Provide a water treatment system if values fall outside the limits.
Exclusions
The warranty does not cover damages caused by limestone formations, deposits and impurities from the water supply and / or failure from
failed system clearing to clean system.
4.2 Risk of freezing
If the unit or the relative water connections are subject to temperatures close to 0°C:
• mix water with glycol, or
• safeguard the pipes with heating cables placed under the insulation, or
• empty the system in cases of long non-use
4.3 Anti-freeze solution
The use of an anti-freeze solution results in an increase in pressure drop.
Make sure that the glycol type utilized is inhibited (not corrosive) and compatible with the water circuit components.
Do not use dierent glicol mixture (i.e. ethylene with propylene).
4.4 Water ow-rate
The project water-ow must be:
• inside the exchanger operating limits (see the TECHNICAL INFORMATION section)
• guarantee, also with variable system conditions (for example in systems where some circuits are bypassed in particular situations).
4.5 Minimum system water content
Minimum system water volumes are described within ‘General technical data’ section and they have to be satised to avoid continuous
compressor switching on and o.
10 WSAT-XEM 50.4-120.4 M0L240E16-01
4.6 Hydraulic connections
UNIT
A
filettare – to threadsaldare – to weld
A1 A2
impianto - system
A + B : fornito da Clivet - Clivet supplied
o - or
B
A
Retirer le joint de connexion avant de souder le tuyau de l’installation.
The rubber gasket might be irreparably damaged.
4.7 Recommended connection
The installer must dene:
• component type
• position in system
279
13
3
1
14
UNIT
610 12
458
15
F
11
1 antivibration joints 9 safety valve
2 piping support 10 Flow Switch
3 exchanger chemical cleaning bypass 11 pressure gauge
4 drain valve 12 thermometer
5 vent 13 lter
6 shut-o valve 14 Internal storage tank
7 Pump / circulating pump 15 Cleaning system bypass
8 expansion vessel
4.8 Water lter
Use lter with mesh pitch:
1,6 mm
It must be installed immediately in the water input of the unit, in a position that is easily accessible for cleaning.
The lter never should be removed, this operation invalidates the guaranty.
M0L240E16-01 WSAT-XEM 50.4-120.4 11
4.9 Flow Switch
The ow switch must be present to ensure shutdown of the unit if water is not circulating.
It has to be installed in a duct rectilinear part, not in proximity of curves that cause turbulences.
A
!
A
A > 5 Ø
Ø
A. minimum distance
4.10 Operation sequence
Close all vent valves in the high points of the unit hydraulic circuit
Close all drain valves in the low points of the unit hydraulic circuit:
• Heat exchangers
• Pumps
• collectors
• storage tank
• free-cooling coil
1. Carefully wash the system with clean water: ll and drain the system several times.
2. Apply additives to prevent corrosion, fouling, formation of mud and algae.
3. Fill the plant
4. Vent the system
5. Execute leakage test.
6. Isolate the pipes to avoid heat dispersions and formation of condensate.
7. Leave various point of service free (wells, vent-holes etc).
Neglecting the washing will lead to several lter cleaning interventions and at worst cases can cause damages to the exchangers and the
other parts.
4.11 Hydronic assembly conguration
Option
For details see:
9 Accessoriesp.43
4.12 Energy recovery
For details see:
9 Accessoriesp.43
12 WSAT-XEM 50.4-120.4 M0L240E16-01
5 Electrical connections
The characteristics of the electrical lines must be determined by qualied electrica personnel able to design electrical installations; moreover,
the lines must be in conformity with regulations in force.
The protection devices of the unit power line must be able to stop all short circuit current, the value must be determined in accordance with
system features.
The power cables and the protection cable section must be dened in accordance with the characteristics of the protections adopted.
All electrical operations should be performed by trained personnel having the necessary qualications required by the regulations in force
and being informed about the risks relevant to these activities.
Operate in compliance with safety regulations in force.
5.1 Electrical date
The serial number label reports the unit specic electrical data, included any electrical accessories.
The electrical data indicated in the technical bulletin and in the manual refer to the standard unit, accessories excluded.
The matriculation plate shows the indications foreseen by the standards, in particular:
• Voltage
• F.L.A.: full load ampere, absorbed current at maximum admitted conditions
• F.L.I.: full load input, full load power input at max. admissible condition
• Electrical wiringdiagram Nr.
5.2 Connections
1. Refer to the unit electrical diagram (the number of the diagram is shown on the serial number label).
2. Verify that the electrical supply has characteristics conforming to the data shown on the serial number label.
3. Before starting work, ensure the unit is isolated, unable to be turned on and a safety sign used.
4. Ensure correct earth connection.
5. Ensure cables are suitably protected.
6. Before powering up the unit, make sure that all the protections that were removed during the electrical connection work have been
restored.
5.3 Signals / data lines
Do not exceed the maximum power allowed, which varies, according to the type of signal.
Lay the cables far from power cables or cables having a dierent tension and that are able to emit electromagnetic disturbances.
Do not lay the cable near devices which can generate electromagnetic interferences.
Do not lay the cables parallel to other cables, cable crossings are possible, only if laid at 90°.
Connect the screen to the ground, only if there aren’t disturbances.
Guarantee the continuity of the screen during the entire extension of the cable.
Respect impendency, capacity and attenuation indications.
M0L240E16-01 WSAT-XEM 50.4-120.4 13
5.4 Power input
Fix the cables: if vacated may be subject to tearing.
The cable must not touch the compressor and the refrigerant piping (they reach high temparatures).
90
90
140
140
334
135
183
135
70.4 – 120.4
50.4 – 65.4
A
B
A
Min 150 mm
Main switch connections
Size 50.4 55.4 60.4 65.4 70.4
Min. cable section Cu (mm²) 1x50 1x50 1x50 1x95 1x95
Max. cable section Cu (mm²) 1x95 1x95 1x95 1x150 1x150
Min. bar Cu section (mm²) -----
Max. bar Cu width (mm) 25 25 25 32 32
Tightening torque (Nm) 9 9 9 20 20
Size 80.4 90.4 100.4 110.4 120.4
Min. cable section Cu (mm²) 1x95 1x95 1x95 1x95 1x95
Max. cable section Cu (mm²) 1x150 1x185 1x185 1x185 1x185
Min. bar Cu section (mm²) -----
Max. bar Cu width (mm) 32 32 32 32 32
Tightening torque (Nm) 20 20 20 20 20
14 WSAT-XEM 50.4-120.4 M0L240E16-01
5.5 Connections perfomer by customer
ALM cumulative fault signal QMP pump protection automatic device
AP18 demand limit SA1 remote on-o
AP19 water reset SA6 sanitary hot water cycle switch
APV 0..10V analogical output for free-cooling management SA7 summer-winter switch
HLC1-4 compressor status signal lamp SA9 cooling thermostat
HLR alarm signal lamp electrical heater electrical panel selector SQ1 Flow Switch
KMP evaporator pump contactor YVHS1 sanitary hot water valve
5.6 Remote ON-OFF
Do not perform short On O cycles
Do not use the remote On O with thermoregulation function.
A B
AB
YES NO !
B
AB
M0L240E16-01 WSAT-XEM 50.4-120.4 15
5.7 Computer connection
1. Service keypad
2. RJ45: standard connection
3. P.C.-not supplied
4. P.C. connection, shift RJ45 from T-HI to T-IP
Congure P.C.
1. connect P.C. and main module with LAN cable
2. check in the taskbar that the connection is active
3. open Control Panel and select Network and sharing center
4. select Modify board setting
5. select Local area connection (LAN)
6. select Internet protocol version 4 (TPC) IPV4 and enter Property
7. set the IP address 192.168.1.100
8. set Subnet mask as 255.255.255.0
9. conrm (OK)
10. enter Start (Windows button)
11. write the command cmd and enter/do it
12. write and run the command Ping 192.168.1.42
13. the message, connection is OK, will appear when successful
14. enter the browser (Crhome, Firefox ecc)
15. write and run the command http:/192.168.1.42
16. Userid = WEB
17. Password = SBTAdmin!
16 WSAT-XEM 50.4-120.4 M0L240E16-01
5.8 Modbus - RS485
Option
LED BSP communication with AP1 module LED BUS communication with Modbus
green communication ok green communication ok
yellow software ok but communication with AP1
down yellow startup / channel not communicating
red ashing: software error red communication down
xed: hardware error
A. Unit
B. Metal conduit
C. Metal septums
D. Metal-lined sheath (sleeve)
Modbus / LonWorks / Cable requirements
Couple of conductors twisted and shielded
Section of conductor 0,22mm2…0,35mm2
Nominal capacity between conductors < 50 pF/m
Nominal impedance 120 Ω
Recommended cable BELDEN 3106A
• Every RS485 serial line must be set up using the ‘In/Out’ bus system.
• Other types of networks are not allowed, such as Star or Ring networks.
• The dierence in potential between the earth of the two RS485 devices that the cable shielding needs to be connected to must be lower
than 7 V
• There must be suitable arresters to protect the serial lines from the eects of atmospheric discharges
• A 120 ohm resistance must be located on the end of the serial line. Alternatively, when the last serial board is equipped with an internal
terminator, it must be enabled using the specic jumper, dip switch or link.
• The cable must have insulation features and non-ame propagation in accordance with applicable regulations.
• The RS485 serial line must be kept as far away as possible from sources of electromagnetic interference.
M0L240E16-01 WSAT-XEM 50.4-120.4 17
5.9 LonWorks
Option
LED BSP communication with AP1 module LED BUS communication with LonWorks
green communication ok green ready for communication
yellow software ok but communication with AP1
down yellow startup
red ashing: software error red ashing: communicating not possible
xed: hardware error communication down
5.10 BACnet IP
Option
LED BSP communication with AP1 module LED BUS communication with BACnet
green communication ok green ready for communication
yellow software ok but communication with AP1
down yellow startup
red ashing: software error red BACnet server down
xed: hardware error restart after 3 sec
18 WSAT-XEM 50.4-120.4 M0L240E16-01
5.11 Remote control
Option
1 Distance up to 350 mt C PSX - Mains power supply unit
pwer supply unit N125/11 5WG1 125-1AB11
2 Distance up to 700 mt C1 AC 120...230V, 50...60Hz
A User interface D KNX bus, max 350 mt
B = B1 KNX bus, max 350 mt
twisted pair with shield, ø 0,8 mm
EIB/KNX cable marking recommende
M0L240E16-01 WSAT-XEM 50.4-120.4 19
6 Start-up
6.1 General description
The indicated operations should be done by qualied technician with specic training on the product.
Upon request, the service centres performing the start-up.
The electrical, water connections and the other system works are by the installer.
Agree upon in advance the star-up data with the service centre.
Before checking, please verify the following:
• the unit should be installed properly and in conformity with this manual
• the electrical power supply line should be isolated at the beginning
• the unit isolator is open, locked and equipped with the suitable warning
• make sure no tension is present
After turning o the power, wait at least 5 minutes before accessing to the electrical panel or any other electrical component.
Before accessing check with a multimeter that there are no residual stresses.
6.2 Preliminary checks
For details refer to the dierent manual sections.
Unit OFF power supply
1. safety access
2. functional spaces
3. air ow: correct return and supply (no bypass, no stratication)
4. structure integrity
5. fans run freely
6. unit on vibration isolators
7. unit input water lter + shut-o valves for cleaning
8. vibration isolators on water connections
9. expansion tank (indicative volume = 5% system content)
10. Close all drain valves in the low points of the unit hydraulic circuit:
11. Close all vent valves in the high points of the unit hydraulic circuit
12. cleaned system
13. loaded system + possible glycol solution + corrosion inhibitor
14. system under pressure
15. vented system
16. refrigerant circuit visual check
17. earthing connection
18. power supply features
19. electrical connections provided by the customer
6.3 Start-up sequence
For details refer to the dierent manual sections.
Unit ON power supply
1. compressor crankcase heaters operating at least since 8 hours
2. o-load voltage measure
3. phase sequence check
4. pump manual start-up and ow check
5. shut-o valve refrigerant circuit open
6. unit ON
7. load voltage measure and absorptions
8. liquid sight glass check (no bubbles)
9. check all fan operating
10. measure return and supply water temperature
11. measure super-heating and sub-cooling
12. check no anomalous vibrations are present
13. climatic curve personalization
14. climatic curve personalization
15. scheduling personalization
16. complete and available unit documentation
20 WSAT-XEM 50.4-120.4 M0L240E16-01
6.4 Refrigeration circuit
1. Check carefully the refrigerating circuit: the presence of oil stains can mean leakage caused by transportation, movements or other).
2. Verify that the refrigerating circuit is in pressure: Using the unit manometers, if present, or service manometers.
3. Make sure that all the service outlets are closed with proper caps; if caps are not present a leak of refrigerant can be possible.
4. Open the valves of the refrigerant circuit, if there are any.
6.5 Water circuit
1. Before realizing the unit connection make sure that the hydraulic system has been cleaned up and the cleaning water has been drained.
2. Check that the water circuit has been lled and pressurized.
3. Check that the shut-o valves in the circuit are in the “OPEN”position.
4. Check that there isn’t air in the circuit, if required, evacuate it using the air bleed valve placed in the system high points.
5. When using antifreeze solutions, make sure the glycol percentage is suitable for the type of use envisaged.
Weight of glycol (%) 10 20 30 40
Freezing temperature (°C) -3.9 -8.9 -15.6 -23.4
Safety temperature (°C) -1 -4 -10 -19
6.6 Electric Circuit
Verify that the unit is connected to the ground plant.
Check the conductors are tightened as: the vibrations caused by handling and transport might cause these to come loose.
Connect the unit by closing the sectioning device, but leave it on OFF.
Check the voltage and line frequency values which must be within the limits: 400/3/50 +/- 10%
Check and adjust the phase balance as necessary: it must be lower than 2%
Example
Working outside of these limits can cause irreversible damages and voids the warranty.
6.7 Compressor crankcase heaters
Connect the oil resistances on the compressor crankcase at least 8 hours before the compressor is to be starter:
• at the rst unit start-up
• after each prolonged period of inactivity
1. Supply the resistances switching o the unit isolator switch.
2. To make sure that heaters are working, check the power input.
3. At start-up the compressor crank-case temperature on the lower side must be higher at least of 10°C than the outside temperature.
Do not start the compressor with the crankcase oil below operating temperature.
6.8 Voltages
Check that the air and water temperatures are within in the operating limits.
Start-up the unit.
With unit operating in stable conditions, check:
• Voltage
• Total absorption of the unit
• Absorption of the single electric loads

This manual suits for next models
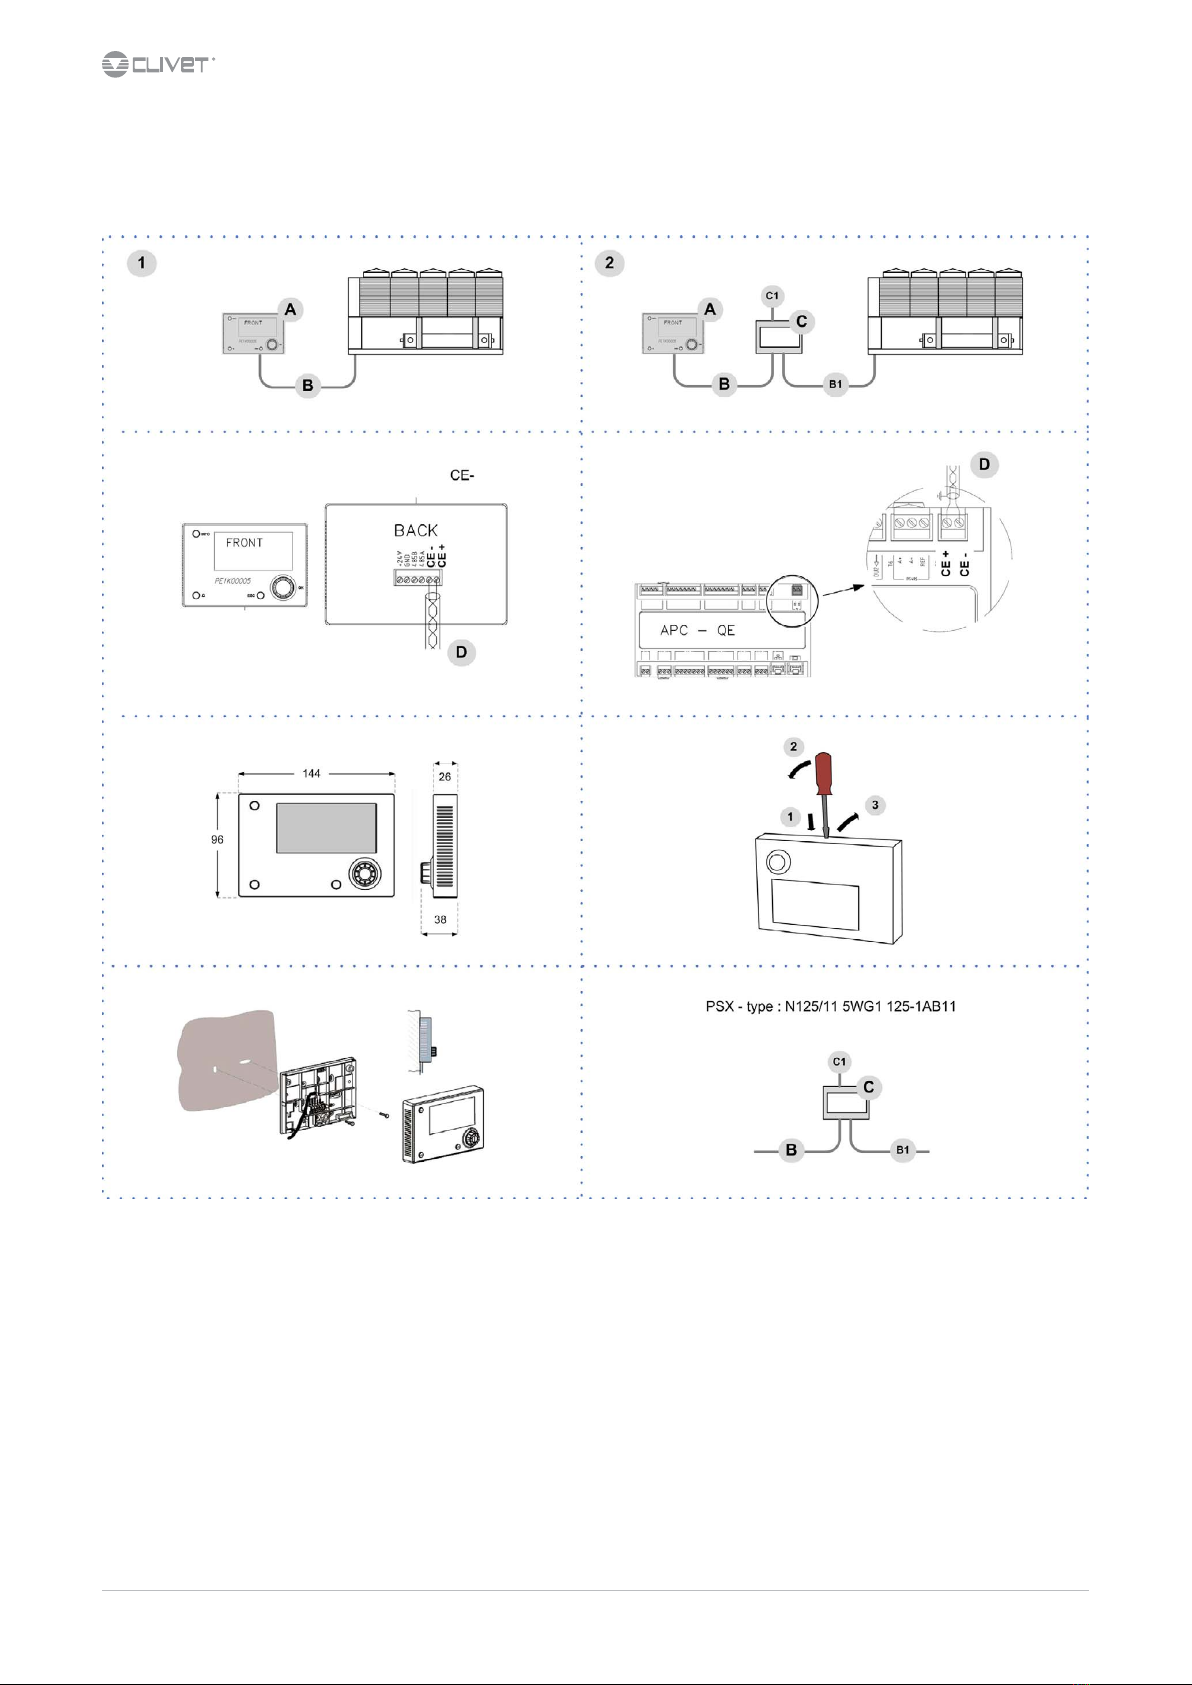
4

Other CLIVET Chiller manuals

CLIVET WSAT-XSC3 260.6-480.8 User manual

CLIVET

CLIVET WSAT-XSC3 260.6-480.8 User manual

CLIVET WSAT-SC 75C Series Guide

CLIVET

CLIVET WSAT-SC 75C Series Guide

CLIVET WSH-XSC3 User manual

CLIVET

CLIVET WSH-XSC3 User manual

CLIVET WSAT-YSC4 User manual

CLIVET

CLIVET WSAT-YSC4 User manual

CLIVET WDAT-3 2.160 Guide

CLIVET

CLIVET WDAT-3 2.160 Guide

CLIVET WSH Series User manual

CLIVET

CLIVET WSH Series User manual

CLIVET WSHN-XSC3 70.4 User manual

CLIVET

CLIVET WSHN-XSC3 70.4 User manual

CLIVET WSA-XEE 262 User manual

CLIVET

CLIVET WSA-XEE 262 User manual

CLIVET MSE-SC 65D User manual

CLIVET

CLIVET MSE-SC 65D User manual

CLIVET WSAN-YES 18.2 Reference manual

CLIVET

CLIVET WSAN-YES 18.2 Reference manual

CLIVET MSE-XSC3 90.4 User manual

CLIVET

CLIVET MSE-XSC3 90.4 User manual

CLIVET WSAT-XSC3 FC 90.4 User manual

CLIVET

CLIVET WSAT-XSC3 FC 90.4 User manual

CLIVET WSAN-YSC4 User manual

CLIVET

CLIVET WSAN-YSC4 User manual

CLIVET MV6-Xmi 252T-2700T Series Reference manual

CLIVET

CLIVET MV6-Xmi 252T-2700T Series Reference manual

CLIVET WSAT-XEE Series Guide

CLIVET

CLIVET WSAT-XEE Series Guide

CLIVET WSAT-2.230 User manual

CLIVET

CLIVET WSAT-2.230 User manual

CLIVET WiSAN-YSE1 10.1 User manual

CLIVET

CLIVET WiSAN-YSE1 10.1 User manual

CLIVET WDATA Series Guide

CLIVET

CLIVET WDATA Series Guide

CLIVET WSH-EE Series Guide

CLIVET

CLIVET WSH-EE Series Guide

CLIVET SCREWLINE3 MDE-SL3 Series User manual

CLIVET

CLIVET SCREWLINE3 MDE-SL3 Series User manual

CLIVET WDH-3 2.160 Guide

CLIVET

CLIVET WDH-3 2.160 Guide

CLIVET WSAT-XEE 352 Quick start guide

CLIVET

CLIVET WSAT-XEE 352 Quick start guide

CLIVET WSAT-XIN Series User manual

CLIVET

CLIVET WSAT-XIN Series User manual

CLIVET SPINchiller2 Duct User manual

CLIVET

CLIVET SPINchiller2 Duct User manual

Popular Chiller manuals by other brands

Carrier 19DG Start up & operation manual

Carrier

Carrier 19DG Start up & operation manual

AERMEC NRV 0550 Installation and maintenance manual

AERMEC

AERMEC NRV 0550 Installation and maintenance manual

S&A CW-6000AN250S01 user manual

S&A

S&A CW-6000AN250S01 user manual

TATA Motors TSH Series INSTALLATION, USE AND MANTEINANCE MANUAL

TATA Motors

TATA Motors TSH Series INSTALLATION, USE AND MANTEINANCE MANUAL

Cold Shot Chillers ACWC-180-EM-DR-LT-0-5 Installation, operation and maintenance instructions

Cold Shot Chillers

Cold Shot Chillers ACWC-180-EM-DR-LT-0-5 Installation, operation and maintenance instructions

Johnson Controls YORK YPC Series Installation

Johnson Controls

Johnson Controls YORK YPC Series Installation

McQuay AGR 070A product manual

McQuay

McQuay AGR 070A product manual

Lindab Plafond Service maintenance manual

Lindab

Lindab Plafond Service maintenance manual

Parker Hiross Hyperchill ICE005 user manual

Parker Hiross

Parker Hiross Hyperchill ICE005 user manual

Midea Aqua Tempo Super Series Technical & service manual

Midea

Midea Aqua Tempo Super Series Technical & service manual

York YCAZ33BA3 manual

York

York YCAZ33BA3 manual

York YCWS0313SC Installation, operation and maintenance

York

York YCWS0313SC Installation, operation and maintenance

Electrolux Air-O-Chill 727151 Specifications

Electrolux

Electrolux Air-O-Chill 727151 Specifications

Ferroli JOLLY TOP I-VM Installation, maintenance and user manual

Ferroli

Ferroli JOLLY TOP I-VM Installation, maintenance and user manual

Trane CVRD Installation

Trane

Trane CVRD Installation

Parker Hiross Hyperchill ICE076 user manual

Parker Hiross

Parker Hiross Hyperchill ICE076 user manual

Komos KRYO NOMAD instruction manual

Komos

Komos KRYO NOMAD instruction manual

Server 86070 manual

Server

Server 86070 manual

manuals.online logo
manuals.online logoBrands
  • About & Mission
  • Contact us
  • Privacy Policy
  • Terms and Conditions

Copyright 2025 Manuals.Online. All Rights Reserved.