Cloudinary 91417 User manual

1
1234567890123456789012345678901212345678901234567890123
1234567890123456789012345678901212345678901234567890123
1234567890123456789012345678901212345678901234567890123
1234567890123456789012345678901212345678901234567890123
1234567890123456789012345678901212345678901234567890123
1234567890123456789012345678901212345678901234567890123
1234567890123456789012345678901212345678901234567890123
1234567890123456789012345678901212345678901234567890123
1234567890123456789012345678901212345678901234567890123
1234567890123456789012345678901212345678901234567890123
1234567890123456789012345678901212345678901234567890123
1234567890123456789012345678901212345678901234567890123
1234567890123456789012345678901212345678901234567890123
1234567890123456789012345678901212345678901234567890123
1234567890123456789012345678901212345678901234567890123
1234567890123456789012345678901212345678901234567890123
1234567890123456789012345678901212345678901234567890123
1234567890123456789012345678901212345678901234567890123
1234567890123456789012345678901212345678901234567890123
1234567890123456789012345678901212345678901234567890123
1234567890123456789012345678901212345678901234567890123
1234567890123456789012345678901212345678901234567890123
1234567890123456789012345678901212345678901234567890123
1234567890123456789012345678901212345678901234567890123
1234567890123456789012345678901212345678901234567890123
1234567890123456789012345678901212345678901234567890123
1234567890123456789012345678901212345678901234567890123
1234567890123456789012345678901212345678901234567890123
1234567890123456789012345678901212345678901234567890123
1234567890123456789012345678901212345678901234567890123
1234567890123456789012345678901212345678901234567890123
1234567890123456789012345678901212345678901234567890123
1234567890123456789012345678901212345678901234567890123
1234567890123456789012345678901212345678901234567890123
1234567890123456789012345678901212345678901234567890123
1234567890123456789012345678901212345678901234567890123
1234567890123456789012345678901212345678901234567890123
1234567890123456789012345678901212345678901234567890123
1234567890123456789012345678901212345678901234567890123
1234567890123456789012345678901212345678901234567890123
1234567890123456789012345678901212345678901234567890123
1234567890123456789012345678901212345678901234567890123
1234567890123456789012345678901212345678901234567890123
1234567890123456789012345678901212345678901234567890123
1234567890123456789012345678901212345678901234567890123
1234567890123456789012345678901212345678901234567890123
1234567890123456789012345678901212345678901234567890123
1234567890123456789012345678901212345678901234567890123
1234567890123456789012345678901212345678901234567890123
1234567890123456789012345678901212345678901234567890123
1234567890123456789012345678901212345678901234567890123
1234567890123456789012345678901212345678901234567890123
1234567890123456789012345678901212345678901234567890123
1234567890123456789012345678901212345678901234567890123
1234567890123456789012345678901212345678901234567890123
1234567890123456789012345678901212345678901234567890123
1234567890123456789012345678901212345678901234567890123
1234567890123456789012345678901212345678901234567890123
1234567890123456789012345678901212345678901234567890123
1234567890123456789012345678901212345678901234567890123
1234567890123456789012345678901212345678901234567890123
1234567890123456789012345678901212345678901234567890123
1234567890123456789012345678901212345678901234567890123
1234567890123456789012345678901212345678901234567890123
1234567890123456789012345678901212345678901234567890123
1234567890123456789012345678901212345678901234567890123
1234567890123456789012345678901212345678901234567890123
1234567890123456789012345678901212345678901234567890123
1234567890123456789012345678901212345678901234567890123
1234567890123456789012345678901212345678901234567890123
1234567890123456789012345678901212345678901234567890123
1234567890123456789012345678901212345678901234567890123
1234567890123456789012345678901212345678901234567890123
1234567890123456789012345678901212345678901234567890123
1234567890123456789012345678901212345678901234567890123
1234567890123456789012345678901212345678901234567890123
1234567890123456789012345678901212345678901234567890123
1234567890123456789012345678901212345678901234567890123
1234567890123456789012345678901212345678901234567890123
1234567890123456789012345678901212345678901234567890123
1234567890123456789012345678901212345678901234567890123
1234567890123456789012345678901212345678901234567890123
Makerspace Mobile
Teachers Podium
91417
Assembly Instructions

2
Part Drawing Description Qty Part Drawing Description Qty
P-1 Table Top 1 EA
P-2 Table Leg 2 EA
P-3 Top Support 2 EA
P-4 Right Top Bracket 1 EA
P-5 Left Top Bracket 1 EA
P-6 Small Top 1 EA
Hardware List
Screw M6*18mm 20 EA
Phillips Wood Screw 4 EA
Caster Wrench 1 EA
Locking Caster 2 EA
Non-Locking Caster 2 EA
Allen Wrench - Large 1 EA
A
B
C
D
E
F
91417 Makerspace Mobile Teachers Podium
G Tapped Rivet 1/4-20 16 EA
H Threaded Rod 1/4-20 X 1 3/4” 8 EA
I Lock Washer - (casters) 4 EA
J 5/32 x 36mm Screw 2EA
K Paper Stop 1EA
3
Assembly Diagram
Identify and Separate all the Parts and Hardware.
Illustration # 1
R
EAD
T
HROUGH
I
NSTRUCTIONS
FROM
BEGINNING
TO
END
BEFORE
STARTING
TO
ASSEMBLE
UNIT
.
1.)
2.)
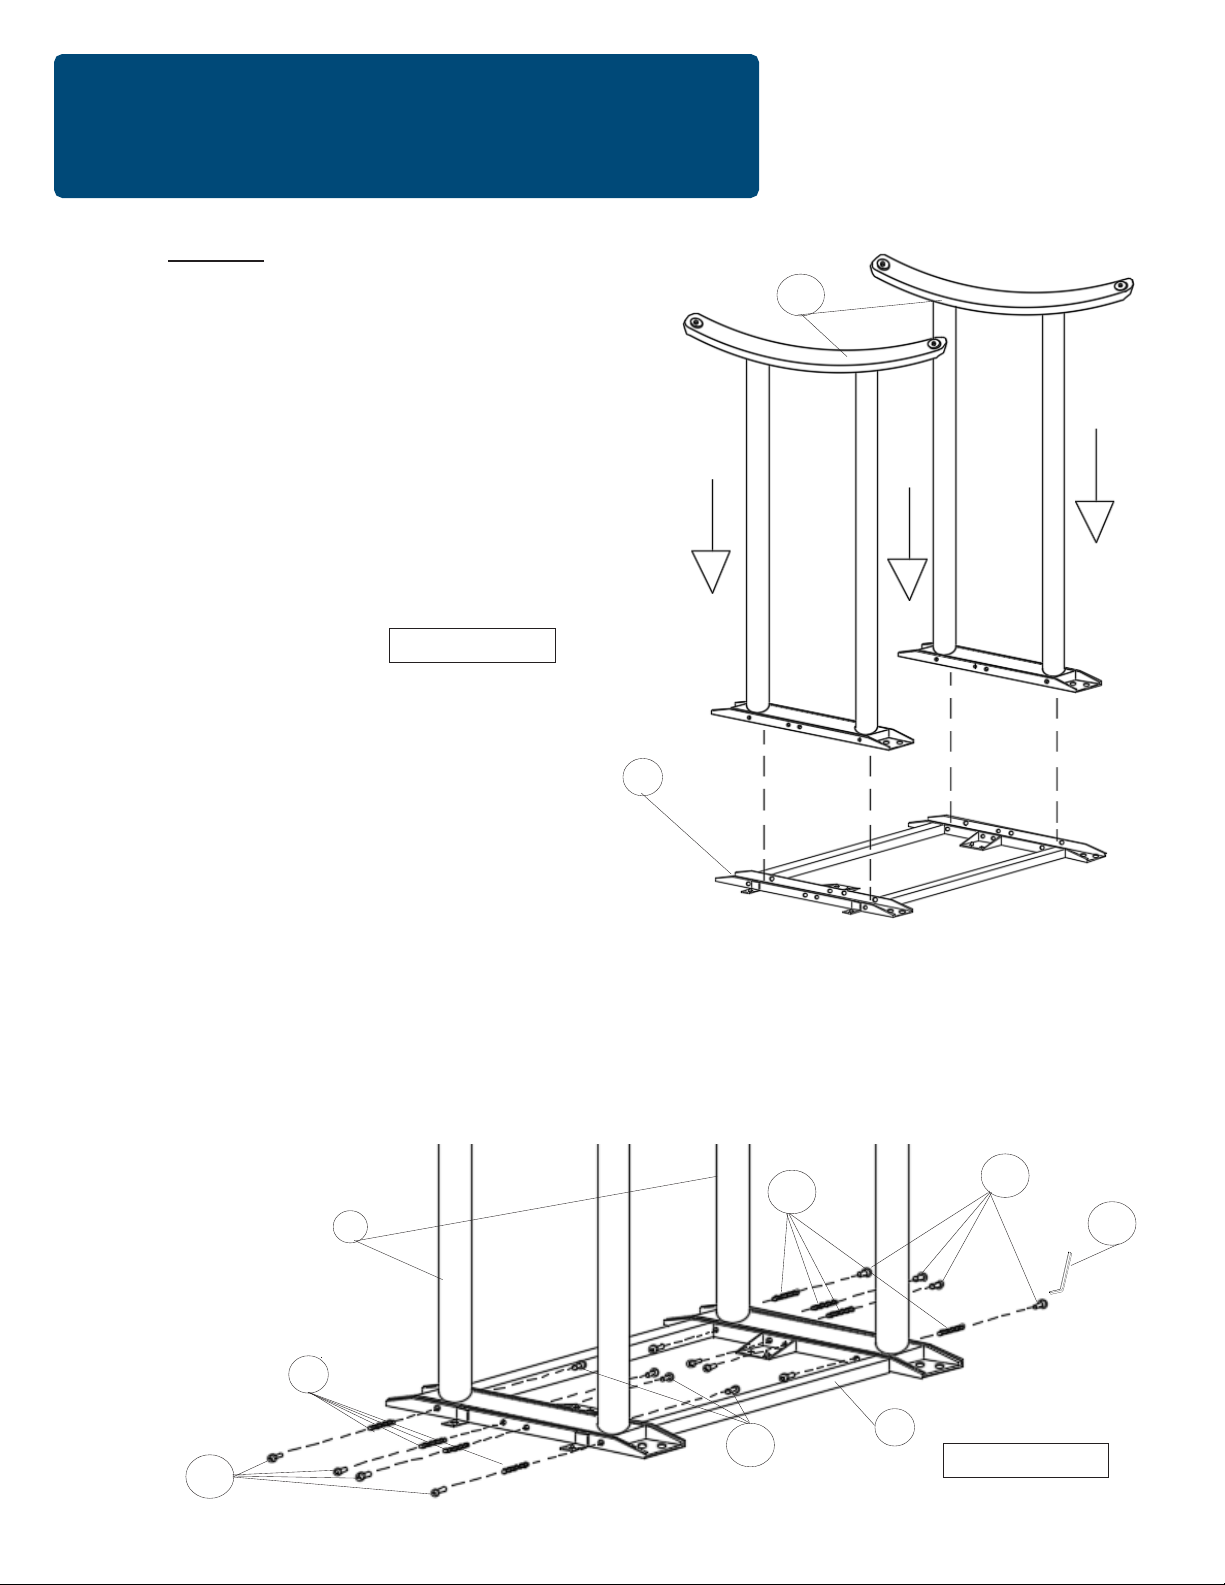
3.) Screw in eight pieces of the Threaded Rod (H) into eight Tapped Rivets (G). Insert the assemblies
through the Top Support (P3) channels and Legs(P2) and secure in place using eight Tapped
Rivets (G) as shown in illustration (2). Use Allen Wrench (E) to tighten.
P3
P2
Place the Top Support (P3) top down on a flat
surface. Insert a Table Leg (P2) into each
channel of the Top Support.
G
G
E
H
H
P3
Illustration #
G
P2

4
Illustration # 3
Illustration #4
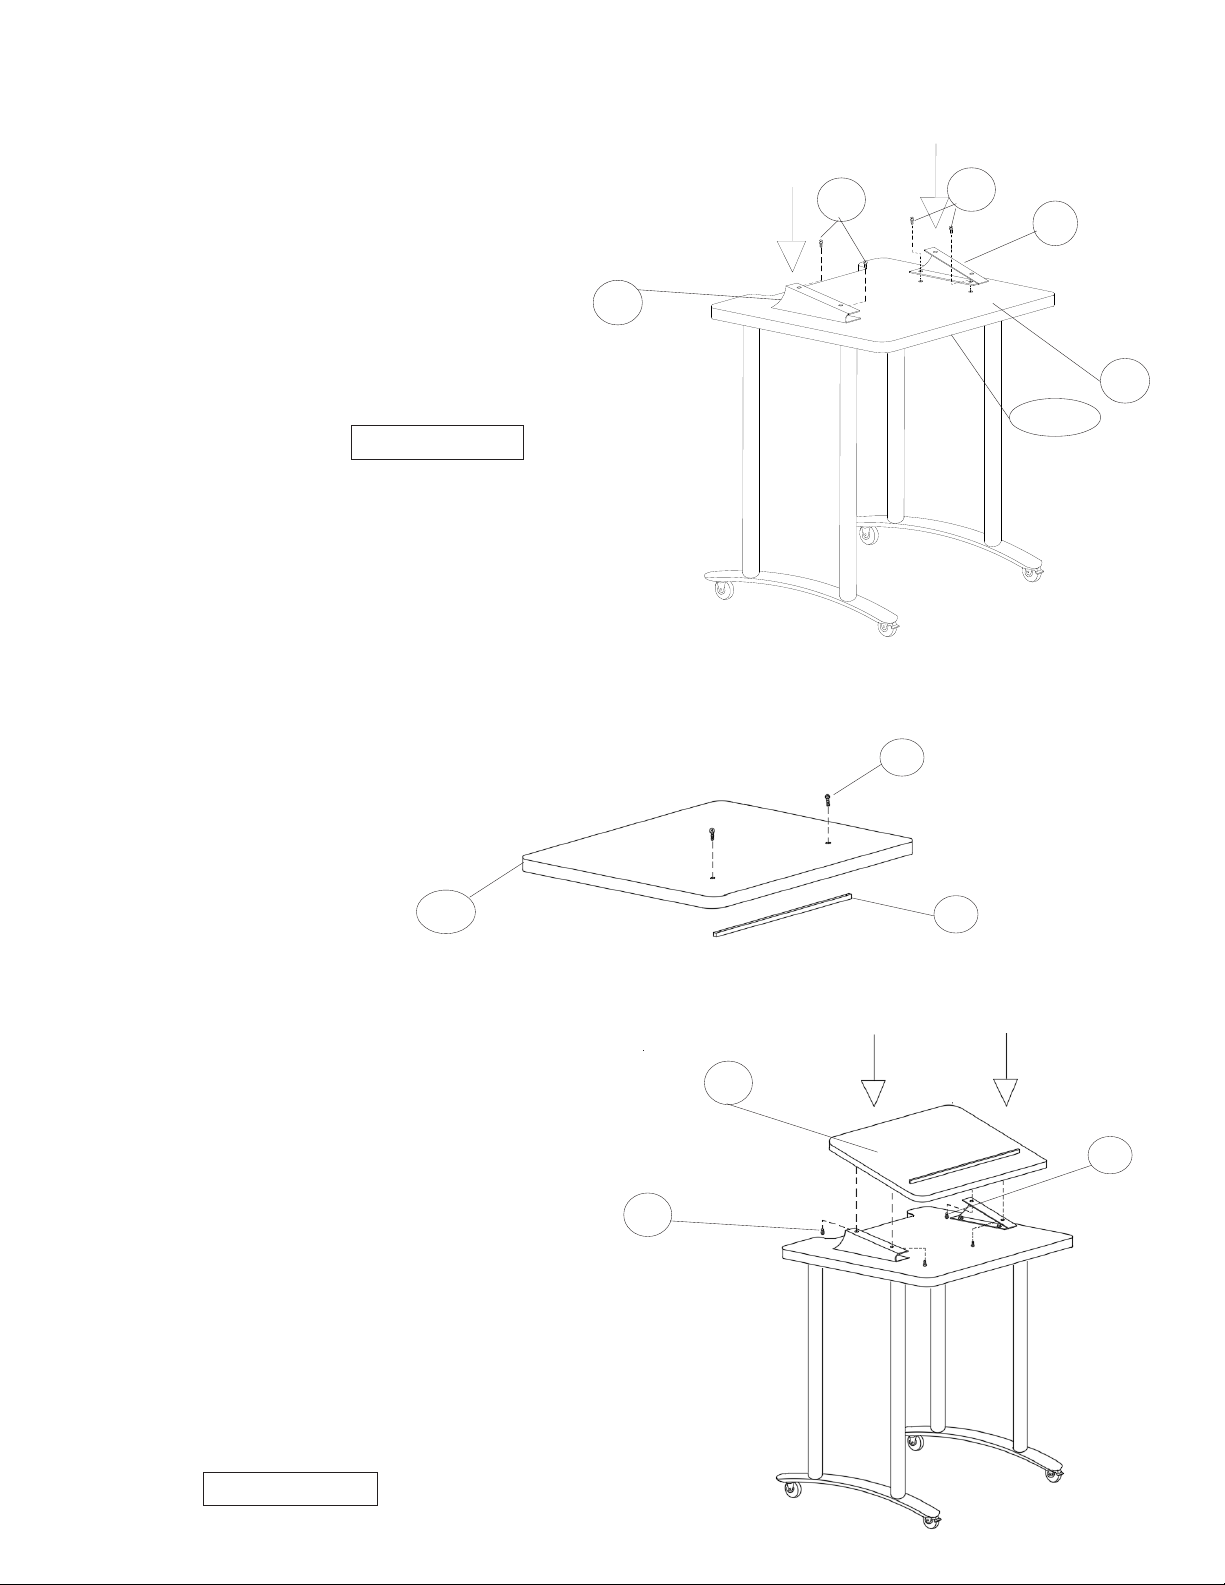
5.)
4.)
C
C
DC
D
Place the frame assembly from Step #3 on
the bottom of the Table Top (P1). Line up
the holes in the frame with the threaded
inserts in the Top. Attach the frame using
twelve Screws (C). Use four Wood Screws
(D) to attach the frames “L” clips to the Top.
C
P1
I
I
A
B
Front
Place a Lock Washer (I) on the two
Locking Casters (A). Screw them into
the front Leg mounting holes. Place a
Lock Washer (I) on the two
Non-Locking Casters (B) and screw
them into the rear holes in the Legs.
Tighten Casters using Caster
Wrench (F).
F
5
Illustration # 5
6.)
8.)
Flip the unit upright and attach the Right Top Bracket (P4) to the Top Panel (P1) using two Screws (C).
Attach the Left Side Bracket (P5) to the Top Panel using two Screws (C) as shown in illustration #5.
C
CP4
P5
P1
Front
C
P6
C
Attach the Small Top (P6) to the top of the
Right Top Bracket and the Left Top Bracket
using two Screws (C) in each. See illustration #6.
Illustration # 6
7.) Attach the Paper Stop (K) to the Small Top (P-6) using 2 screws (J)
J
K
P-6

6
91417_08-21-17
Makerspace Mobile
Teachers Podium
91417
23 1/2” X 27 1/2”
23”
37 1/2”
45”
31 1/2”
30”
15 Incline
Table of contents
Other Cloudinary Indoor Furnishing manuals


