CMA Dishmachines AK User guide


English
FULLY-AUTOMATIC
ESPRESSO COFFEE MACHINE
use and maintenance manual for the TECHNICIAN

INTRODUTION
The manufacturer reserves the right to make product improvements. We guarantee that this manual respects the
technological status at the time the machine is supplied.
We are open to any suggestions from technicians which may improve the product and the manual.
GENERAL WARNINGS
Once the packaging has been removed make certain the appliance is in good condition; if you have any doubts,
check the fault and contact the retailer or manufacturer directly.
Packaging must not be left where children can reach it as it is a potential hazard source.
The appliance must be installed in compliance with the safety standards in force in the country of use.
This appliance is completely safe only when it is connected to an effective earthing system that complies with the
safety standards. Make sure that the mains power is sufficient for the energy required for the machine.
It is unadvisable to use extension leads or electrical adaptors for multiple sockets. If it is essential to use them, use
only single adaptors or leads that comply with the current safety standards. Never exceed the capacity indicated on
the adaptor or leads, or the maximum power indicated on the adaptor.
This appliance should only be used for what it has been designed. Any other use is considered improper and con-
sequently dangerous. The manufacturer cannot be held responsible for any damages caused due to an erroneous
or irrational use. The technician must remind the user about the safety standards to ensure correct operation of the
appliance.
The use of an electrical appliance is subject to the safety standards.
If the customer decides he is not going to use the appliance for a long time, he must disconnect the power cable
from the mains and empty the water contained therein.
To guarantee that the coffee-maker works properly and efficiently, it is essential to follow the manufacturer’s instruc-
tions, carrying out periodical maintenance and a check of all the safety devices.
Always make sure that hands, or other parts of the body, never come within the range of the coffee dispensing spouts
or those of steam and hot water since these can scald.
The repair technician must inform the retailer or manufacturer promptly of any problems when installing or using the
appliance..
The coffee machine must be used at a temperature between 5°C and 40°C.

Summary
1. GENERAL DESCRIPTION......................................................................................................................... 6
2. TECHNICAL FEATURES ...........................................................................................................................7
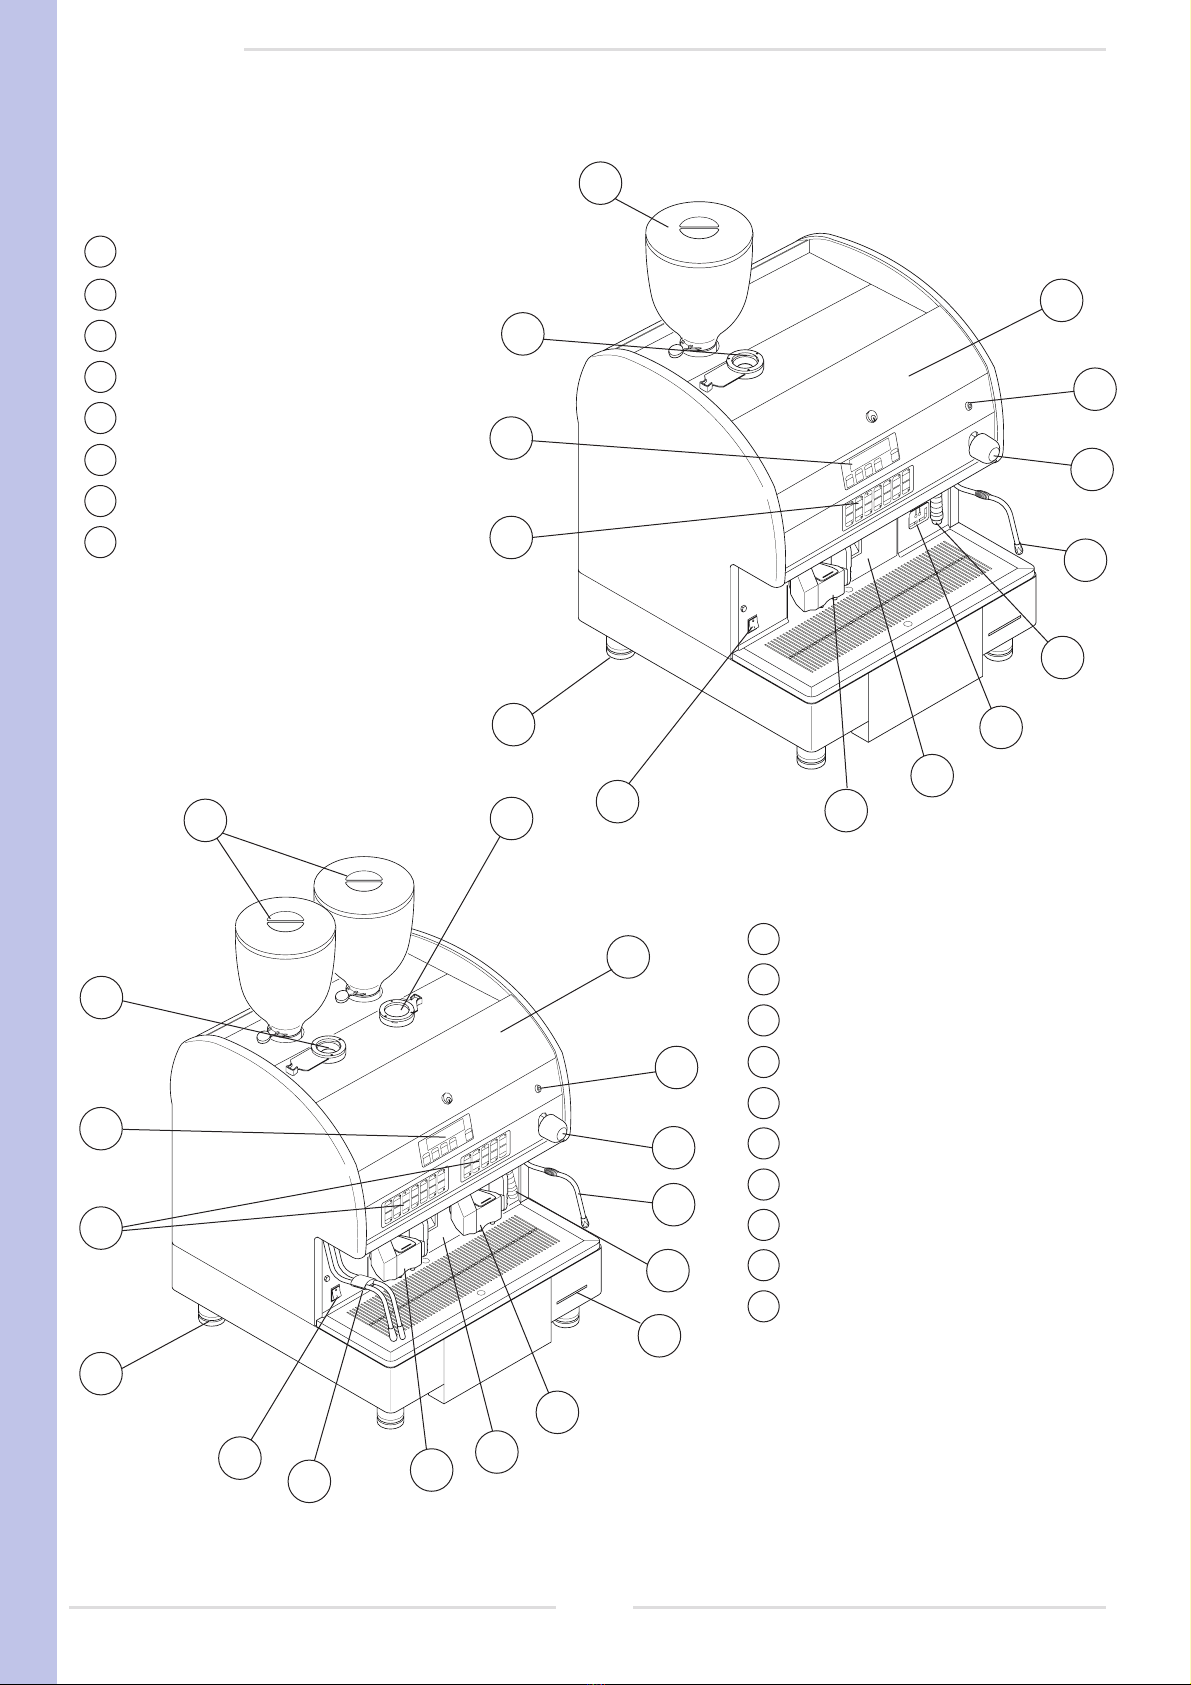
3. DESCRIPTION OF INTERNAL COMPONENTS .......................................................................................7
4. INSTALLATION .......................................................................................................................................... 8
4.1 Unpacking .....................................................................................................................................................................................8
4.2 Preparation of the coffee grinder...................................................................................................................................................8
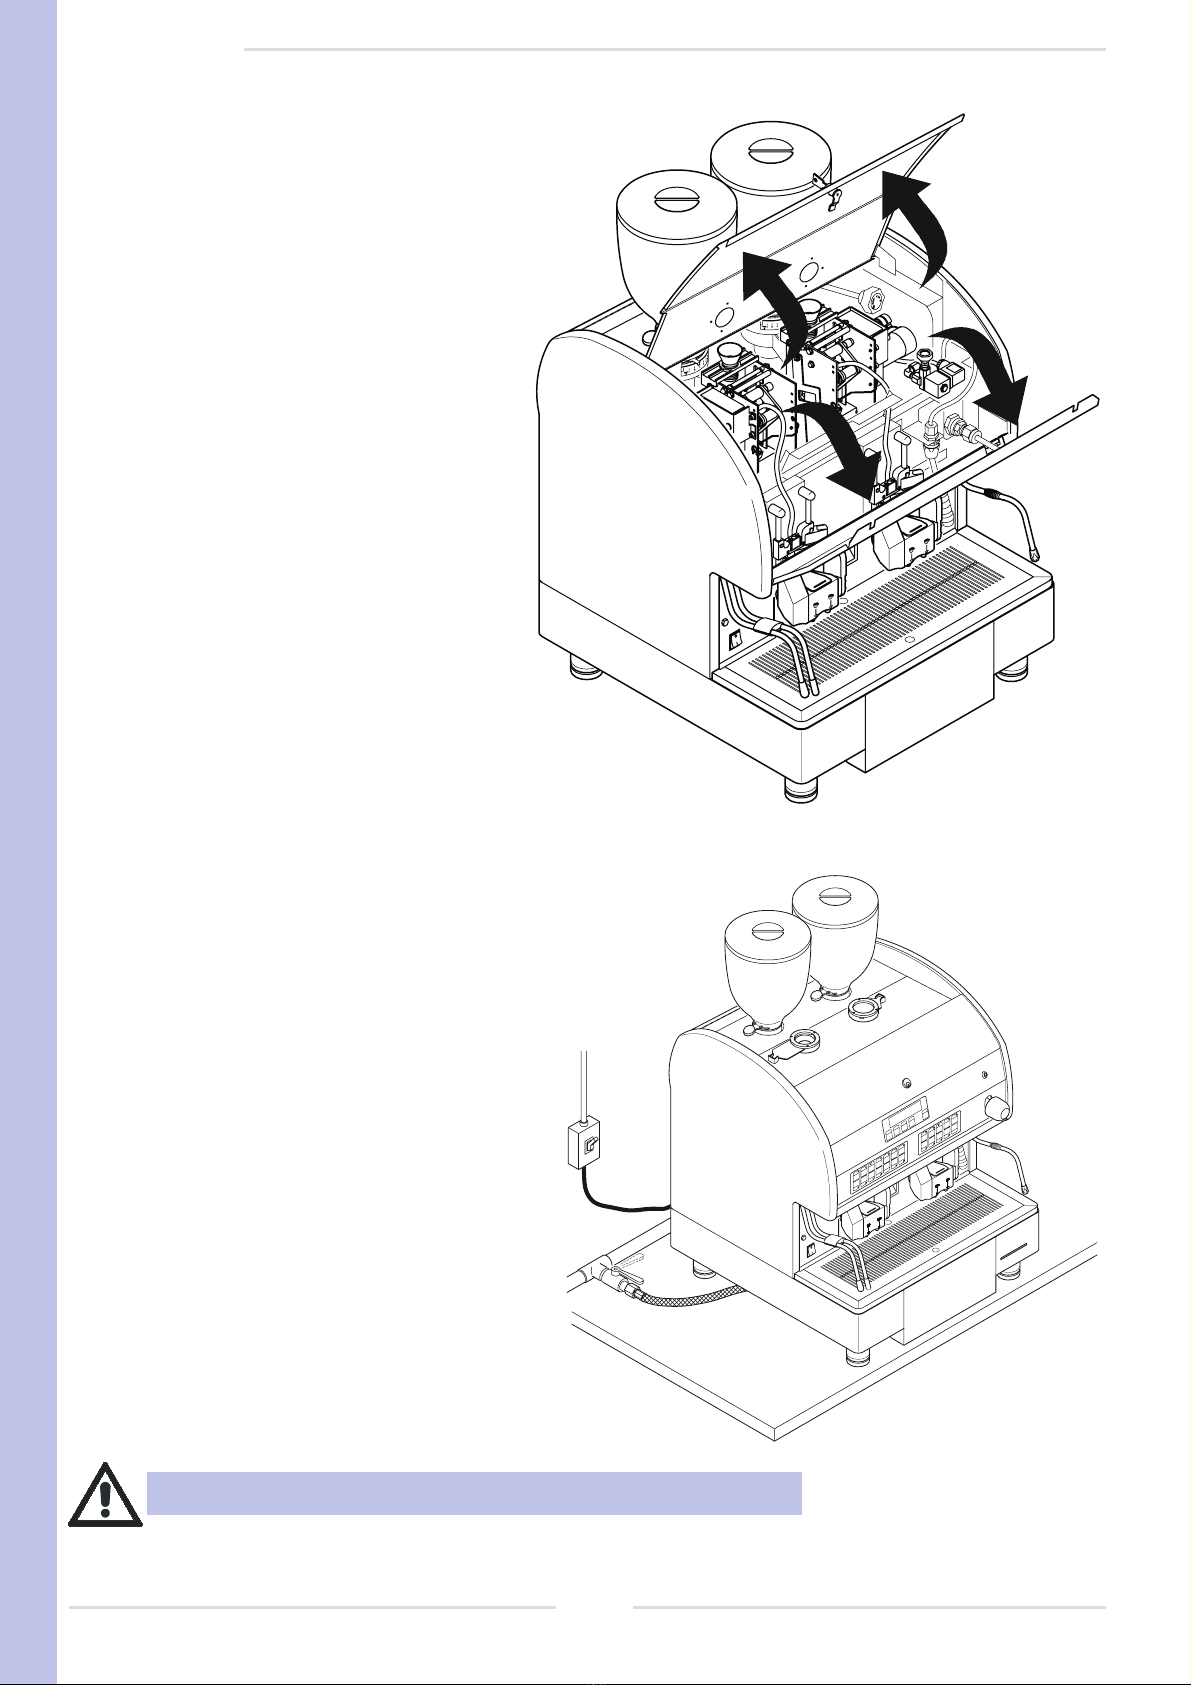
4.3 Positioning the machine ................................................................................................................................................................8
5. CONNECTIONS & OPERATIONS .............................................................................................................9
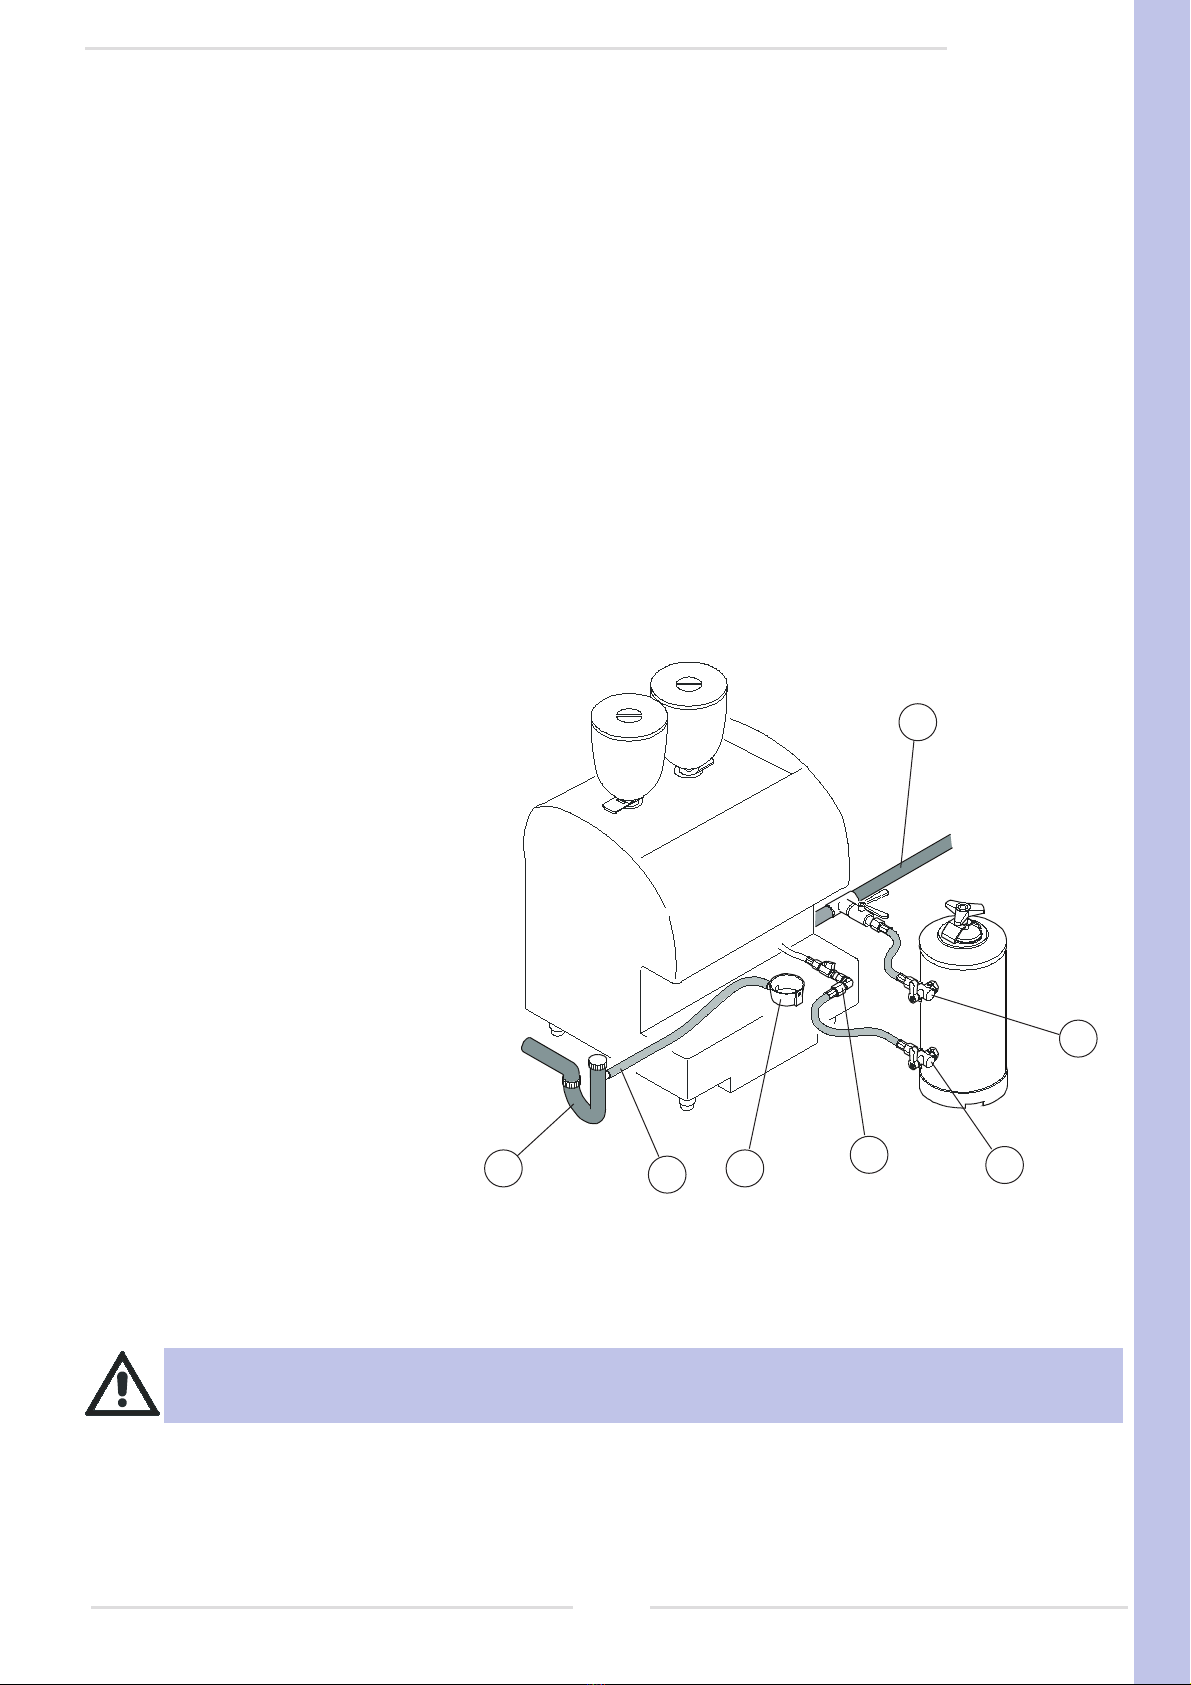
5.1 Hydraulic connection....................................................................................................................................................................9
5.2 Maintenance and cleaning .........................................................................................................................................................10
5.3 Electrical connection ..................................................................................................................................................................10
5.4 Machine start-up ........................................................................................................................................................................12
5.5 Adjustment of the pump .............................................................................................................................................................12
6. MACHINE PROGRAMMING....................................................................................................................13
Programming MENU ..........................................................................................................................................................................13
6.1 Programming of grinding times ..................................................................................................................................................14
6.2 Programming of group temperatures .........................................................................................................................................15
6.3 Programming of Autosteamer temperature................................................................................................................................15
6.4 Programming grounds................................................................................................................................................................16
6.5 Programming piston compression..............................................................................................................................................16
6.6 Loading/saving data on Smart Card...........................................................................................................................................17
6.7 Added water option ....................................................................................................................................................................18
6.8 Programming doses ...................................................................................................................................................................18
6.9 Adjustment of doses...................................................................................................................................................................20
6.10 Programming date......................................................................................................................................................................22
6.11 Alarm signals ..............................................................................................................................................................................23
6.12 Input test ....................................................................................................................................................................................25
6.13 Actuator test ...............................................................................................................................................................................28
6.14 Data reading...............................................................................................................................................................................30
6.15
Resetting data
.............................................................................................................................................................................32
6.16 Programming wash requests .....................................................................................................................................................32
7. MACHINE CONFIGURATION..................................................................................................................34
7.1 Preparation of configuration mode ..............................................................................................................................................34
7.2 Configuration of staff keys...........................................................................................................................................................34
7.3
Configuration of coin slot.............................................................................................................................................................35
7.4
Configuration of cappuccino maker.............................................................................................................................................35
7.5
Configuration of language ...........................................................................................................................................................35
7.6
Activation / De-activation of group 1............................................................................................................................................35
7.7
Activation / De-activation of group 2............................................................................................................................................35
7.8
Configuration of double cycle gr.1...............................................................................................................................................36
7.9
Configuration of double cycle gr.2...............................................................................................................................................36
7.10 Confi
guration of PRESET DEFAULT .........................................................................................................................................36
7.11 Configuration of technical service..............................................................................................................................................36
7.12 Push button panel configuration.................................................................................................................................................37
7.13 Confi
guration of RS 232.............................................................................................................................................................38
7.14 Confi
guration of degrees centigrade or Fahrenheit....................................................................................................................38
7.15 Configuration for lack of coffee in decaffeinated ........................................................................................................................39
7.16 Configuration of washing............................................................................................................................................................39
8. MACHINE COMPONENTS ...................................................................................................................... 40
8.1 Boiler ...........................................................................................................................................................................................40
8.2 Heat exchanger...........................................................................................................................................................................40
8.3 Automatic Water Refill .................................................................................................................................................................40
8.4 Volumetric doser .........................................................................................................................................................................40
8.5 Pressure control ..........................................................................................................................................................................41
8.6 Maintenance of groups................................................................................................................................................................42
8.7
Pressure control ..........................................................................................................................................................................45
8.8
Anti-flooding device .....................................................................................................................................................................45
8.9
Valve unit.....................................................................................................................................................................................45
8.10 Pump system .............................................................................................................................................................................45
8.11 Cappuccino-maker .....................................................................................................................................................................46
9. ELECTRONIC SYSTEM ..........................................................................................................................47
10. TROUBLESHOOTING .............................................................................................................................48
10.1 Indications on the display..........................................................................................................................................................48
10.2 Failures and functional problems ..............................................................................................................................................52
11. ADJUSTMENT of the DISPENSING GROUP..........................................................................................56
11.1 Positioning the cams .................................................................................................................................................................56
11.2 Control the adjustment ..............................................................................................................................................................58
12. CLEANING ............................................................................................................................................... 61
13. WIRING DIAGRAMS................................................................................................................................ 64
13.1 POWER diagram.......................................................................................................................................................................64
13.2 HIGH VOLTAGE diagram..........................................................................................................................................................65
13.3 LOW VOLTAGE diagram...........................................................................................................................................................66
13.4 CPU card - 2003 version...........................................................................................................................................................67
13.5 CPU card - 2005 version...........................................................................................................................................................68
13.6 DRIVER card - 2003 version.....................................................................................................................................................69
13.7 POWER SUPPLY card - 2003 version ......................................................................................................................................70
13.8 MOTHER BOARD connector diagram - 2003 version ..............................................................................................................71
13.9 INTERFACE CONNECTION diagram .......................................................................................................................................72
14. HYDRAULIC DIAGRAMS ........................................................................................................................76
SUMMARY

6
english
Technical manual
model AK
model AKC
1. GENERAL DESCRIPTION
1 Opening for decaffeinated coffee/for washing tabets
2 Coffee grinder hopper
3 Opening for washing tabs
4 Inspection door
5 Programming key
6 Steam dispensing knob
7 Steam dispensing wand
8 Hot water dispensing spout
9 Pressure gauge
10 Coffee grouts box
11 Coffee spouts
12 Main switch for turning on machine
13 Feet
14 Function control touch pads
15 Display
16 Milk + coffee delivery spout.
17 Autosteamer nozzle
18 Smart Card reader
DESCRIPTION - chap.1
1
11
10
9
8
7
4
5
6
12
13
15
14
2
23
1
4
5
6
7
8
16
10
16
15
14
13
12
17
18

7
english
Technical manual
2. TECHNICAL FEATURES
3. DESCRIPTION OF INTERNAL COMPONENTS
1. Left dispensing group
2. Left coffee-grinder
3. Right coffee-grinder
4. Right dispensing group
5. Volumetric doser
6. Pressure gauge
7. Motor pump
8. Drainage trough
9. Electronic card
10. Main switch
11.
Boiler
12. Boiler heating element
13. Pressure switch
Width (L)
Depth (P)
57 cm
Height (H)
Weight
59 cm
83 cm
Total input
94 kg
Voltage
Coffee grinder
motor power
Pump motor
power
Group heating
element power
Piston heating
element power
230/240/400 V
4000 W
(18 A)
2700 W
(12 A)
350 W x 2
(1,5 A)
260 W
(1,2 A)
150 W x 2
(0,8 A)
10 W x 2
(24 V)
Boiler capacity
Boiler working
pressure
Safety valve
calibration
Pressure of
water supplied
Pressure of
dispensed coffee
0,9 - 1,1 bar
0 - 5 bar
8 - 9 bar
2 bar
7 litres
Boiler heating
element power
TECHNICAL FEATURES - chap.2-3
L
P
H
8
7
6
5
4
3
9
10
11
2
1
13
5
12

8
english
Technical manual
4. INSTALLATION
4.1 Unpacking
4.3 Positioning the machine
There has to be plenty of room for the appliance and for
using it correctly.
Prepare the counter where the machine will be placed
and make sure it can bear its weight.
It is important that all the terminals of the connections
to the electricity and to the water mains are easy to reach
and in the immediate vicinity of the machine.
4.2 Preparation of the coffee-grinder
Fit the coffee hoppers in place on the two grinders.
For correct unpacking proceed as follows to unpack the machine
correctly:
1) Cut the straps around the packaging.
2) Pull the box off upwards.
3) Position the machine on the worktop.
To work properly the machine has to stand
on a perfectly level surface.
Any corrections needed to level the machine
can be done by adjusting the feet.
We recommend you keep the packaging until the
guarantee period has expired.
INSTALLATION - chap.4

9
english
Technical manual
5. CONNECTIONS and OPERATIONS
5.1 Hydraulic connection
The softener provided has been designed to function at a pressure ranging between 1 and 9 bar. It has to be filled
with cold drinking water only.
When connecting the machine to the water mains, install a tap between the machine and the mains so as to be able
to interrupt the supply of water to the appliance.
To prevent the water from freezing, install the softener in a room where the temperature is higher than 0°C.
Before connecting the pipes remove any rubber plugs from the softener tap couplings. To connect proceed as
follows:
1) connect the water mains (1) to the softener inlet (2) using the flexible pipe provided;
2) before connecting the outlet of the softener to the machine, rinse the resins of the softener and check that the water,
which originally may be yellowish, is once again clear;
To prevent damage of the outer case, valves and taps, install the softener where it is protected
against accidental knocks.
3) connect the softener outlet (3) to the ma-
chine (4);
4) connect the machine drainage trough (5)
to the drain (6) using the specific pipe pro-
vided, paying attention to avoid sharp bends
or throttlings and keeping it slanted enough
for the waste water to drain away;
5) the drain (6) has to connected to an inspec-
tionable trap (7) that can be cleaned regu-
larly to prevent the reflux of bad smells.
CONNECTIONS and OPERATIONS - chap.5
6
7543
1
2

10
english
Technical manual
5.3 Electrical connections
Connect the cable going from the machine to
the electrical network;
Install a circuit breaker (1).
5.2 Maintenance and cleaning
To make the service and cleaning
operations easier, parts of the external casing
are removable.
In particular from the front, the user has
access to the inside of the machine by opening
the doors that cover the group and push button
panel.
Effect the electrical connections with the mains voltage disconnected.
CONNECTIONS and OPERATIONS - chap.5

11
english
Technical manual
MONOFASE 230V
+ TERRA
NE
BL
GV
NE
MA
CF
LEGEND
MA Brown
Ne Black
BL Blue
GV Yellow-Green
CMachine cable
FElectricity mains
R-S-T Phase
DPhase
NNeutral
Earth
CONNECTIONS and OPERATIONS - chap.5
D
N
TRIFASE 230V
+ TERRA
MA
NE
NE
BL
GV
R
S
T
MA
NE
NE
BL
GV
R
S
T
N
C
TRIFASE 400V
+ NEUTRO
+ TERRA
C
F
F
SINGLE-PHASE 230V
+ EARTH
THREE-PHASE 230V
+ EARTH
THREE-PHASE 400V
+ NEUTRAL
+ EARTH

12
english
Technical manual
CONNECTIONS and OPERATIONS - chap.5
At start-up, after the boiler has been filled, the machine will show the message "PLEASE WAIT". This means that
both groups have not reached the correct working temperature. Upon reaching this temperature, the machine will run
a cycle for both groups and the will show the message "SELECT".
With groups completely cold, warm-up time is about 20 minutes.
Before making selections, for good product quality check boiler pressure via the gauge on the front of the machine
(operating pressure 0.8 –1.2 ) bar)
To bring the machine up to operating capacity without waiting the required time for warm-up, proceed as follows:
Place the programming key in the ON position. Start the machine, first with the main switch, then by pressing ON.
The machine will show the message on the display "PLEASE WAIT".
Press the ENTER key . The machine will perform a dry run of the delivery groups, and then it will go to
"SELECT".
The machine will be ready for operation, and the technician may perform all required operations.
5.5 Adjustment of the pump
Switch the machine on as explained in the user manual.
Effect several automatic washing cycles and check the correct working
pressure on the gauge (8 - 9 bar).
If necessary, calibrate pressure by means of the by-pass adjustment
screw (1) on the pump.
5.4 Machine start-up
Once the machine has been correctly connected to the electrical mains, it is started by placing the
bi-polar switch on the left side of the machine in position 1.
Once this is done, the display will illuminate, and the message "PRESS START" will appear.
In this situation the machine will not be activated, the boiler heating element, and the controls will not be enabled.
By pressing the key on the right of the display push button panel, all machine functions will be activated.
For good quality of delivered product, wait for proper heating of groups and of the water in the boiler
(approx.25 minutes).
1

13
english
Technical manual
PROGRAMMING - chap.6
6. MACHINE PROGRAMMING
This chapter lists the instructions for modifying some machine parameters, such as group temperatures, grinding
times, dose adjustment, and so on.
The procedures are also described for checking for defective components, for counting selections made, for setting
wash requests, and so forth.
To access the programming menu, do the following:
Turn the programming key clockwise. This key is located on the right of the control panel. The display will show the
letter "P", to indicate that the machine can be programmed.
Once the letter P shows on the display, press and hold the MODE key for about five seconds until the display
shows the message "PROGRAMME GRINDING".
Press the MODE key and it will be possible to scroll through all the various programming menus. Press the
ENTER key and it will be possible to enter each sub-menu, and via the ARROW , keys, to modify the
selected parameters.
WITH STAFF KEY
program. grinding
GRINDING TIMES, T° GROUPS, NO. GROUNDS, COMPRESSION STRENGTH
(page14)
opt. add. hot wat. ADDED WATER OPTION (page 18)
programming
wash groups PROGRAMMING OF GROUPS WASHING REQUEST YES/NO (page32)
programming
wash cap. PROGRAMMING OF CAPPUCCINO MAKER WATER REQUEST
YES/NO
(page32)
revert data
to zero ZERO SETTING OF SELECTIONS COUNT (page 32)
readout data COUNT OF SELECTIONS
(
page
30)
WITHOUT STAFF KEY
program test CHECK OF INTERNAL ELECTRICAL COMPONENTS (page 28)
test iNput INPUT SIGNALS CONTROL (page 25)
water level
in the boiler MACHINE ALARMS COUNTING (page 23)
ZERO SETTING (page 24)
program date DATE, HOUR, MINUTES, SECONDS (page 22)
OHNE WASSERBEIGABE
CORRECTION OF MILK, TEA DOSE (page 21)
dose modificat. CORRECTION OF COFFEE DOSE (page 20)
MIT WASSERBEIGABE
ADJUST.OF AMOUNTS OF CAPPUC. MILK AND COFFEE, MILK WITH SHOT OF COFFEE (opt.) (page 21)
PROGram DOSes. COFFEE DOSES
(
page
18)
WITHOUT ADDED WATER
WITH ADDED WATER
MILK, TEA DOSES (page 19)
DOSES OF CAPPUCCINO, MILK AND COFFEE, MILK WITH SHOT OF COFFEE (opt.)
(page 19)
AUTOSTEAMER TEMPERATURE (optional) (page 15)

14
english
Technical manual
6.1 Programming of grinding times
Programming of grinding times is for the purpose of changing the amount of grams of coffee for each selection in
which coffee is used.
This modification is performed by changing the grinding time for each coffee selection.
To modify grinding times, proceed as follows:
Turn the programming key clockwise. This key is located on the right of the control panel. The display will show the
letter "P", to indicate that the machine can be programmed.
Press and hold the MODE key for about five seconds until the display shows the message "PROGRAMME
GRINDING".
Press the ENTER key , and the machine will show the time that has been set for each selection, in succession:
key 1, key 2, key 3...key 24.
In this section, the machine will show only a list of keys to which a beverage has been matched that uses the coffee
beans in the hopper.
For example, if key number 2 is matched with the MILK selection (see "Push button panel configuration", chap.
7.12) and hence coffee is not used, in grinding programming press the ENTER key and the machine will show
the grinding time associated with key 1 before skipping directly to key 3 (provided this key is matched with a beverage
with the aforementioned characteristics).
Use the ARROW keys to increase or decrease grinding time of each selection expressed in seconds or
tenths of seconds.
Grinding times may not always correspond to a constant weight, and may change depending on the type of
coffee, the wear of the grinders or the diameter of grinding. Therefore the coffee grinder will grind a different
dose (give or take a few grams).
GRINDING TIMES TABLE (sec.)
Single Double
Medium-coarse grinding 2,4 2,8
Fine grinding. 2,7 3,2
To exit programming, repeatedly press the MODE key until the display show the message "SELECT".
K1
123451112
6 7 8 9 101314
K6
K2
K7
K3
K8
K4
K9
K5
K10
K11
K13
K12
K14
K15
15 16 17 18 24
19 20 21 22 23
K19
K16
K20
K17
K21
K18
K22
K24
K23
PROGRAMMING - chap.6

15
english
Technical manual
6.2 Programming of group temperatures
In this section it is possible to modify the temperature of each group. In fact, each group is heated by an internal
heating element controlled by a temperature sensor. This operation may be necessary when the coffee delivered is not
at a temperature which is satisfactory to the client.
To adjust the temperature, proceed as follows:
Turn the programming key clockwise. This key is located on the right of the control panel. The display will show the
letter "P", to indicate that the machine can be programmed.
Press and hold the MODE key for about five seconds until the display shows the message "PROGRAMME
GRINDING".
Press the ENTER key until the display shows the message "PROG. GRINDING".
Press the MODE key until the display shows the message "PROG. GR. TEMPERATURE 1".
To modify the temperature of group 1, press the ENTER key again and the display will show the message
"PROG. GR. 1 TEMPERATURE". Press the ENTER key again, to adjust group 2.
Once you have selected the group for which you want to change the temperature via the ARROW keys ,
set the desired temperature.
Standard operating temperature inclusive between 80°C and 92°C.
6.3 Programming of Autosteamer temperature (if configured)
In this section it is possible to modify the temperature of the automatic steam (Autosteamer)
This programming option will be visible and modifiable only if the software has been configured for the use of this
device (optional).
To set the temperature, proceed as follows:
Turn the programming key clockwise. This key is located on the right of the control panel. The display will show the
letter "P", to indicate that the machine can be programmed.
Once the letter P shows on the display, press and hold the MODE key for about five seconds until the display
shows the message "PROGRAMME GRINDING".
Press the ENTER key the message appears "PROG. STEAM TEMPERATURE".
Use the ARROW keys to modify the temperature value.
Once the temperature is set, press the proper key. The machine will stop delivering steam once the beverage reaches
the set temperature.
The actual temperature of the beverage heated by the automatic steam system may differ by a few degrees
depending on the amount of product heated.
To exit programming, repeatedly press the MODE key until the display show the message "SELECT".
PROGRAMMING - chap.6

6.4 Programming grounds no.
This programming operation allows you to change the maximum number of coffee grounds tabs that can be discarded
into the grounds drawer. Once this number has been reached, the machine will inform the operator to empty the grounds
drawer via the procedure shown in the user's manual of the machine.
To modify this value, proceed as follows:
Turn the programming key clockwise. This key is located on the right of the control panel. The display will show the
letter "P", to indicate that the machine can be programmed.
Once the letter P shows on the display, press and hold the MODE key for about five seconds until the display
shows the message "PROGRAMME GRINDING".
Press the ENTER key until the display show the message "PROG. GROUNDS".
Use the ARROW keys to modify the maximum amount of grounds that can be discarded into the drawer.
If the machine uses direct grounds discharge (without drawer), and the user does not wish to be informed that the
drawer is full, the aforementioned value will need to be set to 0. In this case the machine will never signal the need to
empty the grounds drawer.
6.5 Programming piston compression
This menu lets you modify the pressure that the upper piston uses to press the coffee during the pressure phase
that precedes delivery.
By increasing the value shown in this section of the display, the machine will compress the coffee with greater force.
On the contrary, decreasing this value decreases the compression force on the coffee.
The machine identifies four categories of beverage for which it is possible to modify the force of compression:
To modify this value, proceed as follows:
Turn the programming key clockwise. This key is located on the right of the control panel. The display will show the
letter "P", to indicate that the machine can be programmed.
Once the letter "P" shows on the display, press and hold the MODE key for about five seconds until the display
shows the message "PROGRAMME GRINDING".
Press the ENTER key until the display show the message "PROG. COMPRESSION S GR. 1".
Press the ENTER key to select one of the four categories of beverage.
Use the ARROW keys to modify the compression value of the piston (min 80 max 110) for each of the
categories.
The milk and coffee, cappuccino and milk with a shot of coffee selections are to be considered as part of the group 1 single
dose coffee categories if made with the left-hand keypad, group 2 single dose coffee if made with the right-hand keypad.
Single dose group 1 "PROG. COMP. S GR.1"
Double dose group 1 "PROG. COMP. D GR.1"
Single dose group 2 "PROG. COMP. S GR.2"
Doppia dose gruppo 2 "PROG. COMP. D GR.2"
To exit programming, repeatedly press the MODE key until the display show the message "SELECT".
16
english
Technical manual
PROGRAMMING - chap.6

6.6 Loading/saving data on Smart Card
The machine is standard equipped with a Smart Card reader.
This makes it possible to save all data programmed by the user in a card with a microchip. This data can subsequently
be re-loaded in the same machine or in another of the same model.
To do this, proceed as follows:
1. Saving data on Smart Card
Insert the provided Smart Card with the CMA logo facing up.
Turn the programming key clockwise. The display will show the letter "P".
Hold down the MODE key until the display show the message "PROG. GRINDING".
Press the ENTER key until the display shows the message "UPLOAD TO SMART CARD".
Hold down the ENTER key (the display will show the message "UPLOADING") until the display shows the
message "UPLOAD TO SMART CARD".
At this point, all data set on the machine (doses, temperature, grinding times, key configuration, etc.) will be saved
in the memory cell of the Smart Card.
2. Download of data from Smart Card
Insert the provided Smart Card with the CMA logo facing up.
Turn the programming key clockwise. The display will show the letter "P".
Hold down the MODE key until the display show the message "PROG. GRINDING".
Press the ENTER key until the display shows the message "DOWNLOAD FROM SMART CARD".
Hold down the ENTER key (the display will show the message "DOWNLOADING") until the display shows
the message "DOWNLOAD FROM SMART CARD".
At this point, all data previously saved on the Smart Card in question will be loaded into the internal memory of the
machine, which will be fully configured with the data downloaded from the Smart Card (group temperatures, doses,
key configurations and so on).
To exit programming, repeatedly press the MODE key until the display show the message "SELECT".
17
english
Technical manual
PROGRAMMING - chap.6

6.7 Added water option
The added water option makes it possible choose to which coffee selections a certain programmable amount of hot
water will be added.
This option is available in the medium single and double selections, and single and double long (American coffee)
selections of both groups.
To activate this option, proceed as follows:
Turn the programming key clockwise. This key is located on the right of the control panel. The display will show the
letter P, to indicate that the machine can be programmed.
Once the letter P shows on the display, press and hold the MODE key for about five seconds until the display
shows the message "PROGRAMME GRINDING".
Press the ENTER key .The display will show the message "ADDED WATER OPTION".
Press the ENTER key to select one of the categories where this option can be activated. Then use the AR-
ROW keys to activate it (S) or de-activate it (N).
6.8 Programming doses
This function makes it possible to program the amount of product in the cup of the selections delivered by the machine
(coffee, milk, tea, cappuccino and so forth).
Programming must be carried out on all enabled keys, even if the same beverage (coffee, cappuccino, etc.) has
been assigned to more than one key (see "Push button panel configuration" chap.7.12).
To modify the dose of the selection, follow this procedure:
Turn the programming key clockwise. This key is located on the right of the control panel. The display will show the
letter "P", to indicate that the machine can be programmed.
Once the letter P shows on the display, press and hold the MODE key for about five seconds until the display
shows the message "PROGRAMME GRINDING".
Press the MODE key until the display shows the message "PROG. DOSES"
Depending on the type of beverage selected, refer to one of the points mentioned below.
1. COFFEE SELECTIONS PROGRAMMING (with no added water)
Press the key of the desired selection to activate the grinding and delivery cycle.
Once the desired dose of coffee has been reached, press the same key again to stop programming.
Re-programming is possible at any time by repeating the procedure described above.
During programming, if the programming of the coffee dose is stopped using the STOP key , the machine
will not memorize the dose that has just been memorized but instead will retain in memory the last dose previ-
ously memorized.
2. COFFEE SELECTIONS PROGRAMMING (with added water)
Press the key of the desired selection to activate the grinding and delivery cycle.
Once the desired amount of coffee is reached, press the same key again and the machine will stop delivering coffee
and it will automatically start delivering water. Once the desired amount of water is reached, press the selection key
again to stop delivery.
In this way the machine will have memorized both the amount of coffee and the amount of hot water (added water).
Re-programming is possible at any time by repeating the procedure described above.
To exit programming, repeatedly press the MODE key until the display show the message "SELECT".
18
english
Technical manual
PROGRAMMING - chap.6

3. PROGRAMMING COFFEE AND MILK / CAPPUCCINO SELECTIONS
By pressing the key for the desired selection, the phase of milk suction and heating by the cappuccino maker will
be started. Once the desired dose of milk is reached, press the same key again. The machine will stop milk delivery,
and it will memorize the time required for the suction of that amount. It will also activate the coffee grinding and delivery
cycle. Once the desired dose of coffee is reached, press the same key again. The machine will stop delivery of coffee
and it will memorize the amount reached.
4. PROGRAMMING OF MILK DOSES AND FOAMED MILK
By pressing the key for the desired selection, the phase of milk suction and heating by the cappuccino maker will be
started. Once the desired dose of milk is reached, press the same key again. The machine will stop milk delivery, and
it will memorize the time required for the suction of that amount.
5. PROGRAMMING DOSES OF HOT WATER
Pressing the hot water selection key will activate the solenoid valve for tea delivery. Once the desired dose is reached,
press the same key again.
The machine will stop delivery and it will memorize the time required for delivery. The dose can be re-defined at
any time.
6- STEAM TIME PROGRAMMING (optional)
By pressing the steam key (if present), machine will activate the solenoid valve, and steam delivery will begin.
By pressing the same key again, the machine will stop delivery and it will memorize the time required for delivery.
The operation can be repeated at any time.
7. PROGRAMMING DOSES OF MILK WITH A SHOT OF COFFEE (LCL)
a) Cold milk with shot of coffee
Press the key for the selection of cold milk with a shot of coffee. The display will show the message
"PROG. MILK WITH SHOT OF COFFEE F.".
Cold milk delivery will begin.
Once the desired dose has been reached, press the same key again. The machine will stop delivery of cold milk,
memorize the time required for delivery and will automatically start delivery of hot foamed milk. Upon completing the
dose of hot foamed milk, press the same key again, and the machine will stop and memorize delivery. The coffee cycle
will start automatically. Once the desired dose of coffee is reached, press the same key again. The machine will stop
coffee delivery and programming of cold milk with a shot of coffee will be complete.
Programming can be repeated at any time by following the procedure indicated above.
By changing the amount of cold water mixed with the hot water, the amount of water delivered changes as well.
Before programming it is therefore advisable to determine the correct temperature of the hot water.
Dispensing
Cold Milk
Dispensing
Hot milk
foamed
Dispensing
Coffee
Progr.
performed
K3 K3 K3 K3
19
english
Technical manual
PROGRAMMING - chap.6

b) Hot milk with a shot of coffee
Press the key for the selection of hot milk with a shot of coffee. The display will show the message
"PROG. MILK WITH SHOT OF COFFEE C." and delivery will begin of non-foamed hot milk.
Once the desired dose is reached, press the same key. Delivery of non-foamed milk will stop, the machine will
memorize the time required and delivery of hot foamed milk will start automatically. Once the desired dose is reached,
press the key referred to above. A pause will be activated.
Once the desired pause time has elapsed, press the same key again and coffee delivery will start. Once the desired
amount of coffee is reached, press the same key again to stop delivery and memorize the dose.
Programming can be repeated at any time by following the procedure indicated above.
All decaf doses will automatically assume the value of the corresponding non-decaf dose, and will not be
programmable separately.
E.g. 1 ESPRESSO DECAF GR1 will have the same dose as 1 ESPRESSO GR.1 .
By modifying the dose of the espresso gr.1 you will also automatically modify the dose of espresso decaf
gr.1 in the same way.
6.9 Adjustment of doses
In this section of programming it is possible to modify the previously established dose, without re-programming, but
modifying the amount of water used by the machine for each coffee selection or modifying the time memorized by the
machine for each delivery of milk, hot water, etc.
To modify dose parameters, proceed as follows:
Turn the programming key clockwise. This key is located on the right of the control panel. The display will show the
letter "P", to indicate that the machine can be programmed.
Once the letter "P" shows on the display, press and hold the MODE key for about five seconds until the display
shows the message "PROGRAMME GRINDING."
Press the MODE key until the display shows the message "DOSE ADJUSTMENT"
Press the key assigned to the selection for which you want to adjust or modify the dose.
If the selection is a coffee without added water, proceed as follows:
Press the key for the selection of which you wish to modify the dose. The display will show the volume of water in
c.c. calculated by the volumetric dosing device for that particular selection. E.g. "C. DOSE 1 ESPRESSO GR1 CC
NNN".
Use the ARROW keys to modify the amount of water used for the specific selection.
To memorize the modified dose, press ENTER .
If the selection is a coffee with added water, proceed as follows:
Dispensing
Hot milk
pauseDispensing
Hot milk
foamed
Dispensing
Coffee
PROGR.
performed
K8 K8 K8 K8 K8
20
english
Technical manual
PROGRAMMING - chap.6
Other manuals for AK
1
This manual suits for next models
1
Table of contents
Other CMA Dishmachines Coffee Maker manuals

CMA Dishmachines
CMA Dishmachines AK User manual

CMA Dishmachines
CMA Dishmachines ADRIA series User manual

CMA Dishmachines
CMA Dishmachines MARISA User manual

CMA Dishmachines
CMA Dishmachines Luna User manual

CMA Dishmachines
CMA Dishmachines GLORIA User manual

CMA Dishmachines
CMA Dishmachines Sara AK User manual

CMA Dishmachines
CMA Dishmachines Espresso Coffee Machine User manual

CMA Dishmachines
CMA Dishmachines MARISA User manual

CMA Dishmachines
CMA Dishmachines Gloria LCL Configuration guide

CMA Dishmachines
CMA Dishmachines AKC User manual