CO/Tech 40-9132 User manual

ENGLISHSVENSKANORSKSUOMIDEUTSCH
Färgspruta HVLP
Malersprøyte HVLP
Maaliruisku HVLP
HVLP-Spritzpistole
Art.no Model
18-3569 JS-HH12B-UK
40-9132 JS-HH12B
HVLP Spray Gun
Ver. 20140303
Original instructions
Bruksanvisning i original
Original bruksanvisning
Alkuperäinen käyttöohje
Original Bedienungsanleitung
Important!
Read the entire instruction manual carefully
and make sure that you fully understand
it before you use the equipment. Keep the
manual for future reference.
Viktig information:
Läs hela bruksanvisningen noggrant och
försäkra dig om att du har förstått den
innan du använder utrustningen. Spara
bruksanvisningen för framtida bruk.
Viktig informasjon:
Les disse anvisningene nøye og forsikre deg om
at du forstår dem, før du tar produktet i bruk.
Ta vare på anvisningene for seinere bruk.
Tärkeää tietoa:
Lue nämä ohjeet huolellisesti ja varmista
että olet ymmärtänyt ne, ennen kuin alat
käyttää laitetta. Säilytä ohjeet myöhempää
tarvetta varten.
Wichtiger Hinweis:
Vor Inbetriebnahme die komplette
Bedienungsanleitung durchlesen und
aufbewahren.

2

3
ENGLISH
HVLP Spray Gun
Art.no 18-3569 Model JS-HH12B-UK
40-9132 JS-HH12B
Please read theentire instruction manual before using theproduct and then save
it for future reference. We reserve theright for any errors in text or images and any
necessary changes made to technicaldata. In theevent of technical problems or other
queries, please contact our customer services (see address details on theback).
Safety
General safety instructions for power tools
Warning: Readall theinstructions. Failure to adhere to thefollowing instructions
may lead to electric shocks, fires or serious injuries.
SAVE THESE INSTRUCTIONS.
Theterm “power tools” in thewarning text below refers to your handheld mains
operated or battery operatedtool.
1) Work area
a) Keep thework area clean and well illuminated. Cluttered and poorly lit areas
invite accidents.
b) Do not use power tools in explosive environments, such as in thepresence
of flammable liquids, gases ordust. Powertools generate sparks that can easily
ignite dust orfumes.
c) Keep children and other bystanders away from thearea where you are using
thepowertool. Distractions can cause you to lose concentration and control of
thetool.
2) Electrical safety
a) Theplug of thepower tool must fit correctly into thewall socket.
Nevermodify theplug in anyway. Neveruse anadaptor together with
earthed powertools. Unmodified plugs and suitable wall sockets minimize
therisk of electric shocks.
b) Avoid physical contact with earthed objects such as pipes, radiators, ovens
and refrigerators. Thereis anincreased risk of receiving anelectrical shock if your
body is earthed.
c) Do not expose thepower tool to rain or other wet conditions. Waterentering
apower tool will increase therisk of electricshock.

4
ENGLISH
d) Do not abuse themainslead. Neveruse thelead to carry thetool or pull
theplug from awall socket. Keepthelead away from heat, oil, sharp edges
and movingparts. Damaged or tangled leads increase therisk of electricshock.
e) When using power tools outdoors, use anextension lead that is suitable for
this purpose. Theuse of anextension lead designed for outdoor use decreases
therisk of electric shocks.
f) If theuse of thepower tool in awet environment is unavoidable, awall
socket equipped with aportable residual current device (PRCD) should
beused. Useof anRCD significantly reduces therisk of electricshock.
3) Personal safety
a) Pay attention to what you are doing and use common sense when using
powertools. Neveruse power tools if you are tired or under theinfluence of
drugs, alcohol or medication. Onemoment of inattention while using apower
tool may result in aserious injury.
b) Wear protective clothing. Always wear safety glasses. Usingprotective
clothing such as dust masks, non-slip safety shoes, helmets and ear defenders
reduces therisk of injury.
c) Avoid accidental starts. Makesure that thepower switch is set to OFF before
plugging thepower tool into awall socket, fitting thebattery or picking up/
carrying thepowertool. Carrying apower tool with your finger on thepower
switch/trigger or connecting thepower tool to awall socketwhen thepower
switch is set to ON is inviting anaccident.
d) Remove all service tools/keys before switching on thepowertool. Aservice
tool left on arotating part of thepower tool may result in personal injury.
e) Do not overreach. Makesure you stand steady and well balanced at
alltimes. This ensures better control over thepower tool in unexpected situations.
f) Wear suitable clothing. Donot wear loose-fitting clothing or jewellery.
Keephair, clothes and gloves away from movingparts. Loose-fitting clothes,
jewellery or long hair could become caught in movingparts.
g) If equipment for dust extraction or collecting is available make sure it is
connected and used properly. Useof dust collection equipment can reduce dust
related hazards.

5
ENGLISH
4) Use and maintenance of the power tool
a) Do not force thepowertool. Usethecorrect power tool for your application.
Thecorrect power tool will perform thetask better and safer if used at thecorrect
feedrate.
b) Never use thepower tool if thepower switch does not switch thetool on and
off properly. Allpower tools that cannot be controlled by thepower switch are
dangerous and must be repaired.
c) Unplug thelead from thewall socket or remove thebattery before
making any adjustments, changing accessories or storing thepowertool.
Theseprecautions reduce therisk of thepower tool starting unexpectedly.
d) Store power tools that are not being used out of children’sreach. Donot
allow people who are unfamiliar with thetool or these instructions to
operate thetool. Powertools can be dangerous if they fall into thehands of
inexperiencedusers.
e) Maintain powertools. Checkfor any incorrect settings, parts that
catch, broken parts or anything else which may cause thepower tool
to malfunction. Ifsomething is damaged it must be repaired beforeuse.
Accidents are frequently caused by poorly maintained powertools.
f) Keep cutting tools sharp andclean. Properly maintained cutting tools with sharp
cutting edges are less likely to bind and are easier to control.
g) Use thepower tool, and any accessories in accordance with these
instructions, taking into account theworking conditions and thework to
be performed. Using thepower tool for apurpose other than that for which it is
intended could result in adangerous situation.
5) Service
a) Repairs and service should only be performed by qualified tradesmen, and
only with original spareparts. Thisguarantees that thesafety of thepower tool is
maintained.
Safety instructions specific to spray guns
• Thespray gun must not be used in close proximity to sources of ignition such as
open fires, smokers, sparks, filaments, hot surfaces,etc.
• Only use paints or other coating materials with aflashpoint above 21ºC.
• Be aware of potential hazards caused by thecoating material. Follow
theinstructions on thepackaging of thecoating material, especially those related
to personal protection equipment.
• Use thespray gun in awell-ventilated room suited for thepurpose.
• Warning: Neveruse thespray gun with any flammable liquid.
• If themains lead is damaged it should only be replaced by themanufacturer or
aqualified service technician. Thisis to avoid hazards.

6
ENGLISH
• Warning: Riskof personal injury! Neverpoint thespray gun at yourself, other
persons or animals.
• Toxic fumes can be produced from working with thespray gun that could be
hazardous to your health.
• ALWAYS use suitable safety goggles, gloves, breathing masks,etc. to prevent
paint, solvents and poisonous fumes from coming into contact with eyes andskin.
• Always follow theinstructions given by themanufacturer of thepaint or coating
material to be used in thespraygun.
• When working indoors, ensure that there is adequate ventilation.
• Never let children use thespraygun.
• Do not dismantle thespray gun or try to repair it yourself.
• Make sure that no solvent fumes are sucked into thespraygun.
• When using thespray gun outdoors, think about thewind direction. Thecoating
material from thespray gun could land on surfaces where it is not wanted close to
theworkarea.
• When using thespray gun indoors, make sure that theroom is well-ventilated.
• Never lay thespray gun on its side duringuse.
• Never let children play with thespraygun.
Safety symbol guide
Wear ear protection.
Wear safety glasses or visor and aface mask.
Read theentire instruction manual before use and
save it for future reference.

7
ENGLISH
1 2 3 4 5 6
7
8
9
3 1 2
Buttons and functions
1. Aircap
2. Paint nozzle
3. Locknut
4. Power switch
5. [ ] Housing release catch
6. Air filter
7. Coating material volume regulator
8. Container
9. Mainslead
8
ENGLISH
Use
Preparations
Suitable coating materials
Water- and solvent-based paints, 2-component paints, primers, clear finishes, vehicle
finishes, glazes, wood preservants (sealants, oils, etc), wood stains, insecticides.
Unsuitable coating materials
Emulsion paints, alkaline paints, calcimine paints (whitewash), distemper, materials
with aflashpoint below 21ºC.
Preparing the coating material (thinning)
Thoroughly shake thecan of coating material before openingit. Coatings such as paints
normally need to be diluted/thinned before spraying. Testasmall amount of thecoating
before diluting itall. Follow themanufacturer’s advice for thinning thecoating you
areusing. Askyour local paint shop for advice if you are unsure, explain that you are
using aHVLP (high volume, low pressure) type spraygun. Thethickness of apaint is
denoted by its viscosity and is measured by letting acertain amount of paint run through
ahole of acertain diameter. Thelonger it takes for thepaint to run through thehole,
thehigher theviscosity. Viscosity is measured in seconds.
Warning: Onlyuse coating materials with aflashpoint above 21 °C.
Example viscosities of various coating materials
Spray coating Viscosity in DIN-seconds
Primer containing solvent 25–40
Varnish containing solvent 15–40
Water-soluble primer 25–40
Water-soluble varnish 20–35
Wood preservative, paint remover, oil Undiluted
Disinfectant, insecticide Undiluted
Vehicle paint/lacquer 20–35
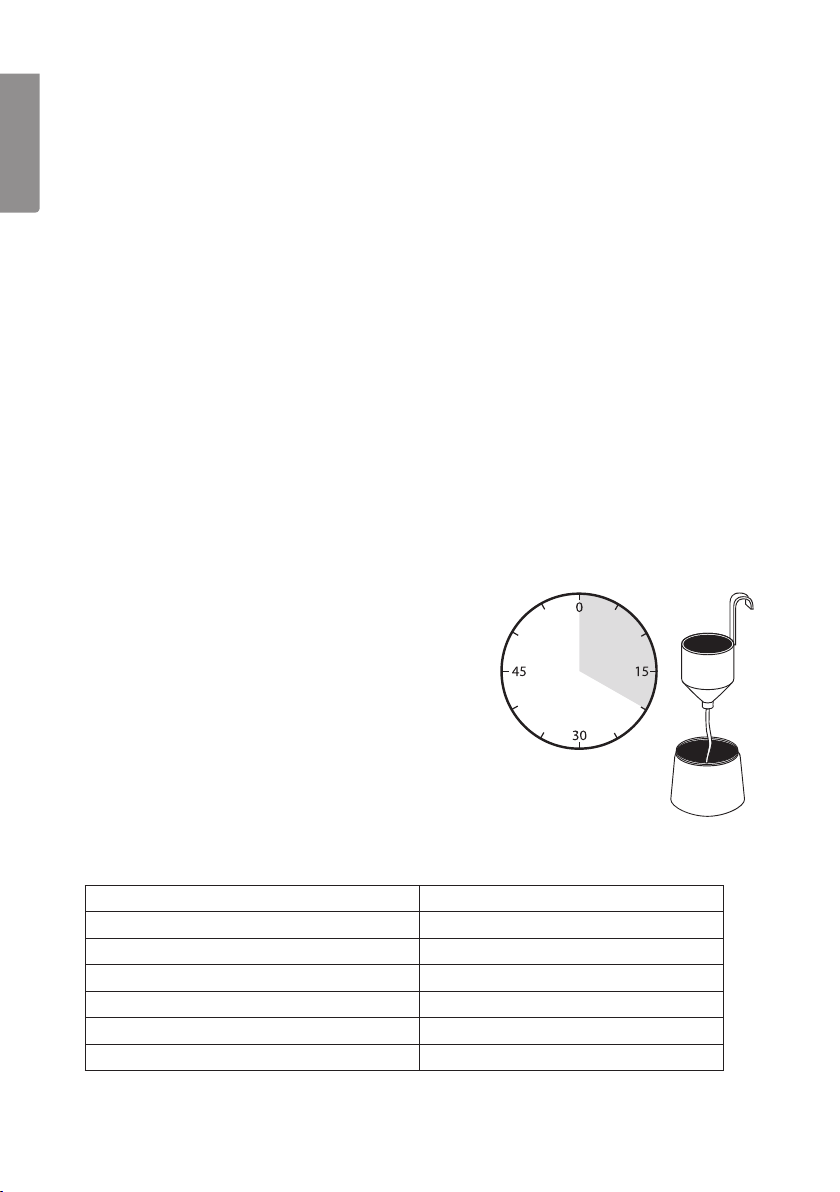
Measuring the viscosity
1. Shakethecontainer of paint before
performing aviscositytest.
2. Diptheentire viscosity cup into thecoating
material so that it fills completely.
3. Holdup theviscosity cup and measure how
long it takes for thepaint to run through
thehole.
4. Dilute thepaint if it is too thick and measure
itagain.

9
ENGLISH
10–30 cm
Preparation of the workpiece to be coated
• Thequality of thefinish will depend on how clean and smooth thesurface is before
it is sprayed. Sandand fill rough or cracked surfaces if required. Remove all dust
from thework area before starting to spray, vacuum clean if possible.
• Cover all surfaces and objects that should not be sprayed with masking tape and
dust sheets or remove them from theworkarea.
• Cover all hinges, screw threads,etc.
Spray painting
1. Unscrew thepaint container.
2. Turn thesuction tube so that it is in
theoptimum position for thework athand:
- When working on lying objects, turn
thesuction tube forwards.
- When working on upright objects, turn
thesuction tube rearwards.
3. Place thecontainer on aflat piece of paper
and pour in thepaint (coating material).
4. Screw thecontainer firmly back onto
thespraygun.
Switching the spray gun on
1. Connect thespray gun to a230V, 50Hz power socket.
2. Aim thespray gun at theobject to be painted.
3. Pull thetrigger (4) until paint comesout. Thetrigger has two stages, thefirst stage
starts themotor, thesecond feeds thepaintout.
Switching the spray gun off
1. Release thetrigger to switch thespray gunoff.
2. Unplug themains lead from thewall socket.
Operating instructions
1. When working outdoors, pay
attention to thewind direction.
2. Begin by test spraying on apiece
of card to set thecorrect spray
pattern and feed rate before starting
to spray theobject to be coated
(settings described in next section).
3. Hold thespray gun perpendicular
to thesurface to be painted and at
adistance of 10–30cm (see fig.).
10
ENGLISH
a b c 3 1
4. Begin spraying outside thetarget area and move your arm in asmooth motion
from side to side or up anddown.
5. Move thespray gun evenly cross-wise or up-and-down, depending on thespray
pattern setting.
6. Let each pass of thespray jet overlap by 4–5cm.
7. Do not interrupt thespraying action once inside thetargetarea.
8. Aneven movement of thespray gun results in aneven surface quality.
9. Varying thedistance or spraying angle will lead to theformation of paint mist,
resulting in anuneven coating.
10. Finish thespraying motion outside thetargetarea.
11. Do not operate thespray gun until thecontainer is completelyempty. Ifthespray
gun can no longer feed paint to thenozzle during operation, there will be
aninterruption in thespraying resulting in anuneven finish.
12. If either thepaint nozzle or air cap are soiled, they should be cleaned with
theappropriate thinningagent.
Settings
Note: Donot pull thetrigger whilst adjusting thesetting.
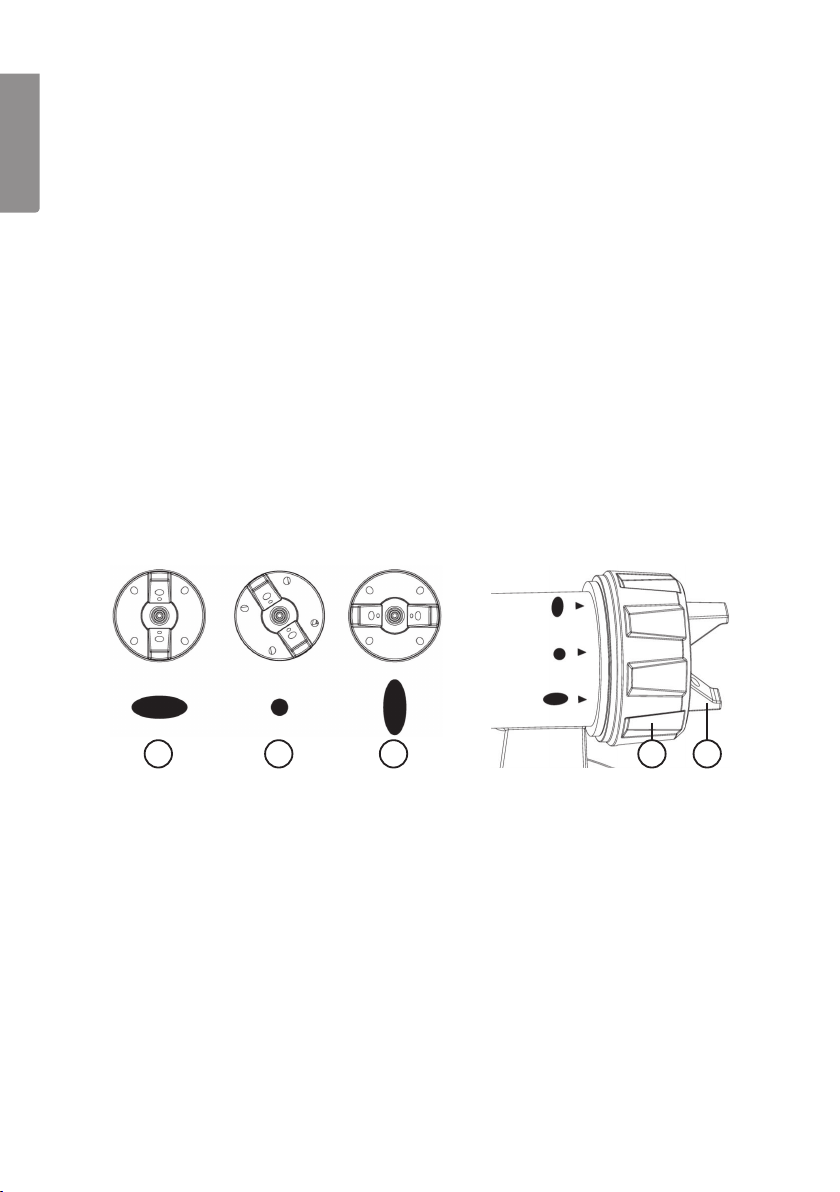
Spray pattern
Three different spray jet settings can be chosen:
a) Vertical, flat jet - for horizontal surfaces.
b) Circular jet - for corners, edges and hard-to-reach surfaces.
c) Horizontal, flat jet - for vertical surfaces.
1. Undo thelock nut (3) and set thepreferred spray pattern by twisting theair cap (1)
to therelevant position. Referto thesymbols on thespray gun and turn theair cap
until it lines up with therelevant symbol.
2. Retighten thelocknut.

11
ENGLISH
7
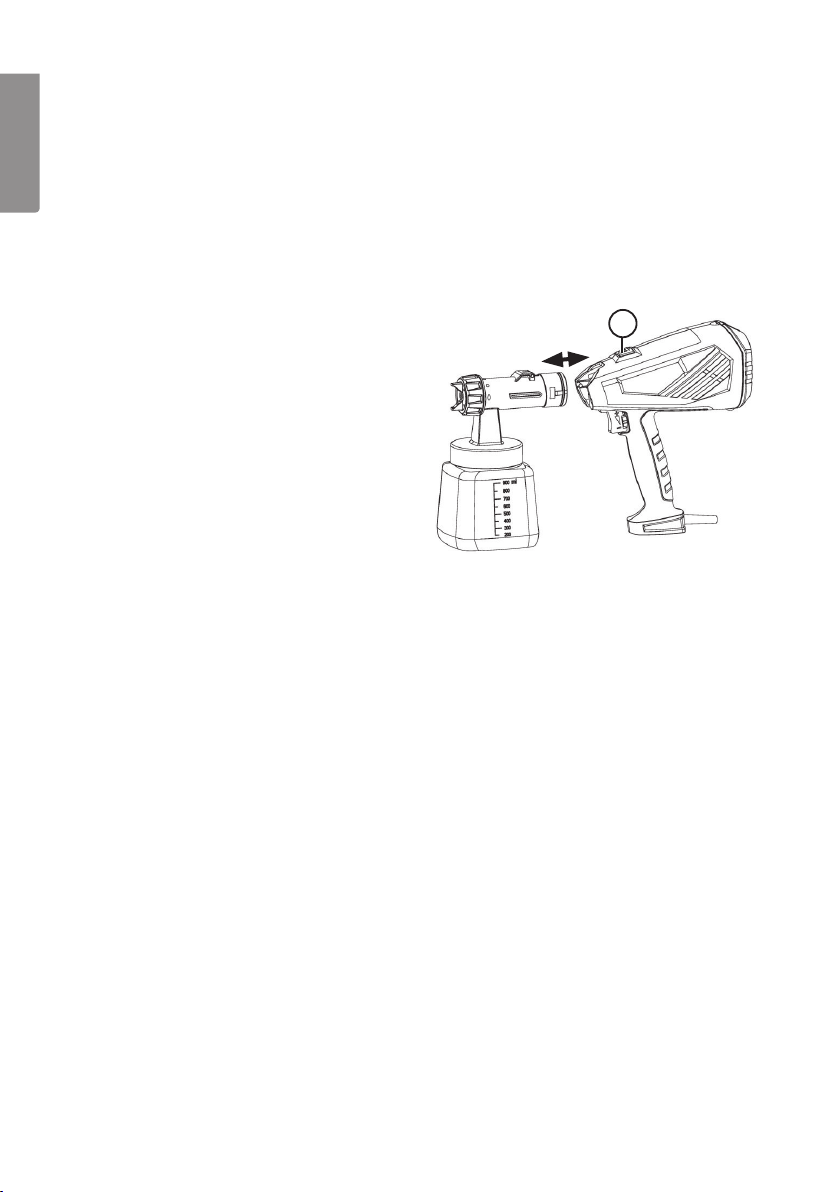
Adjusting the material volume
1. Set thematerial volume by turning theregulator (7).
2. When you are happy with your settings, you can start
spraying thereal object to be painted.
Changing the paint nozzle
Thespray gun comes with 2 paint nozzles, 1.8 mm and 2.6mm. Thesmaller nozzle is
suitable for most purposes. Thelarger nozzle should be used if ahigh volume of paint
needs to be applied.
1. Remove thelocknut.
2. Remove theair and paint nozzles and take them apart, theparts are pressed
together and it can be difficult to separatethem.
3. Change thepaint nozzle, press
thenew nozzle together with
theaircap. Makesure that thelugs
on theair cap slot into thenotches
on thepaint nozzle.
4. Refit theparts onto thespray
gun, making sure that thelugs on
thepaint nozzle fit into thenotches
on thespraygun.
5. Press down on theparts alittle and tighten thelocknut.
12
ENGLISH
5
After finishing work
1. Unplug themains lead from thewall socket.
2. Pull thetrigger so that any paint left in thespray gun runs back into thecontainer.
3. Unscrew thecontainer and pour any leftover paint back into itscan.
4. Clean as much paint as possible off thecontainer and suction tube using asoft
brush orcloth.
5. Pour solvent or water (depending on type of paint used) into thecontainer and
screw it back onto thespraygun. Warning: Onlyuse solvent with aflashpoint
above 21 °C.
6. Detach thespray nozzle-container
assembly from themotor unit by
pressing in therelease catch (5).
7. Reassemble thespray gun by inserting
therear of thespray nozzle-container
assembly into themotorunit. Pressing
therelease catch down will help them
connect more easily.
8. Plug thespray gun back into thewall socket, switch it on and spray thesolvent or
water into another container or onto acloth.
9. Repeat theabove procedure until thesolvent or water coming out of thespray gun
isclear.
10. Switch thespray gun off and pull out theplug from thewall socket.
11. Unscrew thecontainer and dry it, making sure that thesurface of thejoint is clean
and free from paint residue.
12. Wipe theexterior of thespray gun with acloth soaked in solvent orwater.
13. Unscrew and remove thelock nut (3) and remove theair cap and paint nozzle.
14. Wash theloose components and paint needle in solvent orwater. Donot use
metal tools to clean thespraygun. Note: Neverimmerse themotor unit of
thespray gun in water or other liquid.
15. Reassemble thespray gun when it is clean anddry.
13
ENGLISH
Disposal
This product should be disposed of in accordance with local regulations.
Ifyou are unsure how to proceed, contact your local council.
Specifications
Model JS-HH12B, JS-HH12B-UK
Rated voltage 230 V AC, 50 Hz
Power 500W
Max viscosity 100 DIN-s
Max flow rate 750 ml/min with 2.6 mm nozzle
Nozzle diam 1.8/2.6mm
Mains lead 3m
Paint container 800ml
Noise level LpA 82.17 dB(A), K = 3 dB(A)
LwA 93.17 dB(A), K = 3dB(A)
Vibration ah< 2.5 m/s², K = 1.5 m/s²
Weight 1.3kg
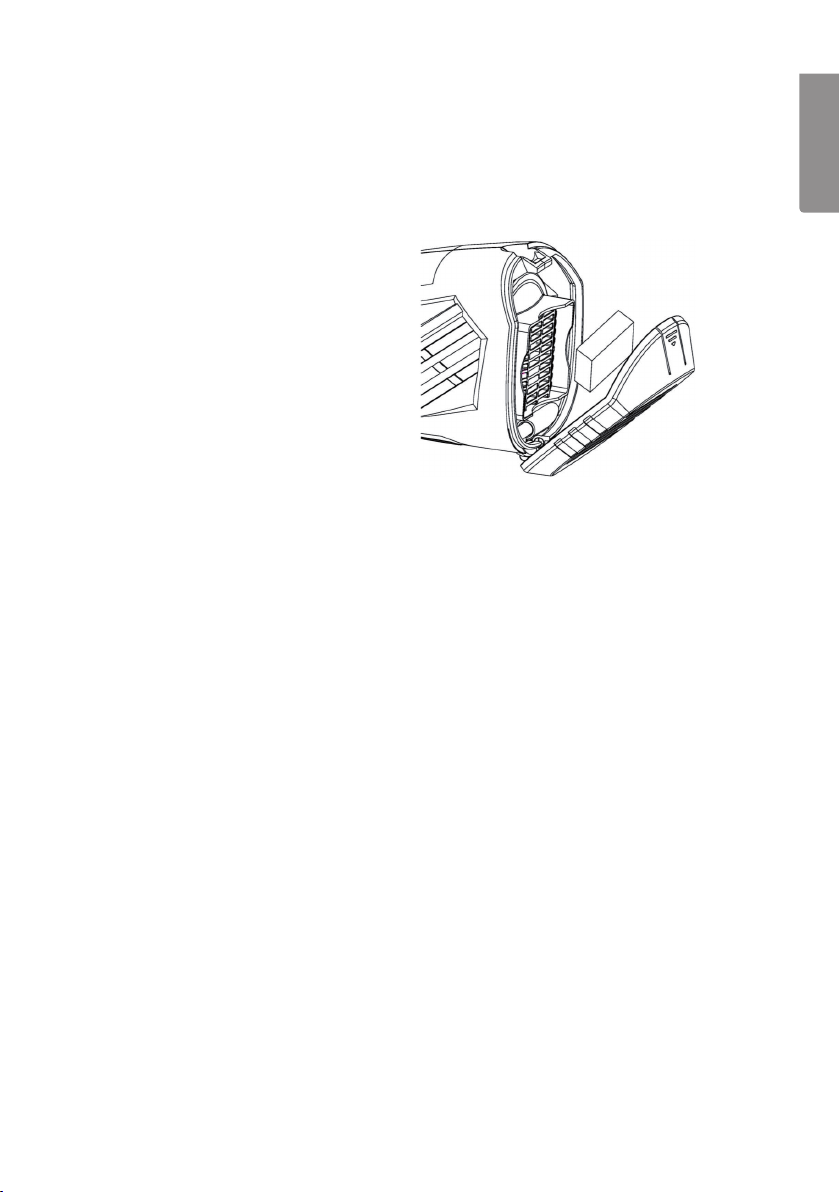
Air filter
1. Remove thecover of theair filter
compartment.
2. Remove thefilter and wash it at
regular intervals.
Note: Neveruse thespray gun without
theair filter inplace.
Care and maintenance
Note: Always unplug themains lead from thewall socket before cleaning or
maintenance of anysort.
• Clean thespray gun by wiping it with asoftcloth. Usealittle mild detergent if necessary.
• Never use abrasive cleaning agents or solvents.

14
ENGLISH
Troubleshooting guide
Problem Cause Action
Thespray
gun does
notstart.
1. Themains lead is not
plugged into thewall
socket properly.
2. Themains lead or plug is
damaged.
3. Thewall socket has
nopower.
1. Check theconnection.
2. Replace themains lead if
necessary.
3. Check all thefuses/circuit
breakers in thecircuit. Contact
aqualified electrician if you
are at all unsure about how to
proceed.
No paint
comes
out of
thenozzle.
1. Thenozzle or suction
tube is clogged.
2. Thesuction tube isloose.
3. Thecontainer is not
screwed ontight.
4. Thepaint is too viscous
(toothick).
1. Clean theparts with solvent or
water depending on thetype of
paintused.
2. Unscrew thecontainer and
secure thesuctiontube.
3. Tighten thecontainer.
4. Dilute thepaint by another 10%.
Thepaint
drips from
thenozzle.
1. Too much paint has built
up on thepaint nozzle
and aircap.
2. Thelock nut isloose.
1. Clean theparts with solvent or
water depending on thetype of
paintused.
2. Tighten thelocknut.
Thespray
jet pulsates.
1. Thepaint container is
nearlyempty.
2. Theair filter is clogged.
3. Thepaint is too viscous
(toothick).
1. Refill thecontainer.
2. Clean or replace theair filter.
3. Dilute thepaint by another 10%.
Runs in
thepaint on
thesurface.
1. Too much paint leaving
spraygun.
2. Paint not viscous enough
(toothin).
3. Spray gun too close or
moved too slowly over
surface.
1. Reduce thepaint volume using
theregulator (7).
2. Check thethickness of coating
material.
3. Refer to the Operating
instructions sectionabove.
Thepaint
does not
cover
thesurface.
1. Too little paint leaving
thespraygun.
2. Thepaint is too viscous
(toothick).
3. Spray gun too far away
from or moved too quickly
over surface.
1. Increase thepaint volume using
theregulator (7).
2. Check thethickness of coating
material.
3. Refer to the Operating
instructions sectionabove.

15
SVENSKA
Färgspruta HVLP
Art.nr 18-3569 Modell JS-HH12B-UK
40-9132 JS-HH12B
Läs igenom hela bruksanvisningen före användning och spara den sedan för fram-
tidabruk. Vireserverar oss förev. text- och bildfel samt ändringar av tekniskadata.
Vid tekniska problem eller andra frågor, kontakta vår kundtjänst (se adressuppgifter
påbaksidan).
Säkerhet
Generella säkerhetsinstruktioner för elektriska handverktyg
Varning! Läsalla instruktioner.
Om nedanstående instruktioner inte följs kan detta leda till elektrisk stöt, brand eller
allvarligskada.
SPARA DESSA INSTRUKTIONER.
Termen ”elektriskt handverktyg” ivarningstexten nedan refererar till ditt nätanslutna
eller batteridrivna handverktyg.
1) Arbetsutrymmet
a) Håll arbetsutrymmet rent och väl upplyst. Belamrade och mörka utrymmen
inbjuder till olyckor.
b) Använd inte elektriska handverktyg iexplosiva miljöer, som inärheten av
lättantändliga vätskor, gaser ellerdamm. Elektriska handverktyg genererar
gnistor som kan antända damm ellerångor.
c) Håll undan barn och åskådare medan du använder det elektriska handverktyget.
Störningsmoment kan göra att du tappar kontrollen över verktyget.
2) Elektrisk säkerhet
a) Det elektriska handverktygets stickpropp måste passa ivägguttaget.
Modifiera aldrig stickproppen på någotvis. Användaldrig adapter
tillsammans med jordade elektriska handverktyg. Omodifierade stickproppar
och passande vägguttag minskar risken för elektriskstöt.
b) Undvik kroppskontakt med jordade föremål,t.ex. rör, element, köksspis och
kylskåp. Detinnebär ökad risk för elektrisk stöt om din kropp är jordad.
c) Utsätt inte det elektriska handverktyget för regn eller våta förhållanden.
Omvatten tränger in iettelektriskt handverktyg ökar det risken för elektriskstöt.

16
SVENSKA
d) Misshandla inte nätsladden. Användaldrig nätsladden för att bära, dra eller
rycka stickproppen ur vägguttaget. Hållundan nätsladden från värme, olja,
vassa kanter och rörligadelar. Skadade eller trassliga nätsladdar ökar risken för
elektriskstöt.
e) När du använder ettelektriskt handverktyg utomhus, använd enskarvsladd
anpassad för detta ändamål. Användning av enskarvsladd för utomhusbruk
minskar risken för elektriskstöt.
f) Om det inte går att undvika att det elektriska handverktyget används ifuktig
miljö, använd ettvägguttag utrustat med jordfelsbrytare. Användning av
jordfelsbrytare minskar risken för elektriskstöt.
3) Personlig säkerhet
a) Var uppmärksam på vad du gör och använd sunt förnuft när du använder
ettelektriskt handverktyg. Användinte ettelektriskt handverktyg om du
är trött eller påverkad av droger, alkohol eller medicinering. Ettögonblicks
ouppmärksamhet när du använder ettelektriskt handverktyg kan resultera iallvarlig
personskada.
b) Använd skyddsutrustning. Bäralltid skyddsglasögon. Attvid behov använda
skyddsutrustning,t.ex. andningsskydd, halksäkra skyddsskor, hjälm och
hörselskydd, minskar risken för personskada.
c) Undvik oavsiktligstart. Setill att strömbrytaren är iläge OFF innan du
ansluter stickproppen till vägguttaget, ansluter batteriet eller lyfter upp/bär
det elektriska handverktyget. Attbära ettelektriskt handverktyg med ettfinger
på strömbrytaren/avtryckaren eller att ansluta ettelektriskt handverktyg till elnätet
när strömbrytaren är iläge ON inbjuder till olyckor.
d) Ta bort alla serviceverktyg/nycklar innan du slår på det elektriska
handverktyget. Ettkvarglömt serviceverktyg på enroterande del av det elektriska
handverktyget kan resultera ipersonskada.
e) Sträck dig inte förlångt. Setill att du står stadigt med god balans helatiden.
Dettamöjliggör bättre kontroll över det elektriska handverktyget ioväntade
situationer.
f) Bär lämplig klädsel. Bärinte löst sittande kläder eller smycken. Hållundan
hår, kläder och handskar från rörligadelar. Lösakläder, smycken och långt hår
kan fastna irörligadelar.
g) Om utrustning för utsugning och uppsamling av damm finns tillgänglig, se till
att denna är ansluten och används på ettkorrektsätt. Användning av dessa
hjälpmedel kan minska dammrelateradefaror.

17
SVENSKA
4) Användning och underhåll av det elektriska handverktyget
a) Pressa inte det elektriska handverktyget. Användettelektriskt handverktyg
som är avsett för det arbetsmoment duutför. Korrekt elektriskt handverktyg gör
jobbet bättre och säkrare med avsedd matningshastighet.
b) Använd inte det elektriska handverktyget om strömbrytaren inte slår på och
stänger av verktyget. Allaelektriska handverktyg som inte kan kontrolleras med
strömbrytaren är farliga och måste repareras.
c) Ta stickproppen ur vägguttaget eller ta ur batteriet innan du utför några
justeringar, byter tillbehör eller lägger undan det elektriska handverktyget för
förvaring. Dessaförebyggande skyddsåtgärder minskar risken för att starta det
elektriska handverktyget oavsiktligt.
d) Förvara elektriska handverktyg som inte används utom räckhåll för barn och
låt inte personer som inte är förtrogna med det elektriska handverktyget
eller dessa instruktioner användadet. Elektriska handverktyg är farliga om de
kommer ihänderna på ovana användare.
e) Underhåll elektriska handverktyg. Kontrollera om något är felinställt, om
rörliga delar kärvar, om delar har gått sönder eller om något annat har
inträffat som kan påverka funktionen hos det elektriska handverktyget.
Omnågot är skadat måste det repareras före användning. Mångaolyckor
beror på dåligt underhållna elektriska handverktyg.
f) Håll skärverktyg vassa ochrena. Ordentligt underhållna skärverktyg med vassa
eggar är mindre benägna att kärva och lättare att kontrollera.
g) Använd det elektriska handverktyget, tillbehöretc. enligt dessa instruktioner,
ta hänsyn till arbetsförhållanden och till det arbete som ska utföras.
Användning av det elektriska handverktyget för andra arbeten än vad det är ämnat
för kan resultera ienfarlig situation.
5) Service
a) Låt behörig personal utföra service och reparationer, och endast med
originalreservdelar. Dettagaranterar att säkerheten hos det elektriska
handverktyget behålls.
Särskilda säkerhetsinstruktioner för färgsprutor
• Inga antändningskällor somt.ex. öppen eld, rökning, gnistor, glödtrådar, heta
ytoretc. får finnas inärheten när färgsprutan används.
• Använd endast färger och andra vätskor med enflampunkt över 21ºC.
• Var uppmärksam på eventuella risker orsakade av sprutämnet, följ anvisningarna
på förpackningen eller informationen som följer med sprutämnet, följ även
anvisningarna gällande personlig skyddsutrustning.
• Använd iväl ventilerade och anpassade utrymmen.
• Varning! Användaldrig någon brandfarlig vätska ifärgsprutan.
• Om anslutningskabeln är skadad får den endast bytas av tillverkaren eller behörig
serviceverkstad. Dettaför att undvikafara.

18
SVENSKA
• Varning! Riskför personskada. Riktaaldrig färgsprutan mot dig själv eller mot
andra personer ellerdjur.
• Vid arbete med sprutan kan giftiga ångor bildas som kan leda till förgiftning och
allvarligt skada hälsan.
• Använd ALLTID lämpliga skyddsglasögon, handskar, andningsmasketc. för att
förhindra att färg, lösningsmedel och giftiga ångor kommer ikontakt med ögon
ochhud.
• Följ alltid de anvisningar som ges av färgtillverkaren eller av tillverkaren för de
vätskor som används ifärgsprutan.
• Se till att arbetsplatsen är väl ventilerad när du arbetar inomhus.
• Låt aldrig barn använda färgsprutan.
• Demontera inte färgsprutan och försök inte reparera densjälv.
• Se till att inga ångor från lösningsmedel sugs in ifärgsprutan.
• När du använder färgsprutan utomhus, tänk på vindriktningen. Sprutämne från
färgsprutan kan hamna på oönskade ytor inärheten av arbetsplatsen.
• När du använder färgsprutan inomhus, se till att lokalen är välventilerad.
• Lägg aldrig färgsprutan på sidan under arbetet.
• Låt aldrig barn leka med färgsprutan.
Produktmärkning med säkerhetssymboler
Använd hörselskydd.
Använd skyddsglasögon eller visir och andningsskydd.
Läs igenom hela bruksanvisningen före användning
och spara den sedan som referensmaterial.

19
SVENSKA
1 2 3 4 5 6
7
8
9
3 1 2
Knappar och funktioner
1. Luftmunstycke
2. Färgmunstycke
3. Låsmutter
4. Strömbrytare
5. [ ] Spärr för isärtagning av
färgsprutan
6. Luftfilter
7. Reglage för inställning av
sprutämnesmängd
8. Behållare
9. Nätkabel

20
SVENSKA
Användning
Förberedelser
Lämpliga sprutämnen
Vatten- och lösningsmedelsbaserad färg, 2-komponentslacker, primers, klarlack,
billack, lasyr, träskyddsprodukter (sealers, oljoretc.), bets, bekämpningsmedel
motinsekter.
Olämpliga sprutämnen
Emulsionsfärg, (t.ex. äggoljetempera), alkaliska färger (t.ex. kalkfärg), slamfärger
(t.ex.Falurödfärg), sprutämnen med enflampunkt lägre än 21ºC.
Rekommendation för ev. spädning av färg
Skaka färgförpackningen ordentligt innan du öppnarden. Färgenska normalt spädas
ut, prova enmindre mängd färg innan allt spädsut. Följtillverkarens råd för utspädning
av färgen. Rådgörmed din färghandlare om du är osäker och tala om att du använder
enfärgspruta av typen HVLP (stor volym, lågt tryck). Måttetpå färgens tjocklek
benämns viskositet och kan mätas genom att låta enviss mängd färg rinna genom
etthål med bestämd diameter. Julängre tid det tar för färgen att rinna igenom, desto
högre viskositet. Viskositeten anges isekunder.
Varning! Användendast sprutämnen som har enflampunkt över 21 °C.
Riktlinjer för viskositet för materialet som ska sprutas
Material Viskositet – DIN-sekunder
Grundfärg som innehåller lösningsmedel 25–40
Fernissa som innehåller lösningsmedel 15–40
Grundfärg som kan spädas ut med vatten 25–40
Fernissa som kan spädas ut med vatten 20–35
Impregneringsmedel för trä, färgborttagningsmedel, oljor Oförtunnad
Desinfektion, insektsmedel Oförtunnad
Bilfärg 20–35
Mätningen av viskositet
1. Skakaförpackningen med färg före provning.
2. Doppahela den medföljande viskositets-
bägaren ifärgen så att den blir heltfull.
3. Hållupp viskositetsbägaren och mät hur
många sekunder det tar för färgen att rinna
genomhålet.
4. Spädut färgen om den är för tjock och
kontrolleraigen.
This manual suits for next models
1
Table of contents
Languages:
Other CO/Tech Paint Sprayer manuals


Popular Paint Sprayer manuals by other brands

Priax
Priax X-10SW Operating and maintenance instructions

micronAir
micronAir AU8000 Operator's manual

Silvan Selecta
Silvan Selecta Utepak 100L instruction manual

Campbell Hausfeld
Campbell Hausfeld HV2000 Series Operating instructions & parts manual

Unimac
Unimac UM-SP-35 user manual

DeVilbiss
DeVilbiss JGP-503 CONVENTIONAL Service bulletin


