Cobra Drive HD CDR 900 User manual

Printed in China
Part No. 480-958-P
Version B
SUPER HD DASH CAM
WITH WI-FI
CDR 900
User Manual
Protect • Re-live • Share
Record Your Ride
D
DA
S
H
C
AM
FI
Y
ou
r Ri
de

Nothing Comes Close to a Cobra®A1A1
©2014 Cobra Electronics Corporation
6500 West Cortland Street
Chicago, Illinois 60707 USA
www.cobra.com
Important Information
Customer Assistance
Safe Driving
Motorists, as well as operators of emergency or service vehicles, are expected to
exercise all due caution while using this product, and to obey all applicable trafc laws.
Security of Your Vehicle
Before leaving your vehicle, always remember to conceal this device in order to reduce
the possibility of break-in and theft.
Privacy
This device may not be used to violate the privacy rights of others. In no way will Cobra
Electronics or its subsidiaries be responsible for inappropriate use of this product. It is
the sole responsibility of the buyer to consult legal counsel for the interpretation of any
laws applicable to the area of intended use of this product.
Important Information and
Customer Assistance
Introduction
Cobra Electronics Corporation
6500 W. Cortland Street
Chicago, IL 60707
www.cobra.com
Trademark Acknowledgement
Cobra™, Nothing Comes Close to a Cobra™, and the snake design are registered trademarks of
Cobra Electronics Corporation, USA.
Cobra Electronics Corporation™ is a trademark of Cobra Electronics Corporation, USA.

English
A2
Controls, Indicators and Connections •
Controls Indicators and Connections
Introduction
Speaker
Micro USB Port
Micro SD Card Slot
Lens
Record / Emergency
Button
Micro HDMI Port
Status
Indicator
Mic
Tripod
Mount
Power / Menu
Button
GPS Receiver Slot

Nothing Comes Close to a Cobra®A3
Congratulations! You’ve made a smart choice by purchasing a Drive
HD Dash Cam from Cobra. This booklet describes the simple steps for
mounting, setting up, and using your dash camera.
Records 1296P Super HD or 1080P Full
HD video. Ambarella™ chipset ensures
excellent image quality, night time
performance, and advanced dynamic range.
WiFi capability allows the CDR 900 to
connect wirelessly with the Drive HD™
app for viewing live video, controlling the
camera, uploading and sharing videos,
adjusting settings, and Cloud Mode on your
smartphone.
Ultra wide 160° viewing angle lms the
entire road and your peripherals without
edge distortion.
Continuous Loop Recording overwrites old
footage unless you want to save it. A time/
date stamp is embedded on all recordings
so you’ll never miss an event while driving.
Ready to use out-of-the-box. Includes
a heavy-duty suction cup to mount the
camera to your windshield and an 8GB
MicroSD card to Record your Ride.
3-axis G-Sensor senses sudden
accelerations and collisions and
automatically protects footage surrounding
the incident.
Additional Features:
Emergency Record Button
Motion Sensor
Built-in Microphone & Speaker
Auto-Record and Auto-Power Off
Optional waterproof case (not included)
Camera Features •
Introduction
Product Features

Nothing Comes Close to a Cobra®1
Contents
Introduction
Introduction
Important Information ..................................A1
Customer Assistance .................................. A1
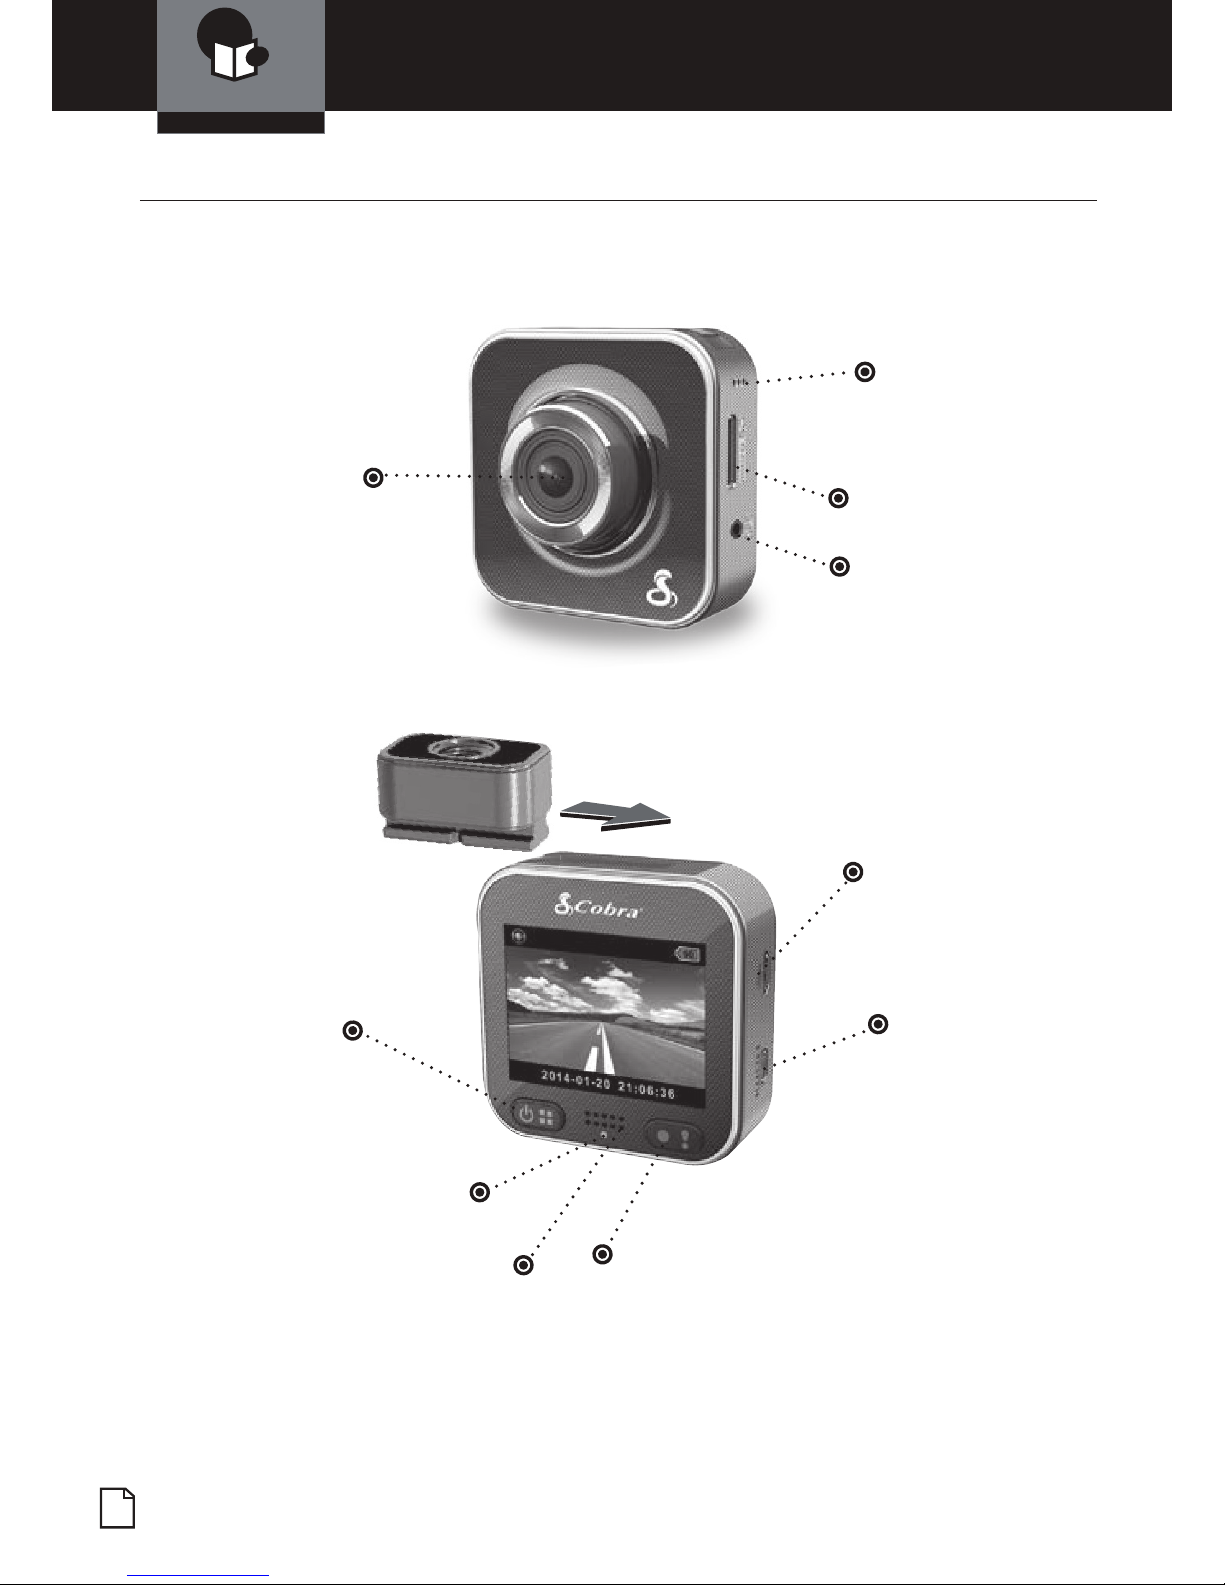
Controls, Indicators and Connections ..................... A2
Product Features .................................... A3
Your Device
What’s in the Box...................................... 2
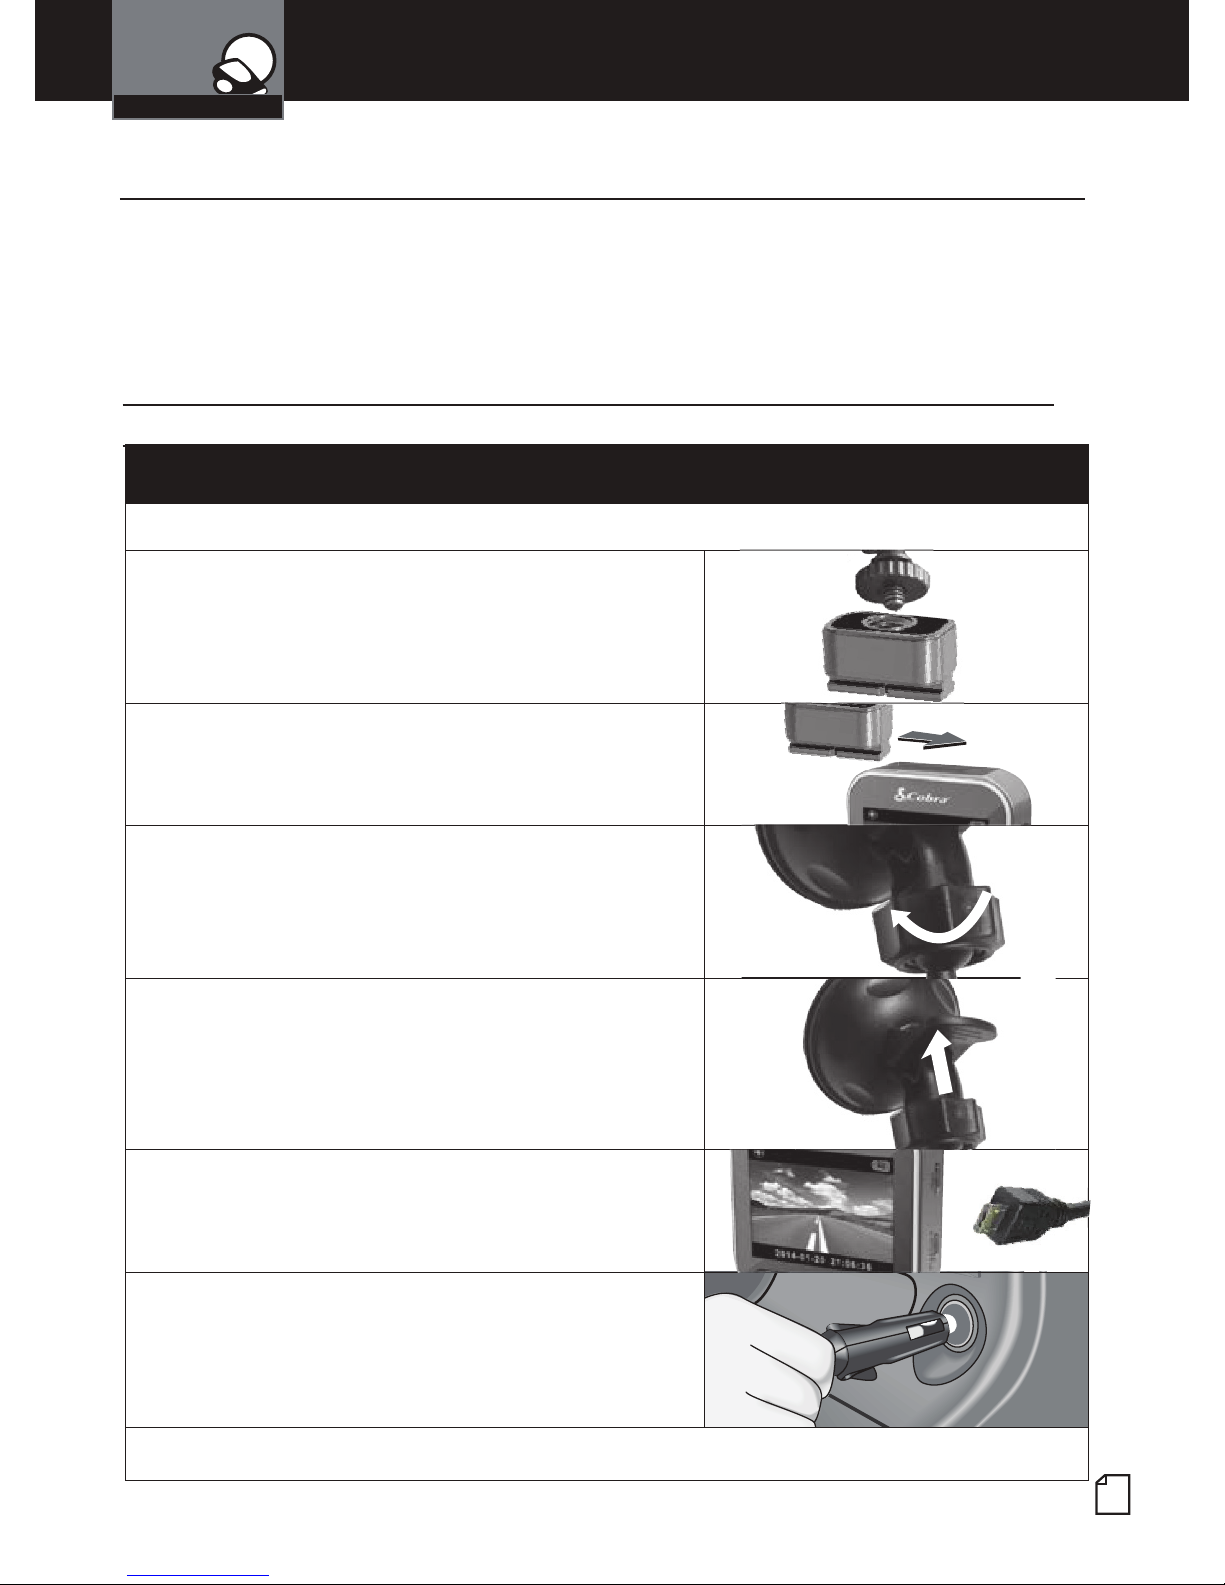
Installation........................................... 3
Camera Operation ................................... 4-9
Charging the device ................................. 4
Inserting and removing the Memory Card ................ 4
Dash Cam Mode vs Action Cam Mode ................... 5
To Start recording video .............................. 6
To make an emergency recording....................... 6
To cancel an emergency recording ..................... 6
To Toggle the Microphone on/off (while recording).......... 7
To Power the device off .............................. 7
Video playback ..................................... 8
Using the Playback Screen ............................ 9
Adjusting Camera Settings ............................. 10
Adjusting the Main Menu Settings ......................10
Connecting to a Computer.............................. 11
Connecting to a TV.................................... 11
Wireless and App Operation .............................12
Connecting to the Smartphone App........................13
Smartphone App Operation ..............................14
Cloud Mode Features...................................16
Motion Detector Setup..................................18
Customer Information
Specications ...................................... 19
Troubleshooting .......................................20
Licensing & Trademark Acknowledgement ................. 21

English
2
What’s in the Box
What’s in the box •
Your Detector
Printedin China
PartNo. 480-958-P
VersionA
SUPER HD DASH CAM
WITH WI-FI
CDR 900
User Manual
Protect • Re-live • Share
Record Your Ride
D
DA
S
H
C
A
M
FI
Y
ou
r Ri
de
Dash Cam (Model # CDR 900) Product Manual
Heavy Duty Suction Cup Mount 8GB Micro SD Card (installed)
Cigarette Lighter Adapter Micro USB to USB Cables (1 foot power/data
& 12 foot power only)
Tripod Connector Lanyard and Lanyard Mount
NOTE: While the 12 foot and 1 foot cables look similar, they have different
functions. The 12 foot cable is for power only and enables Auto-Power
ON and Auto-Record. The 1 foot cord is for data transfer to a computer.

Nothing Comes Close to a Cobra®3
Installation •
Where to Mount Your Unit
You will get optimum performance from your camera if you mount it on the front
windshield, behind the rear-view mirror. This will minimize the impact on the driver’s
line of sight. You’ll also want to keep the camera centered and angle the bracket to
optimize the camera’s view of the road ahead.
Installation
Your Dash Cam
Peel the plastic lm off of the suction cup.
Screw the tripod mount onto the base of the suction
cup mount.
Slide your CDR 900 onto the tripod mount using the
channel on the top of the unit.
To adjust the angle to the road, loosen the angle
locking ring, turn the camera so that it has a clear
view of the road ahead and tighten the knob.
Press the Suction Cup rmly onto the windshield.
Push down on the lever to lock the suction cup in
place.
Plug the 12 foot Micro-USB cable into the camera.
Plug the cigarette lighter adapter on the power
cord into your vehicle’s cigarette lighter.
You can temporarily remove the camera by sliding it off the tripod mount.
Windshield Mounting

English
4
Camera Operation
Charging the device
You can charge the device with the included car charger, or with any micro
USB cable.
When the system is OFF, the status indicator ashes orange.
When the system is ON, the unit will charge in the background without any
icon shown.
Inserting and removing the Memory Card
Your camera comes with an 8GB Micro SD
Card preinstalled, but it can support up to
64GB Micro SD cards (not included).
To remove the memory card, push the
Memory card forward gently until you hear a
click, and the card should release.
To insert a different memory card, orient the
card as shown and press it in until you hear
a click.
Your Dash Cam

Nothing Comes Close to a Cobra®5
Mode Action Cam Dash Cam
Recording Type Normal Continuous Loop Emergency
Press in preview
Unlimited
Display Info 00:06:36 2014/01/01 21:06:35
Remaining on Current date & time
SD card
• Car impact
• Select
during loop
recording
One min. section
(30 seconds
before and after
the event)
Recording
Duration
To Start
Recording
Three Minute
Segments
Camera Operation
Dash Cam Mode vs Action Cam Mode •
Continuous Loop Recording: Once the memory card is full, this camera will
continuously overwrite the oldest footage recorded.
G-Sensor: The G-Sensor is an accelerometer that can detect an impact caused
by an accident. If the G-Sensor is triggered the camera will automatically save
the footage 30 seconds before and after the incident to a protected le that will
not be overwritten by loop recording.
Your Dash Cam
The CDR 900 has two recording modes for different applications:
Dash Cam Mode: Shoots continuous loop and emergency videos.
Action Cam Mode: Shoots normal videos.
NOTE: By default, the CDR 900 formats the SD card so that 50% of the
memory is used for Action Cam Mode and 50% is reserved for Dash
Cam Mode. This allocation can be modied through settings in the App.

English
6
Camera Operation
To Start recording video
Press to turn the camera on. Visual Display
The camera screen turns on to show a live
preview of the camera image.
Press to begin recording. Recording begins and the letters REC ash
in red.
While recording, press to stop
recording.
The recocrding stops and letters REC
disappear.
To make an Emergency Recording
While recording, press and
then .
Visual Display
The icon ashes on the top bar and
shows a progress percentage of the locked
le being recorded.
Your Dash Cam
To cancel an Emergency Recording
While in an emergency recording, press
. Press to conrm.
Visual Display
The emergency recording will stop and the
camera will return to standard recording
mode.
To cancel an Emergency Recording
While in an emergency recording, press
and then . Press
to conrm.
Visual Display
The emergency recording will stop and the
camera will return to standard recording
mode.
OR

Nothing Comes Close to a Cobra®7
To Toggle the Microphone on / off (while recording)
Press to bring up the
recording menu.
Visual Display
The bottom bar changes to show controls
for Microphone Mute and File Lock.
Then, immediately press to
toggle the sound recording.
The microphone icon will appear or
disappear from the top bar.
To Power the device off
Note: In dash cam mode the device will power off automatically when power is discon-
nected from the unit. The length of time is determined by the Delay Power Off setting in
the App.
Press and hold for 2 seconds. Visual Display
The device will power off and the screen
will go dark. If the device is still connected
to USB power, the orange LED may ash to
indicate the battery is charging.
Camera Operation
Your Dash Cam

English
8
Video playback:
If you’re currently recording video, you need to stop recording video rst.
Press to bring up the main menu: Visual Display
The main Menu will appear:
Select and use the buttons to view Action Cam
or Dash Cam les.
Playback Selection Screen will appear:
Camera Operation
Your Dash Cam

Nothing Comes Close to a Cobra®9
Using the Playback Screen •
Previous Video Next Video
Delete Video
Back
Play Video
Timestamp
File Number
Camera Operation
Your Dash Cam
Use the NEXT and SELECT soft keys to select, play and delete les or return to
the main menu screen.
Videos can also be viewed and managed using the Drive HD™ App or a
computer (explained later in this manual).

English
10
Menu Settings
Playback This will take you to the Playback selection screen, allowing
you to play back video you’ve recorded.
Action
Cam/Dash
Cam
Switches between Action Cam and Dash Cam modes. Action
Cam mode allows you to shoot videos of any length and
the G-Sensor is ignored. Dash Cam mode will run continu-
ous loops of 3 minute videos, and delete the oldest videos
automatically.
Wi-Fi Enable/disable WiFi for wireless connection.
Cloud
Mode Note: To use this feature, you must rst use our Smartphone
app to connect your camera to the cloud by providing it the
name and password to connect to a WiFi network.
Voice
Record If you do not want this device to record audio with its inter-
nal microphone, turn this setting off (Dash Cam mode only).
Auto
Record
If this setting is turned on, The camera will automatically
start recording video when it recieves power from the car
charger (Dash Cam mode only).
Screen
Auto Off
If this setting is turned on, the screen will automatically go
dark after 60 seconds of inactivity. The camera will continue
recording (Dash Cam mode only).
Settings Select this option if you want to reset your camera to factory
settings, or format your SD card.
Press to open the main menu.
Use the NEXT and SELECT soft keys to navigate and toggle settings.
60 SEC
OFF
Auto REC
These are basic settings only. More advanced settings can only be changed
through the mobile App.
Your Dash Cam
Adjusting the Main Menu Settings •
Adjusting Camera Settings

Nothing Comes Close to a Cobra®11
Your Dash Cam Connecting to a Computer
To connect your camera to a Computer •
Connect the camera to your computer using the
included USB to Micro-USB Cable.
By default, your device connects to your PC in
Mass Storage mode, and acts like a ash drive.
Videos are stored in the MP4 format. These les
can be opened with the video player that came
with your operating system, or with many third
party video players.
Videos that are locked can be found in the
“Emergency” folder, and Videos that are not
locked can be found in the “DCIM” folder.
Note that while in Dash Cam mode, if the
Memory card gets full, videos that are not
locked will be overwritten to make room for new
videos. If you want to save any videos that are
in the DCIM folder, you should copy them to your
computer, or lock the les.
If your TV supports HDMI input, you can
connect a Micro HDMI to HDMI cable (not
included) between the camera and the TV.
The camera screen will be duplicated on
your TV screen.
To connect your camera to a TV •

English
12
Wireless & APP Operation
Your Dash Cam
The WiFi capability of the CDR 900 allows you to view live
video, control the camera, upload and share videos, or adjust
settings; all from your smartphone. The rst step to connect
your smartphone with the CDR 900 is to download and install
the Drive HD™ App, available for Android™ on the Google Play
Store and for iOS on the App Store.
The camera can connect to the App in two ways:
1. Local Direct Connection
The smartphone connects to the CDR 900 directly via WiFi for remote control,
live view, album management and camera setup.
2. Cloud-Based Internet Connection
The CDR 900 connects to a wireless access point and uploads live video to
the internet cloud server, which can be viewed with your smartphone from
anywhere.
Local
Smartphone CDR 900
AP
AP
AP
Internet
Smartphone Cloud
Server
Wireless Router
3G/4G
Wireless Router
3G/4G Mobile Hotspot
Camera

Nothing Comes Close to a Cobra®13
To connect your camera to the App - Local Mode •
On the Camera, make sure recording is stopped. Go into the main
menu settings and turn ON the Wi-Fi Local option.
Back on the video preview screen, you should now see a white
Wi-Fi icon in the upper left corner of the camera screen. This
means your camera’s Wi-Fi hotspot is active.
Connecting to the Smartphone app
Go to the Wi-Fi settings on your smartphone and look for a new network that
starts with “Cobra —.” Connect to this network.
On your smartphone, launch the Drive HD™ App. It will present you with two
options: Local and Internet. Choose Local, and then choose the Cobra camera
from the list.
If the Cobra camera is not appearing in the list, press the button to refresh.
In rare cases, you may also have to reboot both the smartphone and the camera
to get them to connect the rst time.
Mobile Camcorder
Local
Your Dash Cam
NOTE: It may take up to a minute after you have connected to the
camera for it to show up on the App’s device list.
iOS Settings Page Main Page Camera View Page

English
14
Smartphone App Operation
View Tab
Rec / Stop Tap this button to start and stop recording. These les will
be saved on the camera’s SD card memory, not on your
smartphone.
Video to
smartphone
Tap this button to start and stop recording video. These
les will be saved to your smartphone’s camera roll (on
iOS) or Photo Gallery (on Android).
Still image to
smartphone
Tap this button to take a still picture. This le will be saved
to your smartphone’s camera roll (on iOS) or Photo Gallery
(on Android).
Talk from
smartphone to
camera
Tap this button to turn on your smartphone’s microphone
and send the audio over Wi-Fi to be played on the camera’s
speaker.
Multi-Camera
view
If you have multiple Cobra cameras in your system, tap
this button to see them all at the same time. Tap one of the
camera images to go back.
Flip Vertical Flip the image upside down. This is best if the camera is
mounted on a tripod.
The WiFi Local connection on the Drive HD™App has three tabs across the
bottom. The buttons in each tab, and their functions, are described below.
Album Tab
Dash Cam tab Tap on this tab to view the list of videos taken in the dash
cam mode.
Action Cam tab Tap on this tab to view the list of videos taken in the action
cam mode.
Playback
buttons
Tap on one of these buttons to play back any video from
the list.
Trash icons Tap on one of these buttons to delete a video. This cannot
be undone.
Your Dash Cam
NOTE: Video les are very large so it may take some time for videos
to update.

Nothing Comes Close to a Cobra®15
Smartphone App Operation
Setup Tab
Camcorder
Name You can rename your Camcorder here and set a password if you wish.
Date and Time Here you can send your phone’s system time to the Camera with just
one tap.
Resolution This sets the level of detail in the video. FHD is the default value and re-
cords in 1080P Full HD. SHD is 1296P Super HD, which provides higher
resolution video. Note that not all players support 1296P.
Operation Sound Toggle the Dash Cam’s button tone on/off.
Factory Settings Select this option if you want to reset your camera to factory settings.
This will NOT erase the videos you have stored on your SD card.
Format SD Card Here you can fully erase the videos on your SD Card, and adjust how
much space you want to make available to cyclical recording in Dash
Cam mode. Drag the slider from left to right to set the ratio.
Language Choose your preferred language for the CDR 900.
Internet settings Here you can register a free cloud account so you can access your
camera from your smartphone from anywhere in the world.
Voice Record If you do not want this device to record audio with its internal micro-
phone, turn this setting off (Dash Cam mode only).
Auto Record
If this setting is turned on, The camera will automatically start recording
video when it recieves power from the car charger (Dash Cam mode only).
Screen Auto Off If this setting is turned on, the screen will automatically go dark after
60 seconds of inactivity. The camera will continue recording (Dash Cam
mode only).
Motion Detector If this setting is turned on, the camera will automatically start recording
video if it detects movement in view of the camera. Video recording
stops when there is no movement.
Delay Power Off Here you can select how long the camera waits to shut down after
power is removed. Select 10 second delay, or immediately off.
Impact Sensor Sets the sensitivity of the Impact Sensor (G-Sensor). Options include High,
Low, and Off. The impact sensor, when triggered, will automatically lock
les to prevent them from being automatically deleted by continuous loop
recording.
Your Dash Cam

English
16
Cloud Mode Features
AP
Wireless Router
AP
3G/4G Mobile
Wireless Router
AP
3G/4G
Mobile Hotspot
To connect your camera to the Cloud •
Because your camera has Wi-Fi, it can be connected to the internet (the Cloud).
Once connected, your camera can be accessed from anywhere you carry your
smartphone. This is useful if you want to check on the status of your home or
loved ones while you are away. If your home already has a Wi-Fi network, then
you’ll need to put the SSID (network name) and password into the Cobra Drive HD
app, and then your camera will connect to the internet.
If the location where you are using
your camera does not have a Wi-Fi
network yet, consider a wireless router,
or Mobile hotspot product to get your
camera connected to the internet.
When you’re done, your nal network will look something like the chart below.
Your Dash Cam
AP
AP
Internet
Smartphone Cloud
Server
Wireless Router
3G/4G
Wireless Router
3G/4G Mobile Hotspot
CDR 900
Other manuals for Drive HD CDR 900
3
Table of contents
Other Cobra Dashcam manuals

Cobra
Cobra CDR 840 User manual

Cobra
Cobra CDR 840 User manual

Cobra
Cobra Drive HD CDR 900 User manual

Cobra
Cobra SC201 User manual

Cobra
Cobra CDR835 User manual

Cobra
Cobra CDR 840 User manual

Cobra
Cobra CDR825E User manual

Cobra
Cobra SC200 User manual

Cobra
Cobra drive HD CDR835 User manual

Cobra
Cobra CDR 820 User manual

Cobra
Cobra CDR835 User manual

Cobra
Cobra SC201 User manual

Cobra
Cobra SDVR Assembly instructions

Cobra
Cobra CDR 820 User manual

Cobra
Cobra CDR 840 User manual

Cobra
Cobra CD 855 BT User manual

Cobra
Cobra SC200D User manual

Cobra
Cobra SC200 User manual

Cobra
Cobra SC400 User manual

Cobra
Cobra CDR 840E User manual