CohuHD Costar 3212-2000 User manual

© CohuHD Costar, LLC reserves the right to change specifications without notice.
3212-2000
Thermometric System
Quick Start Guide
&#"##
&#
"%""!#
#
#
$

CohuHD 3212-2000 Thermometric System Quick Start Guide
1
Table of Contents
Table of Contents ........................................................................................................................................ 1
Physical Installation Guidelines ................................................................................................................... 2
Ceiling mounted configuration ............................................................................................................. 2
Wall Mounted configuration ................................................................................................................. 2
Outdoor Mounted configuration ........................................................................................................... 3
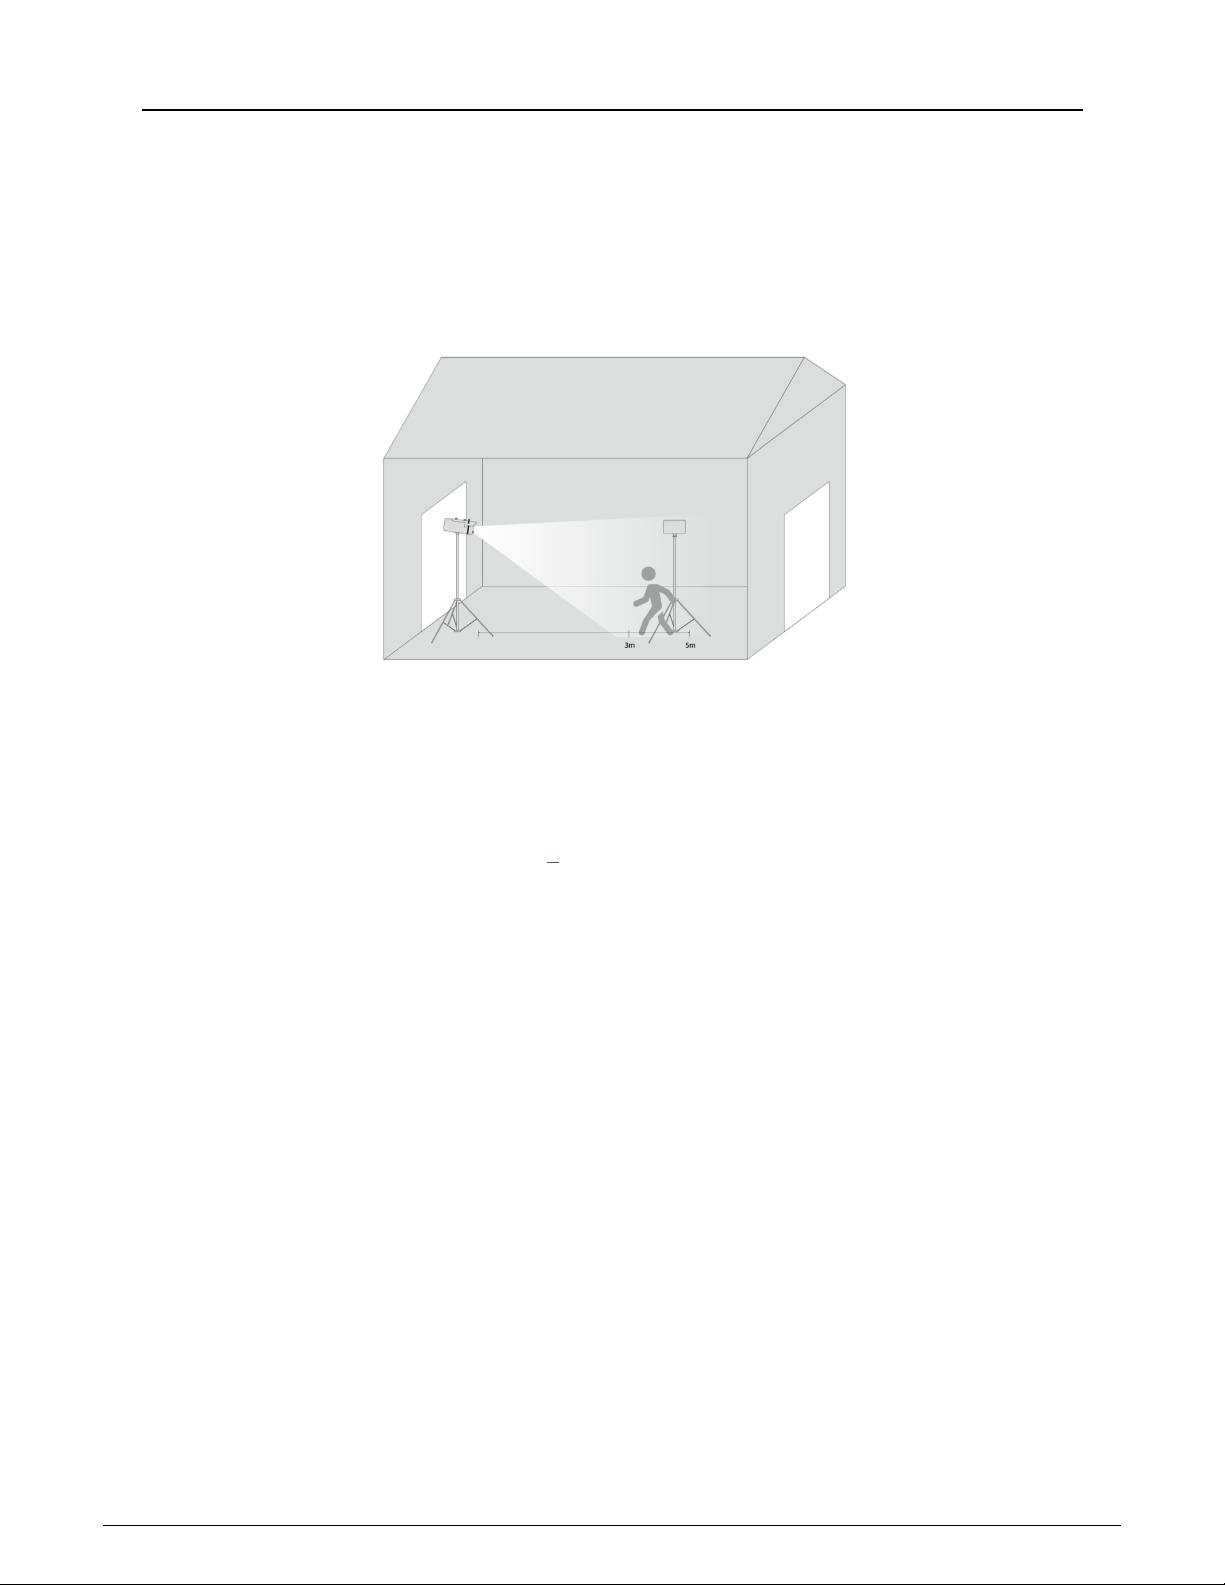
Physical Installation Considerations ........................................................................................................ 3
Configure the Camera ................................................................................................................................. 4
Configure Temperature Ranges............................................................................................................... 5
Set up Detection Zones ........................................................................................................................... 7
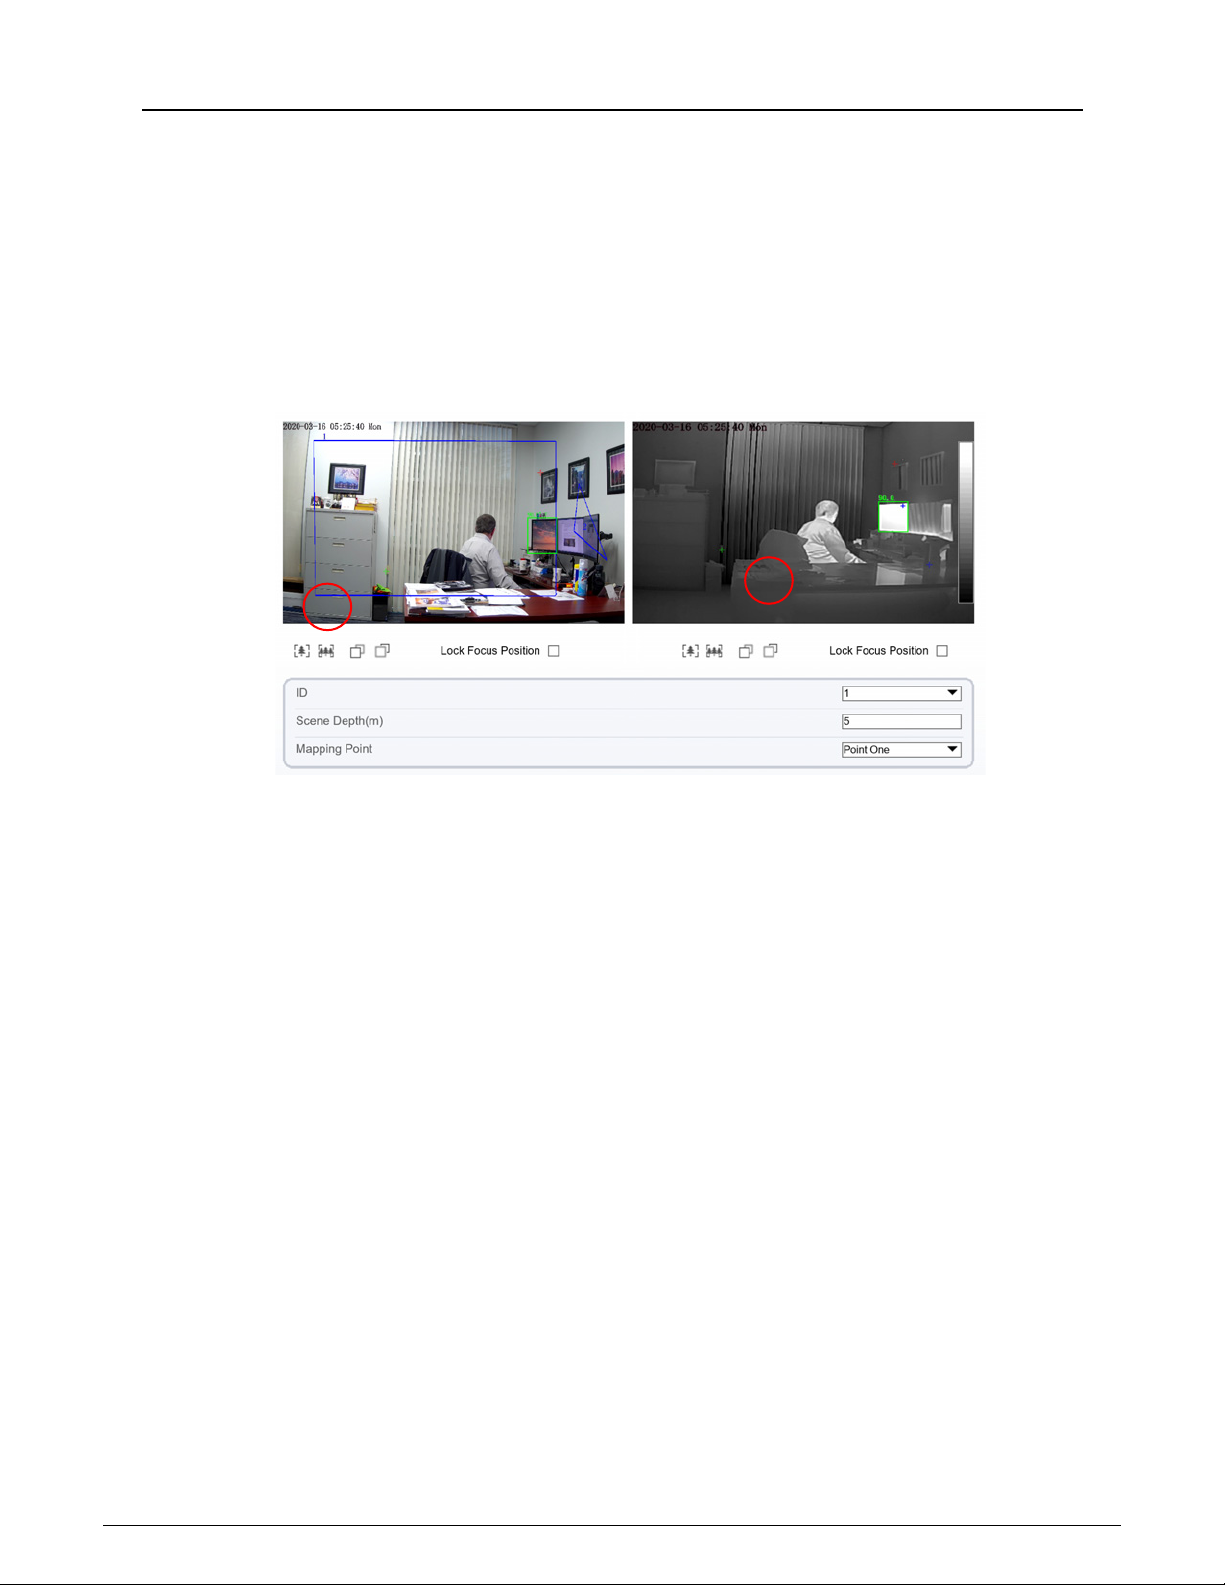
Thermal Mapping ..................................................................................................................................... 8
Thermal Calibration .................................................................................................................................. 9
Set a Temperature Alarm Trigger .............................................................................................................. 11
Connect a Physical Alarm ...................................................................................................................... 13
Set up an FTP Snapshot Location ......................................................................................................... 13
View Live Video.......................................................................................................................................... 15

CohuHD 3212-2000 Thermometric System Quick Start Guide
2
Physical Installation Guidelines
Ceiling mounted configuration
Position the camera at a height of 6.5–7.5 feet from the ground. Place the Thermal Calibration Reference
Device 10–16 feet in front of the thermographic camera, and at the same height, as illustrated below.
Make sure the Thermal Calibration Reference Device is inside the camera’s field of view.
Wall Mounted configuration
When mounting the camera on a wall, use the same height and distance as the ceiling mounted
configuration. See illustration below.

CohuHD 3212-2000 Thermometric System Quick Start Guide
3
Outdoor Mounted configuration
If using the camera in an outdoor setting, provide an enclosed area (tent) to ensure accuracy as
illustrated below.
Physical Installation Considerations
1.For accurate temperature measurement (+ 0.3ºC / 0.5ºF Degrees / Medical grade accuracy) install
the camera in areas without strong air flow. Place the camera away from objects that produce
airflow or high ambient temperature. Do not install the camera opposite an exterior door, air
conditioner, or in a position allowing the sun to shine directly onto the camera.
To ensure accuracy, install the camera indoors or in a stable temperature-controlled environment. If
you install the thermographic system in an open-air environment, temperature readings may differ
from actual temperatures, requiring a software adjustment to compensate.
2.If installed outdoors, provide a tent or an enclosed environment to ensure accuracy.
3.It is necessary to perform temperature measurements within a standardized distance, otherwise
temperature readings will deviate. The best horizontal distance from the camera to a person’s face is
13 feet (4m), with an acceptable range of 10–16 feet (3–4.8m).

CohuHD 3212-2000 Thermometric System Quick Start Guide
4
4.The Thermal Calibration Reference Device should be installed in the camera’s field of view, ideally at
the same height. The best horizontal distance from the camera to the Thermal Calibration Reference
Device is 13 feet (4 meters) with an acceptable range of 10–16 feet
(3–4.8m).
5.The camera should be installed at a height of 6.5–7.5 feet (2.0–2.3m), with an angle less than 25°
horizontally to the faces of people in the scene.
6.Installing the camera straight relative to a human face will yield the best results. (Verify the side face
angle is less than 35° on either side from the intended target).
Configure the Camera
Access the camera using an HTML5 web browser, such as Google®Chrome®, or Microsoft®Internet
Explorer®(IE). When using IE the camera requires ActiveX®controls to display the video. The camera’s
default IP address is 192.168.0.121; the default username and password are both admin.
1.Connect your camera to your LAN or a standalone network. Your computer should be on the same
network.
2.Power on the camera. The camera can be powered via a PoE 802.3afenabled network switch
(requires 10W) or the supplied 12VDC power supply. It may take several minutes for the camera to
start up.
3.Open your web browser and go to 192.168.0.121.
4.Enter admin for both the username and password. You should change the default password after
you log in.

CohuHD 3212-2000 Thermometric System Quick Start Guide
5
5.If using IE, select Download and install the new plugin.
a)Click Run to install the plugin. Close your browser while the plugin installs.
b)Open Internet Explorer again and go to 192.168.0.121. Select Allow to enable the plugin.
6.Log in using admin for both the username and password.
Configure Temperature Ranges
Aside from the settings listed below, we suggest keeping all other
settings as their defaults.
1.Go to the Configuration Tab.
2.Select Human Thermometer » Parameter Configure.
3.Enable Face Detection.

CohuHD 3212-2000 Thermometric System Quick Start Guide
6
4.Go to the Temperature Parameters tab.
5.Set Enable to On to activate temperature measurement.
6.Set Temperature Unit to Celsius or Fahrenheit reflecting the units of measure that you use.
7.Set the Ambient Temperature for the area containing your camera.
NOTE: Cavity Temperature displays the internal operating temperature of the camera.
8.Set the Correction Coefficient. This is a final adjustment above or below the display temperature.
9.Set the Mount Distance in feet or meters. This is the horizontal distance from the camera to the
detection area. In general, this is the distance to the Thermal Calibration Reference Device unit.
10.Set Face Color to display a color pallet showing the hot regions of your targets’ faces.
11.Set Environment Adaptation to On if your camera is outside. Otherwise, leave it set to Off.
12.Set Abnormal Temperature Display to hide temperature readings that are outside your operating
parameters.

CohuHD 3212-2000 Thermometric System Quick Start Guide
7
Set up Detection Zones
A detection zone is 4-corner polygonal area where you want to detect temperatures — typically where
faces appear in your scene. In many cases, a single zone can cover the entire scene, but you create up
to 8 detection zones.
1.Go to the Configuration Tab and select Human Thermometer » Parameter Configure.
2.In the camera image, click four corners outlining the area where faces will appear in your scene; after
you select the last point, click the first point again to finish drawing the zone.
3.Repeat the above steps to draw more zones.
4.Click Apply to save your settings.

CohuHD 3212-2000 Thermometric System Quick Start Guide
8
Thermal Mapping
From here, you can map the thermal image with the visible image, ensuring the accuracy of temperature
measurements within your detection zones.
Within each detection zone, you will select three reference points. We suggest choosing three points
that are far away from each other, so the “triangle” connecting the three points you selected covers 70%
of the total image. Test that the defined area can correctly surround the faces in the scene. If it can’t,
adjust the three reference points.
1.Click the Configuration Tab and select Human Thermometer » Thermal Mapping.
2.Adjust zoom and focus so that the visual image is clear and identify out three points that you can
clearly see in the thermal image — see the example below.
3.Select the ID of a detection zone that you created earlier (1-8).
4.Set the Scene Depth. This is the distance from the camera to the detection area in meters.
5.Select Mapping Point that you want to set. Set points in order — one, two, three.
6.Click a point inside the zone in the visible scene.
7.Click the corresponding point inside the zone in the thermal scene.
8.Repeat this process for the remaining two Mapping Points.

CohuHD 3212-2000 Thermometric System Quick Start Guide
9
9.Repeat steps 3-8 to map other detection zones (ID).
10.Click Apply to save your settings.
In the following illustration you can see Zone 1 — the area of detection (blue line rectangle) and the three
points on each camera view.
Thermal Calibration
The Thermal Calibration Reference Device needs to be powered on for at least 20 minutes, so that it can
reach a stable before you calibrate the camera.
1.Go to the Thermal Calibration tab.
2.Click Enable so that it is On.
3.If you turn on Display Area Info, the Thermal Calibration Reference Device is shown in a rectangle
with its current temperature on thermal image.
4.Enter the Distance to the Thermal Calibration Reference Device and the
Temperature of the unit.

CohuHD 3212-2000 Thermometric System Quick Start Guide
10
5.In the thermal image, draw an area covering the Thermal Calibration Reference Device. Click the four
corners, outlining the Thermal Calibration Reference Device. After you select the last point, click the
first point again to finish drawing the zone.
6.Click Apply.

CohuHD 3212-2000 Thermometric System Quick Start Guide
11
Set a Temperature Alarm Trigger
Set a temperature alarm trigger to set a physical alarm, send a notification, and upload snapshots to
your FTP server when the camera detects a temperature over the allowed threshold.
1.Go to Human Thermometer »Parameter Configure and click Configuration.
2.Click Face Alarm Linkage and define a trigger.
3.Set the Alarm Temperature. Temperatures above this threshold will result in an alarm.
4.Set the days and times when you want to detect temperature alarms.
5.Enable your alarm’s outputs:
a)SMTP sends an email notification. Click Network Source » SMTP to configure your SMTP
server and recipient email.

CohuHD 3212-2000 Thermometric System Quick Start Guide
12
b)FTP Upload upload a snapshot to your FTP server. Click Network Source » FTP to configure
your server.
c)Alarm Record: Record video to an SD card (Optional) when the camera detects a target over
the temperature threshold. You cannot insert an SD card; your camera must have been
ordered with it already installed. Before enabling this feature, be sure the record directory has
been configured correctly (see below) and you have an SD card insert correctly inside the
camera.
d)Set the Output Channel. The camera has two alarm outputs for connecting a strobe light or a
sounder (purchased separately). If the camera detects a high temperature, the camera sends a
high-level signal or pulse signal through the alarm out port. You must Connect a Physical Alarm
before you can select output channels.

CohuHD 3212-2000 Thermometric System Quick Start Guide
13
Connect a Physical Alarm
You can connect an Alarm Bell, Sounder, or a strobe light as a visual indication of the alarm trigger. The
camera has several pigtails as illustrated below.
Locate Pigtail Alarm Out 1 and wire it as illustrated. The alarm relay contact is rated 1 Amp Max.
Set up an FTP Snapshot Location
You can set up an FTP server to store snapshots. The following instructions assume that you have
already set up your FTP server.
1.Select Network Service » FTP.
2.Enable FTP Upload.
3.Enter your FTP Address, Port, account information, and the Path where you want to store
snapshots on your FTP server.
4.Click Apply.

CohuHD 3212-2000 Thermometric System Quick Start Guide
14
5.Go to the Configuration tab, select Human Thermometer » Parameter Configure.
6.Set Snapshot Mode to Timing.
7.Set Upload Image Interval to 5 (seconds).
8.Enable the FTP Upload settings for the types of images that you want to back up
to your FTP server.
•FTP Upload Image Matting: upload only the face picture cut out from the full image.
•FTP Upload Whole Image: upload the full image.
•OSD Overlay Snapshot: Snapshots with the temperature info.
You can find the snapshots in the FTP server path, named by face ID and temperature.

CohuHD 3212-2000 Thermometric System Quick Start Guide 15
View Live Video
Click the Live Video tab to view video with detection areas. The camera detects human targets and
surrounds faces with a green rectangle showing the temperature. The rectangle becomes red when the
camera indicates a high temperature and triggers an alarm.
For additional information or more advanced setting please consult the Thermometric camera User
Guide. Should you have any questions or require additional support please contact our technical support
team at (858) 391-1800 during normal hours of operation Mon–Fri 8:00 am–5:00 pm CST. After hours
you can leave a message and one of our support specialists will return your call. You can also email us
at: [email protected].
Note: The information contained in this user guide is subject to change without notice.

For more information please visit us at:
www.CohuHD.com
Table of contents
Popular Measuring Instrument manuals by other brands

PCE Americas
PCE Americas FL-33458 Operation manual

pyroscience
pyroscience Pico-pH manual

ADCMT
ADCMT 6166 Operation manual

Sper scientific
Sper scientific Large Display Salinity Pen - 850036 manual

Algodue ELETTRONICA
Algodue ELETTRONICA UPM307 user manual

Changzhou Tonghui Electronic
Changzhou Tonghui Electronic TH2821B Operation manuals