Collar AquaLighter aFarm User manual

aFARM
A Q U A P O N I C S E T
Уважаемый аквариумист!
Благодарим Вас за приобретение нашего продукта – аквариумного
набора aFARM set. Для долгого и успешного использования
аквариумного набора, убедительно просим вас внимательно
ознакомиться с настоящим руководством по транспортировке и
эксплуатации.
Что такое aFARM set
Это домашняя мини экосистема, которая представляет собой
самоочищающийся аквариум с рыбками, и внешним поддоном –
держателем, в котором могут расти влаголюбивые растения. Это
аквапонная система в миниатюре – отходы жизнедеятельности рыб,
креветок (токсичные для них самих: азотистые, калийные, фосфорные
соединения, углекислый газ) используются как питательная среда для
растений - утилизируются бактериями и растениями.
aFARM set позволит насладится видом аквариума и влаголюбивых
декоративных растений, а так же может служить минифермой для
выращивания салата и рассады на вашей кухне.
Любители как пресноводного, так и морского аквариума могут
использовать aFARM set для проращивания семян и содержания
ростков мангровых деревьев.
Контакты:
В состав набора входит:
● Аквариум 250*250*250mm, 13L
● Полиуретановая подложка
● Пластиковый поддон- держатель
(для аквариумов с толщиной стекла до 6 мм)
● Фильтр внутренний
● LED подсветка
● Блок питания, 12В 1А
● Самоклеющийся пластиковый фиксатор проводов – 2 шт
Фильтр
Напряжение: AC 220~240V/50Hz
Мощность: 4W
Qmax – 250L/H, Hmax 0.6m
IP 68
LED светильник
Напряжение: AC 220~240V/DC 12V , 1A
Мощность: 4W
Цветовая температура: 5500K - 6500К
Световой поток: 310 люмен
IP X8
Украина
operator@collar.com
0 800 502-17-70
Европа
export@collar.com
+38 063 698-30-21
Испания
info_spain@collar.com
+34 931 64-31-68
Россия, Беларусь, Казахстан
russia@collar.com
+7 906 696-50-99
+7 906 696-49-98
Америка
usa@collar.com
+1 888 236-95-38
Азия, Африка, Австралия
asia@collar.com
+38 063 352-72-39

Подготовка и запуск аквариумного набора aFARM set
1. Аквариум
Тщательно вымыть аквариум изнутри, используя
обычную водопроводную воду и мочалку (без
использования моющих средств!) для того, чтобы
удалить следы загрязнений.
Аквариум должен быть установлен на ровной плоской
поверхности, способной выдержать вес аквариума с
водой, грунтом и оборудованием. Лучшим вариантом
являются специальные подставки (тумбы) под
аквариумы, которые гарантируют равномерность
распределения нагрузки на дно аквариума. Но даже в
случае использования подставки нужно учесть, что
поверхность, кажущаяся ровной, имеет микро-
неровности, которые являются концентраторами
напряжения и могут привести к образованию трещин в
дне аквариума. Для предотвращения этого, перед
установкой следует тщательно протереть дно
аквариума с наружной стороны, использовать
полиуретановую подложку (входит в комплект
поставки)
ВНИМАНИЕ! При нарушении правил установки
аквариума, предприятие-изготовитель не несет
ответственности за возможные повреждения.
Уход за аквариумом
Удаляйте загрязнения с внешних граней аквариума с
помощью бумажных полотенец или микрофибры. Так
как задняя грань аквариума окрашена в черный цвет –
она может быть достаточно легко повреждена (не
используйте для очистки крашеной поверхности
скребки, лезвия, губки с абразивным слоем)
2. Грунт и декорации (приобретаются отдельно)
Насыпьте тщательно промытый грунт на дно
аквариума, рекомендуемый объем грунта – примерно 3
литра. Разместите тщательно промытые декорации
внутри аквариума. Грунт и декорации не входят в состав
набора и приобретаются отдельно.
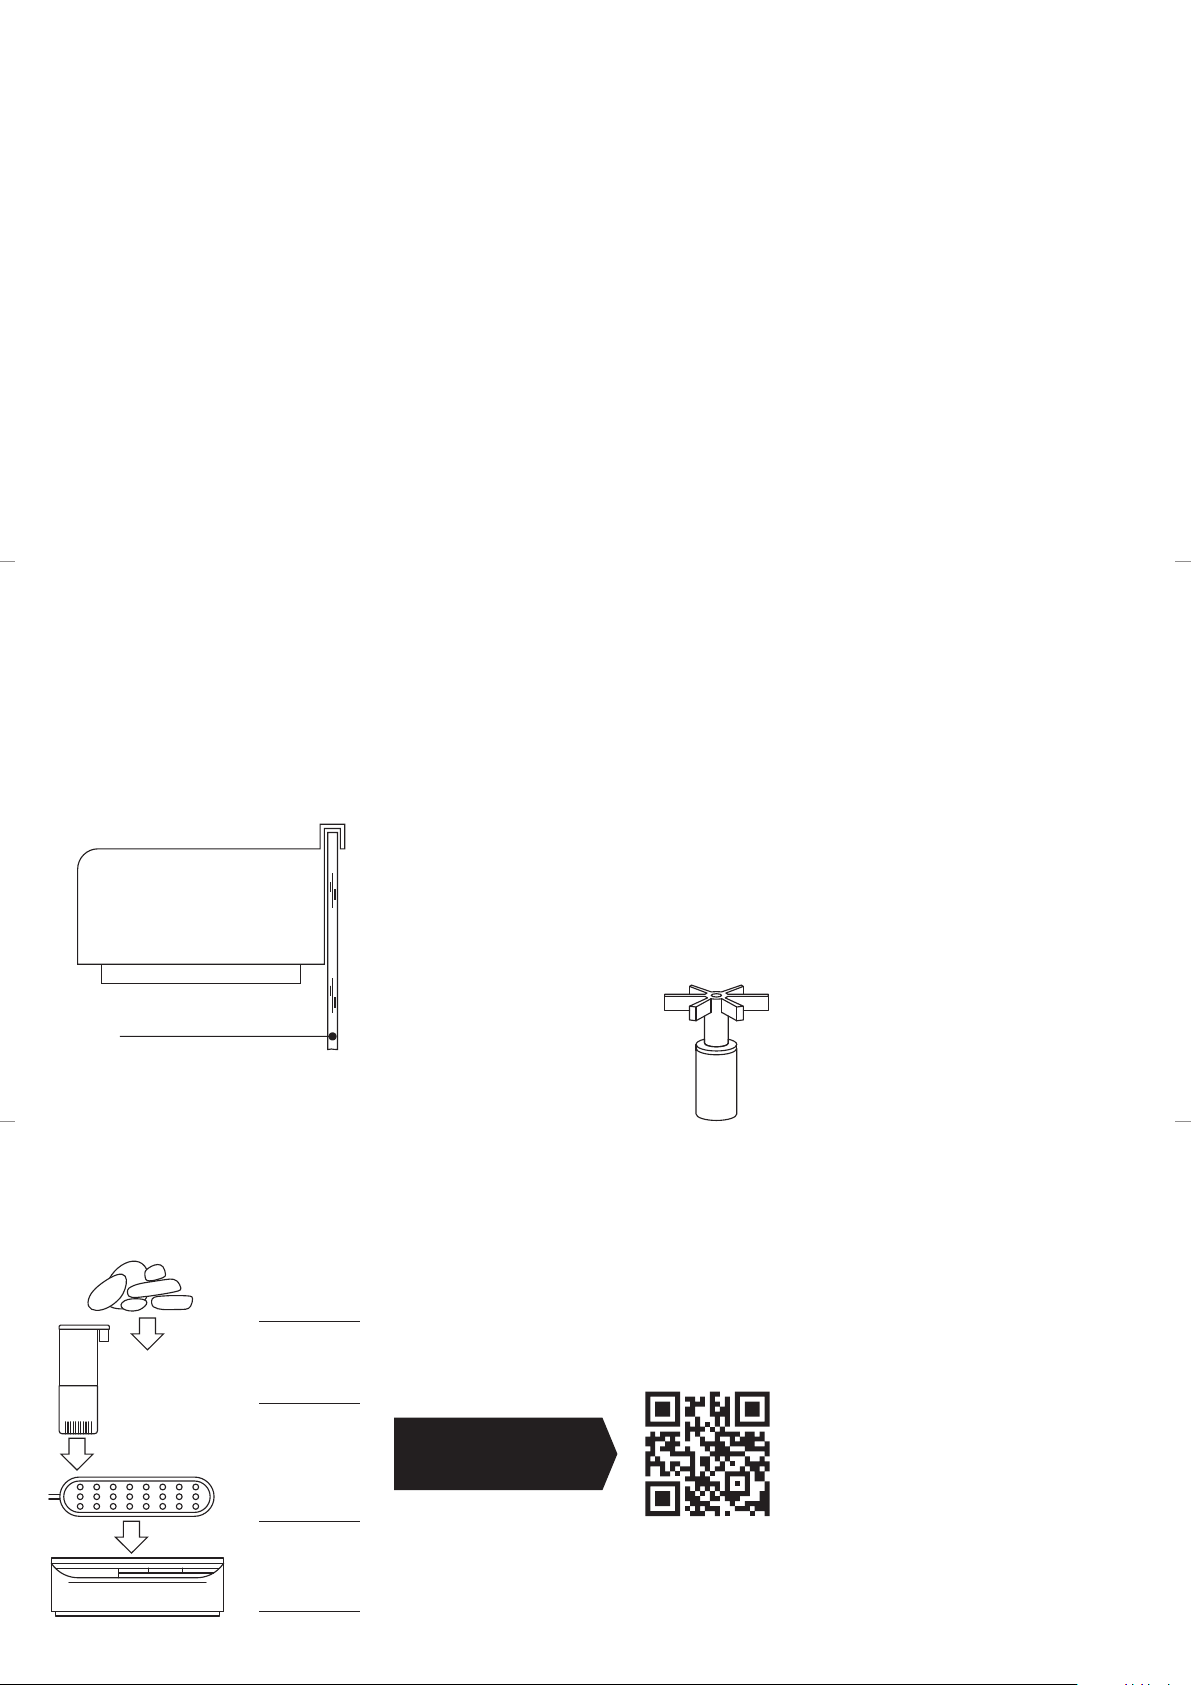
3. Пластиковый поддон – держатель.
Промойте пластиковый поддон – держатель под
водопроводной водой.
Установите пластиковый поддон – держатель на задней
стенке аквариума, как показано на рисунке 1
4. LED светильник
Установите LED светильник внутри поддона. Провод
светильника должен быть выведен на заднюю стенку
аквариума. Вставьте штекер блока питания в разъем
питания светильника. Подключите блок питания
светильника к электросети.
Уход за светильником
Устройство не требует специального ухода. В случае
необходимости следует очистить корпус светильника от
оседающего на нем налета при помощи мягкой
тряпочки или губки.
5. Декоративный грунт-галька
(приобретается отдельно)
Насыпьте тщательно промытый грунт-гальку в поддон,
равномерно распределив его в поддоне.
6. Фильтр внутренний
Аквариумный набор aFARM set снабжен мощным
фильтром, осуществляющим эффективную механичес-
кую и химическую фильтрацию воды. Нижний
контейнер фильтра имеет губку для механической
очистки и активированный фильтрующий уголь для
химической очистки воды. Отсоедините нижнюю часть
фильтра, тщательно промойте под струей водопровод-
ной воды, удаляя остатки загрязнений и угольной пыли,
до тех пор, пока вода перестанет окрашиваться.
Установите фильтр в соответствующий отдел поддона –
держателя. Провод питания фильтра должен быть
выведен на заднюю стенку аквариума.
Уход за фильтром
Фильтр требует периодической очистки с частотой не
реже одного раза каждые 2 недели.
Следите за потоком воды из фильтра, если он ослабел -
это сигнал, что фильтр пора чистить. Фильтрующую
губку необходимо регулярно промывать, чтобы
избавиться от забивших ее частиц. Если этого не
делать, то сила потока воды значительно падает и
снижается качество фильтрации. Для этого отсоедини-
те нижнюю часть фильтра, достаньте фильтрующую
губку и прополощите ее в части аквариумной воды. До
тех пор, пока она не станет более мене чистой.
Активированный уголь следует использовать на
первых этапах запуска аквариума, пока вода содержит
химические загрязнения – в дальнейшем его
необходимо заменить на дополнительную фильтрую-
щую губку или шарики из пористого материала. Губку в
фильтре нужно менять только, если она потеряла свою
фильтрующую способность или начала терять форуму
(не ранее раза в полгода). Во внутреннем фильтре
мочалки состоят из нескольких частей и менять зараз
можно лишь одну. Помните, что поверхность губки
заселяется полезными бактериями, отвечающими за
разложение вредных веществ в аквариуме, если
заменить лишь часть губки, то бактерии со старых
поверхностей быстро заселят новые и не будет никаких
нарушений баланса. Делая перерыв в пару недель, вы
полностью сможете заменить
старое содержимое на новое и не
повредить аквариуму.
Фильтр для аквариума содержат
импеллер — цилиндрический
магнит с крыльчаткой, который
служит для создания тока воды, и
кр еп ит ся на ме та лл иче ск ий или
керамический штифт. Через время
водоросли, бактерии и другой мусор
нак а п л и вают с я н а и м п е л лере и
затрудняют его работу. Загрязнение
существенно уменьшает срок жизни
импеллера и является самой частой причиной поломок
фильтров.
Импеллер
Очистить импеллер очень просто - в нижней части
моторного отсека фильтра снимите защитную
пластиковую крышку, вытащите импеллер сняв его со
штифта, и промойте под напором воды.
Разработайте собственный график ухода за фильтром в
аквариуме и следите за его исполнением.
7. Самоклеющиеся пластиковые держатели проводов
Снимите защитный бумажный слой на нижней части
держателя, активируя клейкий слой. Приклейте
держатели на задней стенке аквариума. Закрепите
провода питания фильтра и светильника в держателях
8. Запуск
Залейте аквариум ранее подготовленной водой до
уровня 2-3 см от края кромки переднего стекла
аквариума. Уровень воды должен находится на 1-2 см
ниже поддона. Включите блок питания светильника и
вилку питания фильтра в электросеть. По истечении
суток, запустите рыбу в аквариум.
Семена или саженцы растений вы сможете посадить
уже на 3й день использования набора.
Для этого остановите фильтр, вынув вилку питания
фильтра из электросети, дождитесь слива остатков
воды из поддона – держателя в аквариум. Разместите
семена или саженцы в грунте-гальке, затем снова
включите фильтр.
Гарантии изготовителя на аквариум
Гарантия распространяется на швы и стыки аквариума.
Изготовитель гарантирует соответствие аквариумов
требованиям настоящего стандарта при соблюдении
условий транспортирования, хранения и эксплуатации.
Гарантийный срок эксплуатации - 2 (два) года со дня
продажи через розничную торговую сеть.
Гарантия не распространяется на повреждение стекла:
сколы, удары или другие механические повреждения.
На светильник и фильтр
Изготовитель предоставляет гарантию на срок 24
месяца с даты продажи. Гарантия распространяется на
повреждения, возникшие по вине изготовителя, т.е.
дефекты материалов и прочее. Гарантия не распростра-
няется на повреждения, возникшие из-за неправиль-
ной э ксплуатации свети льник а/ф ил ьт ра, и ли
использованию его не по назначению.
Внимание! Любые попытки внесения конструкци-
онных изменений, выходящие за пределы его
нормальной эксплуатации или ухода, влекут за собой
потерю гарантии.
В случа е обнаружения непр авильной работ ы
устройства, необходимо обратиться в службу
технической поддержки.
ГАРАНТИЯ
1
2
3
Поддон-
держатель
Фильтр
LED
светильник
Натуральный
грунт - галька
Рис. 1
Рис. 2
Задняя стенка аквариума
Рис. 3
Поддон-держатель
Служба технической поддержки:
тел.: 0800 300-137
aqualighter@collar.com
Чтобы активировать гарантию, зарегистрируйтесь
на сайте www.aqualighter.com.
Отсканируйте QR-код* с помощью мобильного
т е л е ф о н а , ч т о б ы н е м е д л е н н о п е р е й т и к
регистрационной форме.
После подтверждения регистрации ваша гарантия
активируется. Вы получаете прямой доступ к
к р у г л о с у т о ч н о й с л у ж б е т е х н и ч е с к о й и
информационной поддержке. Повторный быстрый
вход на сайт можно выполнить с помощью повторного
сканирования QR-кода.
В случае обна ружен ия неправильн ой работы
ус тр ойс тв а, не обхо ди м о об р ат ит ся в сл ужбу
технической поддержки. Настоящие гарантийные
условия не исключают, не ограничивают и не
приостанавливают прав покупателя, гарантированных
дейст ву ющ им з аконод ате ль ств ом с траны, на
территории которой осуществлена продажа.
Прямая гарантия от производителя избавляет вас от
необходимости обращаться в точку продажи при
возникновении гарантийного случая. Вам не нужно
хранить гарантийный талон, чек или упаковку продукта.
Для осуществления возврата, замены или получения
квалифицированной консультации по продукту
достаточно заполнить простую форму на сайте
компании-производителя.
* QR-код доступа на сайт находится в данной
инструкции, а также на корпусе либо на проводе
изделия.
АКТИВАЦИЯ
ГАРАНТИИ!

aFARM
A Q U A P O N I C S E T
Dear aquarist!
Thank you for purchasing our aquarium kit product.
aFARM set. For the long and successful use of the aquarium kit, we kindly
ask you to carefully read this manual.
What is aFARM set
This is a home mini ecosystem, which is a self-cleaning aquarium with
fish, and an external plant grow container, in which moisture-loving
plants can grow. This is an aquaponic system in miniature - waste
products of fish and shrimp (toxic to themselves: nitrogenous, potash,
phosphorus compounds, carbon dioxide) are used as a nutrient medium
for plants - they are utilized by bacteria and plants.
aFARM set will allow you to enjoy the view of the aquarium and
hygrophilous ornamental plants, and can also serve as a minifarm for
growing lettuce and seedlings in your kitchen.
Fans of both freshwater and saltwater aquariums can use the aFARM set
to germinate seeds and keep sprouts of mangroves.
Contacts:
The kit includes::
● Aquarium 250 * 250 * 250mm, 13L
● Polyurethane padded mat
● Plant grow container
(for aquariums with glass thickness up to 6 mm)
● Internal filter
● LED lamp
● Power supply 12V 1A
● Self-adhesive plastic wire holder - 2 pcs.
Filter
Voltage: AC 220 ~ 240V / 50Hz
Power: 4W
Qmax – 250L/H, Hmax 0.6m
IP 68
LED lamp
Voltage: AC 220~240V/DC 12V , 1A
Power: 4W
Color temperature: 5500K - 6500К
Luminous flux: 310 lumens
IP X8
Ukraine
operator@collar.com
0 800 502-17-70
Europe
export@collar.com
+38 063 698-30-21
Spain
info_spain@collar.com
+34 931 64-31-68
Russia, Belarus, Kazakhstan
russia@collar.com
+7 906 696-50-99
+7 906 696-49-98
USA
usa@collar.com
+1 888 236-95-38
Asia, Africa, Australia
asia@collar.com
+38 063 352-72-39

Preparing and launching the aFARM Set aquarium kit
1.Aquarium
Thoroughly wash the inside of the aquarium using
common water and a washcloth (without using
detergents!) In order to remove traces of dirt.
The aquarium should be installed on flat surface, capable
of supporting the weight of the aquarium with water, soil
and equipment. The best option is special stands
(cabinets) for the aquarium, which guarantee a uniform
load distribution on the bottom of the aquarium. But even
in the case of using the stand, you need to take into account
that the surface, which seems flat, has microroughnesses
that are stress concentrators and can lead to the formation
of cracks in the bottom of the aquarium. To prevent this,
before installation, thoroughly wipe the bottom of the
aquarium from the outside, use a polyurethane paddet
mat (supplied)
ATTENTION! In case of violation of the rules for installing
the aquarium, the manufacturer is not responsible for
possible damage.
Aquarium Care
Remove dirt from the outside of the aquarium with paper
towels or microfiber. Since the back edge of the aquarium
is painted black - it can be quite easily damaged (do not use
a scraper, blade, sponge with an abrasive layer to clean the
painted surface)
2. Ground and scenery (purchased separately)
Pour the thoroughly washed soil into the bottom of the
aquarium; the recommended soil volume is approximately
3 liters. Place thoroughly washed decorations inside the
aquarium. Soil and scenery are not part of the kit and must
be purchased separately
3. Plant grow container.
Rinse the plant grow container under tap water.
Install the plant grow container on the back of the
aquarium, as shown in figure 1
Install the LED lamp inside the p plant grow container. The
wire of the lamp should be led to the back wall of the
aquarium. Insert the plug of the power supply into the
power connector of the lamp. Connect the lamp power
supply to the main electric network.
LED lamp care
The LED lamp does not require special care. If necessary,
should clean the lamp housing with a soft cloth or sponge.
5. Decorative soil (for plant grow container)
Pour the thoroughly washed decorative soil (purchased
separately) into the plant grow container, distributing it
evenly in the plant grow container.
6. Internal Filter
The aFARM Set aquarium kit is equipped with a powerful
filter that provides effective mechanical and chemical
filtration of water. The lower filter container has a sponge
for mechanical cleaning and activated filter carbon for
chemical water treatment. Disconnect the bottom of the
filter, rinse thoroughly under running tap water, removing
any remaining contaminants and coal dust, until the water
no longer stains. Install the filter in the appropriate
section of the pan holder. The power cable for the filter
should be routed to the back of the aquarium.
Filter care
The filter requires periodic cleaning at least once every 2
weeks. Watch the flow of water from the filter, if it is
weakened - this is a signal that it is time to wash the filter.
The filter sponge must be washed regularly. If this is not
done, then the strength of the water flow drops
significantly and the quality of filtration decreases.
To do this, disconnect the bottom plastic part of the filter,
remove the filter sponge and rinse it in the part of the
aquarium water. Until it becomes less clean. Activated
carbon should be used in the first stages of launching the
aquarium, while the water contains chemical impurities -
in the future it must be replaced with an additional filter
sponge or balls made of porous material. The sponge in
the filter needs to be changed only if it has lost its filtering
ability or has begun to lose the form (not earlier than once
every six months). In the internal filter, sponge consist of
several parts and only one can be changed at a time.
Remember that the surface of the sponge is populated
with useful bacteria responsible for the decomposition of
harmful substances in the aquarium, if only part of the
sponge is replaced, then bacteria from the old surfaces
will quickly populate new ones and there will be no
imbalance. Taking a break of a couple of weeks, you can
completely replace the old sponges with new ones and not
damage the aquarium environment.
The internal aquarium filter contains an impeller - a
cylindrical magnet with an impeller, which serves to
create water flow, and is mounted on a metal or ceramic
pin. Over time, algae, bacteria and
other debris accumulate on the
impeller and impede its operation.
Contamination significantly reduces
the life of the impeller and is the
most common cause of filter breakdowns.
Impeller
Cleaning the impeller is very simple - in
the lower plastic part of the filter, remove
the protective plastic cover, pull out the
impeller by removing it from the pin, and rinse it
thoroughly under running water.
Create your own schedule for filter maintenance in the
aquarium and monitor its performance.
7. Self-adhesive plastic wire holders
Remove the protective paper layer on the bottom of the
holder, activating the adhesive layer. Glue the holders on
the back of the aquarium. Fix the power wires of the filter
and the lamp in the holders
8. Aquaruim launch
Fill the aquarium with previously prepared water to a level
of 2-3 cm from the edge of the front glass of the aquarium.
The water level should be 1-2 cm below the bottom of plant
grow container. Connect the power supply of the lamp and
the power plug of the filter to the electric grid. After a day,
put the fishes in the aquarium.
You can plant seeds or seedlings of plants already on the
3rd day of using the aFARM.
To do this, stop the filter by removing the filter plug from
the mains, wait for the remaining water to drain from the
plant grow container into the aquarium. Place the seeds or
seedlings in the decorative soil, then turn on the filter
again.
Manufacturer Warranties
Aquarium warranties
The warranty covers joints of the aquarium
The manufacturer guarantees the compliance of the
aquariums with the requirements of this standard subject
to the conditions of transportation, storage and operation.
Warranty period is 2 (two) years from the date of sale
through a retail network.
The warranty does not cover glass damage: chips, impacts
or other mechanical damage.
LED lamp and filter Warranties
The manufacturer provides a warranty of 24 months from
the date of sale.
The warranty covers damage caused by the manufacturer,
i.e. defects in materials and so on. The warranty does not
cover damage caused by improper use of the lamp / filter,
or its use for other purposes.
Attention! Any attempt to make structural changes,
outside of its normal use or care, will void the warranty.
In case of malfunction of the devices, it is necessary
contact technical support.
WARRANTY
1
2
3
Plant grow
container
Filter
LED lamp
Natural
soil - pebbles
Fig. 2
Fig. 3
Fig. 1
Rear wall of the aquarium
Plant grow container
Technical support service:
tel.: 0800 300-137
aqualighter@collar.com
To activate the warranty,
register at www.aqualighter.com.
Scan a QR code* using your mobile phone to immediately
go to the registration form.
After registration is confirmed, your warranty is activated.
You get direct access to a 24-hour technical and
information support service. Repeated quick entry to the
site can be performed by re-scanning the QR code.
In case of detection of incorrect operation of the device, it
is necessary to contact technical support. These warranty
conditions do not exclude, limit or suspend the buyer's
rights guaranteed by the current legislation of the country
in which the sale was made
Direct warranty from the manufacturer eliminates the
need to contact the point of sale in the event of a warranty
case. You do not need to store the warranty card, receipt or
packaging of the product. To return, replace or obtain
qualified advice on the product, simply fill out a simple
form on the website of the manufacturer.
In case improper functioning of the device is detected
please contact technical support. The present warranty
conditions do not exclude, limit or cease the rights of the
buyer granted by the applicable legislation of the country
where the sale was made.
* The QR code of access to the site is in this manual, as well
as on the case or on the product’s wire.
ACTIVATE THE
WARRANTY!
Table of contents
Languages:
Other Collar Aquarium manuals
Popular Aquarium manuals by other brands

Aqua Medic
Aqua Medic EVO 1001 Operation manual

Aqua Medic
Aqua Medic DC Runner 400 Operation manual

Blue Marine
Blue Marine Reef 120 Cabinet instruction manual

Aqua Medic
Aqua Medic Ocean Queen 90 Operation manual

Aqua One
Aqua One PHX 100 quick start guide

Aqua Medic
Aqua Medic Armatus XD Series Operation manual