Filter label
If required, to prevent gas from escaping, place one of the
enclosed filter stickers on the filter.
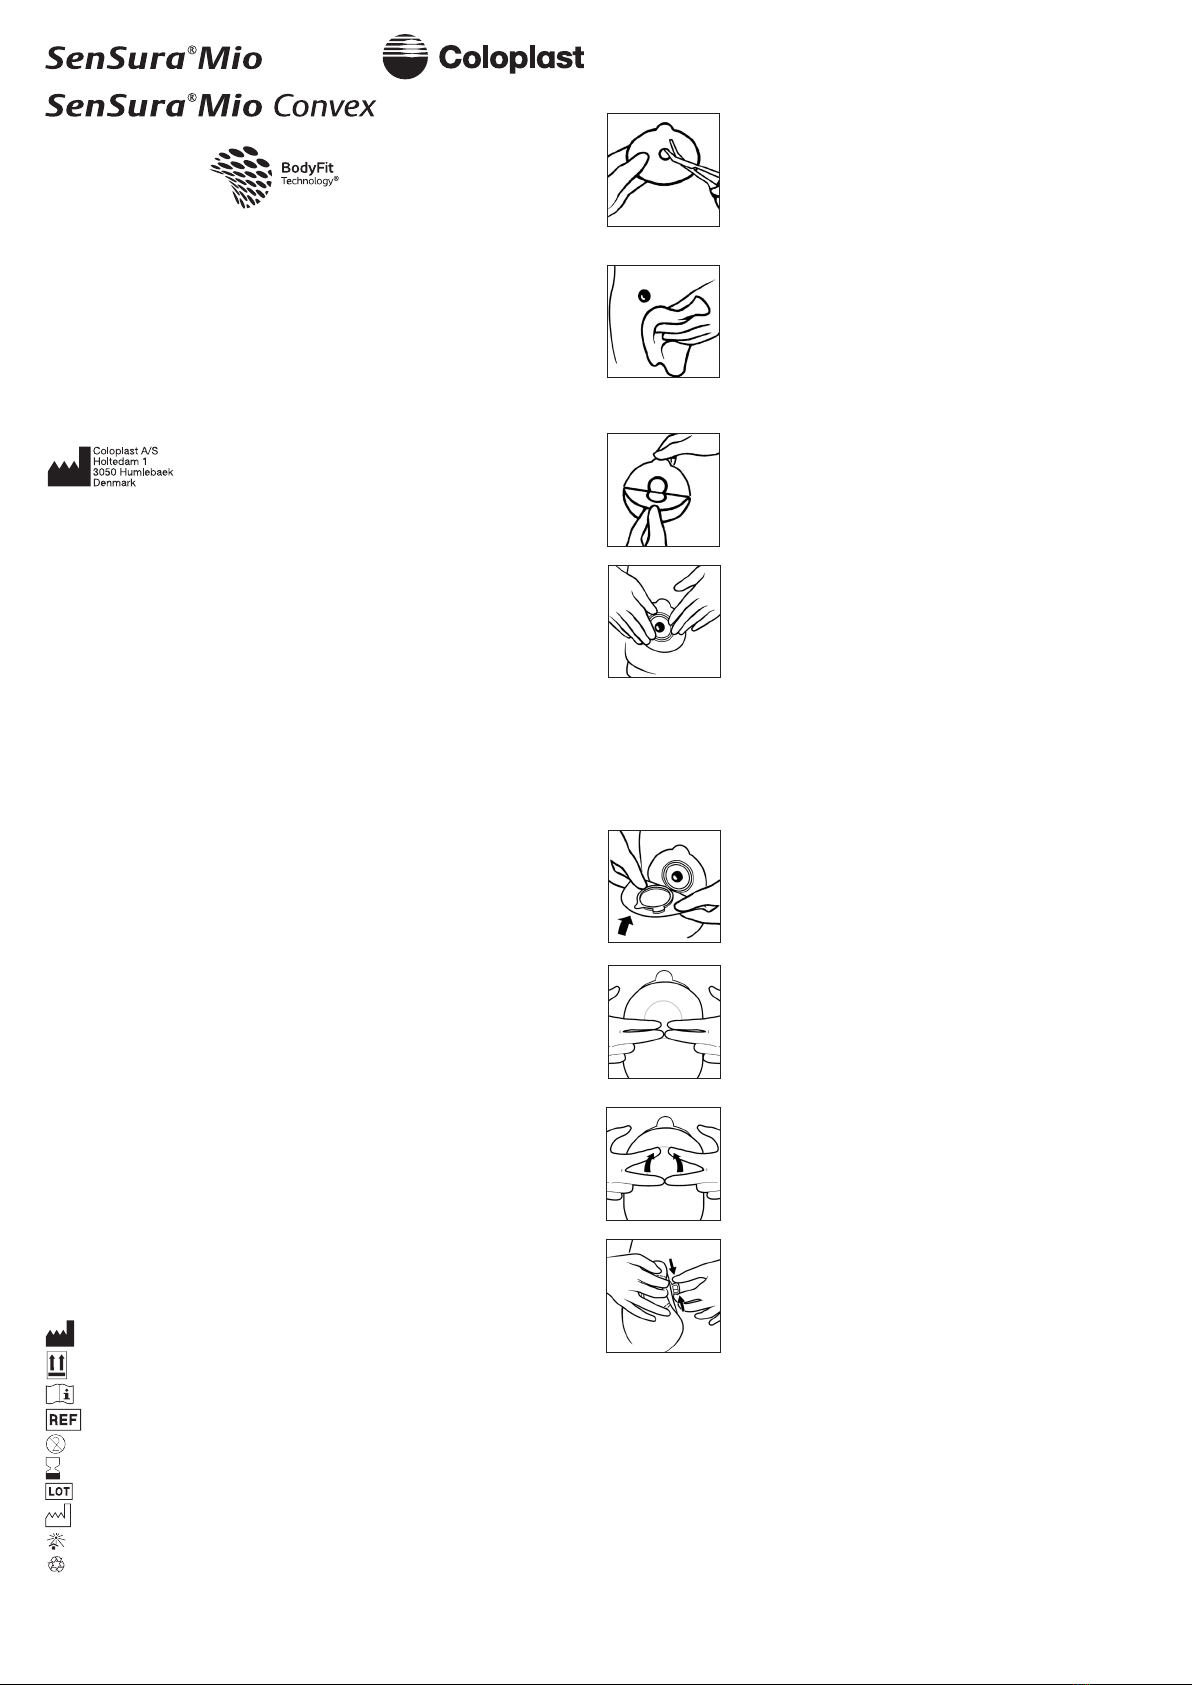
Adjust the belt length, by pulling the straps, so it fits your
body. There is no need to remove the fabric covering the
buckle.
Attach each of the four belt hooks to one of the four belt
tabs on either side of the barrier. Start from the front and
apply a light pressure towards the stomach. Then pull the
belt hooks away from the coupling, until they “click” in
place.
(Only applies for products with belt tabs.)
Disposal
The product is intended for single use only and should be disposed of with
normal household waste. Do not flush the product down the toilet.
Belt
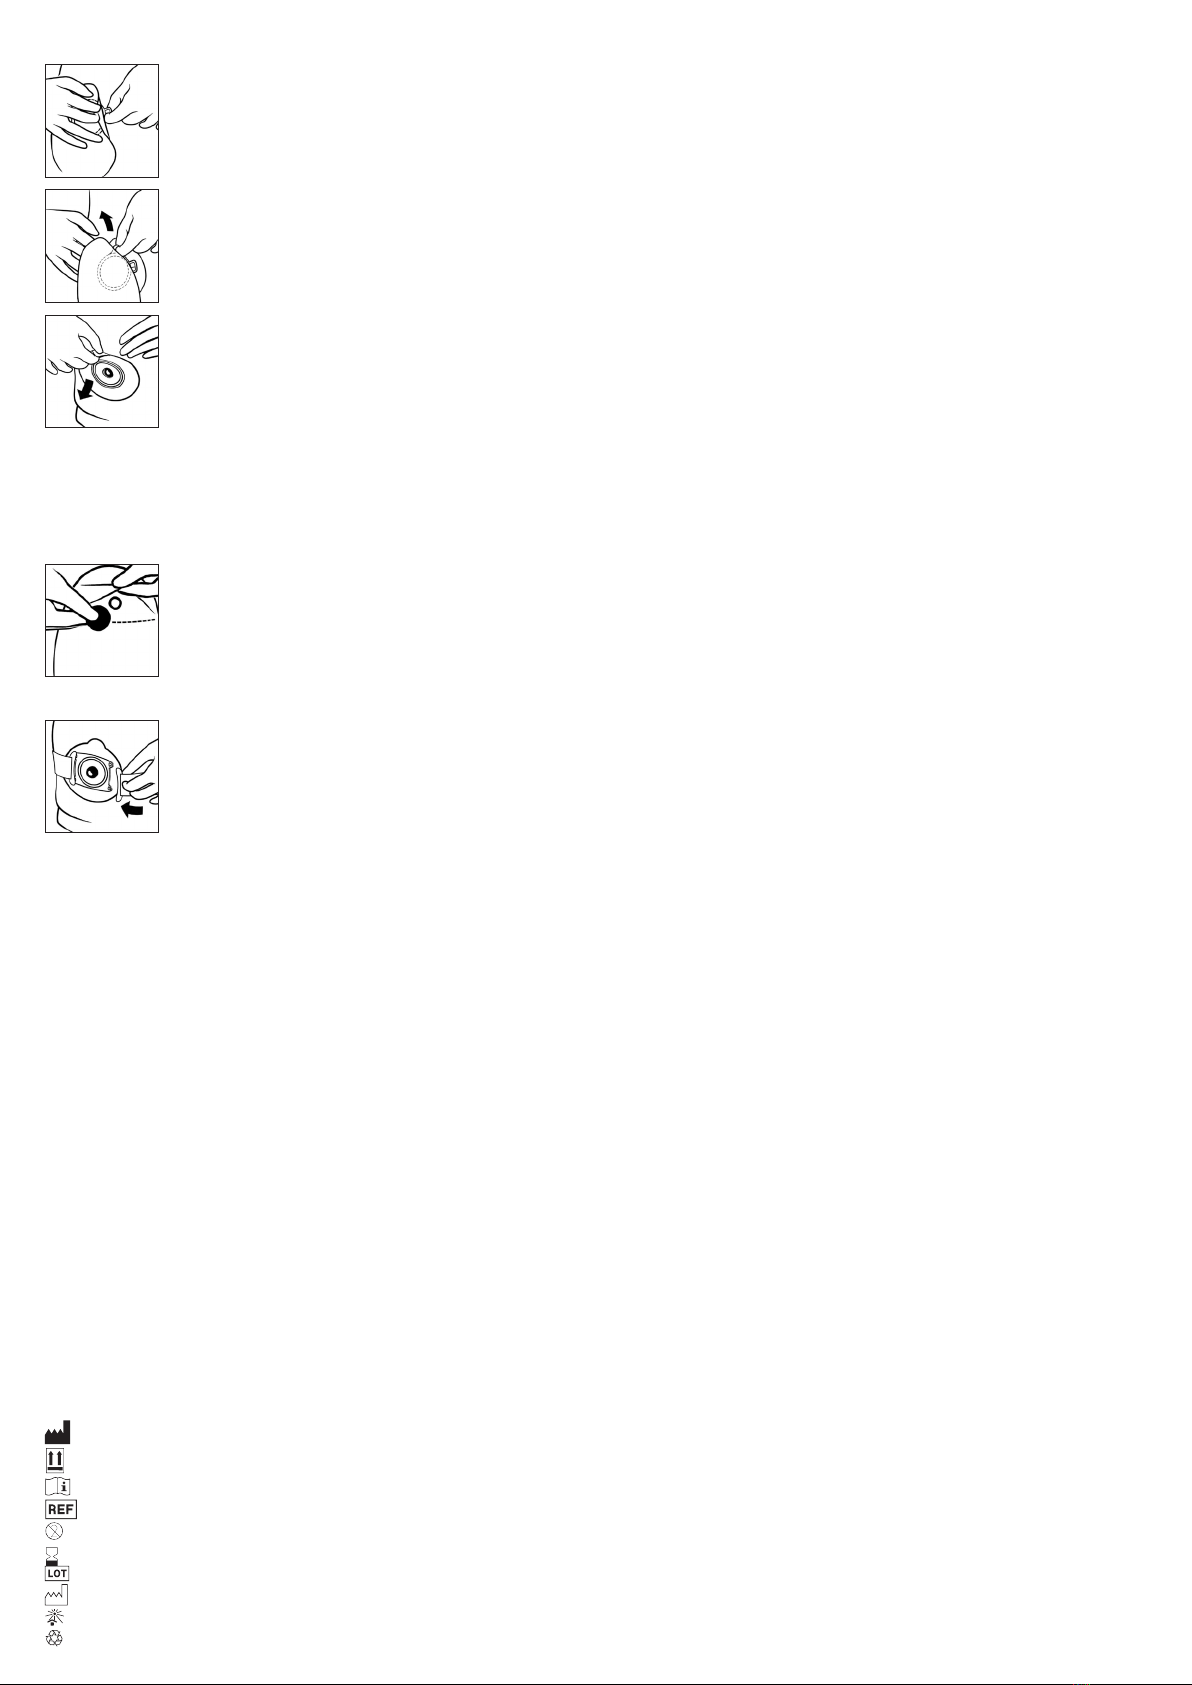
Gently remove the barrier by pulling the removal tab on the
barrier away from the stomach and roll the barrier slowly
downwards.
Apply light pressure on your skin with your free hand to
help removal.
Removal
Remove the pouch by opening the lock ring by pressing the
small turquoise tab facing your stomach with a finger tip.
Hold onto the removal tab and remove the pouch by
carefully pulling the pouch away from the barrier.
Indicación
La bolsa de ostomía está destinada a la recopilación de la salida de un ostoma.
La placa adhesiva debe utilizarse para fijar la bolsa y adherir a la piel intacta
en los alrededores del ostoma.
Información
Almacene el producto en posición horizontal en un lugar fresco y seco: no
congele.
Procure que el producto regrese a temperatura ambiente antes de la
aplicación.
Coloplast no se hace responsable de ninguna lesión o pérdida que pueda
surgir por el uso de este producto sin seguir las recomendaciones actuales de
Coloplast.
Precaución
Consulte a su profesional médico antes de comenzar a usar un producto
convexo.
Advertencia
La reutilización del producto de un sólo uso podría causar lesiones al usuario.
Su reciclaje, limpieza, desinfección y/o esterilización pueden afectar a las
características del producto y exponer al usuario a un riesgo adicional de
lesión o infección.
Modo de empleo
Preparación
Corte un oricio en la placa adhesiva para que se ajuste exactamente en el
estoma con un par de tijeras pequeñas curvas y usando la guía de corte de la
placa adhesiva.
Puede usar la guía incluida de medición de estomas para medir el tamaño y la
forma del estoma.
Es importante que haya un ajuste exacto entre el agujero y el estoma para
reducir el riesgo de ltraciones y problemas de piel.
Limpie cuidadosamente el estoma y el área de piel alrededor. La piel debe
estar totalmente seca antes de la aplicación de la placa adhesiva.
Aplicación
Despegue la lámina protectora de la placa adhesiva.
Alinee la placa adhesiva alrededor del estoma y aplique presión sobre la placa
para asegurar una adhesión rápida y un ajuste perfecto entre el adhesivo y la
piel alrededor del estoma.
La placa adhesiva debe estar bien ajustada alrededor del ostoma. Para
evitar el escape de excremento, es importante garantizar un sello hermético
alrededor del ostoma. Al ejercer presión sobre la placa adhesiva/la bolsa en
el abdomen, comience en el área alrededor del ostoma y presione la placa
adhesiva en la piel. Deslice un dedo sobre todo el alrededor del ostoma para
garantizar que la placa adhesiva forme un sello. Alise la placa adhesiva,
comience desde el ostoma y mueva hacia afuera hasta los bordes para
asegurarse de que la placa adhesiva esté en pleno contacto con la piel.
Asegúrese de que la placa adhesiva esté limpia y seca (Use solo agua cuando
limpie la placa adhesiva).
Asegúrese de que el anillo de cierre esté abierto. Coloque la parte inferior del
acoplamiento de la bolsa en la parte inferior del acoplamiento de la placa
adhesiva.
Presione conjuntamente la bolsa y la placa adhesiva en la parte inferior con
sus dedos medios y con los índices haga una pequeña presión en la parte
superior del acoplamiento hasta que sienta que la bolsa esté correctamente
colocada en la placa adhesiva.
Con los dedos índice, ejerza una presión suave sobre la parte superior del
acoplamiento hasta que sienta que la bolsa se encuentra en la posición
correcta en función de la placa adhesiva.
Cierre el anillo de seguridad presionando la cerradura conjuntamente. La bolsa
está firmemente asegurada en la placa adhesiva cuando se escucha un ‘clic’.
Retirada
Para retirar la bolsa abra el anillo de seguridad presionando la pestaña
turquesa pequeña frente al estómago con la punta del dedo.
Apóyese en la oreja de extracción y retire la bolsa con cuidado retirando la
bolsa de la placa adhesiva.
Retire cuidadosamente la placa adhesiva tirando la oreja de remoción de la
placa adhesiva del estómago y enrollando la placa adhesiva lentamente hacia
abajo.
Aplique una presión suave en la piel con su mano libre para ayudar en la
retirada.
Eliminación
El producto está diseñado para un solo uso y debe desecharse junto con los
residuos domésticos. No deseche el producto por el inodoro.
Pegatina de filtro
Si fuera necesario, para prevenir escapes de gas, coloque una de las pegatinas
incluidas en el filtro.
Cinturón
Ajuste el tamaño del cinturón, tirando de las correas, para que se ajuste a su
cuerpo. No es necesario retirar el tejido que cubre la hebilla.
Fije cada uno de los cuatro ganchos de la correa a una de las cuatro orejas
del cinturón en ambos lados de la placa adhesiva. Comience por el frente y
presione suavemente hacia el estómago. En seguida retire los ganchos del
acoplamiento, hasta que "hagan clic" en su lugar.
(Solo se aplica a productos con lengüetas para cinturón).
Símbolos
Fabricante
Almacenamiento horizontal
Consulte las instrucciones de uso
Número del catálogo
Para un solo uso
Uselo antes de
Código de lote
Fecha de fabricación
Manténgase protegido de los rayos del sol.
Envases reciclables