manuals.online logo
Brands
  1. Home
  2. •
  3. Brands
  4. •
  5. Coloplast
  6. •
  7. Personal Care Product
  8. •
  9. Coloplast Conveen Active Operating instructions

Coloplast Conveen Active Operating instructions

Other Coloplast Personal Care Product manuals

Coloplast SenSura Mio User manual

Coloplast

Coloplast SenSura Mio User manual

Coloplast SenSura Mio User manual

Coloplast

Coloplast SenSura Mio User manual

Coloplast SenSura Mio User manual

Coloplast

Coloplast SenSura Mio User manual

Coloplast SenSura Mio User manual

Coloplast

Coloplast SenSura Mio User manual

Coloplast Conveen User manual

Coloplast

Coloplast Conveen User manual

Popular Personal Care Product manuals by other brands

DC-Connex DCX-L201 user manual

DC-Connex

DC-Connex DCX-L201 user manual

MPVTruma MicroDrop CalimeroJet instruction manual

MPVTruma

MPVTruma MicroDrop CalimeroJet instruction manual

Bosch PHA230 instruction manual

Bosch

Bosch PHA230 instruction manual

Beautify 4000001 care guide

Beautify

Beautify 4000001 care guide

MEIYATI Pro Spa quick start guide

MEIYATI

MEIYATI Pro Spa quick start guide

Blossom LED M3 R24 installation guide

Blossom

Blossom LED M3 R24 installation guide

Philips HB875/01 user manual

Philips

Philips HB875/01 user manual

Orliman SITLIVE OSL3120 INSTRUCTIONS FOR USE AND PRESERVATION

Orliman

Orliman SITLIVE OSL3120 INSTRUCTIONS FOR USE AND PRESERVATION

GE T8 Basic service manual

GE

GE T8 Basic service manual

Pretika ST102 Instructions for use & warranty information

Pretika

Pretika ST102 Instructions for use & warranty information

Beurer FC 76 Instructions for use

Beurer

Beurer FC 76 Instructions for use

Pebble Grey 500.40.70-75 manual

Pebble Grey

Pebble Grey 500.40.70-75 manual

PUSH ortho quick start guide

PUSH

PUSH ortho quick start guide

Dermlite DL3N instructions

Dermlite

Dermlite DL3N instructions

DERMAPEN SEMI user manual

DERMAPEN

DERMAPEN SEMI user manual

Carex SunLite user guide

Carex

Carex SunLite user guide

Roper Rhodes Intense Installation & Aftercare Instructions

Roper Rhodes

Roper Rhodes Intense Installation & Aftercare Instructions

Interacoustics Titan IMP440 Setup & installation

Interacoustics

Interacoustics Titan IMP440 Setup & installation

manuals.online logo
manuals.online logoBrands
  • About & Mission
  • Contact us
  • Privacy Policy
  • Terms and Conditions

Copyright 2025 Manuals.Online. All Rights Reserved.

Urine collection bag
Leg bag with integrated strap
Instructions for use
23315232 Version 1
The Coloplast logo is a registered trademark of Coloplast A/S. All rights reserved.©
(2013-11-25)
Urine collection bag
Indication
The bag has a capacity of 250mL and is for daytime use.
The bag is designed for use with urisheaths.
Coloplast accepts no liability for any injury or loss that may arise if this product is used in
a manner contrary to Coloplast's current recommendations.
Information
Re-use of the single use product may create a potential harm to the user. Reprocessing,
washing, disinfection, and sterilisation may compromise product characteristics, causing
additional risk of physical harm to or infection of the user.
Warning
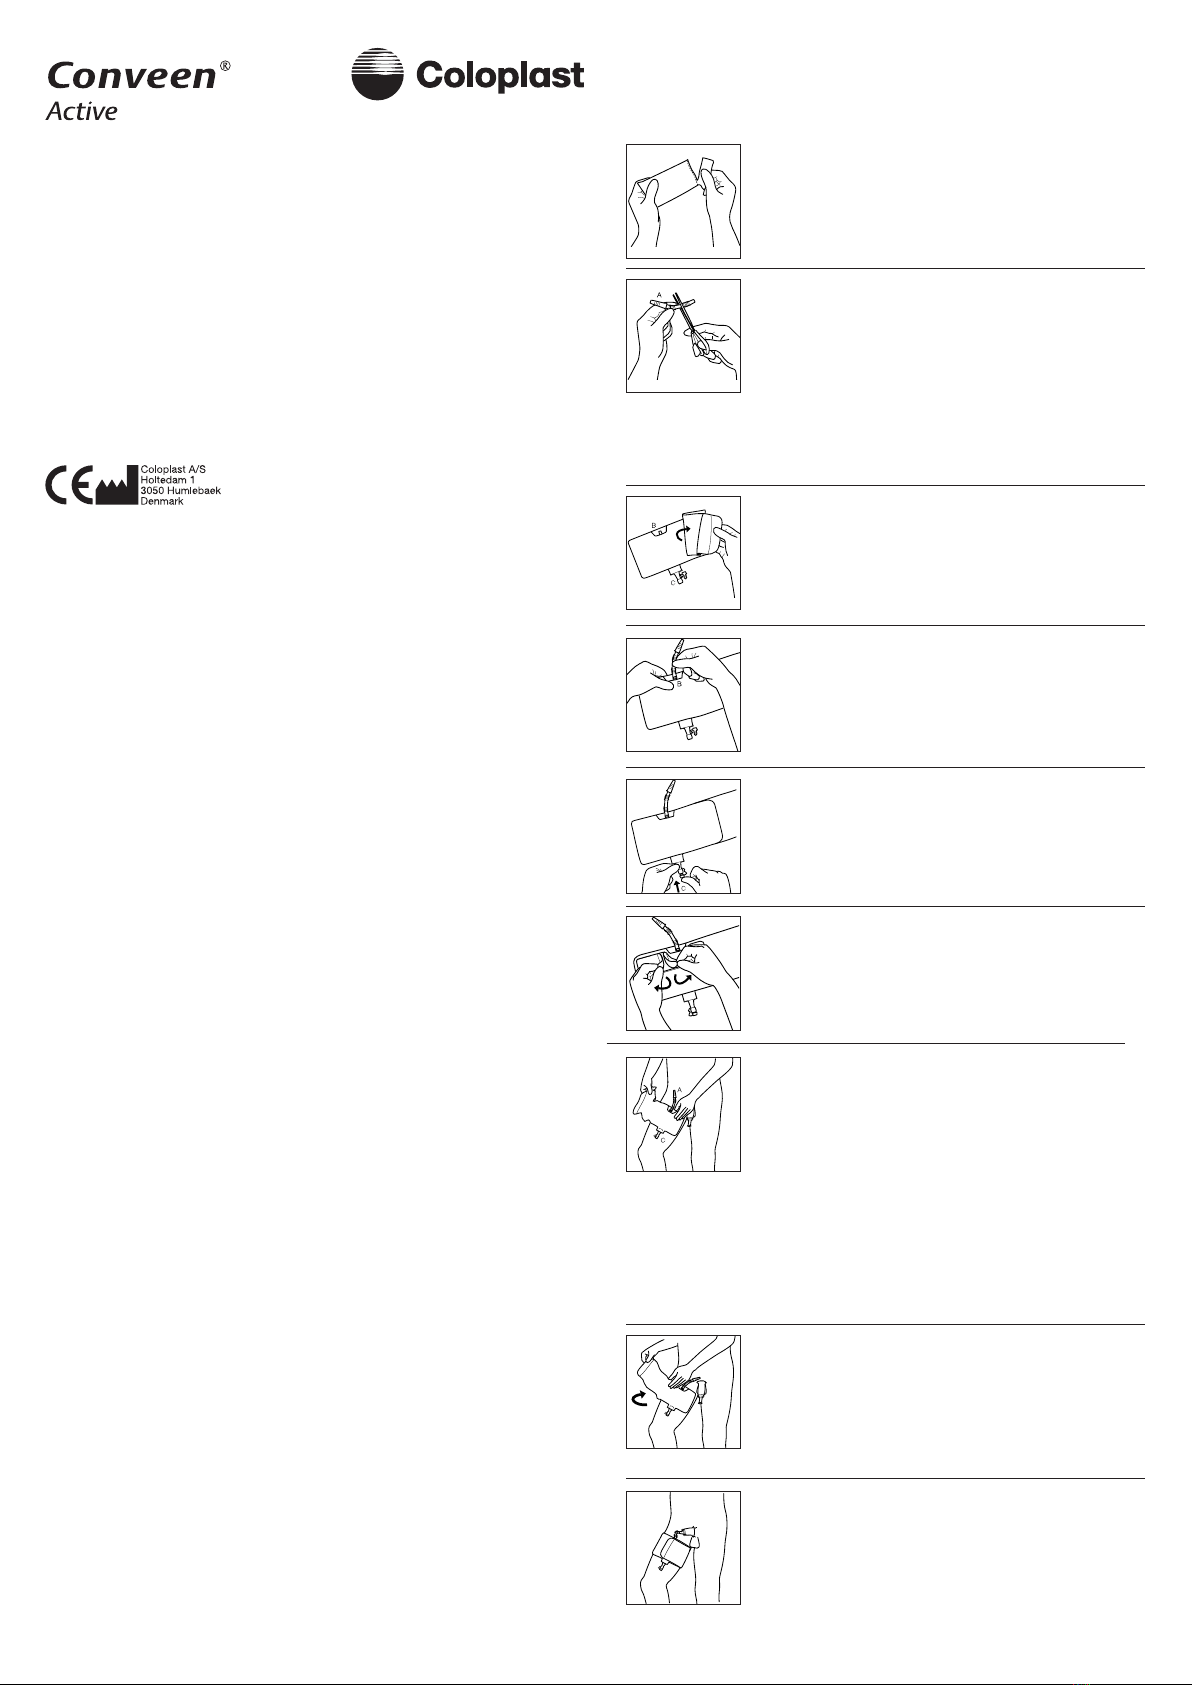
Fitting the leg bag (right leg)
1. Open the packaging by tearing along the perforation. Remove
the leg bag and the small piece of separate tubing.
2. The tubing has smooth and corrugated sections. At one end,
the inlet connector (A) is attached.
The length of the tube may be shortened by half if preferred.
To shorten the tube, simply cut the free end with scissors
immediately after the first corrugated section of tubing. It is
important to retain as much of the subsequent smooth section
as possible. This will help create a secure connection between
leg bag and tube when mounting the tube.
3. Unfold the leg bag and identify the inlet valve at the top of the
bag (B) and the outlet tap at the bottom of the bag (C).
4. Attach the free end of the tube to the inlet valve (B).
5. Close the outlet tap (C).
6. Remove the protective film from the adhesive patch on the
backside of the collection bag.
7. Hold the bag with the inlet connector (A) pointed upwards
and the outlet tap (C) pointed downwards. The adhesive patch
should be facing your right thigh.
Attach the bag directly to the skin of your inner right thigh.
When positioning the bag, make sure it is placed high on your
thigh with the inlet connector centred on your inner thigh,
immediately below the penile area. The aim is a position of the
bag that allows for comfortable and secure connection to a
urisheath.
When first fitting the bag, it may be necessary to reposition it a
few times to discover the optimal position for you.
8. Wrap the long section of strap around your leg and use the
burr fabric to fasten the end of the strap.
The fit should be comfortable and firm. It is not necessary to
have the strap wrapped very tightly around your thigh. The
adhesive patch will help hold the bag securely in place.
How to use Conveen Active
1
2
3
4
5
6
7
8
9. Connect the bag to a urisheath by pushing the bag’s inlet
connector firmly into the urisheath outlet.
9
10. For comfortable wear and discretion, hide the outlet tap by
folding it upwards and tucking it into the pocket between the
bag and the outer layer of elastic strap material.
11. The leg bag should be emptied before it becomes
completely full.
Untuck the outlet tap and position it over a toilet bowl or other
suitable receptacle.
Grasp the outlet with one hand. Squeeze the flexible part
between your fingers. With the other hand, open the tap. Ease
the pressure on the flexible part of the outlet tap gradually to
allow the urine to flow.
Always remember to close the tap after emptying the bag.
Return the tap to the pocket under the elastic strap material.
Emptying and disposal
10
11