Columbia Telecommunications Group FRS22-NL User manual

COLUMBIA
OPERATIONS MANUAL
FRS22-NL
General Mobile Radio Service (GMRS)
22 Channel 2-Way Radios
GMRS/FRS Frequencies
Voice-Activated
Earpiece Included
Owners Manual
and Instructions

2
Contents.................................................................................2
Introduction .................................................................. 6
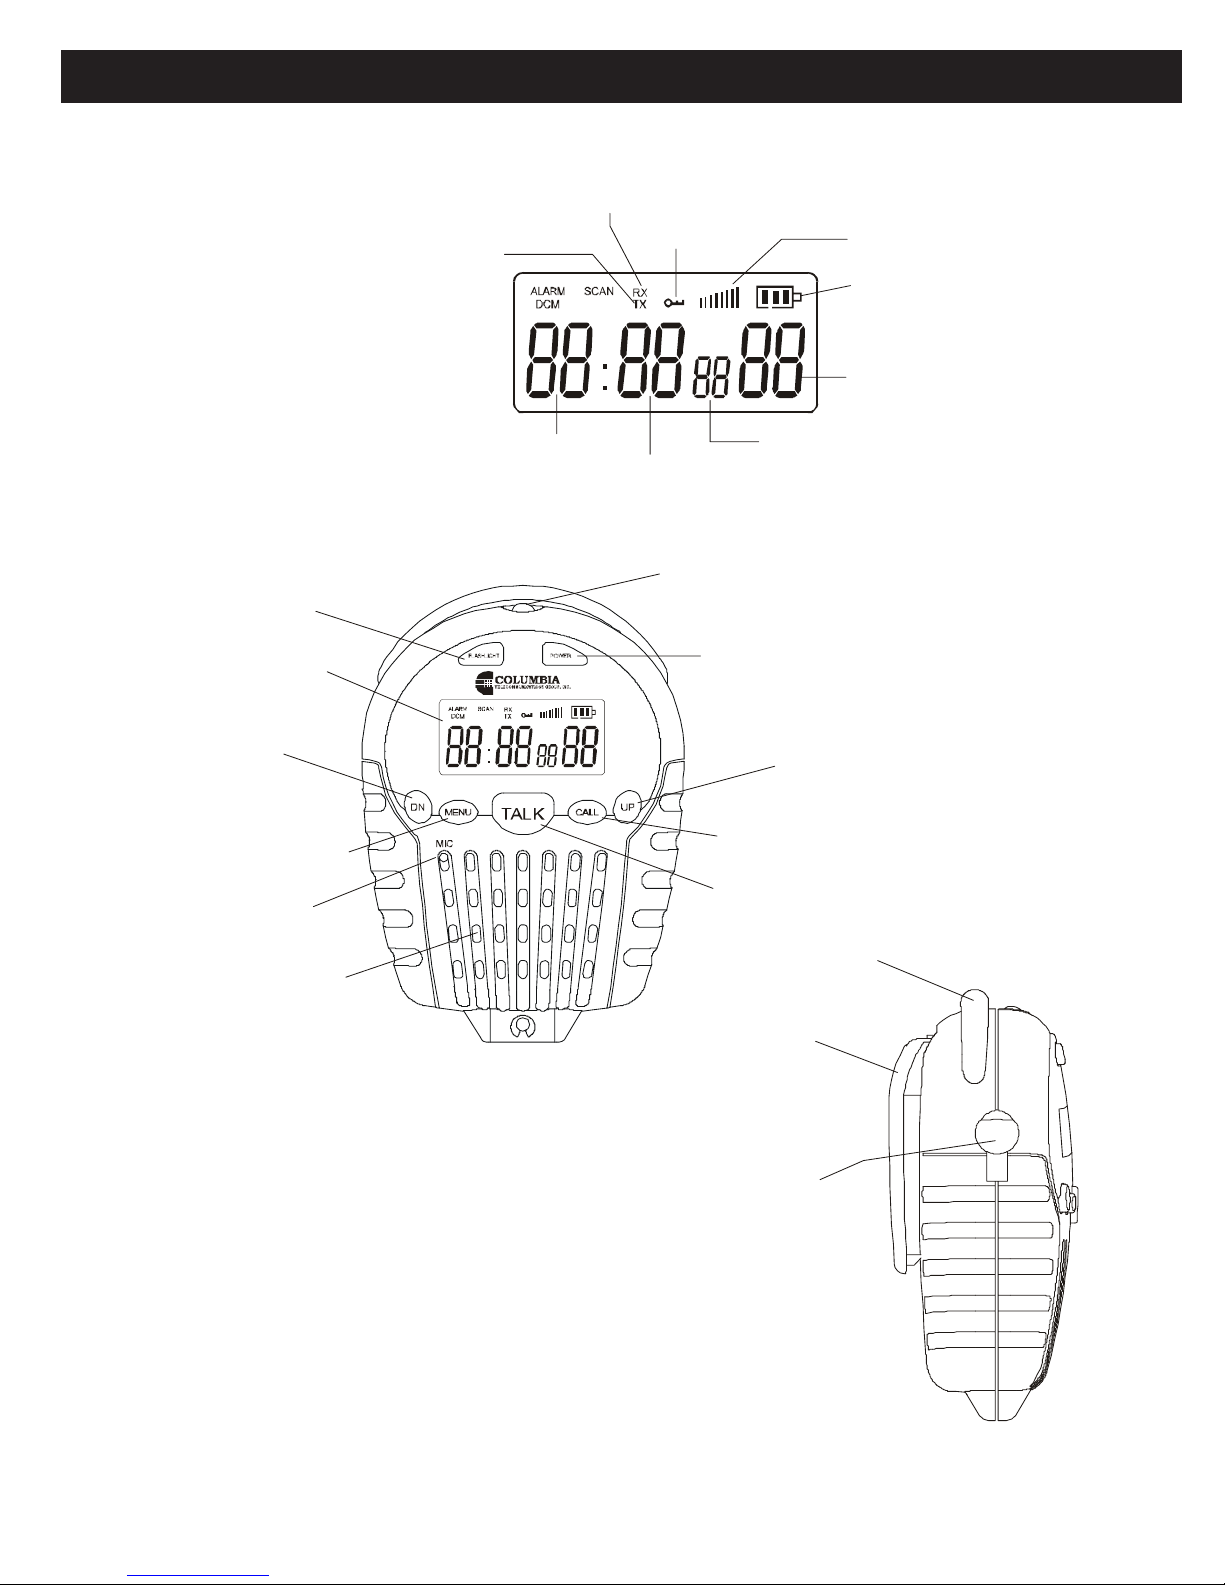
Controls and Displays ............................................ 6
Component Guide ........................................................ 7
Setting Up Your GMRS/FRS Radio ............................... 8
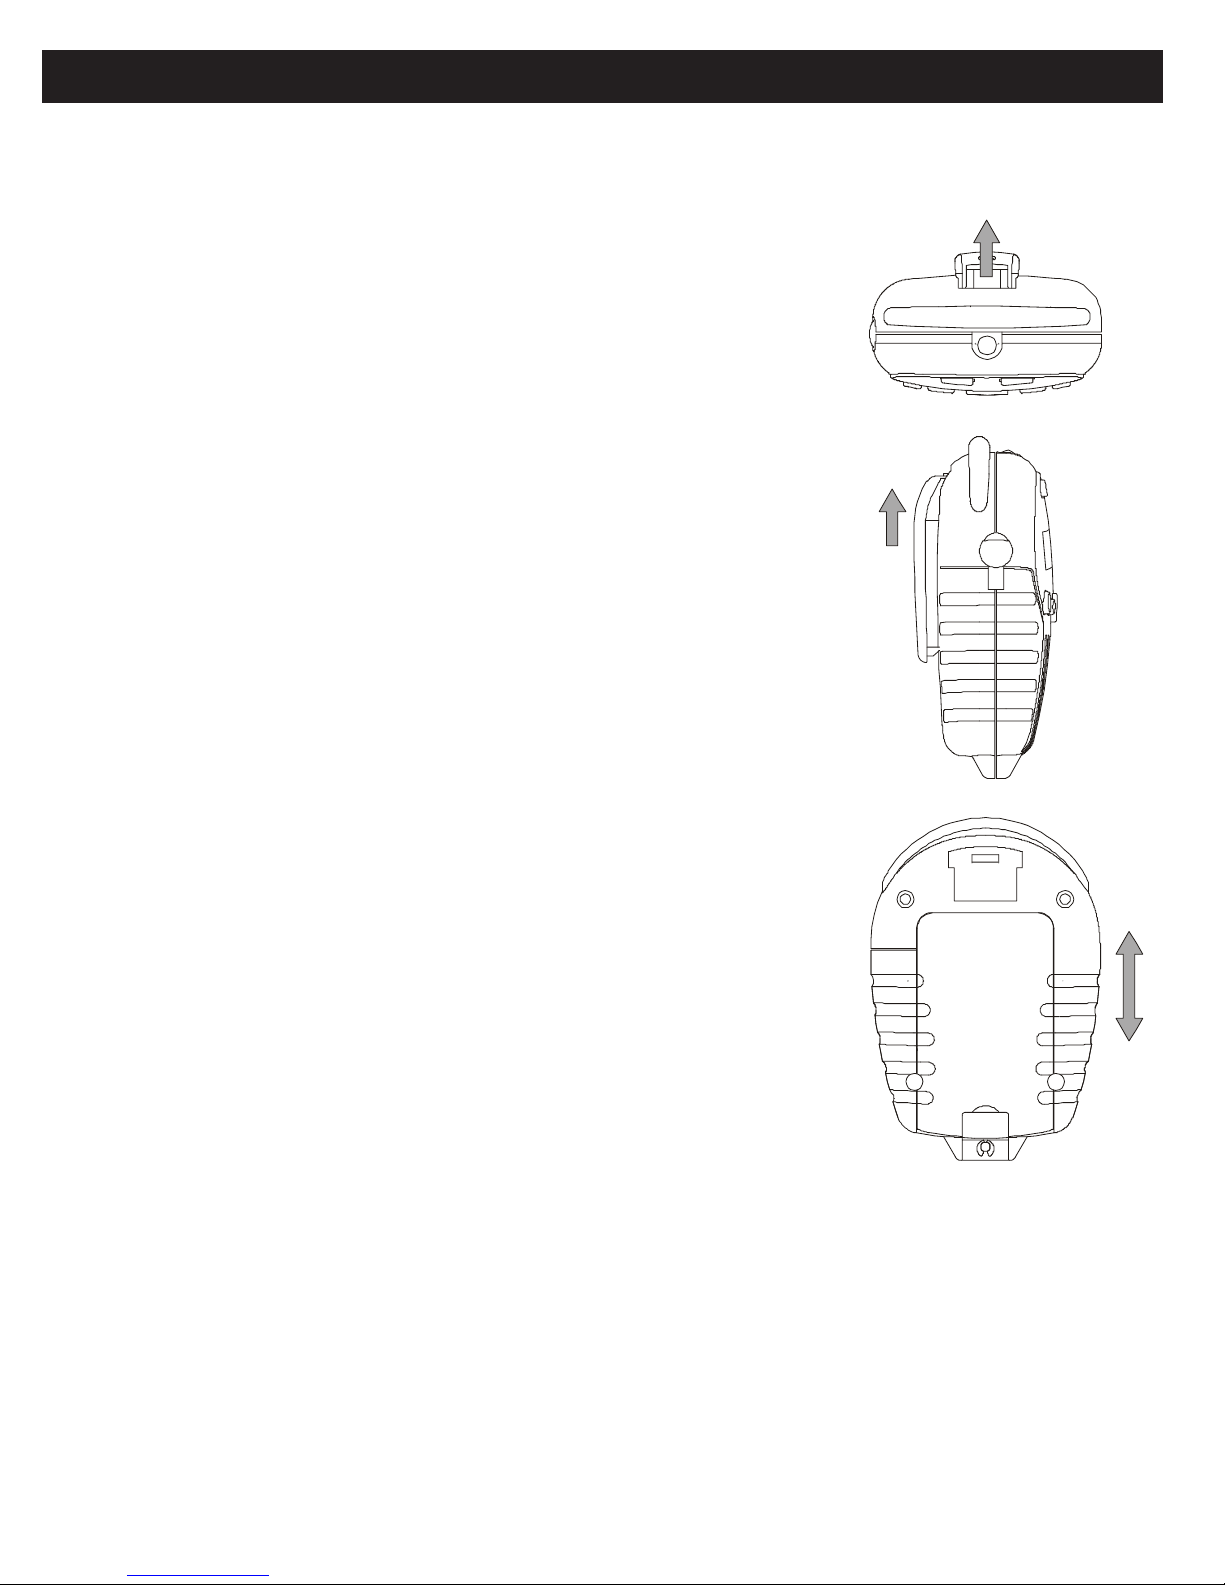
Battery Installation .................................................. 8
Battery Meter ........................................................... 9
Low Battery Indicator ............................................... 9
Operation .................................................................... 11
Turning on your GMRS/FRS .................................. 11
Communication ..................................................... 11
Receiving communications ................................... 11
Respond prompt tone .......................................... 12
Channel selection ................................................ 12
Frequencies .......................................................... 13
To speak to another radio ..................................... 14
Range ................................................................... 14
Calling (Paging) another radio ............................. 15
Setting Call-Ring Tone................................................15
Key Tone ON/OFF.........................................................16
Roger Beep ON/OFF....................................................16
Dual Channel Monitor..................................................17
To set the time..............................................................18
To set alarm clock........................................................18
Using stopwatch..........................................................19
Special Features ........................................................ 20
Automatic Squelch ................................................ 20
Channel Lock................................................................20
Channel Scan ....................................................... 20
Automatic Battery Save ......................................... 21
External Microphone/Speaker/Charger Jacks...... 21
Built-in flashlight...........................................................21
Customer Support ..................................................... 22
Channel Frequencies and Code Charts ................... 23
Warranty .................................................................... 24
Contents
CAUTION.................................................................................3
SAFETY TRAINING INFORMATION....................................4
FCC Warning..........................................................................5

3
GMRS LICENSE
USE OF THIS RADIO WITHIN THE UNITED STATES REQUIRES
AN FCC GMRS LICENSE. AN INDIVIDUAL 18 YEARS OF AGE
OR OLDER, WHO IS NOT A REPRESENTATIVE OF A FOREIGN
GOVERNMENT, IS ELIGIBLE TO APPLY FOR A GMRS SYSTEM
LICENSE. YOU WILL NEED TWO FORMS FROM THE FCC; FCC
FORM 159 AND FCC FORM 605 MAIN FORM AND SCHEDULE F.
YOU CAN FIND THE FORMS ONLINE
AT:HTTP// WWW.FCC.GOV/FORMPAGE.HTWL ,OR CALL 1-800-
418-3676.
To maintain compliance with the FCC`s RF exposure guidelines,
hold the transmitter at least 1 inch (2.5 centimeters) from your face
and speak in a normal voice, with the antenna pointed up and
away. If you wear the handset on your body while using the
headset accessory, DO NOT TRANSMIT.
The FRS-22 supplied belt clip is for storage purposes ONLY. Use
only the supplied antenna.
Unauthorized antennas, modifications, or attachments could
damage the transmitter and may violate FCC regulations.
Normal Position :Hold the transmitter approximately 1” from your
face and speak in a normal voice, with the
antenna pointed up.
MODIFICATIONS OR CHANGES NOT EXPRESSLY APPROVED
BY COLUMBIA TELECOMMUNICATIONS, INC. COULD VOID THE
USER`S AUTHORITY TO OPERATE THE EQUIPMENT.
CAUTION

4
Safety Information For GMRS UNIT
Your wireless handheld portable transceiver contains a low power
transmitter. When the TALK button is pushed it sends out radio frequency
(RF) signals . This device is authorized to operate at a duty factor not to
exceed 50% In August 1996,the Federal Communications Commission
(FCC) adopted RF exposure guidelines with safety levels for handheld
wireless devices.
. DO NOT operate the radio without a proper antenna attached , as this
may damage the radio and also cause you to exceed FCC RF exposure
limits . A proper antenna is the antenna supplied with this radio by the
manufacturer or an antenna specifically authorized by the manufacturer for
use with this radio.
. DO NOT transmit for more than 50% of total radio use time (50% duty
cycle) Transmitting more than 50% of the time can cause FCC RF
exposure compliance requirements to be exceeded.
.ALWAYS use authorized accessories antennas, batteries,belt clips,
speaker/mic, etc). Use of unauthorized accessories can cause the FCC
RF exposure compliance requirements to be exceeded.
ALWAYS keep the antenna at least 2.5cm (1 inch) away from the body
when transmitting ,If you wear the handset on your body while using the
headset accessory, DO NOT TRANSMIT. The FRS-22 supplied belt clip is
for storage purposes ONLY. This is to ensure FCC RF exposure
compliance requirements are not exceeded. To provide the recipients of
your transmission the best sound quality, hold the antenna at least 5cm(2
inches) from the mouth, and slightly off to one side.
SAFETY TRAINING INFORMATION

5
ADJUSTMENT: REPLACEMENT or substitution of transistors,
regular diodes or other parts of a unique nature, with parts other
than those recommended by Columbia, may cause a violation of the
technical regulations of part 95 of the FCC Rules, or violation of
Type Acceptance requirements of Part 2 of the Rules.
NOTE: This equipment has been tested and found to comply with
the limits for a Class B digital device, pursuant to Part 15 of the
FCC Rules These limits are designed to provide reasonable
protection against harmful interference in a residential installation.
This equipment generates, uses and can radiate radio frequency
energy and, if not installed and used in accordance with the
instructions, may cause harmful interference to radio
communications. However, there is no guarantee that interference
will not occur in a particular installation. If this equipment does
cause harmful interference to radio or television reception, which
can be determined by turning the equipment off and on, the user is
encouraged to try to correct the interference by one or more of the
following measures:
• Reorient or relocate the receiving antenna.
• Increase the separation between the equipment and
receiver.
• Consult the dealer or an experienced radio/TV technician for
help.
This device complies with Part 15 of the FCC Rules. Operation is
subject to the following condition: this device must accept any
interference received, including interference that may cause
undesired operation.
FCC Warnings

6
Included in your package
When you unpack your FRS-22 radios,you
should find the following items enclosed in the
package.
* GMRS/FRS radio-2pcs
* Belt clip (attached)-2pcs
* Neckstrap-2pcs
* This manual
Please check for these carefully.If any items are
missing, please call COLUMBIA
Telecommunications Customer support at 1-800-
889-7434 between 9am and 5pm EST (Eastern
Standard Time).
Controls and Displays
1. Mic
2. Speaker
3. Power Button
4. Menu Button
5. Call Button
6. Talk Button
7. Antenna
8. LCD Panel
9. Up Button (Change Channel and Volume)
10. Down Button (Change Channel and Volume)
11. Belt clip
12. Mic/Speaker/Charger Jack
13. Flashlight Button
Introduction
FRS22-NL
Gen er al Mo bi le Rad io S erv ice (GM RS )
2 2 C ha n ne l 2- Wa y Ra d io s
W i t h C T C S S se c u r i t y
G MR S/ F RS Fr e qu en c ie s
Vo ic e- Ac t iv a te d
EarpiesIncluded

7
Component Guide
1.Mic
3. Power Button
4. Menu Button 5. Call Button
6.Talk Button
8. LCD Panel
13. Flashlight Button
Flashlight
9. Up Button
10. Down Button
2.Speaker
Channel
Number
Transmit
Symbol
Receive
Symbol
Battery
Level
Lock Volume
Hour
Minute Second
7. Antenna
11. Belt clip
12. Mic/Speaker/
Charger jack

8
Battery Installation
Batteries are not installed with you GMRS/FRS
2-way radios.To use the radio, you must install 3
AAA size alkaline batteries or 3 AAA size Ni-MH
rechargeable batteries .
Caution: incorrect positioning of the
batteries can damage both the batteries and
the unit.
To install the batteries:
•Remove the belt clip by pulling the tab
on the top of the belt clip back, and
sliding it up and off of the unit.
•Pull the battery door lock tab down to
release the battery cover.
•lnsert three AAA batteries. Position the
batteries according to the polarity
markings on the plastic.
•Replace the battery cover. Snap the lock
tab and belt clip back into place.
Setting Up Your GMRS/FRS Radio

9
WARNING
DO NOT CHARGE THIS UNIT USING AN AC DC
ADAPTOR WITH REGULAR AAA ALKALINE
BATTERIES INSTALLED.USE ONLY THE AC/DC
ADAPTOR WITH AAA RECHARGEABLE
BATTERIES
•Do not mix old and new batteries.
•Do not mix alkaline, standard
(carbon-zinc), or rechargeable
batteries.
Battery Meter
The battery meter is located in the top right corner
of the LCD display panel on the unit. It looks like
a battery with 3 vertical bars inside. These
indicate the amount of power available. As the
power is used, the bars will disappear.
Low Battery Indicator
When the batteries need to be changed, the
battery meter icon will flash. To ensure
uninterrupted communication, replace the
batteries as soon as possible.
Note:
Always use alkaline batteries or Ni -MH type
rechargeable batteries for replacements.
If you store your radio for long periods of time,
always remove the batteries. Batteries may
Setting Up Your GMRS/FRS Radio

10
corrode and leak when left unused over long periods
of time, and permanently damage your radio.
DO NOT PUT BATTERIES INTO FIRE OR
EXPOSE TO HIGH HEAT. THEY MAY EXPLODE.
Setting Up Your GMRS/FRS Radio

11
Turning On Your GMRS/FRS
Push & hold Power button, to turn the GMRS/
FRS radio on or off. The unit will beep, the LCD
panel will display information about your radio, and
the panel will be illuminated by a green light for
several seconds.
Communication
You can communicate two ways with your new
GMRS/FRS radio. There are 22 channels available
to you. You can either talk directly to others and
hear their response, or you can call or page them
with an audible tone.
In all cases, both units must be set to the same
channels, or they will not communicate.
The GMRS/FRS radios can only communicate
when either the TALK button (for speech), or
the CALL button (for paging) is pressed. The
unit can only receive when both buttons are
fully released.
Receiving Communications
When your GMRS/FRS unit is turned on and is not
being used to transmit voice communication or
pages, it is always in the listening mode.
You cannot receive any transmissions when the
TALK or CALL buttons are pressed, even if you
aren’t saying anything. Pressing these buttons
automatically overrides and turns off the receive
mode.
Operation

12
When you are using the unit in conversation,
you must release the TALK and/or CALL
buttons to hear the responses of the other
people. Failure to do so will keep your unit in
transmission mode, preventing you from
hearing other units.
Respond Prompt Tone
When the person talking to you from another
radio finishes speaking and releases his TALK
button, you will hear a tone from your unit.
This means that the other radio is now in
receive mode, and you can begin your
transmission.
Adjusting the Speaker Volume
The Up and Dn(DOWN) Buttons control the
volume, change channels, codes and program
the GMRS/FRS
. Press the UP button to increase volume.
. Press the DN button to decrease volume.
.The LCD displays the volume level by the
number of bars on the screen.
Channel selection
Your GRMS/FRS operates on one of twenty-
two preset channels. You can only talk to
other radios that are set to the same channel
as your unit. The chart on page 23 gives the
frequencies on which your radio operates.
Operation

13
Operation
To change the channel:
•Press the MENU (Channel Set) button.
The large 2-digit channel number on the
display panel will begin to flash.
•While the number is flashing, press the
UP or DN button until you reach the
desired channel.
•Press the MENU (Channel Set) button
6 times or simply press the TALK button
to set the channel.
If you do not press MENU or TALK button, the unit
will automatically set the channel in ten seconds.
Frequencies
Other GMRS/FRS radio models may have only 2
channels. If you want to communicate with these
units, you must set the channels as follows:
22-ch radios Frequency 2-ch radios
Chan 8 467.5625 MHz Chan 1
Chan 12 467.6625 MHz Chan 2

14
Operation
To speak to Another Radio
•Make sure both units are on and set
to the same channel.
•Turn the volume up to an audible level.
•Press and hold the TALK button.The
TXicon will appear on the LCD
display.
•While pressing on the TALK button,
speak into the microphone with your
mouth 2 to 3 inches from the unit.
•When you finish speaking, release
the TALK button immediately to hear
the response.
Range
Your GMRS/FRS unit has a range of up to 2
miles . This range can be decreased by
certain atmospheric and environmental
conditions at the time of your conversation.
Some conditions that affect range are:
•Buildings
•Dense trees or foliage
•Hilly or mountainous terrain
The best range will be in flat, open terrain,
without obstructions.
Your range is also dependent on the battery
condition of the radio, the type of terrain where
you are located, and the strength of the signal
from the transmitting radio.

15
Calling (Paging) Another Radio
The volume of the incoming CALL (Page) tone is
set by UP and DN button.
To send a page, or CALL
•Make sure both units are on.
•Turn the volume up to an audible level.
•Set both units to the same channel .
•Press and release the Call button on the
front of your radio.
The other unit will make a 2 second call (page)
tone. They can then respond to your call by
either:
•Pressing the TALK button and speaking
into the radio, or
•Pressing the Call button, which activates
a 2 second call (page) tone on your
radio.
When Call-Ring number is setted to Call-Ring
Off CA OF , press call key will send the default
Call-Ring tone number 1 to another radio, but the
GMRS/FRS you held will not sound.
Setting Call-Ring Tone
1. Press the MENU button 3 times, the GMRS/
FRS will enter to Call-Ring Setting mode, LCD
will display CA 1 press UP or DN button to
change the Call-Ring number (5 different
tones) or Call Off, the different Call-Ring tone
can heard during changing .When Call-Ring
number is setted to Call-Ring Off CA OF ,
Operation
3 times

16
5 times
pressing Call key will send the default Call-
Ring tone number 1 to another radio, but the
GMRS/FRS you held will not sound.
2. To exit from the Calling-Ring Tone Setting
mode, press MENU 4 times or simply press
the TALK button.
Key Tone ON/OFF
This feature allows the radio to sound a
confirmation beep tone whenever keys are
pressed.
To turn the key tones on or off
1. Press the MENU Button 4 times until the (
)icon is flashing on the LCD screen.
2. Press the UP or DN button to enable (" On "
will appear on the LCD) or disable(" OF " will
appear on the LCD )the key tone feature.
3.To exit from the selecting mode, press the
MENU button 3 times, or simply press the
TALK button once.
Roger Beep ON/OFF
The Roger Beep is a tone which is automatically
transmitted whenever the TALK button is
released, This lets the other person know that
you are
transmitting your message.
To enable or disable the Roger Beep Tone.
1.Press the MENU Button 5 times until the (
)icon is flashing on the LCD screen.
2.Press the UP or DN button to enable( "On " will
appear) Beep Tone feature or disable (" oF "will
Operation
4 times

17
appear ) the Roger beef tone.
3.To exit from the Roger Beep Tone feature, press
the MENU button 2 times, or simply press the
TALK button.
Dual Channel Monitor
This feature allows you to monitor two
channels at the same time. While in dual
channel monitor ,the unit will continuously
monitor both the primary and secondary
channel. When an active signal is found,
the cover sation will be heard 5 seconds
after communication is completed, the unit
will resume scanning the two channels.
Pressing the TALK button during a received
transmission will set the unit to transmit on
the same channel. Pressing the TALK
button when no signal is received will set
the unit to transmit on the primary channel.
To set the Dual Chanel Monitor
1. Press the MENU Button 6 times until the
( OF ) icon is flashing.
2. Select the desired channel by pressing
the UP or DN button.
3. Press the MENU button or TALK button to
set the channel.
To cancel the Dual Channel Monitor
1. Press the MENU button 6 times until the
channel number is flashing.
2. Press the UP or DN button until the ‘‘OF ’’
shown on the LCD.
Operation
6 times

18
3. Press the MENU button or TALK button to
exit from the DCM mode.
To set the Time
Your GMRS/FRS has a 24 hour Time Clock.In
watch mode or after pressing and holding the
POWER button for 3 seconds,set the time as
follows:
1. Enter to time set mode by pressing and
holding the MENU for 3 senconds.When the
setting menu is engated,the Hour segment
in the LCD display will flash.
2. Press the UP or DN button to increase or
decrease the Hour number displayed, the
time Setting will cycle within 24 hour.To
engage auto-repeat,press and hold the UP or
DN botton.
3. Press the CALL botton, then the Minute
Segment in the LCD display will flash.
4. Press the UP or DN button to increase or
decrease the Minutes number displayed. To
engage auto-repeat, press and hold the UP or
DN button.
5. Exit by pressing and holding the MENU button
for 3 seconds.Your GMRS/FRS has a built in
menu function the makes accessing its
advanced fetures easy.
To set Alarm Clock
In watch mode or after pressing and holding
the POWER button for 3 seconds, set alarm
clock as follows:
1. Press MENU button 2 times to enter alarm
Operation

19
setting mode.
2. Press the UP or DN button until the “ON ”
icon shown on the LCD.
3. Press the CALL button, then the Hour
segment in the LCD display will flash.
setting alarm time is the same as the
time(the above part).
Using Stopwatch
1. In watch mode, press the MENU button
to enter the stopwatch mode.
2. Press TALK button once to start the
stopwatch.
3. Press TALL button once to stop the
stopwatch.
4. Press CALL button once to reset the timer.
Operation

20
Channel Scan
Your radio can scan across its 22 channels for any
activity. This allows you find other radios without
having to change channels.
To scan:
• Press the MENU button and the DN button
at the same time.
Automatic Squelch
Your GMRS/FRS is equipped with automatic
squelch circuitry, which filters out weak
transmissions and unwanted noise. These signals
may be picked up as background static, and are
usually caused by terrain conditions, or if you
have reached the limit of your range.
Channel lock
This feature locks the channel adjustment buttons
on the front to the unit so that the channel cannot
be changed accidentally.
To Lock the channel:
.Press the MENU button and the UP
button at the same time untill you hear a
“ beep” sound.The lock symbol(shaped
like a key) will appear on the LCD display.
To Unlock the channel:
. Press the MENU button and the UP
button at the same time untill you hear a
several “ beep” sound.The lock symbol
in the LCD display will disappear.
Special Features
Table of contents