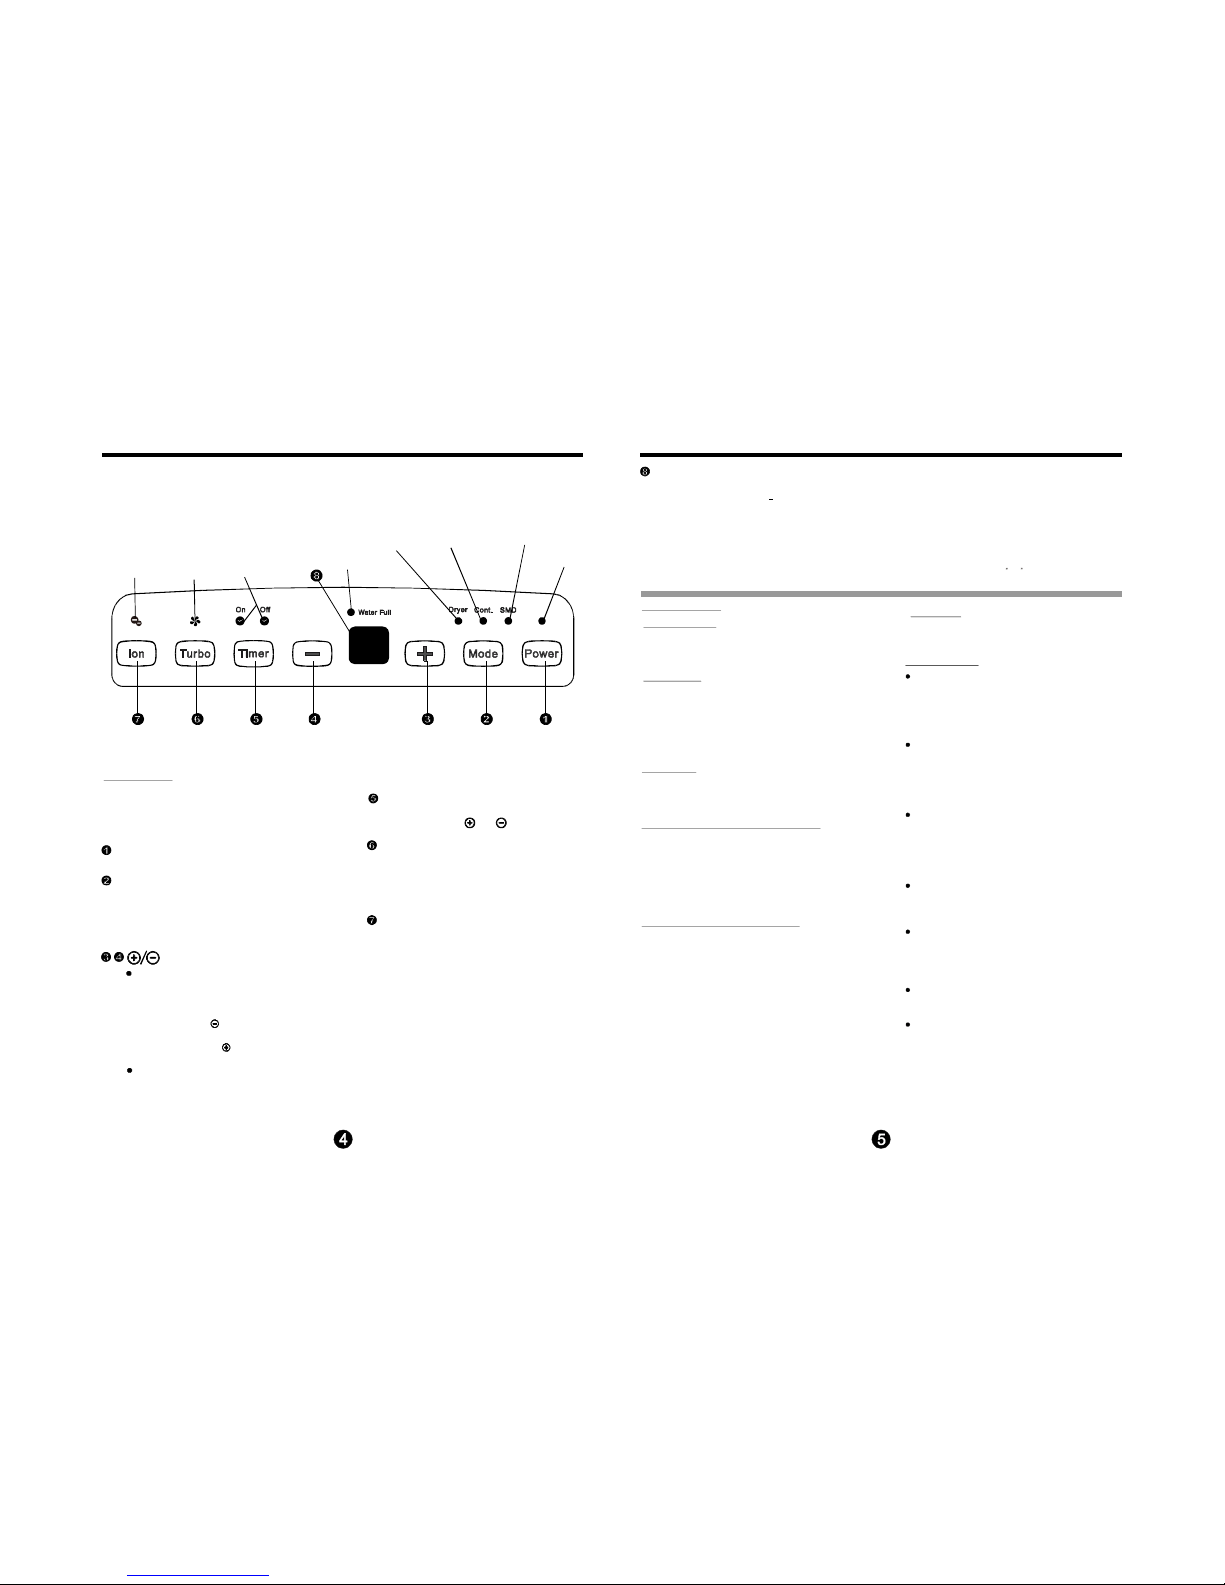
CONTROL PADS ON THE DEHUMIDIFIER
Control pads
When yo u push the button to chang e
op er ati o n mo d es, t he u n it wi ll mak e
a beep s ound to in dicate that it is
ch an gin g mo d es.
N O TE: T he contro l panel of the un it you purc hased ma y be s light ly differe nt according to the
models. Som e models c an b e controlled by remot e controller. Some m odels have no r emote
control function. See the following Fig. 1. Please refer to the REMOTE CONTROL LER
INS TRU CT IO NS for t he rem ote o per ation.
Fig.1
Humidity Set Control Pads
: Dow n/Up Pads
TIMER Set Control Pads
Use the Up/Down pads to set the Auto start and
Auto stop time from 0.0 to 24.
The humidity level can be set within a range of
35 %RH(Relative Humidity) to 85%RH(Relative
Humidity) in 5% increments.
For drier air, press the pad and set to a lower
pe rcent value(%).
For damper air, press the pad and set a higher
pe rcent value(%).
CONTROL PADS ON THE DEHUMIDIFIER
Other features
Bucket Full Light
G lo w s w hen the b uc ket i s re a dy t o b e
e m ptied , or w h en t h e buc ke t is r em ov ed
o r n ot rep la ce d i n th e p rope r pos iti on.
When fr ost builds up on the e vapor ator c oils, the
co mpr ess o r w il l cyc le o ff a nd t he f an wi ll c on tinue
to ru n unti l t he f ro st d isa pp ea rs .
A uto De fr os t
Wait 3 minutes before resuming operation
A f te r the u nit ha s st opp e d , it c an not b e res tart
op e rta t ion i n th e f irs t 3 mi n utes . Th i s i s t o prote ct
the uni t. Oper ation will automa tical ly s tart after
3 mi nut e s .
N OTE :W he n Aut o d efr ost in g ope ra tio n,th e uni t m ay
ma ke a voi ce o f r efr ige ran t flow ing, it is n o rmal.
Sett ing the Timer
When th e unit is on, first press t he Timer
but to n, the Tim er Off indi cator light
i llumin ates . It ind icates t he Auto Stop
progr am i s in it iated. P re ss i t again th e
Tim e On ind ec ator li ght ill um in ates .I t
i ndi ca te s the A uto Star t i s initi at ed.
Pr ess or hold th e UP or DOWN pad to
change the Auto ti me by 0.5 hour inc re-
ments, up to 10 hou rs, then at 1 ho ur
i ncreme nts up t o 24 hours . The control
will count dow n the time remaining unti l
start.
The se lected t ime will r egister in 5 seconds
and t he system wil l autom atica ll y revert
bac k to di splay the previous hum idity
sett ing.
When th e Au to start & Auto stop ti me s a re
set, within th e same p rogr am se quence,
TIME R O N OFF i ndi cat or li ghts ill um ina te
identifying bo th ON and OFF times ar e
now prog rammed.
Turning the unit ON or O FF at any time or
adjusting the t imer sett ing to 0.0 will cancel
the Auto Start/Stop function.
When LED display window displ ays the
code o f P2 , the Auto Sta rt/Stop func tion
will also be c ancel le d.
When th e u n it is of f, fi rst pr ess t he Tim er
but to n, t he TIM ER O N indic ato r lig ht
i llumin ates . It ind icates t he Auto Start
progr am i s in it iated. P re ss i t again th e
Tim e Off i ndecator li ght i llum in ates .I t
i ndi ca te s the A uto Stop i s init iat ed.
Display
Shows the set % humidity level from 35% to 85% or auto
start/stop time (0~24) while setting, then shows the actual
( 5% accuracy) room % humidity level in a range of
- Humidity sensor error--Unplug the unit and plug it back
in. If error repeats, call for service.
- Temperature sensor error-- Unplug the unit and plug it
back in. If error repeats, call for service.
±30%
RH(Relative Humidity) to 90%RH(Relative Humidity).
Error Codes and Protection Codes:
AS
ES
Time r Pad
Press to initiate the Auto start and Auto stop feature,
in conjuction with the and key pads.
Auto Shut Off
The sh uts o ff a ft er 30 s econ ds wh en
the b uck e t i s f ul l, or w h en th e bu ck et is re mov ed
o r n ot r epl a ce d i n th e pr ope r p os iti on. When t he
se tting h um idi t y is re ac he d, th e un i t w i ll b e sh u t
o ff a u tom at ic ally. F or s o me mo del s ,th e fan m ot or
w i ll c on tin ue o p er atin g.
deh um id ifi e r
Auto-Restart
If the unit breaks off une xpectedly due to the power cut,
it will restart with the previous function setting automa-
tical ly w hen the power resume s.
Power Pad
Press to tu rn the dehumidifier on and off.
Unit operation on
indicator li ght
High fan
indicator light
Timer on/off
indicator light
Ion operation on
in dicator light
Bucke t full
indicator light
Co nti nuous
operation on
indicator light
Dryer operation
on indicator light
Sm art d ehumidifying
operation on indicator
light
Mode Pad
Press to select the desired operation mode from
Dehumidif ying,Dryer,Continuous dehumidify ing an d
Sma rt d ehumidify ing.
NOT E: Dryer an d Smart deh umidifying modes are
op tional.
Turbo Pad
Ion Pad(optional)
Press to activate the ionizer. Anions ar automatically
generated by ionization. The anions deactive the
airborne chemical vapors and dust particles. Press
it again to stop the function.
Control the fan spe ed. Press to select either High
or Normal fan speed. Set the fan control to High for
maxi mum moisture rem oval. When the humidity ha s
been reduced and quiet operation is preferred, set
the fan control to Normal.
- Unit is defrosting-- Allow the unit time to automatically
defrost. The protection will clear after the unit self defrosts.
- Bucket is full or bucket is not in right position-- Empty
the bucket and replace it in the right position.
- Unit malfunction
P1
P2
E1 -- Unplug the unit and plug it back in. If
error repeats, call for service.
- Unit malfunction-- Unplug the unit and plug it back in. If
error repeats, call for service.
E3
S mar t deh umidify in g m ode( opti on al )
A t s mar t d e hum id ify ing mo de , t h e un it w il l au to mat ic a lly
co n tro l ro om hum i dit y in a c om fo r ta ble r a nge 45%~ 55 %
ac co rdi ng t o t h e r oom t emp era tu re. The hum i dit y set tin g
fun c tio n wi l l be i nva l id.
EC- Refrigerant leakage detection-- With this new technology,
the display area will appear EC when the unit detects
refrigerant leakage ,call for service.