Comfort Digisystem DT10 User manual

Comfort Digisystem User Manual
Comfort Digisystem
Receiver
DT10
&
Programmer DT05
English

2Receiver DT10
User Manual
Table of Contents Page
Introduction Comfort Digisystem 3
Presentation of the Receiver DT10 3
Overview - Receiver DT10 4
Check the hearing instrument’s input 5
Getting started 7
Acoustic indication, sound signals 8
Modes in the Receiver DT10 8
Output for user with different input types and 9
programs in the hearing instrument
Pairing 12
Functions Programmer DT05 - professional tool 14
Menu Programmer DT05 16
Trouble shooting 18
Service and warranty 19
Technical data 19
Important safety instructions 20

3
Receiver DT10
Introduction to the Comfort Digisystem
Thank you for choosing Comfort Digisystem. Our products are easy to use and
give you crystal clear sound.
Before using the product, please read this manual carefully.
The Comfort Digisystem products feature SecureStream Technology – a
unique, patented digital technology allowing eavesdrop-secure radio transfer
in real time.
Comfort Digisystem Receiver DT10
— the world’s first digital mini receiver
The Comfort Digisystem Receiver DT10 is a digital mini receiver that you
can easily connect to any hearing aid with a standard three-pin Europlug
audio shoe.
The receiver weighs 1,5 gram and is powered by the hearing instrument’s
battery. To minimize energy consumption, the mini receiver is equipped with
an optional auto-sleep feature.
Together with existing microphones and receivers in the Comfort Digisystem
assortment, the Receiver DT10 provides clear speech perception.
The Receiver DT10 is the world’s first mini receiver, taking full advantage of
digital technology in enabling outstanding sound reproduction.
The optional professional tool Programmer DT05 can be used to configure the
Receiver DT10.
The Programmer DT05 also makes it easy to test the Receiver DT10 with or
without a hearing instrument.

4Receiver DT10
Overview - Receiver DT10
Push-button
For toggling between
different listening
modes and activating
pairing mode.
Europlug
For connecting to the
audio shoe on a hearing
instrument or to
the socket on the
Programmer DT05.

5
Receiver DT10
Check the hearing instrument’s input
To be able to use the Receiver DT10, check if — and how — the hearing
instrument supports the use of a mini receiver:
1. The hearing instrument must be equipped with an audio shoe with a
powered Europlug socket made for mini receiver use. This connects the
Receiver DT10 to the hearing instrument and also supplies the DT10 with
power from the hearing instrument’s battery. The received audio signal
will then be transferred from the Receiver DT10 to the hearing instrument
through the audio shoe.
2a. If the hearing instrument is equipped with a Programmable DAI input
(DPAI), programming of the hearing instrument might be necessary (check
with audiologist or hearing instrument manufacturer). In this case the push-
button on the Receiver DT10 cannot switch between the R and R+M modes.
This is instead done by using different listening programs in the hearing
instrument.
Europlug
TIP! The volume of the Receiver DT10’s R and R+M mode can be set individually
by using the Programmer DT05.
This makes it possible to use the push-button as a simple volume control in
combination with a hearing instrument with Programmable DAI input (DPAI).

6Receiver DT10
2b. If the hearing instrument is equipped with a DAI input (check with
audiologist or hearing instrument manufacturer), no programming of the
hearing instrument is necessary. The Receiver DT10 works with the Micro-
phone (M) listening program on your hearing instrument. By setting up the
Receiver DT10 with the Programmer DT05, the push-button on the
Receiver DT10 can be used to select the listening mode: Radio only (R mode)
or Radio + Hearing instrument microphone (R+M mode).
Europlug

7
Receiver DT10
Getting started
Connect the Receiver DT10 to the audio shoe on the hearing instrument.
Check that the audio shoe is connected to the hearing instrument according
to the manufacturer’s instructions.
Make sure that the Receiver DT10 is fitted in the correct manner and push the
Euro-plug completely into the socket of the audio shoe.
The Receiver DT10 is powered by the hearing instrument’s battery. Make sure
that the battery is fresh. If you are unsure, replace the battery.
The Receiver DT10 will start automatically when it’s connected to the hearing
instrument. Briefly press the push-button on the Receiver DT10 to turn it on
or off again.

8Receiver DT10
Acoustic indication, sound signals
The following is a description of the acoustic indications (sound signals). The
sound signals consist of various combinations of two different tones: one high
pitch tone (1000 Hz) and one low pitch tone (500 Hz), and two different tone
lengths.
Action: Sound signal: Indicate this:
Button pressed Short high pitch • Selecting mode
briefly or turning on
Button pressed Short high pitch x 2 • •— Turning off
briefly + long low pitch
Button pressed Short low pitch • • Pairing mode
2 sec. + short high pitch
Pairing Short high pitch x 2 • • Successful pairing
Pairing Long high pitch — — Pairing failed
+ long low pitch
Listening modes in the Receiver DT10
The available listening modes in the Receiver DT10 can be setup in
different configurations:
R Default setting
R+M Setup with Programmer DT05 is necessary
R and R+M Setup with Programmer DT05 is necessary
The Programmer DT05 is used to configure and enable or disable different
listening modes in the Receiver DT10. The push-button on the Receiver DT10
is used to toggle between the activated listening modes.
It is also possible to disable the push-button completely.

9
Receiver DT10
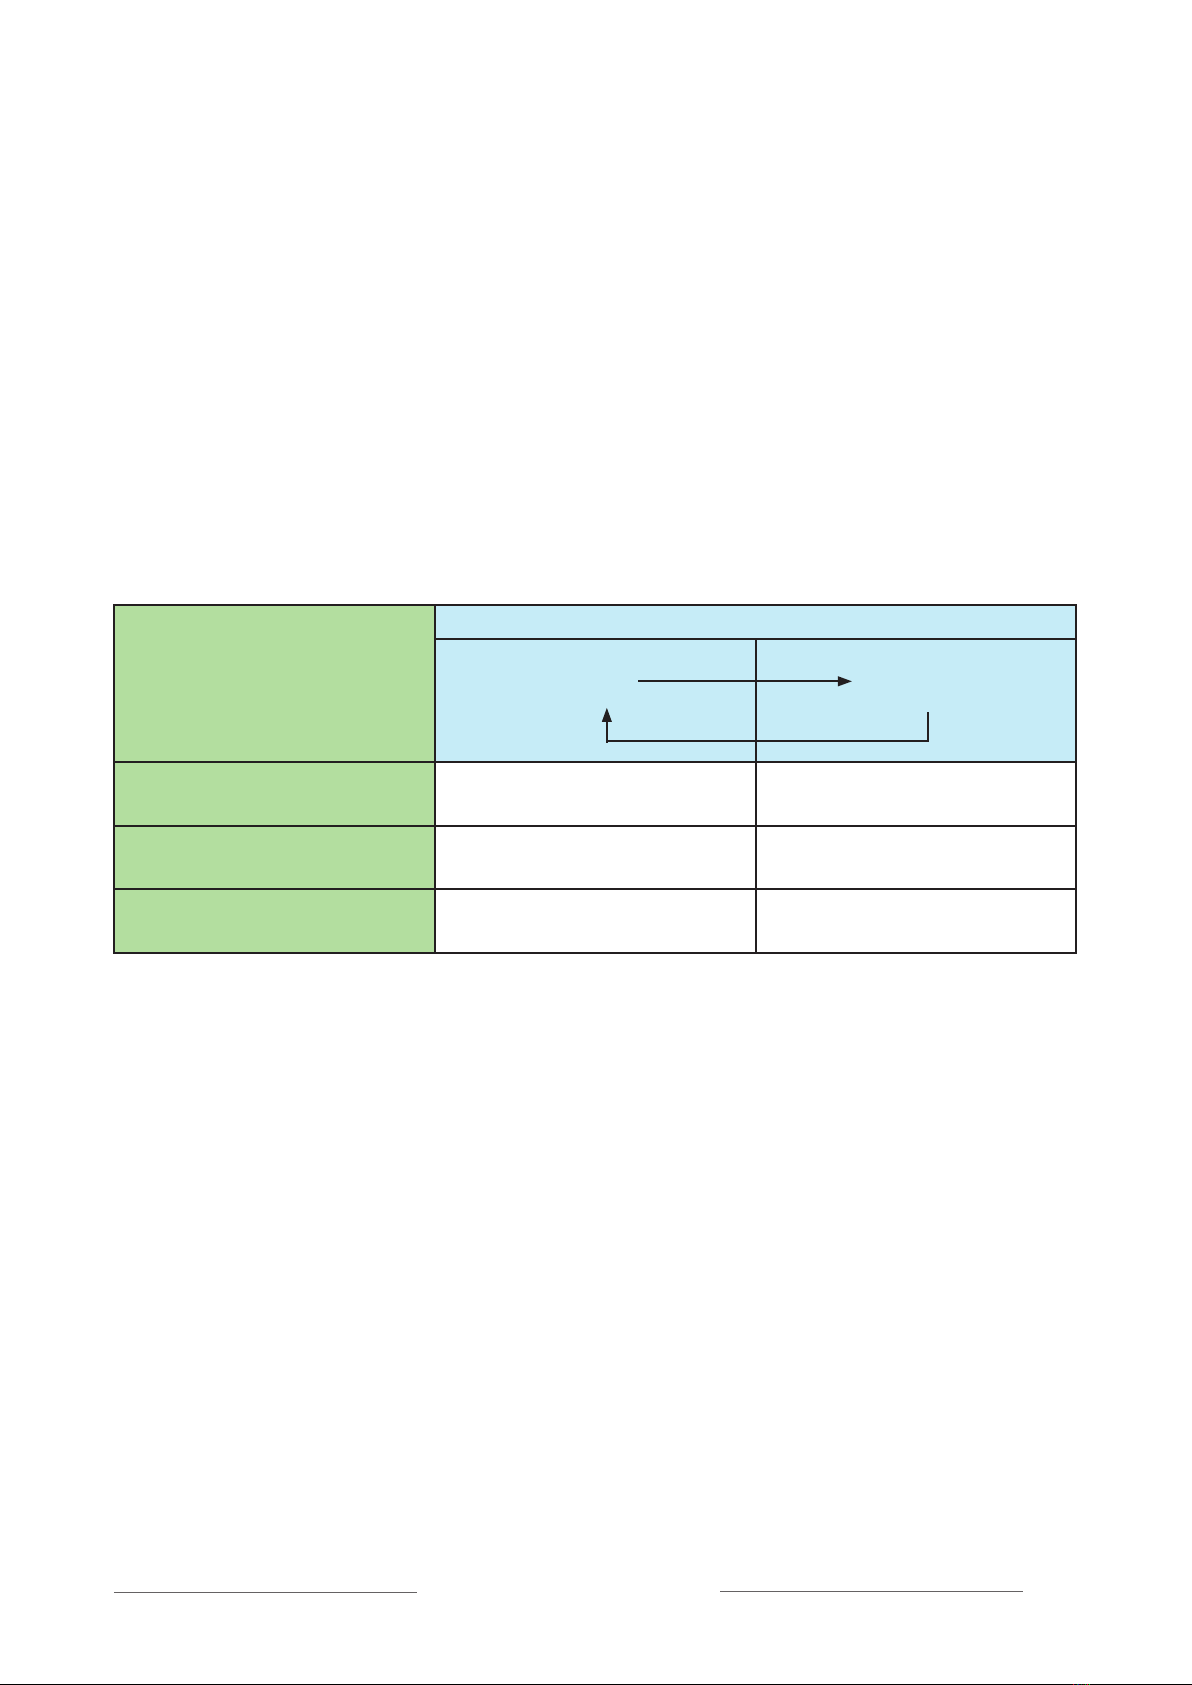
Output for user with different input types and programs in the
hearing instrument
Different hearing instrument electrical input types and available programs in
the hearing instrument will result in different output for the user. Output for
the user is shown in the white sections of the charts below.
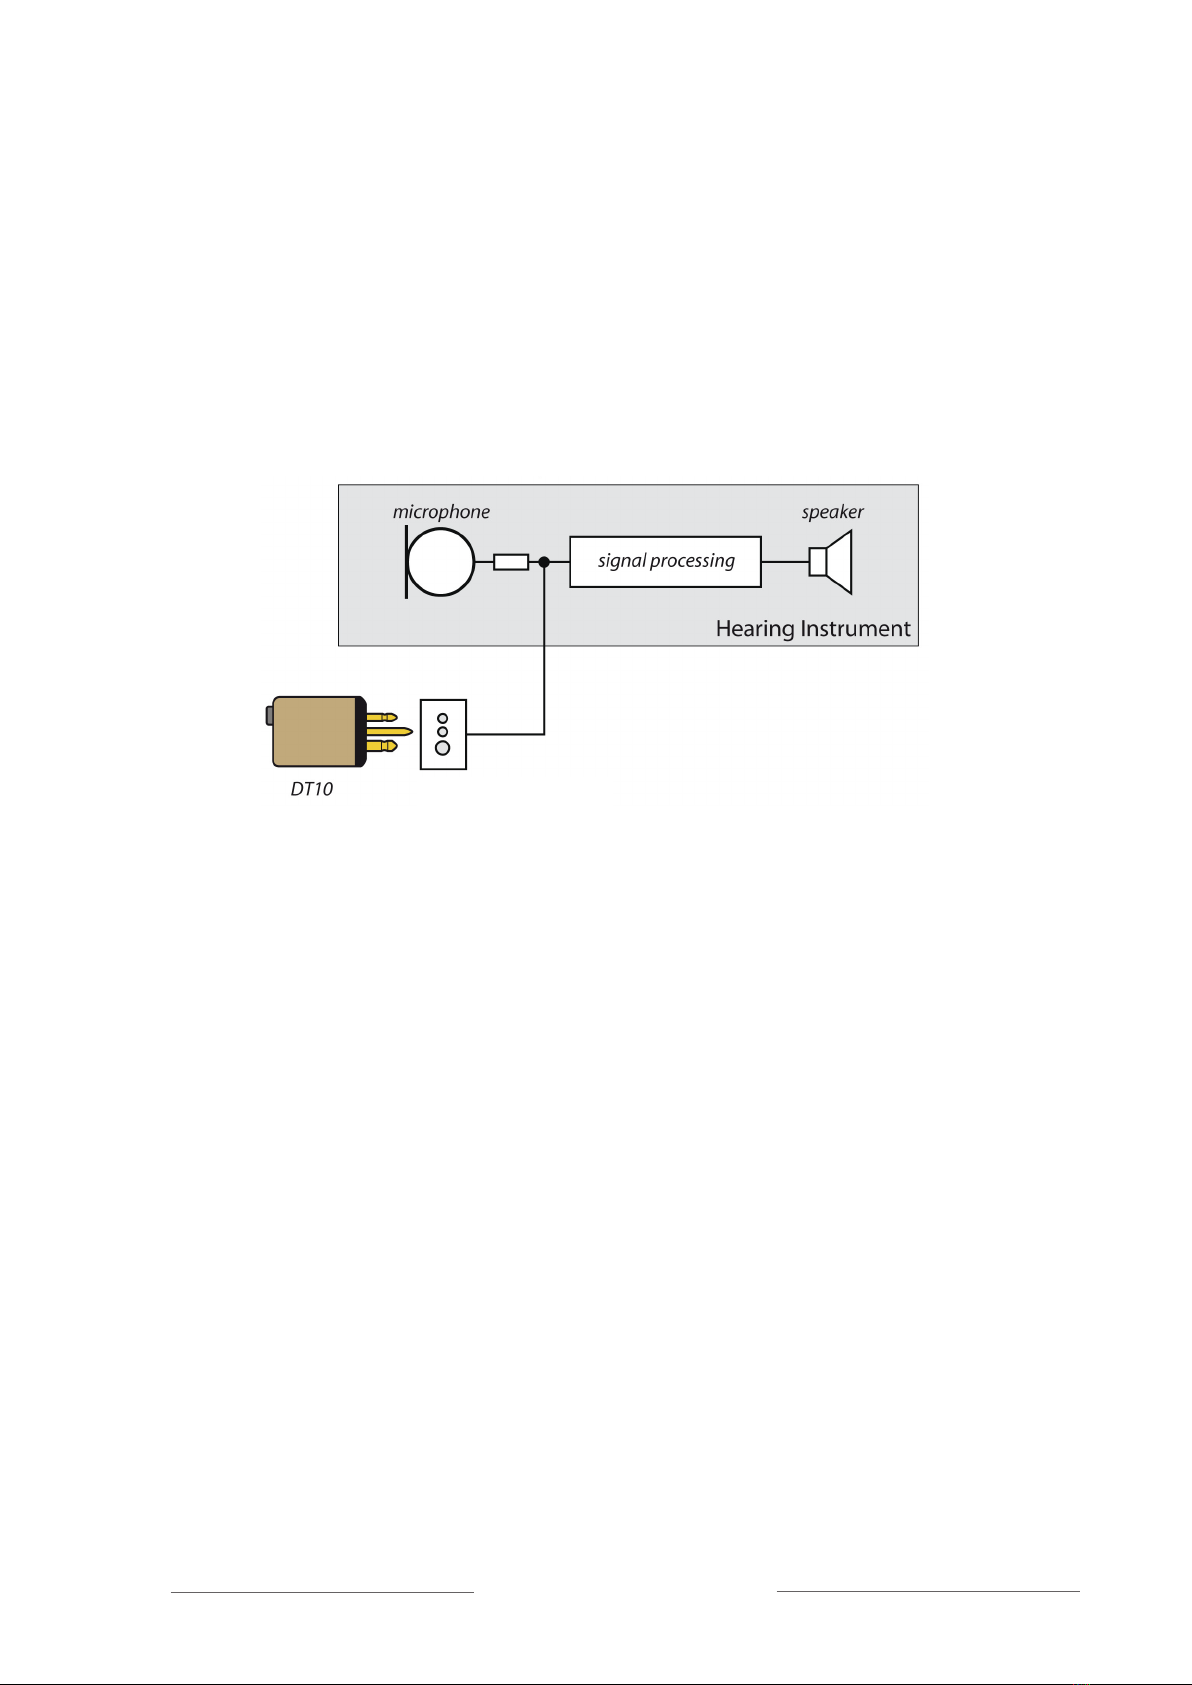
Receiver DT10 with R mode enabled (default setting)
The chart below shows the output (what the user can hear) when Receiver
DT10 listening mode R is enabled in combination with different input types
and programs in the HI.
When pressing the push button on the Receiver DT10, the listening mode is
shifted in the following sequence:
Hearing instrument:
Receiver DT10 push-button
Off
R mode
DAI input Off Radio only
Programmable DAI input
DAI + M program Off Radio + HI microphone
Programmable DAI input
DAI program only Off Radio only

10 Receiver DT10
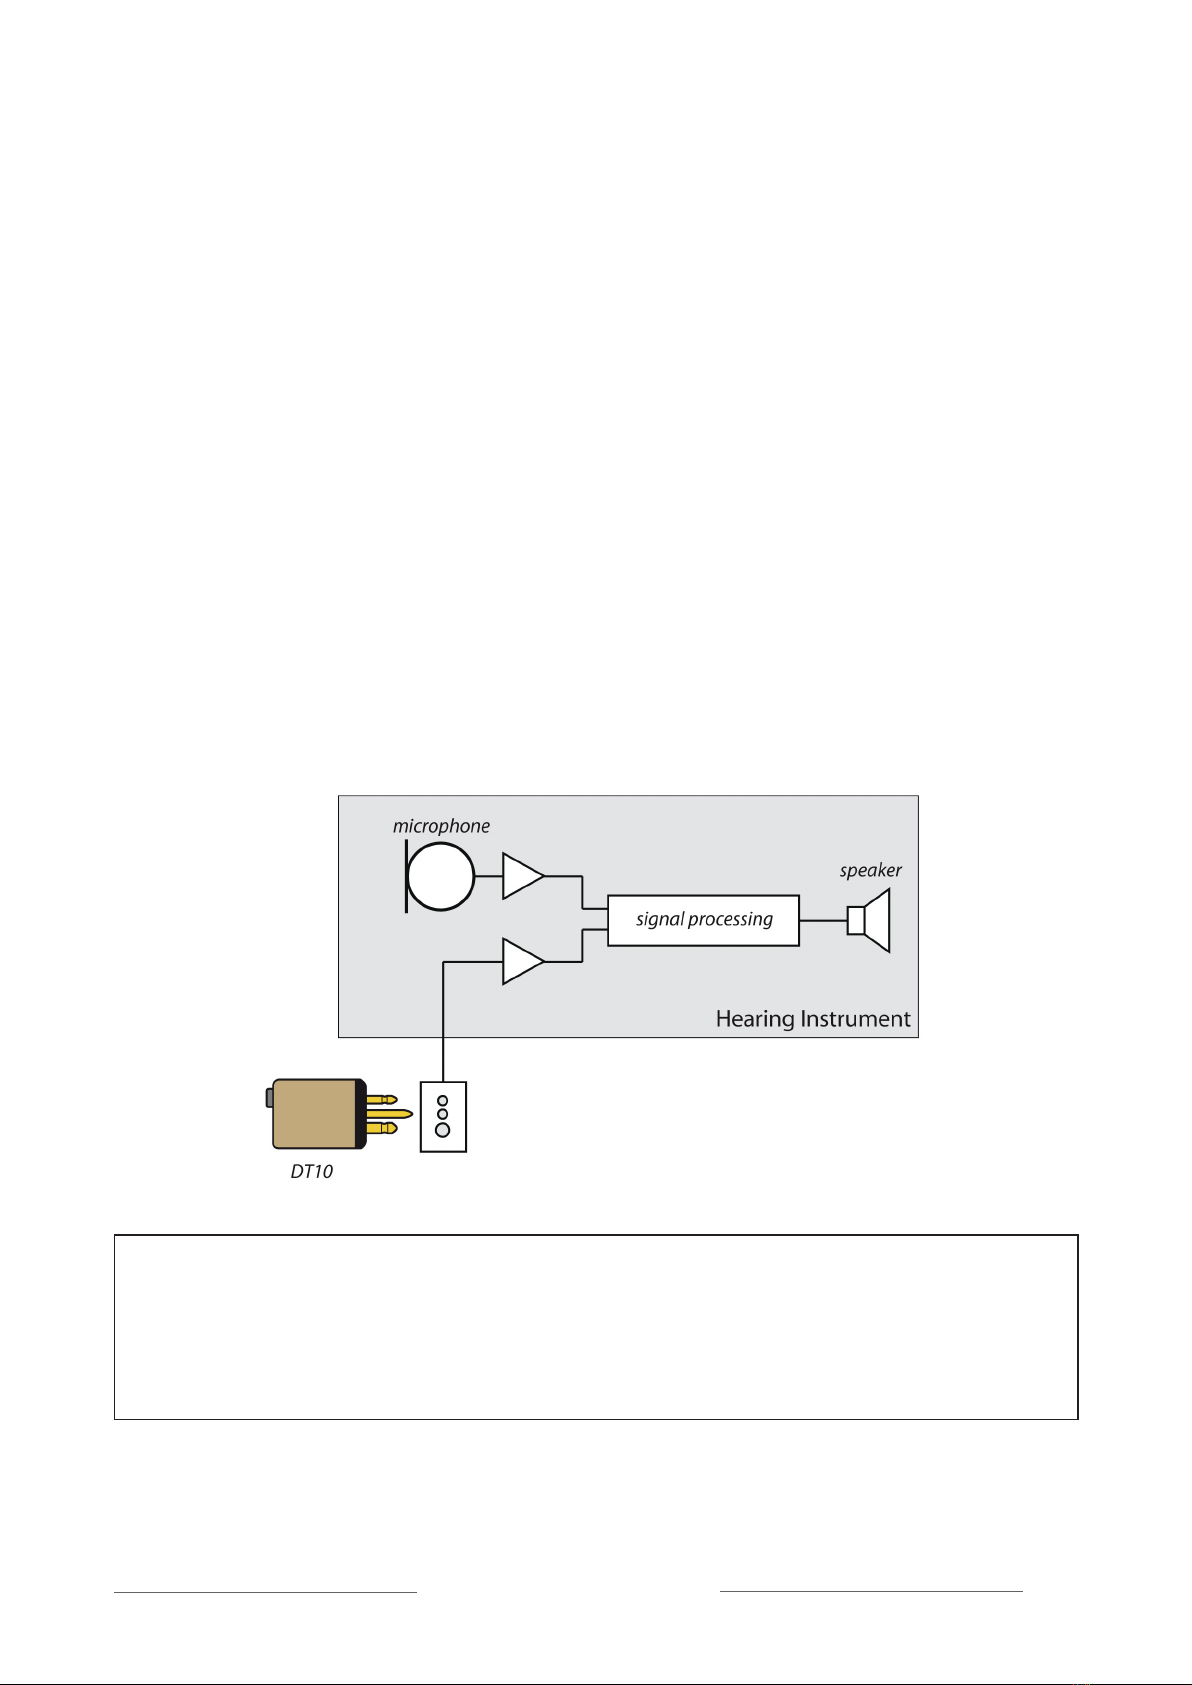
Receiver DT10 with R+M mode enabled and R mode disabled
The chart below shows the output (what the user can hear) when Receiver
DT10 listening mode R+M is enabled, in combination with different input types
and programs in the HI.
When pressing the push-button on the Receiver DT10, the listening mode is
shifted in the following sequence:
Hearing instrument:
Receiver DT10 push-button
Off
R+M mode
DAI input Off Radio + HI microphone
Programmable DAI input
DAI + M program Off Radio + HI microphone
Programmable DAI input
DAI program only Off Radio only

11
Receiver DT10
Receiver DT10 with both R and R+M modes enabled
The chart below shows the output (what the user can hear) when Receiver
DT10 listening modes R and R+M both are enabled, in combination with differ-
ent input types and programs in the HI.
When pressing the push-button on the Receiver DT10, the listening mode is
shifted in the following sequence:
Hearing instrument:
Receiver DT10 push-button
Off
R mode
R+M mode
DAI input Off Radio only Radio +
HI microphone
Programmable DAI
input
DAI + M program
Off Radio +
HI microphone *
Radio +
HI microphone *
Programmable DAI
input
DAI program only
Off Radio only * Radio only *
* When using this setup in combination with Programmable DAI input (DPAI), the level of the two
modes (R+M and R) can be programmed individually to serve as a volume control.
Note! Difference in volume can occur
When using a hearing aid with Programmable DAI input (DPAI) and having both R
and R+M modes in the Receiver DT10 enabled there can be a difference in volume
between the R and R+M modes even if the Receiver DT10 has been programmed
with identical output levels for the two modes. The reason for this difference is that
the output level in the Receiver DT10 is affected by the input impedance of the hear-
ing instrument.
The difference in output level can vary between different hearing instruments -
usually the output level will be slightly higher in the R+M mode. An adjustment
might be done with the Programmer DT05 in order to meet the users requirements.

12 Receiver DT10
Pairing
The Receiver DT10 can receive but not transmit pairing information. To pair
the Receiver DT10 with your Comfort Digisystem transmitter the Receiver
DT10 must be connected either to your hearing instrument or to the
Programmer DT05.
Press the push-button on the Receiver DT10 for 2 seconds to activate pairing
mode.
When pairing mode is activated, you receive an acoustic indication: • •
Send the pairing information within 15 seconds.
To interrupt pairing mode, briefly press the push-button.
Example 1: Pairing a Receiver DT10 into an existing Comfort Digisystem
consisting of one Conference Microphone DC20 and one Receiver DH10:
1. Connect the Receiver DT10 to the hearing instrument’s audio shoe
according to the instructions.
2. Initiate pairing mode in the DT10 by pressing
the push-buttons for 2 seconds. Acoustic indication: • •
3. Start the Conference Microphone DC20.
4. Rapidly press the pairing button on the DC20 twice. The display on the
DC20 responds with the text Sending info.
5. The Receiver DT10 confirms successful
pairing with an acoustic indication: • •
Example 2: Make a new eavesdrop secure configuration with one Micro-
phone DM80 and two hearing instruments with Receiver DT10s:
1. Connect the Receiver DT10s to the hearing instrument’s audio shoes
according to the instructions.
2. Activate pairing mode in the two DT10’s by pressing
the push-buttons for 2 seconds. Acoustic indication: • •
3. Start the Microphone DM80 and open the menu. Select
Communication/
Pairing/New code key
and answer
Yes
to the question of whether you
want to create a new code key and transmit it.
4. The Receiver DT10s confirm successful
pairing with an acoustic indication: • •

13
Receiver DT10
Example 3: Make a new eavesdrop secure configuration with one Micro-
phone DM80 and two Receiver DT10s using the Programmer DT05:
1. Put one of the Receiver DT10s into the Programmer DT05.
2. Start the Programmer DT05 and connect headphones or a neck loop to
be able to listen.
3. Activate pairing mode for the DT10 by pressing the push-button for
2 seconds.
In the headphones/neckloop you receive an acoustic indication: • •
4. Start the Microphone DM80 and open the menu. Select
Communication/
Pairing/New code key
and answer
Yes
to the question of whether you
want to create a new code key and transmit it.
5. The Receiver DT10 confirms
successful pairing with an acoustic indication: • •
6. Remove the paired DT10 and connect the other DT10
into the Programmer DT05.
7. Activate pairing mode on the DT10 by pressing the push-button for
2 seconds.
In the headphones/neckloop you receive an acoustic indication: • •
8. Open the menu on the DM80 and select
Communication/Pairing/Send
info
.
9. The Receiver DT10 confirms successful
pairing with an acoustic indication: • •

14 Receiver DT10
Volume indicator
Europlug socket
On / Off
Pairing button Menu control
Socket for headphones / earphones
Charging socket
Volume button -
Volume button +
Function indicator
Socket for
neckloop
INFORMATION FOR PROFESSIONALS:
Functions Programmer DT05 - optional professional tool
Order separately

15
Receiver DT10
Programmer DT05
The Programmer DT05 is an optional professional tool that can be used both
for configuring and test-listening of the DT10.
The Programmer DT05 can be used to configure one setting at a time in the
Receiver DT10. Select the desired setting in the menu and double press the
pairing button. The Receiver DT10 must be set to pairing mode.
The Programmer DT05 can also be used to configure all settings at the same
time in a DT10. To do this, adjust all parameters in the DT05 and then select
Send all
on the DT05 menu. The Receiver DT10 must be set to pairing mode.
Receiver DT10 can be configured while connected to the hearing aid. The
distance between the Programmer DT05 and the Receiver DT10 should not
exceed 0.5 meters.
To listen to a DT10, plug it into the socket on the programmer and connect
headphones or a neck-loop.
Menu control
To access the menu, press the menu control
and then scroll up or down.
Press the menu control to select.
Scroll up
Press / select
Scroll down

16 Receiver DT10
Menu in the DT05
R enable
R
R+M enable
R+M
Tone ind.
Auto sleep
Pairing
Always on
Send all
Settings
- Language
- Factory Reset
- About
Back (relates to both the main menu and submenus)
Here you can choose to return to the menu and to the main display.
R enable
Enables selection of R mode with the push-button.
R
Adjusts the output level of the Receiver DT10 when using R mode.
R+M enable
Enables selection of R+M mode with the push-button.
R+M
Adjusts the output level of the Receiver DT10 when using R+M mode.
Tone ind.
Activates acoustic indication tones when selected. Indication for pairing mode
and pairing is always heard even if
Tone ind.
is disabled.
Auto sleep
When
Auto sleep
is enabled the Receiver DT10 goes into sleep mode if the
Digisystem Microphone (transmitter), is turned off. This significantly reduces
the power consumption of the Receiver DT10. The Receiver DT10 automati-
cally starts again when you turn on your microphone.

17
Receiver DT10
Pairing
When
Pairing
is selected, the DT10 can be set to pairing mode by pressing the
push-button for two seconds.
If
Pairing
isn’t selected, pairing mode cannot be enabled with the push-
button. To override this, (if the Receiver DT10 needs to be reconfigured or
if new pairing information needs to be received), press and hold the push-
button on the Receiver DT10 for 2 seconds within 10 seconds of it having been
connected to a hearing instrument or a Programmer DT05. This sets the
Receiver DT10 to Pairing mode and it is then ready to receive new settings
from the Programmer DT05.
Always on
The setting
Always on
, disables the off-function of the push-button, leaving
the Receiver DT10 always on.
Warning! If the Receiver DT10 is in sleep mode and another radio signal
(with the same frequency that you are using) is present, the Receiver
DT10 might start again automatically. This could cause a loud hissing
noise and that’s why
Auto sleep
should be used with caution.
If you enable
Always on
and at the same time disable
Pairing
, the push-
button on the Receiver DT10 becomes inoperable.
Send all
To configure a Receiver DT10 with all settings in the display of the Program-
mer DT05 select
Send all.
If you choose
Send all,
you will receive the warning
“All settings in DT10 will be overwritten”. Only select
Yes
if you want to over-
write all data in your Receiver DT10.
Settings
Language
For selection of menu language.
Factory Reset
DT05: Resets the Programmer DT05 to its default settings.
DT10: Resets the Receiver DT10 to its default settings. Also deletes all
pairing information. To prevent eaves-dropping a new code key must be
generated.
About
Software information.

18 Receiver DT10
Trouble shooting
The receiver does not start
1. Check that the correct listening program is selected on the hearing
instrument.
2. Make sure the Receiver DT10 is correctly connected to the hearing
instrument’s audio shoe. Also check the connection between the audio
shoe and the hearing instrument.
3. Make sure all connecting surfaces are clean.
4. Check/replace the hearing instrument’s battery.
5. Remember to press the push-button briefly to switch the DT10 on.
Poor speech intelligibility
The distance between the transmitter and the receiver may be too long. The
range is around 15 meters.
The distance between the microphone and the talking person may also be too
long; move the microphone closer to the talking person.
Try changing the channel/environment.
Poor range and interference
In some environments, such as in buildings with a lot of concrete, iron or
sheer metal structures, the range may be reduced.
There may also be electronic equipment nearby causing interference. Change
the channel.
No sound
Check that the transmitter and the receiver are set to the same channel.
Loud hissing noise
Check that the Comfort Digisystem units you are using are paired together.
If
Auto sleep
is enabled, the Receiver DT10 goes into sleep mode if there is
no radio signal. But if another radio signal (with the same frequency you are
using) is present, the Receiver DT10 might start again automatically. This
could cause a loud hissing noise and that’s why
Auto sleep
should be used
with caution.

19
Receiver DT10
Service and warranty
Comfort Audio provides a comprehensive warranty for two years from the
date of delivery. This covers all manufacturing and material defects. Problems
caused by careless handling or actions taken inside the product or its
accessories are not covered by the warranty.
Please feel free to contact us at Comfort Audio if you have any questions.
Technical data
Radio transmission: SST - SecureStream Technology
Frequency range: F1 operates in 850-872 MHz
Range: Approx. 15 m
Dimensions: 9,7 x 11,2 x 21,3 mm
Weight: 1,5 g
!

20 Receiver DT10
Important safety instructions —
read before using your product
1) Read these instructions.
2) Keep these instructions.
3) Heed all warnings.
4) FolIow all instructions.
5) Do not use this apparatus near water.
6) Clean only with dry cloth.
7) Do not use near any heat sources such as radiators heat registers stoves,
or other apparatus (including amplifiers) that produce heat.
8) Do not defeat the safety purpose of the polarized or grounding plug. A
polarized plug has two blades with one wider than the other. A grounding
plug has two blades and a third grounding prong. The wide blade or the
third prong is provided for your safety. If the provided plug does not fit
your electrical outlet, consult an electrician for replacement of the
incorrect outlet — (only when using polarized plug).
9) Protect the power cord from being walked on or pinched particularly at
plugs convenience receptacles. and the point where they exit from the
apparatus.
10) Only use attachments/accessories specified by Comfort Audio AB.
11) Unplug this apparatus during Iightning storms or when unused for long
periods of time.
12) Refer all servicing to qualified service personnel. Servicing is required
when the apparatus has been damaged in any way (such as if a Iiquid has
been spilled on the apparatus, the apparatus has been subject to impact
by another object or dropped or the apparatus has been exposed to rain
or moisture) or does not operate normally.
Other manuals for DT10
2
This manual suits for next models
1
Table of contents
Other Comfort Digisystem Receiver manuals