Comfort Sync 507065-01 Planning guide

*2P0912* *P507065-01*
© 2012
ALLIED AIR ENTERPRISES
215 METROPOLITAN DR.
WEST COLUMBIA, SC 29170
indoor temperature
indoor humidity is 41%
fan is
OFF
fan is
AUTO
cool−to
set temp
75
heat to
72
heat
or
cool
fan is
AUTO
away
mode
outdoor
temperature
80
system is cooling
?
9:39 am July 18, 2012
Wi−Fi
THIS MANUAL MUST BE LEFT WITH THE HOMEOWNER
FOR FUTURE REFERENCE
HOMEOWNER’S MANUAL
Comfort SynctThermostat
Touch Screen Programmable Communicating Thermostat
CONTROLS
507065−01
09/12
General
Congratulations on choosing the Comfort Synctouch screen, pro-
grammable thermostat! The state−of−the−art technology built into this de-
vice makes it easy for you to keep your home comfortable while at home,
and it allows you to adjust your home’s comfort settings from wherever
you have access to the internet!
Help screens are just a touch away; this manual will get you started ex-
periencing a whole new world of home comfort.

507065−01 09/12 Page 2
Table of Contents
Comfort SyncThermostat 2. . . . . . . . . . . . . . . . . . . . . . . . . . . . . .
Thermostat Lock−out 2. . . . . . . . . . . . . . . . . . . . . . . . . . . . . . . . . . . .
Start up 3. . . . . . . . . . . . . . . . . . . . . . . . . . . . . . . . . . . . . . . . . . . . . . .
User Preferences Quick Reference Chart 4. . . . . . . . . . . . . . . . . . .
Tools used to change preferences 5. . . . . . . . . . . . . . . . . . . . . . . . .
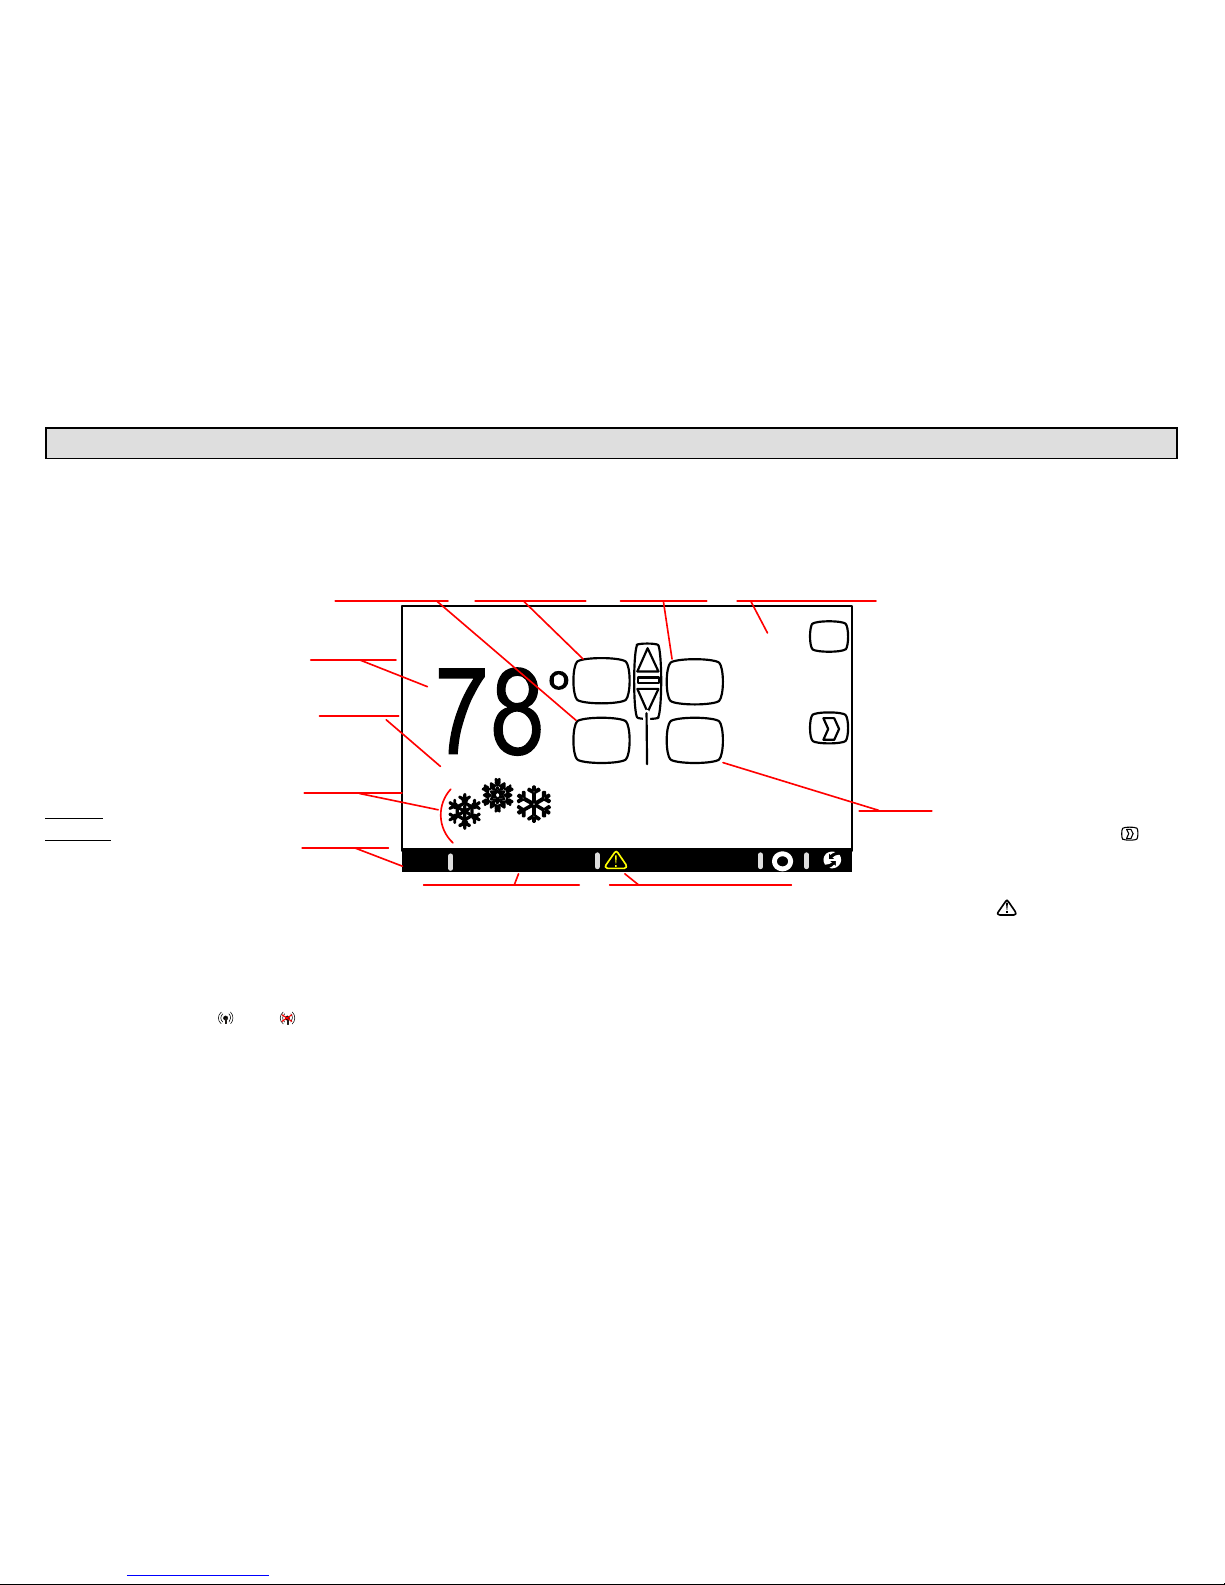
User Dashboard and HELP 6. . . . . . . . . . . . . . . . . . . . . . . . . . . . . . .
System Settings 6. . . . . . . . . . . . . . . . . . . . . . . . . . . . . . . . . . . . . . . .
Clock Settings 7. . . . . . . . . . . . . . . . . . . . . . . . . . . . . . . . . . . . . . . . . .
Display Settings 7. . . . . . . . . . . . . . . . . . . . . . . . . . . . . . . . . . . . . . . .
Weather 8. . . . . . . . . . . . . . . . . . . . . . . . . . . . . . . . . . . . . . . . . . . . . . .
Edit Programs 8. . . . . . . . . . . . . . . . . . . . . . . . . . . . . . . . . . . . . . . . . .
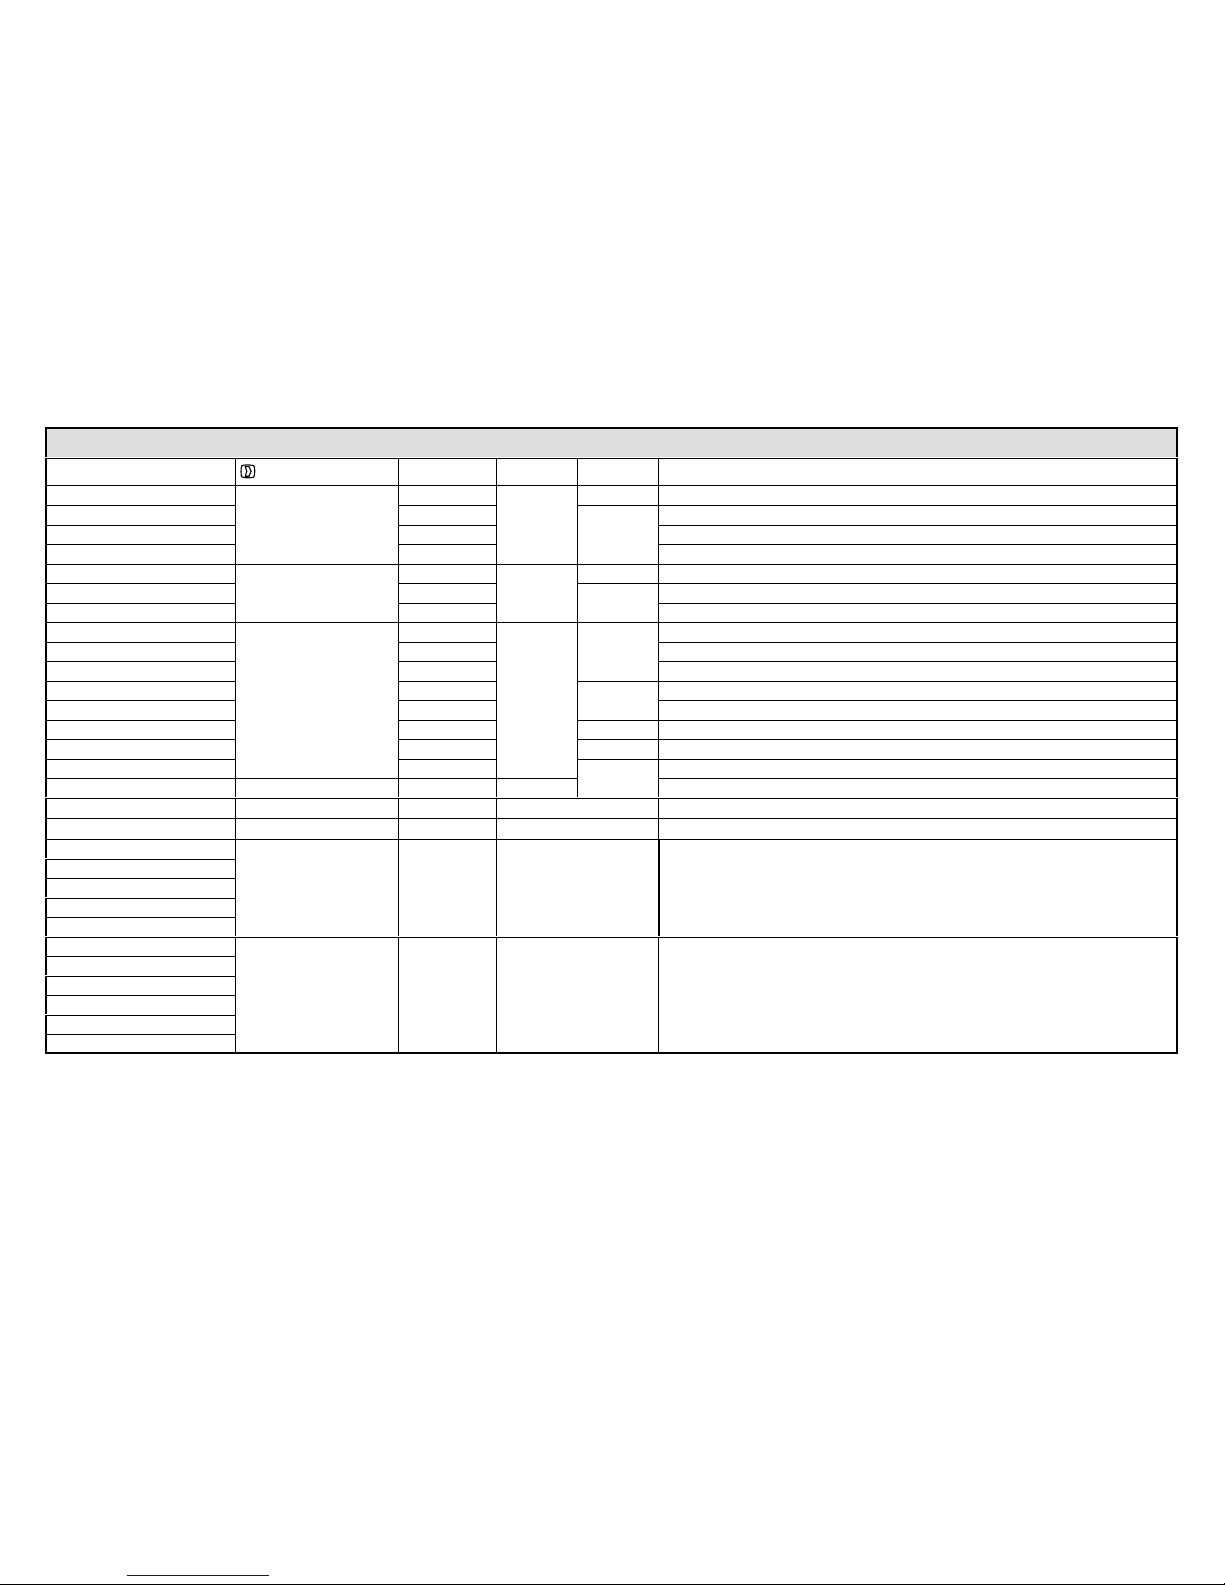
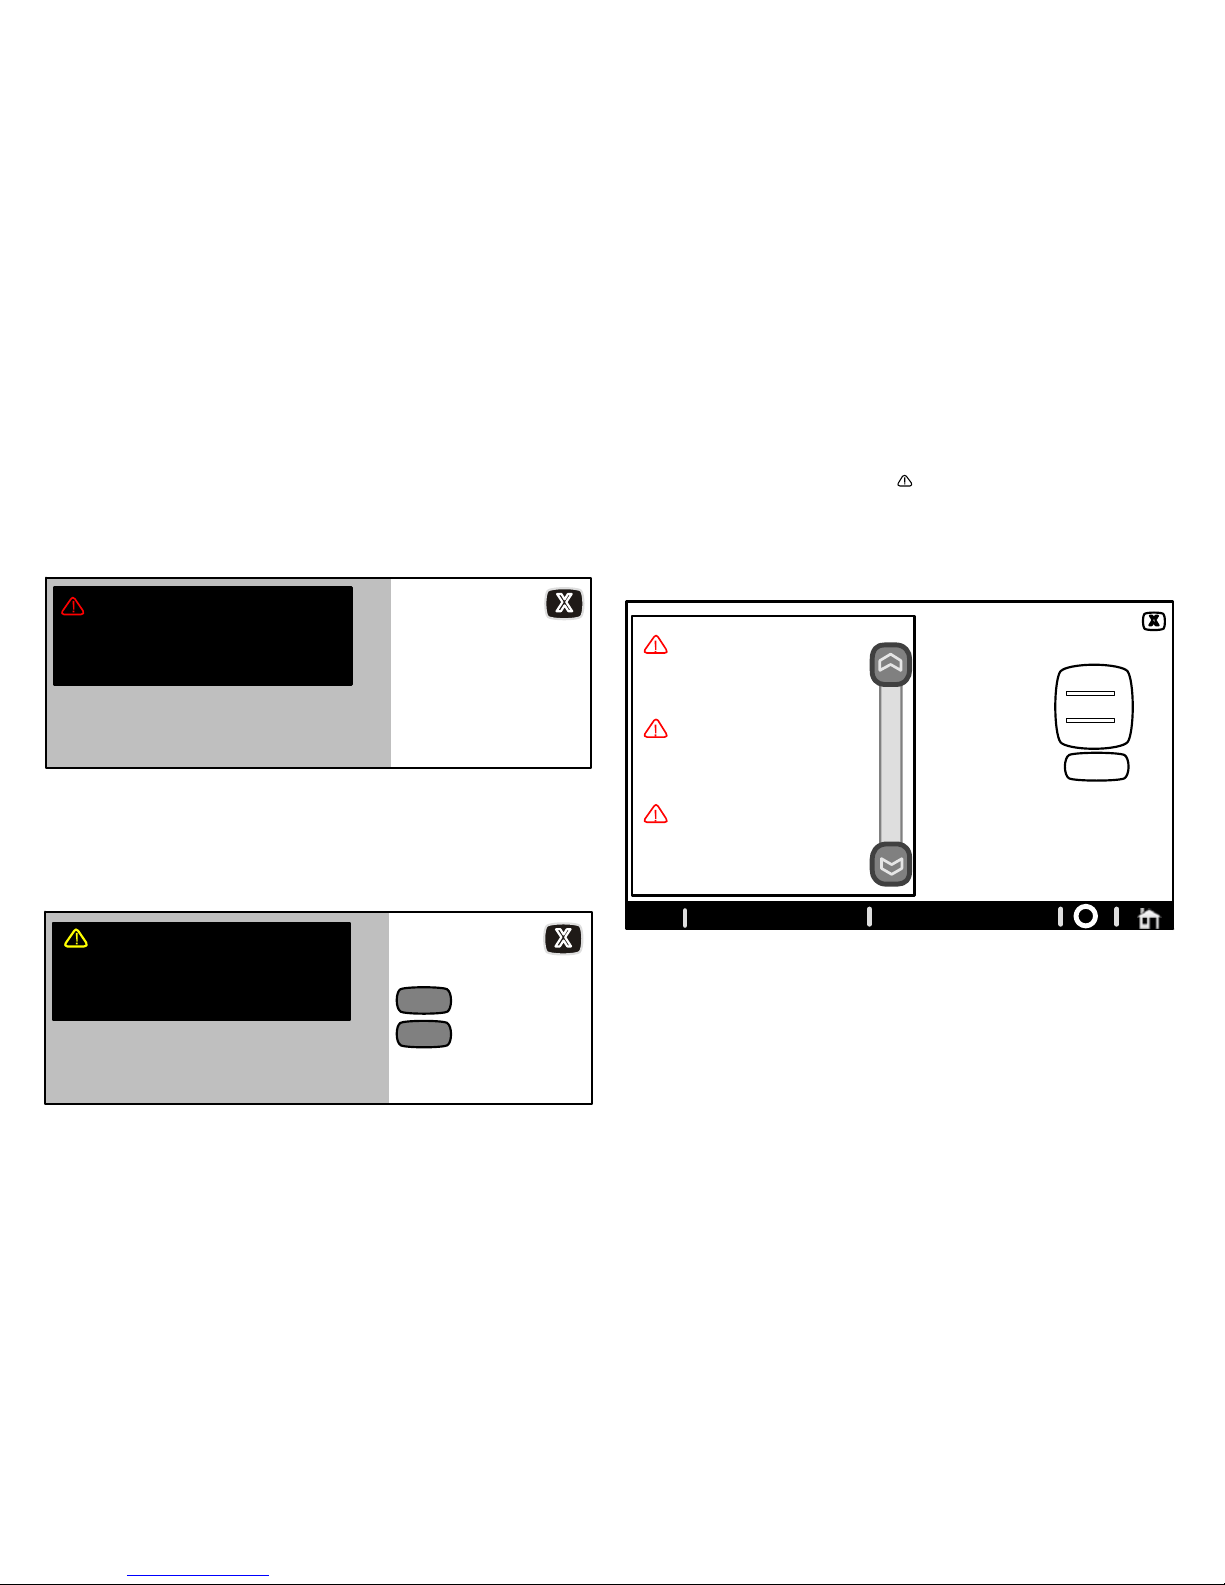
Alerts 9. . . . . . . . . . . . . . . . . . . . . . . . . . . . . . . . . . . . . . . . . . . . . . . . .
Reminders 11. . . . . . . . . . . . . . . . . . . . . . . . . . . . . . . . . . . . . . . . . . . . .
Service Information 13. . . . . . . . . . . . . . . . . . . . . . . . . . . . . . . . . . . . . .
Adjust temperature and change programsProgram HOLD 14. . .
Away button (Vacation mode) 14. . . . . . . . . . . . . . . . . . . . . . . . . . . . .
Setting humidity controls 16. . . . . . . . . . . . . . . . . . . . . . . . . . . . . . . . .
Enabling Wi−Fi from User Home Screen 17. . . . . . . . . . . . . . . . . . . .
Registering Comfort Syncfrom User Home Screen 18. . . . . . . . .
Computer Login to Comfort SyncServer 20. . . . . . . . . . . . . . . . . .
WARNING
Do not switch system to cool if the outdoor temperature is below
45°F (7°C). This can damage the cooling system.
NOTICE
Use this thermostat only as described in this manual.
Comfort SynctThermostat
The communicating Comfort Sync thermostat is an electronic 7−day
programmable touch screen thermostat with color display. It also offers
enhanced capabilities which include humidification measurement and
control, dew point adjustment control, dehumidification measurement
and control, and equipment maintenance reminders. The thermostat’s
autochangeover mode permits control of heating, cooling, humidifica-
tion, and dehumidification without user involvement.
The Comfort Syncthermostat can connect to the internet using your
home’s wireless Wi−Fi access point. After online registration is com-
pleted, weather information is automatically sent to the thermostat, and
you will have full access to the thermostat from anywhere using a remote
internet connection via computer, smartphone, or iPad.
The thermostat stores system parameters in nonvolatile memory (re-
tains data when electrical power fails or is turned off), and includes on-
board help screens.
Indoor Air Quality accessories are supported with time-based notifica-
tion of consumables including media filters, UVC bulbs and humidifier
pads service / replacement.
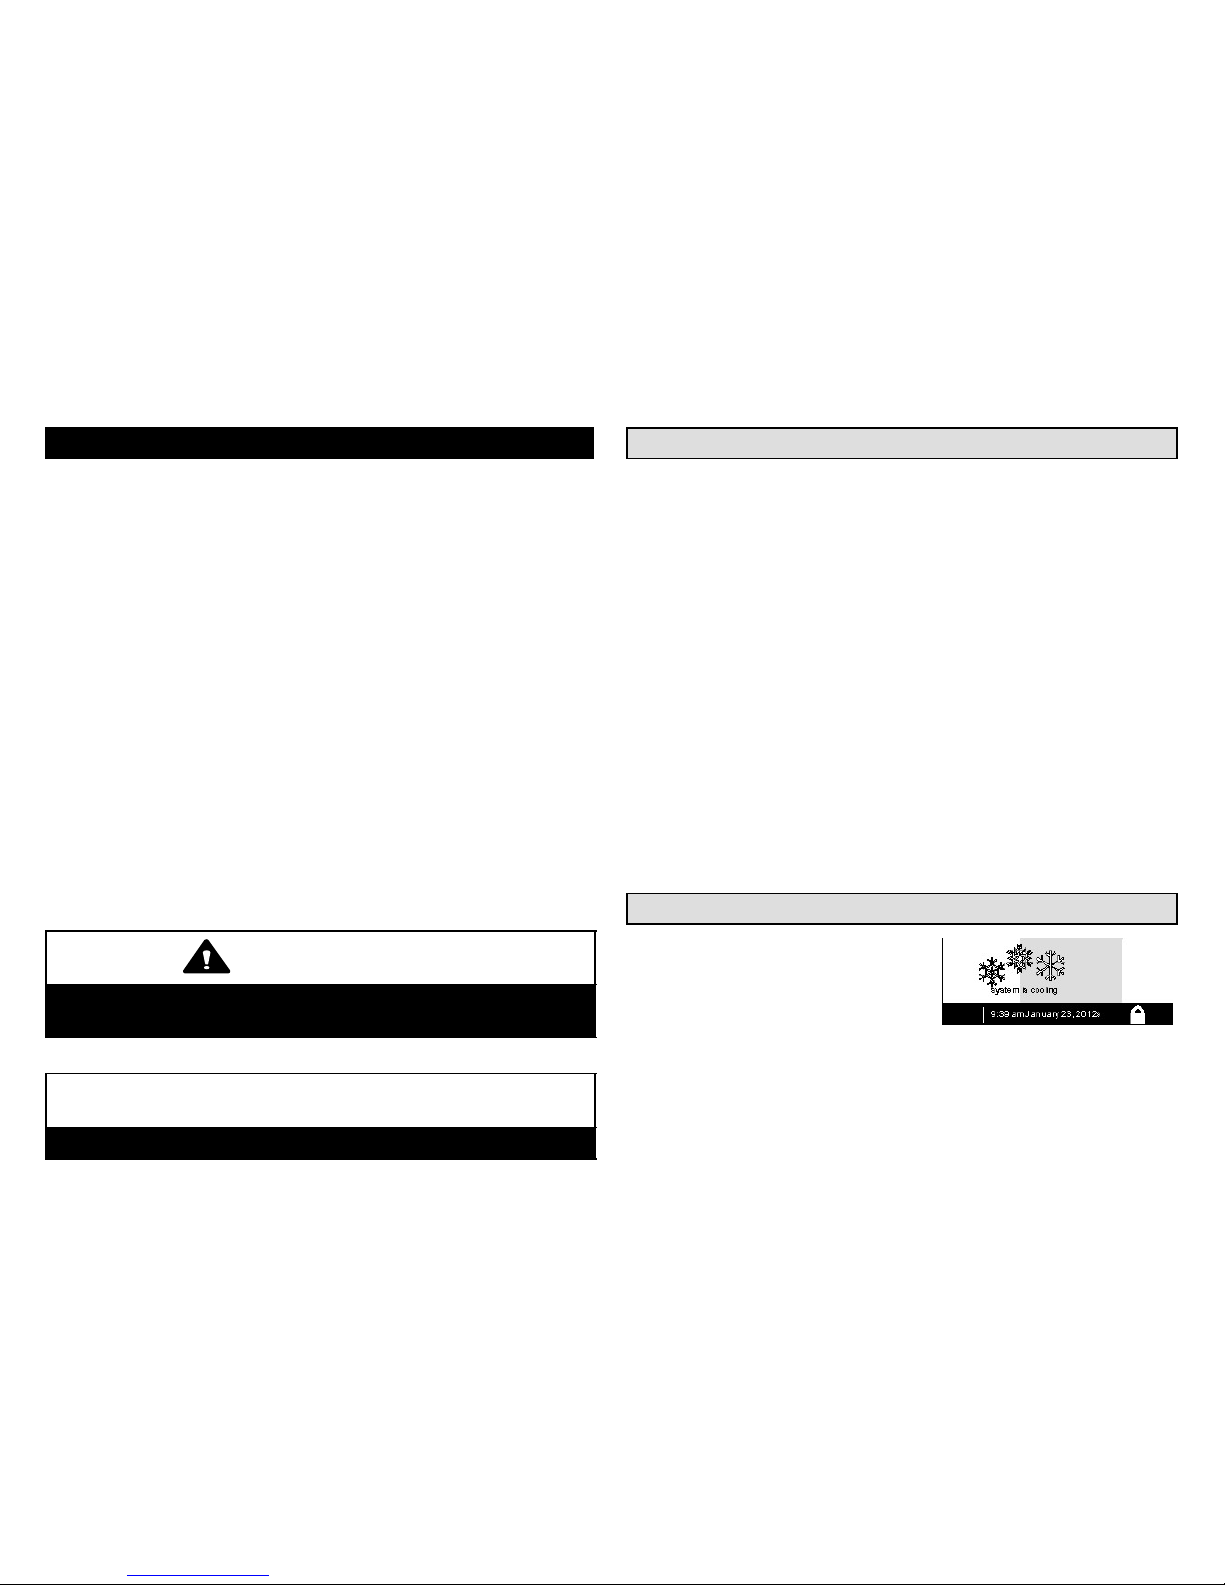
Thermostat Lock−out
A lock" icon at the bottom center
screen (shown in the picture), indi-
cates the thermostat is either par-
tially− or fully−locked.
Partially−locked, any user can adjust the temperature up or down to set a
hold" for a selectable time.
Fully−locked, no one can make any changes to the thermostat’s settings.
To unlock, press and hold the lock" icon for 5−6 seconds.
To lock the thermostat, access Screen lockout" through the dash-
board’s display settings" described on Page 7.
Wi−Fi

Comfort Sync7−Day Programmable Communicating Thermostat
Page 3
Start up
In event of power failureIf a power failure occurs,
when the power comes back on, the thermostat will reboot
and when complete, the HOME screen will return.
What the Home screen tells you...
After the thermostat and the
system has been fully con-
nected and powered on, the
Comfort Syncthermo-
stat’s Home screen is dis-
played. Figure 1 shows a
display and describes what
the thermostat is telling you.
Note that set to heat or
cool communicates that the
system is operating in
manual mode; if it were in
program mode, the heat or
cool button would read
summer program is on (or
other named program).
Other information...
Until and unless the indoor temperature is at or between
the two settings (70 to 75 degrees in this example), the system
should run until it does measure within that temperature range.
The Wi−Fi indicator is (not ), therefore, the thermostat is
connected with your wireless network router.
Away mode sets the thermostat for energy saving while you are gone
for an extended period of time. In this mode, the system will only
come on if indoor temperature falls below 62 degrees (for heating) or
if indoor temperature rises above 85 degrees (for cooling).
What you can do from the Home screen...
Typically, what every homeowner wants from an air
conditioning system is to be able to control that
system using a convenient device to
adjust heating, cooling, and the
level of humidity in the home.
From this screen you may:
− adjust temperature
settings
− access menus to change
the program mode
− change how the
fan operates
− access the dashboard"
(fig. 3) by pressing
− access and view active
service alerts by pressing
the icon
− access help screen by
pressing the ?" icon.
Adjusting the temperature and changing the
system mode of operation is described fully
beginning on Page 14.
Adjusting the humidity, even if no physical humidifier or
dehumidifier is present, may also be available, provided the
installer has implemented the feature during setup.
See Page 16 for details on humidity control.
indoor temperature
indoor humidity is 41%
fan is
OFF
fan is
AUTO
cool−to
set temp
75
heat to
70
heat
or
cool
fan is
AUTO
away
mode
outdoor
temperature
80
system is cooling
press to go
to user
dashboard
use arrows
to change
temperature
?
9:39 am July 18, 2012
Wi−Fi
Figure 1. Home screen (typical)
indoor
temperature
indoor
humidity
outdoor temperature
cool−to settingheat−to setting system mode
system status
fan is set
to AUTO
service alerts are presenttime, month, day, year
(if feature is turned on)
(if feature is
turned on)
Wi−Fi setup
button

507065−01 09/12 Page 4
User Preference Quick Reference Chart (to change, use tools shown on Page 5)
user setting dashboard button Default page tools variables
Fan Setting
system settings
auto
Page 6
menu auto, on, circulate
Humidifier OFF
toggle
OFF, ON
Indoor Humidity Display OFF OFF, ON
Dehumidifier OFF OFF, ON
Time and Date
clock settings
Page 7
time/date (Time/date elements screen)
Daylight Saving Time Enabled toggle Enabled, Disabled
Clock Format 12H 12 Hour, 24 Hour
Background Theme
display settings
cobalt
Page 7
toggle
cobalt, cotton, carbon
Temperature Display Scale (F) (F) Fahrenheit, (C) Celsius
Power Save ON ON, OFF
Screen Lock−out Unlocked menu Unlocked, Partially Locked, Fully Locked
Language Displayed English English, French, Spanish
Outdoor Temp Display OFF toggle OFF, ON
Backlight Intensity 100% arrows 20 to 100% (in 20% increments)
Clean Screen (view
only)
(30 sec. timer deactivates touch screen to clean screen; use damp cloth to clean)
Weather weather Page 8 (shows 5−day weather forecast if connected to internet via Wi−Fi)
Setup a program edit program save energy See details Page 8
View alerts alerts See details Page 9
Filter 1 Timer
reminders Disabled See details Page 11 Disabled, 3 Months, 6 Months, 12 Months, 24 Months, Custom Time
Filter 2 Timer
Humidifier Pad Timer
UV Bulb Timer
Maintenance Timer
Dealer Name
service information
(these may
show install-
er input data
but owner
may change)
See details Page 13 (keyboard)
Dealer Address
Dealer Phone
Dealer Email
Dealer Website
System Desc

Comfort Sync7−Day Programmable Communicating Thermostat
Page 5
keyboard tool
typical menu options
up/down arrows
network security key or passphrase
password displays here as keys touched
cool only
heat only
heat or cool
off
emerg. heat
programs
75º
set to
on
auto
circulate
SMTWTFS
January 2012
1234567
8 9 10 11 12 13 14
15 16 17 18 19 20 21
22 23 24 25 26 27 28
29 30 31 save
09 : 39 am
time and date tool
time
format
12 HR
daylight
saving
enabled
toggle tool
Figure 2. User preference change tools

507065−01 09/12 Page 6
User Dashboard and Help (?) Screens
From the Home screen, press the button to go to the dashboard. The
dashboard (figure 3) allows you to set the system to operate the way you
want it to operate. From the dashboard, you can access system settings,
clock settings, and display settings, weather, edit programs, alerts, re-
minders, service and help (?).
FEATURES
press any button for access to more features and controls
weather
system
settings
clock
settings
display
settings
service
edit
programs alerts reminders
?
9:39 am July 18, 2012
Wi−Fi
Figure 3. User dashboard − indoor settings
System settings
Press button: system settings. Figure 4 A" shows the screen with its
defaults. Figure 4 B" shows how the devices can be configured.
Press button: set to AUTO. (button may read: set to ON or set to CIR-
CUL..). Select from pop−up menu: on, auto, or circulate.
Press buttons: humidifier, humidity display, or dehumidifier to turn
each on. The resulting display shows the default values of humidifier and
dehumidifier; use the arrows to change either.
When humidity display is ON, text near the screen bottom shows the
current humidity. Touch the X" button to return to dashboard or the
Home icon for the Home screen.
SYSTEM SETTINGS
?
current indoor humidity is 50%
set to
AUTO
humidifier
is ON
humidity
display IS
ON
de−
humidifier
is ON
fan settings humidity settings
humidifier
settings
dehumidifier
settings
on
auto
circulate
40%
set to 50%
set to
when turned
on, the text
below will
appear
showing
current
setting
SYSTEM SETTINGS
set to
AUTO
humidifier
is OFF
humidity
display IS
OFF
de−
humidifier
is OFF
fan settings humidity settings
humidifier
settings
dehumidifier
settings
(default is OFF)(default is AUTO) (default is OFF) (default is OFF)
B
A
ALL CHANGES
MADE ON THIS
SCREEN ARE IN-
STANTLY SAVED.
?
9:39 am July 18, 2012
Wi−Fi
Figure 4. System Settings

Comfort Sync7−Day Programmable Communicating Thermostat
Page 7
Clock settings
Press clock settings (see figure 3). Figure 5 shows the Set current time
and date screen. Use the horizontal arrows to scroll to month and year;
then touch a day of month to select it. Touch time format and daylight
saving to toggle these options. Use the up/down arrows to change time.
Touch am/pm to select morning or afternoon (am/pm does not appear if
24HR format is selected).
CLOCK SETTINGS
?
SMTWTFS
January 2012
1234567
8 9 10 11 12 13 14
15 16 17 18 19 20 21
22 23 24 25 26 27 28
29 30 31 save
09 : 39 am
set current date and
time
time
format
12 HR
daylight
saving
enabled
?
9:39 am July 18, 2012
Wi−Fi
Figure 5. Set current time and date
Display settings
Press display settings (see figure 3). Figure 6 A" shows the Display
settings screen and defaults.
Press buttons: Temp scale (ºF/ºC), power save (ON/OFF) and out-
door temp display (ON/OFF) to toggle these options.
Press buttons: Background theme, language and screen lockout;
press to select options from pop up menus (figure 6 B").
Press button: backlight intensity; use up/down arrows to change the
intensity of backlighting in 20% increments.
Use the press to CLEAN SCREEN button to give yourself a 30 second
timer to clean off the screen (use a damp cloth to clean).
DISPLAY SETTINGS
back−
ground
theme
COTTON
temp
scale
is ºF
power
save
is ON
press to
CLEAN
SCREEN
language
is
ENGLISH
screen
lockout
UN−
LOCKED
outdoor
temp
display
is ON 20%
backlight
intensity
cobalt
cotton
carbon
ENGLISH
FRENCH
SPANISH
unlocked
partially
locked
DISPLAY SETTINGS
press any button for access to more features and controls
back−
ground
theme
COTTON
temp
scale
is ºF
power
save
is ON
press to
CLEAN
SCREEN
language
is
ENGLISH
screen
lockout
UN−
LOCKED
outdoor
temp
display
is ON 20%
backlight
intensity
B
A
?
9:39 am July 18, 2012
Wi−Fi
?
9:39 am July 18, 2012
Wi−Fi
Figure 6. Display settings

507065−01 09/12 Page 8
Weather
Press button: weather (see fig. 3). Figure 7 shows a typical 5−day fore-
cast screen. Use X" button to return to the previous screen.
WEATHER
5−day forecast for Columbia, SC
today tomorrow wednesday thursday friday
forecast
Hi 85
Lo 60
20% chance
of rain
forecast
Hi 85
Lo 60
50% chance
of rain
forecast
Hi 70
Lo 60
100% chance
of rain
forecast
Hi 85
Lo 60
20% chance
of rain
forecast
Hi 90
Lo 60
?
9:39 am July 18, 2012
Wi−Fi
Figure 7. Typical weather screen
Edit program
Press button: edit program (see fig. 3). Figure 8 A" shows edit program
screen. Figure 8 B" shows pop up menus that appear when the selections
are touched and it illustrates changes made to the program.
Edit the season programs" to your preference. (Save energy uses high−effi-
ciency EnergyStar settings to promote energy conservation).
select programs − select a preset program; or press and hold any button
for the keyboard and change button names to user preference.
select days − week/weekend, individual days, all 7 days.
time − up/down arrows to change time in 15 minute increments.
cool− & heat−to − up/down arrows to change temperature in 1º increments.
fan mode − on, auto, circulate.
Figure 8 B" also shows that the evening time has been disabled; this is
done by pressing and holding the time button for that time period. (Touch add
setting to re−enable that time period). Use the restore button to restore de-
faults for the preset programs. Press "X button after changing; a pop−up
prompts with back, discard and save options. Select save to save and re-
turn to the dashboard.
EDIT PROGRAMS
summer
select
programs
summer
program will follow these settings on mon−fri
winter
spring fall
save energy
custom
06:00 am 78 70 AUTO
select
days time cool−to heat−to fan mode
85 62
08:00 am AUTO
82 62
10:00 pm AUTO
sat−sun
mon−fri
05:00 pm 78 70 AUTO
change
days
press and hold any time to enable or disable for the time period restore
press/hold
program
button to
rename
EDIT PROGRAMS
summer
select
programs
winter
spring fall
save energy
my program
06:00 am 76 70 ON
select
days time cool−to heat−to fan mode
85 66
08:00 am AUTO
82 62
08:30 pm AUTO
all 7 days
mon−fri
add setting
change
days
press and hold any time to enable or disable for the time period restore
on
auto
circulate
week/weekend
individual days
all 7 days
B
my program
program will follow these settings on all 7 days
A
press/hold
program
button to
rename
?
9:39 am July 18, 2012
Wi−Fi
Figure 8. Edit program screen

Comfort Sync7−Day Programmable Communicating Thermostat
Page 9
Alerts
Figure 10 shows how an alert appears when it occurs after the system
has been put into operation. Use information on this screen to contact
your HVAC serviceman. Use the X" to return to the previous screen.
A red alert (red icon) identifies a problem that could prevent the system
from working properly or not working at all, and if allowed to run, could
cause damage to the system. You MUST call for service immediately.
alerts ( 1) of ( 1)
9:39 am July 18, 2012
Service Alert Code 290
indoor unit reports:
Heat Problem
service info
your dealer
1−800−123−4567
Figure 9. Typical red alert
A service alert (yellow icon) tells you to perform routine service, or to call
the dealer to service, one or more of the following: Filters, Humidifier Pad
and UV Light Service and Maintenance. These alerts will appear based
on elapsed time set per the reminders". For information on clearing and
remind later, see reminders on Page 11.
alerts ( 1) of ( 1)
9:39 am July 18, 2012
Service Alert Code 3000
system reports:
Replace Filter 1 clear
remind
later
service info
your dealer
1−800−123−4567
Figure 10. Typical service alert
Access alerts through the dashboard
Press the Home screen alert icon ( ) or the alerts button on the dash-
board (see figure 3). Any alerts will appear similar to those shown in fig-
ure 11. Touch the select alert time period for viewing button to view
alerts that occurred in the last 24 hours, last 30 days, or last 12 months.
Contact your HVAC serviceman to report the alerts and related prob-
lems.
ALERT (1) of (1)
02/23/2012 9:39 am
Service Alert Code: 292
Indoor unit reports:
Problem
ALERT (1) of (1)
02/23/2012 9:39 am
Service Alert Code: 331
Indoor unit reports:
RSBCommunication Link Problem
ALERT (1) of (1)
02/23/2012 9:39 am
Service Alert Code: 252
Indoor unit reports:
Discharge Air Temperature High
last 24
hours
select alert
time period for
viewing
last 24 hours
last 30 days
last 12 months
service info
your dealer
1−800−123−4567
?
9:39 am July 18, 2012Wi−Fi
Figure 11. Alerts viewed from dashboard option

507065−01 09/12 Page 10
Navigate to different screens (see figure 12). You can clear alerts and set new reminders after routine service. You may also set a remind later" to be
reminded at a more convenient time for doing the service. If a red alert (red ) is present, contact the party identified under service info.
reminder ( 1) of ( 4)
04/03/2012 02:39pm
Service Alert Code 3000
system reports:
replace filter 1
reminder ( 2) of ( 4)
04/03/2012 02:39pm
Service Alert Code 3001
system reports:
replace filter 2
reminder ( 3) of ( 4)
04/03/2012 02:39pm
Service Alert Code 3002
system reports:
replace humidifier pad
ALERT HISTORY
clear
last 24
hours
remind
later
select alert
time period
for viewing
MAIN ALERT SCREEN
noyes
was action taken?
(returns main
alert screen)
clear button SCREEN
cancelset
select one
disabled
3 months
6 months
12 months
24 months
custom time
remind later or yes button SCREEN
reminder ( 1) of ( 4)
04/03/2012 02:39pm
Service Alert Code 3000
system reports:
replace filter 1
reminder ( 2) of ( 4)
04/03/2012 02:39pm
Service Alert Code 3001
system reports:
replace filter 2
reminder ( 3) of ( 4)
04/03/2012 02:39pm
Service Alert Code 3002
system reports:
replace humidifier pad
ALERT HISTORY
select alert
time period
for viewing
reminder ( 1) of ( 4)
04/03/2012 02:39pm
Service Alert Code 3000
system reports:
replace filter 1
reminder ( 2) of ( 4)
04/03/2012 02:39pm
Service Alert Code 3001
system reports:
replace filter 2
reminder ( 3) of ( 4)
04/03/2012 02:39pm
Service Alert Code 3002
system reports:
replace humidifier pad
ALERT HISTORY
clear
last 24
hours
remind
later
last 24 hours
last 30 days
last 12 months
alert time period button SCREEN
service info
your dealer
1−800−123−4567
service info
your dealer
1−800−123−4567
service info
your dealer
1−800−123−4567
service info
your dealer
1−800−123−4567
?
9:39 am July 18, 2012
Wi−Fi ?
9:39 am July 18, 2012
Wi−Fi
Figure 12. Alerts

Comfort Sync7−Day Programmable Communicating Thermostat
Page 11
Service Alert Codes
Number Value Number Value Number Value Number Value Number Value
3000 Filter 1 3002 Humidifier Pad 3004 Maintenance 4000 User WiFi state change, disable 4002 Image file download failed
3001 Filter 2 3003 UV Light 3005 PureAir Maintenance 4001 Firmware download failed
Reminders
Reminders alert you to perform routine services, such as replacing filters. Access the reminders from the dashboard reminders button.
Setting reminders
NOTE − A previously set service time can be changed using the custom time" option.
Use one of the month" reminders to be reminded when to perform the routine service again.
Use custom to pop−up the time/date screen (figure 14) to set an exact date and time for a reminder to appear. Use the arrows to select a month; then
select a day of the month. Press save when finished.
REMINDERS
select frequency for automatic reminders
disabled 3 months 6 months 12 months 24 months custom
Replace Filter 1
Replace
Humidifier Pad
Replace UV Bulb
Maintenance
Reminder
disabled 3 months 6 months 12 months 24 months custom
Replace Filter 2
Figure 13. Set new alert date
SMTWTFS
July 2012
REMINDERS
1234567
8 9 10 11 12 13 14
15 16 17 18 19 20 21
22 23 24 25 26 27 28
29 30 31 save
set custom date for
UV Bulb
Maintenance
Figure 14. Setting custom time

507065−01 09/12 Page 12
?
9:39 am July 18, 2012
Wi−Fi
alerts ( 1) of ( 1)
9:39 am July 18, 2012
Service Alert Code 3000
system reports:
Replace Filter 1 clear
remind
later
alerts ( 1) of ( 1)
9:39 am July 18, 2012
Service Alert Code 3000
system reports:
Replace Filter 1
9:39 am July 18, 2012 ?
noyes
was action taken?
Using remind later"
You may choose remind later and then pick from the options list. When
you press set, the screen changes to confirm your selection. Press X to
clear and return to the Home screen.
Use custom to open the time/date screen (figure 14) and set an exact
date and time for the reminder to appear. Press in one of the boxes to
highlight it and use the up/down arrows to change the value in that box.
Repeat for all boxes. When desired reminder is displayed, press set.
Service reminders can be cleared or date−changed through the service alert’s clear and remind later buttons on the right side of the screen.
(goes to
screen
below)
alerts ( 1) of ( 1)
9:39 am July 18, 2012
Service Alert Code 3000
system reports:
Replace Filter 1
?
set cancel
disabled
3 months
6 months
12 months
24 months
custom time
(returns to
above
screen)
X"
clears alert
temporarily;
alert will
repeat
service info
your dealer
1−800−123−4567
service info
your dealer
1−800−123−4567
service info
your dealer
1−800−123−4567
?
9:39 am July 18, 2012Wi−Fi
?
9:39 am July 18, 2012
Wi−Fi
Figure 15. Viewing, clearing, and changing reminder time

Comfort Sync7−Day Programmable Communicating Thermostat
Page 13
Service Information
Service information is normally filled in by the installer at time of initial
installation. However, you can change this information, when and if
needed.
Touch any line of text to produce a keyboard and then enter any new in-
formation. Touch the save button when finished entering information.
SERVICE INFORMATION
Dealer Name my dealer
Dealer Address 1234 Fifth St
Dealer Phone 1−800−448−5872
Dealer Email my dealer’s email
Dealer Website
System Desc my home system
press any line to edit it
thermostat info
click any line;
keyboard will
pop up to input
information
?
9:39 am July 18, 2012
Wi−Fi
keyboard tool
System Desc
my home system
Figure 16. Service Information
HELP (?)
When you touch the help icon (?) the screen changes to show an array of
(?)’s located at "active" points on the screen. When you touch a (?) a
popup describes what you can do by pressing the active button(s) near-
est it. Figure 17 shows an example of the screen and a popup.
indoor temperature
indoor humidity is 41% fan is
OFF
fan is
AUTO
cool−to
set temp
75
heat−to
70
heat
or
cool
fan is
AUTO
away
mode
outdoor
temperature
80
system is cooling
9:39 am July 18, 2012Wi−Fi ?
Change the system function to either heat
or cool (auto), heat only or cool only mode
or turn on one of the Programs. You can
also select ’edit’ to enter the edit program
screen.
Figure 17. Typical Help (?) screen

507065−01 09/12 Page 14
Adjust temperature and change programs
Adjust temperature when programming is OFFWhen the
programmingis OFF, the mode button (shown in figure 18, labeled heat
or cool) indicates a manual state (no mention of program"). In this
mode, change temperature by pressing a set temp button, which pro-
duces an up or down arrow, then use the arrows until the cool to" (or
heat to") number is at the desired temperature.
This setting will remain until you decide to change it again. (The inset
shows an alternate configuration of button layout in non−program mode.)
use arrows
to change
temperature
?
touch
cool−to
button
indoor temperature
indoor humidity is 41%
fan is
OFF
fan is
AUTO
cool−to
set temp
75
heat to
70
heat
or
cool
fan is
AUTO
system is cooling
cool−to
set temp
75
cool
only
fan is
AUTO
alternate
cool−only button
layout
(mode
button)
away
mode
?
9:39 am July 18, 2012
Wi−Fi
Figure 18. Adjusting temperature with NO program running
Away Mode (Vacation)The away mode button on the home
screen sets the system for manual operation and allows you to set the
thermostat for energy saving while you are gone for an extended period
of time. In this mode, the system will only come on if indoor temperature
falls below a set degree (62 default for heating) or if indoor temperature
rises above a set degree (85 default for cooling). You may adjust those
settings as desired.
Turn Programming ONIf the programming is OFF, turn it on by
pressing the mode button (shown in figure 19, labeled heat or cool). The
manual settings menu includes an option to access programs. Select
programs. The program settings menu takes the place of the manual
settings menu. (Either menu will time out and disappear if you don’t make
a selection within a few seconds). Select an option (e.g. spring/fall), The
menu disappears and the mode button will display the selected program
(e.g. spring...program is ON).
Turn Programming OFFIf the programming is ON, turn it off by
pressing the mode button (e.g. spring...program is ON). The program
settings menu includes an option for manual. Select manual. The menu
changes to the manual settings. Select one (e.g. heat only), The menus
disappear and mode button will display the selected manual option (e.g.
heat only).
use arrows
to change
temperature
?
touch
cool−to
button
indoor temperature
indoor humidity is 41%
fan is
OFF
fan is
AUTO
cool−to
set temp
78
heat to
70
heat
or
cool
fan is
AUTO
system is waiting
cool only
heat only
heat or cool
off
emerg. heat
programs
summer
winter
spring/fall
save energy
custom
edit programs
manual
spring...
program
is ON
(mode
button)
(mode
button)
(manual
settings
menu)
(program
settings
menu)
?
9:39 am July 18, 2012
Wi−Fi
Figure 19. Turning on the program

Comfort Sync7−Day Programmable Communicating Thermostat
Page 15
Adjust temperature when program is ONProgram HOLD
When the program is ON, the mode button (shown in figure 20, labeled
spring...program is ON) indicates which program is running. In this
mode, change temperature by pressing a set temp button, which pro-
duces an up or down arrow, then use the arrows until the cool to" (or
heat to") number is at the desired temperature (see Ain figure 20).
While changing the setting, the other options menu appears (see Bin
figure 20), giving a list of options you can choose.
You may select one of the hour buttons (1, 2, 8, or 24) if desired. If you
select custom, a time/date appears and you have the option of setting
the hold for any length of time (see Cin figure 20).
After a hold is set, the other options menu disappears and a message
will state when the hold expires, along with a cancel option should you
choose to revert back to the program.
Note that if you do not choose one of the other options", the default set-
ting will be that the program is held until the next period.
indoor temperature
indoor humidity is 41%
fan is
OFF
fan is
AUTO
cool−to
set temp
78
heat to
75
spring...
program
is ON
fan is
AUTO
away
mode
outdoor
temperature
80
use arrows
to change
temperature
touch
cool−to
button
indoor temperature
indoor humidity is 41%
fan is
OFF
fan is
AUTO
cool−to
set temp
75
heat to
72
program hold until
next program setting
other options include
away
mode
system is cooling
use arrows
to change
temperature
?
1hr 2hr
8hr 24hr
custom
select an option or do
nothing to accept the
default Program d"hold
until next period"
Program hold until
next period
cancel
(other options menu)
SMTWTFS
January 2012
1234567
8 9 10 11 12 13 14
15 16 17 18 19 20 21
22 23 24 25 26 27 28
29 30 31 save
09 : 39 am
program hold
?
9:39 am July 18, 2012
Wi−Fi ?
9:39 am July 18, 2012
Wi−Fi
Figure 20. Adjusting temperature with program running

507065−01 09/12 Page 16
Setting humidity controls
NOTICE
Humidifier and dehumidifier controls must be setup by the in-
staller or these controls will not be visible. If your system has one
or both of these features and the controls are not visible, contact
your dealer for proper setup.
If the controls have been setup, they will appear and will be ON.
To adjust humidity controls (either to humidify or dehumidify), click the
button to go to the dashboard controls; then select system settings
button. Some systems may have a humidifier and some may have a de-
humidifier, while still other systems may have both (as shown in figure
21). You can control either or both from this screen.
Both controls work identically. Touch the button of the humidity control
you want to address; if it says (de)humidifier is OFF, one touch will
change it to (de)humidifier is ON and bring on the RH setting button be-
low that button. When you touch the set−to button, the arrows appear,
allowing you to change to the desired humidity setting.
Remember that the humidify" control only operates while in the heating
mode and dehumidify" only operates while in the cooling mode.
SYSTEM SETTINGS
current indoor humidity is 50%
set to
AUTO
humidifier
is ON
humidity
display IS
ON
de−
humidifier
is ON
fan settings humidity settings
humidifier
settings
dehumidifier
settings
40%
set to 50%
set to
;when
turned on,
the text
below will
appear
showing
current
setting
?
9:39 am July 18, 2012
Wi−Fi
Figure 21. Humidifier controls

Comfort Sync7−Day Programmable Communicating Thermostat
Page 17
Enabling the thermostat’s Wi-Fi feature from the Home screen
press any line to edit it
connect
password
security
is WPA2
network name (SSID)
type the network security key or passphrase for
(locked Wi−Fi Access Point [AP])
network security key or passphrase
press here to enter network name
press here to enter Wi−Fi AP (router) password
displays information here as keys pressed
User Agreement
accept decline
connect
press here to enter Wi−Fi AP (router) password
next...
next...
5.2 CREATE NEW AP
1
START
HERE
WI−FI SETTINGS
WI−FI SETTINGS
NETWORKSETTINGS
Wi−Fi
enable
NETWORK
SETTINGS
Wi−Fi
disable
none
WEP
WPA
WPA2
WEP
WPA
WPA2
Secure Connection Recommended!
Make sure the router is capable of, and set to operate in
wireless network b" mode. Check router utility program or
contact service provider for help. A secure wireless network
is recommended over an open (unsecured) network. You will
need the homeowner’s approval and router password to
enable Wi−Fi in a secured connection.
Enable Wi−FiTo enable the Wi−Fi feature to com-
municate with a wireless router:
1. Press and release Wi−Fi" in the lower left corner of the
HOME screen (see START HERE). The screen
changes from the Home Screen to the WI−FI SET-
TINGS screen.
2. Press the Wi−Fi enable button.
3. Press next as necessary; then press accept after
reading the User Agreement.
4. Press NETWORK SETTINGS; this screen shows a
graphical view of buttons representing Wi−Fi options
OPEN and SECURE wireless networks and a button
for creating a new access point (AP).
5. Decide which of the following buttons you need to se-
lect:
5.0OPEN Wi−Fi Port (no password required).
5.1SECURE Ports (requires router password).
5.2Create new AP (Access Point).
5.2aWhen creating a new AP, you have the option
of selecting a security level (default is none; choose
from WEP, WPA, WPA2, depending on the security de-
fined in the homeowner’s router); the password field
appears.
6. When you touch in one of the input fields (press here
to enter...), the keyboard tool appears. Enter pass-
word (if simply logging into an existing network) or en-
ter the network name if creating a new AP. If you mis-
type the password or if you cannot access the se-
lected network, a message will alert you to retry.
7. Press connect to complete the connection. Note that
Wi−Fi enable" button on the Wi−Fi SETTINGS screen
changes to Wi−Fi disable".
7 END
7 END
7 END
5.0 UNSECU-
RED ACCESS
POINT 5.1 SECURE
Access Points
6
2
4
5.2
5.2
5.1
3
1
6
6
5.2
a
5?
5.0
Wi−Fi
Figure 22. Wi−Fi setup

507065−01 09/12 Page 18
Registering the Comfort Synctthermostat
From NETWORK SETTINGS screen, you can change to the desired net-
work as shown in figure 23. Enter security key or passphrase. X" back to the
WI−FI SETTINGS screen.
choose a wireless network
add new
network
NETWKB NETWKC NETWKD *NETGEAR
NOTE NETWORK’s marked with * - Selecting one of these
wireless networks may result in an unreliable connection to
your thermostat. Press help ?" for tips on improving signal
strength.
(returns to
WI−FI SETTINGS
screen)
?
9:39 am July 18, 2012
Wi−Fi
AP Info
dis−
connect
type the network security key or passphrase for
NETGEAR
Figure 23. Change Networks
Registration for online access
From the WI−FI SETTINGS screen, press the thermostat not registered"
button (see figure 24).
Enter homeowner email address twice and press the register button.
A pop up screen then appears to notify the user to check their home comput-
er for instructions to complete the registration. After the server sends the
email with the network link, registration and account creation must be com-
pleted on the homeowner’s personal computer (see Page 19).
NOTE − Time from pushing the registration button on the thermostat and re-
ceiving the consumer portal register link from your email on your computer is
from 5 to 15 minutes.
After registration has been completed, any available firmware downloads
will immediately start downloading to the thermostat.
REGISTRATION
register
enter your email
re−enter your email
Register with Comfort Sync thermostat to enable remote access
and online weather information
System Desc
Wi−Fi 9:39 am July 18, 2012
WI−FI SETTINGS
connected
Wi−Fi
enabled
thermostat
not
registered
Connection to server has not bee established or it has been lost. Please
wait until a connection is established.
Firmware
update
auto
press to
change network
settings
press to enable
/ disable Wi−Fi
press to change
thermostat regis-
tration
Wi−Fi 9:39 am July 18, 2012
press to toggle firm-
ware update between
auto" and off"
NOTE −
If any downloads are available for the thermostat they will start downloading
right away. When new firmware is being downloaded or when Gelaskins are
being installed, the thermostat screen will temporarily go blank and running
units may cease operation while the system is being reset to accommodate
the new changes. This is normal and can last a couple minutes.
(returns to
HOME
screen)
Figure 24. Registering the system for online access
For any issues with Wi−Fi connections, refer to Wi−Fi Troubleshooting
Checklist 507094−01.

Comfort Sync7−Day Programmable Communicating Thermostat
Page 19
Personal Computer account registration for Comfort Synctserver
NOTE − This following information is customer setup in-
structions and is shown here to allow the installer to help
walk the customer through the setup process.
NOTE − if the customer has already setup an account,
click the Click Here" button to access that account.
After registering through your Comfort Syncthermostat in-
terface, go to the homeowner’s computer and locate the
email sent from the server:
Dear Customer,
Congratulations on your purchase of an Allied Com-
fort Sync thermostat! You are only a few steps away
from total control of your Comfort Sync system. Reg-
istering your thermostat will allow you to remotely ac-
cess it from anywhere in the world on any device with
an internet connection. Please complete your Com-
fort Sync registration by clicking the link below:
Register
Click on the Register link; the screen (to the left) will appear.
Fill in the User Name and Password fields and check the
agree to terms and conditions box. Click Create User button.
A series of pages and prompts follows to provide guidance
through profile setup and user preference definitions.
Figure 25. Computer login for online access

507065−01 09/12 Page 20
Personal Computer Welcome page; Interactive Demo; Online Comfort Synctinformation; Using Gelaskins
Figure 26. PC Welcome Screen
Welcome home.
Access all the great Wi−Fi enabled features on your Comfort Syncthermo-
stat from our secure web portal. After signing in, you´ll be able to view your
Comfort Syncsystem settings, adjust the temperature and view reminders
and alerts ˘ just as you would on your Comfort Syncthermostat at home.
With a familiar look and settings this simple, you should feel right at home.
Don´t forget to check out the available Apps and customizable skins using
the links on the right side of the page. From the welcome page, you may also
click on links to launch an interactive demo or learn more about Comfort
Sync.
How Do I Turn on Skins on the Comfort SynctThermostat?
From the thermostat Home screen, press then display setting then
power save buttons. From the popup menu, select skins. The skin picture
will appear after 30 seconds of inactivity.
How Do I Upload a Skin?
Skins should be ordered from www.gelaskins.com/comfortsync. After order-
ing the skin, Gelaskins will email the image file (.jpg) to the homeowner. This
.jpg" has been altered to display correctly on the Comfort SyncThermo-
stat. Images can be uploaded to the Comfort Syncthermostat from the
consumer portal site (www.mycomfortsync.com) under the tab "skins".
For quick reference, locate the quick reference card in the thermostat package.
Date Revision description
07−2012 Preliminary release (Draft 1)
09−2012 Draft 2
Table of contents
Other Comfort Sync Thermostat manuals
Popular Thermostat manuals by other brands

RS PRO
RS PRO CC908WHB-3 Assembly, installation and operation instructions

Axor
Axor Citterio M Instructions for use/assembly instructions

Horstmann
Horstmann CentaurStat 7 User instructions

Johnson Controls
Johnson Controls T8000 Series installation instructions

Venstar
Venstar P474-1100RF owner's manual

Carrier
Carrier Programmable Thermostats Installation, start-up, and operating instructions