Commercial Sound Services DSA-4 User manual

213 Highland St., Texas City, Texas 77591
(409) 933-0696 office (409) 933-0694 fax
email: don@commercialsoundservices.com
website: www.commercialsoundservices.com
DSA-4 / DSA-4M
“Digital Sound Announcer”
Desi ned And Manufactured By Commercial Sound Services, Texas City, Texas
(Please check our website for the latest updates to this manual.)
DSA-4/DSA-4M manual Page-1

DSA-4 / DSA-4M
“Digital Sound Announcer”
Thank you for purchasin the New Digital Sound Announcer known as the DSA. This system
is desi ned to deliver up to 16 prerecorded announcements for safety announcements, park
information for amusement rides, o-carts tracks, food venders, box offices, etc. The DSA
announcement system will playback the exact wordin for the announcement every time to
assure the announcement will be the same each and every time it is played. This prevents a live
operator from accidentally leavin out a part or misstatin the announcement allowin a law suite
in the event an accident. This system is a self contained unit with an MP3 player that can
playback up to 16 prerecorded messa es.
There are two basic models to choose from: the Model DSA-4, which has (4) push buttons for
(4) messa es, and a Stop button to stop the messa e if needed. The messa es will turn
themselves off after the messa e is finished. The Model DSA-4M has the same features as the
DSA-4 but with a built-in push-to-talk microphone. Your DSA can be ordered to handle up to 16
prerecorded announcements with as many push buttons as you need. We also have optional
external switches, sensors, or timers that can be connected to your DSA to make
announcements play automatically. Check with us to have your DSA built to your custom needs.
All DSA models contain (1) 2-channel preamplifier (1) MP3 player, (1) optional microphone, (1)
power amplifier. The power amplifier will drive four 8-ohm speakers in parallel on the two stereo
speaker output channels. The speakers can be 4 to 8-ohm. The stereo power amplifier is rated
100-watts x 2. Any 8-ohm speakers can be used, (not 70-Volt Line Speakers--Do Not Connect
Due To Amplifier Dama e Will Occur).
The preamplifier has the volume controls located inside the unit. Once set, the volume will not
need to be adjusted. This prevents tamperin . The DSA system operates on 12VDC/5amps. All
included parts are desi ned for easy “in-the-field” replacement if needed.
DSA-4/DSA-4M manual Page-2

INSTALLATION
1. Before installin the DSA control box, the speakers should be installed first. Determine
the best location for the sound to be heard by everyone. All the wires should be hidden
from view and protected from the weather by conduit. Have the two (2) speaker wires
comin from the speakers to the DSA, also have the low volta e power run to the same
location alon with the speaker cables. NOTE: route the low volta e power cable and
speaker cable to a central location where the DSA will be mounted. It is recommended
to use the DSA-Mount.
2. Remove the four (4) screws on the front control panel to ain access to the inside of the
enclosure. Unplu the cat5e connector from the front control panel cat5e coupler. This
coupler connects the MP3 player track tri ers to the control buttons via a cat5e cable. If
installin a DSA-4M system, unplu the XLR microphone connector ( range wire) on
the rear of the small preamplifier (Rolls PA71). Carefully place the control panel in a
safe place for now.
3. Remove the two (2) top nuts and the two (2) lower nuts holdin the entire (white) power
amplifier assembly onto the clear plexi lass mountin plate, once removed, set aside.
Remove the six (6) Phillips screws at the top, middle, & bottom holdin the mountin
plate to the enclosure. Once the mountin plate is removed, make sure the amplifier
mountin screws holdin the amplifier to the mountin plate are ti ht on the plate, this
will come loose when removin the amplifier assembly. Ti hten screws to properly hold
the amplifier in place before installin the mountin plate..
4. Mount the empty enclosure securely to a pole, a frame or whatever you are mountin the
DSA enclosure to usin the enclosed fender washers. If usin the DSA-Mount, please
follow the instructions included with the mount. Before installin the plexi lass mountin
plate, make sure the amplifier mountin screws are ti ht before installin the amplifier.
Route power cable & speaker wires throu h the wire plu on the bottom of the
enclosure.
5. After mountin the enclosure, leave the power and speaker cables han in for now.
Install the amplifier mountin plate with the six (6) screws.
6. Install the amplifier assembly on the four (4) threaded screws. Install the nuts on each
screw makin sure they are secured.
7. Route the two speaker cables and screw them to the terminals at the bottom of the
amplifier on the left. The terminals, lookin from the top down are: (+) (-), (-) (+).
D N t C nnect M re Than TWO (2) 8- hm speakers per set f speaker terminals.
8. Route the low volta e 12vdc power cable from the power transformer to the two wires
that are marked power 12VDC + and 12VDC - Use the included blue wire nuts to
connect the wires. PLEASE BE SURE THE POWER TRANSFOMER WIRES THAT
ARE MARKED WITH A WHITE STRIP ARE CONNECTED TO THE (+) RED WIRE &
THE BLACK WIRE IS CONNECTED TO THE SOLID BLACK WIRE.
9. Before applyin power, make sure all plu -in power connectors on the Rolls PA-71 & the
MP3 player are plu ed in securely before applyin power. D N t apply power at this
time !!!
DSA-4/DSA-4M manual Page-3

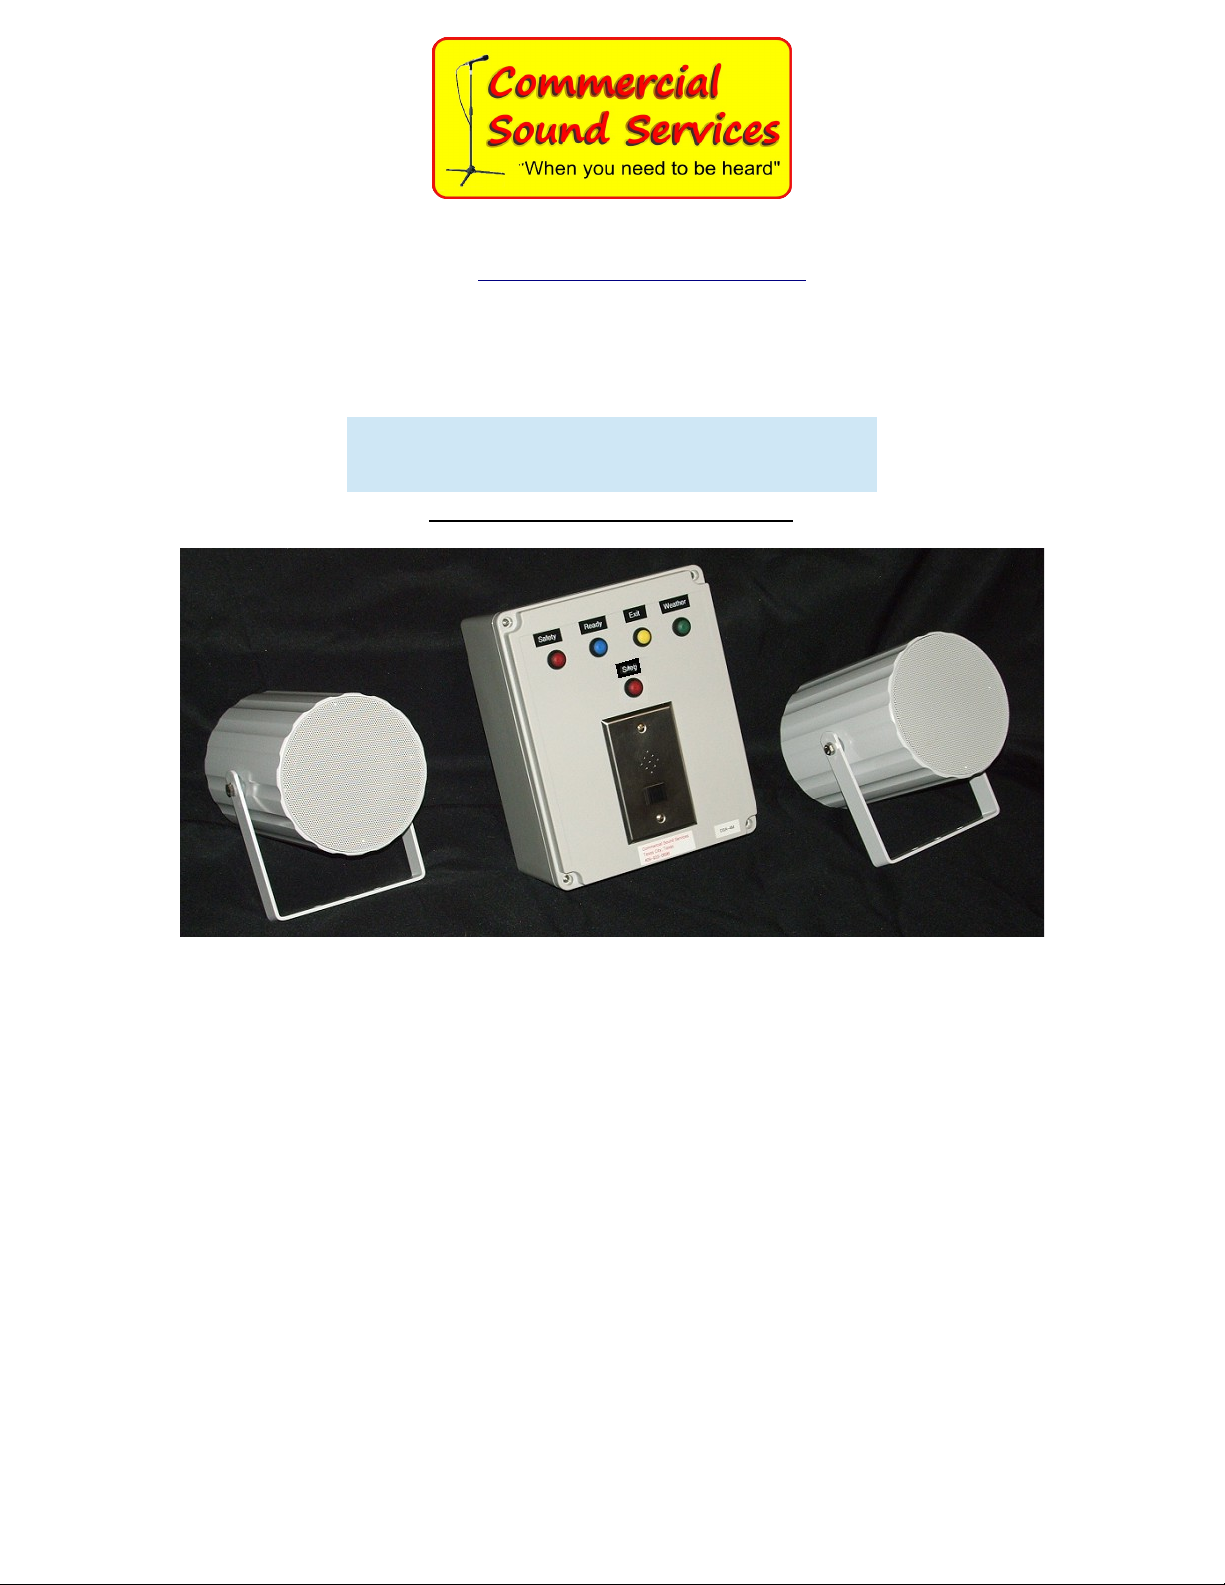
10. Locate the push button control panel and plu in the control panel cat5e cable to the
cat5e cable coupler to to the MP3 player. If usin the model DSA-4M, plu in the Green
XLR microphone connector ( range wire) to the preamplifier (Rolls PA-71) mounted on
top of the white power amplifier.
11. D N t Install The Cover At This Time, but do support the cover to prevent any dama e.
12. Plu in the 12VDC power supply, wait for 8-seconds before pushin any buttons to allow
the system to boot up.
13. Push and release any announcement button, except “Stop”, to play a test messa e.
(Your DSA is shipped to you with some test messa es or your custom announcements
already recorded.) Set the volume control on the preamplifier for the correct loudness.
Adjust the Line Level volume control on the preamplifier for the loudness of the MP3
player. Adjust the microphone volume level. For the microphone loudness, use the test
or actual announcement already recorded on the micro-SD card.
14. To test the microphone, push and hold the black button on the stainless steel
microphone plate and speak into the microphone to make a live announcement. Adjust
the microphone volume level as needed. If feedback (squealin ) is heard, turn down the
microphone volume control or move the speakers father away from the DSA-4M control
box. If usin a custom CSS push to talk microphone the same adjustments applies.
15. Check all push buttons for all messa es, the stop button, microphone volume level, &
messa e volume level. If all is correct, it's OK to install the cover, unless you're oin to
chan e the announcements on the micro-SD card. In that case, skip to the next section.
16. Install the four (4) stainless steel screws to secure the control panel. The DSA is ready
to use. NOTE: There Is No On/Off Switch, The DSA Is Always On And Ready To use.
REMOVING OR INSTALLING THE micr -SD CARD
NOTE: First, Turn Off P wer T DSA C ntr l B x. The card cann t be inserted r
rem ved while the DSA has p wer.
Remove the DSA front panel by removin the (4) screws, one in each corner. Find the RED
circuit board located on the Lower Ri ht on top of the WHITE amplifier. On the lower ri ht side
of the board is a small silver SD card holder. With N P wer On, insert the micro-SD card, it
will click into place. NOTE: If the power was on when the micro-SD card was inserted there will
be no dama e to the micro-SD card, but the MP3 player will not reco nize the card & will not
play. If this happens, or if the card came lose in the holder, re-seat the card
Observe the green LED f r the f ll wing c de:
a. 1-Lon blink, no formatted micro-SD media found.
b. 1-Lon blink followed by 1-short blink - micro-SD found, no MP3 files located.
c. Constant short blinks – hardware problem with MP3 decoder.
d. 3-short blinks – micro-SD media found, at least one MP3 file located. This is the correct
blinkin pattern to watch for.
As soon as the MP3 player powers up with 3-short blinks, the system is ready to play.
Check all push buttons to see if all announcements play. If so, install the control button
panel, the DSA is now ready to use....enjoy!
DSA-4/DSA-4M manual Page-4

RECORDING TO Micr -SD CARD
Puttin your own recorded announcements on the supplied micro-SD card is a simple task.
The equipment needed is:
Computer
Optional mixer with effects
MP3 converter
MicroSD card writer (supplied)
To simplify recordin , use the internal sound recorder supplied in every PC. A sound mixin
pro ram can be used to enhance the announcement. But for a fast, easy, inexpensive recordin s
use te followin .
1. Record your announcements on your PC. Your computer will usually save the file as
a .wav file. The DSA only accepts mp3 files for playback, so you will have to convert
them after recordin . As you make each recorded announcement, you must name
each file with a number & appropriate name like this: 001 Start, 002 Exit, 003 Delay,
004 Weather, 005 Emer ency, etc. The number attached to the name is how the
DSA associates the announcement with each button, switch or sensor that trips it.
(Ex: button 1 trips messa e 001, button 2 trips messa e 002, etc.) The number on
the file must have 3 di its total with a leadin zero. The DSA can have up to 16
announcements, so they would be numbered 001 thru 016. Save the files in a folder
so they can be converted to mp3's. If your computer can save the file as an mp3, do
so and the next step can be skipped.
2. You must now convert your files to mp3's. If you don't have a way to do that on your
computer already, you can o on line to et a free MP3 converter, or purchase the
MP3 converter we use by NCH software to convert the .wav sound file to an MP3
sound format. Once the MP3 format is saved to an output folder, the files can be
saved to the micro-SD card in the next step. All files should now have a .mp3
extension. They should look like this: 001 Start.mp3, 002 Exit.mp3, etc. This is the
only way the DSA will use the announcement recordin s.
3. If your computer doesn't have an SD card slot, you can use the supplied micro-SD
card reader/writer to save the files on the enclosed micro-SD card. When finished,
check to see if all files will play back correctly on your computer from the card. If all
is OK, then remove the micro-SD card from the reader/writer adapter & install the
card into the DSA MP3 player followin the instructions outlined in REMOVING OR
INSTALLING THE micr -SD CARD.
WARRANTY
The DSA is warranted to be free from defects in manufacturin for 1-year on installation. Any
failure to any part of the DSA will be replaced by a CSS, CSS Service Tech, or by overni ht UPS
delivery to the client if part is available. Warranty is limited to product defect or failure, warranty
does not cover any abuse, misuse, or normal wear & tear.
DSA-4/DSA-4M manual Page-5

FOR SERVICE - PLEASE CALL US
409-933-0696
PARTS LIST
DSA-4675 --- Red Push Button
DSA-4680 --- Yellow Push Button
DSA-4685 --- Green Push Button
DSA-4690 --- Blue Push Button
DSA-92P ----- Enclosure
DSA-92AM --- Plexi lass Amplifier Mountin Plate
DSA-71 --------------- 2-Channel Preamplifier
DSA-Pwr Amp -----– Power Amplifier
DSA-Pwr Supply --- 12vdc/5amp
DSA-WWM ---------- Microphone
DSA-SDW ----------- micro-SD Writer/Reader
DSA-MSDC --------- micro-SD Card 2GB
DSA-MP3 ------------ MP3 Player
DSA-Pent ---- Desi ner Projector Speaker
DSA-BH ------ 11” x 4” Horn Speaker
DSA-WMS --- Wall Mount Speaker
ASSEMBLIES
DSA-Amp-194 --- Complete with DSA-71, Pwr Amp, MP3
DSA-92FP4 ------- Front Panel w/4-Buttons
DSA-92FP4M ----- Front Panel w/4-Buttons & 1-Microphone
DSA-4/DSA-4M manual Page-6
This manual suits for next models
1
Table of contents