COMO AUDIO Como Audio Turntable User manual

User Manual
The Como Audio Turntable

2
Please keep the original packaging in order to safely ship or
otherwise transport your
Turntable in the future, especially if service is ever required. The warranty does not include
damaged caused by shipping.
IN THE BOX:
➢TURNTABLE / PLATTER / SLIP MAT / DUST COVER
➢ALLEN WRENCH x 2 (FITS COUNTERWEIGHT AND CARTRIDGE)
➢TWO-POINT CARTRIDGE ALIGNMENT (IF REPLACING CARTRIDGE)
➢15V/0.8A UNIVERSAL POWER SUPPLY
➢RCA TO RCA AUDIO CABLE 4’/1.2M
➢SET UP GUIDE
➢45 RPM “SINGLE”ADAPTER
➢RCA TO 3.5 mm CABLE ADAPTER (FOR USE WITH COMO AUDIO AUX INPUT)
➢DRIVE BELT
PARTS DIAGRAM:
1 Platter and slip mat
2 Drive pulley
3 Drive belt
4 Tonearm counter-weight
5 Tonearm lift lever
6 Tonearm rest
7 Tonearm
8 Headshell with finger lift and pre-mounted Ortofon OM10 cartridge with clear protective
cap
9 Dust Cover
10 Dust Cover hinges
11 Hinge fasteners
12 Analog outputs and External power supply input
EN

3
Illustrations may vary.
EN

4
ASSEMBLY
Platter, drive belt, and dust cover installation and stylus cover removal
With clean hands (finger oil could make the belt slip), install the flat drive drive belt as shown in
the above illustration, wrapping it around the exterior of the plastic sub-platter and the upper
section of the pulley. Do NOT place the belt over the lower section of the pulley. Place the black
metal platter over the sub-platter on the turntable and put the Como Audio felt mat on the top
of the metal platter to protect your records. Align the holes in the back of the dust cover over
the hinges on the back of the turntable’s base and gently slide the dust cover over them.
Connect the included external power supply to the rear 15V/0.8A input.
> Remove the clear protective cap under the stylus prior to playing a record! Save the cap.
______________________________________________________________________________
Controls, Features, and Connections
1 ON/OFF POWER SWITCH (left side)
2 DRIVE PULLEY
3 PHONO/LINE OUTPUT, GROUND CONNECTION
4 BLUETOOTH POWER SWITCH (right side)
5 SPEED CONTROL BUTTON
6 POWER SUPPLY INPUT
Illustrations may vary.
EN

5
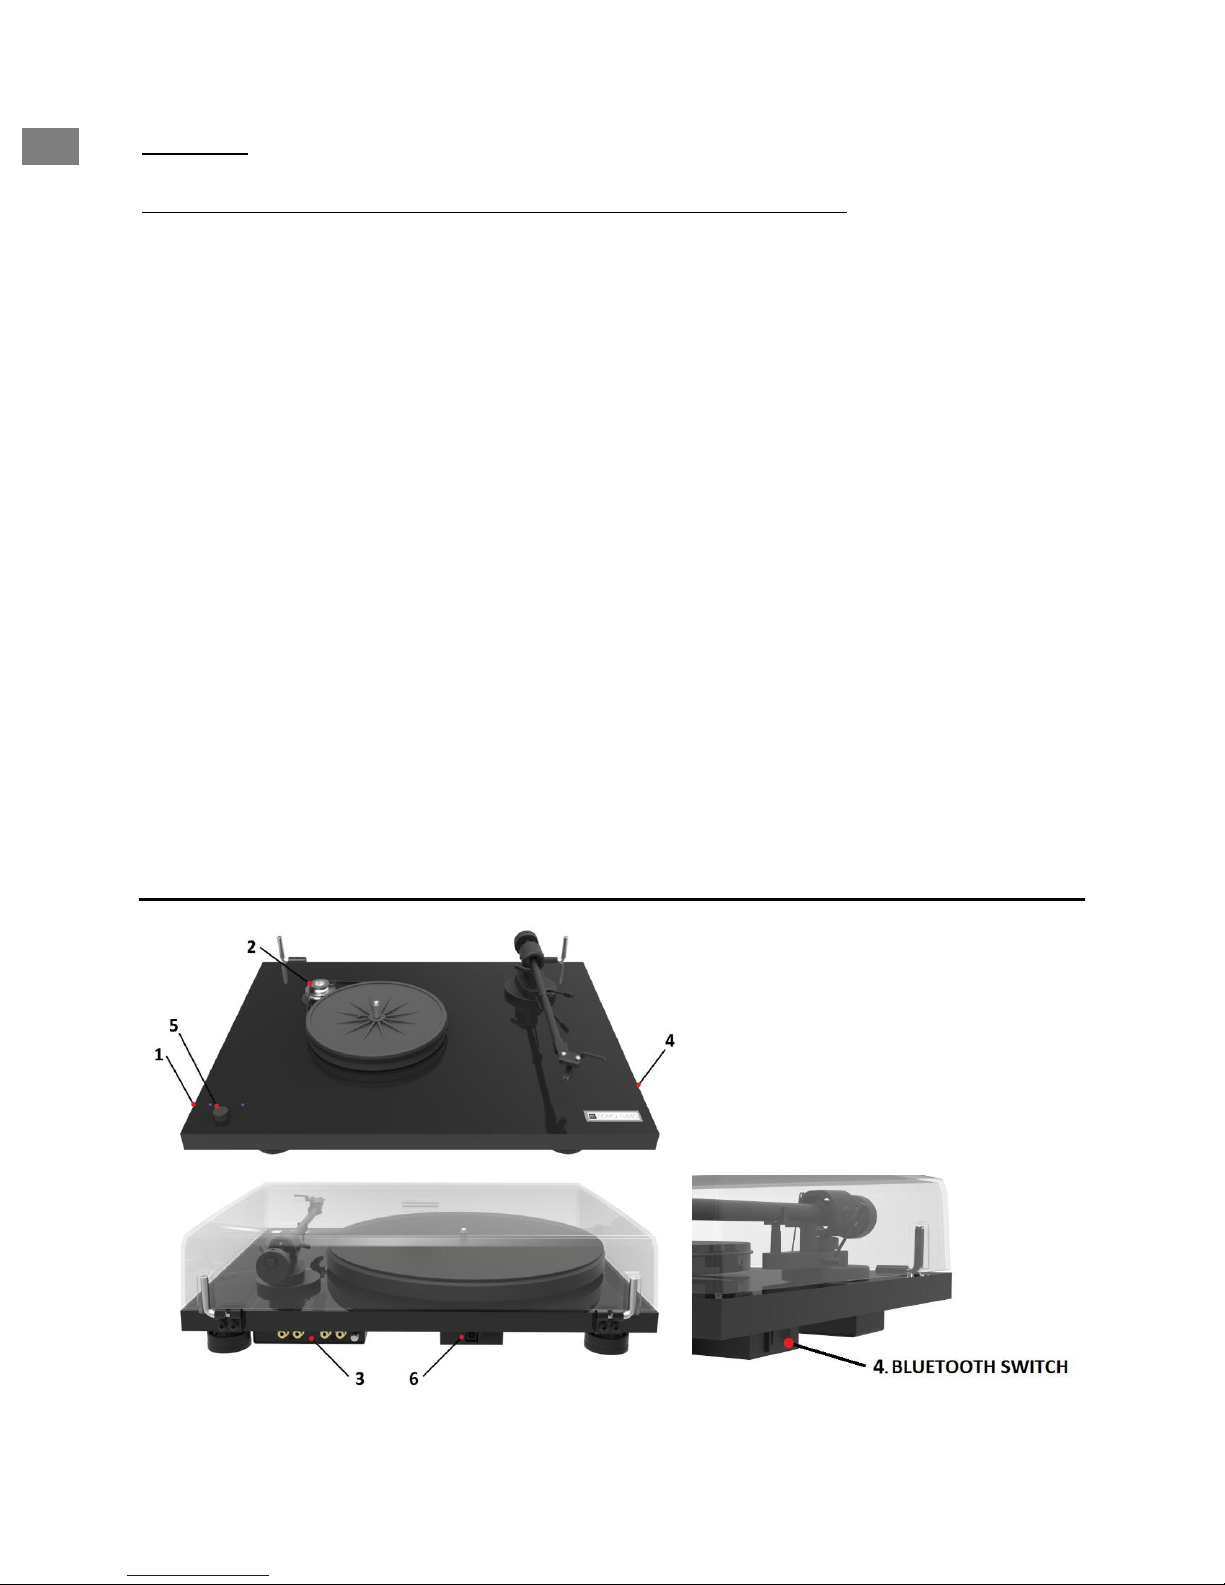
1. On/Off switch (not to be confused with #4 Bluetooth switch)
Press the left-hand side ON/OFF switch alternately to start or stop the motor. BE CERTAIN TO
REMOVE THE CLEAR PROTECTIVE CAP UNDER THE STYLUS BEFORE PLAYING A RECORD.
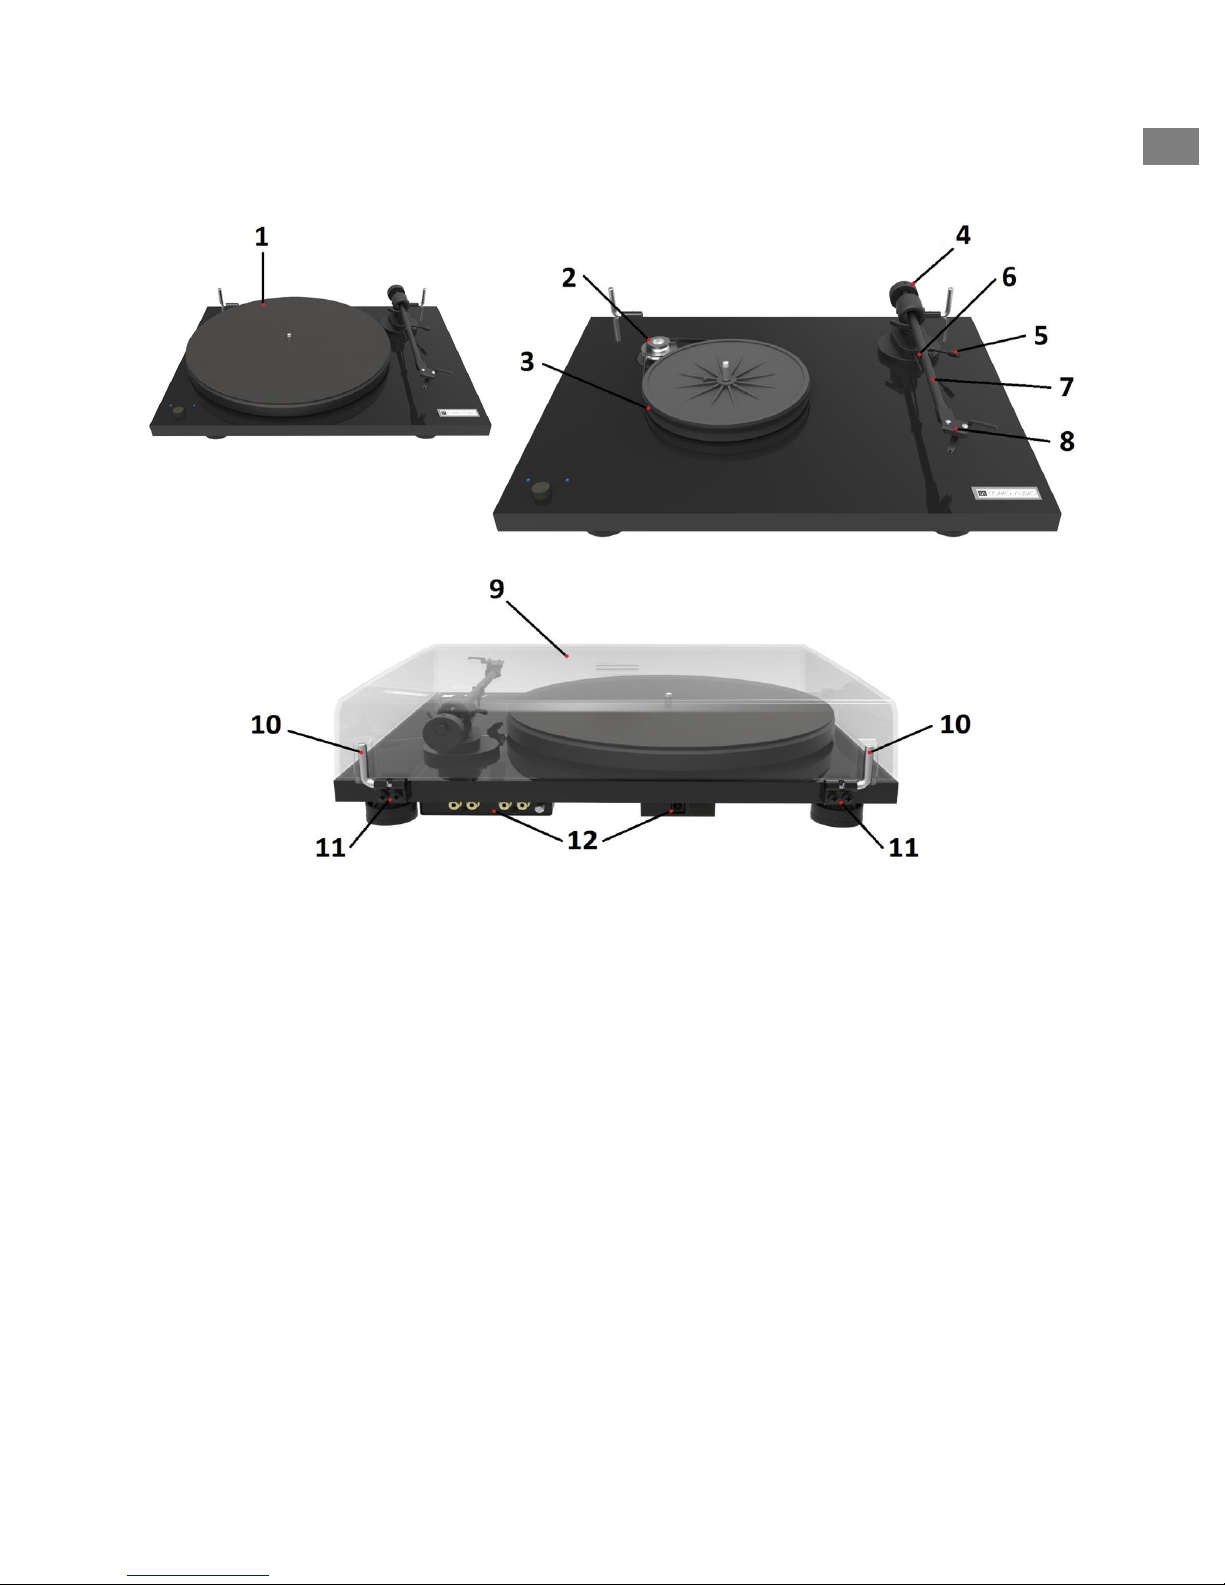
2. Drive pulley
Position the included FLAT drive belt over the upper portion of the pulley as described above in
“Assembly”. The lower (wider) section of the drive pulley should only be used for 78 rpm speed
along with a different belt and stylus. See point #5 “Playback Speed Button”.
3. Line and Phono outputs
Skip this section and go to point 5 below if you’re connecting the Como Audio Turntable wirelessly
via Bluetooth.
The Como Audio Turntable has two analog outputs –LINE OUT with integrated phono preamplifier
and PHONO OUT. Use the LINE OUT with the Auxiliary input on your Como Audio model or other
music system’s Aux input. If connecting to a Como Audio system, ignore the ground wire attached
to the RCA cable. There is an included 3.5 mm adapter to place over one end of the included RCA
audio cable for the Como Audio system’s Aux input.
Use the PHONO OUT if you prefer to use an outboard phono preamplifier or are connecting to a
receiver or integrated amplifier with a dedicated Phono input. Make sure the phono input offers
correct matching and amplification for the type of cartridge used. If the outboard phono
preamp or receiver/integrated amplifier has a ground connection, you can connect the ground
wire (attached to included RCA cable) from it to the ground connection on the back of the Como
Audio Turntable if you experience a hum noise.
Take care about connecting the left and right channels of the audio cable correctly. The right
channel is usually marked red, the left channel black or white.
4. Bluetooth switch
You can connect your Como Audio Turntable wirelessly with a compatible Bluetooth device. If you
currently have a device or devices that automatically connect via Bluetooth with your Como Audio
music system such as a smart phone, turn the Bluetooth off on those devices to avoid them
connecting while you are connecting your Como Audio Turntable. Turn the Como Audio
Turntable’s Bluetooth switch (right hand side) On. The Turntable’s power switch need not be on,
just the Bluetooth switch. Turn your Como Audio music system (or other audio system) on and
place it in Bluetooth mode by rotating the front panel Source knob until the Bluetooth icon is
highlighted, then press the Source knob in to select. The Como Audio Turntable will pair and
connect to your Como Audio music system. Initial pairing can take several minutes. If pairing
doesn’t happen after a few minutes, turn the Como Audio turntable’s Bluetooth switch off for a
few seconds, then back on again, and wait another few minutes for pairing to occur. Once
successfully paired, you’ll hear a confirmation beep and the volume will auto set to level 22. After
the initial pairing, connection of the Como Audio Turntable is automatic each time the Como Audio
system is placed in Bluetooth mode.
For pairing with non-Como Audio systems, refer to the manual of the given product.
EN

6
To restart the Turntable’s Bluetooth transmitter, turn the Turntable’s Bluetooth switch OFF and
ON. A restart is usually only needed when pairing to a new device or if the Como Audio model has
been Factory reset.
When changing from Bluetooth to another source you may need to lower the volume, as
Bluetooth automatically requires and sets a higher volume level than other sources.
For your convenience, your Como Audio system allows you to save Bluetooth as a preset. Simply
press and hold one of the front panel preset buttons on your Como Audio model when in
Bluetooth mode. From then on, briefly press that preset button to go to Bluetooth mode even if
the Como Audio system is in standby.
We recommend leaving the Como Audio Turntable’s Bluetooth switch on even when the Turntable
is not being used for faster connection when the Como Audio music system is placed in Bluetooth
mode.
It is normal to continue to hear a few seconds of sound through your Como Audio model after
lifting the tone arm on the record.
5. Playback speed button
To play records at 33 or 45 rpm, with the Como Audio Turntable on, briefly press the speed
control button in the lower left. The selected speed is shown respectively by the flashing green
LED. When the platter has attained full speed, the LED stops flashing. The default speed is always
33 rpm.
To play 78 rpm records you must change the stylus to the Ortofon OM78 (not included) and change
the belt to a rounded belt that goes around the lower pully section. Please contact your dealer or
Como Audio for more information.
Note: Like most high-performance turntables, the Como Audio Turntable is manual, meaning the
tone arm is manually placed on the record and when one side of a record is finished playing,
manually lift the tone arm up using the tone arm lift lever and place it in the tonearm rest.
6. Power input
Connect the included 15V external power supply to this rear input. Several different plugs are
included. Select the correct plug for your region, insert the plug’s four tabs into the power supply,
and push down on the center of the plug while pushing the plug upwards to lock it into position.
EN

7
Replacing the stylus
A damaged or worn stylus may damage your records and should be replaced. The stylus is changed
by pulling it straight out and in the opposite direction of the turntable's arm: with one hand, grasp
the stylus from both sides and pull. Installing the new stylus: Holding the new stylus from the top,
press it gently into the space at the tip of the cartridge where the old stylus was. Don't force it. If
you wish to replace the entire cartridge we strongly recommend using a local professional service
center of your choice, as the tonearm wires connecting to the cartridge are very delicate and can
break very easily. The included allen wrench can be used to remove the cartridge from the
headshell.
Placement, cleaning, and other suggestions
Place the Como Audio Turntable on a level, flat surface not subject to vibration.
Wipe the dust cover and plinth as needed with a soft cloth.
We recommend you keep the dust cover closed during playback to protect the record and
stylus.
We further recommend you keep the tone arm locked to the tone arm rest when not in use to
prevent the arm from accidentally moving and damaging the stylus.
Keep your records away from heat to avoid warping and store them in their respective sleeves
to help protect them.
Do not attach a cleaning brush to the tone arm, as this will change the weight the
counterweight has been pre-set for.
We do not recommend the use of a record weight stabilizer, as it puts additional strain on the
motor.
___________________________________________________________________________
EN

8
Technical specifications: The Como Audio Turntable
Nominal speeds
33/45/78 rpm; microprocessor-controlled
Speed variance
33: ±0.65% 45: ±0.50%
Wow and flutter
33: ±0.18% 45: ±0.16%
Signal to noise
-66dB
Effective tonearm mass
0.28 ounces/8.0g
Effective tonearm length
8.6" (218.5mm)
Overhang
0.87”/22.0mm
Power consumption
4.5W/In standby: Less than 0.5W/Bluetooth on: 1W
Dimensions (W x H x D)
16.54”x 4.41”x 12.99”/420 x 112 x 330mm
Weight
11.02 lbs/5.0kg
Technical specifications: MM-Cartridge Ortofon OM 10
Frequency range
20Hz-22kHz
Channel separation
22dB/1kHz
Output voltage
4mV
Recommended load
impedance
47kohms/amplifier connection –MM-input
Compliance/stylus type
20µm/mN –elliptical
Recommended tracking force
15mN
Weight
0.01 lbs/5g
Technical specifications: Integrated MM Phono pre-amplifier
Gain
34dB
Output voltage
200mV/1kHz at 5mV/1kHz input
Input impedance
47kohms/100pF
Noise floor
-68dB
RIAA EQ curve accuracy
20Hz-20kHz/max. 0.5dB
Technical specifications: External power supply
Model ZZU1001-080150
Input 100-240V / 50-60Hz
Output 15V / 0.8A
EN

9
Trouble shooting:
Your Como Audio Turntable is manufactured to the highest standards and undergoes strict
quality control before leaving the factory. Faults that may possibly occur are not necessarily due
to material or production faults but can sometimes be caused by incorrect use or other
circumstances. Please read through the below list when troubleshooting:
The platter doesn't turn although the unit is switched on:
The unit is not connected to the external power supply.
The external power supply is not plugged in or is not getting power.
The drive belt is not around platter or has slipped off.
No signal through one or the other channel or both channels:
No signal contact from the cartridge to the internal tonearm wiring, or from that to the arm
lead, or from that to the phono outputs, or between that and the Como Audio system. This
could be due to a faulty plug, broken wire or solder joint, or simply a loose plug/socket
connection.
The Bluetooth or Aux input (depending on connection method) has not been selected on the
Como Audio music system.
The Como Audio music system is not switched on.
Strong hum:
A ground wire is not connected. Note a ground connection is not available on Como Audio
systems.
Distorted or inconsistent sound from one or both channels:
The Como Audio Turntable is connected to the wrong input on the Como Audio music system.
The stylus or cantilever is damaged.
The wrong rpm speed is selected, the drive belt is overstretched or dirty, or the platter bearing
is dirty or damaged.
Service
Should you encounter a problem which you are not able to alleviate or identify despite the above
information, please contact your point of purchase or Como Audio for further advice. Do not
return the Como Audio Turntable without an authorization number.
Shipping damage is not covered under the warranty. For this reason, we strongly recommend
retaining the original packaging.
Do not return the Como Audio Turntable without making sure it is safely disassembled and
correctly packaged in the original packaging. Please remove these parts and pack them
separately: lid, platter, and belt.
Fit the clear cartridge protection cap over the stylus prior to carefully packaging the Turntable.
EN

10
Warranty
The warranty period is two years to the original owner and does not include cartridge/stylus
replacement. Como Audio accepts no responsibility for damage caused by not adhering to
instructions for use and/or by transportation without the original packaging. Any unauthorized
modifications effecting performance or cosmetics are not covered under the warranty
______________________________________________________________________________
The information in this guide was correct at the time of printing. Como Audio reserves the right
to make changes to the technical specifications as deemed necessary without prior notice.
Questions or problems?
www.comoaudio.com
Copyright 2019 by Como Audio, Inc. All rights reserved. This manual was written by Peter Skiera
and cannot be reproduced in whole or in part without permission from Como Audio, Inc
“The Bluetooth® word mark and logos are registered trademarks owned by the Bluetooth SIG,
Inc. and any use of such marks by Como Audio, Inc. is under license. Other trademarks and trade
names are those of their respective owners.”
Note: The wood veneers we apply to our MDF plinths are indeed real wood. They are quite
literally products of nature, and as such, have their own color and grain characteristics which
can vary from tree to tree, often times greatly so. It is exactly these naturally occurring
variations that result in each plinth being truly unique. Accordingly, there may not be a precise
match to your Como Audio music system’s finish. Also, the wood veneer can darken over time,
particular when exposed to sunlight.
TTM4519
EN

11
Important Safety Instructions:
1. Read these instructions.
2. Keep these instructions.
3. Heed all warnings.
4. Follow all instructions.
5. WARNING- To reduce the risk of fire or electric shock, do not expose this apparatus to rain
or moisture.
6. Apparatus shall not be exposed to dripping or splashing and no objects filled with liquids,
such as vases, shall be placed on the apparatus.
7. Clean only with a dry cloth.
8. Do not block any ventilation openings. Install in accordance with the manufacturer’s
instructions.
9. Do not install near any heat sources such as radiators, heat registers, stoves, or other
apparatus (including amplifies) that produce heat.
10. Only use attachments/accessories specified by the manufacturer.
11. Use only with the cart, stand, tripod, bracket, or table, specified by the manufacturer, or
sold with the apparatus. When a cart is used, use caution when moving the cart/apparatus
combination to avoid injury from tip-over.
12. Operate this product only from the type of power source indicated on the rear panel. For
products using an external power supply, use an exact replacement if lost or damaged.
13. For added protection for this product during a lightning storm, or when it is left unattended
and unused for long periods of time, unplug it from the wall outlet. This will prevent
damage to the product from lightning storms and power line surges.
14. Unplug this product from the wall outlet and refer servicing to qualified personnel under
the following conditions:
a. When the power supply cord or plug is damaged.
b. If liquid has been spilled or objects have fallen into the product.
c. If the product has been exposed to water or rain.
d. If the product does not operate normally by following the operating instructions.
e. If the product has been dropped or damaged in any way.
f. When the product exhibits a distinctive change in performance.
15. When replacement parts are required, be sure your service technician has used
replacement parts specified by the manufacturer or have the same characteristics as the
original part. Unauthorized substitutions may result in fire, electric shock, or other hazards.
16. Upon completion of any service, ask the service technician to perform safety checks to
confirm the product is in proper operating condition.
17. Keep this product a safe distance away from naked flame.
18. The recommended operating temperature range is 5C –40 C (41 F –104 F).
19. Protect the power cord from being walked on or pinched particularly at plugs, convenience
receptacles, and the point where they exit from the apparatus.
20. The power cord plug serves as the disconnect device and should remain readily accessible.
EN

12
Waste from Electrical and Electronic Equipment (WEEE): This directive mandates the
collection and recycling of electronics and component materials in order to reduce the
amount going to landfills. Outside North America, when the user decides to discard this
product, it must be sent to a separate collection facility for recycling. Please contact your
point of purchase for more details.
Como Audio models comply with the RoHS (Restriction of Hazardous Substances)
directive.
FCC Caution: Any changes or modifications not expressly approved by the party responsible for
compliance could void the user's authority to operate this equipment.
This device complies with Part 15 of the FCC Rules. Operation is subject to the following two
conditions: (1) This device may not cause harmful interference, and (2) this device must accept
any interference received, including interference that may cause undesired operation. This
device and its antenna(s) must not be co-located or operating in conjunction with any other
antenna or transmitter.
Note: This equipment has been tested and found to comply with the limits for a Class B digital
device, pursuant to part 15 of the FCC Rules. These limits are designed to provide reasonable
protection against harmful interference in a residential installation. This equipment generates,
uses and can radiate radio frequency energy and, if not installed and used in accordance with
the instructions, may cause harmful interference to radio communications. However, there is no
guarantee that interference will not occur in a particular installation. If this equipment does
cause harmful interference to radio or television reception, which can be determined by turning
the equipment off and on, the user is encouraged to try to correct the interference by one or
more of the following measures: —Reorient or relocate the receiving antenna. —Increase the
separation between the equipment and receiver. —Connect the equipment into an outlet on a
circuit different from that to which the receiver is connected. —Consult the dealer or an
experienced radio/TV technician for help. This equipment complies with FCC radiation exposure
limits set forth for an uncontrolled environment. This equipment should be installed and
operated with minimum distance 20cm between the radiator and your body.
This equipment complies with FCC radiation exposure limits set forth for an uncontrolled
environment. This transmitter must not be co-located or operating in conjunction with any
other antenna or transmitter. The availability of some specific channels and/or operational
frequency bands are country dependent and are firmware programmed at the factory to match
the intended destination. The firmware setting is not accessible by the end user.
EN

13
The Bluetooth transmitter has integrated antenna and no other antenna can be connected.
This device complies with Industry Canada RSS standards. Operation is subject to the following
two conditions: (1) This device may not cause interference, and (2) this device must accept any
interference, including interference that may cause undesired operation of the device.
Le présent appareil est conforme aux CNR d'Industrie Canada applicables aux appareils radio.
L'exploitation est autorisée aux deux conditions suivantes: (1) l'appareil ne doit pas produire de
brouillage, et (2) l'utilisateur de l'appareil doit accepter tout brouillage radioélectrique subi,
même si le brouillage est susceptible d'en compromettre le fonctionnement.
EN

14
Tak fordi du har købt en Como Audio Turntable. Læs venligst denne vejledning, før du opsætter
og bruger din nye grammofon. Din Como Audio Turntable er blevet afsendt delvist demonteret
for at undgå beskadigelse.
Du bedes opbevare den originale emballage så du kan forsende den og transportere din
pladespiller sikkert i fremtiden, især hvis service nogensinde bliver påkrævet. Garantien
omfatter ikke skader der måtte opstå i forbindelse med forsendelse.
I KASSEN:
➢GRAMMOFON / PLADETALLERKEN / MÅTTE / STØVDÆKSEL
➢UNBRAKONØGLE x 2 (TIL MONTERING AF MODVÆGT OG PICKUP)
➢TO-PUNKTS JUSTERING AF PICKUP (HVIS MAN UDSKIFTER PICKUP)
➢15V / 0,8A UNIVERSEL STRØMFORSYNING
➢RCA TIL RCA AUDIOKABEL 1,2M
➢OPSÆTNINGSVEJLEDNING
➢45 OMDR./MIN. "ENKELT" ADAPTER
➢RCA TIL 3,5 mm KABELADAPTER (TIL BRUG MED COMO AUDIO AUX INPUT)
➢DRIVREM
DELE DIAGRAM:
1 Pladetallerken og måtte
2 Remskive
3 Drivrem
4 Tonearm modvægt
5 Tonearm løftestang
6 Tonearm holder
7 Tonearm
8 Headshell med fingerløft og formonteret Ortofon OM10 pickup med gennemsigtig
beskyttelseshætte
9 Støvdæksel
10 Støvdæksel hængsler
11 Fastgørelse af hængsler
DA

15
12 Lydudgange og indgang til ekstern strømforsyning
Illustrationer kan variere.
DA

16
MONTAGE
Montering af pladetallerken, drivrem og støvdæksel samt fjernelse af nålens dæksel
Monter den FLADE drivrem som vist i ovenstående illustration, sådan at den sidder omkring
ydersiden af underpladen og den øverste del af remskiven. Sæt ikke remmen over den nederste
del af remskiven. Placer den sorte metalplade over underpladen på pladespilleren og læg Como
Audio-filtmåtten oven på metalpladen for at beskytte dine plader. Placer hullerne bag på
støvdækslet over hængslerne på bagsiden af pladespillerens base og skyd støvdækslet forsigtigt
hen over dem. Tilslut den medfølgende eksterne strømforsyning til den bageste 15V / 0,8A
indgang.
> Fjern den gennemsigtige beskyttelseshætte under nålen inden afspilning! Opbevar hætten.
______________________________________________________________________________
Betjening, funktioner og forbindelser
1 TÆND-/SLUKKONTAKT (venstre side)
2 REMSKIVE
3 PHONO/LINE UDGANG, JORDFORBINDELSE
4 BLUETOOTH-KONTAKT (højre side)
5 HASTIGHEDSVÆLGER
6 POWER SUPPLY INPUT
______________________________________________________________________________
Illustrationer kan variere.
DA

17
1. Tænd-/sluk-knap (må ikke forveksles med Bluetooth-kontakten #4)
Tryk på tænd-/sluk-knappen i venstre side for at starte eller standse motoren. SØRG FOR AT
FJERNE DEN GENNEMSIGTIGE BESKYTTELSESHÆTTE UNDER NÅLEN INDEN AFSPILNING.
2. Remskive
Placer det medfølgende FLADE drivrem over den øverste del af remskiven som beskrevet
ovenfor under "Montering". Den nederste (brede) del af remskiven skal kun bruges til 78
omdr./min. hastighed sammen med en anden rem og nål. Se punkt #5 "Hastighedsvælger".
3. Line og Phono-udgange
Spring over dette afsnit og gå til punkt 5 nedenfor, hvis du tilslutter Como Audio Turntable trådløst
via Bluetooth.
Como Audio Turntable har to analoge udgange - LINE OUT med integreret phono-forforstærker og
PHONO OUT. Brug LINE OUT sammen med Aux-indgangen på din Como Audio-model eller et andet
musiksystems Aux-indgang. Hvis du forbinder pladespilleren med et Como Audio-system, kan du
ignorere jordledningen på RCA-kablet. Der medfølger en 3,5 mm adapter til at placere over den
ene ende af det medfølgende RCA-lydkabel til Como Audio-systemets Aux-indgang.
Brug PHONO OUT, hvis du foretrækker at bruge en ekstern phono-forforstærker eller tilslutter en
receiver eller en integreret forstærker med en dedikeret Phono-indgang. Sørg for, at phono-
indgangen giver korrekt matching og forstærkning for den anvendte type pickup. Hvis den eksterne
phono-forstærker eller receiver/integrerede forstærker har en jordforbindelse, kan du tilslutte
jordledningen (på det medfølgende RCA-kabel) fra den pågældende enhed til jordforbindelse på
bagsiden af Como Audio-drejebordet, hvis du oplever en brummende støj.
Sørg for at tilslutte højre og venstre kanals lydkabel korrekt. Højre kanal er normalt markeret med
rødt, den venstre kanal er sort eller hvid.
4. Bluetooth-kontakt
Du kan forbinde din Como Audio Turntable trådløst med en kompatibel Bluetooth-enhed. Hvis du
har en eller flere enheder, der automatisk kan oprette forbindelse via Bluetooth med dit Como
Audio-musiksystem, såsom en smartphone, skal du slukke for Bluetooth på disse enheder for at
undgå, at de opretter forbindelse, mens du tilslutter din Como Audio Turntable. Slå Como Audio
Turntables Bluetooth-kontakt (på højre side) til. Pladespillerens tænd-/sluk-kontakt behøver ikke
være tændt, kun Bluetooth-kontakten skal være tændt. Tænd for dit Como Audio-musiksystem
(eller et andet lydsystem) og indstil det til Bluetooth-tilstand ved at dreje på frontpanelets
kildeknap, indtil Bluetooth-ikonet er fremhævet, og tryk derefter på kildeknappen for at vælge.
Como Audio Turntable foretager pardannelse og opretter forbindelse til dit Como Audio
musiksystem. Indledende pardannelse kan tage flere minutter. Hvis pardannelsen ikke er
gennemført efter et par minutter, skal du slukke for Como Audio-pladespillerens Bluetooth-kontakt
i nogle sekunder, derefter tænde for den igen og vente et par minutter, før pardannelsen indledes.
Når pardannelsen er gennemført, hører du et bekræftelses-bip, og lydstyrken indstilles automatisk
til niveau 22. Efter den indledende pardannelse sker tilslutningen af Como Audio Turntable
automatisk hver gang Como Audio-systemet sættes i Bluetooth-tilstand.
For pardannelse med ikke-Como Audio systemer, se manualen til det givne produkt.
DA

18
For at genstarte pladespillerens Bluetooth-sender, skal du slå pladespillerens Bluetooth-kontakt
FRA og TIL. En genstart er normalt kun nødvendig, når du danner par med en ny enhed, eller hvis
Como Audio-modellen er blevet fabriksnulstillet.
Når du skifter fra Bluetooth til en anden kilde, skal du muligvis sænke lydstyrken, eftersom
Bluetooth automatisk kræver og indstiller et højere lydniveau end andre kilder.
For nemheds skyld giver Como Audio-systemet dig mulighed for at gemme Bluetooth som en
forudindstilling. Du skal blot trykke på en af frontpanelet forudindstillingsknapper og holde den
inde på din Como Audio-model, når den er i Bluetooth-tilstand. Tryk derefter kortvarigt på
forudindstillingsknappen for at skifte til Bluetooth-tilstand, selv hvis Como Audio-systemet er i
standby.
Vi anbefaler, at du lader Como Audio Turntables Bluetooth-kontakt være slået til, selvom
pladespilleren ikke bruges, for at sikre at der hurtigt oprettes forbindelse, når Como Audio-
musiksystemet indstilles til Bluetooth-tilstand.
Det er normalt, hvis man fortsat hører et par sekunders lyd gennem Como Audio-anlægget, efter at
have løftet tonearmen fri af pladen.
5. Afspilningshastighedsvælger
For at afspille plader med 33 eller 45 omdr./min. skal du trykke kortvarigt på
hastighedsreguleringsknappen nederst til venstre mens Como Audio Turntable er tændt. Den
valgte hastighed vises med den blinkende grønne LED. Når pladetallerkenen har nået fuld
hastighed, holder LED'en op med at blinke. Standardhastigheden er altid 33 omdr./min.
For at afspille plader med 78 omdr./min. skal du udskifte nålen med en Ortofon OM78
(medfølger ikke) og udskifte remmen med en rund rem, der føres rundt om den nedre del af
remskiven. Kontakt din forhandler eller Como Audio for at få flere oplysninger.
Bemærk: Som de fleste hifi-pladespillere er Como Audio Turntable manuel, hvilket betyder at
tonearmen skal anbringes manuelt på pladen, og når afspilningen af pladen skal afsluttes, skal man
løfte tonearmen manuelt ved hjælp af tonearmens løftegreb og placere den i holderen.
6. Strømindgang
Tilslut den medfølgende 15V eksterne strømforsyning til denne indgang på bagsiden. Flere
forskellige stik er inkluderet. Vælg det korrekte stik til din region, sæt stikkets fire ben i
strømforsyningen, og tryk ned på stikkets midte, mens du trykker stikket opad for at låse det fast.
DA

19
Udskiftning af nål
En beskadiget eller slidt nål kan beskadige dine plader og skal udskiftes. Nålen udskiftes ved at man
trækker den lige ud og i den modsatte retning af pladespillerens arm: Med den ene hånd skal du
tage fat i nålen fra begge sider og trække i den. Montering af den nye nål: Mens du holder den nye
nål fra toppen, skal du trykke den forsigtigt ind i det sted ved spidsen af pickuppen, hvor den gamle
nål sad. Brug ikke overdreven kraft. Hvis du ønsker at udskifte hele pickuppen, anbefaler vi på det
kraftigste, at du kontakter et lokalt professionelt servicecenter efter eget valg, da tonearmens
ledninger, der forbinder pickuppen, er meget følsomme og meget let knækker. Den medfølgende
unbrakonøgle kan bruges til at fjerne pickup fra headshell.
Placering, rengøring og andre forslag
Placer Como Audio Turntable på en plan, flad overflade, der ikke udsættes for vibrationer.
Tør om nødvendigt støvdækslet og plinten af med en blød klud.
Vi anbefaler, at du holder støvdækslet lukket under afspilning for at beskytte pladen og nålen.
Vi anbefaler endvidere, at du holder tonearmen fastlåst til holderen, når den ikke er i brug, for
at forhindre at armen ved et uheld flytter sig og beskadiger nålen.
Hold dine plader borte fra varme for at undgå at de bliver bøjede og opbevar dem i deres
respektive omslag for at beskytte dem.
Undgå at sætte en rengøringsbørste på tonearmen, da det ændrer den vægt, som modvægten
er forudindstillet til.
Vi anbefaler ikke brugen af en pladevægt-stabilisator, da det fører til ekstra belastning på
motoren.
___________________________________________________________________________
DA

20
Tekniske specifikationer: Como Audio Turntable
Nominelle hastigheder
33/45/78 omdr./min.; mikroprocessorstyret
Hastighedsvariation
33: ±0,65% 45: ±0,50%
Wow og flutter
33: ±0,18% 45: ±0,16%
Signal til støj
-66dB
Tonearmens effektive masse
8,0 g
Tonearmens effektive
længde
218,5mm
Overhæng
22,0mm
Strømforbrug
4,5W / I standby: Mindre end 0,5 W / Bluetooth tændt: 1W
Dimensioner (B x H x D)
420 x 112 x 330mm
Nominelle hastigheder
33/45/78 omdr./min.; mikroprocessorstyret
Tekniske specifikationer: MM-pickup Ortofon OM 10
Frekvensområde
20Hz-22kHz
Kanalseparation
22dB/1kHz
Udgangsspænding
4mV
Anbefalet
belastningsimpedans
47kohm/forstærker tilslutning –MM-input
Overensstemmelse/nål-type
20µm/mN –elliptisk
Anbefalet sporingskraft
15mN
Vægt
5g
Tekniske specifikationer: Integreret MM Phono forforstærker
Gain
Udgangsspænding
200mV/1kHz ved 5mV/1kHz input
Indgangsimpedans
47kohm/100pF
Grundstøj
-68dB
RIAA EQ kurve nøjagtighed
20Hz-20kHz/maks. 0.5dB
Tekniske specifikationer: Ekstern strømforsyning
Model ZZU1001-080150
Indgang 100-240V / 50-60Hz
Udgang 15V / 0,8A
DA
Table of contents
Languages:
Other COMO AUDIO Turntable manuals