Compac Furniture CUBO CUB-CU128-FP User manual

Job No: 163507
The CUBO Collection
CUB-CU128-FP
Stash, store and show off in style!
Congratulations on the purchase of your CUBO unit.
Make life simple with the ultra-versatile Cubo collection. Display, store, divide spaces, and more with this multi-
functional range.
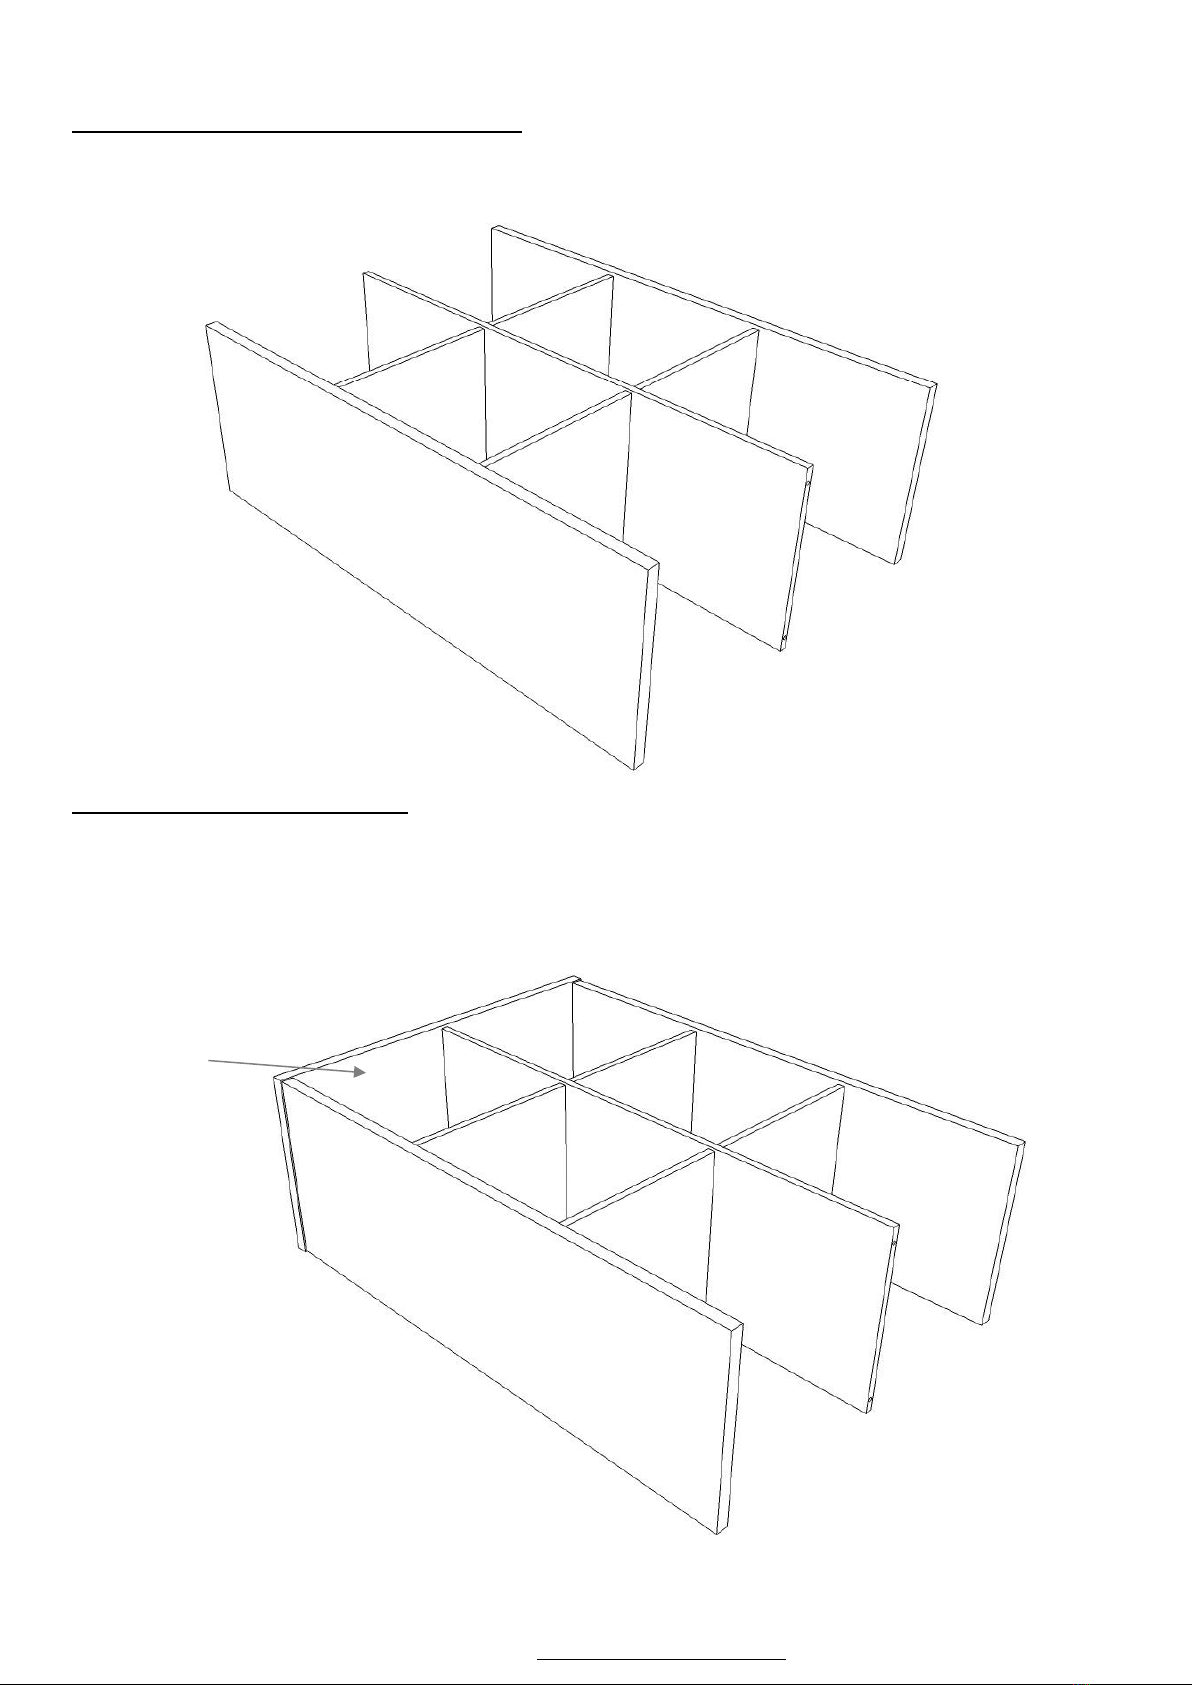
Solidly built with a unique interlocking design for rigidity, the Cubo collection has a clever open back panel so it can
be placed against a wall or freestanding as a smart room feature. Cubo stands out from the crowd with several other
smart features –a small removable glide foot makes transportation and cleaning easier, and the matching felt
storage boxes are made to fit neatly into the cavities for simple storage. With a 10 year guarantee it’s a popular style
for good reason, so make a solid choice in Cubo. The felt storage boxes are a generous size, measuring 350 x 350 x
350mm, and are available in grey, orange, green, pink, yellow, blue, red, black and white.
If you have any questions please email info@platform10.co.nz or call 0800 7 10 10 10.
WHERE TO ASSEMBLE YOUR CUBO UNIT
Assemble your CUBO on a clean and smooth surface, free of anything which may damage the finished surfaces. A
clean, carpeted floor is ideal. If assembling on a workbench or table we suggest you cover it with the carton the unit
was packaged in.
Warning! Never leave hardware parts where children can reach them. Small parts may be a choking hazard!
Do not allow children to climb on the unit as this can cause the unit to tip. Compac Furniture can take no
responsibility for damage or injury caused by climbing, sitting, or standing on the unit in any way.
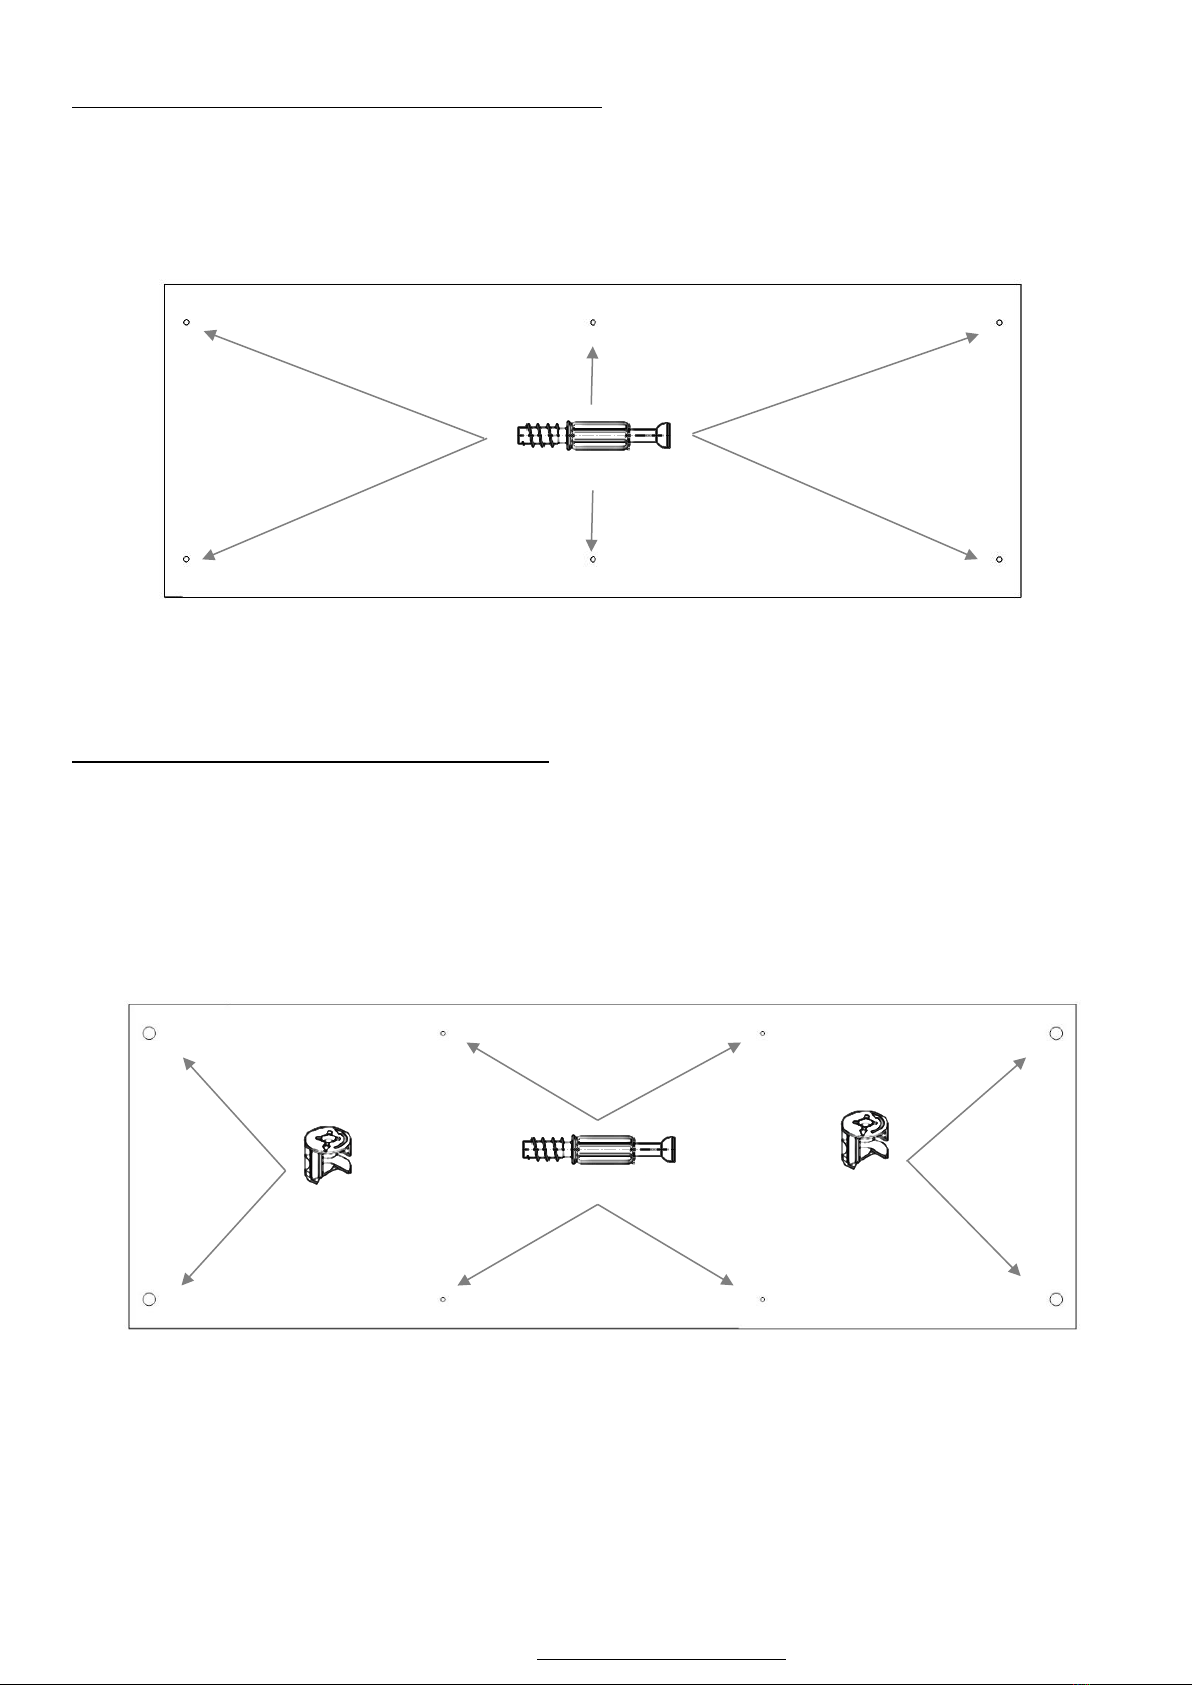
TOOLS REQUIRED:
•Size 2 Pozi-screwdriver or simple battery screwdriver.
•Hammer
10 YEAR GUARANTEE
The Cubo Collection carries a 10 year guarantee against defective material or workmanship, excluding misuse and
normal wear and tear. Obviously, as this unit is customer-assembled we cannot guarantee cabinet failure or
damage from incorrect assembly. All claims need proof of purchase –to ensure this register your CUBO unit at
www.platform10.co.nz.
Follow the assembly instructions carefully and take note of the precautions below.
•Avoid direct sunlight wherever possible.
•Keep cabinet in a dry place.
•Wipe off spilt liquids immediately.
•Avoid placing hot items directly on the surface.
•To clean, wipe with a clean, slightly damp cloth and buff dry with a soft dry cloth - microfibre is ideal.
•Do not allow nail polish, removers, deodorant or other damaging chemicals to come into contact with
the surface.

CUBO CUB-CU128-FP 2
For assembly advice or parts go to www.compacfurniture.co.nz or call 0800 100 858
PARTS LIST
Please check you have all the necessary parts before beginning to assemble your CUBO unit. If any parts are missing or
damaged please contact the manufacturers directly, either via our website or our 0800 number.
QTY
PART
DIMENSIONS
NOTES
2
Top/Base
811W x 396D x 25mmH
Top and Base are interchangeable
2
Ends
1140W x 390D x 25mmH
LH and RH Ends are interchangeable
1
Vertical Shelves
1140W x 379D x 25mmH
2 x Grooves
2
Horizontal Shelves
755W x 379D x 15mmH
Grooved - interchangeable
1
Back Panel
370W x 370D x 15mmH
HARDWARE LIST
PART
CODE
QUANTITY
Connecting Bolts
H1
20
Large Cams
H2
20
36mm Woodscrews
H10
5
Black Plastic Feet
H37
5
Rafix Fitting
H33
4
Rafix Bolt
H34
4
White Cam Covers
H48
32
CAM INSTALLATION & OPERATION GUIDE
The Cam and Connecting Bolt system is used to put your unit together.

CUBO CUB-CU128-FP 3
For assembly advice or parts go to www.compacfurniture.co.nz or call 0800 100 858
STEP ONE: Install Hardware in TOP and BASE
•Lay the TOP and the BASE on a clean clear surface with the holes facing UPWARDS.
•Install six H1 CONNECTING BOLTS in the holes in the TOP and the BASE as shown below. These two parts
are identical, so you don’t need to worry about mixing them up.
……………….
STEP TWO: Install Hardware in the ENDS
•Take the ENDS and lay them with the holes facing UPWARDS.
•Install four H2 CAMS in each END. Ensure that the arrow on the top of each Cam points to the unfinished
edge.
•Install four H1 CONNECTING BOLTS in each END as shown below:
H1 Connecting Bolts
H2 Cams
H2 Cams
H1 Connecting Bolts

CUBO CUB-CU128-FP 4
For assembly advice or parts go to www.compacfurniture.co.nz or call 0800 100 858
STEP THREE: Install Hardware in the SHELVES
•Take the SHELVES and lay them with the holes facing UPWARDS.
•Install four H2 CAMS in each SHELF. Ensure that the arrow on the top of each Cam points to the unfinished
edge.
……………….
STEP FOUR: Install Hardware in the BACK PANEL
•Take the BACK PANEL and lay it with the holes facing UPWARDS.
•Install four 33 RAFFIX FITTINGS into the BACK PANEL. Ensure that the Open End of the RAFIX FITTING is
facing the edge of the BACK PANEL. You may need a hammer to tap these into place. Ensure they are
straight.
H2 Cams
H2 Cams
H33 Rafix
Fitting

CUBO CUB-CU128-FP 5
For assembly advice or parts go to www.compacfurniture.co.nz or call 0800 100 858
Now we can put it all together…………………….
STEP FIVE: Attach Horizontal SHELVES to the 1st END
•Take an END and two SHELVES (Note, all shelves, horizontal or vertical, are identical).
•Connect the H1 CONNECTING BOLTS installed in the End to the H2 Cams installed in the Shelves as shown
below. Ensure that the Groove in the Shelf is facing upwards.
•Turn the H2 Cams installed in the Shelf in a clockwise direction to lock the End and the Shelf together.
These should turn at least a ½ to a ¼ turn.
STEP SIX: Attach the 2nd END
•Take the other END
•Connect the H1 CONNECTING BOLTS installed in this 2nd END to the H2 CAMS installed in the SHELVES as
shown below.
•Turn the H2 Cams installed in the Shelves in a clockwise direction to lock the End and the Shelf together.
These should turn at least a ¼ to a ½ turn.
End
Shelf
Shelf

CUBO CUB-CU128-FP 6
For assembly advice or parts go to www.compacfurniture.co.nz or call 0800 100 858
STEP SEVEN: Attach vertical SHELVES
•Take the remaining two SHELVES
•Fit the grooves in the vertical Shelf over the grooves in the Horizontal Shelves as shown below.
STEP EIGHT: Attach the TOP
•Take one of the TOP/BASE components
•Fit the H1 CONNECTING BOLTS installed in the TOP to the H2 CAMS installed in the ENDS and SHELVES
as shown below.
•Turn the H2 Cams in a clockwise direction to lock the Top and the Ends and Shelves together. These should
turn at least a ¼ to a ½ turn.
Top

CUBO CUB-CU128-FP 7
For assembly advice or parts go to www.compacfurniture.co.nz or call 0800 100 858
STEP NINE: Attach the BASE
•Take the BASE
•Fit the H1 CONNECTING BOLTS installed in the Base to the H2 CAMS installed in the ENDS and SHELF as
shown below.
•Turn the H2 Cams in a clockwise direction to lock the Base and the Ends and Shelf together. These should
turn at least a ¼ to a ½ turn.
STEP TEN: Attach the FEET
•Screw the H37 Feet to the BASE as shown below.
•
NOTE: These feet are optional, to make cleaning and shifting of the unit easier, and can be left off if preferred.
However, we cannot cover damage caused to the base of the unit if the feet are left off.
Base

CUBO CUB-CU128-FP 8
For assembly advice or parts go to www.compacfurniture.co.nz or call 0800 100 858
STEP ELEVEN: Attach Back Panel
•Your Cubo Unit has one BACK PANEL that can be added for extra stability. This can be placed at the back of
any of the outside corner cubes on your Shelving unit. Once you have decided in which Cube to place the
Back Panel, screw the H34 RAFIX BOLTS into the four holes in the Cube as shown below.
•Fit the Back Panel as shown below. The Rafix Bolts will fit into the RAFIX FITTINGS installed in the Back
Panel.
•Tighten the screws on the backs of the RAFFIX FITTINGS.
STEP TWELVE: Cover the CAMS and Holes
•Using the White Stickers provided, cover the cams and remaining holes.
H34 Rafix Bolts
Table of contents
Other Compac Furniture Indoor Furnishing manuals
Popular Indoor Furnishing manuals by other brands

Whittier Wood
Whittier Wood 1995DUET Assembly instructions

Dorel Home Products
Dorel Home Products 4073449 manual

Manhattan Comfort
Manhattan Comfort 27900 Assembly instructions

Walker Edison
Walker Edison W584DHDHB Assembly instructions

Cosmopolitan
Cosmopolitan COSMOLiving DA8170-02 Assembly instructions

Coaster
Coaster 120577 Assembly instructions