Compac Furniture Tyler FTL5 User manual

Job No 35387
TYLER 5 DRAWER LINGERIE CHEST
Congratulations on your purchase of your 5 DRAWER LINGERIE CHEST.The TYLER Collection is made in
New Zealand from 100% New Zealand made MDF –an environmentally sound and renewable resource.
If you require any parts or assembly advice or have any questions please go to
www.farmersfurniture.co.nz or call us direct on 0800 100 858.
WHERE TO ASSEMBLE YOUR LINGERIE CHEST
Assemble your unit on a clean and smooth surface, free of anything which may damage the laminated
surface. A carpeted floor is ideal. If assembling on a workbench or table we suggest you cover it with the
carton the unit was packaged in.
Warning! Never leave hardware parts where children can reach them. Small parts may be a choking
hazard!
PARTS LIST
Please check you have all the parts before beginning to assembling your cabinet. The measurements will
help you identify each part. If any parts are missing or damaged please contact us directly for replacements
and advice. Do not call the store you bought the cabinet from as they will be unable to help you. Note: You
will find two pieces of board fitted across the ends of the package. These are for packing purposes only and
are not part of the cabinet.
QTY
PART
MEASUREMENTS
NOTES
1
Top
450 x 396 x 25mm
Black laminate finish - Blue mark
1
Base
450 x 396 x 25mm
Black laminate finish - Purple mark
1
LH End
1154 x 388 x 25mm
Black laminate finish both sides - Green mark
1
RH End
1154 x 388 x 25mm
Black laminate finish both sides - Red mark
1
Rail
384 x 80 x 15mm
Plain MDF
1
Top Drawer Front
378 x 195 x 15mm
Black laminate finish
4
Drawer Fronts
378 x 235 x 15mm
Black laminate finish
5
LH Drawer Sides
340 x 160 x 12mm
Plain MDF 12mm - Green mark
5
RH Drawer Sides
340 x 160 x 12mm
Plain MDF 12mm - Red mark
5
Drawer Backs
334 x 155 x 12mm
Plain MDF 12mm
5
Drawer Bottoms
344 x 339 x 4mm
Plain MDF 4mm
1
Back Panel
1174 x 404 x 4mm
Plain MDF 4mm

TYLER Five Drawer Lingerie Chest - FTL5 2
For assembly advice or parts go to www.farmersfurniture.co.nz or call 0800 100 858
HARDWARE LIST
QTY
PART
CODE
16
Connecting Bolts
H1
6
Large Cams
H2
10
Small Cams
H3
20
Drawer Slide Screws
H4
4
Large Screws
H5
20
Small Woodscrews
H6
24
31mm Wood screws
H9
16
Dowels
H15
4
Black Plastic Feet
H16
5
Set of metal drawer slides
H21
1
Bag of small Nails
H27
5
TYLER Handles & Handle
Screws

TYLER Five Drawer Lingerie Chest - FTL5 3
For assembly advice or parts go to www.farmersfurniture.co.nz or call 0800 100 858
COLOUR CODING
To help identify the parts, the main components are colour coded with a pen mark on the back edge of the panel.
(The edge without any laminate on it.)
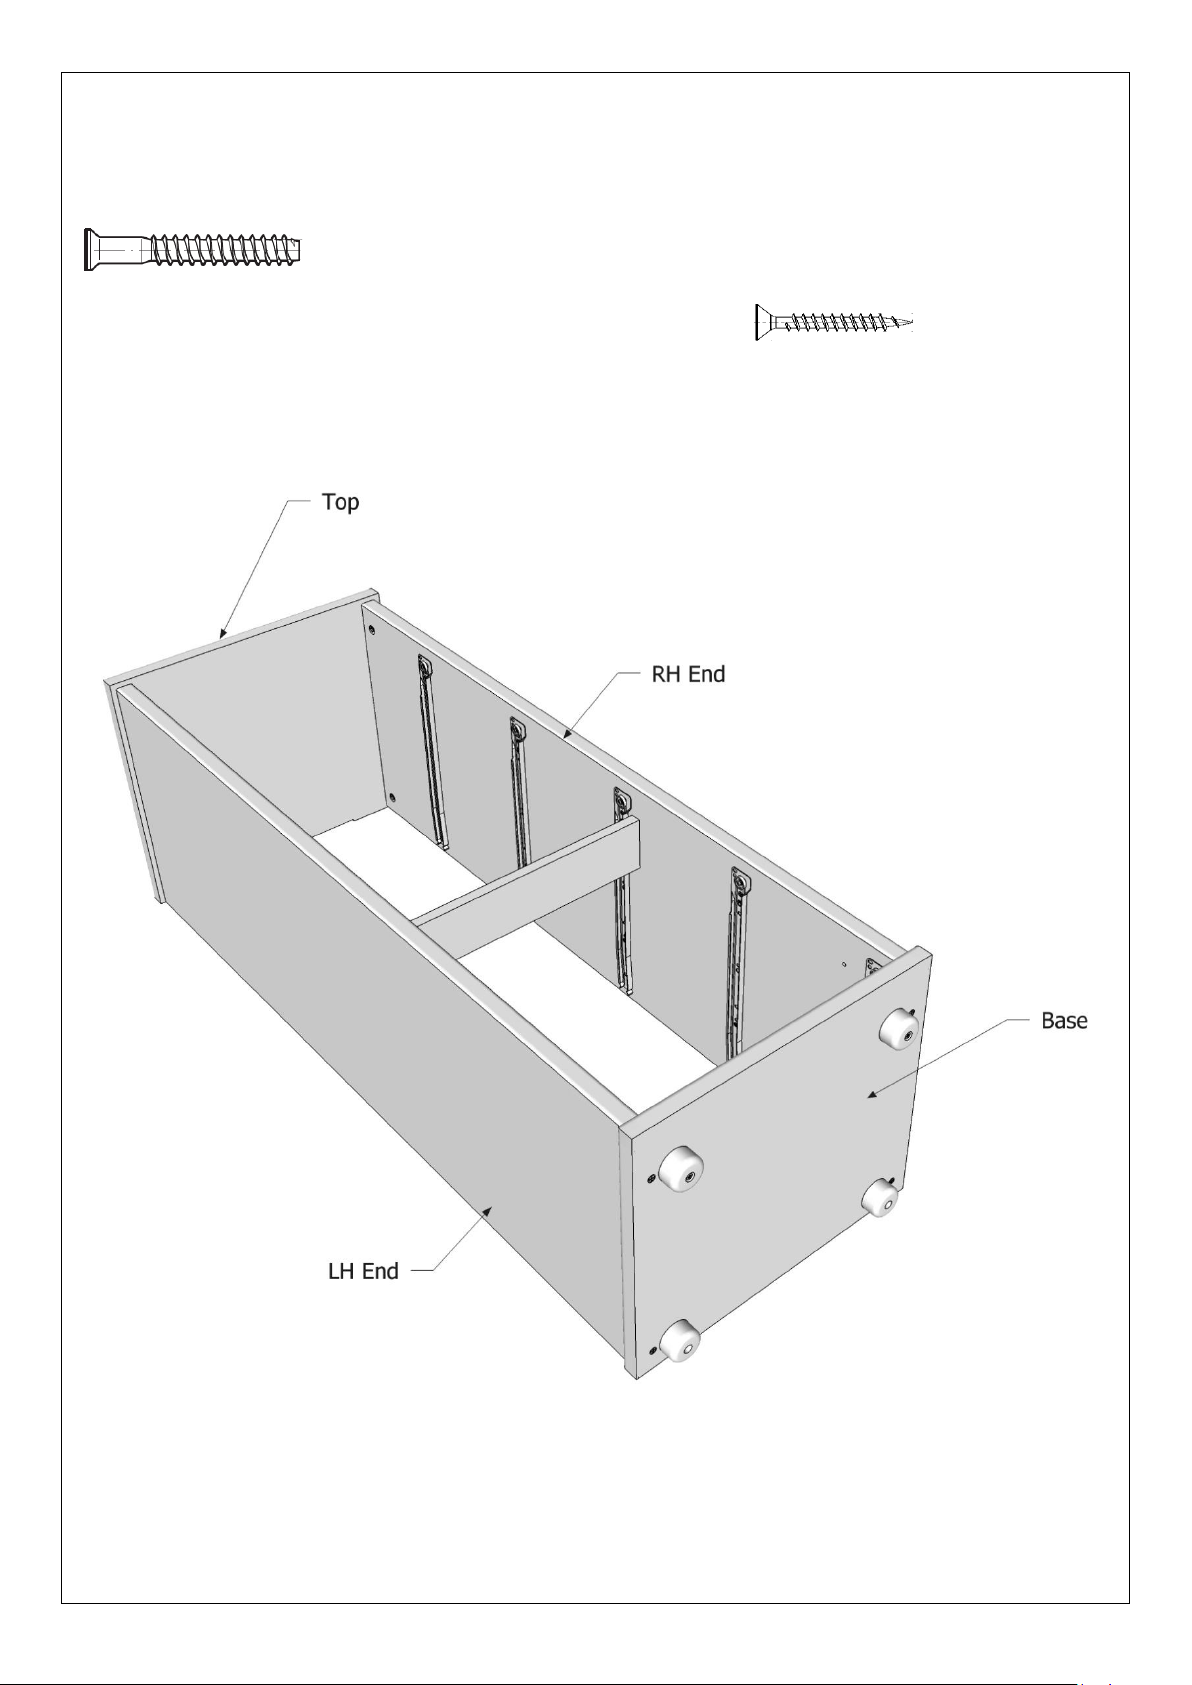
RED Right Hand Parts. (E.g. RH End, RH Drawer Side.)
GREEN Left Hand Parts. (E.g. LH End, LH Drawer Side.)
BLUE Tops
PURPLE Bases
5 YEAR WARRANTY
This furniture carries a 5 year warranty against defective material or workmanship, excluding misuse and normal
wear and tear. Obviously, as this unit is customer-assembled we cannot guarantee cabinet failure or damage from
incorrect assembly. All claims need proof of purchase –to ensure this register at www.farmersfurniture.co.nz.
Follow the assembly instructions carefully and take note of the precautions below.
■Avoid direct sunlight wherever possible.
■Keep cabinet in a dry place.
■Wipe off spilt liquids immediately.
■Avoid placing hot items directly on the surface.
■Clean with a soft cloth.
■Do not allow nail polish, removers, deodorant etc. to come into contact with the surface.
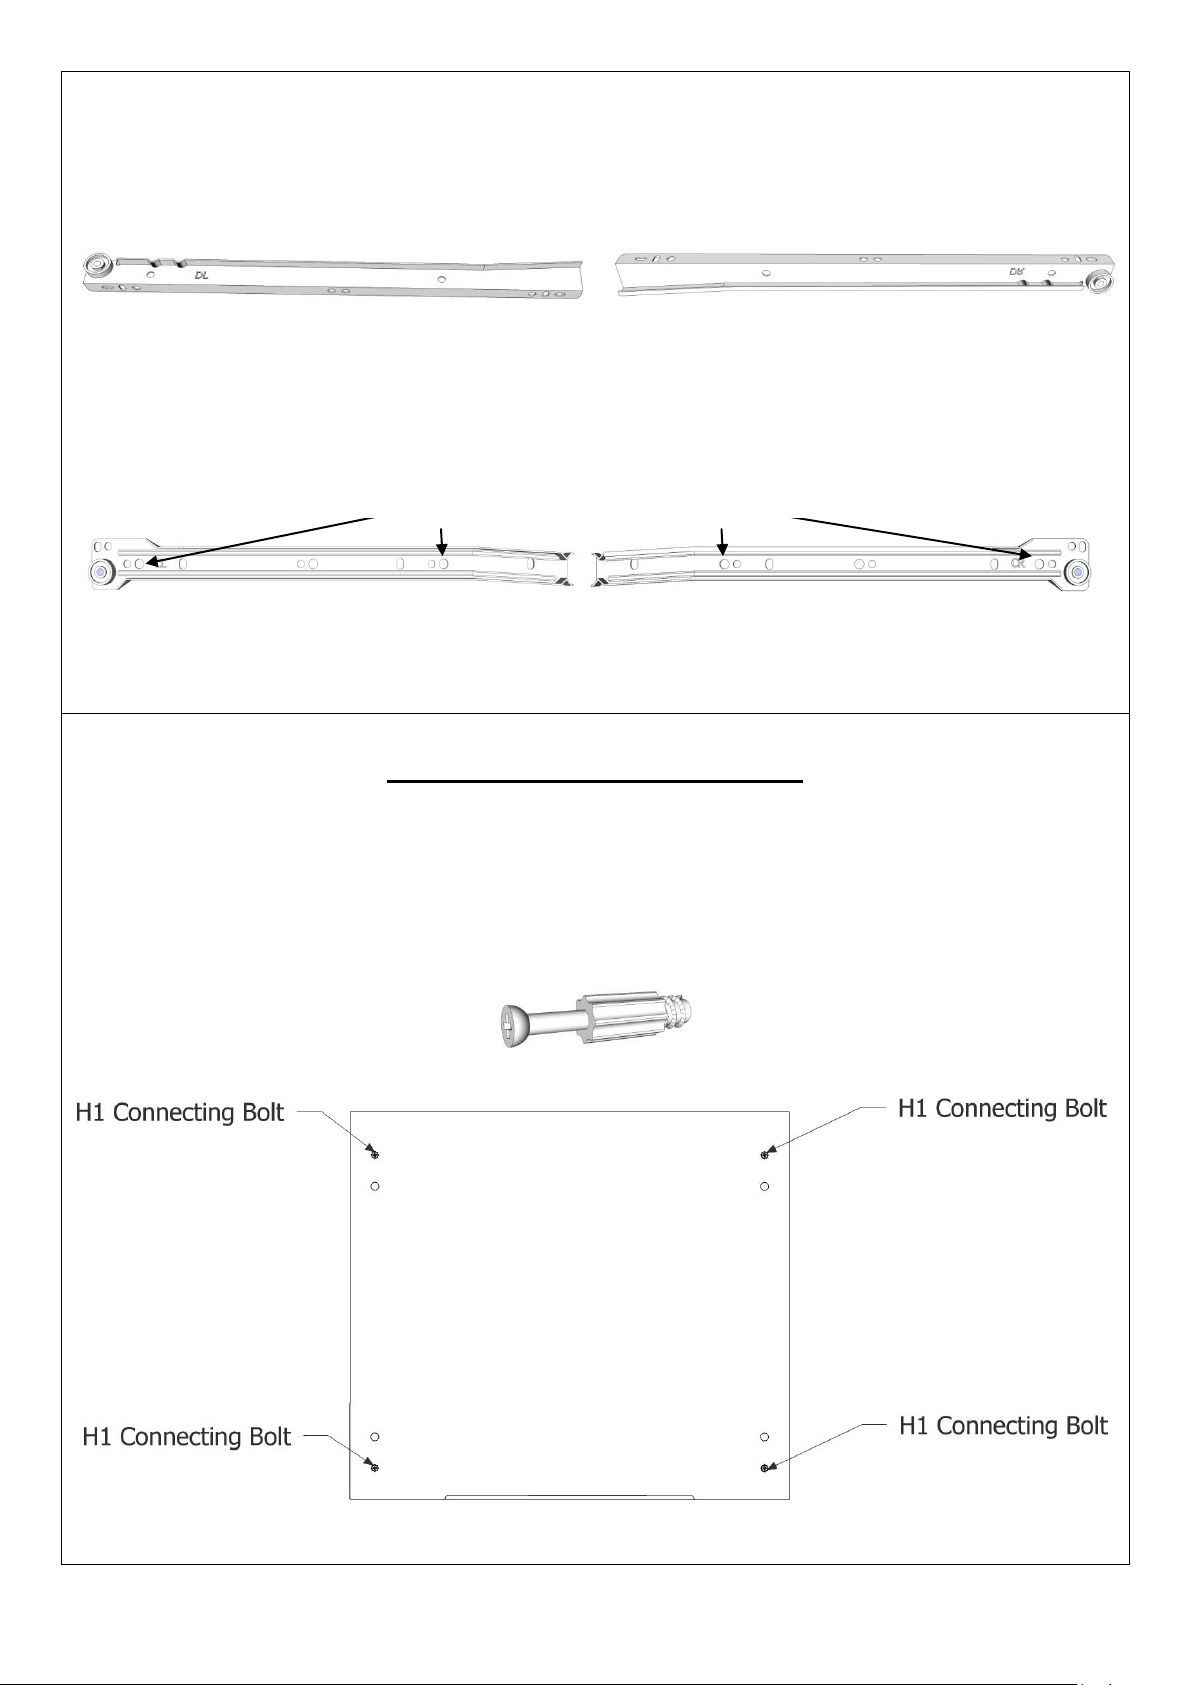
CAM INSTALLATION & OPERATION GUIDE
The Cam and Connecting Bolt system is used to put your unit together. Below is an explanation of how this system
works. To see a demonstration go to the assembly assistance tab on www.farmersfurniture .co.nz.

TYLER Five Drawer Lingerie Chest - FTL5 4
For assembly advice or parts go to www.farmersfurniture.co.nz or call 0800 100 858
DRAWER SLIDES GUIDE
Your pack will contain five sets of Metal Drawer Slides. These are bundled together with adhesive tape.
Each set comprises of 4 components. Undo the tape on one set at a time and separate the parts into four
piles.
LEFT HAND PART (DL) RIGHT HAND PART (DR)
The Drawer Slide components shown above are attached to the drawers. They have the letters DR or DL
stamped on them to indicate left hand or right hand components. Put these parts aside for attaching to the
drawers later on.
LEFT HAND PART (CL) RIGHT HAND PART (CR)
The Drawer Slide components shown above are to be attached to the cabinet. They have letters CR or CL
stamped on them to indicate left hand or right hand components.
INSTALL THE HARDWARE
STEP 1
Lay the Top laminate side down, on a smooth clean surface.
Screw four H1 Connecting Bolts in the holes as indicated in the drawing below.
Use these holes

TYLER Five Drawer Lingerie Chest - FTL5 5
For assembly advice or parts go to www.farmersfurniture.co.nz or call 0800 100 858
STEP 2
Take the LH End and lay it on a clean, clear surface with the holes facing upwards.
Take the five LH Cabinet Drawer Slides (stamped CL) and screw it to the LH End using the H4 Drawer Slide
Screws. Use the holes as indicated in the diagram below - each slide requires two screws.
Insert two H2 Large Cams as indicated. Make sure the arrow on top of the cam points towards the top
edge of the End.
Push two H15 Dowels into the top edge of the End as indicated below.
Screw one H1 Connecting Bolt into the hole as indicated in the drawing below
H4 H2 H15 H1
Front Edge

TYLER Five Drawer Lingerie Chest - FTL5 6
For assembly advice or parts go to www.farmersfurniture.co.nz or call 0800 100 858
STEP 3
Repeat previous step with the Right Hand End.
H1 H4 H2 H15
STEP 4
Insert two H15 Dowels into the end of the Rail and two H2 Large Cams as indicated below.
Ensure the arrow on the top of the cam points toward the edge of the rail with the Dowel in it.
Front Edge

TYLER Five Drawer Lingerie Chest - FTL5 7
For assembly advice or parts go to www.farmersfurniture.co.nz or call 0800 100 858
ASSEMBLE THE CABINET
STEP 1
Lay the LH End on a clean and clear surface.
Fit the Rail to the LH End - the cam should face up to the top of the unit. The Connecting Bolt in the End
will fit up into the Cam in the Rail.
Turn the Large Cam in a clockwise direction to lock the Rail to the End. NOTE: Ensure the Cam turns a least
a ¼ to ½ a turn.
To see a demonstration of how the cam and connecting bolt works go to www.farmersfurniture and to the
assembly assistance tab at the top.
Front Edge

TYLER Five Drawer Lingerie Chest - FTL5 8
For assembly advice or parts go to www.farmersfurniture.co.nz or call 0800 100 858
STEP 2
STEP 3
Stand the LH End with the Rail
attached onto its back edge.
Attach the RH End to the Rail. Turn
the Cam to lock the End to the Rail.
Attach the Top to the Ends.
The Connecting Bolts in the Top
will fit down into the Cams in the
Ends.
Tighten the Cams to lock the Top to
the Ends. Ensure the Cams turn at
least a ¼ to ½ a turn.

TYLER Five Drawer Lingerie Chest - FTL5 9
For assembly advice or parts go to www.farmersfurniture.co.nz or call 0800 100 858
STEP 4
Attach the Base using the four H5 large Screws. Ensure the laminated side of the Base faces into inside of
the unit.
Next attach the H16 Black Plastic Feet using four H9 Woodscrews
The holes for the feet are predrilled.

TYLER Five Drawer Lingerie Chest - FTL5 10
For assembly advice or parts go to www.farmersfurniture.co.nz or call 0800 100 858
STEP 3
Lay the unit on its front edge - make sure the surface is clean and clear of anything that may damage the
Black finish. Fit the Back Panel into place - make sure the Back panel is square and Ends do not bow
outwards otherwise the drawers will not run properly.
Nail the Back Panel in place with the Small Nails provided. Space the nails about 10 to 15 cm apart.
Stand the cabinet upright.

TYLER Five Drawer Lingerie Chest - FTL5 11
For assembly advice or parts go to www.farmersfurniture.co.nz or call 0800 100 858
ASSEMBLE THE DRAWERS
Your TYLER Lingerie Chest has five drawers - one narrow top drawer and four bottom drawers. All drawers
are made up of the same parts and therefore are constructed in the same way. To see a demonstration of
how to put drawers together go to the assembly assistance tab at www.farmersfurniture.co.nz.
STEP 1
Install the hardware as shown below.
Note: Be sure that the arrow on the Cam points to the end of the drawer side nearest it.
H15 Dowel H3 Small Cam H1 Connecting Bolt

TYLER Five Drawer Lingerie Chest - FTL5 12
For assembly advice or parts go to www.farmersfurniture.co.nz or call 0800 100 858
STEP 2
Lay the Drawer Front face down on a smooth, clean surface.
Attach the LH and RH Drawer Sides by fitting them down into place over the Connecting Bolts installed in
the Drawer Front.
Turn the H3 Small Cams clockwise to lock the Drawer Sides in place.
Next slide the Drawer Bottom into place in the grooves in the Drawer Sides and Drawer Front.
Fit the Drawer Back into place between the Drawer Sides and secure with four H9 Woodscrews as shown
below.
H9 Woodscrew

TYLER Five Drawer Lingerie Chest - FTL5 13
For assembly advice or parts go to www.farmersfurniture.co.nz or call 0800 100 858
STEP 3
Turn the drawer upside-down as shown and attach the Drawer Slides (DR and DL) with the four H6 Small
Screws as shown below. Each slide requires two screws. The DL goes on the LH Drawer Side and the DR
goes on the RH Drawer Side.
To see a demonstration of how to attach the drawers slide to the drawer go to the assembly assistance tab
at www.farmersfurniture.co.nz
H6 Small Screw
STEP 4
Turn the drawer over.
Attach the Drawer Handle using the screw provided with
the Handle.
Fit the drawers into the cabinet. Start with the top drawer
and work your way down.
CONGRATULATIONS, YOUR TYLER FIVE DRAWER
LINGERIE CHEST IS NOW COMPLETE.
THANK-YOU FOR SUPPORTING NEW ZEALAND MADE
FURNITURE
Angle the drawer slightly
to ensure that the wheel at
the back of the drawer
slide goes behind the front
wheel on the cabinet slide.
Then lift the drawer up and
slide it into the channel of
the drawer slide attached
to the cabinet.

TYLER Five Drawer Lingerie Chest - FTL5 14
For assembly advice or parts go to www.farmersfurniture.co.nz or call 0800 100 858
Add to your collection….
To view full range go to…
www.farmersfurniture.co.nz
Table of contents
Other Compac Furniture Indoor Furnishing manuals
Popular Indoor Furnishing manuals by other brands

Manutan
Manutan A131659 user guide

Hay
Hay KORPUS Series quick start guide

Harbor Freight Tools
Harbor Freight Tools PITTSBURGH AUTOMOTIVE 91200 Owner's manual & safety instructions

Whalen
Whalen Sonoma Ridge Desk instruction manual

Tchibo
Tchibo 353 412 Assembly instructions

Argos
Argos Metal Highsleeper Wardrobe 151/5680 Assembly instructions

Storage 4 Crafts
Storage 4 Crafts storeaway Knighthayes Edition 2.0 Assembly instructions

Sauder
Sauder 413852 manual

LDI Spaces
LDI Spaces SAFCO Pnyx 5211 Assembly instructions

Delta Children
Delta Children Simmons Kids Augusta Dresser manual

FourStar
FourStar 11225119 Assembly instructions

Evidencia Moveis
Evidencia Moveis 205/051 Assembly instructions