COMPANION DC100-09 User manual

Part No. DC200-09
Double Burner Wok Cooker
Part No. DC100-09
Single Burner Wok Cooker
AS 2658:2008
Cert. GSCS20069
SAI Global
AS 2658:2008
Cert. GSCS20054
SAI Global
AS 2658:2008
Cert. GSCS20055
SAI Global
AS 2658 1988
Cert. GSCS20063
SAI Global
AS 2658 2008
Cert. GSCS20063
SAI Global
AS 2658 2008
Cert. GSCS20108
SAI Global
AS 2658 2008
Cert. GSCS20148
SAI Global
AS 2658 2008
Cert. GSCS20148
SAI Global
AS 4551-2008
Cert. GSCS20131
SAI Global
Wok Cookers Instruction Manual
IMPORTANT
It is IMPORTANT that you read these instructions
carefully and understand the operation and safety
features of this appliance. Familiarise yourself with the
appliance before connecting it to its gas container.
Keep these instructions for future reference.
companionleisure.com.au

GENERAL WARNINGS
• This appliance shall only be connected
to cylinder with a 3/8” LH BSP gas cylinder
valve certied to AS2469 standards.
This appliance is designed for outdoor use only
and must be operated away from any ammable
material or surfaces and materials.
• This appliance is to be stored in a dry and well
ventilated location free from direct sunlight.
Do not store when still connected to the cylinder.
Make sure that the cylinder is disconnected and
is stored in a well ventilated area, free from direct
sunlight, heat and ignition sources. If being stored
indoors insure that the location complies with the
standard AS/NZS1596.
• This appliance must only be serviced by an
authorised service agent, return to your place
of purchase for service and repair.
DANGER!
• Do not use or store ammable materials in the
appliance storage drawer or near the appliance.
• Do not spray aerosols in the vicinity of this
appliance while it is in operation
• Do not modify this appliance
• During operation all surfaces and the glass will be
extremely hot and should not be touched
or handled.
• Do not use the appliance if it has a leak, worn,
deteriorated or damaged seals.
• Handle with care even after brief use, always pick
up using the handle not the cylinder.
• It may be hazardous to attempt to t other types
of gas containers or cartridges.
• Use only in well ventilated areas.
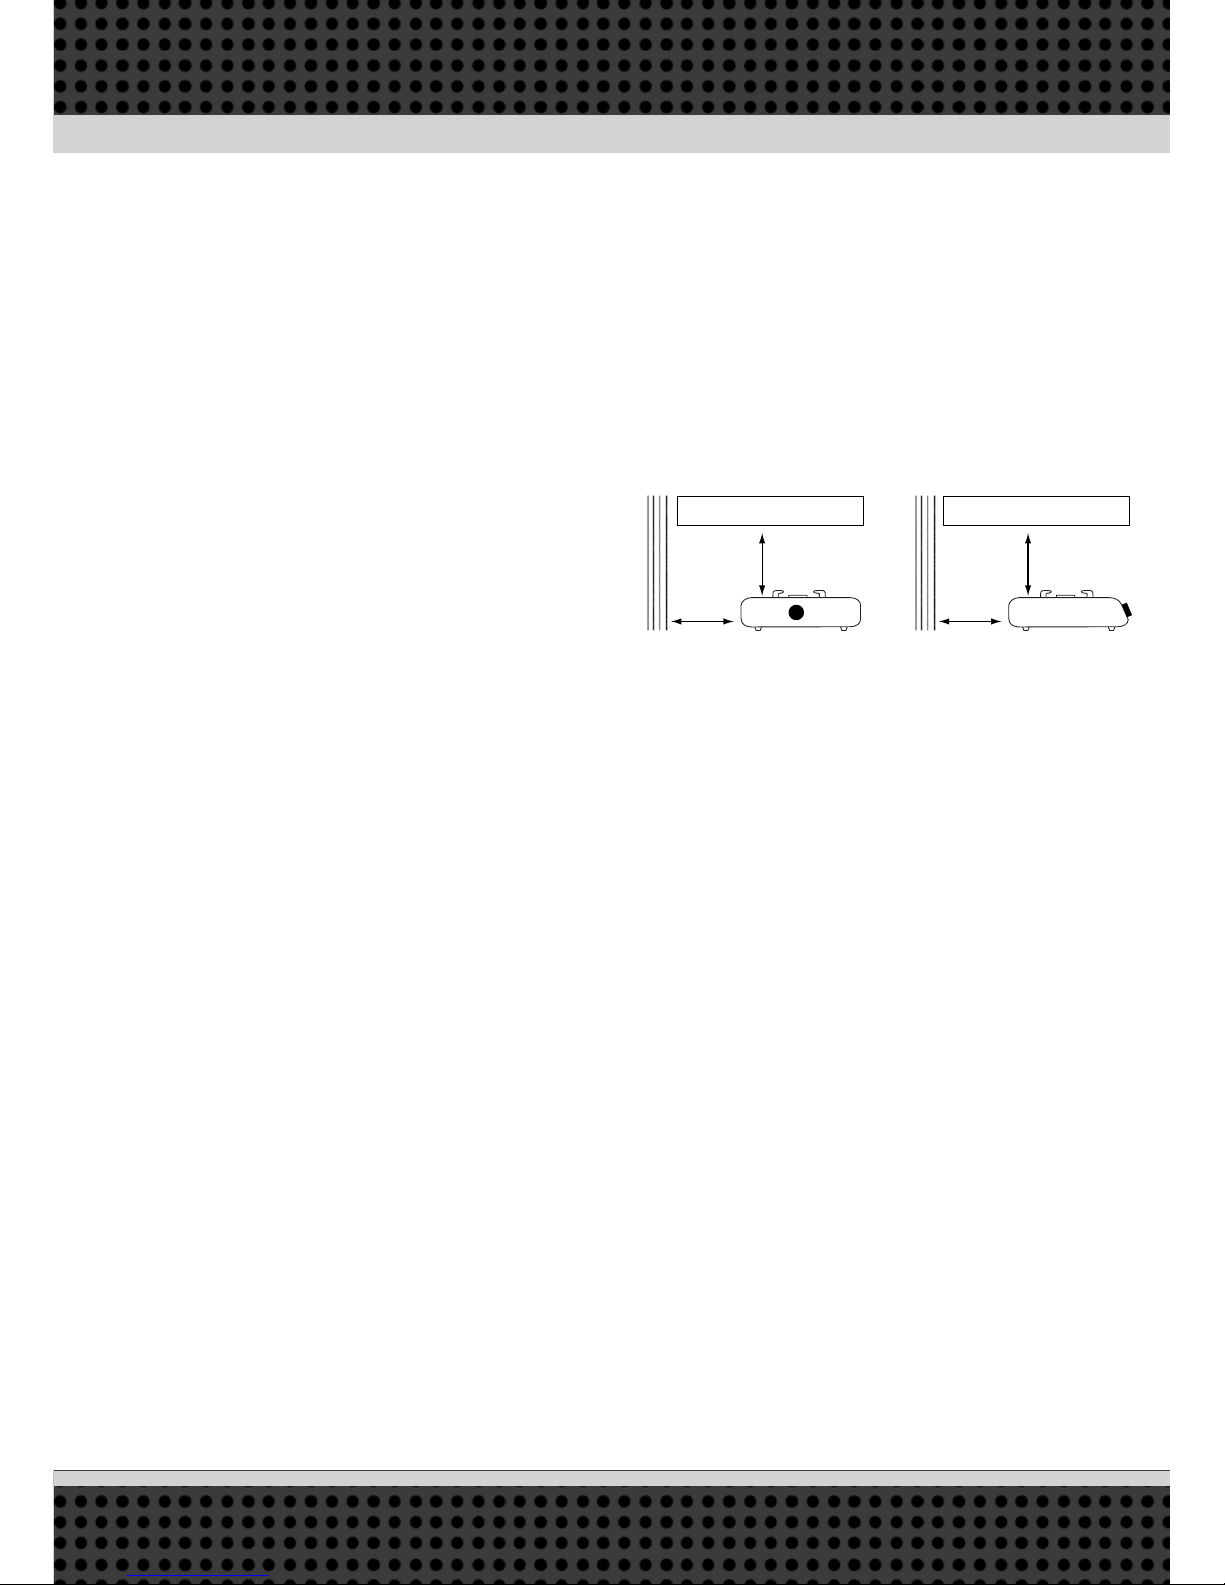
• Always operate appliance a minimum of 800mm
from ammable materials, walls and ceiling.
• Do not use adaptors or modify appliance to t
other connectors or cylinders.
• Children must be supervised by an adult at
all times.
• Never leave appliance unattended when operating.
• Do not use as a cooking appliance or modify for
any other reason.
IMPORTANT
• Keep away from children at all times.
• Surfaces of the appliance will become hot during
operation please take care when handling or
moving the appliance.
• Appliance is to be used on a stable, level, at
non-ammable surface, the appliance should
be protected from direct drafts and in a well
ventilated place.
• Take care that the primary air intakes, located
on the burner tube of this appliance, are not
obstructed or that the air ow restricted by the
placing of items or other appliances close to or
adjacent to the inlets.
•
If you smell gas immediately turn the gas off at the
cylinder and move the appliance and cylinder to a
well ventilated area outside, keeping well away from
sources of heat such as naked ames and pilot lights.
• Do not attempt to move or relocate the appliance
when it is operating. Extinguish the burner and
allow to cool, disengage the gas cylinder then
move the appliance.
CHECKING FOR GAS LEAKS
• Check that all connections are tight and that
the gas cylinder connection has been tightened
before you turn the cylinder gas valve on.
• NEVER check for leaks with a ame or pilot light.
• Using soapy water coat all connections, if
bubbles appear turn the cylinder gas control off
and retighten the connection before re-testing.
• Inspect the appliance regularly for signs of wear,
leaks or incorrect operation. If symptoms such
as aring of the burners, issues with lighting,
damages to hoses or connections or leaks from
seals or gas controls are identied do not attempt
to repair, return to your authorised stockist for
service and maintenance.
• To check if gas remains in the cylinder,
disconnect from the appliance and hold the
cylinder in a vertical position then shake from
side to side, if there is a sound or feel of liquid
movement inside the cylinder contains gas.
• When changing gas cylinders ensure this is
conducted outside in a well ventilated location
free from people, animals and ignition sources
such as naked ames, pilot lights and electrical
equipment with heaters or elements.

companionleisure.com.au
SAFETY INSTRUCTIONS
This appliance must only be used in an above ground open air situation with natural ventilation,
without stagnant areas, where gas leakage is rapidly dispersed by wind and natural convection.
Any enclosure in which the appliance is used
should comply with one of the following:
(A) An enclosure with walls on all sides,
but with no overhead cover.
(B) Within a partial enclosure that includes an
overhead cover and no more than two walls.
(C) Within a partial enclosure that includes an
overhead cover and more than two walls, the
following must apply:
(1) At least 25% of the total wall area is completely
open.
(2) 30% or more in total of the remaining
wall side, back and front wall areas is
open and unrestricted.
(3) In the case of balconies, 20% or more
of the total wall area must remain open
and unrestricted.
1
1
1
2
2CARBON MONOXIDE HAZARD
• This appliance produces carbon monoxide which
has no odour. Using the appliance in enclosed
spaces for example, caravan, car, boat or mobile
home could cause DEATH.

225mm
or more
Side Clearance Rear Clearance
Combustible material
225mm
or more
600mm
or more
Combustible material
Rangehood
600mm
or more
Rangehood
SideFront Rear Gas Connection
A
C
B D
COMPONENTS IDENTIFICATION
1. Cooker Body
2. Pot Stand / Trivet
3. Inner Burner
4. Outer Burner
5. Igniters
6. Flame Control / Piezo Igniters
7. Gas connection (3/8” SAE)
DIMENSIONS
1
2
7
5
6
3
4
(DC100-09 pictured)
Model A B C D
DC100-09 390mm 305mm 120mm 195mm
DC200-09 715mm 380mm 120mm 357mm

225mm
or more
Side Clearance Rear Clearance
Combustible material
225mm
or more
600mm
or more
Combustible material
Rangehood
600mm
or more
Rangehood
SideFront Rear Gas Connection
A
C
B D
companionleisure.com.au
INSTALLATION
• Appliance must be installed only by a
licensed gas tter or plumber.
• This appliance must not be modied.
• This appliance must be mounted on a
surface such as stainless steel, ceramic
tiles or a similar non-combustible material
only. The appliance must not be mounted
directly on to other surfaces such as
Laminex, plastic or timber.
SAFETY INSTRUCTIONS
Ensure that all instructions are read and
understood by the owner and licenced gas
tter/plumber prior to the installation of the
appliance and that all warnings and markings
on the appliance and owner’s manual are
followed.
• Never install a damaged or faulty appliance
– return for repair or replacement.
• Inspect data plate for correct gas type
suitable for the appliance.
• Check that the gas inlet connection is free
from damage or blockages.
• Check that there is sufcient stability and
ventilation for the appliance to operate
correctly, safely and efciently.
• The appliance must be operated on a rm,
level and non-combustible surface.
• Ensure appliance is installed in a position
where all minimum clearances are
recognised and adhered to.
CLEARANCES
This appliance must be installed so a
vertical clearance of at least 600mm is
maintained between the burners and
any combustible material.
Where this is not practical the underside of any
combustible material with a vertical clearance
of less than 600mm above the burner should
be protected by a surface material at least
6mm thick. This is then covered in sheet
metal of not less than 0.4mm in thickness or
protected by an equivalent material extending
at least 225mm beyond the sides of the cooker.
In either case the vertical clearance above the
burner should not be less than 450mm.
The minimum clearance from the appliance to
the rear or sides of all combustible surfaces
must be no less than 225mm. When the
appliance is installed abutting a side or rear
surface the surface must be made of non-
combustible materials such as ceramic tiles
or glass splash backs. If the surrounding
surfaces are constructed with a combustible
material, contact your local Gas Authority for
information on clearances required.
• Remove the appliance from its packaging
and discard all packaging materials
• Locate appliance in selected location and
ensure that gas connection point on the
rear of the appliance is easily accessible
once it is installed
• Connect the appliance to the gas hose and
regulator assembly, ensuring that there are
no twists or kinks in the hose and that all
connections are tightened with a spanner
• Check for leaks with soapy water

Before assembly
Before assembly
Burner off
After assembly
After assembly
✗ ✗
SAFE INSTALLATION OF
REGULATOR AND HOSE ASSEMBLY
• This appliance must be installed only by a
licensed gas tter or plumber
• This appliance shall only be used with an
AGA or SAI Global approved LP gas hose
and regulator assembly
• The regulator must be regulated to
2.75kPA output
• The installation of the regulator and hose
assembly must follow Australian Standards
AS5601
• DO NOT use adaptors
• The hose and regulator assembly should
not be assembled beneath the appliance, in
direct sunlight or close to other sources
of heat
• The hose must be free from twists and kinks
• The hose length must not exceed 1800mm
• All connections should be tightened with
a spanner and then leak tested with soapy
water – DO NOT use a naked ame to
check for leaks.
ASSEMBLY OF BURNER HEAD
Correct assembly method
Eliminates the possibility of back re and
assures the proper functioning of the burner.
Wrong assembly method
Will cause backre. May damage the whole
unit.
OPERATING INSTRUCTION
1) Make sure the
Ignition Knob is
set to the “OFF”
position.
2) Push in and turn
the ignition knob
anti-clockwise
until a “click”
sound is heard,
check that the burner is now alight.
3) If burner is not alight, return the Ignition
knob back to the “OFF” position, allow the
excess gas to disperse then repeat step 2.
ADJUSTING THE FLAME
• To adjust the ame to the desired
levels please follow the instructions
as shown below.

Inner and outer burner -
high ame
Inner burner -
high ame
Inner and outer burner -
low ame
Inner burner -
low ame
companionleisure.com.au
TURNING OFF THE BURNER
• Turn ignition
control back
to the “OFF”
position, check
that there is
no ow of gas
from the burner
assembly
CORRECT PLACEMENT
OF UTENSILS
Do not place anything e.g.
re proof mat between pan
support, as serious damage to
the appliance may result.
Do not remove the pan
support and enclose the burner
with a wok stand as this will
concentrate and deect heat
onto the hotplate.
Do not use large pots or heavy
weights which can bend the pan
support or deect ame onto
the hotplate.
Locate pan centrally over
the burner so that it is stable
and does not overhang the
appliance.
Use only wok support supplied
or recommended by the
manufacturer of the appliance.
MAINTENANCE
SHOULD BE CARRIED OUT EVERY 6 MONTHS
OF OPERATION
• Keep the cooker clean regularly by wiping with a
damp cloth.
• Before checking and maintaining cooker, make
sure the main gas valve is turned off.
• Make sure the burner head is clean before using
the cooker. Use a steel wire brush to clean the
burner if it is heavily clogged. If the burner is
heavily clogged, do not use the unit. Contact
your authorised plumber or gas tter to carry out
cleaning and maintenance. Do not attempt to
remove the burner units yourself.
• Check the gas pipes regularly for wear or leaks. If
any wear or leaks are present, please contact an
authorised plumber or gas tter for repair.
• Do not touch the burner, trivet, tray etc immediately
after use or when in use. This could burn your hand.
• Clean the trivet and tray after each use. Always
wipe off spills, do not leave spills to dry on the
surface of the trivet, tray or burner.
• Inspect the electrodes carefully after you have
removed the tray receptacle and if soiled, clean
with a dry cloth.
• Wash the burner head and burner cap with a moist
and soapy sponge or cloth. Do not put them in
cold water immediately after use as thermal shocks
could cause cracking.

Distributed by
PRIMUS AUSTRALIA Pty Ltd
Bundoora Victoria 3083
www.companionleisure.com.au
TROUBLE SHOOTING
If you can smell gas before, during or after operation, then turn gas cylinder OFF IMMEDIATELY.
Then follow relevant troubleshooting steps in the table below.
Problem Possible Cause What you can do
(If these do not work contact an authorised technician)
What ONLY an authorised
service technician can do
Appliance will
not light
• Incorrect gas in the
gas cylinder
• Gas cylinder not on
• Possible internal
part blockages or
blockage in
hose and regulator
• Check that the cylinder contains gas
and the correct gas (LPG) is being used
• Turn the gas cylinder ‘on’
• If the problem persists contact the place
of purchase or an authorised service
technician for advice and assistance
• Check appliance injectors,
burner, gas inlet, hose and
regulator for blockages
You can smell gas
before, during or
after operation
• Gas connections
not tight
• Gas connections
leaking
• Immediately turn gas cylinder off
• Ensure all connections are spanner tight
• Perform a leak test on all gas
connections
• If leak persists, then immediately turn
gas cylinder OFF and contact the place
of purchase for advice or assistance.
Abnormal ame • Blockages in
brass cap
• Blockages in the
injectors
or aeration holes
• Ensure the cooker has cooled down
• Check the burner for any blockages in
the brass caps
• If the problem persists contact the place
of purchase or an authorised service
technician for advice and assistance
• Check the burner for
any blockages in the
ejector end
• Check the injectors and
aeration holes for any
blockages.
DO NOT: Operate this appliance before
reading the instruction booklet
DO NOT: Place articles on or against this
appliance
DO NOT: Place chemicals or ammable
materials, or spray aerosols near
this appliance
DO NOT: Operate with panels, covers or
guards removed from this appliance
DO NOT: Operate in an enclosed area
without ventilation
DO NOT: Operate in a boat, caravan or tent
TECHNICAL SPECIFICATIONS
Part No. DC100-09 DC200-09
Size 390 x 305 x 120mm 715 x 380 x 120mm
Weight 4.3kg 6.5kg
Injector size
Outer 0.95mm 0.95mm
Inner 0.45mm 0.45mm
Pilot 0.50mm 0.50mm
Gas type Propane Propane
Gas pressure 2.75kPA 2.75kPA
Consumption 16.5Mj/Hr 33.0Mj/Hr
Gas tting 3/8” SAE 3/8” SAE
Ignition Piezo Piezo
Other manuals for DC100-09
1
This manual suits for next models
1
Table of contents
Other COMPANION Kitchen Utensil manuals