Comtest Networks 2745 User manual

Rev 1-0 May 2018 Page 1 of 4
Model 2745 24x12 Power Combiner Installation Guide
Copyright © 2018,
Comtest Networks Inc.
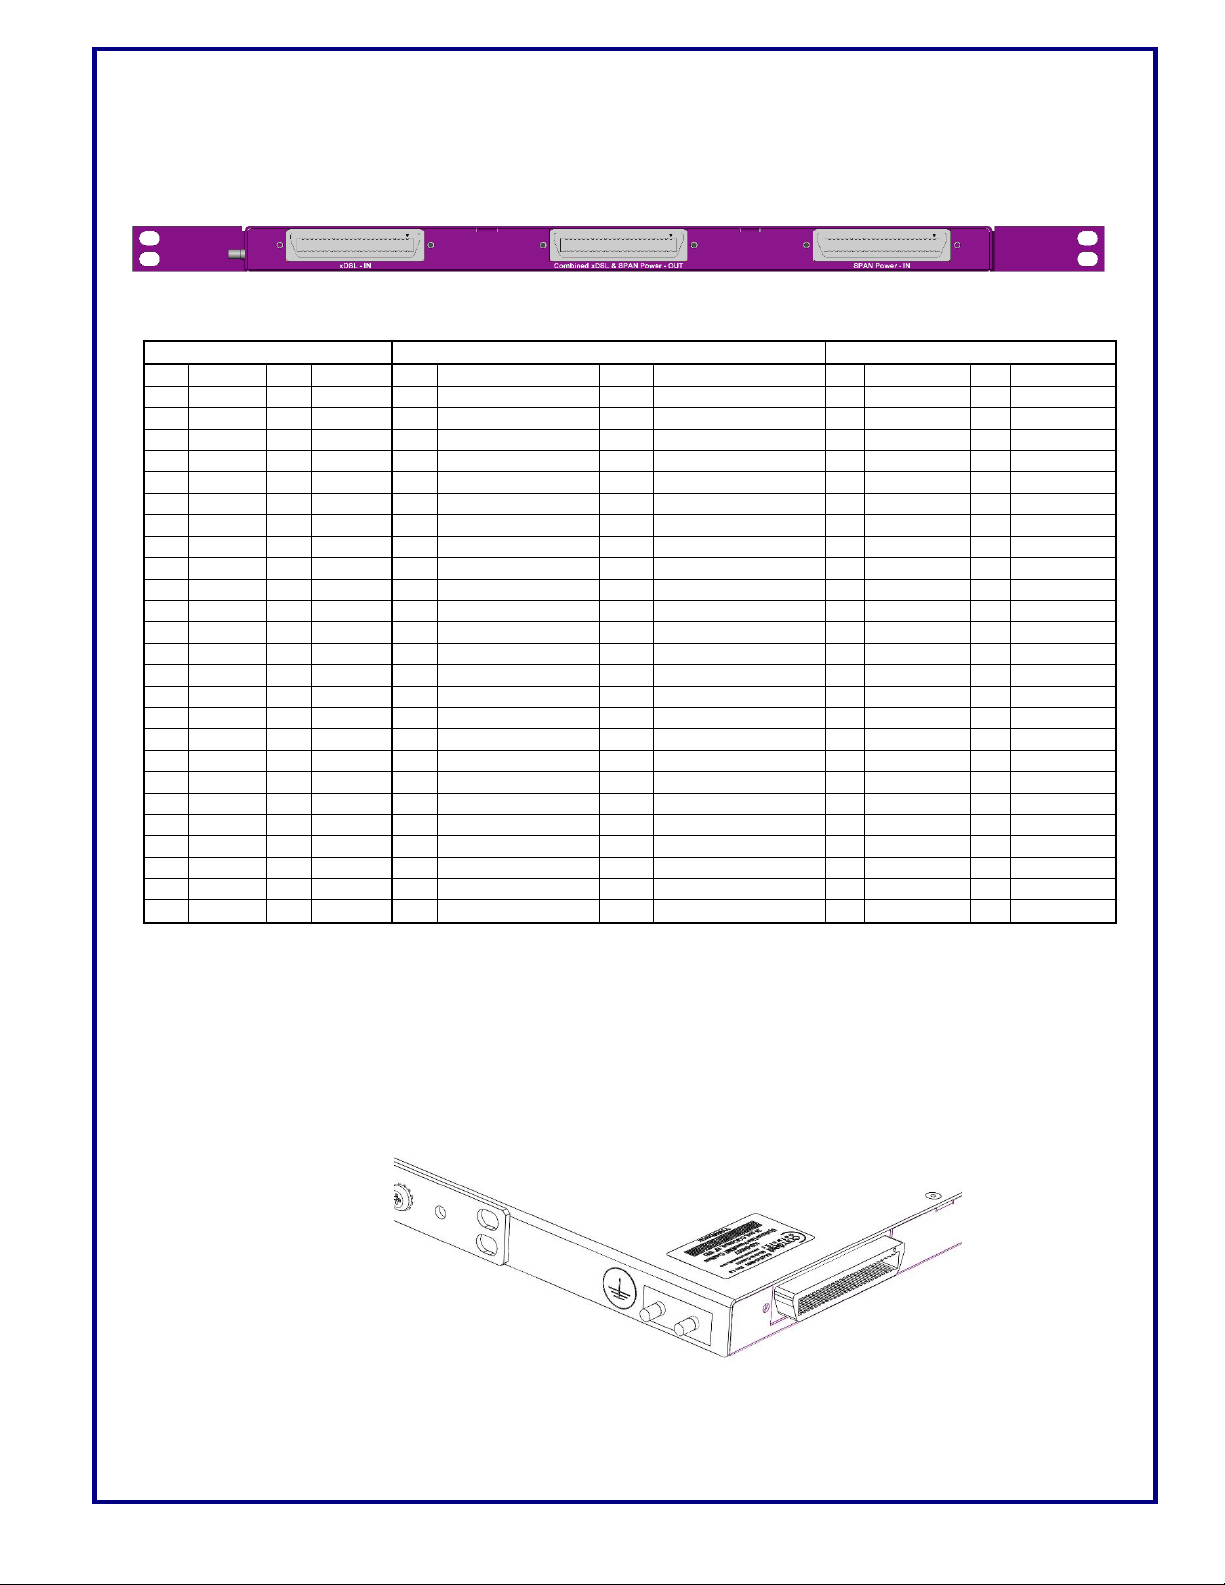
This guide provides the basic information required to install the Comtest Model 2745 24x12 Power Combiner Shelf
on a 19 or 23 inch rack assembly.
Unpackingthe2745Shelf
Before opening the 2745 shipping box, carefully inspect for any signs of damage. If the box has been damaged,
note the damage before opening the box. Open the box and remove the 2745 shelf and carefully examine it for
any damage. If the shelf is damaged, contact your supplier for instructions to return it for a replacement. If there is
no damage, verify that all packed items have been received. You should receive the following:
Comtest model 2745 shelf, part number SA-2745-1201
Quantity 1 Rack Mounting Bracket kit, part number SA-2745-0010
oQuantity 2 Rack Mount Brackets, part number PD-2745-0010
Quantity 1 Mounting hardware kit, part number SA-0000-0001
oQuantity 4, 10-32 x 3/8 screws, part number HW-PP06-05SS
oQuantity 4, #10 external tooth lock washers, part number HW-WE06-00SS
Quantity 1 Ground Kit, part number CA-2745-0013
Quantity 2 Power Combiner Cables, part number CA-2745-0014
Quantity 1 Installation Guide SA-2745-1217
If any of the above items are missing, please contact your supplier.
Installation
The 2745 requires ½U (0.875 inches) of rack space. The shelf is supplied with mounting brackets and hardware to
allow installation in a 19 inch or 23 inch rack.
Preparation for Mounting
19 Inch Mounting
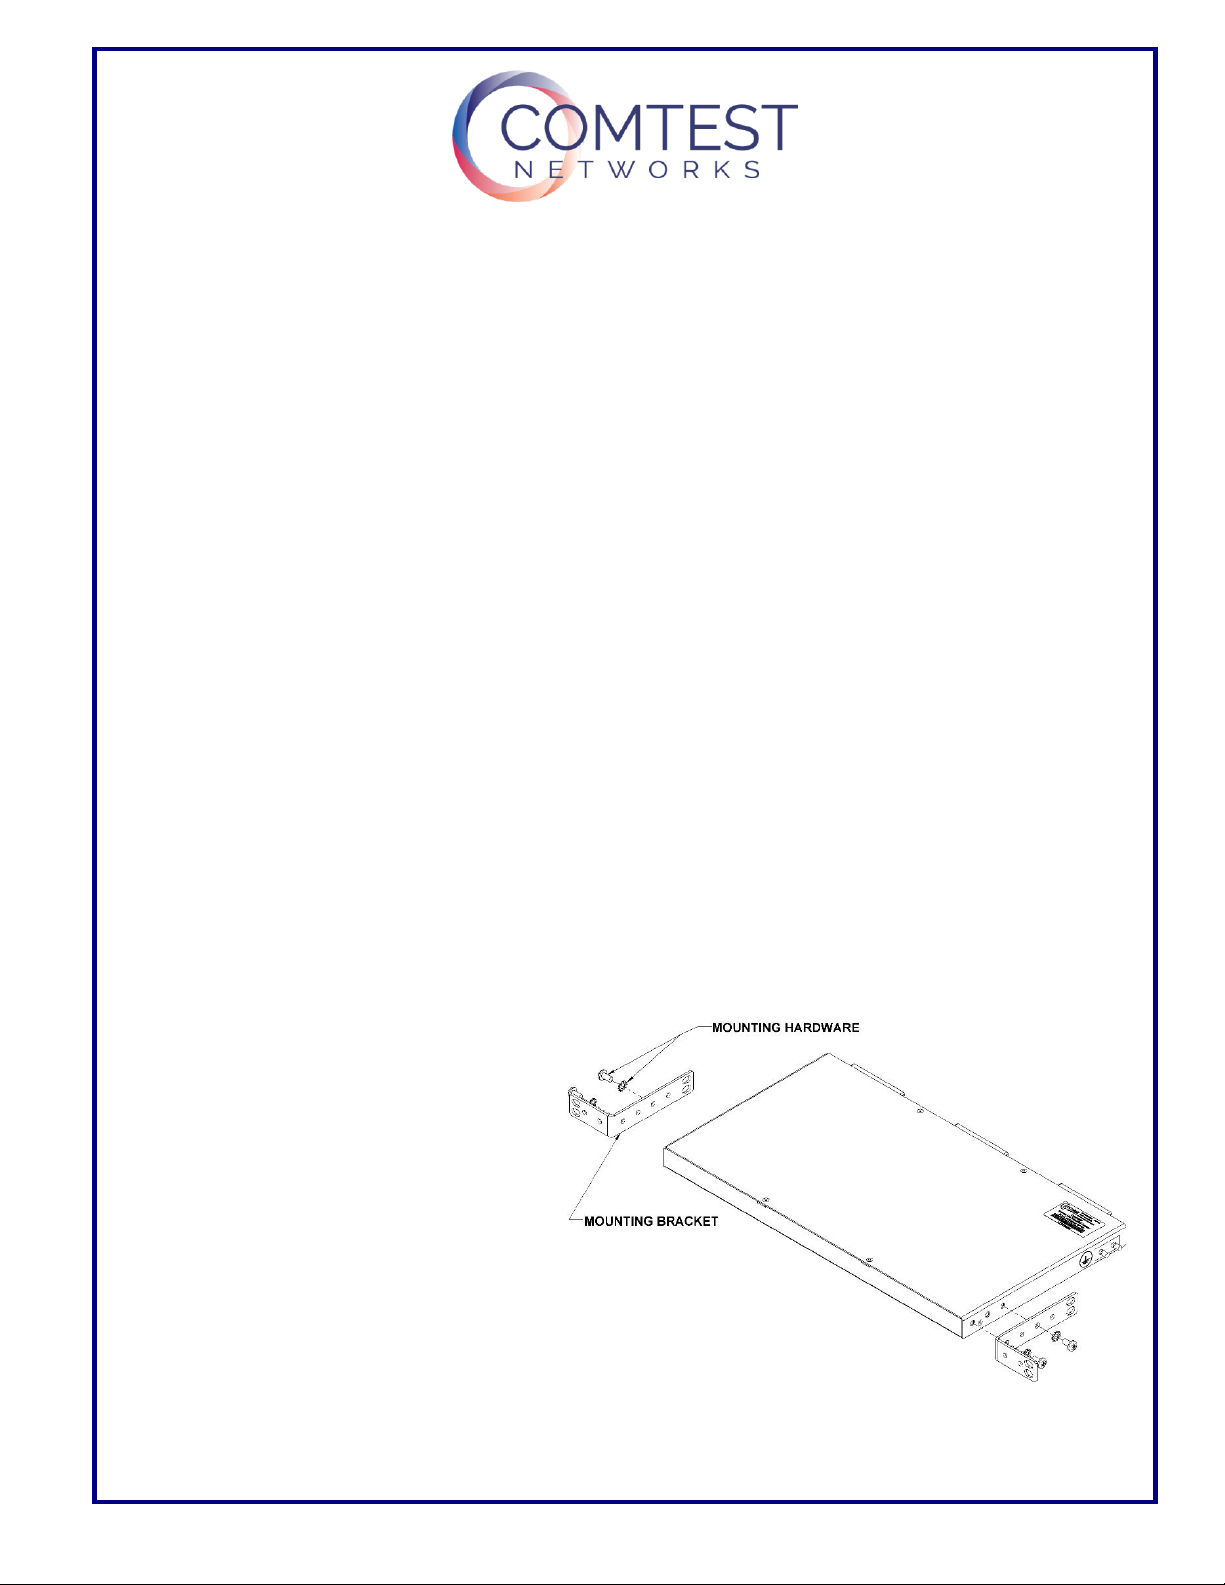
For 19 inch mounting, the long side of the
mounting bracket is attached to the side of
the shelf. There are three positions to mount
the bracket on the shelf and four positions on
the mounting bracket. The Rack Mounting
Bracket can also be mounted with the flange
at the back. Thus, there are 24 possible
mounting positions for the Rack Mounting
Bracket. Choose a suitable mounting
position for the shelf then, using the provided
10-32 screws and lock washers, attach the
bracket to each side of the shelf. Place the
shelf in position on the rack and, using the
appropriate screws and lock washers, attach
the shelf to the rack. Please note the
hardware (screws) required to mount the
shelf to the rack is not supplied with the 2745
shelf mounting kit.

Rev 1-0 May 2018 Page 2 of 4
23 Inch Mounting
For 23 inch mounting, the short side of
the mounting brackets is attached to
the side of the shelf. There are three
positions to mount the brackets on the
shelf. Choose a suitable mounting
position for the shelf then, using the
provided 10-32 screws and lock
washers, attach the bracket to each
side of the shelf. Place the shelf in
position on the rack and, using the
appropriate screws and lock washers,
attach the shelf to the rack. Please
note the hardware (screws) required to
mount the shelf to the rack is not
supplied with the 2745 shelf mounting
kit.
CablingOverview
New Installations
The 2745 Shelf cabling configurations will vary depending on installation locations and the number of lines
supported by the DSLAM. However, the physical interface to the rear panel connectors is standard 50-pin RJ-21
type receptacle connectors. Each splitter card uses 24 pairs of the 25 pairs available on each 50-pin connector.
After the shelf has been attached to the rack, the cabling can be prepared as shown below
For improved DSL performance, Comtest recommends the use of CAT 5, or better, cabling on the DSL connectors
for our 2745 Power Combiner Shelf in order to ensure that optimum system performance is achieved and
maintained. Comtest suggest that the CAT 5 mating connectors used be equipped with either a 90oor 120ocover
so that routing of the cables is simplified.
CAUTION - To reduce the risk of fire, use only No. 26 AWG or larger telecommunication line cord/cable.
Install the cables in the following sequence:
Connect xDSL Cable first
Insert the screw through the connector
cover and into the RJ-21 connector, on
the back panel, and carefully tighten.
Connect SPAN Cable second
Assemble the connector cover and plug
as above.

Rev 1-0 May 2018 Page 3 of 4
xDSL IN
Combined xDSL & SPAN Power OUT
SPAN Power IN
Ring
Tip
Ring
Tip
Ring
Tip
1
DSL 1
26
DSL 1
1
DSL 1 + Power 1
26
DSL 1 + Power 1
1
Power 1
26
Power 1
2
DSL 2
27
DSL 2
2
DSL 2 + Power 1
27
DSL 2 + Power 1
2
Power 2
27
Power 2
3
DSL 3
28
DSL 3
3
DSL 3 + Power 2
28
DSL 3 + Power 2
3
Power 3
28
Power 3
4
DSL 4
29
DSL 4
4
DSL 4 + Power 2
29
DSL 4 + Power 2
4
Power 4
29
Power 4
5
DSL 5
30
DSL 5
5
DSL 5 + Power 3
30
DSL 5 + Power 3
5
Power 5
30
Power 5
6
DSL 6
31
DSL 6
6
DSL 6 + Power 3
31
DSL 6 + Power 3
6
Power 6
31
Power 6
7
DSL 7
32
DSL 7
7
DSL 7 + Power 4
32
DSL 7 + Power 4
7
Power 7
32
Power 7
8
DSL 8
33
DSL 8
8
DSL 8 + Power 4
33
DSL 8 + Power 4
8
Power 8
33
Power 8
9
DSL 9
34
DSL 9
9
DSL 9 + Power 5
34
DSL 9 + Power 5
9
Power 9
34
Power 9
10
DSL 10
35
DSL 10
10
DSL 10 + Power 5
35
DSL 10 + Power 5
10
Power 10
35
Power 10
11
DSL 11
36
DSL 11
11
DSL 11 + Power 6
36
DSL 11 + Power 6
11
Power 11
36
Power 11
12
DSL 12
37
DSL 12
12
DSL 12 + Power 6
37
DSL 12 + Power 6
12
Power 12
37
Power 12
13
DSL 13
38
DSL 13
13
DSL 13 + Power 7
38
DSL 13 + Power 7
13
38
14
DSL 14
39
DSL 14
14
DSL 14 + Power 7
39
DSL 14 + Power 7
14
39
15
DSL 15
40
DSL 15
15
DSL 15 + Power 8
40
DSL 15 + Power 8
15
40
16
DSL 16
41
DSL 16
16
DSL 16 + Power 8
41
DSL 16 + Power 8
16
41
17
DSL 17
42
DSL 17
17
DSL 17 + Power 9
42
DSL 17 + Power 9
17
42
18
DSL 18
43
DSL 18
18
DSL 18 + Power 9
43
DSL 18 + Power 9
18
43
19
DSL 19
44
DSL 19
19
DSL 19 + Power 10
44
DSL 19 + Power 10
19
44
20
DSL 20
45
DSL 20
20
DSL 20 + Power 10
45
DSL 20 + Power 10
20
45
21
DSL 21
46
DSL 21
21
DSL 21 + Power 11
46
DSL 21 + Power 11
21
46
22
DSL 22
47
DSL 22
22
DSL 22 + Power 11
47
DSL 22 + Power 11
22
47
23
DSL 23
48
DSL 23
23
DSL 23 + Power 12
48
DSL 23 + Power 12
23
48
24
DSL 24
49
DSL 24
24
DSL 24 + Power 12
49
DSL 24 + Power 12
24
49
25
50
25
50
25
50
ConnectorPinOuts
The Model 2745 is a 24 port combiner that provides the required filtering for running Strand Power (+/-190VDC) and providing
VDSL2 copper transport over the same copper pairs.
Grounding
For safety reasons, the 2745 needs to be grounded to the rack through a ground terminal located on the right side
rear of the shelf. Use the hardware provided to attach your ground wire to the shelf. Note, 8 AWG wire is
recommended for the ground.

Rev 1-0 May 2018 Page 4 of 4
Warranty
Comtest warrants all equipment manufactured by it and bearing its nameplate to be free from defects in
workmanship and materials, during normal use and service, for a period of three (3) years from the date of
shipment. In the event that a defect in any such equipment arises within the warranty period it shall be the
responsibility of the customer to return the equipment by prepaid transportation to a Comtest service centre prior to
the expiration of the warranty period for the purpose of allowing Comtest to inspect and repair the equipment. If
inspection by Comtest discloses a defect in workmanship or material it shall, at its option, repair or replace the
equipment without cost to the customer, and thereafter return it to the customer by the least expensive mode of
transportation the cost of which shall be prepaid by Comtest. In no event shall this warranty apply to equipment
which has been modified without the written authorization of Comtest, or which has been subject to abuse, neglect,
accident or improper application. If inspection by Comtest discloses that the repairs that must be made on the
equipment are not covered by this warranty, the regular repair charges shall apply to any repairs made to the
equipment.
This warranty constitutes the only warranty applicable to the equipment sold by Comtest and no other warranty or
condition, statutory or otherwise, expressed or implied shall be imposed upon Comtest nor shall any representation
made by any person including a representation by a representative or agent of Comtest be effective to extend the
warranty coverage provided herein. In no event (including, but not limited to the negligence of Comtest, its agents
or employees) shall Comtest be liable for special or consequential damages or damages arising from the loss of
use of the equipment and on the expiration of the warranty period all liability of Comtest whatsoever in connection
with the equipment shall terminate.
Canada Help
171 Macfarlane Rd., Unit E techhelp@comtestnetworks.com
Ottawa, Ontario 1-877-369-5499 (Canada)
K2E 6V4, Canada Fax: 1-613-368-4616
Tel: 1-613-369-5499
Table of contents
Other Comtest Networks Media Converter manuals
Popular Media Converter manuals by other brands

Grundfos
Grundfos CUE, 110-250 kW Installation and operating instructions

Extron electronics
Extron electronics IN1608 xi IPCP SA with LinkLicense user guide

ifi
ifi AURORA user manual

Z3 Technology
Z3 Technology HE4K-DCK-RPS User instructions

Audio Research
Audio Research reference dac user manual

QSI
QSI Quantum Revolution-A User's operation manual

Converters.TV
Converters.TV 15155 Operation manual

TR-Electronic
TR-Electronic CEW58M-8192/4096 EIP SL3010 Assembly instructions

Bosch
Bosch VIP-X1600-XFM4A Quick installation guide

Unitronics
Unitronics Vision OPLC V130-33-R2 installation guide

Bonart
Bonart ART-M1 instruction manual

THOR
THOR H-2/4HD-EM manual