Comtrend Corporation WAP-5922MP User manual

USER MANUAL
WAP-5922MP
AC1200 Wireless Mesh Point
Version A1.0, January 22, 2018

1
Preface
This manual provides information related to the installation and operation of this
Dual-Band Wireless Mesh Point. The individual reading this manual is presumed to
have a basic understanding of home networking terminology and concepts.
If you find the product to be inoperable or malfunctioning, please contact technical
For product updates, new product release, manual revision, or software upgrades,
please visit our website at http://www.comtrend.com
Important Safety Instructions
With reference to unpacking, installation, use, and maintenance of your electronic
Dual-Band Wireless Mesh Point, the following basic guidelines are recommended:
Do not use or install this product near water, to avoid fire or shock hazard. For
example, near a bathtub, kitchen sink or laundry tub, or near a swimming pool. Also,
do not expose the equipment to rain or damp areas (e.g. a wet basement).

2
Copyright
Copyright© 2018 Comtrend Corporation. All rights reserved. The information
contained herein is proprietary to Comtrend Corporation. No part of this document
may be translated, transcribed, reproduced, in any form, or by any means without
the prior written consent of Comtrend Corporation.
NOTE: This document is subject to change without notice.
Protect Our Environment
This symbol indicates that when the equipment has reached the end of
its useful life, it must be taken to a recycling center and processed
separate from domestic waste.
The cardboard box, the plastic contained in the packaging, and the parts that make
up this router can be recycled in accordance with regionally established regulations.
Never dispose of this electronic equipment along with your household waste; you
may be subject to penalties or sanctions under the law. Instead, please be
responsible and ask for disposal instructions from your local government.

3
Table&of&Contents&
!
Chapter 1 Product Information ..................................... 5
1.1 Introduction and Features ........................................ 5!
1.2 System Requirements ............................................... 6!
1.3 Package Contents ..................................................... 7!
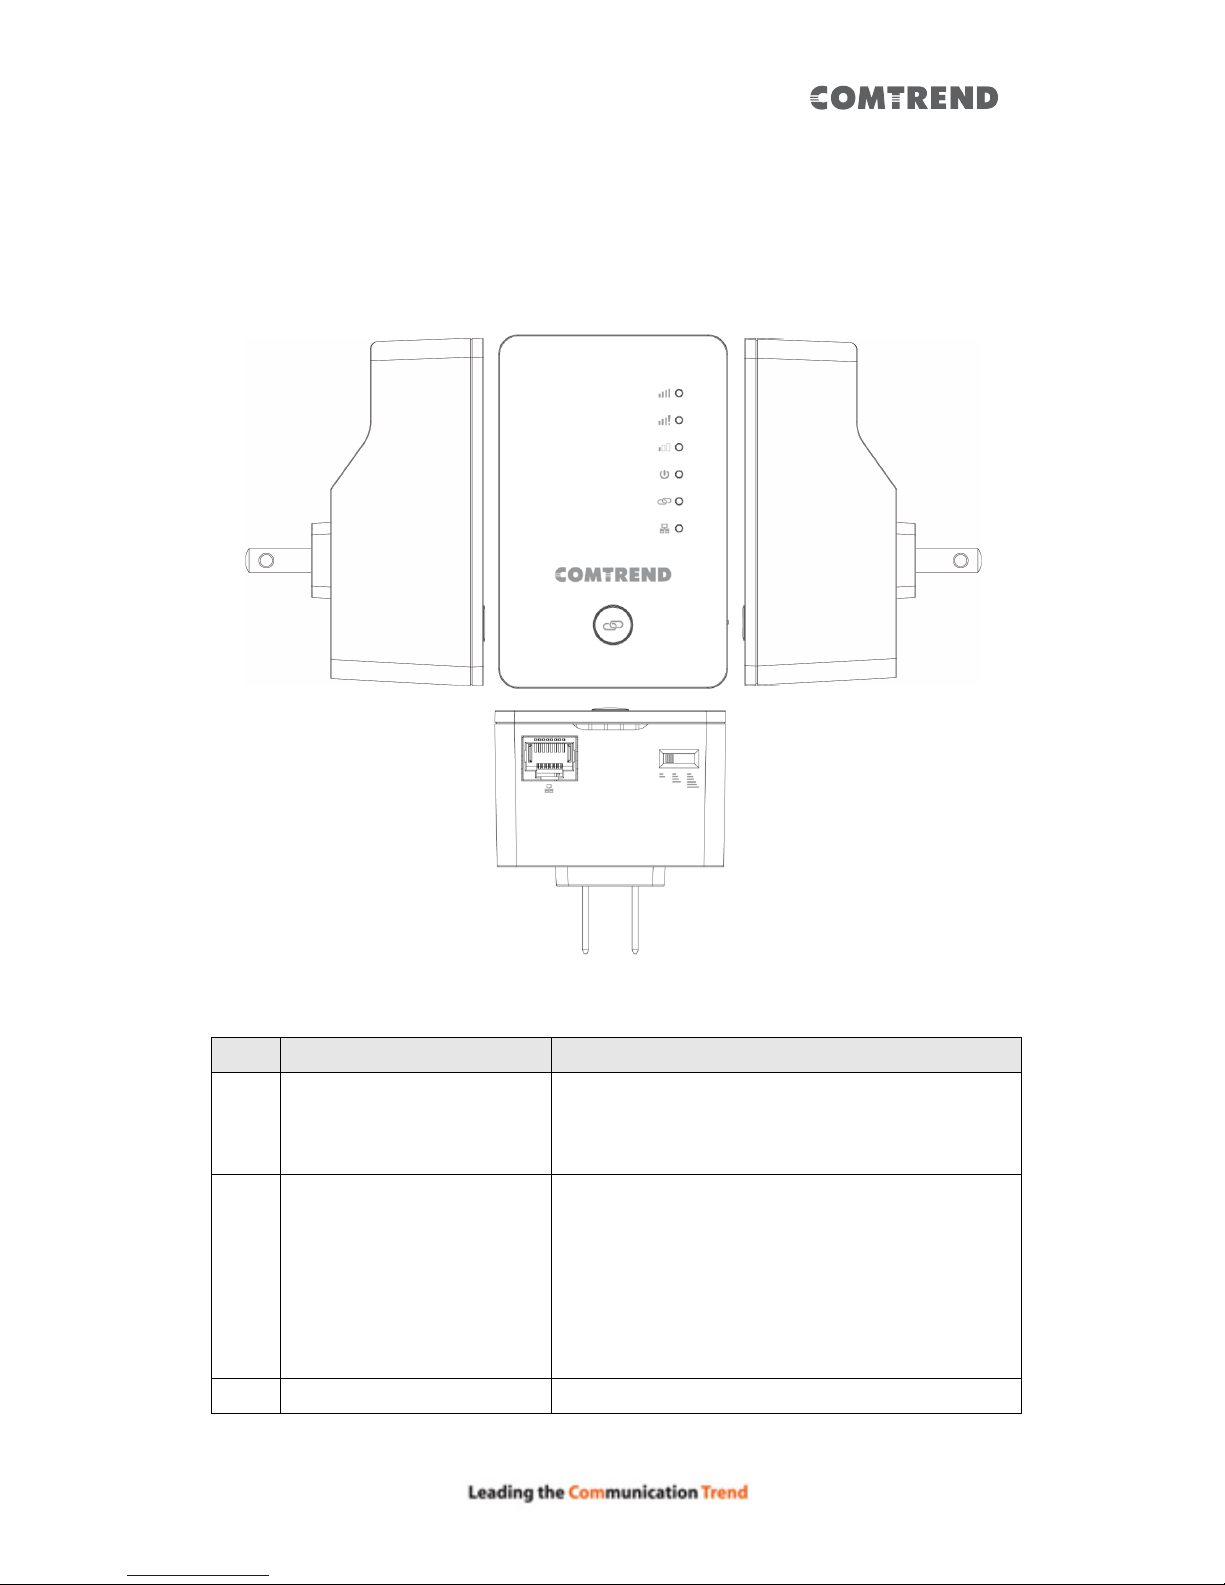
1.4 Get familiar with your Wireless Mesh Point............... 8!
Chapter 2 Mesh WiFi-Supported Installation............... 12
2.1 Device Setup ........................................................... 12!
2.1.1 WiFi Network Setup............................................................15!
Chapter 3 Repeater Mode ........................................... 17
3.1 Repeater Mode Quick Installation Guide ................. 17!
3.1.1 Hardware WPS button setup.........................................18!
3.1.2 Web browser quick setup................................................20!
3.2 Repeater mode Advanced Settings.......................... 27!
3.2.1 Connect to web configuration menu ........................27!
3.2.2 Home............................................................................................29!
3.2.3 WPS Setting.............................................................................31!
3.2.4 Advanced Settings ...............................................................33!
3.2.5 WLAN 2.4G settings ............................................................36!
3.2.6 WLAN 5G settings ................................................................38!
3.2.7 MAC Address Filtering .......................................................40!
3.2.8 How to find the MAC address of your device.......42!
3.2.9 System Utility .........................................................................46!
3.2.10 Configuration .......................................................................48!
Chapter 4 AP Mode ..................................................... 52
4.1 AP Mode Quick Installation Guide ........................... 52!
4.1.2 Web browser quick setup................................................53!
4.2 AP Mode Advanced Settings .................................... 58!
4.2.1 Connect to web configuration menu ........................58!
4.2.2 Home............................................................................................59!
4.2.3 WPS Setting.............................................................................61!
4.2.4 Advanced Settings...............................................................63!
4.2.5 WLAN 2.4G settings ............................................................67!

4
4.2.6 WLAN 5G settings ................................................................69!
4.2.7 MAC Address Filtering .......................................................70!
4.2.8 How to know the MAC address of your device ...73!
4.2.9 System Utility .........................................................................76!
4.2.10 Configuration .......................................................................78!
Chapter 5 Appendix .................................................... 81
5.1 Configuring TCP/IP on PC ....................................... 81!
5.1.1 Windows XP IP address setup:.................................... 81!
5.1.2 Windows Vista/Windows 7 IP address setup: ...82!

5
Chapter 1 Product Information
1.1 Introduction and Features
The AC1200 Dual-Band Wireless Mesh Point has a compact design, and provides
excellent network performance to extend your Wi-Fi signal and wireless coverage.
Features of this Wireless Mesh Point include:
Easily extends the wireless signal inside your home or office.
Compact design while maintaining excellent network performance.
Supports 802.11a/b/g/n and 802.11ac standards, it can provide up to
300Mbps for 2.4Ghz on 11n mode and 866Mbps for 5Ghz on 11ac mode.
LED signal indicators to easily realize the best location placement to
extend the WiFi signal for best wireless performance.
Supports Repeater mode and AP mode.
WPS (Wi-Fi Protected Setup) hardware button for easy installation and
wireless security.

6
1.2 System Requirements
nWireless network card which is compatible with 802.11a/b/g/n and 802.11 ac
wireless network standards.
nWindows XP, Windows 7, Windows 8, Windows 10 or MAC OS or Linux
operating system.

7
1.3 Package Contents
Before you start to use this Wireless Mesh Point, please check if there’s anything
missing in the package, and contact your place of purchase to claim for missing
items:
•Wireless Mesh Point (1 pcs)
•Quick Install Guide (1 pcs)

8
1.4 Get familiar with your Wireless Mesh Point
Interface Descriptions
Item
Item Name
Description
A
LAN
10/100/1000M Ethernet LAN Port with
Auto-MDI/MDI-X. Connect to a computer,
switch or hub for local network sharing.
B
Reset / WPS
Reset the Wireless Mesh Point to factory default
settings (clear all settings) or start the WPS
function. Press this button and hold for 10
seconds to restore all settings to factory
defaults, or press this button for less than 5
seconds to start the WPS function.
C
WiFi Output Power Switch
Switch the button to change.
A
C
B

9
LED Activity
LEDs
Behavior
Description
Note
Signal
Strength
LED1 on
LED2 off
LED3 off
1. The device is in repeater
mode, when LED2 & 3 are off
and LED1 is on. It means the
device has optimal signal
quality.
2. Device in AP mode, when
LED1 is solid on, it represents
the device is ready.
(Device ready means it
obtained an IP from the
uplink DHCP server.)
An optimal signal
means the Wireless
Mesh Point is placed
with proper
distance to help to
extend the
network.
Good signal:
-45 to -60dBm
LED1 off
LED2 on
LED3 off
1. The device is in repeater
mode, when LED1 & 3 are off
and LED2 is on. It indicates
the current placement is too
close to the uplink router,
which is not an effective
placement of the wireless
mesh point.
Signal too strong:
> -45dBm

10
LED1 off
LED2 off
LED3 on
1. The device is in repeater
mode, when LED1 & 2 are off
and LED3 is on. It indicates
the current placement is too
far from the uplink router,
which potentially makes the
uplink connection weak and
may result in slow speed or
disconnection.
signal too weak:
< -60dBm
LED1 LED2
LED3
flashing
1. The device is not with a stable
connection. It may be in the
progress of pairing, grouping,
and or synchronising.
2. The device will not be able to
configure before these 3 LEDs
stop flashing.
The device in
factory default and
powered (with
power LED on), in
this state, it is not
ready to make any
configuration, and
it needs to wait
until LED1, 2 & 3
are flashing.
(If only the power
LED on, the
Wireless Mesh Point
is still in booting
process.)
Power
LED 4 on
The device is powered on.
LED4
flashing
Firmware upgrading is taking
place.
LED4 off
Device is powered off or no
power.

11
WPS &
Paring
status
LED5 on
1. The device is successfully
finished WPS handshaking.
2. The device is already paired or
grouped with the current
network.
LED5
flashing
The device is processing WPS PBC
handshaking.
There is a 120
second open
window to process
WPS PBC
handshaking and
after 120 seconds
time out, the LED
will turn Off.
Off
1. The device is not performing
WPS handshaking.
2. The device is not paired or
grouped with any network.
Ethernet
LED6 on
The device is connected to
another device via Ethernet cable.
Off
The device is not connected to
another device via Ethernet cable
or no Ethernet cable is attached.
Flashing
There is Ethernet traffic.

12
Chapter 2 Mesh WiFi-Supported Installation
Scenario 1: Using a Comtrend Mesh WiFi-Supported Gateway
Use anywhere from 1-10 Mesh Points on a single network.
Scenario 2: Using a Non-Comtrend Mesh WiFi-Supported Gateway
Use anywhere from 2-10 Mesh Points on a single network.
Note: A minimum of 2 Mesh Points are required to create a connection for this
scenario.
2.1 Device Setup
The following steps show how to setup your Whole-Home WiFi Mesh System
using Ethernet Pairing. For additional setup options (including WPS), please refer
to the User Manual available online.
NOTE: If you are using a Comtrend WiFi Mesh-Supported Gateway, then the
Mesh Points will work in conjunction with your Gateway’s WiFi. If you are not
using a Comtrend WiFi Mesh-Supported Gateway, then the WiFi Mesh Points will
create a separate WiFi Mesh System (Note: This application will require at least
two WiFi Mesh Devices to create a Mesh System).
1. Connect one end of an Ethernet Cable into each Mesh Point (WAP-5922MP)
that you wish to have in your Whole-Home WiFi Mesh System. For this example,
we will use two Mesh Points.
2. Plug the Mesh Points into an outlet near your Network Device (Router,
Modem).
Steps 1-2
Ethernet
Cable

13
3. Connect the other end of the Ethernet Cables into your Network Device. The
pairing process will then automatically begin.
4. Wait until all WPS/Grouping LED’s light up solid (around 3 to 5 minutes). This
means the two Mesh Point’s are now in the same WiFi Mesh System. If you are using
a Comtrend WiFi Mesh-Supported Gateway, then the two Mesh Points are now in the
same WiFi Mesh System as the Comtrend Gateway as well.

14
5. Disconnect the Ethernet Cables and unplug the Mesh Points. Then find a suitable
location for each Mesh Point with an accessible power outlet. The Mesh Points should
be placed in different directions between the Network Device and the areas farthest
from the Network Device.
NOTE: If you are not using a Comtrend WiFi Mesh-Supported Gateway, then you
will need to leave one Mesh Point connected via Ethernet to the Network Device.
6. Once the Mesh Points are plugged into their new locations, wait for the
WPS/Grouping LEDs to light up solid. This means they are grouped again and the
WiFi Mesh System is ready to use.
7. To add new Mesh Points to the Mesh System, simply plug the new device(s)
into an outlet and press the WPS Button for 2-3 seconds. Within two minutes,
press the WPS Button on a Mesh Point in the existing system. The WPS/Grouping
LED will light up solid.
LED / Icon
Status
Indication
Signal - Optimal
First LED On
The extender has an optimal signal
connection with its uplink device. The
distance in between is ideal.
Signal - Too Strong
Second LED On
The extender has too strong a signal
connection with its uplink device. The
distance in between is too close.
Signal - Too Weak
Third LED On
The extender has too weak a signal
connection with its uplink device. The
distance in between is too far.
The following LED’s will show you if you
have the optimal placement.

15
8. If you are using a Comtrend WiFi Mesh-Supported Gateway, then
the WiFi Mesh System will automatically use the original WiFi
settings on your Gateway. If you are using a Non-Comtrend
WiFi-Supported Gateway, then please reference the back of the
Mesh Point that is connected to the Gateway for the default SSID
and Password WiFi settings.
If you would like to change your network’s SSID or Password please
continue to section 2.1.1.
2.1.1 WiFi Network Setup
1. You can now use your computer’s Wireless configuration
utility to search for a Wireless Network name such as: repeater0003.
(The default SSID of this Mesh point is ‘repeater0003’, and 0003 is
for reference. It will be the last 4 digits of the device’s MAC number.)
2. Open your Web browser, and input ‘http://comtrend.setup’ in the address
bar.

16
3. The system will prompt you to input the username and password. Default
username is ‘admin’ and password is ‘1234’. Click the ‘OK’ button to continue.
4. After you log into the Webpage, input your WiFi network name in the ‘Device
SSID’ field, and also the password in the ‘KEY’ field for both the 2.4GHz and 5GHz
WiFi networks. After the configuration, click the ‘APPLY’ button to finish the setup.
The devices will reboot, and when the WPS/Grouping LEDs on all of the Mesh
Points light up solid, the Whole-Home WiFi Mesh System is ready.

17
Chapter 3 Repeater Mode
This chapter will explain how to quickly install this device by using the quick setup
method and explain each detailed setting on the web user interface while in repeater
mode.
3.1 Repeater Mode Quick Installation Guide
For first time setup and installation, move this Wireless Mesh Point close to the
Wireless Broadband Router or Access point you wish to connect to. After installation
is complete, move this Wireless Mesh Point to the place you wish to permanently
wish to use it.
Plug this Wireless Mesh Point into a power outlet on the wall, and you should see the
‘Power’ LED light up in few seconds. If not, check if the power outlet you’re using is
working.
You can setup the wireless connection via the ‘Hardware WPS button’ or ‘Software
web browser’.
If your broadband router or access point also supports a ‘WPS button’, we
recommend you to use the WPS button to establish connection.

18
Using WPS button - please go to section 3.1.1
Using Web browser - please go to section 3.1.2
3.1.1 Hardware WPS button setup
1. Press and hold the WPS button on the Wireless Mesh Point for 2 seconds, the
‘WPS’ LED will start flashing.
2. Press the WPS button on the wireless broadband router or access point you
wish to connect to within 2 minutes.
WPS LED
WPS button

19
NOTE: the WPS button position on the access point above is for reference;
different devices may have different WPS button positions or locations.
TIP: If the access point you wish to connect to does not have a hardware
WPS button, you can also use its web configuration menu’s WPS function
to establish connection. Or you can login to the WAP-5922’s web user
interface to perform quick setup (for detailed setup refer to ‘3.1.2 Web
browser quick setup’ manual)
3. When WPS connection is successfully established, the Wireless Mesh Point will
reboot immediately to make your settings take effect ; if the ‘WPS’ LED flashes
fast, a problem has occurred, please wait for 2 minutes until the ‘WPS’ LED goes
off, and start from step(1) again.
When quick installation is successful, the ‘Signal’ LED will turn on.
4. Please plug this Wireless Mesh Point into a power outlet on the wall in the place
you wish to use it (the ideal place will be the center of your house) and, the
wireless connection will be established automatically as long as it’s within
range of your wireless router or access point.
Signal LED
Other manuals for WAP-5922MP
1
Table of contents
Other Comtrend Corporation Network Hardware manuals