CONSIGNES
IMPORTANTES
L’utilisation d’appareils ménagers, surtout au-
tour des enfants, demande la prise de précau-
tions dont les suivantes :
LIRE TOUTES LES DIRECTIVES
AVANT L’UTILISATION
TENIR LOIN DE L’EAU
DANGER – Un appareil est sous
tension, même quand il est éteint.
Pour réduire le risque de choc électrique :
1. Le débrancher pour le nettoyer.
2. Ne pas le placer ni le ranger là où il peut être
tiré ou tomber dans une baignoire ou un évier.
3. Ne pas l’utiliser dans la baignoire ni dans la
douche.
4. Ne pas le placer ni l’échapper dans l’eau ou un
liquide quelconque.
5. Ne pas saisir un appareil qui est tombé dans
l’eau. Le débrancher immédiatement.
6. Toujours le débrancher immédiatement après
l’avoir utilisé.
NE PAS LE SAISIR
DANS L’EAU
ATTENTION — Pour réduire le risque de
brûlures, choc, incendie ou blessure :
1. Ne jamais laisser un appareil branché sans
surveillance. Ne tirez, tordez ni enroulez le fil
autour de l’appareil.
2. Assurer une surveillance étroite quand il est
utilisé par, sur ou autour d’enfants ou de
personnes handicapées.
3. Ne l’utiliser que tel que prévu. Ne pas utiliser
d’accessoires non recommandés par le
fabricant. N’utilisez pas une rallonge avec cet
appareil.
4. Ne jamais l’utiliser si le cordon ou la fiche
est endommagée, s’il ne fonctionne pas bien,
s’il a été échappé, endommagé ou échappé
dans l’eau. Le présenter à un service après-
vente où il sera inspecté et réparé.
5. Protéger le cordon des surfaces chaudes.
6. Ne jamais échapper ni insérer un objet
dans une ouverture.
7. Ne déposez pas l’appareil sur une surface
quand il est en marche.
8. Ne pas l’utiliser avec un peigne endommagé
ou si des dents sont cassées car on risque de
se blesser. Avant l’utilisation, assurez-vous
que les lames sont bien alignées (voir
« Entretien de la tondeuse »).
9. Ne pas l’utiliser à l’extérieur ni là où l’on
utilise des aérosols ou administre de
l’oxygène.
10. Ne pas l’utiliser si les évents sont bloqués
ni sur une surface souple comme un lit ou un
divan où les évents peuvent s’obstruer.
Garder les évents libres de charpies, cheveux
et autres matières du genre.
11. Brancher le cordon à l’appareil puis à la prise.
Pour le débrancher, éteindre l’appareil puis
sortir la fiche de la prise.
12. Éviter de toucher la peau avec les lames
en marche.
13. Lors de l’utilisation, ne pas tordre ni
pincer le cordon. Si le cordon s’emmêle,
éteindre l’appareil et détordre le cordon avant
de continuer l’utilisation.
CONSERVER CES
DIRECTIVES
DIRECTIVES
D’UTILISATION
Cet appareil ne s’alimente que du secteur 120
VCA, 60 Hz. Pour réduire le risque de choc élec-
trique, il est muni d’une fiche polarisée (une
lame est plus large que l’autre). Par mesure de
sécurité, la fiche ne convient que d’une façon
dans une prise polarisée. Si elle ne s’enfonce
pas complètement, inversez-la. Si elle ne con-
vient toujours pas, consultez un électricien. Ne
modifiez pas la fiche. Ne tentez pas de contrer
cette mesure de sécurité.
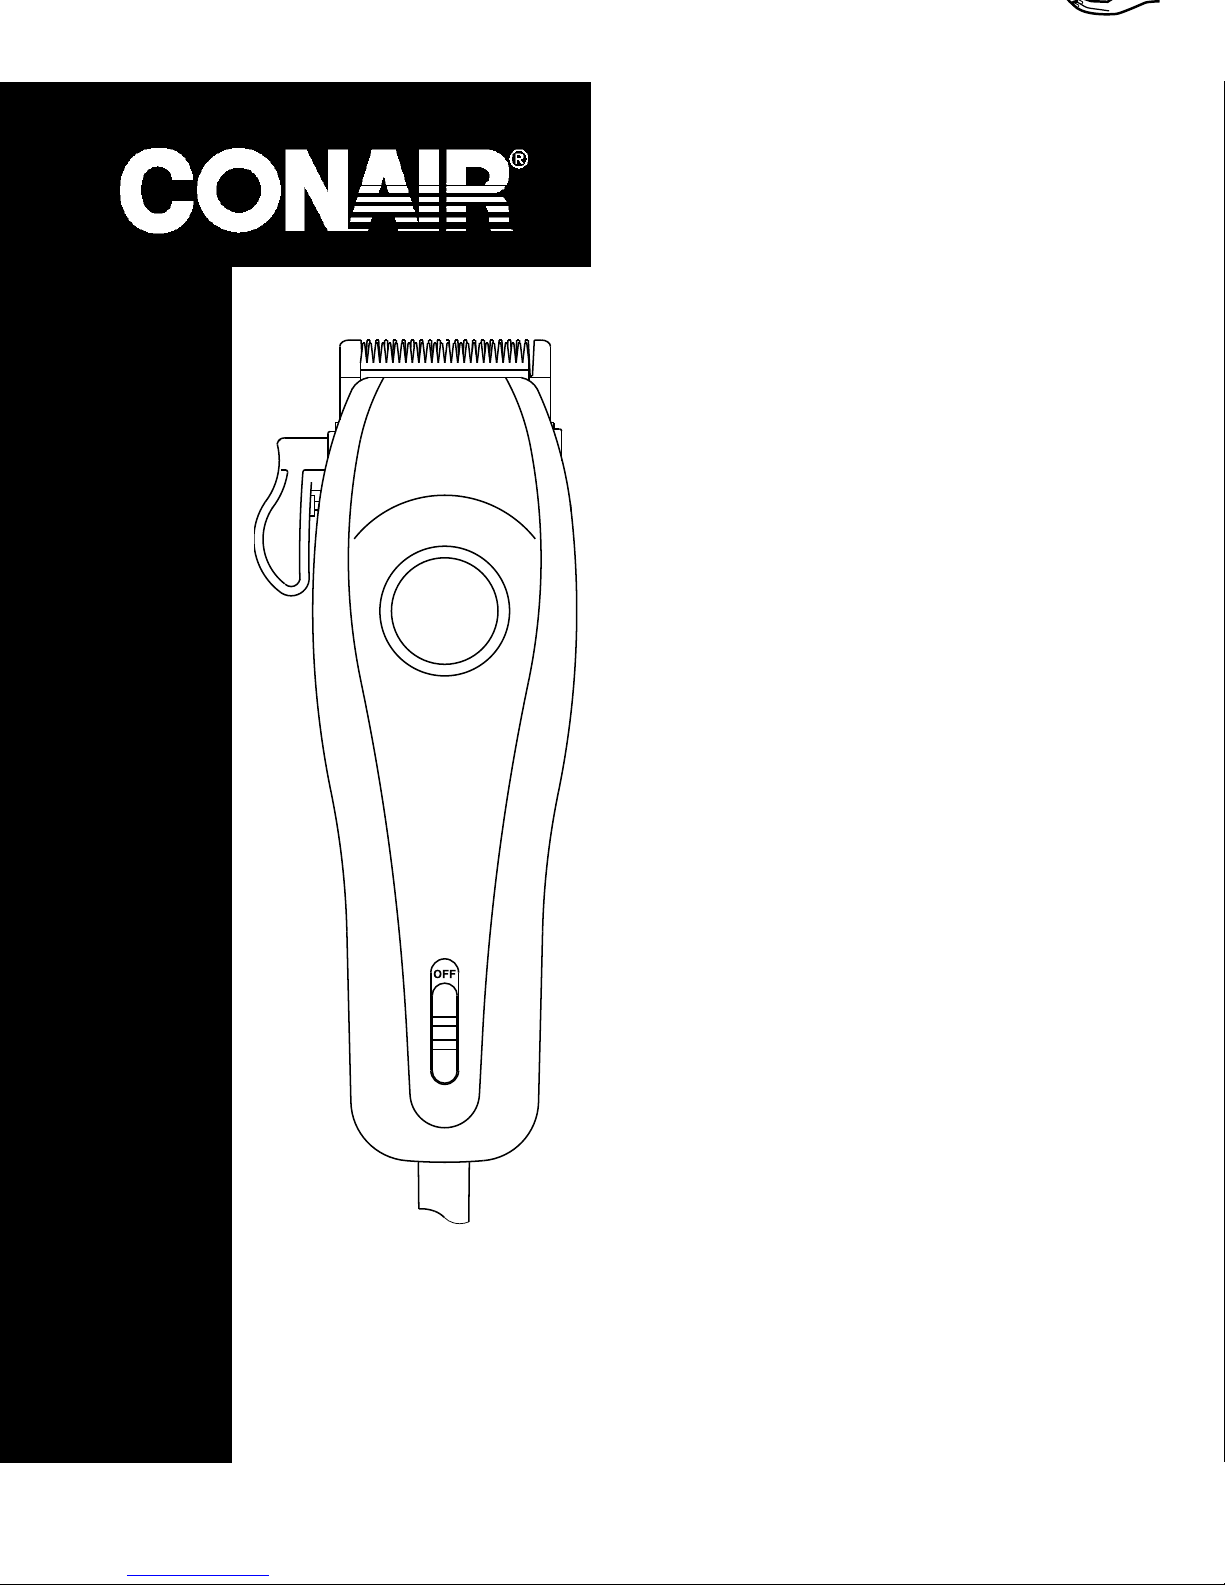
La trousse des coupe de cheveux Conair® vient
avec tout ce qu’il faut pour réaliser des coupes
professionnelles à la maison. Son nouveau mo-
teur à couple puissant, avec ses lames en acier
pour une coupe précise, vient avec une com-
mande de réglage à 5 positions Ajustamatic.
Quelle que soit la longueur de coupe voulue, le
tondeuse coupe automatiquement la section à la
longueur désirée. La tondeuse est aussi fournie
avec 10 peignes de longueurs variées (dont des
peignes pour l’oreille gauche et l’oreille droite,
des ciseaux de coiffeur, un peigne de coiffure à
dents inclinées, un peigne de coiffeur à dents
droites, une cape de pleine longueur, un étui,
9 pinces à cheveux pour faciliter la coupe, une
brosse pour la nuque et un DVD d’instructions
bilingues de 28 minutes avec tout plein de
conseils. Il y a aussi de l’huile de lubrification,
une brosse et un protège-lame pour faciliter
l’entretien et protéger les lames de la tondeuse.
GUIDE CONAIR DE COUPE
DES CHEVEUX À LA MAISON
Avant tout :
1. Inspecter la tondeuse, s’assurer qu’elle est
propre, bien huilée et qu’elle fonctionne bien.
2. Placer une cape autour du cou de la
personne.
3. Asseoir la personne de façon à ce que sa tête
soit au niveau des yeux pour plus de stabilité
et de contrôle.
4. Peigner les cheveux puis saisir la tondeuse
d’une façon confortable. Tout est prêt pour
la coupe.
COUPE MOYENNE À LONGUE
Commencer par une petite section de cheveux
pour s’habituer à la longueur laissée par la ton-
deuse. Débuter avec le peigne le plus long pour
ensuite passer à un peigne plus court si l’on dé-
sire couper les cheveux plus courts.
• Le peigne court (numéro 1) coupe les cheveux
à 3 mm.
• Le peigne mi-court (numéro 2) coupe les
cheveux à 6 mm.
• Le peigne mi-long (numéro 3) coupe les
cheveux à 9 mm.
• Le peigne long (numéro 4) coupe les cheveux
à 12 mm.
• Le peigne long (numéro 5) coupe les cheveux
à 1,6 cm.
• Le peigne long (numéro 6) coupe les cheveux
à 1,9 cm.
• Le peigne long (numéro 7) coupe les cheveux
à 2,25 cm.
• Le peigne long (numéro 8) coupe les cheveux
à 2,5 cm.
• Le peigne pour l’oreille gauche est légerement
incliné pour contourner l’oreille gauge.
• Le peigne pour l’oreille droite est légèrement
incliné pour contourner l’oreille droite. Ces
peignes facilitent grandement cette partie de la
coupe des cheveux.
Poser le peigne en le tenant par
les dents pour enclencher sa
base sur les lames.
Pour enlever le peigne, placer
l’index et le pouce comme illus-
tré et pousser le peigne en sou-
levant.
REMARQUE : Ne jamais pousser ni forcer la ton-
deuse à travers les cheveux pour aller plus vite.
L’expérience professionnelle démontre que la
tondeuse travaille mieux quand elle passe à
travers la chevelure à sa propre vitesse.
Pour commencer la coupe :
1. Peigner les cheveux dans le sens naturel de
la pousse.
2. Avec le peigne long, découper les côtés, de
base en haut. Tenir la tondeuse légèrement
contre les cheveux, les dents du peigne
pointant vers le haut, mais à plat contre la
tête. Soulever la tondeuse graduellement
vers le haut et l’extérieur, ne coupant qu’un
peu de cheveux à la fois.
Procéder ainsi pour les côtés et l’arrière de la
tête. Pour couper les cheveux plus
courts :
A) Presser le peigne plus forte-
ment contre la tête, ce qui de-
mande un peu plus de pratique.
OU
B) Passer à un peigne plus court.
Il est préférable de laisser les che-
veux trop longs que trop courts.
Pour des cheveux plus longs sur
le dessus, utiliser le peigne de
coiffeur pour soulever les che-
veux, les coupant par-dessus le
peigne. Encore, tenir les cheveux
entre les doigts et les couper à la
longueur voulue. Toujours couper
de l’avant vers l’arrière de la
tête, raccourcissant les cheveux
graduellement en réduisant l’es-
pace entre le peigne ou les doigts
et la tête. Peigner souvent pour
constater les résultats et enlever les cheveux
coupés.
DÉLIGNAGE :
Le délignage se fait sans peigne. Peigner les che-
veux puis placer la tondeuse entre le favori et
l’oreille (ill. 1). Tenir le coin de la lame contre
la ligne des cheveux. Utilisant la ligne comme
guide, passer la tondeuse lentement autour de
l’oreille. Pour la nuque et les favoris, tenir la ton-
deuse inversée (ill. 1) et la presser légèrement
contre la peau, à la longueur voulue, déplaçant la
tondeuse vers le bas.
ARRÊTER. PEIGNER. VÉRIFIER.
Pour des résultats professionnels, peigner sou-
vent et vérifier les résultats. On évite ainsi les
favoris inégaux, la nuque inégale, etc.
CONSEILS POUR DES COUPES
À RAS PARFAITES.
Toujours couper du bas de la nuque jusqu’à la
couronne, utilisant le peigne le plus long. Tenir
le peigne à plat contre la tête et déplacer la ton-
deuse lentement à travers les cheveux. Procéder
de même pour les côtés, allant de bas en haut.
Pour un dessus plat, utiliser un peigne plat
et non le peigne de la tondeuse. Couper les
cheveux par-dessus le peigne (ill. 2). Pour
dégrader la nuque, utilisez le peigne n° 1. Pei-
gner pour voir s’il y a des inégalités. Découper
les favoris et la nuque (voir « Délignage »).
ENTRETIEN PAR
L’UTILISATEUR
ENTRETIEN DE LA TONDEUSE
SI LES LAMES NE SEMBLENT PAS BIEN
ALIGNÉES :
ENTRETIEN DE LA LAME
Toujours huiler les lames avant, pendant et après
l’usage pour assurer un rendement optimal. Te-
nir la tondeuse loin du corps, pointant vers le
bas et appliquer de l’huile sur le devant et les cô-
tés de la lame; essuyer l’excédent avec un linge
propre et doux.
La tondeuse Conair® a été soigneusement in-
spectée pour assurer le bon alignement des
lames. Il faut les réaligner si on les enlève pour
les nettoyer ou si elles ont été frappées. Com-
ment savoir si elles sont hors d’alignement?
30
PIÈCES
Trousse de coupe des cheveux
Directives
d’utilisation et
d’entretien
Modèle HC340WC
IMPORTANT SAFETY
INSTRUCTIONS
When using electrical appliances, especially
when children are present, basic safety precau-
tions should always be followed, including the
following:
READ ALL INSTRUCTIONS
BEFORE USING
KEEP AWAY FROM WATER
DANGER– any appliance is electri-
cally live, even when the switch is off.
To reduce the risk of death or injury by electric
shock:
1. Unplug this appliance before cleaning.
2. Do not place or store appliance where it can fall
or be pulled into a tub or sink.
3. Do not use while bathing or in a shower.
4. Do not place in, or drop into, water or other
liquid.
5. Do not reach for an appliance that has fallen
into water. Unplug immediately.
6. Always unplug this appliance from electrical
outlet immediately after using.
DO NOT REACH
INTO THE WATER
WARNING — To reduce risk of burns, electro-
cution, fire, or injury to persons:
1. This appliance should never be left un-
attended when plugged in. Do not pull, twist,
or wrap line cord around appliance.
2. Close supervision is necessary when this
appliance is used by, on, or near children or
invalids.
3. Use this appliance only for its intended
purpose as described in this manual. Do
not use attachments not recommended by
the manufacturer. Do not use an extension
cord to operate this appliance.
4. Never operate appliance if it has a damaged
cord or plug, or if it is not working properly,
if it has been dropped or damaged, or
dropped into water. Return appliance to a
service centre for examination and repair.
5. Keep cord away from heated surfaces.
6. Never drop or insert any object into any
opening on this appliance.
7. Do not place appliance on any surface while
it is operating.
8. Do not use this appliance with a damaged or
broken comb or with teeth missing from the
blades, as injury may occur. Before use,
make certain blades are aligned properly.
(See “Care of your Clippers.”)
9. Do not operate outdoors or where aerosol
(spray) products are being used or oxygen is
being administered.
10. Never operate the appliance with the air
openings blocked or while on a soft surface,
such as a bed or couch, where the air open-
ings may be blocked. Keep the air openings
free of lint, hair, and the like.
11. Always attach plug to appliance first, then to
outlet. To disconnect, turn all controls to
“OFF”; remove plug from outlet.
12. Avoid skin contact with moving blades.
13. When using appliance with its cord, check
for tangles or kinks in the cord. If the cord
does become tangled during use, turn unit
off and straighten cord before operating.
SAVE THESE
INSTRUCTIONS
OPERATING
INSTRUCTIONS
This appliance is intended for household use.
Use on Alternating Current (120V AC 60Hz) only.
This appliance has a polarized plug (one blade
is wider than the other). As a safety feature, this
plug will fit in the outlet only one way. If the plug
does not fit fully in the outlet, reverse the plug. If
it still does not fit, contact a qualified electrician.
Do not attempt to defeat this safety feature.
Your new Conair Haircut Kit has everything you
need to achieve professional haircuts at home.
Its powerful new torque motor clipper, with steel
blades for long-lasting cutting precision, fea-
tures a new 5-position adjustamatic taper con-
trol. Whatever hair length you set the lever for,
the clipper will automatically cut all hair in that
section at the desired length. Also included are
10 attachment combs for different hair lengths
(including left and right ear taper combs), bar-
ber scissors, a styling comb with angled teeth,
a barber comb with straight teeth, a full-length
barber cape, a case for easy storage, 9 styling
clips to assist you in cutting longer hair styles, a
neck brush and a 28 minute step-by-step How-
to DVD filled with styling tips and techniques in
both English and French. It also comes with lu-
bricating oil, a cleaning brush and a blade guard
for easy maintenance and protection of the clip-
per blades.
THE CONAIR GUIDE
TO CUTTING HAIR AT HOME
Before you start:
1. Inspect your clipper. Make sure it’s free of hair
and dirt, properly oiled, and running smoothly.
2. Place cape around the neck of the person
getting a haircut.
3. Seat the person so that his or her head is at
your eye level.This gives you greater visibility
and control.
4. First, comb hair until it’s tangle-free. Then
hold clipper in a comfortable grip. Now you’re
ready to cut.
MEDIUM TO LONG CUT
To begin with, cut only a small amount of hair
until you become used to the length each attach-
ment leaves the hair. Try the longest attachment
comb and put the taper control in the highest
setting. If you want a shorter cut, you can then
use shorter combs.
• Short attachment comb (number 1) cuts hair
to 1/8”.
• Medium-Short attachment comb (number 2)
cuts hair to 1/4”.
• Medium-Long attachment comb (number 3)
cuts hair to 3/8”.
• Long attachment comb (number 4) cuts hair
to 1/2”.
• Long attachment comb (number 5) cuts hair
to 5/8”.
• Long attachment comb (number 6) cuts hair
to 3/4”.
• Long attachment comb (number 7) cuts hair
to 7/8”.
• Long attachment comb (number 8) cuts hair
to 1”.
• Left ear attachment comb lightly tapers over
left ear. Attach combs by holding the
teeth up, then snapping them
onto the bottom of the clipper
blade.
To remove comb attachments,
place index finger and thumb as
illustrated; then pull out and up.
NOTE: Never push or shove the clipper through
the hair to make it move more quickly. Profes-
sional experience shows that the clipper works
most efficiently when it cuts through the hair at
its own speed.
To begin cutting hair:
1. The hair should be combed in its natural
direction.
2. Using the largest attachment comb, trim
sides from the bottom upward. Hold clipper
lightly against the hair with teeth
of the attachment comb pointing
upward, yet flat against the head.
Gradually lift the clipper upward
and outward through the
hair, trimming just a little at
a time. Repeat around sides and
back of head.
If you want hair to be even
shorter:
A) Apply more pressure to the
head with the attachment comb
that is in place. This takes a little
practice, of course.
OR
B) Just switch to a shorter attachment comb.
Remember, it’s better to leave
too much hair than too little. For
longer hair on top, use the barber
comb and lift hair on the top of
the head, cutting over the comb,
or hold the hair between the fin-
gers and cut to desired length.
Always working from the front
to the back of the head, gradually
cut the hair shorter by reducing
the space between the comb or
fingers and the head. Comb often
to check for uneven strands, and
to get rid of trimmed hair.
OUTLINING
Outlining requires no attachments. Comb hair
into the desired style. Position the clipper be-
tween the sideburns and the ear (see below),
making sure the corner edge of the blade is
against the hairline. With the outline of the hair as
your guide, slowly move the clipper over, around
and behind the ears. For the back of the neck
and the sideburns, hold the clipper upside down
(see above) and, holding it against the skin at the
length desired, move the clipper downward.
STOP. COMB. CHECK.
For best results, do as the professionals do:
comb hair often, and check clipping results as
you comb. This way you avoid uneven sides,
bangs, neckline, etc.
SHORTCUTS TO PERFECT
FLAT TOPS, CREW CUTS, ETC.
Always cut from the back of the neck to the
crown, using the longest comb setting. Hold
the comb attachment flat against the head and
slowly move the clipper up through the hair. Use
the same technique for the sides, cutting from
the bottom to the upper side of the head.
For the front to the crown, cut the hair against
the direction in which it grows, then even it up
with the sides.
For a flat top, use the flat comb, not the attach-
ment comb. Just cut hair on top of the head over
flat comb (see above).
To taper hair down to the neckline, use attach-
ment comb #1. Comb hair and check for uneven
spots. Outline sideburns and neck areas (see
“Outlining”).
USER MAINTENANCE
CARE OF YOUR CLIPPERS
IF YOU DETERMINE THAT BLADE ALIGNMENT
IS INCORRECT:
MAINTENANCE OF THE BLADE
Always apply oil to the blades before, during and
after use. This will ensure maximum cutting per-
formance. Hold clipper away from your body in
a downward position and apply oil on the front
and sides of the cutter blade. Wipe excess oil off
with a soft, dry cloth.
30
PIECE
Haircut kit
Instructions for
Care and Use
Model HC340WC
ill. 2
ill. 1