LIMITED THREE YEAR WARRANTY
Conair will repair or replace (at our option)
your unit free of charge for 36 months from
the date of purchase if the appliance is
defective in workmanship or materials.
To obtain service under this warranty, return
the defective product to the service centre
listed below, together with your purchase
receipt and $7.50 for postage and handling.
In the absence of a purchase receipt, the
warranty period shall be 36 months from the
date of manufacture.
ANY IMPLIED WARRANTIES, OBLIGATIONS,
OR LIABILITIES, INCLUDING BUT NOT
LIMITED TO THE IMPLIED WARRANTY OF
MERCHANTABILITY AND FITNESS FOR A
PARTICULAR PURPOSE, SHALL BE LIMITED
IN DURATION TO THE 36 MONTH DURATION
OF THIS WRITTEN, LIMITED WARRANTY.
IN NO EVENT SHALL CONAIR BE LIABLE
FOR ANY SPECIAL, INCIDENTAL, OR
CONSEQUENTIAL DAMAGES FOR BREACH OF
THIS OR ANY OTHER WARRANTY, EXPRESS
OR IMPLIED, WHATSOEVER.
This warranty gives you specific legal rights, and
you may also have other rights, which vary from
province to province
.
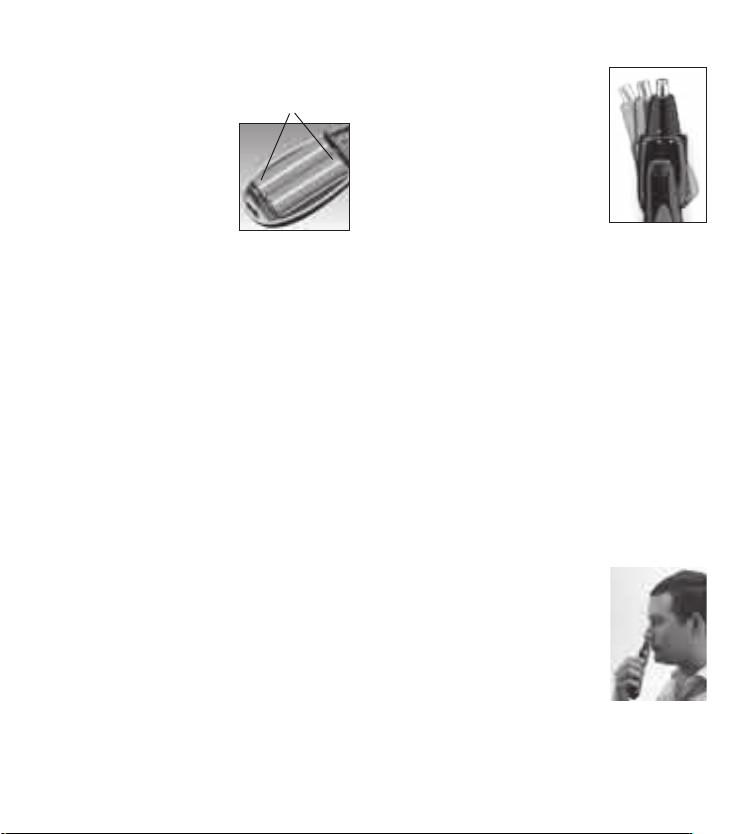
TO TRIM YOUR EAR HAIR
Turn unit on. Gently insert
trimmer head no more than
1" into outer ear canal. Gently
move trimmer in and out of the
outer ear and rotate trimmer
in a circular motion around
the ear canal opening. Guide
the trimmer around the outer
surface of ear to trim protruding hairs. Never
insert trimmer more than 1" into ear canal.
TYPES OF BEARDS/MUSTACHES
GROWING A BEARD OR MUSTACHE
There are three key factors that determine which
beard or mustache style is most suitable for
your face:
1. The shape and dimensions of your face.
2. The natural growth of your beard/mustache.
3. The thickness of your beard/mustache.
If you are unsure of the type of beard or
mustache that most suits your face, speak with
a professional hair stylist and ask for an opinion
on what style would be best. Once your beard
or mustache has been styled, it is essential that
you maintain its appearance. To do this, use your
shaper to trim your beard/mustache weekly.
For the best trimming results, your beard should
be slightly damp (not wet) before using the
trimmer. This will prevent the trimmer from
removing more hair than desired.
07CN10117 IB-7607
GETTING STARTED
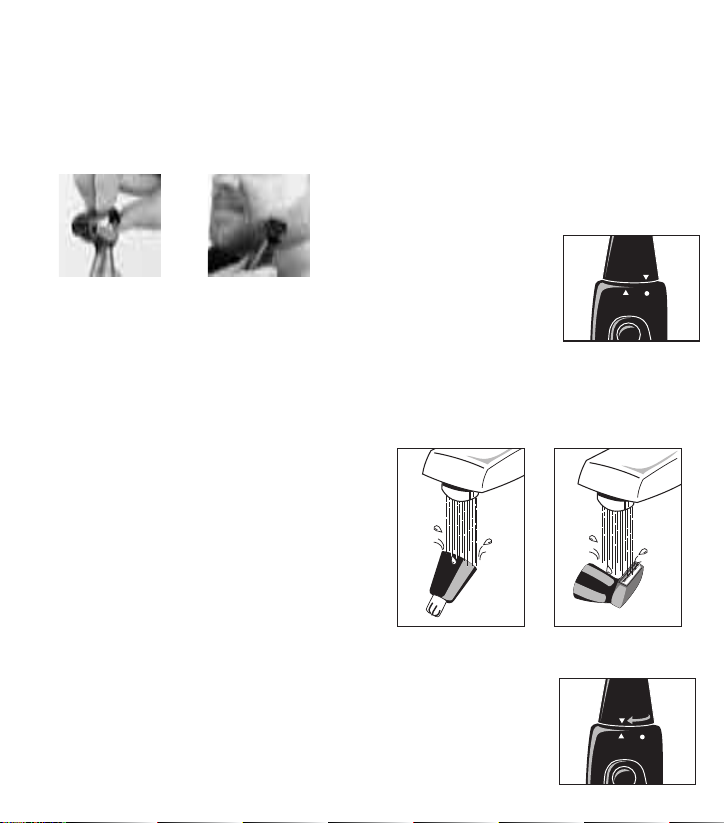
TO SWITCH TRIMMER HEADS
Begin with trimmer in normal pivot position.
Hold the handle of the trimmer while turning the
trimmer head counterclockwise until the arrow
mark is aligned properly with the circle mark
(Fig. 2). At this point you should be able to easily
lift the nose/ear trimmer head from the handle.
To use a new trimmer head on the unit, properly
install the head into position making sure the
arrow mark is aligned with the circle mark,
turn clockwise until the two arrows are aligned
(Fig. 3) and lock into position.
OUTLINING YOUR BEARD
1. It is always best to begin with a clean, slightly
damp beard.
2. After you have combed through your beard in
the direction it grows naturally, you will want to
outline the desired shape, beginning under your
jawline.
3. Attach the 3/4" trimmer head. Begin defining
your beard’s shape under your chin and work
upward on each side of your face toward your
ears. Then define the upper outline of your beard
across your cheeks, past your sideburns and
toward your hairline.
NOW YOU’RE READY TO TRIM YOUR BEARD
1. To use the adjustable attachment comb, slide
it over the trimmer blade and snap down into
position (Fig 4). At first, until you become familiar
with the adjustments, use the longest trim setting
(3/8”). (You can always go back and make your
beard a little shorter.) (Fig. 5)
2. Begin trimming your beard using smooth,
even strokes. Start with your sideburns and work
downward toward your chin. (Never attempt to
trim against the natural growth of your beard,
because the hair will be cut too short.)
3. If you decide you want a closer trim, you can
now adjust the 5-position comb to a shorter
setting and go over your beard again until you
achieve the desired length.
TO TRIM YOUR MUSTACHE
1. For best results, start with a clean, slightly
damp mustache.
2. Comb through your mustache in the direction
it grows.
3. Place the 5-position comb over the trimmer
blades and snap it into position. It is a good idea
to start with the longest trim setting adjustment.
(You can always go back and cut your mustache
more closely with a shorter setting.)
Fig. 2 Fig. 3
Fig. 4 Fig. 5
SERVICE CENTRE:
Conair Consumer Products Inc.
100 Conair Parkway,
Woodbridge, Ontario, L4H 0L2.
1-800-472-7606
©2007 Conair Consumer Products Inc.
www.conaircanada.ca
Consumer Call Centre E-mail :
Consumer_Canada@Conair.com
ALWAYS TRIM YOUR MUSTACHE
FROM THE TOP DOWN
After your mustache has been trimmed to the
desired length, remove the 5-position trimming
attachment and, using the blades only, define the
outline of the bottom of your mustache.
TO CLEAN YOUR TRIMMER
Make sure trimmer is off.
1. To remove the trimmer
head for cleaning, turn the
head counter-clockwise
until the arrow mark
aligned with the circle
mark, then lift the head
gently (Fig 6).
2. Only rinse the head under water (Fig 7).
For proper functioning of the unit, the handle
can not touch or be immersed in water.
3. After cleaning, make sure to shake dry the
head before replacing it
to the body.
4.To reassemble the head
onto the body, align the
arrow on the head with
Fig. 6
Fig. 7Fig. 7
the circle on the body and then, turn clockwise
until the arrow on the body is aligned (Fig 8)
Note: The trimmer head attachment can also
be cleaned by rinsing under water.
Fig. 8
GARANTIE LIMITÉE DE TROIS ANS
Conair, à sa discrétion, réparera ou remplacera
sans frais un appareil si, au cours des 36 mois
suivant la date de l’achat, il affiche un vice de
matière ou de fabrication.
Pour obtenir un service au titre de la garantie,
renvoyer le produit défectueux au service
après-vente, indiqué ci-dessous, accompagné
du bon de caisse et de 7,50 $ pour les frais de
poste et administratifs. En l’absence du bon de
caisse, la période de garantie sera de 36 mois
à compter de la date de fabrication.
TOUTE GARANTIE IMPLICITE,OBLIGATION OU
RESPONSABILITÉ, Y COMPRIS MAIS SANS Y
ÊTRE LIMITÉ, LA GARANTIE IMPLICITE DE
BONNE VENTE ET D’APTITUDE À ACCOMPLIR
UNE TÂCHE PA RTICULIÈRE, SERA LIMITÉE À
LA DURÉE DE 36 MOIS DE CETTE GARANTIE
LIMITÉE ÉCRITE.
EN AUCUN CAS PEUT-ON TENIR CONAIR
RESPONSABLE DE QUELQUE DOMMAGE
SPÉCIAL, INDIRECT OU FORTUIT QUE CE
SOIT POUR LE BRIS DE CETTE GARANTIE OU
DE TOUTE AUTRE GARANTIE, EXPRESSE OU
IMPLICITE QUE CE SOIT.
Cette garantie vous accordance des droits
particuliers et peut vous accorder d’autres droits
qui varient d’une province à l’autre
.
TONTE DES POILS D'OREILLES
Mettez la tondeuse en marche.
Insérez-la doucement dans le
canal auriculaire externe sur au
plus 25 mm. Agitez-la tondeuse
dans un mouvement circulaire
de va-et-vient tout en suivant
l'ouverture du canal. Guidez-la
sur la surface extérieure pour
couper les pols en surface. N'insérez jamais
la tondeuse plus de 25 mm dans le canal
auriculaire.
TYPES DE BARBES/MOUSTACHES FAIRE
POUSSER UNE BARBE OU UNE MOUSTACHE
Il y a trois facteurs à considérer pour établir quel
type de barbe ou moustache convient le mieux à
votre visage :
1. La forme et la grandeur de votre visage.
2. La croissance naturelle des poils.
3. L’épaisseur de la barbe ou moustache.
Si vous n’êtes pas certain du type de barbe
ou moustache qui vous conviendrait le mieux,
parlez-en avec un coiffeur et voyez quels conseils
il pourrait vous donner. Une fois que la barbe ou
la moustache est taillée, il est important d’en
maintenir l’apparence. Pour ce faire, vous pouvez
utiliser la tondeuse pour tailler votre barbe ou
moustache chaque semaine.
Pour obtenir les meilleurs résultats, la barbe
devrait être légèrement humide (non pas mouillée)
avant d’utiliser la tondeuse. Vous éviterez ainsi de
couper trop de poils.
07CN10117 IB-7607
TOUT D'ABORD
CHANGER LA TÊTE DE TONDEUSE
Commencez avec la position normale de la tête.
Tenez le manche tout en tournant la tête dans le
sens antihoraire jusqu'à ce que la flèche s'aligne
avec le cercle (ill. 2). Vous devriez alors pouvoir
séparer la tête de tondeuse pour poils de nez/
oreille du manche.
Pour utiliser une autre tête de tondeuse, posez la
tête correctement, alignant la flèche sur lat ête
avec le cercle sur le manche, puis en tournant
la tête dans le sens horaire jusqu'à ce que les
deux flèches soient alignées (ill. 3). La tête sera
alors engagée.
DÉCOUPAGE DE LA BARBE
1. Il est toujours plus facile de débuter avec une
barbe propre et légèrement humide.
2. Une fois la barbe peignée dans le sens de la
pousse naturelle, découpez-la de la forme voulue,
en débutant avec le contour de la mâchoire.
3. Découpez la forme en partant sous le menton
et en travaillant vers le haut, de part et d’autre
du visage, jusqu'aux oreilles. Découpez ensuite
le haut, le long des joues, des favoris et vers la
ligne des cheveux.
VOUS ÊTES PRÊT À TAILLER VOTRE BARBE
1. Pour utiliser le peigne ajustable, glissez-le sur
la lame de la tondeuse et enclenchez-le en place
(ill. 4). Au début et jusqu'à ce que vous soyez
familier avec l'ajustement, utilisez la position la
plus longue (9 mm)(vous pouvez toujours faire une
deuxième passe plus courte).
2. Commencez la tonte en passes douces et
uniformes. Partez ds vavoris vers le menton. (Ne
tondez jamais à contre-poil car les poils seront
coupés trop courts.)
3. Si vous voulez une coupe de plus près, vous
pouvez ajuster le peigne à une autre position et
refaire la tonte jusqu'à ce que vous obteniez la
longueur voulue.
TAILLER SA MOUSTACHE
1. Une moustache propre et légèrement humide
donnera de meilleurs résultats.
2. Peigne la moustache dans le sens de la
pousse.
3. Placez le peigne à 5 positions sur la lame et
enclenchez-le. Il est bon de débuter au réglage
le plus long (vous pouvez toujours repasser à un
réglage plus court).
TAILLEZ TOUJOURS LA MOUSTACHE DE HAUT
EN BAS
Une fois la moustache taillée à la longueur
voulue, enlevez le peigne à 5 positions et,
n'utilisant que la lame, définissez la ligne du bas
de la moustache.
ill. 2 ill. 3
Fig. 4 Fig. 5
SERVICE APRÈS-VENTE :
Conair Consumer Products Inc.
100 Conair Parkway,
Woodbridge, Ontario, L4H 0L2.
1-800-472-7606
©2007 Conair Consumer Products Inc.
www.conaircanada.ca
Courriel du centre d’appels à la clientèle :
Consumer_Canada@Conair.com
TAILLEZ TOUJOURS LA MOUSTACHE
DE HAUT EN BAS
Une fois la moustache taillée à la longueur
voulue, enlevez le peigne à 5 positions et,
n’utilisant que les lames, découpez le contour
inférieur de la moustache.
NETTOYER LA TONDEUSE
Assurez-vous que la tondeuse est éteinte.
1. Pour enlever la tête
et la nettoyer, tournez-la
dans le sens antihoraire
jusqu'à ce que la flèche
s'aligne avec le cercle,
puis soulevez la tête
doucement (ill. 6).
2. Ne rincez que la tête sous l'eau (ill. 7). Afin
d'assurer un bon fonctionnement, le manche
ne devrait pas toucher l'eau ni être plongé
dans l'eau.
3.
Après le nettoyage,
assurez-vous de bien
sécher la tête avant
de la remettre sur le
manche.
ill. 6
ill. 7ill. 7
4. Pour rassembler la tête, alignez la flèche
sur la tête avec le cercle sur le manche et
tournez la tête dans le sens horaire jusqu'à ce
que les flèches soient alignées (ill. 8).
Remarque : La tête de tondeuse peut aussi
être rincée sous l'eau.
ill. 8