Conbrov T17 User manual

Conbrov T17 Dash Cam
User Manual
Model No.: T17

Table of Contents
Part 1:Before First Use .............................................1-2
Part 2:Quick Guide ......................................................3
Part 3: Detailed User Manual ................................. 4-24
Part 3 Detailed User Manual
What's included ......................................................... 6
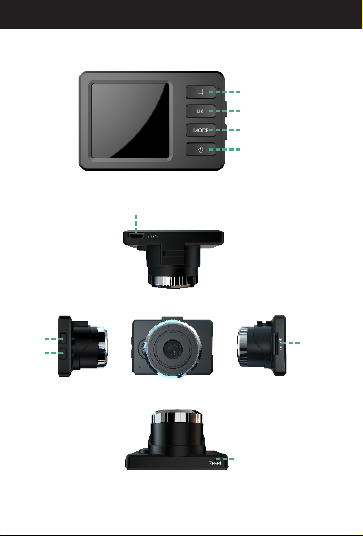
Button specification .................................................. 8-9
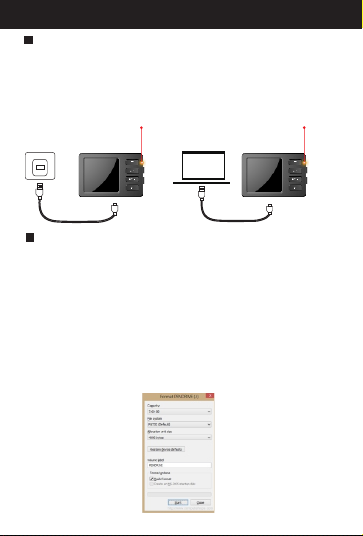
Charging your camera ................................................ 10
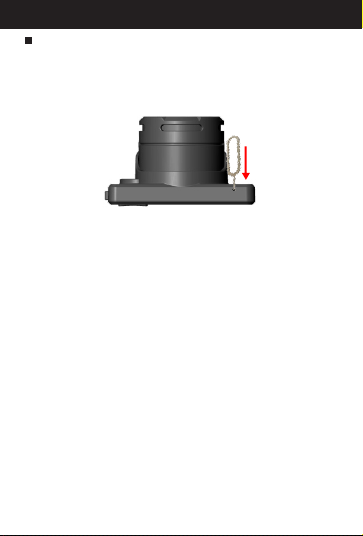
Installing SD card ....................................................... 10
Setting the date and time .............................................
11
Directions for Function Operation .......................... 12-21
1.How to Record Manually...........................................
12
2.How to Record while Charging.................................
12
3.About Menu Button....................................................
13
4.About Mode Button....................................................13
5.About Loop Recording...............................................14
6.About Resolution...................................................... 14
7.About Date Stamp.....................................................15
8.About Format............................................................15
9.About Language Setting............................................ 16
10.About Auto Power Off...............................................16
11.About Automatic Screen Savers................................17
12.About Manual Screen Savers...................................
17
13.About Frequency.....................................................18
14. About Time Setting..................................................18
15. About Video Rotate.................................................
19
16.About Resetting...................................................... 19
17.About Video Preview................................................
20
18.About G Sensor.......................................................20
19.About Photographing...............................................21
20.About Recording Audio.............................................21
21.About Beep Sound...................................................21
Technical specifications ..............................................
22
LED status ..................................................................
23
FAQs ..........................................................................
24
Warranty ....................................................................
25
Disposal .....................................................................
25
Declaration of conformity ............................................
26

1
Charging the camera
Formatting the micro SD card
Yellow indicator Yellow indicator
Before the first use, please charge the camera to full
power. While charging, the LED lights turn yellow and
then turn off when the camera is fully charged.
Before the first use, please format the micro SD card to
FAT 32 format.
A. (Applicable to Windows system ONLY.)The camera
only supports class 10 micro SD card with at least an
8GB capacity and a maximum capacity of 32 GB.
B. When in standby mode, press menu button two
times to open the menu items and select “Format.”
Then press ”OK.” You'll see “cancel” and “OK” options.
When you select “OK,” it will format the micro SD card.
At that point, anything previously stored on the micro
SD card cannot be recovered.
Part1: Before First Use

Resetting the camera
If the camera malfunctions for any reason, reset it
with the included pin. A small paper clip can also be
used.
2
Part1: Before First Use

A.Install the micro SD card B.Set up the camera
C. Turn On/Off and record D.Play the video
USB2 .0
1
2
For more detailed information, see Part 3:Detailed User Manual.
3
Part2: Quick Guide

• Read this instruction manual carefully before using
the camera. It contains important information for your
safety as well as operating and maintenance
instructions.
• Follow all safety precautions in order to prevent
damage due to improper use of the camera.
• Keep this user manual for future use. Should this
camera be passed along to a third party, this user
manual should be handed on as well.
• Use the camera only for its intended purpose.
• In the event of improper use or erroneous handling,
no liability can be assumed for any possible damage
which may occur.
• Never try to repair the camera yourself. Only allow
qualified personnel to repair the camera in the event
of malfunctions.
• Warning! Never immerse the camera in water or other
liquids while cleaning or operating it. Never hold the
product under running water.
• Do not open the housing under any circumstances.
Do not introduce any metal objects into the interior of
the housing.
• Never use accessories which are not recommended
by the manufacturer.
• Keep the camera away from all hot surfaces and
flames. Protect the camera from extreme heat and
cold, dust, direct sunlight, humidity , and water.
• Do not place heavy objects on the camera.
The manufacturer is not responsible for any missing
video data due to maloperation, microSD card
malfunctions, camera angle limitation, etc.
4
Safety precautions

The camera should be used for legal purpose only.
Follow the laws of your country. Recording and
circulating an image of an individual may constitute
an infringement of their privacy for which you could
be liable. Ask for authorization before filming
individuals, particularly if you want to keep your
recordings and/or circulate images on the Internet
or any other medium. Do not circulate a degrading
image or one which could undermine the reputation
or dignity of an individual.
5
Warning on invasion of privacy
.

Conb rov T17 D ash Cam
User M anual
Mode l No.: T17
Camera Car bracket
Car charger
USB cable Card reader Pin
User manual
6
What's included

7
T17 diagram
Reset
USB
Micro SD
card
Up
Down
Menu
Record/Enter
Mode
Power

A.Power B.Record/Confirm
C. Menu D.Mode
In standby mode, press”OK”
button and switch to recording
mode.
In standby mode, short press
mode button, then you can switch
between photo and replay mode.
Press and hold the power bu tton for
2 seconds, the camera makes a
start-up sound and the sc reen lights
up and then enters into sta ndby mode;
press the power button fo r 2 seconds
again, the camera makes a s hutdown
sound and its screen goes o ut and
then powers off.
In standby mode, press “menu” button
to menu option, you can set p arameter
information and previ ew it; when in
menu mode, press”OK”,then you can
set parameter informa tion and save it.
8
Button specification

E.Select up/down
F. Reset
If the camera malfunctions for
any reason, You can use the
included pin to push the reset
button to reset. When resetting is
successful, the camera will turn
off right away. Then, you need
to press the “power” button to
turn on the camera again.
In menu/mode mode, press
“up/down” button, then you
can choose the menu items.
9
Button specification

Yellow indicator Yellow indicator
1. Charging your camera
(1)Please refer to the picture above to insert the micro SD
card into the slot. Pay attention to the direction, as the micro
SD card only goes in one way.
(2)When inserting the micro SD card into the slot, you need
to press it until you hear a click sound.
.
Installing the microSD Removing the microSD
2. Installing SD card
10
Directions for your Conbrov T17 Camera
(1)There are two ways of charging: one is charging by car
charger(included) and the other is charging via your PC.
(2)The yellow LED is on while charging and turns off when
the camera is fully charged.

3. Setting the date and time
Press the menu button into menu items two times, then
press the“down” button to select ”Date/Time”, press the
“OK” button, and you'll see the date and time. Then, press
the “up” or “down” button to set the date and time. When
finished, press the menu button two times back to standby
mode.
11
Directions for your Conbrov T17 Camera

1. How to Record Manually
2. How to Record while Charging
.
Press and hold the power button to turn on the
camera into standby mode, and press the “OK” button
to start recording. Then, you'll see a flashing red icon
on the screen. While recording, pressing the “OK”
button will stop the recording and save the video.
In this mode, you don't need to turn on the camera or
record manually first. Plug it into charging port or
connect to the car charger, the camera will start up
automatically to record. While recording, pressing
the “OK” button will stop the recording back to
standby mode.
HD
12
Directions for your Conbrov T17 Camera

When in standby mode, press “menu” button into menu
items and select “Loop recording”.Then press “OK”.
You'll see “Off”,“Three Minute,”“Five Minute” ,and “Ten
Minute” options. If you choose “Off”, it will turn off the
loop recording function. When the card is full, the
camera will turn off automatically. If you choose “Three
Minute”, “Five Minute”,or“Ten Minute” option, when
the card is full, the newest video will overwrite the
oldest one.“Three Minute” means that each video clip
is 3 minutes long. “Five Minute” for 5-minute video clip,
“Ten Minute” for 10-minute video clip.
5. A Loop Recordingbout
6. A Resolutionbout
When in standby mode, press the menu button into
menu items and select “Resolution” .Then press “OK”
.You'll see “FHD” “HD” and “VGA”options. Select the
resolution you need and press “OK” to save the
setting. When finished, press the menu button two
times back to standby mode.
13
Directions for your Conbrov T17 Camera

3. About Menu Button
When in standby mode, press the “menu” button to
enter into the menu items. Then, you can press the
“up” and “down” buttons to select menu items.
4. About Mode Button
In standby mode, you can press the “mode” button to
switch between photograph and video playback
modes.
14
Directions for your Conbrov T17 Camera

When in standby mode, press menu button to menu
items and select “Date Stamp”. Then press “OK”.
You'll see “Off” and “On”options. When you choose
”On”, press “OK”. Press the menu button two times to
get back to standby mode. In this case, there will be
Date Stamp on video while playing videos. If you
choose ”Off” instead, there won't be any Date Stamp
on the video while playing.
7. A Date Stampbout
8. A Formatbout
When in standby mode, press menu button two times to
open the menu items and select “Format”. Then press
“OK”. You'll see “cancel” and “OK” options. When you
select “OK” ,it will format the micro SD card. At that point,
anything previously stored in the micro SD card cannot
be recovered.
15
Directions for your Conbrov T17 Camera

9. A Language Settingbout
When in standby mode, press menu button two times
into the menu items and select “Language”. Then
press ”OK”. You'll see several language options.
Choose your national language and press “OK” to
save the setting. When finished, press the menu
button two times back to standby mode.
10. A Auto Power Offbout
When in standby mode, press menu button two times
to menu items and select “Auto Power Off”. Then,
press ”OK”. You'll see “Off”, “One Minute”, “Three
Minute”options and “Ten Minute”. If you choose
”Off”,the camera won't turn off automatically. If you
choose “One Minute”, the camera will turn off
automatically when standby time is more than one
minute. If you choose “Three Minute”, the camera will
turn off automatically when standby time is more than
three minutes. If you choose “Ten Minute”, the camera
will turn off automatically when standby time is more
than ten minutes. Select the option, you need and
press “OK” to save the setting. When finished, press
the menu button two times back to standby mode.
16
Directions for your Conbrov T17 Camera

Dri ver rec order
POW ER OFF
11. A Automatic Screen Saversbout
When in standby mode, press menu button two times
to menu items and select “Screen Savers”. Then,
press “OK”. You'll see “Off”,“Three Minute”, “Five
Minute” and ‘“Ten Minute” options. If you choose “Off”,
t h e c a m e r a w o n ' t s h o w u p S c r e e n S a v e r s
automatically during recording. If you choose“Three
Minute”, the camera will show up Screen Savers
automatically when recording time is more than three
minutes. If you choose “Five Minute”, the camera will
show up Screen Savers automatically when recording
time is more than five minutes. If you choose “Ten
Minute”, the camera will show up Screen Savers
automatically when recording time is more than ten
minute. Setting Screen Savers will help you save more
power battery while recording. Select the option you
need and press “OK” to save the setting. When
finished, press the menu button two times back to
standby mode.
12. A Manual Screen Saversbout
17
When in recording mode or standby mode, press and
hold the power button will enter into manual Screen
Savers. Then, press the power button again to close
screen saver mode.
Directions for your Conbrov T17 Camera

13. A Frequencybout
When in standby mode, press menu button two times
to menu items and select “Frequency”. Then, press
“OK.” You'll see “50HZ” and “60HZ” options. Select
the option you need and press “OK” to save the
setting. When finished, press the menu button two
times back to standby mode.
14. A Time Settingbout
When in standby mode, press menu button two times
to menu items and select “Date/Time”. Then, press
“OK”. You'll see the defaulted time format. Press “up”
and “down” buttons to set the date and time. When
finished, press “OK” to save the setting and press the
menu button two times back to standby mode.
18
Directions for your Conbrov T17 Camera
Table of contents
Other Conbrov Dashcam manuals