Concordia Ascent-Touch User manual

User Guide
Ascent-Touch Brewer

Table of Contents
Important Safety Information............................... 1
The Ascent-Touch Brewer Components .................. 2
Using the Brewed Coffee System ....................... 3
Starting the System ..................................................... 3
Machine Software Overview ................................ 4
System Menu ................................................................. 4
Accessing the System Menu...........................................4
Check Statistics ..............................................................4
Beans and the Bean Hopper................................ 5
Storing Coffee Beans.................................................... 5
Filling a Bean Hopper .....................................................5
Inserting the Hopper Stopper..........................................5
Removing the Hopper Stopper .......................................5
Cleaning and Maintenance .................................. 6
Daily Cleaning Procedures ........................................ 6
Daily Cleaning Timer.......................................................6
Perform the Clean Cycle.................................................7
Clean Drain Grate and Drain Tray ..................................9
Clean Exterior Surfaces ..................................................9
Refill Consumables .........................................................9
Display Messages.......................................................... 10
Troubleshooting ............................................................ 10
FAQ ................................................................................. 10

Customer Service (800) 778-0990 1
Important Safety Information
The safety of you and your customers is important to Concordia. The
Ascent-Touch Brewer dispenses hot liquids. Please follow all safety
precautions outlined in this manual, in order to reduce the risk of electric
shock, burns, and/or injury to persons or property.
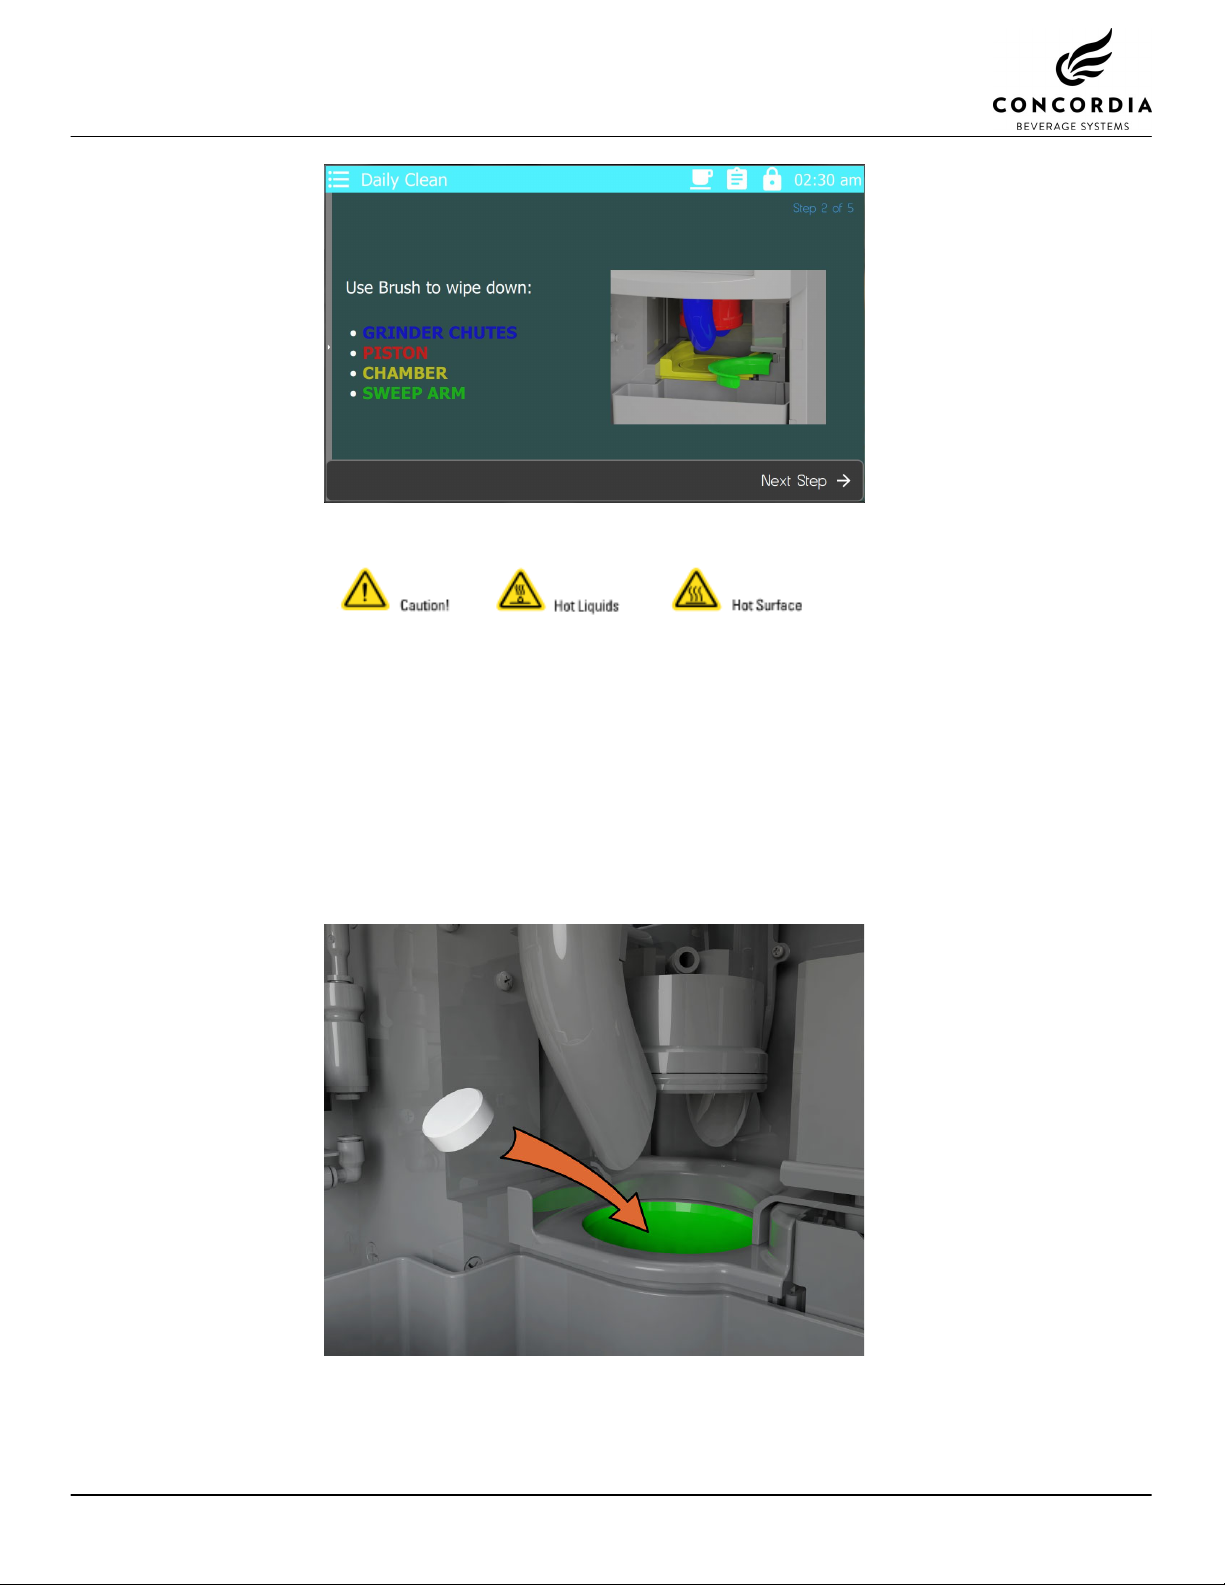
Machine Operation
Do not use the machine for anything other than its specific
intended purpose.
Close supervision is required anytime the machine is used near
children.
Machine must be installed in a safe and stable location and in
accordance with Concordia’s installation requirements.
Machine to be installed with adequate backflow protection to
comply with the applicable federal, state, or local plumbing codes
having jurisdiction.
Do not attempt to override safety interlocks.
Do not operate the machine with unauthorized parts or
attachments. Improper use may cause fire, electrical shock,
hazard, or injury.
Hot Surfaces and Liquids
Care must be taken around the machine, as hot liquids are
produced and dispensed. Serious burns can occur.
Do not touch hot surfaces or parts.
Electrical
To protect against electrical hazards, do not immerse the power
cord, plugs, or machine in water or any other liquid.
Turn the power switch to the OFF position when the machine will
not be used for an extended period.
NOTE: Perform a thorough clean prior to switching the machine
off for an extended period. See cleaning and maintenance
procedures on page 6.
Do not operate the machine with an improper or damaged power
cord or plug, or after the machine has been damaged in any
manner.

Customer Service (800) 778-0990 2
The Ascent-Touch Brewer Components
1. Touch Screen
The touch screen provides a user-friendly interface for selecting and pouring beverages.
2. Front Door
The lower section of the front door opens to access the grounds bin for cleaning and
maintenance.
3. Product Outlet
The product outlet is where beverages and hot water are dispensed.
4. Power Switch
The power switch is located on the middle left side on the back of the machine.
5. Drain Tray and Grate
The drain tray and grate direct excess liquid to the drain.
6. Bean Hoppers
Bean hoppers store whole beans and are located on top of the machine. Up to 4 bean
hoppers may be present.
7. Grounds Bin (Not Shown - See Page 7)
The grounds bin holds the used coffee grounds and is located behind the front door. The
machine will notify you when the grounds bin is full and needs to be emptied.
1
2
3
4
7
6
5

Customer Service (800) 778-0990 3
Using the Brewed Coffee System
Starting the System
The power switch is located at the rear of the machine, on the left side.
1. Press the power switch to the ON position to start the machine.
2. Make sure the grounds bin is in place and the front door is in the
closed position when turning on the machine. The machine will not
warm up if the grounds bin is out or the front door is open.
3. The display will read:
CALIBRATING
If hot water tank is still heating when calibration is complete the display
will read:
TANK IS WARMING
Machine warm-up takes up to 10 minutes. During warm-up, the machine
is heating the water and calibrating the brew group.
WARNING: Wait at least 10 seconds between turning the machine off
and back on again. Quickly flipping the power switch on and off can blow
a fuse within the machine and/or result in machine malfunction.

Customer Service (800) 778-0990 4
Machine Software Overview
System Menu
Accessing the System Menu
Open the door to display the system menu icons.
Daily Clean
The screen will guide you through the cleaning process. For cleaning
procedures, see page 6.
Check Statistics
The screen will display the preventative maintenance schedule,
beverage counts, cleaning schedule, and other beverage statistics.

Customer Service (800) 778-0990 5
Beans and the Bean Hopper
Always use fresh, whole beans to ensure a quality beverage.
WARNING: Never place coffee beans in the grinder using your hand(s).
WARNING: Do not place ground coffee, or other foreign materials, in the bean hopper.
Storing Coffee Beans
Coffee beans are typically sealed in airtight packaging by the roaster. Once the bag has been opened, the
freshness of the beans will begin to decrease.
To store beans that have already been opened, reseal the bag, removing as much air as possible. Store at
room temperature; do not refrigerate or freeze.
Filling a Bean Hopper
1.Remove the hopper lid
2.Pour the beans into the bean hoppers
3.Replace the hopper lid
DO Use fresh, whole coffee beans.
DO NOT Place ground coffee into the bean hopper.
DO NOT Place foreign materials in the bean hopper.
DO NOT Feed beans into the grinder by hand.
Inserting the Hopper Stopper
The hopper stopper blocks the hopper chute when removing a full bean hopper.
1. Place the hopper stopper in the slot at the base of the bean hopper and push it into the bean hopper.
2. With the hopper stopper in place, you can remove a full hopper from the machine. Make sure to hold the
lid on top of the hopper
Removing the Hopper Stopper
To remove the hopper stopper once the bean hopper is back in its proper position on top of the Ascent Touch
Brewer, simply pull the hopper stopper from the bean hopper.
Hopper Stopper

Customer Service (800) 778-0990 6
Cleaning and Maintenance
To ensure sanitation, avoid mechanical failure, and ensure continual
operation, the Ascent Touch Brewer MUST be cleaned and maintained
daily.
Concordia cleaning products must be used in order to ensure proper
cleaning.
NOTE: Do NOT store cleaning products near consumables.
DO NOT USE CLEANING PRODUCTS THAT CONTAIN
BLEACH.
Daily Cleaning Procedures
Daily cleaning and maintenance can be performed in 10 minutes.
1. Perform the clean cycle
2. Empty the grounds bin
3. Clean the drain grate and the drain tray
4. Clean exterior surfaces
5. Clean the product outlet
Daily Cleaning Timer
You must clean the Ascent Touch Brewer every 24 hours. After 24
hours, the clean icon will appear in the upper right corner of the display.
You must clean the machine within the next two hours.
If the machine is not cleaned within two hours after the clean icon
appears the machine will be disabled and you will not be able to pour
drinks until the clean cycle has been performed.
(Clean Icon)

Customer Service (800) 778-0990 7
Perform the Clean Cycle
1. Open the door to show the option icons on top right of screen.
2. Press the DAILY CLEAN icon.
3. Press START CLEAN.
4. The display will show:
PLEASE TAKE OUT AND CLEAR GROUNDS BIN
5. Open the front door and remove the grounds bin. Once the grounds
bin has been emptied and placed back in the system, close the door
and press NEXT STEP.
6. The display will show: GETTING READY

Customer Service (800) 778-0990 8
WARNING: The chamber and surrounding areas will be hot!
7. Use the cleaning brushes provided to clear all coffee debris from the
brew group area. Clean the grinder chutes thoroughly with the white
bristled tube brush. Ensure all coffee grounds have been cleared
from the chute opening. Clean the piston, chamber, and sweep arm
with the paint brush.
8. Close the door and press NEXT STEP.
9. The display will show: RINSING
10. Wait until the rinse cycle finishes and the display shows: DROP
CLEANING TABLET INTO CHAMBER
11. Place one cleaning tablet in the brew chamber and press NEXT
STEP.

Customer Service (800) 778-0990 9
12. The display will show: PLEASE PLACE CLEANING TUBE UNDER
DISPENSE NOZZLE
13. Place the cleaning tube under the product outlet and press NEXT
STEP.
14. The display will show: CLEANING
15. Wait until the cleaning cycle finishes and the display shows:
TAKE OUT AND CLEAR GROUNDS BIN / WIPE DISPENSE
NOZZLES
16. Remove and empty the grounds bin and clean the product outlet
area thoroughly and then press NEXT STEP.
17. Select COMPLETE.
Clean Drain Grate and Drain Tray
1. Remove the drain grate and clean with sanitizer.
2. Clean the black plastic drain tray with towel moistened with soap and
water. Do NOT use bleach or any other chemical cleaner, or wash in
a dishwasher.
Clean Exterior Surfaces
1. Clean the exterior of the machine area using a towel moistened with
sanitizer.
2. Clean the front panel of the machine.
3. Thoroughly clean around the beverage dispensing area. Wipe with a
wet towel.
4. If further cleaning is necessary, clean using mild dish soap mixed
with warm water.
WARNING: To avoid contact with chemicals and hot water, do not
clean the beverage dispensing area during the brew system clean
process.
Refill Consumables
Refill all beans, as needed.

Customer Service (800) 778-0990 10
Display Messages
DISPLAY MESSAGE WHAT TO DO
Calibrating Wait for initialization to complete.
Warming Up
Machine warm-up requires up to 10 minutes. If this message appears
on screen for more than 30 minutes, turn machine off at power switch,
wait 10 seconds, and turn machine on.
Select Coffee The machine is operational and ready to pour a beverage.
Grounds bin out. Please replace to
continue. Replace grounds bin to resume normal operation.
Door open. Please close door to continue. Close door to resume normal operation.
Brew clean is due. Please clean to continue. Perform the clean cycle. For cleaning procedures, see page 6.
Grounds bin is full. Please empty to
continue. Empty the grounds bin.
Troubleshooting
MACHINE SYMPTOM WHAT TO DO
Display is blank
Ensure the machine’s power switch is turned “ON,” see page 4.
Ensure the power cord is plugged into the wall outlet.
Machine won’t operate
Check for display for an error message.
Ensure the power cord is plugged into the wall receptacle.
Ensure the machine’s power switch is turned “ON,” see page 3.
Verify the building main circuit breaker is not tripped.
Coffee is bitter
Perform the clean cycle. For cleaning procedures, see page 6.
The machine may need to be recalibrated. Contact Customer Service for
assistance.
The coffee beans are stale. Use fresh beans.
FAQ
Q - Can I use different types of coffee beans?
A - YES. However the recipes are set for specific types of coffee. The machine will need to be recalibrated
by a trained technician. .
Q - How do I cancel a beverage?
A - Press the CANCEL button any time during beverage pour to stop the pouring of a beverage.
Q - How can I tell if my employees cleaned the machine?
A - If your machine is not cleaned within 24 hours, the display will read BREW CLEAN IS DUE. For
complete information on the cleaning timers, see page 6.
Q - How do I check the daily beverage statistics?
A - The Ascent Touch Brewer tracks both daily and cumulative beverage statistics. For step-by-step
directions on checking beverage statistics, see page 4.
Q - If I want to clean my bean hoppers, how do I pull them off the machine without spilling the
beans?
A - To remove a bean hopper containing beans, you must first place the hopper stopper in the bean hopper.
For complete instructions on inserting the hopper stopper, see page 5.

PN 2900-352
Rev C
Concordia Beverage Systems, Inc.
6812 185th Avenue NE
Redmond, WA 98052
USA
Sales
(800) 995-9019
(425) 453-2800
Customer Service
(800) 778-0990
(425) 453-2868
Table of contents
Popular Brewing System manuals by other brands

Blichmann Engineering
Blichmann Engineering TOWER of POWER Operation, Assembly & maintenance manual

American Metal Ware
American Metal Ware Shuttle P300 Operator's manual

Instant
Instant 140-6017-01 user manual

Curtis
Curtis G4 CGC Series user guide

Klarstein
Klarstein Beerfest manual

BrewBuilt
BrewBuilt X1 Uni Pro Assembly and Instruction Guide