Connevans FmGenie User manual

Bring the magic
of sound to your ears
User Guide &
Reference Manual
Third Edition

fm
G
enie
fm
G
enie
fm
G
enie
fm
G
enie
Welcome to your new
fmGenie radio aid system
A range of information guides are supplied
with your system.
For those new to radio aids, we particularly
recommend pages 12-17 of this User
Guide and new fmGenie users will find the
separate Fast Track Guide is the easiest way to get
their new system working.
User Guide & Reference Manual
This User Guide & Reference Manual contains
everything you could possibly need to know about an
fmGenie in one book.
In its entirety it is ‘intensive reading’ – however, keep this booklet safe as
most users find it invaluable for future reference,
troubleshooting and for expanding their system.
We have carefully divided it into structured sections to
help you navigate through the many pages.
We would suggest that you become familiar with using
your fmGenie before activating some of the more
advanced features.
If you do not have an adviser to turn to for guidance you
are welcome to contact the fmGenie support team by
Many questions can be answered by looking in the Questions & Answers
section and the appendices.
fm
G
enie
– Communication for life
fm
G
enie
fm
G
enie
Encapsulated Morning &
Evening Check List Card
To help users or carers keep their
equipment up and running.
Single sided
A4 card
for
pinning
up on
the wall.
www.connevans.com/fmgenie
This information website contains the entire
current Connevans Catalogue plus a wealth of
other information, including all the fmGenie
sheets featured here.
Check for new information on the fmGenie or
print spare copies of information sheets.
www.DeafEquipment.co.uk
Online shopping website for all equipment
supplied by Connevans
Including spares and additional items to add to
your fmGenie system.
Fast Track Guide
A basic step by step guide to getting started with a new
fmGenie system so you can use it straight away.
New fmGenie systems come with a separate Fast Track
Guide dedicated to the specific system – such as direct
input, neck loop or use with MicroMLxS/MLxS.
This manual also includes a generic fast track guide to cover
the first steps.
Encapsulated Tutor
Courtesy Card
Ideal for lending to a tutor
the first time they use a
radio aid so they
know how and
why they have
to wear the
transmitter.
Double sided A5
card.
Customer Services: 01 737 247571 Text: 01 737 243134 Fax: 01 737 223475
www.connevans.com www.DeafEquipment.co.uk
CONNEVANS LIMITED
54 Albert Road North, Reigate, Surrey RH2 9YR

fm
G
enie
fm
G
enie
5
1
Fast Track Guide
Generic Fast Track Guide
The fmGenie uses standard size AA batteries. Rechargeable batteries are
the recommended option and, once fitted, are charged ‘in situ’ – just like
a mobile phone.
Rechargeable batteries – nickel metal hydride (NiMH)
New rechargeable batteries require charging before use.
1 To fit the batteries, slide open the battery
cover and insert as shown. The technique
is a combination of ‘squeeze, thumb and
wiggle’– you won’t break it and the
firm fit stops the battery cover
accidentally falling off.
2 Do NOT turn on the fmGenie.
3 Plug the twin tail charger into the socket marked
‘Chg’ and turn on charger – rolling battery bars
should be visible on the right of the status display.
4 The equipment will be given an initial 4 hour charge – enough for a
few days’ use.
5 When the display goes blank, fmGenie is ready for use.
After this initial charge, your fmGenie will automatically
take either a full or top up charge as required.
Non Rechargeable Alkaline batteries
The fmGenie can also be used with alkaline AA batteries – which
can be useful in an emergency – you could even borrow
some from your TV remote controls!
The performance is the same whatever type of AA battery is used.
PAGE 55
This Generic Fast Track Guide takes you through the basic steps
required to get an fmGenie working – a separate ‘specific use’ fastrack
guide is supplied with new systems.
Part 1 Batteries
4
fm
G
enie
fm
G
enie
CONTENTS
1Fast Track Guide
5
2The problem with hearing aids 12
3The fmGenie radio aid system 14
4User operating guide
fmGenie Transmitter 32
fmGenie Receiver 40
Batteries & charging 55
Routine testing & fault finding 59
5Experienced user information
Fitting and balancing a radio aid 64
Connecting an fmGenie transmitter to external equipment 66
fmGenie conference microphone 69
fmGenie accessories tester 71
Output level setter 73
Using the fmGenie with the telephone 74
6fmGenie Questions and Answers 76
7Technical appendices
Appendix 1: fmGenie default channel 84
Appendix 2: Guide to fmGenie transmitter settings 85
Appendix 3: Guide to fmGenie receiver settings 91
Appendix 4: Status display information 98
Appendix 5: Important warnings and cautions 100
Appendix 6: Connevans fmGenie after sales service
and support 102
Appendix 7: Record of your fmGenie settings 104
Appendix 8: Frequency cha
nnel coding comparisons 105

fm
G
enie
fm
G
enie
7
1
6
1
fm
G
enie
fm
G
enie
Fast Track Guide
Fast Track Guide
2 Give the fmGenie transmitter to a colleague and ask them to
walk to the other side of the room while talking normally into the
microphone at 150mm (the length of a biro) from the mouth.
3 Plug the test headphones into the
fmGenie receiver audio output
socket (Audio out).
4 Using the test headphones,
listen to the fmGenie receiver
and adjust the Tx volume to a
comfortable level.
Part 2a Turning on
1 Connect an aerial or lapel microphone
into the fmGenie transmitter external
microphone socket (Ext mic).
PAGES 50 and 84
Part 2b Using test headphones to check the fmGenie
system
Hearing aid users setting up an fmGenie for themselves should skip
this section and move on to Part 3.
1 Check that ‘HI’ audio output is selected
on the receiver by checking the display.
If is not shown, you will need to refer to
page 9 and set ‘HI’ rather than ‘LO’ .
PAGE 95
3 Check that both units are showing
the same channel number.
If they are not, you will need to
match the channels.
Assuming you are able to hear your colleague talking, well done
– you are halfway to a fully working system. The next step is to get the
hearing aid(s) working with the fmGenie receiver.
...or
with a
lapel mic
Either with
an aerial to
use the
internal
mic ...
2 Turn on both the transmitter and receiver by pressing and
holding the ON/OFF button until the display turns on and the
alert indicator flashes once.
It is time rather
than pressure
which turns on an
fmGenie – to
prevent accidental
switching on/off.

fm
G
enie
fm
G
enie
9
1
8
1
fm
G
enie
fm
G
enie
Fast Track Guide
1 Ensure that the ‘Tx vol’ volume is at minimum.
2 Select ‘LO’ audio output in
the battery compartment by
sliding the switch to the left
– this is important in order
not to overload the input on
the hearing aid. The
symbol will then show on the
status display.
3 The hearing aid user should listen at
arms length to somebody talking, to
establish the level of sound from the
hearing aid alone. Page 11 explains
further as to why we do this.
Part 3b – Using an fmGenie receiver with a direct input
hearing aid
Fast Track Guide
PAGE 95
1 Ensure that the ‘Tx vol’ volume is at minimum.
2 Check that ‘HI’ audio output is
selected on the receiver by checking
the display.
If is not shown, you will need to refer to
page 9 and set ‘HI’ rather than ‘LO’ .
3 The hearing aid user should listen at arm’s length to somebody
talking to establish the level of sound from the hearing aid alone –
page 11 explains why we do this.
4 Plug in a neck loop.
5 Make sure that both fmGenie units are
turned on.
6 The hearing aid wearer should take the
receiver and place the neck loop around
their neck. They should then turn their hearing
aid(s) to the ‘T’ position.
7 The helper should take the fmGenie
transmitter and walk to the other side of the
room while talking normally into the microphone
at 150mm (the length of a biro) from the mouth.
8 The hearing aid user should be
able to hear the helper through
the fmGenie receiver by
adjusting the Tx volume up to a
comfortable level.
Congratulations, it’s as simple as
that!
If nothing is heard with the hearing aid, a hearing helper could listen
using a pair of test headphones. If the helper can hear with the
headphones then any problem must lie with either the hearing aid or
the neck loop.
The hearing aid ‘T’ position can be roughly checked by moving the
hearing aid near to a mains transformer (e.g. any plug-in power supply)
when you should hear a buzz or hum. The neck loop can be checked by
exchanging it for a spare one.
Part 3a – Using an fmGenie receiver with an inductive
neckloop and hearing aid on ‘T’
PAGE 95
Each type of direct input hearing aid requires a specific
connection shoe. Your hearing aid instruction guide
should tell you the hearing aid switch settings to use.
For programmable hearing aids it is necessary for the
direct input option to have been activated when it was
programmed – please refer any hearing aid questions to
your audiological advisor.

fm
G
enie
fm
G
enie
11
1
10
1
fm
G
enie
fm
G
enie
In an ideal world, setting the volume controls (and the treble and bass
tone) would be done with the help of an audiologist, however it is also
possible for a good listener to set their own listening preference.
Very simply, the sound
heard at a distance
through the fmGenie
should be similar to,
or slightly louder than,
the sound heard from
the hearing aid on its
own at close range in
a quiet room.
Volume controls
The fmGenie volume can be set
by a comparison method.
1 Initially establish a
satisfactory listening level
with the hearing aid(s)
alone, at arm’s length from
somebody talking to you.
2 Turn on the fmGenie
system, give the transmitter to your helper and ask them to walk
away whilst talking.
3 You should now listen to the hearing aids but this time through the
fmGenie receiver without changing the hearing aid volume controls.
Adjust the transmitter volume control (Tx vol) to match, or be
slightly louder than, the original listening level through the hearing
aid alone.
Tone controls
Setting the tone controls is straightforward but most users do not need
to adjust them at this stage.
Part 4 – Setting the volume
Fast Track Guide
4 Plug the direct input lead
into the ‘Audio out’
socket and connect to
the direct input shoes
and hearing aids. It may
be necessary to
temporarily remove the
hearing aids to do this.
5 Make sure that both units are turned on.
6 The hearing aid wearer should take the receiver and
can now put their hearing aids back on.
7 The helper should take the fmGenie transmitter and
walk to the other side of the room while talking into the
microphone at 150mm (the length of a biro) from the mouth.
8 The hearing aid user should be
able to hear the helper through
the fmGenie, adjusting the
receiver Tx volume control to
a suitable level as required.
It may be necessary to repeat
steps 3 – 8.
=
Fast Track Guide
fmGenie user features
This generic fast track guide is designed to get you started with
your new fmGenie quickly and easily. To help achieve this, your
fmGenie has been factory set for single channel operation with
some user features disabled.
The available features are all explained in section 4 and, when you
have chosen the features you wish to use, appendices
1-3 will explain how to access them. PAGE 97

A hearing aid user in a
room will often find that
the level of background
noise – general shuffling
and coughing – can be as
loud as the speaker’s
voice, and amplified
sound, such as television,
can sound distant and
unclear. This problem is
usually accentuated by
poor room acoustics. It is
difficult for hearing people
to appreciate the problem.
The human ear seems to
be capable of filtering out
many unwanted sounds,
but a hearing aid is unable
to do this. Whereas a pair of spectacles can correct sight, hearing aids do
not fully correct hearing loss.
In a basic one-to-one situation a hearing impaired person with a correctly
fitted hearing aid should be able to make maximum use of their residual
hearing using a hearing aid – providing there is not too much background
noise and that the speaker stays close by – say within one metre or at
arm’s length. Unfortunately, this type of ideal
situation is rare.
When someone moves away, the sound
pressure level at the hearing aid microphone
falls. It is certainly possible to turn up the
amplification of the aid and although this will
maintain the sound output level from the aid,
it will also mean that the level of background
and surrounding noise is increased.
Most people have used a cassette recorder or
dictating machine to record their voices. A
comparison would be to put the microphone
fm
G
enie
fm
G
enie
13
2
12
2
fm
G
enie
fm
G
enie
The problem with hearing aids
The problem with hearing aids on the other side of the room. If you did, your voice
would sound distant with a lot of background noise.
(Why not try it!) Both a hearing aid and a cassette
recorder have a microphone to ‘feed in’ sound –
hence, the comparison between the cassette
recorder and the hearing aid.
The day that you stop seeing people on TV wearing
microphones is the day that you can start looking
for a hearing aid which will not benefit from a radio
aid system.
There are many types of hearing aids currently
available with each one having different
characteristics and response. Hearing aids which
suit one person may well be totally unsuitable for another. It is most
important that a user feels happy with an aid and that the hearing aid has
been correctly set by the dispenser.
A hearing aid has both gain (amplification) and frequency compensation.
The gain counters the level of hearing loss, and the frequency
compensation helps to compensate for the type of hearing loss. The word
‘help’ is used intentionally as help is all the aid can do; it cannot restore
hearing.
A hearing aid will perform to the best of its ability when the person talking
is within a distance of approximately one metre from the person wearing
the hearing aid. In practice, it is realistic to say that the effectiveness of
the hearing aid decreases when the distance between the person speaking
and the hearing aid user is greater than an arm’s length. A radio aid
system will help to solve this problem.

What will a radio aid NOT do?
Well, a radio aid normally adds no gain (or power or volume) to a hearing
aid – so a user will not be given increased amplification. It is the power
output of the hearing aid, NOT the radio aid, that the hearing aid user
listens to.
What does it do then?
The fmGenie will provide a consistent sound feed over varying
distances just as if the person speaking was always
at arm’s length.
The system can be used in conjunction with hearing
aids, cochlear implant processors or headphones.
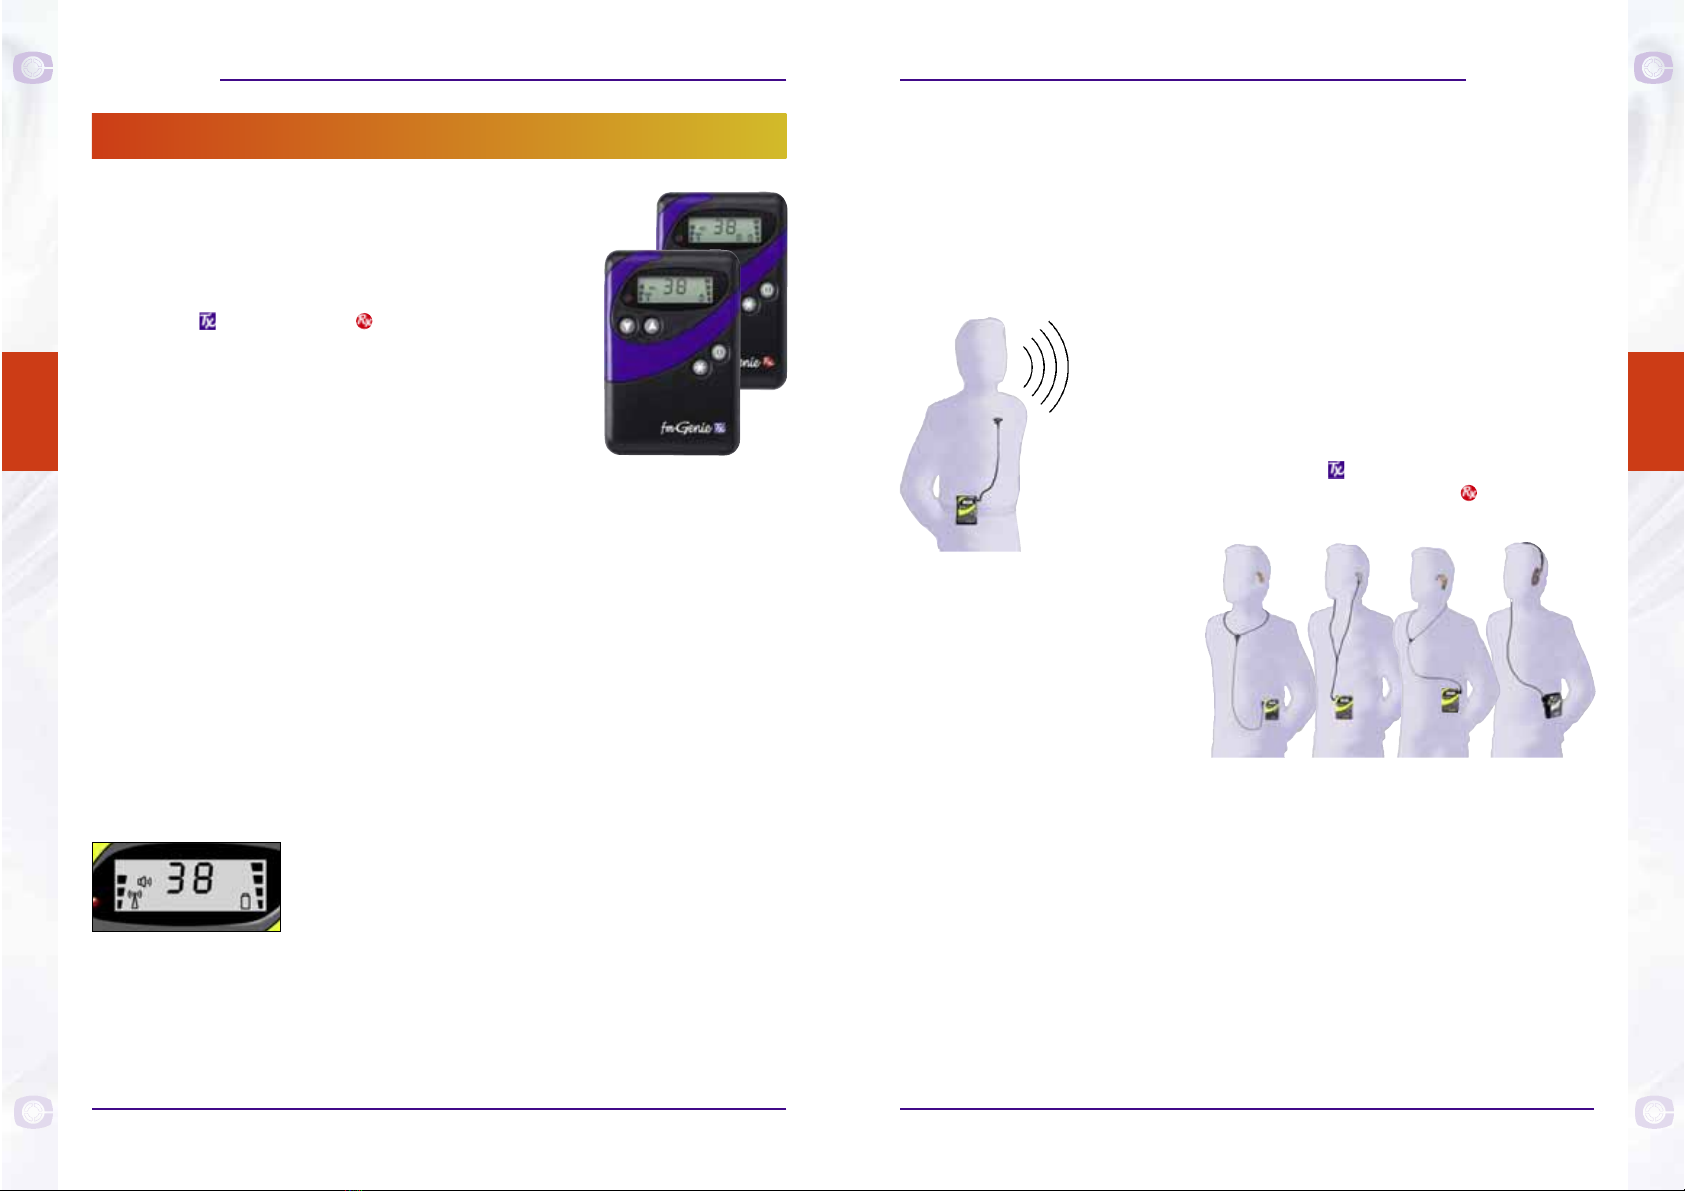
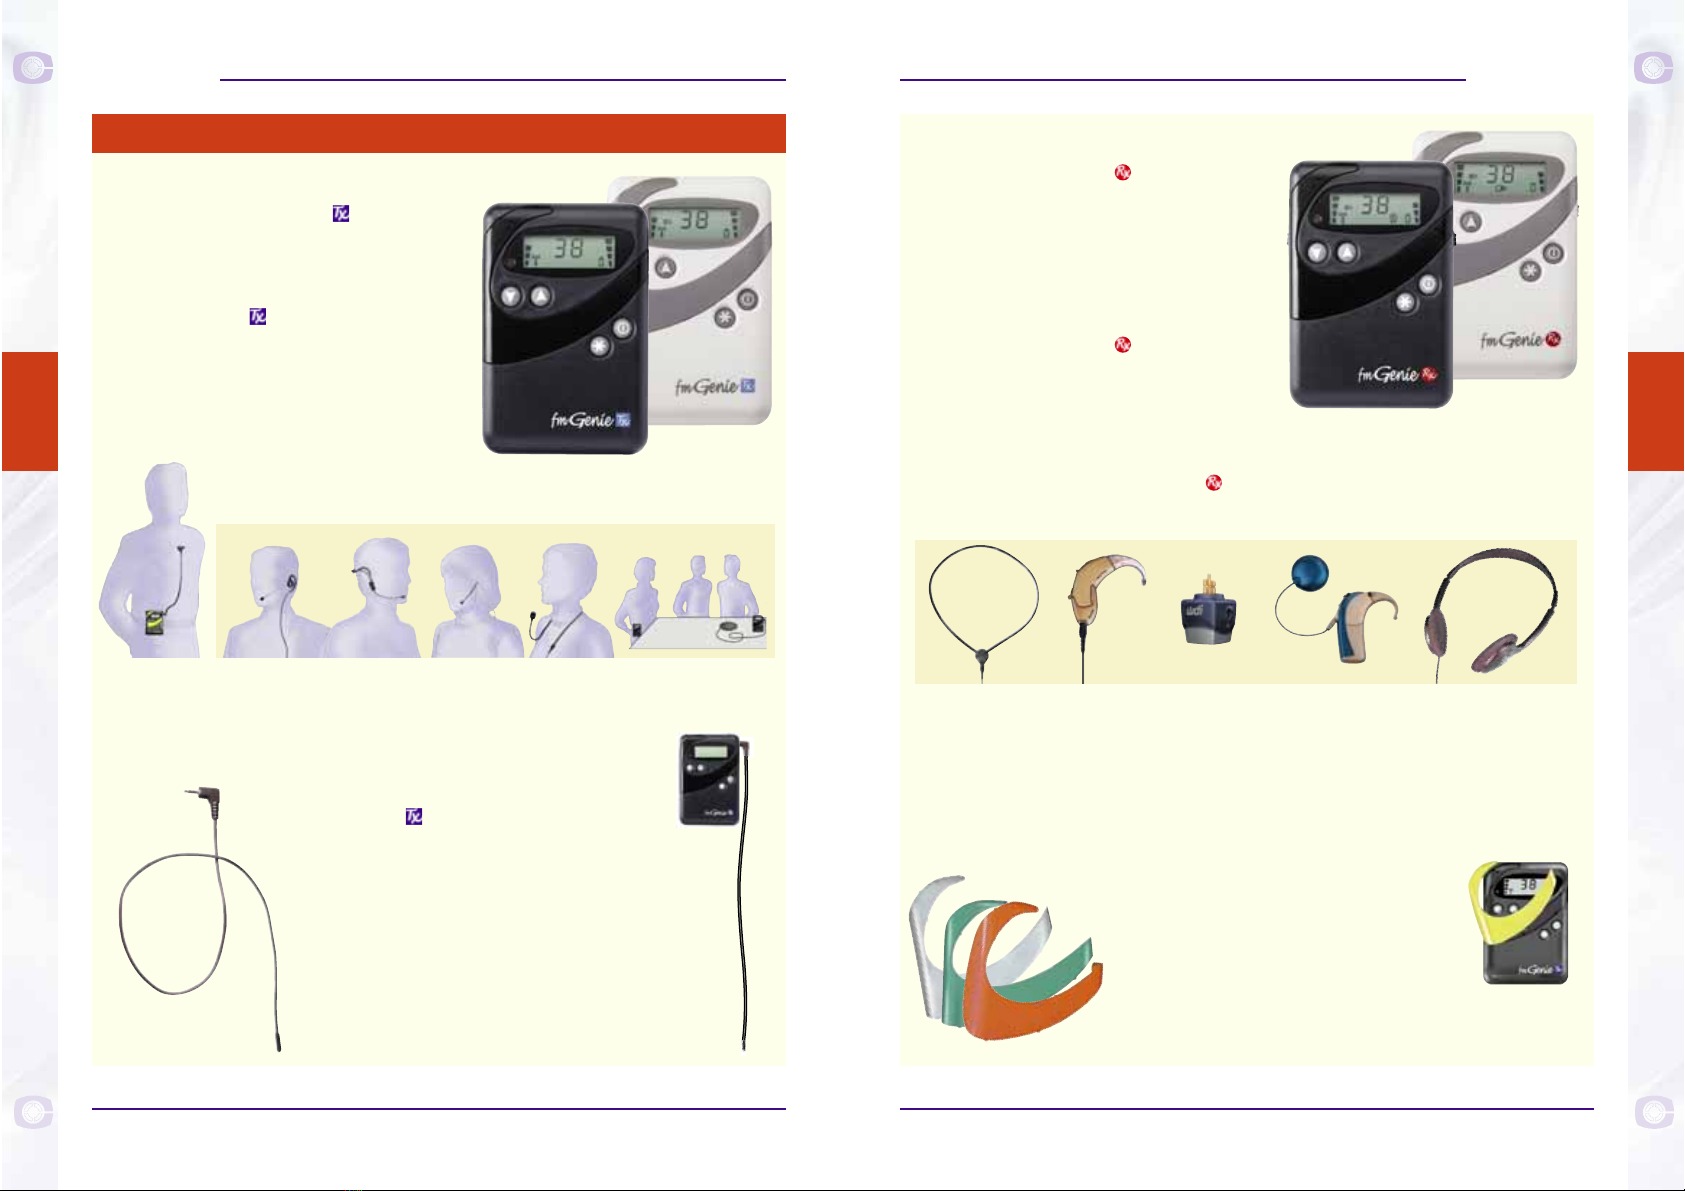
Who wears what?
The fmGenie transmitter unit is worn by the
person speaking. The fmGenie receiver is worn by
the user who carries it around with them wherever
they go.
When using the fmGenie
system, cochlear implant and
hearing aid users still listen
through their own aids but now
the speaker’s voice is fed
‘directly to the ear of the user’.
Headphone users simply listen
to a receiver.
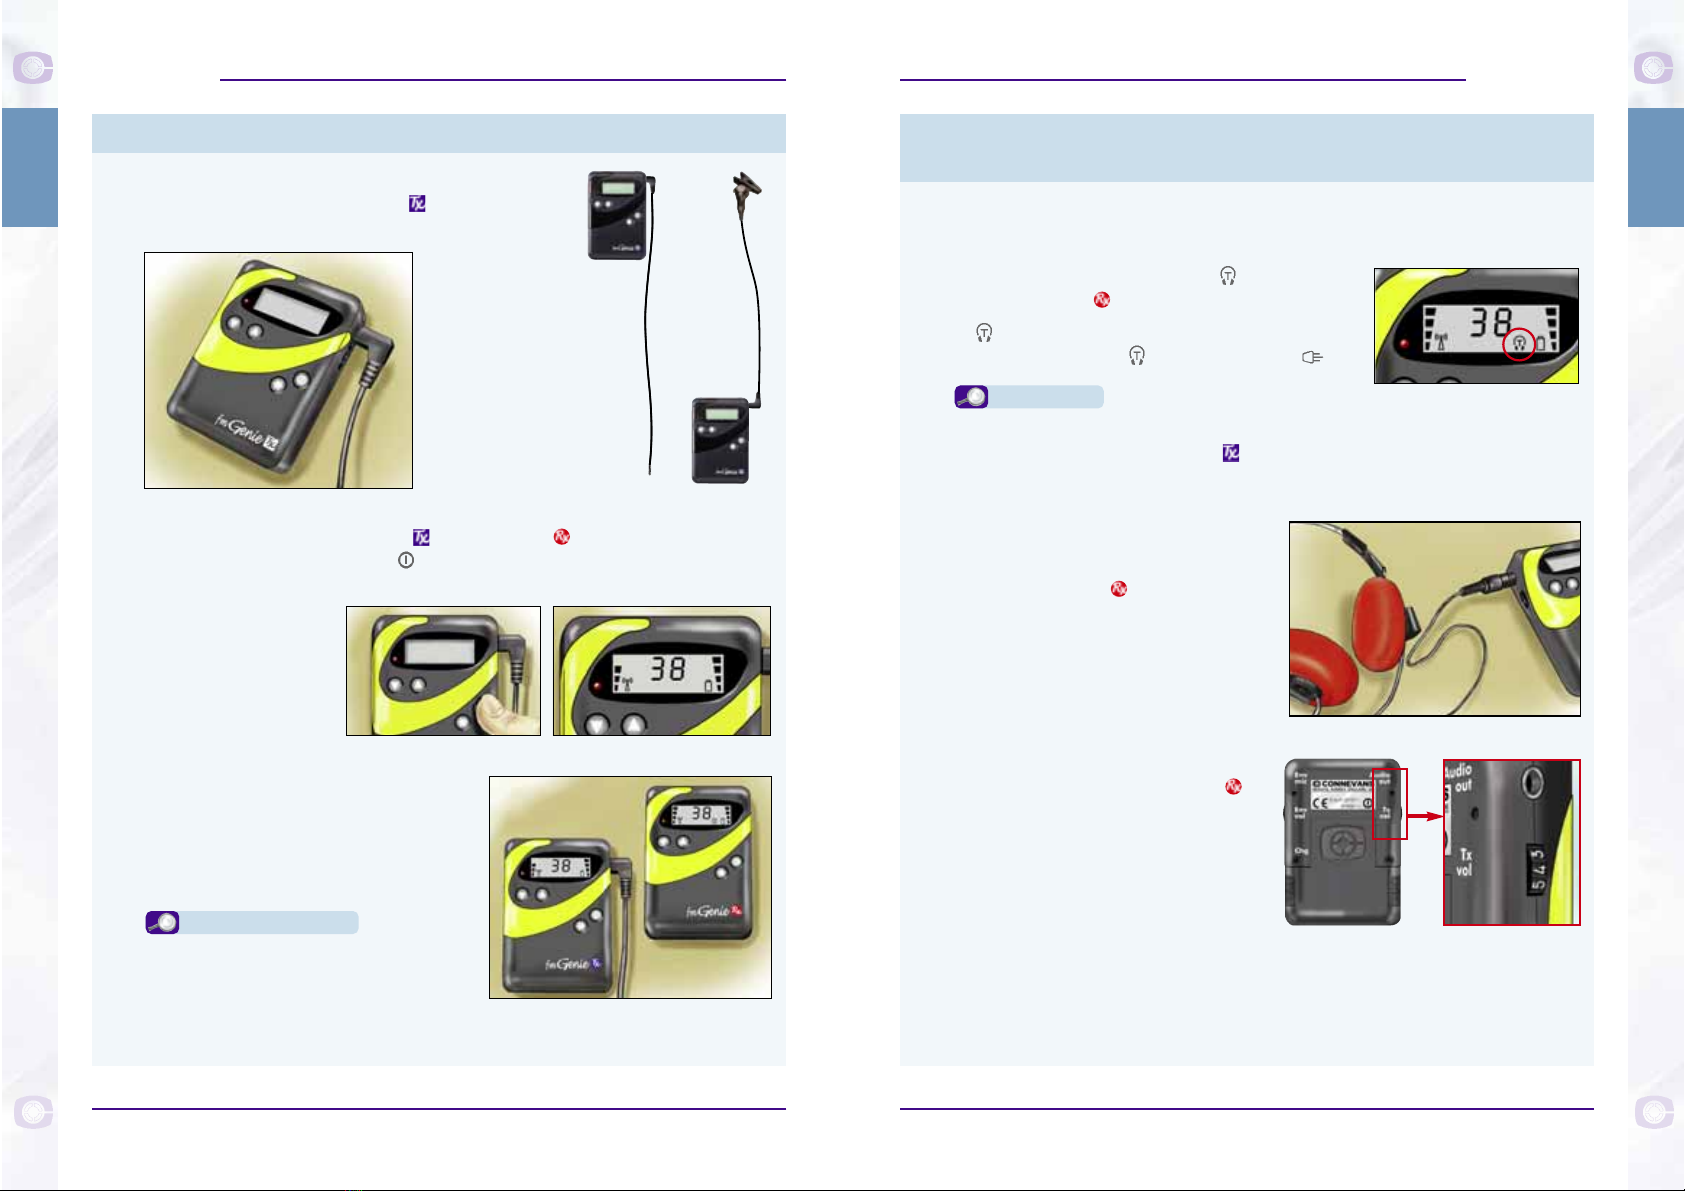
How does the hearing aid ‘hear’ the radio aid?
The input to the user’s aid, or implant processor, from the radio
microphone receiver can be via a direct input connection (if available) or
an inductive loop pick-up ‘T’ coil.
The fmGenie will provide a consistent level of sound wherever the hearing
aid user or person talking may be in the room. There is a great
improvement in the ‘signal to noise ratio’ heard by the user with much less
background ‘mush’.
What happens if the person speaking talks loudly?
The Connevans fmGenie system has an automatic gain control (AGC) to
prevent loud sounds from causing discomfort or distortion.
Principle of operation
The fmGenie is a wireless communication system
designed specifically for use by people with a hearing
loss. The system consists of two main elements: a
transmitter and a receiver . The transmitter unit
collects the sound and transmits it without loss of
quality to the receiving unit. Both ‘ends’ of the system
are portable and the receiving unit presents this
relayed sound in some way to the user.
Design objectives
Radio systems for deaf and hard of hearing people have been available for
many years. The concept for the fmGenie was to design a product with
high visual appeal and acceptance combined with functionality and
features second to none.
The fmGenie has been designed to work with personal hearing aids. It is
the user’s hearing aids that provide the hearing loss correction and the
power or gain for a user. However it would be acceptable to say that a
radio aid adds “effective” gain because as the speaker moves away from
arm’s length distance there is no reduction in the volume (or power!)
presented to the hearing aid user.
The fmGenie provides a high quality sound feed to allow the hearing aids to
work to the best of their ability in a wide range of situations. Your fmGenie
has also been designed to allow you to gain maximum benefit from future
improvements in hearing aids.
What is special about the fmGenie?
The Connevans fmGenie has unrivalled sound
quality, advanced user features and a superb range
of accessories to support & extend system use.
The fmGenie is a multichannel system with team teaching, long battery life,
LCD status display and many innovative features including Wirefree Direct
Input – WDI. In this reference guide we will help you determine the features
that are of benefit to you and the options to select – we will also help you
decide which features to lock, disable or simply ignore.
fm
G
enie
fm
G
enie
15
14
fm
G
enie
fm
G
enie
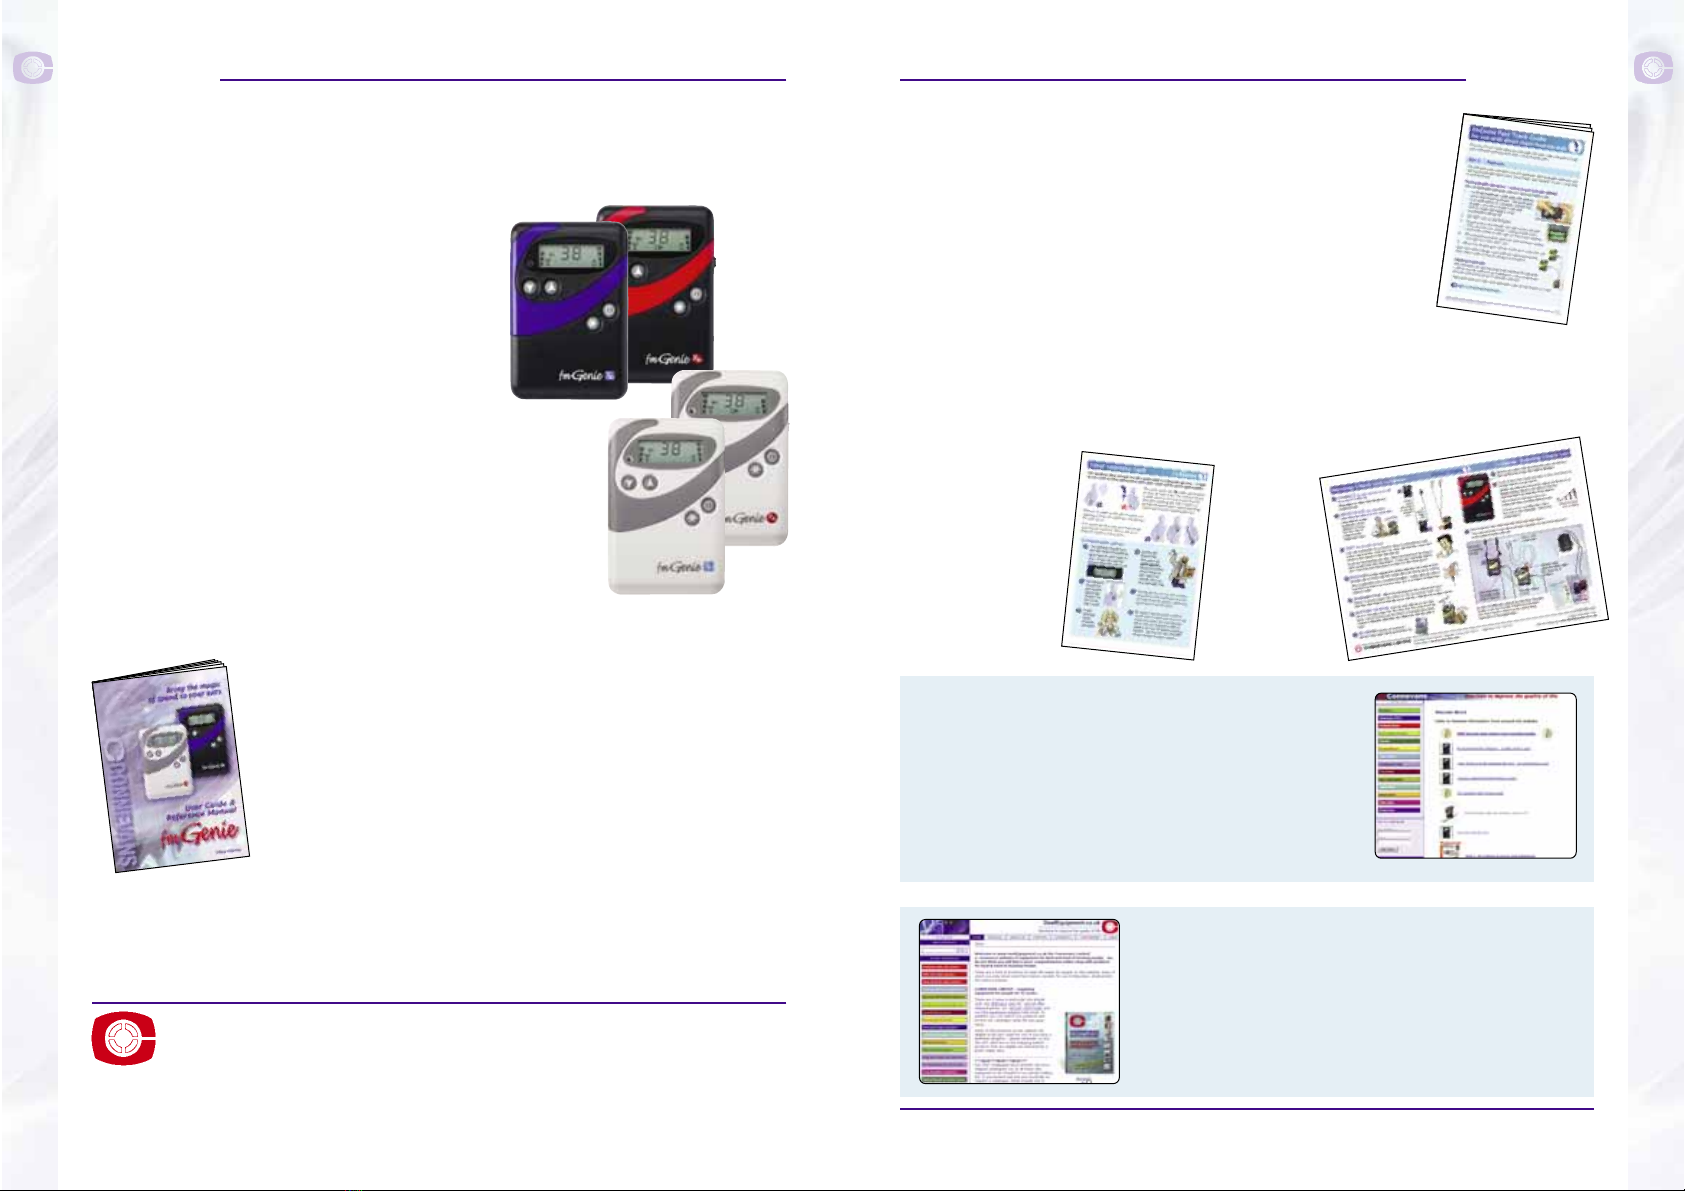
THE fmGenie RADIO AID SYSTEM
BACKGROUND
3
The fmGenie radio aid system
3
The fmGenie radio aid system

understand at first where the sound comes from if they cannot see the
speaker talking. A radio aid increases the emphasis on sound, but visual
clues are still important. Experience and practice are necessary to make
full use of this available ‘sound’.
Is the fmGenie a true wireless radio system?
Yes. The Connevans fmGenie is an FM radio system working on a similar
basis to the domestic BBC VHF radio network, although the fmGenie
operates at a higher frequency and cannot be picked up on a conventional
domestic radio. BBC Radio 2 transmits between 88-90.2 MHz in the VHF FM
band and narrow band radio microphone systems for the hearing impaired
operate around 173-175 MHz. In order that a number of radio aid systems
may operate on the same site, a number of channels have been allocated,
each with specific frequencies. Manufacturers use varying channel coding
systems; the fmGenie uses a channel number code system (see appendix 8
for a comparison chart).
Who manufactures the fmGenie?
The fmGenie system has been designed by Connevans and is
manufactured, sold and serviced in our works in Reigate – Made in Britain.
Where can I find further information?
www.connevans.com
How well does it work?
The fmGenie has a very good frequency response with low levels of
distortion. For hearing aid users the overall performance of the system will
probably be limited by the user’s own hearing aids. If the hearing aids are
correctly fitted then the overall system will perform well, but if the hearing
aids are badly chosen or fitted it will not. The system will give a range of at
least a room inside or coverage outside of over a football pitch, thus
meeting most requirements.
Who will the fmGenie help?
Your audiologist is the best person to consult with regards to suitability of
equipment. However, as a rough guide an fmGenie radio aid will be of
benefit to anyone who is a good hearing aid user. If you are able to sit
beside a hearing aid user in a quiet room and communicate via their hearing
aids rather than by lip reading (i.e. if the person is able to make good use of
their hearing aids) then a radio aid will be helpful, allowing the hearing aid
user to ‘listen at a distance’. The fmGenie will help to counteract the
problems of distracting sounds outside that quiet room situation. The
fmGenie will also help those with a mild or no hearing loss, who will benefit
from help with concentration in lectures, by using a pair of headphones .
How does it sound?
Using a pair of test headphones
it is possible for a hearing
person to ‘get a feel’ for the
improvement that an fmGenie
can give in noisy situations.
When demonstrating an
fmGenie to a user sitting
nearby, an initial response from
the hearing aid user of “sounds
the same”, is not unusual. It is
difficult to improve on the
hearing aids themselves and
because a consultation room is
usually quiet it is not until we move outside into a more usual level of
ambient noise with a greater distance from the person talking that the user
realises the potential benefit of a radio aid.
Bear in mind however, that a hearing aid user is not used to interpreting
sounds from afar. “Over here” means nothing, people often don’t
fm
G
enie
fm
G
enie
17
3
16
fm
G
enie
fm
G
enie
The fmGenie radio aid system
3
The fmGenie radio aid system

fm
G
enie
fm
G
enie
19
3
18
3
fm
G
enie
fm
G
enie
The fmGenie radio aid system
fmGENIE RECEIVER
The fmGenie receiver ‘receives’ the
signal from the transmitter and is
worn by the hearing aid user. It may
be carried in a pocket or in a pouch
with belt clip with or without a
harness. It can be concealed under
clothing if wished.
The fmGenie receiver can be used in
variety of ways. A pair of personal
stereo style headphones or earphones
can be used by people with minimal
hearing loss. Hearing aids can be used on their
‘T’ setting or with direct input connection if
available. The fmGenie receiver can also be
connected to cochlear implant processors.
When used with an inductive neck loop, usually worn under a sweater
or jacket, it will probably also be necessary to use an environmental
lapel microphone (Part no. FMG213M6) so that the hearing aid user can
hear their own voice and the sound immediately adjacent to them.
fmGENIE TRANSMITTER
The fmGenie transmitter ‘sends’ or
‘transmits’ the sound that will be
heard by the listener and is worn by
the lecturer or person talking.
The transmitter can be used in a
neck harness with its internal
microphone or in a belt pouch with
any of the range of external
microphones.
System elements
External microphones for use with transmitter – see pages 20-22.
See also Connevans Catalogue or website for current range of microphones
fmGENIE TRANSMITTER AERIAL
An aerial is supplied with each new
transmitter. When an fmGenie
transmitter is used with a lapel
microphone the lead acts as the
aerial so a separate hanging aerial is
only required when the internal
microphone is being used.
Part no. FMG25M
Part no. FMG121
Available in white
or graphite grey
For use with hearing aid ‘T’ input, direct audio input, wire free direct input,
cochlear implant processor or headphones
fmGENIE DESIGNER FLASH
The fmGenie designer flash allows
you to customise the look of your
fmGenie.
Part no. FMG13
See page 37 for more information and the
Connevans Catalogue for range of colours available.
The fmGenie radio aid system
Part no. FMG110
Available in white or graphite grey

fm
G
enie
fm
G
enie
2120
fm
G
enie
fm
G
enie
3
The fmGenie radio aid system
3
The fmGenie radio aid system
fmGENIE MICROPHONE PACK
Part no. FMG213M6
Microphone head Part no. FMG211
This is the actual device which picks up the sound.
Ideally the microphone should be situated 150mm
(6 inches or the length of a biro!) from the mouth.
The mic head fits to the lead with a firm
push on/pull off action.
Microphone lapel clip Part no. FMG212
Use the clip to position the microphone head the right
distance from the mouth.
Microphone connecting lead Part no. FMG21M600
The lead has a 2.5mm right angle plug which goes into the ‘Ext mic’ ( )
or ‘Env mic’ ( ) of the fmGenie.
The lead needs to be long enough to reach the fmGenie without straining
which could damage the lead.
fmGENIE FLEXIBLE COLLARWORN MICROPHONE
An easily shaped flexible gooseneck form collar worn microphone most
suitable for soundfield use.
There can be hygiene concerns when a headworn microphone for a
soundfield system is shared so this microphone is a
good compromise.
Moving the microphone closer to the mouth reduces the
chance of feedback although the effect of
head movement is increased. For this
reason we do not normally advise
using this type of microphone for
conventional radio aid use.
Overall length: 600mm,
Diam. of frame: 6mm, Weight: 84g.
Part no. FMG260
Lengths available: 600mm FMG21M600
800mm FMG21M800
150mm
Contains a microphone head, lapel clip
and a 600mm lead
fmGENIE FEATHERWEIGHT HEADWORN MICROPHONE
Exceptionally light and comfortable to wear but only suitable for use by
one individual.
A featherweight microphone only has limited adjustability so this model
is suitable when it is possible to have one’s own to keep – which is good
for hygiene too. It is possible to make minor adjustments
to the frame shape yourself.
Diam. of frame: 2.5mm Weight: 15g.
Featherweight microphones:
FMG2450S Small frame size,
FMG2450M Medium frame size
FMG2450L Large frame size
fmGENIE EARWORN MICROPHONE
An earworn microphone for use with fmGenie transmitters
in noisy rooms and with soundfield systems. It is
particularly light and comfortable to wear.
Part no. FMG23- Short boom 90mm
Part no. FMG23S Standard boom 105mm
Part no. FMG23+ Long boom 120mm
For up-to-date information on products
available from Connevans, visit the
Connevans websites.
www.connevans.com
– the information website for Connevans
www.DeafEquipment.co.uk
– the e-commerce website for Connevans

fm
G
enie
fm
G
enie
2322
fm
G
enie
fm
G
enie
3
The fmGenie radio aid system
3
The fmGenie radio aid system
MODULAR SYSTEM BELT STAR ADAPTOR
The belt star adaptors are
special clips designed to hold
pouches securely to the
wearer’s own belt.
There are two versions of the
modular system star adaptor
available; one for fitting up to 20mm
belts or harness webbing used in the
modular system body harness and
the other up to 30mm belts.
Part nos. 35STAR20 & 35STAR30
fmGENIE POUCH
For use with either transmitter or receiver ,
the pouch has a belt clip and may be worn
directly on a belt or clipped onto waistband
or pocket.
The pouch can also be
used with any of the
wide range of Modular
Harness System
products.
Part no. FMG630
HIP POUCH & SHOULDER STRAP
Particularly good for use with the
transmitter as it is very easy to
transfer from person to person.
Can also be used with a receiver .
Requires an fmGenie
microphone pack (not
included) for use with
a transmitter.
Part no. FMG640
TRANSMITTER NECK HARNESS & POUCH
The pouch on the neck harness has a hole for the
transmitter internal microphone.
Use the popper fastening to put
the strap around the back of the
head rather than trying to pull
the strap over the head.
If using the internal microphone, the
transmitter aerial will need be used.
Part no. FMG621
fmGENIE CONFERENCE MICROPHONE
Designed for use on a table, the
fmGenie conference microphone is an
invaluable accessory for use in group
discussions.
Can be used with either a
transmitter or receiver .
HANGING BELT POUCH
An fmGenie belt pouch which hangs securely from the
belt and is particularly suitable for ‘more active children’
and those who wear their belts loose.
Part no. FMG650 Suitable for belts up to 30mm (11/8” ).
Please see page 69 for further information.
Part no. FMG220
All spares and accessories are available online at our shopping website,
visit www.DeafEquipment.co.uk and click on the fmGenie section.

fm
G
enie
fm
G
enie
2524
fm
G
enie
fm
G
enie
3
The fmGenie radio aid system
3
The fmGenie radio aid system
FMGENIE SMALL SYSTEM CARRYING CASE
A small rigid case with a foam lining which has
cut outs to suit the fmGenie. It will hold a
transmitter , receiver , 4 batteries and a few
accessories. Unlike the full system carrying case, no
charger or harnesses are carried with the result
that it is much smaller and much more suited to
daily use.
Case size: Approx. 230mm x 190mm x 45mm
Part no. FMG610GY Grey case
FMG610BK Black case
MODULAR SYSTEM CHILD’S BODY HARNESS
Has a moulded carrier which holds the fmGenie
pouch securely. The style is similar to a child’s
reins harness with the child putting both arms
through it.
The radio microphone would normally
be worn at the front with the release
clip at the back – but in fact the
harness can be worn reversed so that
the child is less likely to paint it!
An optional elasticated strap section
is included for added comfort.
Part no. 35BODY
MODULAR SYSTEM WAIST HARNESS
For use with the fmGenie pouch with
either transmitter or
receiver . It is adjustable in
size with a two fingered
grip release clip. The belt is
fitted with a moulded carrier onto which the
pouch belt clip fits in such a way that the unit
cannot accidentally be pushed off it.
Small Part no. 35WAISTS
Standard Part no. 35WAIST
Extra Large Part no. 35WAISTXL
RECEIVER ‘BUM’ BAG
The design of the Connevans
range of ‘bum’ bags includes a
special separate rear zip section to
safely carry a transmitter or
receiver – other items can be carried
in the front section.
The zip of the rear section closes slightly short to
allow the safe exit of a direct input lead or neck loop
lead. The Connevans bum bags are available in a
range of colours to suit your mood!
Pouch size: Approx. 230mm wide x 130mm high
Belt size 32'' max. Part no. 2247
Belt size 31-49'' Part no. 2248
UNIVERSAL SMALL WAIST
POUCH
Particularly suited to children who
don’t need to carry any extra items.
The single pocket waist pouch is
much smaller than our ‘bum’ bag.
Pouch size: approx. 165mm wide x
95mm high.
Belt size: up to 810mm (32”) max.
Part no. 35UP
CARRY POUCH
A woven black polyester pouch, with a canvas feel, will
hold a receiver , transmitter and associated leads.
A nice item for daily use which fits easily into school
bags and encourages users to keep their equipment
tidy.
Pouch size: Approx. 175mm x 180mm x 45mm
Part no. FMG615

fm
G
enie
fm
G
enie
2726
fm
G
enie
fm
G
enie
fmGENIE FULL SYSTEM CARRYING CASE
This is a rigid case which has a foam lining with cut
outs to suit the fmGenie. All the elements of a
working system can be carried in it. This is a most
useful item when storing or distributing equipment.
The case will hold a transmitter , receiver ,
spare flashes, harness, 8 batteries, twin tail
charger, conference microphone and direct input
or neck loop accessories.
Case size: Approx. 385mm x 330mm x 85mm
Part no. FMG611
MULTITURN PLASTIC NECK LOOP
A thin loop which has a soft flexible feel, lies
comfortably around the neck and offers
excellent performance.
This neck loop has a 2 pin N.P. socket and
requires the use of the patch cord shown
below.
Plastic neck loops are approx. 225mm diameter.
Thickness of loop: 5.5mm. Weight: 35g.
Part no. FMG441
Patch cords for multiturn plastic neck loop
Black with a straight 2 pin N.P. plug for
plugging into the neck loop and a right
angled 3.5mm plug to connect to the
receiver . The neck loop patch cords
are available in a range of lengths and
can also be used with bone conductors.
Part no. FMG42... available in 200, 400, 600 and 800mm lengths.
fmGENIE DIRECT INPUT LEADS
Direct input leads for the fmGenie are available in a
range of lengths and in black or white.
The Connevans fmGenie binaural direct input leads
have a ‘V’ format with an ‘earphone’ look about
them. The extended selection of lengths allow them
to be worn up the
back if desired. The ‘V’
lead has a small slider
midway along the lead
which can be moved
by slightly wetting it.
Single leads are
available for users
with one hearing aid.
There is also a range of direct
input leads with inline filters
designed to reduce possible
interference from digital aids.
Please refer to the Connevans catalogue or websites for specific lengths
and part numbers – direct input shoes are also listed there.
IMPORTANT NOTE: The fmGenie direct input leads are unattenuated
and must only be used with fmGenie receivers.
FMGV FMGS
A range of attenuated direct input leads for
use with personal stereos is available from
Connevans – these leads are clearly
identifiable as they have a blue 3.5mm jack
plug. Please see ‘Listening for Pleasure’ in
the Connevans Catalogue.
3
The fmGenie radio aid system
3
The fmGenie radio aid system
UNIVERSAL CARRY CASE
A medium size ‘lunchbox style’ case with
plain 15mm foam inserts to hold an fmGenie
or CRM-220 system with leads still connected
and the units still in their pouches.
Case size: Approx. 275mm x 223mm x 79mm
Part no. FMG612
Inline RF interference filter

fm
G
enie
fm
G
enie
2928
fm
G
enie
fm
G
enie
fmGENIE HEADPHONES
Personal stereo style headphones for users
requiring help with concentration in lectures or
for those with a mild hearing loss.
Part no. FMG7420
fmGENIE WDI & WDI NECK LOOP
The fmGenie Wirefree Direct Input
(WDI) unit plugs into an ear level
receiver fm shoe, It is powered from
the hearing aid and is driven from a
lightweight WDI neckloop attached to
an fmGenie receiver .
The fmGenie Wirefree Direct Input unit combines the
advantages of wirefree direct input with fmGenie
features, such as team teaching, long range, multiple
channels, tone control adjustment and status display.
The WDI neck loop may be worn under clothing
without affecting the sound quality.
Please note that an ear level receiver
fm compatible direct input hearing aid
is required to use the fmGenie WDi unit.
fmGenie WDI unit Part no. FMGWDI
WDI neck loops:
100mm lead, diam. approx 225mm Part no. FMG474S
250mm lead, diam. approx 225mm Part no. FMG474J
500mm lead, diam. approx 225mm Part no. FMG474M
900mm lead, diam. approx 225mm Part no. FMG474L
fmGENIE TEST HEADPHONES
A lightweight pair of headphones for routine
listening tests, not particularly robust but
comfortable to wear with a pleasant sound and
very good value for money!
Part no. FMG7410
BONE CONDUCTOR
A bone conductor can be used with an fmGenie receiver .
There are three parts in a complete unit; the bone
conductor itself, the metal headband and the connecting
lead. More than one user has commented that a bone
conductor on an fmGenie has a much stronger vibration
than a modified post-aural bone conduction hearing aid.
FMG42600 600 mm patch lead
FMG42800 800 mm patch lead
FMG48V600 600mm ‘V’ patch lead for 2 bone conductors
MBONECONB2 Bone conductor (beige)
MBONEHEAD Headband for single bone conductor
Double sided headbands are also available to special order.
fmGENIE PERSONAL SOUNDFIELD CASE AND
AMPLIFIED SPEAKERS
A personal soundfield option for use with an
fmGenie receiver which can be a useful solution
in some situations, such as for cochlear implantees
who have not been reviewed or fitted with a
personal radio aid system.
The fmGenie volume control adjusts the speaker volume and can be
easily set by the user. We advise the use of an ear or headworn
microphone with the transmitter to reduce the chance of feedback.
Size: 200 x 125 x 80mm inc. fmGenie & pouch.
Weight incl. speakers, fmGenie & pouch: 468g.
Part no. FMG681
fmGENIE EARPHONES
Personal stereo style earphones for users requiring
help with concentration in lectures or for those with a
mild hearing loss.
Part no. FMG7431
3
The fmGenie radio aid system
3
The fmGenie radio aid system

fm
G
enie
fm
G
enie
3130
fm
G
enie
fm
G
enie
FMG PACK 3: DIGITAL VOICE RECORDER
Excellent quality recording from an
fmGenie receiver and able to record
continuously for many hours. Ideal for
lectures and meetings.
The unit records exactly what is heard by the
radio aid by recording directly from an
fmGenie receiver being used with direct input.
Replay is via a ‘blue plugged’ direct input binaural
lead using your existing direct input shoes.
Includes a Digital Voice Recorder, leads and instructions.
Part no. FMG9PK03B
FMG PACK 4B: TELEPHONE USE – WITH A HANDSET
AT HOME OR WORK
With this pack, the phone conversation
from your corded phone can be fed
directly into your hearing aid via the
fmGenie system.
Includes a telephone curly cord listening adaptor with volume
control, connection to fmGenie and instruction sheet.
Part no. FMG9PK04B
FMG PACK 5: TELEPHONE USE – WITH HEADSET
AT WORK
Connecting an fmGenie radio system into a
telephone offers the best possible quality of
telephone sound for hearing aid users.
Provides a high quality hands-free telephone/
telesales facility which may literally make the
difference between being able to work or not.
Suitable for use with virtually all telephone systems,
both analogue and digital. The use of a headset
microphone leaves the hands free for keyboard entry.
Includes a transmitter input adaptor, a T-Call base adaptor,
SupraPlus monaural headset and instruction sheet.
Part no. FMG9PK05
fmGENIE ACCESSORIES TESTER
Allows you to functionally test:
a direct input lead when connected to a radio aid
a WDI, MLxS or other ear level receiver
an fmGenie aerial
fmGenie & CRM-220 microphones.
The fmGenie accessories & MLxS etc tester is an
indispensable product for both Teachers of the Deaf
and carers. See page 71 for full details.
Includes headphones to allow normally hearing person to
test the system, pack of AA batteries, a carry pouch and
instruction sheet.
Part no. FMG750
SYSTEM ADD-ON ACCESSORY PACKS
These packs contain connecting leads and instructions for connecting
to external equipment.
FMG PACK 1: TV SCART
Allows you to plug an fmGenie
transmitter directly into the TV.
Includes a SCART to phono socket, the lead to
fit the transmitter and an instruction sheet.
Part no. FMG9PK01B
FMG PACK 2: MULTIMEDIA/AUDIO
This pack will allow you to
connect your fmGenie to a
wide range of multimedia/
audio equipment.
Includes an fmGenie transmitter
input adaptor plus a pack of
assorted leads to fit most
requirements and instruction sheet.
Part no. FMG9PK02
3
The fmGenie radio aid system
3
The fmGenie radio aid system

fm
G
enie
fm
G
enie
33
User Operating Guide – Transmitter
4 4
User Operating Guide – Transmitter
Standard/long
range switch
Plug-in
charger
input
Integral
microphone
External
microphone
socket Auxiliary
input
Threshold
setting
User
preference
settings
32
fm signal
strength
Aerial symbol
Triangle symbol
Sound symbol
Management
settings
Under flash
Default channel
select:
Tens
Units
Channel down
Alert
indicator
Channel
number
Circle
symbol
Microphone mute
symbol
Status display
Power on/off
Star function
control
Battery level
Battery
symbol
USER OPERATING GUIDE
fmGenie Transmitter
Transmitter front
Transmitter Display
Transmitter top, back and sides
Channel up
fm
G
enie
fm
G
enie

34
Transmitters are easily identified by the Tx in a blue square on the front.
Another obvious feature is that the transmitter has no volume controls
while the receiver has one on each side.
MICROPHONE
The transmitter has an integral microphone in the top face of the
unit although most users will choose one of the external microphone
options – lapel, earworn, collarworn and conference table top are the
common ones. These microphones are all connected using the ‘Ext
mic’ socket and the full range of available microphones can be found
on page 20-21 and in the Connevans catalogue or websites.
There is a sophisticated automatic gain control (AGC) circuit
in the transmitter which will help compensate for loud
speech levels. In use, both the internal or lapel microphone
should be near to the mouth to reduce the
effects of background noise; ideally 150mm
(6
'' or the length of a biro) from the mouth.
AERIAL
A separate hanging aerial is not required with
external microphones as the microphone lead
itself acts as the aerial.
When using the internal microphone, a
hanging aerial will need to be used. Please note that a hanging aerial is not
the same as a microphone extension lead without its microphone head
plugged in as the fmGenie will identify this as a faulty microphone.
WEARING AN fmGENIE
The can be worn in a variety of ways.
The most usual is to use a belt pouch and a
lapel microphone. A hip pouch alternative
is also available (see page 23) as is a neck
harness for those simply wishing to wear it
around the neck. Unlike a belt pouch, the
neck harness has a hole for the internal
microphone in a .
fmGenie Transmitter
fm
G
enie
fm
G
enie
Transmitter
with aerial
35
User Operating Guide – Transmitter
4 4
User Operating Guide – Transmitter
ON/OFF
To turn on an fmGenie , hold down the on/off button until the alert
indicator flashes and you see the status display. To turn off, hold down the
button until the display disappears. It is time rather than pressure that is
required to turn an fmGenie on or off.
The facilities available in your fmGenie depend upon how it has been set
up. The majority of users will simply turn it on and use it.
Our advice is to leave the transmitter on for the duration of the lesson and
use the microphone mute facility when sound from the transmitter is not
required, see below. This is especially important with digital hearing aids
which can sometimes cause interference (noise) from the receiver when
the transmitter is turned off.
STATUS DISPLAY
A typical status display is shown here. We would
expect to see a 3 bar aerial, a channel number, the
level of battery charge and the sound symbol when
someone talks.
Other common status display information
A 4 bar aerial shows that long range has been selected.
A flashing after turning on indicates that some form
of channel change facility is enabled.
Appendix 4 explains other display information and error messages.
An explanation of the battery charge levels is shown on page 56.
STAR FUNCTION CONTROL
Transmitter microphone muting
(Default setting: enabled)
The microphone mute is a useful facility for making
discreet aside comments without being overheard or
for use when the tutor is talking to people other than
the fmGenie user.
If there is no flashing , a short press of the star function button will
mute the microphone – as long as the facility has not been disabled.
If the feature is active the alert indicator and microphone mute symbol
will flash (as a reminder that users cannot hear you). Another press of the
button returns to normal.
fm
G
enie
fm
G
enie
Transmitter
used with
a lapel
microphone
needs no
aerial

fm
G
enie
fm
G
enie
36
fm
G
enie
fm
G
enie
User Operating Guide – Transmitter
44
THE DESIGNER FLASH
The designer flash is available in a wide range
of colours, see the Connevans catalogue for
the current range. Users can use enamel
paints to individualise flashes (under
supervision) if they wish!
The flash is not intended for frequent changing
and double sided sticky tape may be fitted on the
underside to allow them to be stuck down if required.
37
User Operating Guide – Designer flash
To remove the designer flash
Use the black end of the twiddling stick (or
your fingernail!) and insert into the small slot
at the side of the flash on the left of the
fmGenie. Lever the flash off carefully by
lifting and sliding the tool around the edge
of the flash rather than twisting it.
Fitting the designer flash
Locate the lower left corner and then the bottom edge. Press the first peg
into place. Check that the top pip is under the lip and press the second
peg into position. Smooth thumb firmly along flash and round corner,
pressing third peg into place.
AUTO POWER OFF – BATTERY SAVING
In order to conserve battery life, your fmGenie and will automatically
turn themselves off if no sound has passed through the system for 1 hour.
Receivers using an environmental microphone will automatically turn off if
no sound is received from the transmitter for 2 hours.
fm
G
enie
fm
G
enie
CHANNEL CHANGE
When first turned on a flashing indicates that one
or more of the channel change features is available.
Manual channel change (Default setting: off)
Note: to avoid the possibility of two transmitters being on the same
channel, we would not advise that this feature normally be enabled.
When the manual channel change facility has been enabled, for 2 minutes
after turning on (while the is still flashing) you can use the UP / DOWN
buttons to change channel. Alternatively, during the same time
period, pressing both the together will select the default channel. A
short press of the button will truncate the tuning (channel select) period
and stop the flashing . See appendices 2 & 3.
Autotune (Default setting: off, see appendix 2)
Another channel change feature that can be enabled is the autotune
option. When autotune is enabled, if the buttons on both transmitter
and receiver(s) are pressed during the channel select period (while the
is flashing) then receiver(s) within approximately 2 metres will
automatically tune to the channel.
The channel number flashes when autotuning is active and the scrolls
through the channels to find the channel. Pressing the button again
on the stops the autotune permission signal. To prevent problems from
‘unintentional’ button pressing the fmGenie transmitter has a 2 minute
and the fmGenie receiver a 1 minute ‘window’ for channel changing
after turn on. The channel select period may be cancelled by a short press
of the button. Please note that an aerial or microphone is required in the
and an output lead in the for autotune to work.
During autotune, a high frequency tone can be heard when using a pair of
headphones with the . This tone is, however, beyond the frequency
response of most hearing aids. If a function has been disabled the display
will show “– –” when the relevant button is pressed.
CONNECTING AN fmGENIE TRANSMITTER
TO EXTERNAL EQUIPMENT
An fmGenie transmitter can be
directly connected to external
equipment such as TV or video,
please see page 66 for details.

3938
User Operating Guide – Transmitter
4
User Operating Guide – Transmitter
4
Conventional radio aid – fmGenie transmitter default settings.
These are the default settings for fmGenie use with hearing aids.
fmGenie Diversity soundfield system – transmitter default
settings.
The important features here are that fast AGC is selected together with
microphone muting and the 50KHz euro frequency scheme.
Note: A collar, ear or head worn microphone should be used for
soundfield systems to minimise the chance of acoustic feedback.
fm
G
enie
fm
G
enie
Are you a user of technology?
More than the catalogue and more than the
website – the Connevans Information
Resource CD also has information sheets,
product operating instructions, technical
procedures, and Powerpoint presentations
to help the professional.
All the fmGenie printed information is available
for printing extra copies. The pdf version of this
booklet is particularly useful with quick link bookmarks
and search facility.
You may already have had a Connevans CD with your fmGenie?
If not, please ask for a free copy with your next spares order.
Phonak MLxS/MicroMLxS receivers & Cochlear implant
processors – fmGenie transmitter settings.
The fmGenie works well with Phonak MLxS/MicroMLxS receivers and
cochlear implant processors. The normal fmGenie features are
available – but the must be set to Long Range.
fm
G
enie
fm
G
enie
Other manuals for FmGenie
7
Table of contents