Conrad VC630 User manual

CONRAD IM INTERNET http://www.conrad.de
Imprint
These operating instructions are published by Conrad Electronic GmbH, Klaus-
Conrad-Str.1,92240 Hirschau/Germany
No reproduction (including translation) is permitted in whole or part e.g. photo-
copy, microfilming or storage in electronic data processing equipment, without
the express written consent of the publisher.
The operating instructions reflect the current technical specifications at time of
print.We reserve the right to change the technical or physical specifications.
©
Copyright 1998 by Conrad Electronic GmbH. Printed in Germany.
Note de l´éditeur
Cettenoticeestunepublicationdelasociété Conrad Electronic GmbH,Klaus-Con-
rad-Str.1,92240 Hirschau/Allemagne.
Tous droits réservés, y compris traduction. Toute reproduction, quel que soit le
type,par exemple photocopies,microfilms ou saisie dans des traitements de texte
electronique est soumise à une autorisation préalable écrite de l`éditeur.
Impression,même partielle,interdite.
Cette notice est conforme à la règlementation en vigueur lors de l´impression.
Donnéestechniqueset conditionnementsoumisàmodificationssans aucunpréalable.
©
Copyright 1998 par Conrad Electronic GmbH. Imprimé en Allemagne.
Impressum
Diese Bedienungsanleitung ist eine Publikation der Conrad Electronic GmbH.
Alle Rechte einschließlich Übersetzung vorbehalten.Reproduktionen jederArt,z.B.
Fotokopie, Mikroverfilmung, oder die Erfassung in elektronischen Datenverarbei-
tungsanlagen,bedürfen der schriftlichen Genehmigung des Herausgebers.
Nachdruck,auch auszugsweise,verboten.
Diese Bedienungsanleitung entspricht dem technischen Stand bei Drucklegung.
Änderung inTechnik undAusstattung vorbehalten.
©
Copyright 1998 by Conrad Electronic GmbH. Printed in Germany.
Impressum
Deze gebruiksaanwijzing is een publikatie van Conrad Electronic Ned BV.
Alle rechten, inclusief de vertaling, voorbehouden. Reprodukties van welke aard
dan ook,fotokopie,microfilm of opgeslagen in een geautomatiseerd gegevensbe-
stand,alleen met schriftelijke toestemming van de uitgever.
Nadruk,ook in uittreksel,verboden.
Deze gebruiksaanwijzing voldoet aan de technische eisen bij het ter perse gaan.
Wijzigingen in techniek en uitrusting voorbehouden.
©
Copyright 1998 by Conrad Electronic Ned BV. Printed in Germany.
*308-11-98/05-MS
NL
D
F
GB
100% recy-
cling paper.
Bleached
without
chlorine.
100% Recyc-
ling-papier.
Chloorvrij
gebleekt.
100% Recyc-
ling-Papier.
Chlorfrei
gebleicht.
100%
papier
recyclé.
Blanchi
sans chlore.
OPERATING INSTRUCTIONS
Digital Multimeter
VC630, VC650, VC670 TRUE RMS
Item-No.:122645, 122653, 122661
NOTICE D´EMPLOI
Multimétres numériques
VC630, VC650, VC670 TRUE RMS
Node commande:122645, 122653, 122661
BEDIENUNGSANLEITUNG
LCD Digitalmultimeter
VC630, VC650, VC670 TRUE RMS
Best.-Nr.:122645, 122653, 122661
GEBRUIKSAANWIJZING
Digitale multimeter
VC630, VC650, VC670 TRUE RMS
Bestnr.:122645, 122653, 122661
NL
D
F
GB
Page 2 - 44
Page 45 - 90
Seite 91 - 134
Pagina 135 - 175

3
• VC 630 and VC 650: measurement of capacitors up to 40 uF max.; VC
670 up to 400 uF
• Frequency measurements up to 4 MHz max.
• VC 630 and VC 650: resistance measurements up to 40 MOhm max.; VC
670 up to 400 MOhm max.
• Continuity test, diode test, transistor test (hfe parameter)
• VC 650 and VC 670: temperature measurements using the temperature
adapter available as an option
• VC 650 and VC 670: logic level measurements
• VC 650 and VC 670: signal generator output (TTL) from 1 Hz up to
5 kHz (in steps)
• A measurement must not be performed under unfavourable ambient
conditions. Unfavourable ambient conditions include:
- wetness or excessive air humidity,
- dust and combustible gases, fumes or solvents,
- thunderstorms or storm conditions such as strong electrostatic fields,
etc.
Any use other than as described above can lead to damage to the pro-
duct and can also cause hazards such as for example, short-circuit, fire,
electric shock, etc. No part of the product must be modified or conver-
ted! The safety information must be observed!
2. Introduction, presentation
The three digital multimeters VC 630, VC 650 and VC 670 are menu-dri-
ven instruments each with a multifunction display. The otherwise custo-
mary rotary switch for selecting measurement functions is entirely mis-
sing. Therefore, logically, there are also no contact-closure or other com-
mon switch problems. With the base model VC 630, in addition to the
normal multimeter functions, transistor tests, frequency and capacity
measurement are possible. With the VC 650, in addition temperature
2
Digital Multimeter VC 630, VC 650, VC 670 TRUE RMS
Attention! You must read this!
Please read these operating instructions thoroughly. Damage arising
from failure to observe the operating instructions will void any guaran-
tee claims. Failure to observe the instructions may also endanger life!
We accept no liability for consequential damage resulting from this. It is
assumed that the user has basic knowledge of handling measuring
instruments and PCs. Keep these operating instructions in a safe place.
Contents Page
1. Intended use........................................................................................... 2
2. Introduction............................................................................................ 3
3. Safety instructions.................................................................................. 4
4. Functional description of
operating elements (buttons operation).............................................. 7
5. Description of measurement functions............................................... 13
6. Maintenance, battery replacement, fuse replacement,
setting up the measuring instruments................................................ 38
7. Technical data and measurement tolerances ..................................... 41
1. The intended use of the measuring
instrument comprises:
• DC voltage measurements up to 1000 VDC max.
• AC voltage measurements up to 700 VAC rms max.
• DC or AC current measurements up to 20 A max.
• VC 670: TRUE RMS - AC current measurements up to 20 A max. and AC
voltage measurements up to 700 VAC rms max.
GB

5
• The measuring instrument may not be used in overvoltage category III
installations per IEC 664. The measuring instrument and test leads are
not protected against arc explosions (IEC 1010-2-031, Section 13.101).
• Measuring instruments and accessories do not belong in the hands of
children!
• In commercial facilities the accident-prevention regulations of the
Industrial Employers' Liability Association for electrical systems and
equipment must be observed.
• In schools, training facilities, hobby and self-help workshops, the hand-
ling of measuring instruments must be supervised responsibly by trai-
ned personnel.
• Except where this can be performed manually, live parts may be expo-
sed when opening covers or removing components. The points of mea-
surement may also be live. Before any adjustment, maintenance, repair
or replacement of components or assemblies necessitating opening the
unit, the unit must be disconnected from all voltage sources and cir-
cuits. If adjustment, maintenance or repair of the opened unit under
voltage is unavoidable, this may only be carried out by a specialist
familiar with the associated risks and applicable regulations (VDE-
0100, VDE-0683, VDE-0701).
• Capacitors in the unit may remain charged even when the unit has
been isolated from all voltage sources and circuits.
• Take particular care when dealing with voltages greater than 25 V AC
or greater than 35 V DC. Even at these voltages it is possible to receive
a lethal electric shock if electrical conductors are touched.
Therefore, first of all switch off the voltage source, connect the measu-
ring instrument to the test points of the circuit to be measured, set the
required voltage measuring range on the measuring instrument and
only then switch on the voltage source. After the measurement has
been completed, switch off the voltage source and remove the test
leads from the circuit test points.
• Before every voltage measurement, ensure that no other measure-
ment function is active (resistance measurement, diode test, etc.).
4
measurement (using the adapter available as an option) and logic tests
are possible. Furthermore, a TTL signal generator is built in. The output
frequency is between 1 Hz and 5 kHz.
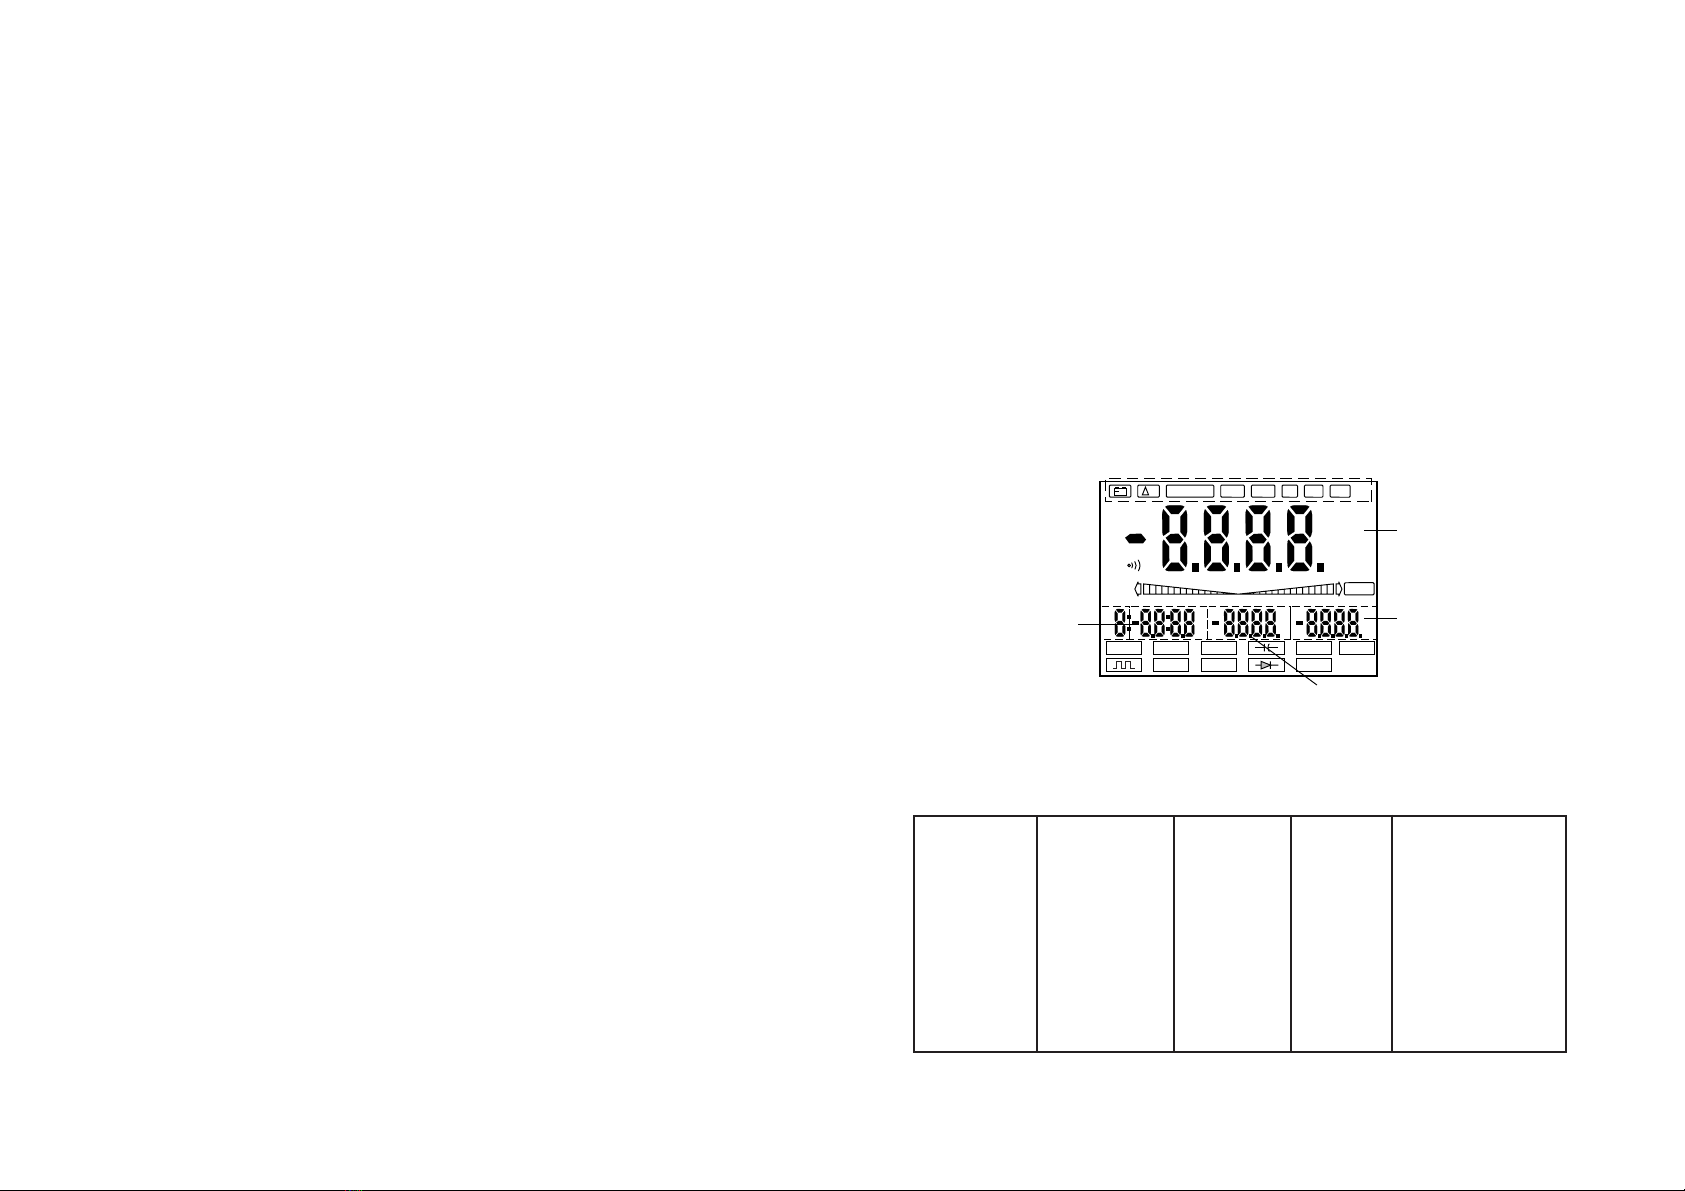
Finally, the VC 670 is configured as a true rms multimeter. True rms
means that independently of the measured AC current and voltage
waveform, the multimeter always displays the true rms value of the mea-
surement. In addition, the following features are present in the VC 650:
capacity measurement up to 400 uF max., true rms AC voltage measure-
ment up to 700 V, true rms AC current measurement up to 20 A max. and
resistance measurement up to 400 MOhm max. Furthermore, the VC 670
DMM has switchable back-lighting and an acoustic measured value indi-
cator (TONE) ; according to the level of the measurement, a higher or
lower signal tone sounds.
All three DMMs have a serial interface, via which communication with a
PC becomes possible. The software (diskette) and the additional hard-
ware (interface lead) are available as an option. If the measuring instru-
ment is not in use for longer than approx. 30 min., the AUTO POWER OFF
function then switches the instrument off. The multimeters can be used
universally, in hobby, educational and (non-industrial) commercial appli-
cations, etc.
3.Safety instructions
• The VC 630, VC 650 and VC 670 TRUE RMS digital multimeters are EMC
and safety-approved (CE for domestic and commercial use, not for
industrial use) and meet the 89/336/EU EMC directive and 73/23/EU low
voltage directive.
• These units have been constructed in accordance with VDE 0411 Part 1
= EN or IEC 61010-1 protective measures for electronic measuring
instruments and left the factory in a perfect technically-safe condition.
To maintain this condition and to ensure safe operation, it is essential
for the user to observe the safety instructions and warning notes which
are contained in this user manual.
• Current measurements are only approved in circuits which are themsel-
ves protected by a 20 A 250 V fuse and in which no voltages above 250
VAC or 250 VDC are present.

7
• Never switch the measuring device on immediately after it has been
brought from a cold into a warm area. The resulting condensation
water could damage the unit. Allow the unit to come to room tempe-
rature before switching it on.
4. Functional description of operating
elements (buttons operation)
4.1 Basic description
Illustration of front view: see fold-out page
4.2 Basic display
According to the DMM model and measurement functions, various indi-
cations can be seen in the main display (S0) and in the sub-display S1, S2
and S3. The following table explains these
Meas. func S0 S1 S2 S3
ACV AC volts Hz (<100kHz) ——- ——-
ACA AC amps Hz (<100kHz) ——- ——-
DCV DC amps ——- ——- ——-
+
TRIG
±
REC
½
cly
ms
mV
%
dB
mV
KHz
¡C¡F
MAX MIN
%
MIN/MAX TIME LMT PH REC RCLL
mVA%
AUTO
AC DC
TONE
Mk½Hz
¡C¡FnumF
HOLD
0-10-20-30 -30-20-10
Hz hfe
Logic
VOLT
½
mA
A
TEMP
S0
S1
S2
S3
6
• Before every change in measuring range, the test leads or adapters
must be removed from the test points. Before every measurement,
check the measuring instrument and test leads and adapters for
damage.
• The measuring instrument should not be used in areas or under adver-
se environmental conditions, in which inflammable gas, fumes or dust
are present or can occur. For your own safety it is essential to avoid the
measuring instrument or test leads becoming damp or wet. Avoid ope-
ration in the immediate vicinity of
a) strong magnetic fields (loudspeakers, magnets)
b) electromagnetic fields (transformers, motors, coils, relays, contac-
tors, electromagnets, etc..)
c) electrostatic fields (charges/discharges)
d) transmission aerials or HF generators
The measuring instrument can otherwise be damaged.
• For your own safety it is essential to avoid the measuring instrument or
test leads and adapters becoming damp or wet.
• When measuring, use only the test leads and optional matching adap-
ters supplied with the measuring instrument. No others may be used.
• To avoid electric shock, care should be taken that the test probes and
the connections (measurement points) are not touched during measu-
rement, not even indirectly.
• The voltage between any socket of the measuring instrument and
earth must not exceed 500 VDC or VAC rms.
• If it can be assumed that safe operation is no longer possible, then the
unit must be switched off and protected against unintentional opera-
tion.
It can be assumed that safe operation is no longer possible, if
- the unit shows visible signs of damage,
- the unit no longer functions and
- after prolonged storage under unfavourable conditions or
- after severe transportation stress.

9
„MIN/MAX“ detection of the highest and lowest measured values
„TIME“ internal clock; the indication is in minutes and seconds up
to one hour and beyond this in hours and minutes. Maxi-
mum indication 23:59 (23 hours, 59 minutes)
„LMT“ "LIMIT" = comparative measurement with selectable upper
and lower limits (VC 670 only)
„PH“ "Peak Hold" = peak value measurement indication (VC 650
and VC 670 only)
„REC“ "Record" = record/store a measured value; there are 10
memory locations available. The number of the current
memory location is shown on the extreme left of the dis-
play.
„RCLL“ "Recall" of a stored measured value. For memory location
details see "REC" above
remaining positions
„HOLD“ "Data Hold" = the measured value is held (e.g. pending
transcription) until the "HOLD" button is pressed again or
the DMM switched off..
„AUTO“ is displayed when automatic range control is active.
„TONE“ tone signal for measured value recognition (VC 670 only)
„TRIG±“ trigger button for frequency measurement. Triggering on
the positive "+" or negative "-" edge of the signal to be
measured.
„Logic“ logic function display (VC 650 and VC 670 only).
„HI“ high logic level measurement
„LO“ low logic level measurement
8
4.3 Display information and operating mode symbols
Upper header, after the "ENTER MENU" button is pressed
„Æ%“ stands for "REL" = relative value measurement; possible
with ACV, DCV, Ohm, continuity, diode test, capacity, mA,
uA and A. The difference relative to a certain measured
value is displayed. The function is switched off by pressing
the "ENTER" button.
Resistance Ohm ——- ——- ——-
Continuity ——- ——- ——-
Diode test mV ——- ——- ——-
hfe hfe ——- ——- ——-
Capacitor test nF, uF ——- ——- ——-
Hz Hz, kHz, MHz V (olt) ——- ms, 1/2 Period
(0,01 - 99 msec)
TEMP °C / °F°F / °C ——- ———
TTL-gen. Hz ——- ——- ——-
LOGIC Hi, Lo Hz V TTL/3V-CMOS/
5V-CMOS
D% Variation Ref. value Diff. % ——-
MIN/MAX inst. Measurement ——-
value
MIN MAX
PH = Peak inst. measurem. ——- Max. value ——-
Hold value („frozen“)
TIME (clock) - - - hours, minutes,
seconds <24h

11
V = volt (unit of electrical potential difference)
A = ampere (unit of electrical current)
Hz = hertz
kHz = kilohertz (exp.3)
k½= kilohm (exp.3)
M½= megohm (exp.6)
pF = picofarad (pico = exp. -12)
nF = nanofarad (nano = exp.-9)
uF = microfarad (micro = exp.-6)
4.4 Configuration of buttons and functional description with
button operation
4.4.1 General
All parameters can be changed/set by means of the various buttons on
the instrument. According to the instrument model, the following set-
tings are possible:
"TRIG" (all three DMMs), „ „ lighting (VC 670 only), „ „ tone signal
(VC 670 only), "RANGE" (manual range setting), "AC/DC" with „½“,
"HOLD", "POWER" (on/off), "ENTER MENU" (confirmation button), „“
(measurement function button via "ENTER"), "mA TEMP A" (measure-
ment function button to the right of "ENTER"); "TEMP" (VC 650 and VC
670 only), "< >" (selection-aid button), „HzhfeLogic „ (measure-
ment function button to the left of ENTER); „ „ and "Logic" (VC 650
and VC 670 only)
4.4.2 TRIG
a) TRIG button
This button is required for frequency measurement to switch from
positive triggering to negative triggering. Positive triggering "+"
means that the signal to be measured is captured on its rising
10
„- - - -“ logic level measurement between high and low
„PASS“ indication for LMT function (VC 670 only), meaning that the
measured value is somewhere between the previously-set
lower and upper limits
„hfe“ hfe (amplification) parameter indication during transistor
test measurements
„O.L“ "Overload" = measured value too great, ie. measurement
range limit exceeded
„ „ signal generator TTL output symbol (VC 650 and VC 670
only)
„ „ symbol for battery replacement
„°C“ degrees Celsius unit of measurement during temperature
measurements with optional temperature adapter (VC 650
and VC 670 only)
„°F“ degrees Fahrenheit unit of measurement during tempera-
ture measurements with optional temperature adapter (VC
650 and VC 670 only)
„->I-“ symbol for diode test
„-I(-“ symbol for capacity measurements of bipolar and unipolar
capacitors
„ “ symbol for acoustic continuity test
all remaining symbols stand for the various units of measurement:
AC = alternate unit
DC = direct unit
mV = millivolt (exp.-3)
+–

13
ly-measured value is held, or 'frozen'. The "HOLD" symbol appears at the
right-hand edge of the screen. In this condition, other than the "HOLD"
button, only the "ENTER" measurement function button and "POWER"
switch have an effect on the settings. The remaining buttons lose their
functions (being switched off).
To release the current measurement again, press the "HOLD" button
once more. The (new) instantaneously-measured value is displayed.
4.4.6 POWER
The measuring instrument is switched on or off by means of the
"POWER" switch. If the measured value does not change within about
30 minutes, the measuring instrument switches itself into "stand by"
mode. Energy consumption is reduced by this auto-power-off feature.
5.Setting the measurement function with the
buttons surrounding "ENTER"
Arranged around the "ENTER" button, the following functions are selec-
table:
a) above "ENTER"
- "V"; AC voltage measurement up to 700 VAC rms max. (true rms for
VC 670),
- "V"; DC voltage measurement up to 1000 VDC max.,
- resistance measurement up to 40 MOhm max. (VC 670 up to 400
MOhm) and continuity test (acoustic) up to 20 Ohm max.
- "-|(-"; capacity measurement up to 40 uF max. (VC 670 up to 400 uF)
and "->|-"; diode test.
b) to the right of "ENTER"
- "mA"; DC and AC current measurements up to 400 mA max. (true
rms for VC 670)
- "A"; DC and AC current measurements up to 20 A max. (true rms
for VC 670)
- temperature measurements with optional adapter (VC 650 and VC
670 only)
12
edge. Negative triggering "-"means that the signal to be measu-
red is captured on its falling edge.
b) Lighting (VC 670 only)
Press the button for about 2 seconds. The back-lighting is swit-
ched on for improved readability under adverse light conditions.
Press the button again for about 2 seconds. The back-lighting is
switched off.
Attention!
Do not leave the lighting switched on for too long, because it uses a
great deal of energy. Switch the back-lighting off, as soon as this is no
longer required.
c) TONE signal (VC 670 only)
This function is switched on by pressing the "TRIG" button once,
valid only when measuring voltage and current (mA and A). A hig-
her or lower tone sounds according to the level of the signal
being measured (inclusive of the automatic range switching).
4.4.3 RANGE
Automatic range selection "AUTO" is switched off by use of the "RAN-
GE" button, i.e. the desired measurement range is selected manually. For
AC voltage measurements, for example, the four ranges 400mV, 4V, 40V,
400V and 700V can be selected in turn with each operation of the "RAN-
GE" button.
To select "AUTO", automatic range selection, the "RANGE" button must
be pressed again and held for about 2 seconds..
4.4.4 „AC/DC/OHM “
This button is used to switch from DC to AC (current or voltage) measu-
rements and from resistance measurement to acoustic continuity test
and vice versa.
4.4.5 HOLD
The "HOLD" button must be pressed once when test records are to be
kept and the instantaneously-measured value is to be noted down be-
fore it changes again. By pressing the "HOLD" button, an instantaneous-

15
Attention!
Should the range be exceeded (> 700 VAC rms) an acoustic warning sig-
nal (interrupted tone) sounds. Never exceed the maximum input level!
Note!
1. During AC voltage measurement in addition to the measured value
and the bar graph, in the right-hand lower sub-display ("small" dis-
play) the frequency of the AC voltage is also indicated. Note also the
following illustration.
2. The VC 670 measures the true rms of an AC input. This type of mea-
surement is always useful where non-sinusoidal, overloaded, mixed-
frequency or high frequency (switching power supply) signals are
concerned.
3. Selectable special functions
According to the model of measuring instrument, the following sub-
functions can be selected via the "ENTER MENU" button:
"Æ%" reference value measurement, "MIN/MAX" value capture,
"TIME", "REC" record measured value, "RCLL" recall measured value,
"LMT" comparison function (VC 670 only) and "PH" peak value hold
(VC 650 and VC 670 only). These sub-functions are described in detail
from section 5.12.
AUTO
AC
VOLT
V
Hz
MAIN DISPLAY
BARGRAPH DISPLAY
SUB DISPLAY (S1)
(LCD)
0+10
14
c) to the left of "ENTER"
- "Hz"; frequency measurements up to 4 MHz max. and "hfe"; tran-
sistor test
- "LOGIC"; logic level measurements (TTL, 3V, 5V) up to 5 V max. (VC
650 and VC 670)
- "SIG OUT"; TTL signal generator function up to 5 kHz max. (VC 650
and VC 670)
Attention!
Observe without fail the maximum permitted input levels! Take care
when handling voltages greater than 25 VAC rms / DC: touching electri-
cal circuits can endanger life due to electric shock.
Before changing to another measurement function, the test leads are to
be disconnected from the object being measured and removed from the
measuring instrument.
Use only the supplied test leads and the optional adapters for your mea-
surements. Before connecting, always check the condition of the
connecting plug and test probes and check the insulation for damage.
The test leads, but not the adapters, are approved for voltages up to
1000 V max. The VC 630, VC 650 and VC 670 measuring instruments are
designed for voltages up to 1000 VDC and 700 VAC rms max.
5.1 AC voltage measurement
For measurement of AC voltages up to 700 VAC rms max., proceed as fol-
lows:
a) Switch on the measuring instrument. The initial configuration is
always AC voltage measurement in "AUTO" (automatic range selec-
tion) mode.
b) Connect the black test lead to the "COM" measuring instrument
socket and the red test lead to the „V•Ohm•Hz•Logic•->I-“ socket
c) The bar graph, a sort of analogue indicator with fast measurement
reaction time, is active beneath the measured value while measuring.
The bar graph performs the function of a trend indicator.
d) Connect the test leads to the object to be measured.

17
2. Selectable special functions
The following sub-functions, according to the model of multimeter,
are selectable by means of the "ENTER MENU" button:
"Æ%" reference value measurements, "MIN/MAX" value capture,
"TIME", "REC" record measured value, "RCLL" recall measured value,
"LMT" comparison function (VC 670 only) and "PH" peak value hold
(VC 650 and VC 670 only). These sub-functions are described in more
detail from Section 5.12..
5.3 Resistance measurement and continuity test
Attention!
Ensure that all circuit components, circuits and assemblies and other
objects to be measured are completely voltage-free.
For the measurement of resistances up to 40 MOhm max. (VC 670 up to
400 MOhm max.) and (acoustic) continuity test up to 20 Ohm max., pro-
ceed as follows:
a) Switch the measuring instrument on. The initial configuration is
always AC voltage measurement in "AUTO" (automatic range selec-
tion) mode. Now press the „V•-I(-•½•->I-“ button once. The measu-
ring instrument switches to resistance measurement, recognisable
through the Omega symbol at the bottom edge of the screen.
b) Connect the black test lead to the measuring instrument "COM"
socket and the red test lead to the „V••Hz•Logic•->I-“ socket.
AUTO
VOLT
V
0 +10 +20 +30
16
5.2 DC voltage measurement
For measurement of DC voltages up to 1000 VDC max. proceed as fol-
lows:
a) Switch on the measuring instrument. The initial configuration is
always AC voltage measurement in "AUTO" (automatic range selec-
tion) mode. Now press the "AC/DC" button once. The measuring
instrument switches to DC voltage, recognisable when the symbol
"AC" under "AUTO" disappears.
b) Connect the black test lead to the "COM" measuring instrument
socket and the red test lead to the „V•½•Hz•Logic•->I-“ socket
c) The bar graph beneath the measured value is active during mea-
surement, being similar to an analogue indicator with a faster reac-
tion time. The bar graph operates as a trend indicator.
d) Connect the test probes to the object to be measured.
Attention!
Should the range be exceeded (> 1000 VDC) an acoustic warning signal
(interrupted tone) sounds. Never exceed the maximum input level!
When a "-" appears in front of the DC voltage measured value, the mea-
sured voltage is negative (or the test leads are reversed).
Note!
1. During DC voltage measurement in addition to the measured value
only the bar graph is visible. None of the sub-displays is active. Note
also the following illustration.

19
2 Selectable special functions
The following sub-functions, according to the model of multimeter,
are selectable via the "ENTER MENU" button:
"Æ%" reference value measurements, "MIN/MAX" value capture,
"TIME", "REC" record measured value, "RCLL" measured value recall,
"LMT" comparison function (VC 670 only) and "PH" peak value mea-
surement (VC 650 and VC 670 only). These sub-functions are descri-
bed in more detail in section 5.12.
5.4 Measurement of diodes and capacitors „->I- -I(-“
Attention
Discharge every capacitor before connecting it to the measuring instru-
ment. When short-circuiting capacitors, high-energy discharges can
occur. Take care in areas where dust, inflammable gas, fumes or liquid is
present or can occur. ==> Danger of explosions! Do not touch the
connectors of capacitors with voltages over 35 VDC or 25 VAC. Caution -
danger to life!
Carry out no measurements on capacitors built into circuits or parts of
circuits.
For the measurement of diodes and semi-conductors or capacitors up to
40 uF max. (VC 670up to 400 uF max., proceed as follows:
a) Switch on the measuring instrument. The initial configuration is
always AC voltage measurement in "AUTO" (automatic range selec-
AUTO M½
½
0 +10 +20 +30
18
c) The bar graph beneath the measured value is active during measure-
ment, being similar to an analogue indicator with a faster reaction
time. The bar graph operates as a trend indicator.
d) Connect the test probes to the object to be measured, taking care
that it is voltage-free.
Note!
If resistors are to be measured which are built into a circuit in which
transistors/diodes are present, the test voltage of the 400-Ohm range is
sufficient to cause current to flow through these semiconductors. Hence
the measured values can be distorted.
The resistance of the test leads (some 0.1 to 0.2 Ohm) can normally be
ignored. However, even this low value can lead to inaccuracies in the
400 Ohm measurement area.
When resistance measurements are performed, take care that the mea-
surement points which are to be touched with the test probes are free
from dirt, oil, solder flux or similar. Such conditions can distort the mea-
sured value.
Should "O.L" appear in the display, the measurement range has been
exceeded or the circuit being measured is open-circuited. Do not measu-
re loaded capacitors, as a possible discharge may damage the measuring
instrument.
e) fBefore the acoustic/optical measurement of continuity up to 20 Ohm
max., press the "AC/DC" button once. The measuring instrument is
thereby switched from "½" measurement to „•))“.
Note!
1. During resistance measurement/continuity test, other than the mea-
sured value only the bar graph is also present. None of the sub dis-
plays is active. Note also the following illustration.

21
General note!
1. During capacity measurement and diode test, other than the mea-
sured value only the bar graph is also present. Note the following
illustration.
2. Selectable special functions
The following sub-functions, according to the multimeter model, are
selectable using the "ENTER MENU" button:
"Æ%" reference value measurements, "MIN/MAX" value capture,
"TIME", "REC" record measured value, "RCLL" measured value recall,
"LMT" comparison function (VC 670 only) and "PH" peak value measure-
ment (VC 650 and VC 670 only). These sub-functions are described in
more detail in section 5.12.
AUTO mV
AUTO µF
0 +10 +20
20
tion) mode. Now press the „V•-I(-•½•->I-“ button twice. The measu-
ring instrument switches to capacity measurement, recognisable
through the capacitor symbol at the bottom edge of the screen..
When the „V•-I(-•½•->I-“ button is pressed once again (ie. from the
base configuration, three times), diode test is reached, recognisable
through the diode symbol at the bottom edge of the screen.
b) For diode test, connect the black test lead to the "COM" socket of the
measuring instrument and the red test lead to the „V•½•Hz•Logic•-
>I-“ socket. When measuring capacity, only the measurement socket
adjacent to the "mAoTEMPoA" button on its right is to be used
("TEMP" present only on VC 650 and VC 670).
c) The bar graph beneath the measured value is active during measure-
ment, being similar to an analogue indicator with a faster reaction
time. The bar graph operates as a trend indicator.
d) Connect the test probes to the object to be measured, a diode, taking
care that it is voltage-free.
Note when measuring diodes!
Connect the test probes to the voltage-free semi-conductor component,
a diode or transistor. In this process, note that the red test lead must be
connected to the anode and the black test lead to the cathode. The for-
ward conducting direction will now be measured. For an intact PN-junc-
tion in a silicon diode path, a value between 0.45 and 0.75 VDC appears,
while in a germanium diode path a value between 0.2 and 0.4 VDC
appears. If, however, instead of a voltage "O.L" (for overload) appears,
the diode path is open-circuit or the test leads reversed. If for transistors
a voltage of more than 1 V is measured, it can be that the transistor
incorporates resistors.
For light-emitting diodes, a forward voltage of approx. 1.4 up to 2.2
VDC will be measured. Where low current LEDs are concerned, the mea-
surement current is sufficient to cause these to light.
The reverse direction of a diode path is measured with the red test lead
connected to the cathode and the black test lead to the anode. If as a
result of this a voltage value is indicated, the diode is faulty. If on the
contrary "O.L" is indicated, the diode path is high-impedance (O.K).

23
Note!
1. The frequency of the AC current is also indicated during AC current
measurement in addition to the measured value and the bar graph in
the bottom right of the sub-display ("small" display). In this connec-
tion, note the following illustration.
2. The VC 670 measures the true rms of an AC input. This type of mea-
surement is always useful where non-sinusoidal, overloaded, mixed-
frequency or high frequency (switching power supply) signals are
concerned.
3. Selectable special functions
The following sub-functions, according to multimeter model, are sel-
ectable by means of the "ENTER MENU" button:
"Æ%" reference value measurements, "MIN/MAX" value capture,
"TIME", "REC" record measured value, "RCLL" measured value recall,
"LMT" comparison function (VC 670 only) and "PH" peak value mea-
surement (VC 650 and VC 670 only). These sub-functions are descri-
bed in more detail in section 5.12.
5.6 20 A DC and AC current measurement
For the measurement of DC or AC currents up to max. 20 A, proceed as
follows:
a) Switch the measuring instrument on. The initial configuration is
always AC voltage measurement in "AUTO" (automatic range selec-
AUTO
AC
mA
mA
Hz
0 +10 +20
22
5.5 mA DC and mA AC current measurement
For the measurement of DC and AC currents up to 400 mA max., proceed
as follows:
a) Switch the measuring instrument on. The initial configuration is
always AC voltage measurement in "AUTO" (automatic range selec-
tion) mode. Now press the „mA•TEMP•A“ once. The measuring
instrument switches to mA AC current measurement, recognisable
through the symbol "AC" adjacent to and to the left of the measured
value. For the measurement of DC currents up to 400 mA max. press
the "AC/DC" button once.
b) Connect the black test lead to the "COM" measuring instrument
socket and the red test lead to the "mA" socket (VC 630) or
„mA•TEMP• “ socket (VC 650 and VC 670).
c) The bar graph beneath the measured value is active during measure-
ment, being similar to an analogue indicator with a faster reaction
time. The bar graph operates as a trend indicator.
d) Connect the test leads in series with the object to be measured (see
following illustration).
Attention!
When a "-" appears in front of the DC current measured value, the mea-
sured current is negative (or the test leads are reversed).
Do not measure any currents in circuits in which voltages greater than
250 VDC or VAC rms can occur, otherwise as a result life can be endan-
gered. Never measure currents over 400 mA. Measure currents equal to
or lower than 400 mA only in circuits themselves protected by a 400 mA
quick-blow fuse.
A
~
Fuse
Current
source
Measuring
instrument
Load

25
in the bottom right of the sub-display ("small" display). In this
connection, note the following illustration.
2. The VC 670 measures the true rms of an AC input. This type of mea-
surement is always useful where non-sinusoidal, overloaded, mixed-
frequency or high frequency (switching power supply) signals are
concerned.
3. Selectable special functions
The following sub-functions, according to multimeter model, are sel-
ectable by means of the “ENTER MENU” button
#“Æ%” reference value measurements, “MIN/MAX” value capture,
“TIME”, “REC” record measured value, “RCLL” measured value recall,
“LMT” comparison function (VC 670 only) and “PH” peak value mea-
surement (VC 650 and VC 670 only). These sub-functions are descri-
bed in more detail in section 5.12.
5.7 Temperature measurement (VC 650 and VC 670 only)
The temperature measuring range of the digital multimeter extends
from -40°C to +1000° C. Temperature measurement is carried out
exclusively using a K-type thermocouple probe. It should be noted that
outside the temperature range +18°C to + 28°C (= range of guaranteed
measurement accuracy) only the thermocouple should be placed within
the temperature to be measured. Additionally, the temperature
AUTO
AC
A
A
Hz
0 +10 +20
24
tion) mode. Now press the „mA•TEMP•A“ button twice. The measu-
ring instrument switches to A AC current measurement, recognisable
through the symbol "AC" to the left and adjacent to the measured
value. For the measurement of DC currents up to 20 A max., press the
"AC/DC" button once.
b) Connect the black test lead to the "COM" measuring instrument
socket and the red test lead to the "20 A" socket.
c) The bar graph beneath the measured value is active during measure-
ment, being similar to an analogue indicator with a faster reaction
time. The bar graph operates as a trend indicator.
d) Connect the test leads in series with the object to be measured (see
following illustration).
The "RANGE" button (manual range selection) is without function
during A current measurement.
Attention!
When a "-" appears in front of the DC current measured value, the mea-
sured current is negative (or the test leads are reversed). Never measure
currents over 400 mA. Measure currents equal to or lower than 400 mA
only in circuits themselves protected by a 400 mA quick-blow fuse.
Never measure currents over 20 A. Measure only in circuits themselves
fused at 20 A and in which no powers greater than 4000 VA can occur.
Measurements of currents equal to 20 A may be of 30 s duration max.
and be carried out only at intervals of 15 minutes (shunt cooling phase).
Note!
1. During AC current measurement, indicated in addition to the mea-
sured value and the bar graph, the frequency of the AC current is also
A
~
Fuse
Current
source
Measuring
instrument
Load

27
(“small” display) the temperature in “°F” is also indicated. Note the
following table.
2. Selectable special functions
The following sub-functions, according to multimeter model, are
selectable by means of the “ENTER MENU” button:
“Æ%” reference value measurements, “MIN/MAX” value capture,
“TIME”, “REC” record measured value, “RCLL” measured value recall,
“LMT” comparison function (VC 670 only) and “PH” peak value mea-
surement (VC 650 and VC 670 only). These sub-functions are descri-
bed in more detail in section 5.12.
5.8 Frequency measurement
a) Switch the measuring instrument on. The initial configuration is
always AC voltage measurement in “AUTO” (automatic range selec-
tion) mode. Now press the „Hz•hfe• •Logic“ button once. The mea-
suring instrument switches to frequency measurement, recognisable
through the symbol “Hz” in the bottom left of the display and
through the display of period in ms in the left sub-display and volta-
ge in V in the right-hand sub-display. In addition the symbol “TRIG”
with “+” or “-” appears to the left beneath the measurement value.
b) Connect the black test lead to the “COM” measuring instrument
socket and the red test lead to the „V•½•Hz•Logic•->I-“ socket.
c) The bar graph beneath the measured value is active during measu-
rement, being similar to an analogue indicator with a faster reaction
time. The bar graph operates as a trend indicator.
AUTO
¡C
¡F
TEMP
0 +10 +20
26
measuring set is available optionally and is therefore not among the
standard items supplied. If no thermocouple is connected to the
measuring instrument, the current room temperature is automatically
measured and displayed (in °C and °F).
To perform a temperature measurement, proceed as follows:
a) Switch the measuring instrument on. The initial configuration is
always AC voltage measurement in “AUTO” (automatic range selec-
tion) mode. Now press the “mA•TEMP•A” button three times. The
measuring instrument switches to temperature measurement, reco-
gnisable through the symbol “TEMP” at the bottom right of the dis-
play and by the display of the temperature in degrees C and in the
sub-display in degrees F.
b) Insert the thermocouple plug correctly polarised (smaller and wider
contacts) into the temperature adapter and connect this correctly
polarised (observe “+” and “-”) into the “COM” (=“-“) and
„mA•TEMP• „ (=“+“) sockets.
c) The bar graph beneath the measured value is active during measure-
ment, being similar to an analogue indicator with a faster reaction
time. The bar graph operates as a trend indicator.
d) Connect the thermocouple probe to the voltage-free object to be
measured. Hold the temperature probe on/in the object to be measu-
red until the DMM display has stabilised (approx. 30 s).
Attention!
Do not connect any voltages. The instrument can be destroyed by this.
Note !
1. During temperature measurement, in addition to the measured
value and the bar graph in the bottom right of the sub-display

29
“Æ%” reference value measurements, “MIN/MAX” value capture,
“TIME”, “REC” record measured value, “RCLL” measured value recall,
“LMT” comparison function (VC 670 only) and “PH” peak value mea-
surement (VC 650 and VC 670 only). These sub-functions are descri-
bed in more detail in section 5.12.
5.9 Transistor test
Attention !
The transistor socket is not protected against overload.
To measure the hFE parameter (amplification) of a transistor, proceed as
follows:
a) Switch the measuring instrument on. The initial configuration is
always AC voltage measurement in “AUTO” (automatic range selec-
tion) mode. Now press the „H•hfe• • Logic“ button three times.
The measuring instrument switches to transistor test, recognisable
through the symbol “hfe” in the bottom left of the display.
b) The bar graph beneath the measured value is active during measure-
ment, being similar to an analogue indicator with a faster reaction
time. The bar graph operates as a trend indicator.
c) Place the transistor to be tested into the measurement socket. Obser-
ve the pin configuration (e.g. c-b-e) of the item to be measured
(given in transistor comparison tables/lists).
Note the following:
- some types of transistor include base-emitter resistors, which can
distort the measurement result.
- the measured hfe value is not absolutely accurate. It only confirms
whether the transistor is working or not. The actual amplification of a
transistor depends on its working current. This multimeter can deliver
a base current up to 10 uA with a Vce of 2.8 V. The collector current
flowing during measurement is captured and from this the hFE value
is calculated.
28
d) Connect the black test lead (test probe) to the circuit or signal gene-
rator earth and the red test lead (test probe) to the signal to be mea-
sured.
Attention!
It is essential to observe the maximum input levels! Do not connect any
voltages greater than 250 VDC or VAC rms max. Life can be endangered
by coming into contact with voltages greater than 25 VAC or 35 VDC.
Do not switch to another measuring function or to another range
during measurement.
Switching under voltage (high energy) can cause a disconnection arc,
which can irrevocably destroy the printed circuit tracks inside the mea-
suring instrument. In addition, life may be endangered as a result of
damage to the measuring instrument.
Frequency measurement is not possible with voltages smaller than
approx. 50 mV rms (measured at 1 KHz).
Notes!
1. During frequency measurement, in addition to the measured value
and the bar graph, in the bottom right sub-display (“small” display)
the level (amplitude) of the measured voltage in VAC rms is also dis-
played; in addition the 1/2 period (1/2 reciprocal of the frequency) of
the signal being measured (up to 100 kHz) appears in the left sub-dis-
play. Note the following table.
2. Selectable special functions
The following sub-functions, according to multimeter model, are
selectable by means of the “ENTER MENU” button:
AUTO
Hz
0 +10 +20
ms mV

31
- if the test point shows a level between 30% and 70% of Vcc, then “--
-” appears in the display
To establish the logic level or to set the level ranges, proceed as follows:
a) Switch the measuring instrument on. The initial configuration is
always AC voltage measurement in “AUTO” (automatic range selec-
tion) mode. Now press the „Hz•hfe• •Logic“ button four times.
The measuring instrument switches to logic test, recognisable
through the symbol “Logic” at the bottom of the display and through
the display of the voltage in V in the centre of the sub-display and of
the frequency in kHz on the right of the sub-display. Additionally, to
the left of the voltage indication “t” can be seen with the TTL level,
with “CMOS 3V” => “3C” and with “CMOS 5V” => “5C”.
b) Connect the black test lead to the “COM” measuring instrument
socket and the red test lead to the „V•½•Hz•Logic•->I-“ socket.
c) The bar graph beneath the measured value is active during measure-
ment, being similar to an analogue indicator with a faster reaction
time. The bar graph operates as a trend indicator.
d) Now connect the other end of the black test lead (test probe) to the
“earth” of the digital circuit, normally “-”.
e) While the black test lead remains connected to “earth”, touch the
points to be tested with the red test probe.
5.11 Use as signal generator (not VC 630)
The DMM incorporates a sort of “function generator”, which delivers
from the centre measurement socket a frequency variable between the
limits 1 Hz and 5 (5.041) kHz at the fixed level of 5V.
To output a TTL level at a frequency variable within these limits, proceed
as follows:
a) Switch the measuring instrument on. The initial configuration is
always AC voltage measurement in “AUTO” (automatic range selec-
tion) mode. Now press the„Hz•hfe• •Logic“ button twice. The
30
- no transistor can be measured which is incorporated into a circuit.
- the hfe values of FETs or other unipolar transistors cannot be measu-
red with this multimeter.
- when the connecting “legs” of the item to be measured do not fit
into the socket (too “fat”), do not use force, otherwise the socket can
thereby be damaged.
- the measurement of hfe reacts to temperature variations. As soon as
the transistor is picked up and plugged into the connector and war-
med with the fingers, the measured value can alter. If an unstable dis-
play occurs, remove the transistor and allow it to cool down to room
temperature.
Notes!
1. During transistor tests, in addition to the measured value only the
bar graph is also displayed. The sub-displays are not active.
2. Selectable special functions
The following sub-functions, according to multimeter model, are sel-
ectable by means of the “ENTER MENU” button:
“Æ%” reference value measurements, “MIN/MAX” value capture,
“TIME”, “REC” record measured value, “RCLL” measured value recall,
“LMT” comparison function (VC 670 only) and “PH” peak value mea-
surement (VC 650 and VC 670 only). These sub-functions are descri-
bed in more detail in section 5.12.
5.10 Logic test (not VC 630)
This measurement function is used to establish the logic levels in digital
circuits (27-TTL, 3 V or 5 V logic and others). With this logic function the
following conditions can be determined:
- if the test point shows a high level greater than 70 % of Vcc then “Hi”
appears in the display.
- if the test point shows a low level, smaller than 30 % of Vcc, then
“Lo” appears in the display.

33
tions is selected, the selection disappears automatically after
approx. 6 s.
b) “Æ%” reference value measurement
The reference value measurement, represented by a delta and per-
cent symbol, enables measurements with reference to a previously-
set value. This set value appears then unchanged in the right-hand
sub-display. Adjacent and to the left, the difference value in per-
cent is indicated in the centre sub-display; in the main display the
instantaneous actual measured value appears. This function is par-
ticularly well-suited to resistance measurement. The display can be
set to “0000”, meaning that resistance measurements can be car-
ried out in the low ohms range without the need to deduct the
resistance of the test leads from the measured value each time.
Reference value measurement is possible during voltage, current,
resistance, capacity and temperature measurement (temperature
with VC 650 and VC 670 only). Because “AUTO”-ranging is switched
off during reference value measurement, the desired measurement
range must be set manually prior to using this special function.
To set the reference value, proceed as follows:
Set the desired measurement range (by means of the “RANGE”
button). Measure the required reference value, e.g. a DC voltage of
12 VDC. Press the “ENTER MENU” button once. The menu appears
in the top line. Within 6 seconds, press the “ENTER MENU” button
once again. The first of the special functions, “Æ%”, is set. The refe-
rence value “12 VDC” is displayed in the right-hand small display
(sub-display).
5.13 “MIN/MAX” value-capture sub-function
When the highest- (= “MAX”) and the lowest- (= “MIN”) occurring
measured value of a steadily-changing measured level is to be captured
then, during the measurement, press the “ENTER MENU” button. The
menu appears in the top line. The first symbol (for reference value
measurement) flashes. Using the “< >” button, move from symbol to
symbol. Press this button until the “MIN/MAX” symbol flashes. Finally
press the “ENTER MENU” button again. The flashing ceases and the
“MIN/MAX” value-capture is started.
32
measuring instrument switches to signal generator output, recognis-
able through the symbol „ “ at the bottom left of the display.
b) Connect the black test lead to the “COM” measuring instrument
socket and the red test lead to the „mA•TEMP• “ socket of the
VC 650 or VC 670.
c) Although the bar graph appears under the display of the output fre-
quency, it is however not here as trend indicator.
d) Connect the test probes to the object to be measured and, when
necessary, operate the following buttons to set the output frequen-
cy:
Each operation of the “<” button (under “Enter”) reduces the output
frequency by one step. Each operation of the “>” button (under “Enter”)
increases the output frequency by one step.
Attention!
Do not short-circuit the signal generator output of the measuring instru-
ment, because the unit can be destroyed by this.
Connect no voltage to the signal generator output of the measuring
instrument, because the unit can similarly be damaged or destroyed.
Note !
Selectable special functions
The following sub-function is selectable by means of the “ENTER MENU”
button: “TIME”. The sub-functions are described in more detail from
section 5.12.
5.12 General and “Reference value measurement” sub-function
a) General
The following chapters describe the special functions which are to
be seen at the top of the LCD display after the “ENTER MENU” but-
ton is pressed. According to the measuring instrument model, more
or fewer function symbols appear. When none of the special func-

35
To set the limits, proceed as follows:
First set the desired measurement range manually by means of the
“RANGE” button. Press the “ENTER MENU” button. The menu appears in
the top line. The first symbol (for reference value measurement) flashes.
Using the “< >” button, move from symbol to symbol. Press this button
until the symbol “LMT” flashes. Confirm the selection with the “ENTER”
button. As a result of this, three sub-displays appear. In the left sub-
display the current measured value is indicated. The centre sub-display
shows the upper limit and the right sub-display shows the lower limit.
The right sub-display flashes. Now press the button “< >” by pressing the
right (+) or left (-) button edge until the desired lower limit is shown.
Confirm by pressing the “ENTER” button. The centre sub-display flashes.
Proceed with setting the upper limit as for the lower. Press the “ENTER”
button once in confirmation. Depending on the level of the measured
value, “PASS” is now displayed when the measured value lies between
the upper and lower limits. “LO” is displayed when the measured value is
lower than the set lower limit. “HI” is displayed when the measured
value is higher than the upper set limit.
5.16 “PH” peak hold measurement sub-function (not VC 630)
With the peak hold function, the highest-occurring measured value is
captured and indicated. Press the “ENTER MENU” button. The menu
appears in the top line. The first symbol (for reference value
measurement) flashes. Using the “< >” button, move from symbol to
symbol. Press this button until the symbol “PH” flashes. Confirm the
input with the “ENTER” button. The peak value captured within
milliseconds (ms) is displayed in the centre sub-display. The currently-
measured value can be read in the main display. To exit the “PH”
function, press the “ENTER MENU” button once briefly or press the
“AC/DC” button or one of the measurement function buttons around
the “ENTER MENU” button => the relevant screen appears.
5.17“REC” record measured value and “RCLL” recall measured
value sub-functions
Up to 10 measured values can be stored and recalled by means of the
sub-functions “REC” (record) and “RCLL” (recall). The measured values
34
Clearly and above all simultaneously, the instantaneously-measured
value, the maximum value (centre sub-display) and the minimum value
(right sub-display) are now displayed on the whole screen area.
To exit the “MIN/MAX” function, press the “ENTER MENU” button once
briefly or the “AC/DC” button or one of the measurement function
buttons around the “ENTER MENU” button => the relevant screen
appears.
5.14 “TIME” (time-capture) sub-function
During measurement a clock can be started by means of the “TIME”
function, which records the time from the start of measurement. The
time stored is 24 hours maximum. Until one hour has elapsed, the time is
presented in minutes and seconds, thereafter in hours and minutes.
To set the clock, proceed as follows:
During or prior to measurement press the “ENTER MENU” button. The
menu appears in the top line. The first symbol (for reference value
measurement) flashes. Using the “< >” button, move from symbol to
symbol. Press this button until the “TIME” symbol flashes. Confirm the
selection with the “ENTER” button. The clock is displayed in the left sub-
display. The clock can be started and stopped and reset to zero using the
“< >” button. Pressing once on the left arrow (left button edge) stops or
starts the clock. Pressing once on the right arrow (right button edge)
resets the clock to zero. To exit the “TIME” function, press the “ENTER
MENU” button once briefly or press the “AC/DC” button or one of the
measurement function buttons around the “ENTER MENU” button =>
the relevant screen appears.
5.15 “LMT” comparison value measurement sub-function
(VC 670 only)
So-called comparison measurements are possible by means of the “LMT”
(limit) function. High/low comparisons can be made in this sub-function,
in which the instantaneously-measured value is compared with the
highest and lowest reference values stored. To exit the “LMT” function,
press the “ENTER MENU” button once briefly or press the “AC/DC”
button or one of the measurement function buttons around the “ENTER
MENU” button => the relevant screen appears.

37
2. Having established the connection, switch on the measuring instru-
ment by means of the “POWER” switch.
3. Press the “HOLD” button (approx. 3 seconds) until the circle symbol
with a “2” appears on the right beneath the main display.
4. Now switch the PC (“computer”) on.
5. Use of Windows software (optionally available):
Attention!
The following steps presuppose basic knowledge of MS Windows. In
case of difficulty, study the Windows manual concerning the use of
WINDOWS.
Windows 95 and a VGA monitor are required for the operation of this
software.
a) Start the computer and activate Windows.
b) Load the diskette into the appropriate 3.5" drive (“a” or “b”).
c) With the mouse, click the “START” button and then click “Run”.
As a result of this, the Run dialog box with command line opens.
d) Enter the following at the flashing cursor:
When the diskette is in drive “a” : type a:\setup and press
[Enter] or click “OK”
When the diskette is in drive “b” : type b:\setup and press
[Enter] or click “OK”
e) Follow the on-screen directions to complete the installation.
f ) To start the program, with the left mouse button double-click
the program “Multimeter” and then follow the on-screen
instructions.
Take note also of the “README” file on the diskette for remarks
concerning operating.
36
remain stored even after the measuring instrument has been switched
off.
To record a measured value, proceed as follows:
Press the “ENTER MENU” button. The menu appears in the top line. The
first symbol (for reference value measurement) flashes. Using the “< >”
button, move from symbol to symbol. Press this button until the symbol
“REC” flashes. Confirm the input with the “ENTER” button. The
measuring instrument is now ready to record. Press the right edge (“>”)
of the “< >” button to select the memory location (from 0 to 9).
Pressing the left edge of the button stores the measured value; each
time the left edge of the button is pressed again, the same memory
location is overwritten. The number of the current memory location is
indicated on the left adjacent to the sub-display.
To recall the stored measurement value, proceed as follows:
Press the “ENTER MENU” button. The menu appears in the top line. The
first symbol (for reference value measurement) flashes. Using the “< >”
button, move from symbol to symbol. Press this button until the symbol
“RCLL” flashes. Confirm the input with the “ENTER” button. The
memory locations are called in reverse order (9 => 0) each time the left
edge of the “< >” button is pressed. Each time the right edge of the “<
>” button is pressed, the memory locations are called in increasing
order (0 => 9). To exit the function press the “ENTER” button.
5.18 Connecting the measuring instrument to a computer
Attention!
Data transfer takes place unidirectionally, i.e. only in one direction: from
the measuring instrument to the PC and not vice versa
The following steps are required for communication between an (IBM
compatible) PC and the measuring instrument:
1. Connect the optionally-available interface cable on the one hand
with the 5-pin asymmetrical socket on the measuring instrument
and on the other hand to the PC.

39
attacked. Additionally, the fumes are explosive and damaging to health.
When cleaning, also use no sharp-edged tools, screwdrivers or metal
brushes or similar.
6.2 A 9 V battery is required to operate the measuring instru-
ment. The battery should be changed when the battery-
change symbol appears in the display. For this, proceed as
follows:
- disconnect the measuring instrument from the circuit being
measured,
- remove the test leads from the measuring instrument,
- switch the unit off and
- with a suitable cross-head screwdriver, unscrew the fixing screws
at the top centre and at the bottom left and right of the lower
case shell.
- now carefully lever off the lower case shell.
- wearing disposable gloves, remove the used battery and dis-
connect it from the connecting clips.
- taking a new, unused battery, connect the connecting clips to
the correctly-polarised battery and place it in the battery
compartment.
- having successfully inserted/changed the battery, carefully close
the case again. Take care not to trap the connecting clip leads
during re-assembly.
Attention!
Never operate the measuring instrument in an opened condition! Dan-
ger to life!
Never leave an exhausted battery in the measuring instrument, because
even “leak-proof” batteries can corrode and thereby release chemicals
which can endanger health or destroy the battery compartment.
6. Note the following if other software is to be used:
The data format is 14 bytes long. The sequence is as follows:
BYTE 1 2 3 4 5 6 7 8 9 A B C D E
Example 1 DC - 3 . 9 9 9 V CR
Example 2 AC 3 9 9 . 9 m V CR
Program example in BASIC simply to read the multimeter:
10 OPEN “COM1:4800, N, 7, 2, RS, CS, DS, CD“ AS #2
20 IN$=INPUT$(14, #2)
30 PRINT IN$
40 CLOSE #2
50 END
Data transfer parameters (communication parameters):
Transfer rate : 4800 baud (= bps = bits per second)
Character code : 7-bit ASCII
Parity : keine
Stop bits : 2
6. Maintenance, changing the battery, chan-
ging the fuse, positioning the measuring
instrument
6.1 Maintenance
To guarantee the accuracy of the VC 630 / 650 / 670 multimeters long-
term, calibration should be carried out once yearly, possibly in our
service centre (S-2000).
Fitting/changing the battery is described in section 6.2; changing the
fuse is described in 6.3. To clean the unit and its display window and the
test leads, use a dry, clean, lint-free, anti-static cloth.
Attention!
Use no carbonaceous cleaning fluids nor petrol, alcohol or similar for
cleaning, otherwise the surface of the measuring instrument may be
38
This manual suits for next models
2
Table of contents
Languages:
Other Conrad Multimeter manuals