Contemporary Research LA-B18 User manual

LA-B18 Light Alert
Product Manual
972.931.2728 | 888.972.2728 | www.contemporaryresearch.com

Page | 2 LA-B18 Product Manual 032023
Contents
Overview .......................................................................................................................................................................... 3
Connecting the LA-B18 ........................................................................................................................................................ 4
Setup .............................................................................................................................................................................. 4
Rear Circuit Board Connections .............................................................................................................................................. 5
Setup Notes ...................................................................................................................................................................... 6
P1 Logic Input Port ............................................................................................................................................................. 7
Web Pages ....................................................................................................................................................................... 8
RS-232/Telnet/UDP Control Protocol ..................................................................................................................................... 10
Control Commands ........................................................................................................................................................... 11
LA Toolbox Software ......................................................................................................................................................... 12
LA-B18 Specifications ........................................................................................................................................................ 13
Safety Instructions and Warranty ......................................................................................................................................... 14

Page | 3 LA-B18 Product Manual 032023
Overview
The LA-B18 is a low voltage remote controllable optical signaling device. The 18 x 5/8 inch RGB LED optical element with programable color
and intensity. The color and intensity settings may be stored as a preset. The presets can be recalled by Telnet or RS-232 serial command or
by contact closure. A loop of two or more presets may be created with a programmable on time for each preset.
The unit is ideal for any location where visual signaling is desired. This can include health care facilities, first responder facilities, education
facilities, or high noise environments such as industrial, manufacturing, or production facilities.
Programming may be accomplished via Telnet or RS-232 serial command or using on-board DIP switches.
Features
18 x 5/8 inch RGB LED element
Red, Green, and Blue individually adjustable with 100 steps of intensity
Flashing mode
9 user defined color presets stored in non-volatile memory
Fully remote controllable via RS-232, Telnet, or contact closure
Integrated Electronics
Logic inputs may be interfaced with alarm system or emergency management system
May be mounted at any orientation
Surface mountable or mounts to standard 2-gang electrical enclosure
Full ASCII 2-way RS-232/Telnet commands
Powered via PoE or optional external 12 VDC 1 A power supply

Page | 4 LA-B18 Product Manual 032023
Connecting the LA-B18
Power
Power may be provided to the LA-B18 by PoE via the Ethernet connector.
For applications where an Ethernet connection is not desired, the unit can be powered from the optional PS12-1.0 external power supply.
The output of the power supply will connect to the coaxial power connector marked ‘12V’ on the left side of the circuit board.
Setup and Control
The color and intensity of the LA-B18 can be customized and stored as a preset. The unit supports nine presets plus off. The color settings
can be set and stored by the following listed below.
On-board web browser
RS-232 commands via the 3.5 mm TRS serial port or Telnet
Rear DIP Switches
The presets can be recalled by the following listed below.
On-board web browser
RS-232 commands via the 3.5 mm TRS serial port or Telnet
Rear DIP Switches
Contact closure logic input port
Setup
IP Address
The IP mode of the LA-B18 is set to DHCP by default. The current IP address may be found using the LA Toolbox software for Windows or any
readily available IP scanner software.
The IP mode and IP settings may be changed and edited by the following.
On-board web browser
RS-232 commands via the 3.5 mm TRS serial port or Telnet
Rear panel DIP Switches
Web Pages
On board web pages are available configuration and control. Connect the Ethernet port of the LA-B18 to a PC or other compatible device
with a web browser. A crossover cable is not required. Open a web browser and enter the IP address of the LA-B18 into the address bar to
access the web pages.
RS-232
The LA-B18 may be controlled and configured using RS-232 ASCII strings from a terminal program or control system processer. Connection to
the unit for RS-232 communication can be through the 3.5 mm TRS connector on the rear panel, Telnet, or UDP port 31931. The default baud
rate is 115,200.
Rear DIP Switches
The two banks of DIP switches on the rear facing circuit board are used to set the device number of the LA-B18 during normal operation. In
program mode, the DIP switches may be used for configuration of the IP settings, color settings, and other functions.
Logic Input Port
The logic input port has three input pins plus 12 V and ground pins. The input pins may be used to remotely recall presets from a switch or
contact closure of a control system processor. The logic input port is labeled P1 on the circuit board.

Page | 5 LA-B18 Product Manual 032023
Rear Circuit Board Connections
12 VDC Power Input
2.1 mm coaxial jack (inside center conductor positive), 11 to 14 VDC, 12 VDC typical, 0.6 A maximum. May be used in lieu of PoE.
RS-232
3.5 mm TRS jack RS-232 data link for control, configuration, and firmware updates. Baud rate 1200 to 230.4K.
Tip – Data Receive
Ring – Data Transmit
Sleeve - Common
Ethernet
RJ-45 jack, 10/100Mbps Ethernet for control, web page access, configuration, and firmware updates. PoE supported.
P1 Logic Input Port
P1 Logic Input control port 5-pin captive screw terminal, for preset recall using contact closure. Labeled P1 on the circuit board.
1 – Ground
2 – Input 1
3 – Input 2
4 – Input 3
5 – 12 VDC output

Page | 6 LA-B18 Product Manual 032023
S2
Program switch.
S3
Boot switch.
SW2
DIP switch bank 2.
SW1
DIP switch bank 1.
USB
USB mini-B jack virtual com port for control or firmware updates.
Setup Notes
Output
The levels for the red, green, and blue LED elements are individually adjustable in steps of 0 to 100. The levels can be adjusted in the Settings
web page, RS-232 or Telnet command, or by using the rear DIP switches.
Presets
Color settings can be stored as a preset. Up to 9 presets may be stored in memory.
A preset consists of the values for red, green, and blue, plus values for Time On and Next Preset. For a static preset, the value for Time On
must be set to 0. If the Time On parameter is set to 0, then the Next Preset parameter is not used.
Presets can be stored using the Settings web page, RS-232 or Telnet commands or rear DIP switches. Presets can be recalled using the Main
or Settings web page, RS-232 or Telnet commands, or contact closure.
Looped Presets
A continuous loop of two or more presets can be created. The additional parameters required are Time On and Next Preset.
The Time On parameter sets the length of time an individual preset is on before transitioning to the next preset. The values for Time On
range from 0 to 240. Each increment equals 1/10th of a second. If the Time On is set to 0, that preset will remain active until another preset
is selected.
The Next Preset parameter specifies the next preset to be transitioned to after the Time On time of the current preset has been reached.
Below is an example of looped presets flashing red and blue.
Preset
Red Level
Green Level
Blue Level
Time On
Next Preset
1 50 0 0 5 2
2 0 0 50 5 1
The sequence of looped presets may be initiated by recalling any preset that is part of the loop. The sequence may be stopped by selecting
Preset 0 or any preset that is not part of the sequence.

Page | 7 LA-B18 Product Manual 032023
Network Addressing
The IP mode of the LA-B18 is DHCP by default. The current IP address may be found using the LA Toolbox software for Windows.
The IP mode may be set to static operation. The IP settings may be set manually in the Settings web page, by RS-232 command, or by using
the rear panel DIP switches.
Restore Factory Default Settings
The unit may have the configuration restored to the factory default settings. It is recommended to perform a hard power cycle after the
factory default settings are restored. Some settings may not revert to the default until after a hard power cycle.
The factory default settings may be restored with the Restore button on the Settings web page, by RS-232 command, or by using the rear
pane DIP switches.
P1 Logic Input Port
The P1 Logic Input may be used to recall presets from contact closures or control ports on a control system processor. Shorting a pin to
ground equals a logic high. An open circuit equals a logic low. The action of the input may be momentary or latching.
The input has three active modes of operation. The mode of operation may be set in the Settings web page or by using the rear panel DIP
switches.
Mode 0 – Not Used
The Logic Input is not used.
Mode 1 – Trigger Mode
This mode allows for simple recall of presets 0-3.
Pin 1 Pin 2 Pin 3
Low Low Low Preset 0 (off)
High Low Low Preset 1
Low High Low Preset 2
Low Low High Preset 3
Mode 2 – Static
This mode allows for recall of presets 0-7.
Pin 1 Pin 2 Pin 3
Low Low Low Preset 0 (off)
High Low Low Preset 1
Low High Low Preset 2
High High Low Preset 3
Low Low High Preset 4
High Low High Preset 5
Low High High Preset 6
High High High Preset 7
Mode 3 – Static +1
This mode allows for recall of presets 1-8.
Pin 1 Pin 2 Pin 3
Low Low Low Preset 1
High Low Low Preset 2
Low High Low Preset 3
High High Low Preset 4
Low Low High Preset 5
High Low High Preset 6
Low High High Preset 7
High High High Preset 8

Page | 8 LA-B18 Product Manual 032023
Web Pages
The LA-B18 has on-board web pages for control, monitoring, and configuration. The web pages may be accessed using a web browser by
entering the unit’s IP address in the browser’s address field. The web pages may also be accessed through LA Toolbox. Double-clicking on a
unit in the equipment list will launch the default web browser and navigate to the Main web page.
The on-board web pages are accessible to all users. By default, a password is required to recall a preset or make any programming or
configuration changes.
A mode is available that allows a user to recall presets without entering a password. This mode is selectable from the Settings web page.
Default Password
The default password is based on the last six digits of the unit’s MAC address. The MAC address may be found on the SN/MAC sticker on the
rear of the unit. The password field is in the System section of the Main web page. Enter the last six digits of the MAC address in the
password field, then click the Log In button. The digits should be entered with no punctuation or spaces. Letters should be entered as upper
case. i.e.: 200A2D.
Update Password
The password can be updated in the Settings web page. Enter the new password in the New Password field and click the Change button.
The password may consist of up to 20 characters. The characters can be any combination of numbers, upper- and lower-case letters, and
special characters.

Page | 9 LA-B18 Product Manual 032023
Allow Free Access to Main Web Page Only
An option is available that will allow password free access to the Main web page allowing users to change presets and check status. Changes
to the Settings web page related to setup and configuration will not be allowed unless the password is entered. To enable this option, log in
and navigate to the Settings web page. Click the checkbox next to Preset Ctl while logged out.
Clear Password
Clearing the password will allow password free access to any of the LA-B18’s web pages permit control and configuration changes.
The password may be cleared in the System web page. Clear the contents of the New Password field and click the Change button.
The password may also be cleared using the rear panel DIP switches. Follow the steps below to clear the password.
Make note of the SW2 DIP switch settings.
Set DIP switch 8 in DIP switch bank SW2 to the PROG position (on).
Set DIP switches 1,2, and 4 in DIP switch bank SW2 to the on position.
Press switch Program S2.
Return the SW2 DIP switch settings to the previous state.

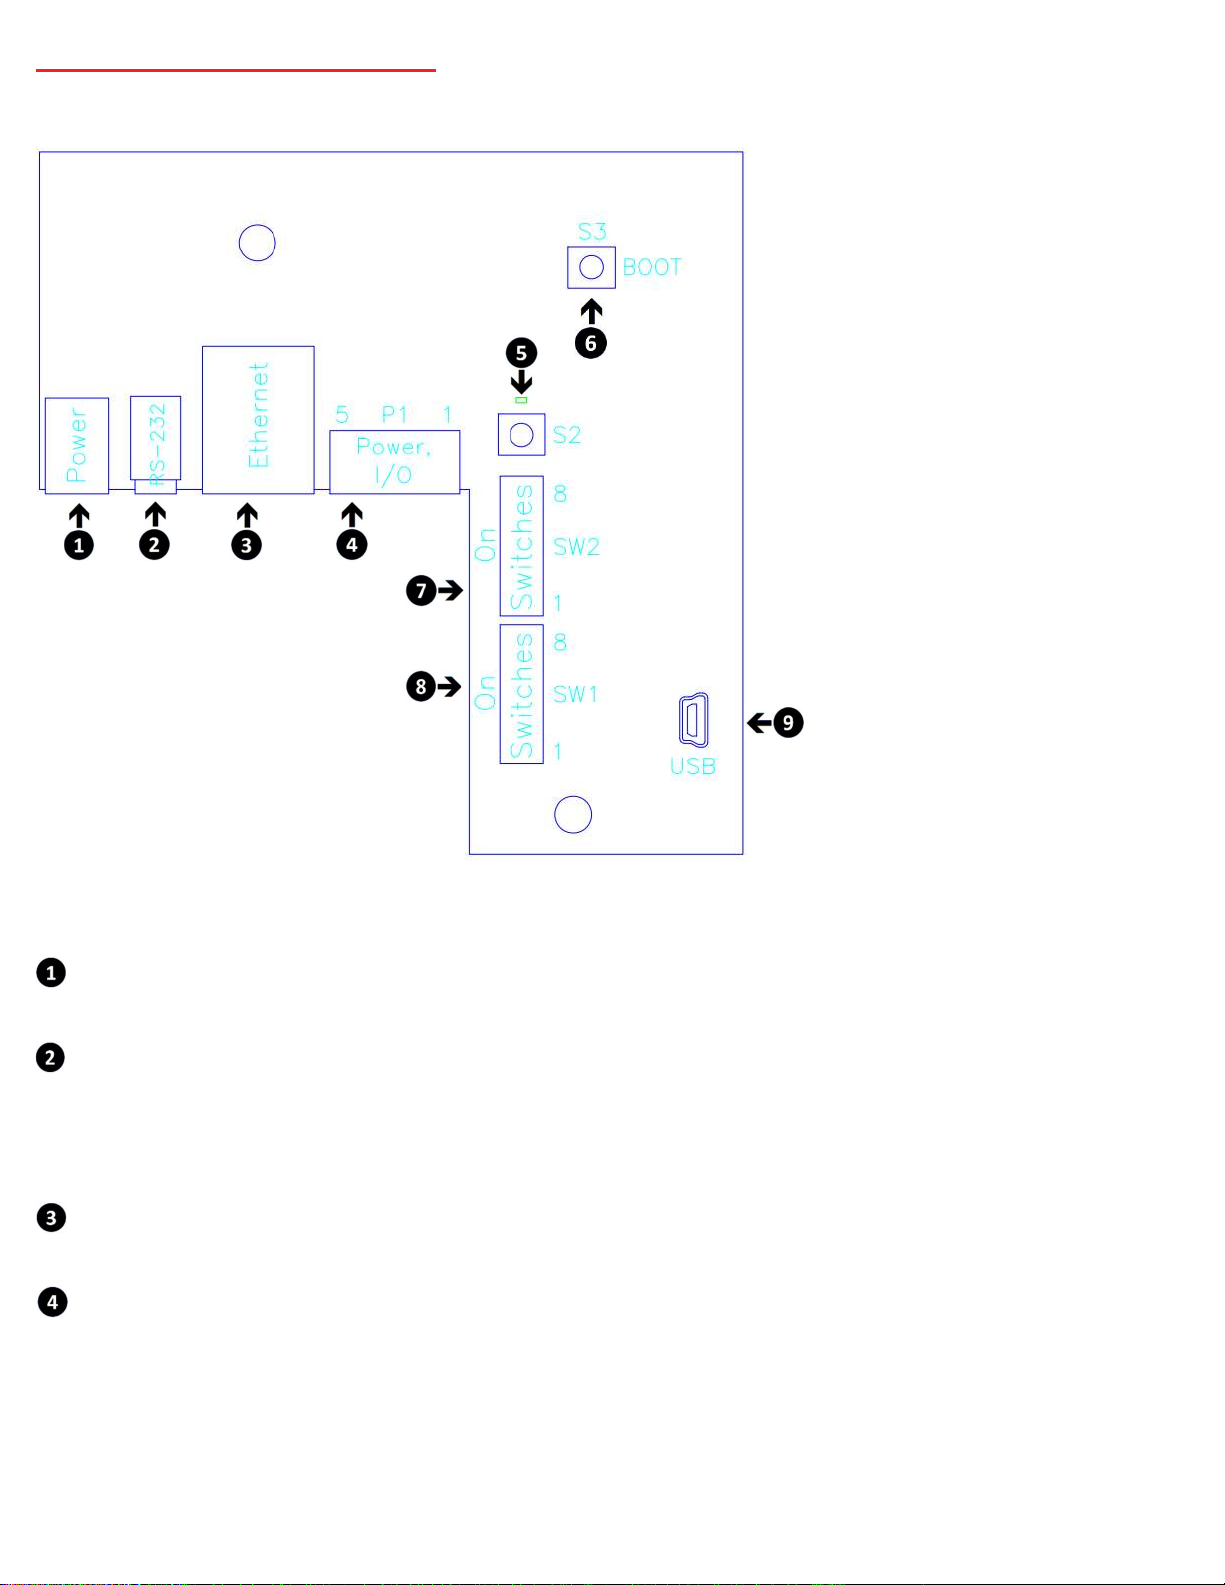
Page | 10 LA-B18 Product Manual 032023
RS-232/Telnet/UDP Control Protocol
The LA-B18 full duplex RS-232/Telnet protocol enables a system programmer to control all functions as well as monitor status. All commands
are sent as ASCII strings. No delays between characters or commands are required, as data is interrupt driven and buffered.
Communications parameters are 1200 to 230,400 baud, 8 data bits, no parity, and 1 stop bit. Factory default is 115,200 baud. The RS-232
port will accept non-standard control such as voltage that swings from 0 to +5 VDC, commonly found when IR ports are used to send RS-232
commands.
The same control communication is possible via IP Telnet (up to two sessions) and via UDP to the decoder’s IP address to port 31931 (fixed)
with status feedback to port 31932. Status feedback to port 31932 is disabled by default, send “>UO” command (UF turns UDP status
feedback off) or set with front-panel menu. The default Telnet port is 23.
General Protocol Specifications
Command strings sent to the LA-B18 begin with the ASCII > (greater than symbol) as an ‘Attention’ character and end with a carriage return
(ASCII CR, Hex $0D, or keyboard Enter) as an ‘End of command’ character.
Responses from the LA-B18 begin with the ASCII < (less than symbol) as an ‘Attention’ character and end with a carriage return followed by a
line feed (ASCII LF, Hex $0A) as an ‘End of command’ character.
A carriage return is required at the end of each command and is assumed in all examples.
Command String Structure
[Attention] [Command] (Parameters) [Return]
Attention Single character (>) starts the string
Command A two-character command
Parameters Added attributes to some commands
Return A carriage return ends the command string (ASCII CR, Hex $0D, or keyboard Enter) may be used in programming. For
simplicity, the programming examples in the manual will not show the ‘CR’.
Command and Status Response
Commands can be sent back-to-back at any time without any delay. To allow for rapid, multiple commands, status responses are
intentionally delayed by about 125mS, sending the most recent status in response to control commands or user actions.
String Example
The example below is a command to recall Preset 6 followed by the response string.
>P6
<P6
The status of a setting may be queried by omitting the = (equals symbol).
>IY
<IY DHCP

Page | 11 LA-B18 Product Manual 032023
Control Commands
Code Function Operation
Output
SR= Set Red Set Red Level 0-100
SB= Set Blue Set Green Level 0-100
SG= Set Green Set Blue Level 0-100
Presets
Sn Save Preset Save preset to memory
n=1-9
Example Save Preset 1: >S1
Pn Recall Preset Recall preset from memory
n=0-9, P0 sets output to off
Example Recall Preset 1: >P1
In=x Set On Time Set Preset On Time
n=0-9 and corresponds to the desired preset, x=1-240 and
corresponds to time in increments of 1/10th of a second
Example Set Preset 2 On Time to 2 seconds: >I2=20
I0 Clear all On Times Clear On Time for all presets
Nn Set Next Preset Set Next
Presetn=Preset
number
Network Setup
IP= Set IP Address IP=xxx.xxx.xxx.xxx Define IP address
IM= Subnet Mask IM=xxx.xxx.xxx.xxx Define subnet mask
IG= Default Gateway IG=xxx.xxx.xxx.xxx Define default gateway
IY= IP Mode 1=Static 2=DHCP
MC MAC Address Returns MAC Address
Serial Communication
EN
Echo On
Echo On
This command is not available for Telnet. Enable local echo
in the terminal program.
EF Echo Off Echo Off
R5= Baud Rate 0=1200 4=19.2K
1=2400 5=38.4K
2=4800 6=115.2K (Default)
3=9600 7=230.4K
Unit
NM= Set Name Sets the LA-18B name. Limited to 20 characters
MN Model Name Returns the product model name
HR
Hardware Version
Returns the hardware version
ID ID Returns the product model and application firmware version
IB Bootloader Returns the bootloader version
Miscellaneous
HE Help Returns a list of serial commands
Z! Reload factory default
settings
Reconfigures unit for all factory default settings.
IP address will not revert to default until after a Z]
command or power cycle.
Z!2 Reload factory default
settings, retains web
password
Reconfigures unit for all factory default settings. Current
web password is retained.
IP address will not revert to default until after a Z]
command or power cycle.
Z] Reboot Emulates a reboot from a hard power cycle

Page | 12 LA-B18 Product Manual 032023
LA Toolbox Software
LA Toolbox software for Windows is used for monitoring the status and updating firmware of LA-B18 units. The units can be connected via
Ethernet or serial port. Devices are automatically discovered when LA Toolbox is launched.
A download link for LA Toolbox may be found here: https://www.contemporaryresearch.com/products/la-b18-light-alert-bar
Open an LA-B-18 Web Page
The web page of an LA-B18 may be opened by double-clicking anywhere on the line of the desired unit.
Update Firmware
The firmware in individual LA-B18 units may be updated using LA Toolbox. Follow the steps below.
Click anywhere in the line that contains the unit to be updated.
Press the Update Firmware near the bottom of the LA Toolbox window.

Page | 13 LA-B18 Product Manual 032023
LA-B18 Specifications
Physical Size (WHD): 18.26” [464 mm] wide, 4.525” [115 mm] height, 1.38” [35 mm] deep
Weight: .877 lbs [398 g]
Enclosure: Aluminum with white powder coat paint
Mounting: Wall or ceiling flush mount or 2-gang electrical box
Rear Connections RS-232: 3.5 mm TRS, RS-232 data link to control system, 1200 to 230K baud
Ethernet: RJ-45 10/100 for Telnet configuration and control, firmware updates, PoE
I/O Control Port: Detachable 5-position 5.08mm terminal block
1 – Ground
2 – Logic Input 1
3 – Logic Input 2
4 – Logic Input 3
5 – 12 V
Power In: 2.1 mm coaxial jack (inside center conductor positive)
0.6 A maximum, 11.5 to 15 VDC, 12 VDC typical
Options
PS12-1 (5401-001) Switching power supply, 100 – 250 VAC Auto Voltage Sensing Input, 12 VDC 1 A Output

Page | 14 LA-B18 Product Manual 032023
Safety Instructions and Warranty
Read before operating equipment.
Cleaning - Unplug this product from the wall outlet before cleaning. Do not use liquid cleaners or aerosol cleaners. Use a damp cloth
for cleaning.
Power Sources - Use supplied or equivalent UL/CSA approved low voltage DC plug-in transformer..
Lightning - Avoid installation or reconfiguration of wiring during lightning activity.
Power Lines - Do not locate an outside antenna system near overhead power lines or other electric light or power circuits or where it can fall
into such power lines or circuits. When installing an outside antenna system, refrain from touching such power lines or circuits, as contact
with them might be fatal.
Overloading - Do not overload wall outlets and extension cords as this can result in a risk of fire or electric shock.
Object and Liquid Entry - Never push objects of any kind into this product through openings as they may touch dangerous voltage
points or short out parts, resulting in a fire or electric shock. Never spill liquid of any kind on the product.
Servicing - Do not attempt to service this product yourself as opening or removing covers may expose you to dangerous voltage or
other hazards. Refer all servicing to qualified service personnel.
Damage Requiring Service - Unplug this product from the wall outlet and refer servicing to qualified service personnel under the
following conditions:
o When the power supply cord or plug is damaged.
o If liquid spills or objects fall into the product.
o If the product is exposed to rain or water.
o If the product does not operate normally by following the operating instructions. Adjust only those controls that are
covered by the operating instructions. An improper adjustment of other controls may result in damage and will often
require extensive work by a qualified technician to restore the product to its normal operation.
o If the video product is dropped or the cabinet is damaged.
o When the product exhibits a distinct change in performance, this indicates a need for service.
Heat – This product should be situated away from heat sources such as radiators, heat registers, stoves, or other products (including
amplifiers) that produce heat.
Warranty: Three (3) year limited warranty on all parts and labor for Contemporary Research manufactured products. Contemporary Research
warrants its manufactured products against defects in materials and workmanship for a period of three years from the day of purchase by
authorized dealer. If Contemporary Research receives notice of such defects during the warranty period; Contemporary Research, at its
option, will repair or replace products that prove to be defective.
Exclusions: The above warranty shall not apply to defects resulting from improper or inadequate maintenance by the customer, customers
applied software or interfacing, unauthorized modifications or misuse, mishandling, operation outside the normal environmental
specifications for the product, use of the incorrect, modified or extended power supply, acts of God, weather, or improper site operation and
maintenance. Please note Contemporary Research SSV-DX Display Express PC product carries a six-month limited warranty.
Product Service: Contemporary Research will test, repair, or replace the product or products without charge if the unit is under warranty. If
the product is out of warranty, Contemporary Research will test, and then repair the product or products. The parts and labor charge will be
estimated by a technician and confirmed by the customer prior to repair. All components must be returned for testing as a complete unit.
Contemporary Research will not accept responsibility for shipment after it has left the premises.
Technical Support: Contemporary Research technicians will determine and discuss with the customer the criteria for repair and/or
replacement. Contemporary Research Technical Support can be contacted through one of the following resources: e-mail support at
suppor[email protected] or phone at: 972-931-2728
Return Material Authorization (RMA) Number: Before returning a product for repair or replacement, request an RMA from Contemporary
Research’s technical support. Provide tech support with a return phone number, e-mail address, shipping address, product serial numbers
and original purchase order number. Describe the reason for repairs or returns as well as the date of purchase. See the General RMA Terms
and Procedures section for more information. RMA’s are valid for 30 days and will be issued to authorized Contemporary Research dealers
only. End users must return products through authorized Contemporary Research dealers. Include the assigned RMA number in all
correspondence with Contemporary Research. Write the assigned RMA number clearly on the shipping label of the box when returning the
product. All products returned for credit are subject to a restocking charge without exception.
Voided Warranty: The warranty does not apply if the original serial number has been removed or if the product has been disassembled or
damaged through misuse, accident, acts of God, weather, modifications, use of incorrect, modified or extended power supply, or
unauthorized repair.

Page | 15 LA-B18 Product Manual 032023
Shipping and Handling: Contemporary Research will not pay for inbound shipping transportation or insurance charges or accept any
responsibility for laws and ordinances from inbound transit. Contemporary Research will pay for outbound shipping, transportation, and
insurance charges for all items under warranty, but will not assume responsibility for loss and/or damage by the outbound freight carrier. If
the return shipment appears damaged, retain the original boxes and packing material for inspection by the carrier. Contact your carrier
immediately.
Products not under Warranty: Payment arrangements are required before outbound shipment for all out of warranty products.
General RMA Terms and Procedures: RMA’s are valid for 30 days and will be issued only to authorized active Contemporary Research dealers
and distributors.
End users must return products through authorized Contemporary Research dealers. End users may be eligible for a RMA at the
discretion of CR Technical Support.
Before a defective product can be authorized to send in for repair, it must first go through the troubleshooting process with a
member of the Contemporary Research Technical Support team.
Products authorized for repair must have a valid RMA (Return Material Authorization) number.
Contemporary Research Technical Support will approve the issue of an RMA number.
An RMA number is to be included in all correspondence with Contemporary Research.
The RMA number must appear clearly on the shipping label when the product is returned.
A packing slip must be included on the inside of the box with the RMA number listed and reason for RMA return.
Products received at Contemporary Research that do not have a valid RMA number clearly marked on the outside of the shipping
container may be refused and returned to sender.
Boxes showing external damage will be refused and sent back to the sender regardless of the clearly marked RMA number and will
remain the responsibility of the sender.
Advanced Replacement Policies:
For Contemporary Research manufactured products, advance replacement will be provided for “out-of-the-box” failures up to thirty
(30) days after the initial shipment of products.
Shipments of equipment that are refused upon attempted delivery, for any reason, are subject to restocking charges.
3220 Commander Drive, Suite 102
Carrollton, TX 75006
Ph. 888-972-2728
www.contemporaryresearch.com
Table of contents
Popular Lighting Equipment manuals by other brands

Delta Light
Delta Light iMAX Adjustable Trimless BL manual

New Star
New Star NSF-T400W quick start guide

superbrightleds
superbrightleds WIFI-CON user manual

Bigassfans
Bigassfans Powerfoil X3.0 Quick installation guide

North Light
North Light Ebba XYIP-3ELED-120-B quick start guide

Gamma+
Gamma+ Cove LED 200 user manual