PROCESS YPROCESS MPROCESS C PROCESS K
FILE NAME: 85096850_CntrNxtONE_QRG_EN_FR.indd NEW COMP BAN: 85096850
REV: 09/16
DESCRIPTION: Contour Next ONE Meter QRG
DATE: 09/21/16 CLIENT: Ascensia Diabetes Care V0 01/12/16 Initial build
V1 02/03/16 DMC Annotations
V2 02/09/16 DMC Annotations
V3 04/16/16 DMC Annotations
V4 04/27/16 DMC Annotations
V5 07/07/16 DMC Annotations
V6 09/21/16 DMC Annotations
PROGRAM VERS: InDesign CC(2014) SKU: Multi
5050 1st Ave South
Suite #101
Seattle, WA 98134
Tel: 206.587.0800
Fax: 206.587.0356
MARKET: CA SPEC: 10000799865 REV 01
LANGUAGES: EN/FR PARENT BAN: Multi BAR CODE: 85096850 (2D Matrix)
TRIM SIZE: 11” (H) x 27.5” (W) PREVIOUS BAN: N/A
UNIT of MEASURE: mmol/L MASTER REF: DCAM-69-1801 version 3.0
LASER PROOF EPSONS PROOF SIGNATURE
APPROVED
RESUBMIT WITH CHANGES
APPROVED
RESUBMIT WITH CHANGES
PROJ. MGR. SIGNATURE _________________________________ DATE ____________
PROJ. MGR. SIGNATURE _________________________________ DATE ____________
PROJ. MGR. SIGNATURE _________________________________ DATE ____________
VERSION: V6
MANUEL D’UTILISATION SIMPLIFIÉ
Utilisation uniquement avec les
bandelettes réactives Contour®next.
Le lecteur de glycémie
Contour®next ONE
smartLIGHT
Touche Haut
Touche Bas
Port d’insertion de la
bandelette réactive
Extrémité carrée grise : Insérer
cette extrémité dans le port
d’insertion de la bandelette réactive.
Extrémité contenant l’échantillon :
L’échantillon sanguin est aspiré ici
MISE EN GARDE
Le lecteur de glycémie
Contour next ONE fonctionne
uniquement avec les bandelettes
réactives Contour®next et la solution
de contrôle Contour®next.
Consulter le manuel d’utilisation
Contour next ONE, pour obtenir des
informations sur l’utilisation du lecteur
de glycémie, les informations de sécurité
importantes, les avertissements et les mises
en gardes.
L’application ContourMCDiabetes
Il est possible de transférer
automatiquement (sans câble) les résultats
du lecteur de glycémie Contour next ONE
sur un smartphone (téléphone) ou une
tablette.
1. Depuis un smartphone (téléphone) ou une
tablette, accéder à l’App StoreMS ou au
Google PlayMC store.
2. Rechercher l’application
Contour Diabetes.
3. Installer l’application Contour Diabetes
et suivre les instructions pour connecter
le lecteur de glycémie.
OU Scanner avec l’app code QR ou
visiter www.contourone.com pour en
apprendre plus.
REMARQUE : Si le lecteur de glycémie
n’est pas connecté avec l’application
Contour Diabetes, il faut suivre les
instructions dans le menu Configuration
initiale du lecteur de glycémie lors de la
première utilisation du lecteur de glycémie.
Allumer et éteindre le lecteur de
glycémie
• Appuyer et maintenir enfoncée la touche
OK pendant 2 secondes jusqu’à ce
que le lecteur de glycémie s’allume ou
s’éteigne.
• Insérer une bandelette réactive dans
le lecteur de glycémie pour allumer le
lecteur de glycémie.
• Appuyer deux fois sur OK quand le
lecteur de glycémie est éteint pour
allumer le voyant blanc du port
d’insertion de la bandelette réactive.
Touches de défilement Haut/Bas/OK
Anneau
• Les touches
et de l’anneau
permettent de faire
défiler les options.
• Quand un symbole clignote, le
sélectionner ou le modifier.
Touche OK
• Appuyer sur la
touche OK pour
confirmer une
sélection.
Configuration initiale du lecteur de
glycémie
Appuyer et maintenir enfoncée la touche OK
pendant 2 secondes jusqu’à ce que le lecteur
de glycémie s’allume.
Touche OK
REMARQUE : Après 30 secondes
d’inactivité, l’écran s’assombrit. Pour
rallumer l’écran, appuyer sur la touche OK.
La configuration initiale démarre avec
Afficher la cible prédéfinie.
1Afficher la cible prédéfinie
Le lecteur de glycémie compare les résultats
glycémiques avec un intervalle cible (par
exemple 3.9 mmol/L–7.2 mmol/L) pour
indiquer si le résultat du test est :
• dans l’intervalle cible.
• au-dessus de l’intervalle cible.
• en-dessous de l’intervalle cible.
On peut modifier cet intervalle cible prédéfini
depuis l’application Contour Diabetes
après avoir effectué la configuration initiale
du lecteur de glycémie.
Le lecteur de glycémie affiche
un intervalle cible général
prédéfini.
1. Pour passer à l’écran suivant, appuyer
sur la touche OK.
Continuer pour Régler l’heure.
Utilisation avec l’application
ContourMCDiabetes disponible
en téléchargement sur
l’App StoreMS ou sur Google PlayMC.
2Régler l’heure
Les chiffres des heures clignotent.
1. Pour modifier l’heure,
appuyer sur la touche
ou de l’anneau.
2. Pour confirmer l’heure et passer aux
minutes, appuyer sur la touche OK.
3. Pour modifier les minutes, appuyer sur la
touche ou de l’anneau, puis appuyer
sur la touche OK.
Pour un format de 12 heures, sélectionner
AM ou PM, appuyer sur la touche
ou de l’anneau, puis appuyer sur la
touche OK.
3Régler la date
L’année clignote.
1. Pour modifier l’année,
appuyer sur la touche
ou , puis appuyer sur
la touche OK.
2. Pour modifier le mois, appuyer sur la
touche ou , puis appuyer sur la
touche OK.
3. Pour modifier le jour, appuyer sur la
touche ou , puis appuyer sur la
touche OK.
4La configuration est terminée
Le lecteur affiche brièvement la
configuration sauvegardée, puis émet un
signal sonore et s’éteint.
La configuration est terminée.
Test au bout du doigt
Consulter la notice d’utilisation de
l’autopiqueur pour obtenir des instructions
détaillées sur sa préparation.
ATTENTION : Risques biologiques
potentiels
• Toujours se laver les mains avec
de l’eau savonneuse et bien les
sécher avant et après le test, la
manipulation du lecteur de glycémie,
de l’autopiqueur ou des bandelettes
réactives.
• Tous les composants de ce
conditionnement sont considérés
comme présentant un risque
biologique et peuvent potentiellement
transmettre des maladies
infectieuses.
Se reporter au manuel d’utilisation
Contour next ONE pour des
informations complémentaires.
MISE EN GARDE
• L’autopiqueur fourni dans votre kit
est destiné à être utilisé par un seul
patient.
• Il faut configurer le lecteur de
glycémie avant de réaliser un test
de glycémie pour la première fois.
Se reporter au menu Configuration
initiale du lecteur de glycémie.
Se reporter au manuel d’utilisation
Contour next ONE pour des
informations complémentaires.
1. Préparer l’autopiqueur.
Consulter la notice d’utilisation de
l’autopiqueur pour des instructions
détaillées.
2. Insérer fermement l’extrémité carrée grise
d’une nouvelle bandelette réactive dans
le port d’insertion jusqu’à l’émission d’un
bip par le lecteur de glycémie.
Le lecteur de glycémie s’allume et affiche
l’écran Appliquer du sang. Le lecteur
de glycémie est maintenant prêt pour la
réalisation du test avec une goutte de sang.
3. Utiliser l’autopiqueur pour obtenir une
goutte de sang au bout du doigt.
4. Masser la main et le doigt aux abords
du site de prélèvement pour obtenir une
goutte de sang.
5. Mettre immédiatement l’extrémité de
la bandelette réactive au contact de la
goutte de sang.
6. Si le lecteur de glycémie émet deux signaux
sonores et si l’écran affiche une goutte de
sang qui clignote, la bandelette réactive
n’a pas absorbé suffisamment de sang.
Appliquer plus de sang sur la bandelette
réactive dans les 60 secondes qui suivent.
Tourner la page pour accéder à Test au
bout du doigt (suite) et se renseigner sur les
Marqueurs de repas.
Besoin d’aide ?
Pour plus d’informations, consulter le site :
www.contourone.com.
Contacter le Service Clientèle Diabetes Care
au 1-800-268-7200.
Le lecteur est préconfiguré et verrouillé
pour afficher les résultats en mmol/L. Si les
résultats sont exprimés en mg/dL, contacter
le Service Clientèle Diabetes Care au
1-800-268-7200.
Destiné à un usage de diagnostic in vitro.
Pour obtenir des informations sur les brevets et les licences associées,
consulter le site : www.patents.ascensia.com.
Ascensia, le logo Ascensia Diabetes Care, Contour, Glucofacts, le logo Aucun
étalonnage, Microlet et Deux chances sont des marques de commerce et/ou
des marques déposées d’Ascensia Diabetes Care Holdings AG.
MC voir www.ascensiadiabetes.ca/fr/tm-mc
Apple and the Apple logo are trademarks of Apple Inc., registered in the
U.S. and other countries. App Store is a service mark of Apple Inc.
The Bluetooth®word mark and logos are registered trademarks
owned by Bluetooth SIG, Inc., and any use of such marks by
Ascensia Diabetes Care is under license.
Google Play and the Google Play logo are trademarks of Google Inc.
(®= marque déposée. TM/MC = marque commerciale non déposée.
MS = marque de service.)
Toutes les autres marques commerciales appartiennent à leur
propriétaires respectifs et sont utilisées uniquement à titre informatif.
Aucune relation ou aucune recommandation ne doit être déduite ou suggérée.
85096850
© 2016 Ascensia Diabetes Care Holdings AG. Tous droits réservés. Rev. 09/16
French
QUICK REFERENCE GUIDE
Uses only Contour®next
blood glucose test strips.
Your Contour®next ONE meter
Grey Square End: Insert this
end into the test strip port
Down
Button
Test Strip Port
OK Button
Up Button
smartLIGHT
Sample Tip: Blood sample pulled in here
CAUTION
Your Contour®next ONE meter works
only with Contour®next test strips and
Contour®next control solution.
Read your Contour next ONE User
Guide for the Intended Use of the meter
and a list of Important Safety Information,
Warnings, and Precautions.
The Contour™Diabetes app
You can automatically transfer results from
your Contour next ONE meter wirelessly
to your smartphone or tablet.
1. On your smartphone or tablet, go to the
App StoreSM or the Google Play™store.
2. Search for the Contour Diabetes app.
3. Install the Contour Diabetes app and
follow the instructions to pair your meter.
OR Scan with QR Code app or visit
www.contourone.com to learn more.
NOTE: If you do not pair your meter with
the Contour Diabetes app, follow the
instructions in Initial Setup from the Meter
the first time you turn on your meter.
Turn the Meter On and Off
• Press and hold the OK button for
2 seconds until your meter turns
On or Off.
• Insert a test strip into the meter to turn
the meter On.
• Press OK twice when the meter is Off to
turn On the white test strip port light.
Up/Down, Scroll/OK Buttons
Outer Ring
• The and
buttons on the
outer ring allow you
to scroll through
the options.
• When a symbol is blinking, you can select
it or change it.
OK Button
• Press the OK
button to accept a
selection.
Initial Setup from the Meter
Press and hold the OK button for 2 seconds
until the meter turns on.
OK Button
NOTE: The screen dims after 30 seconds of
inactivity. To light the screen again, press the
OK button.
Initial setup begins with
View Pre-Set Target.
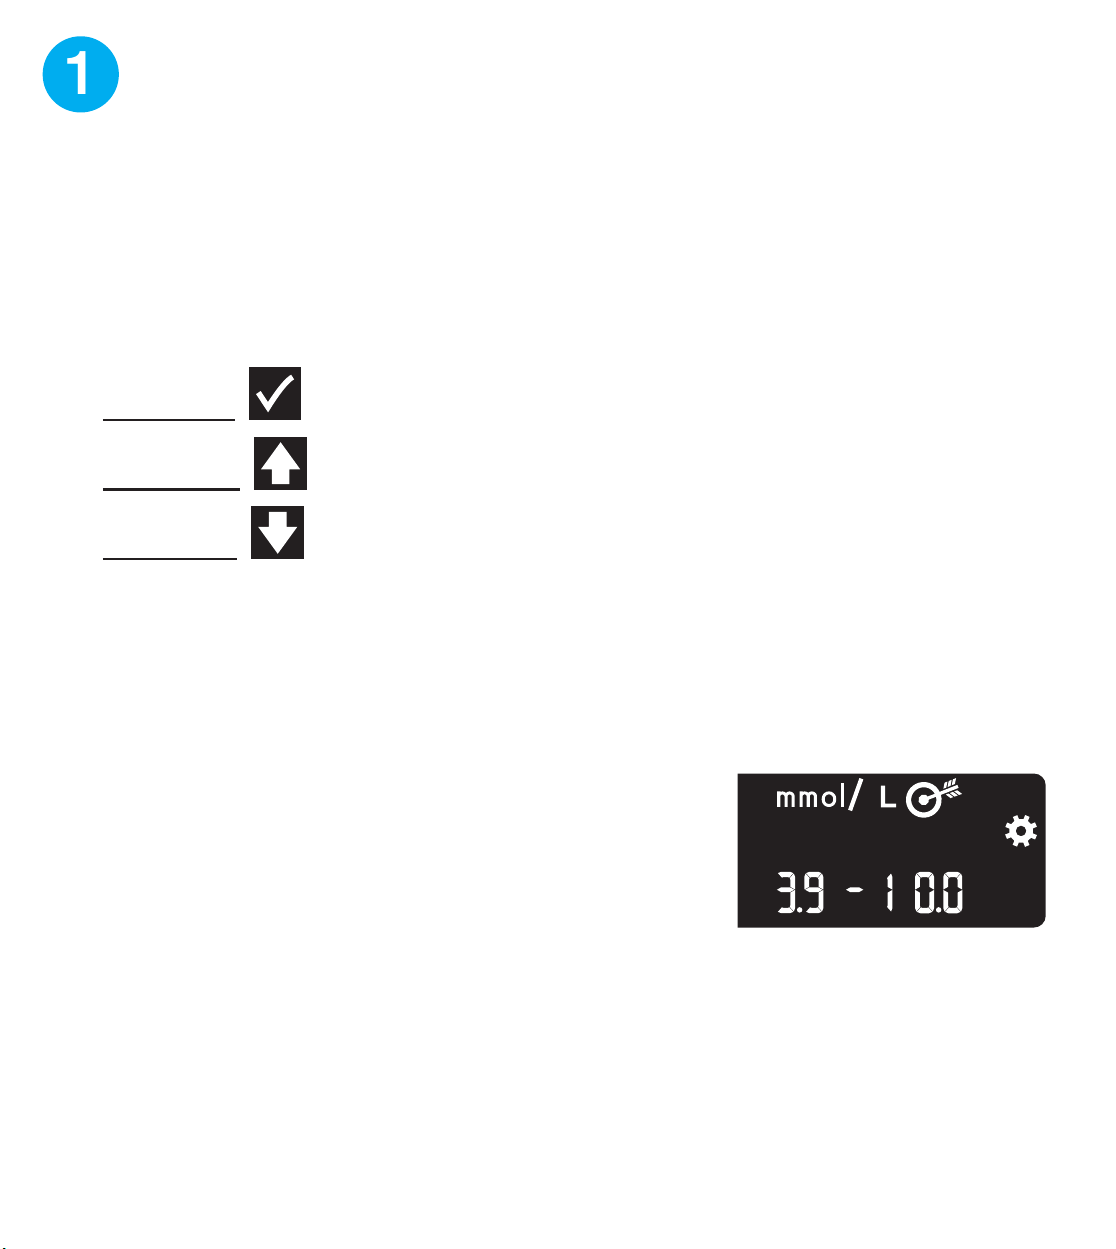
1View Pre-Set Target
The meter compares your blood sugar
results with a Target Range (for example,
3.9 mmol/L–7.2 mmol/L) to let you know if
your test result is:
• within your Target Range.
• above your Target Range.
• below your Target Range.
You can change this pre-set Target Range
from the Contour Diabetes app after initial
setup of the meter.
The meter displays a pre-set
Overall Target Range.
1. To move to the next screen, press the
OK button.
Continue to Set the Time.
Works with the Contour™Diabetes app
available for download on
the App StoreSM or on Google Play™.
2Set the Time
The hour is blinking.
1. To change the hour, press
the or button on the
outer ring.
2. To set the hour and move to minutes,
press the OK button.
3. To change the minutes, press the
or button on the outer ring, then
press the OK button.
For a 12-hour format, select AM or PM,
press the or button on the outer ring,
then press the OK button.
3Set the Date
The year is blinking.
1. To change the year, press
the or button, then
press the OK button.
2. To change the month, press the
or button, then press the
OK button.
3. To change the day, press the or
button, then press the OK button.
4Setup is Complete
The meter briefly displays your saved
settings, then beeps and turns OFF.
Setup is complete.
Fingertip Testing
Refer to your lancing device insert
for detailed instructions on preparing the
lancing device.
WARNING: Potential Biohazard
• Always wash your hands well with
soap and water and dry them before
and after testing or after handling the
meter, lancing device, or test strips.
• All parts of this kit are considered
biohazardous and can potentially
transmit infectious diseases.
For more information, refer to the
Contour next ONE User Guide.
CAUTION
• The lancing device provided with
your kit is intended for use by a single
patient.
• Set up your meter before doing your
first blood sugar test. Refer to Initial
Setup from the Meter.
For more information, refer to the
Contour next ONE User Guide.
1. Prepare the lancing device.
Refer to your lancing device insert for
detailed instructions.
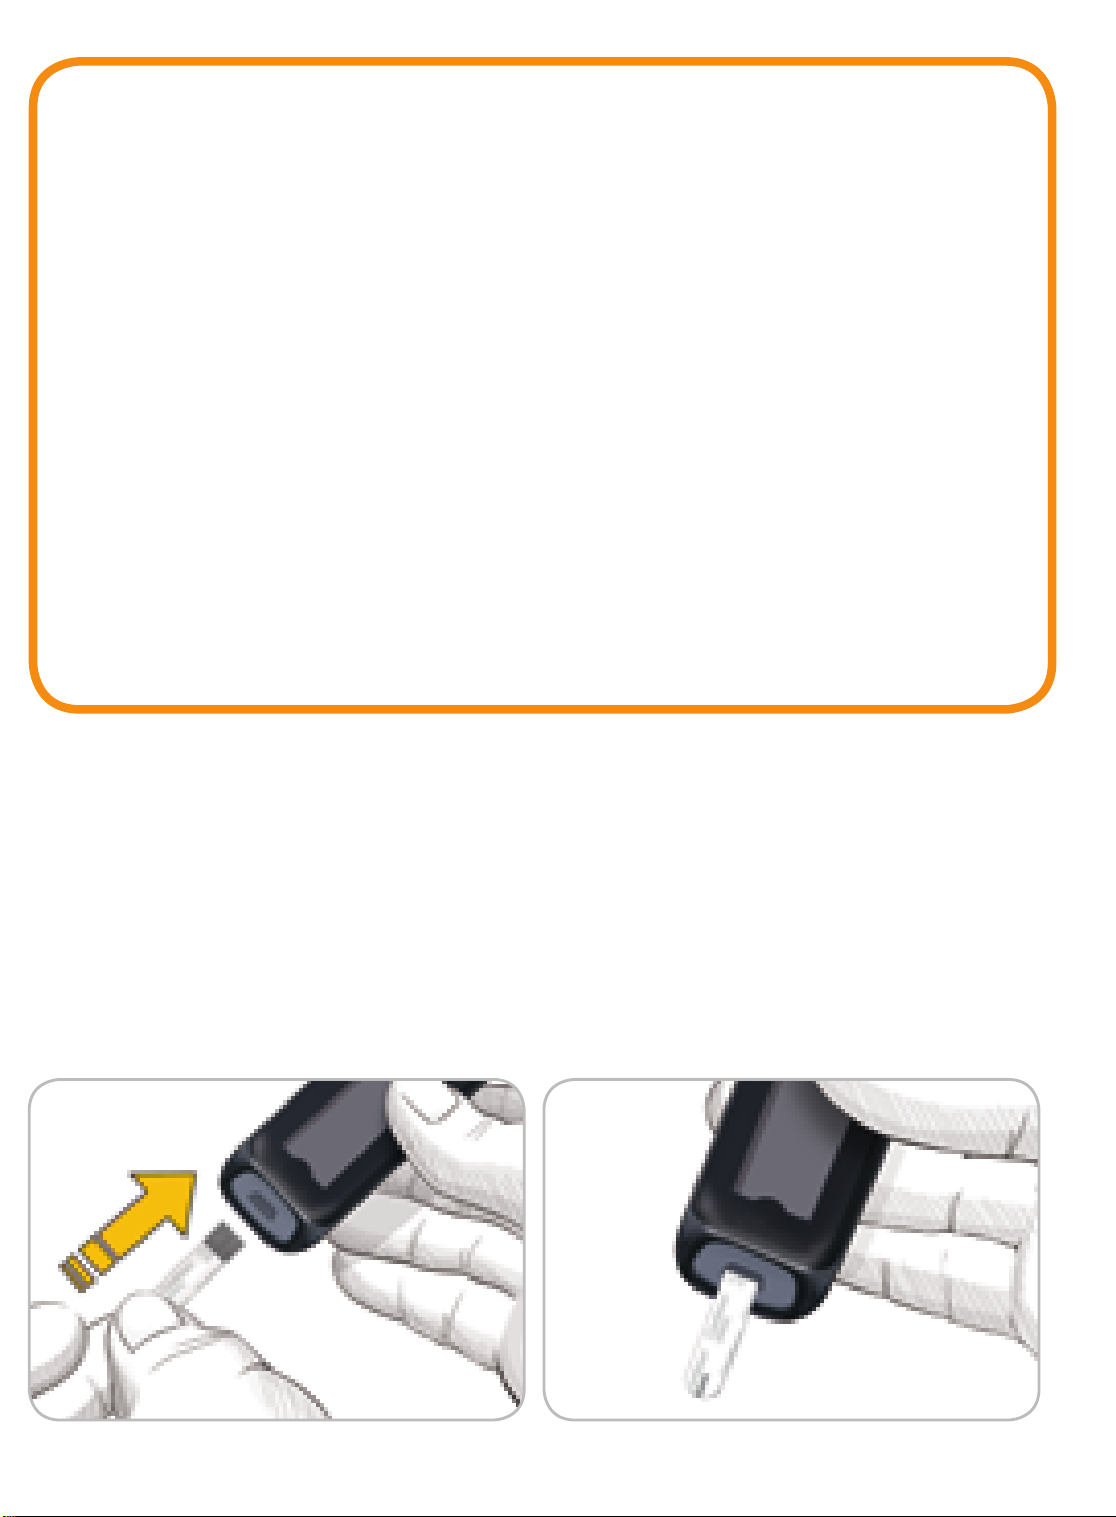
2. Insert the grey square end of a new test
strip firmly into the test strip port until the
meter beeps.
The meter turns on and displays the Apply
Blood screen. The meter is now ready to
test a blood drop.
3. Use your lancing device to get a drop of
blood from your fingertip.
4. Stroke your hand and finger toward the
puncture site to form a drop of blood.
5. Immediately touch the tip of the test strip
to the drop of blood.
6. If the meter beeps twice and the screen
displays a blinking blood drop, the test strip
does not have enough blood. Apply more
blood to the test strip within 60 seconds.
Turn the page to continue Fingertip Testing
and learn about Meal Markers.
Need Help?
For more information,
go to www.contourone.com
Contact Diabetes Care Customer Service at
1-800-268-7200.
Your meter is preset and locked to display
results in mmol/L. If your result is in mg/dL,
contact Diabetes Care Customer Service at
1-800-268-7200.
For in vitro diagnostic use.
For information on patents and related licenses, see
www.patents.ascensia.com.
Ascensia, the Ascensia Diabetes Care logo, Contour, Glucofacts, the
No Coding logo, Microlet, and Second-Chance are trademarks and/or
registered trademarks of Ascensia Diabetes Care Holdings AG.
TM see www.ascensiadiabetes.ca/en/tm-mc
Apple and the Apple logo are trademarks of Apple Inc., registered in the
U.S. and other countries. App Store is a service mark of Apple Inc.
The Bluetooth®word mark and logos are registered trademarks
owned by Bluetooth SIG, Inc., and any use of such marks by
Ascensia Diabetes Care is under license.
Google Play and the Google Play logo are trademarks of Google Inc.
(®= registered trademark. TM = unregistered trademark
SM = service mark.)
All other trademarks are properties of their respective owners and are
used solely for informative purposes. No relationship or endorsement
should be inferred or implied.
85096850
© 2016 Ascensia Diabetes Care Holdings AG. All rights reserved. Rev. 09/16
English
Manufactured for:
Ascensia Diabetes Care Holdings AG
Peter Merian-Strasse 90
4052 Basel, Switzerland
Fabriqué pour :
Ascensia Diabetes Care Holdings AG
Peter Merian-Strasse 90
4052 Bâle, Suisse
Front Panel
85096850_CntrNxtONE_QRG_EN_FR.indd 1 9/29/16 12:30 PM