Convoy Performance Series Quick start guide

Please read this manual thoroughly before operang the unit, and keep it for further reference.
Convoy Technologies 6409 Highview Drive | Fort Wayne, IN 46808 | Ph (888) 565-2583
Owner’s / Installaon Manual
Performance Series
RVM-0734
REARVIEW MIRROR MONITOR

Please read this manual thoroughly before operang the unit, and keep it for further reference.
Convoy Technologies 6409 Highview Drive | Fort Wayne, IN 46808 | Ph (888) 565-2583
Owner’s / Installaon Manual
Performance Series
RVM-0734
PRECAUTIONS
1. Precauons
Storage and keeping
Do not expose the monitor to excessive heat or cold. The storage temperature of this device is -30 ~+75 C, and the oper
ang temperature is -20 ~+60 C. The Humidity is Rh90%.
Never use this device near a bathtub, wash basin, kitchen, damp basement, swimming pool or similar place.
Never use this device in environments with excessive moisture, dust or smoke.
Avoid dropping or striking this device.
Never puncture, scratch or use abrasive cleaning materials on this device.
The monitor is not designed to be waterproof.
Operang Precauons
Make sure all cables are connected properly observe polarity. Improer cable connecons may damage the monitor. Re
move the power cable connecons when you do not intend to use the unit.

Please read this manual thoroughly before operang the unit, and keep it for further reference.
Convoy Technologies 6409 Highview Drive | Fort Wayne, IN 46808 | Ph (888) 565-2583
1. Precauons
Maintenance
1. Remove all the cable connecons from the monitor before cleaning the unit.
2. Use a mild household detergent and clean the unit with a slightly damp, so cloth. Never use strong solvents such as thin-
ner or benzene, as they might damage the nish of the device.
This symbol is intended to alert the user to the presence of uninsulated “dangerous voltage” within the product’s en-
closure that may be of sucient magnitude to constute risk of electric shock to persons.
This symbol is intended to alert the user to the presence of important operang and maintenance (servcing) instruc-
ons in the literature accompanying the appliance.
This symbol is intended to alert the user not to waste electrical and electronic equipment.
CAUTION
You are cauoned that any changes or modicaons not expressly approved in this manual could void your warran-
tee and necessitate expensive repairs.
Declaraon of conformity
This device complies with Part 15 of the FCC Rules. Operaon is subject to the following two condi-
ons: This device may not cause harmful interference. This device must accept any interference
received, including interference that may cause under desired operaon.
Owner’s / Installaon Manual
Performance Series
RVM-0734
PRECAUTIONS

Please read this manual thoroughly before operang the unit, and keep it for further reference.
Convoy Technologies 6409 Highview Drive | Fort Wayne, IN 46808 | Ph (888) 565-2583
Owner’s / Installaon Manual
Performance Series
RVM-0734
Mounng the RearView Mirror Monitor
1) Loosen the set screw holding the installed rearview mirror in place, and carefully slide it o its base. The Convoy RVM-0734
will use the installed base on the windshield.
2) Mount the supplied windshield bracket to the back of the RVM-0734 with the supplied screws. Slide the bracket onto the base
on the windshield, ghten the locking screw. Route the cable up under the headliner to the A pillar and down.
3) The device may be powered by a 12 or 24 volt automove baery or vehicle electrical system.
4) Make sure all cables are connected properly, observe polarity. Improper cable connecons may damage the monitor. Remove
the power cable connecons when you do not intend to use the unit.
1. CH1-Brown, CH1 Trigger—Brown (12VDC)
2. CH2-White, CH2 Trigger—White (12VDC)
3. CH3-Yellow, CH3 Trigger—Yellow (12VDC)
4. CH4-Blue, CH4 Trigger—Blue (12VDC)
5. Red to Power (9-48VDC +)
6. Black to Ground
7. 13 pin din to Monitor
Funcon Keys:
1. Power = Power On/O
˂ = a. Quad (AV1-4) and triple (AV1-3) images display switch
b. Adjust up numbers of opons in menu pages
1. MENU = a. Enter Menu
b. Turn Menu Page
2. = a. Dual images display switch: (AV1-2) TO (AV3-4)
b. Adjust down numbers of opons in menu pages
3. AV = a. Single channel switch (AV1, AV2, AV3, AV4)
b. As opon choosing buon in menu page

Please read this manual thoroughly before operang the unit, and keep it for further reference.
Convoy Technologies 6409 Highview Drive | Fort Wayne, IN 46808 | Ph (888) 565-2583
Owner’s / Installaon Manual
RVM-0734 Operaon
Menu Page 3:
Volume Control, etc.
Menu Page 4:
Camera Channel Mirror Image on
or o.
Menu Page 1:
Picture Controls
Menu Page 2:
Appearance Controls
Menu Page 5:
Camera focus delay me aer
trigger voltage is removed.
Funcon Keys:
1. Power = Power On/O
2. = a. Quad (AV1-4) and triple (AV1-3) images display switch
b. In the menu, it will adjust up numbers or opons
3. MENU = a. Enter Menu
b. Turn Menu Page
4. = a. Dual images display switch: (AV1-2) TO (AV3-4)
b. In the menu, it will adjust down numbers or opons
5. AV = a. Single channel switch (AV1, AV2, AV3, AV4)
b. In the menu, this will select an opon on that menu page.

Please read this manual thoroughly before operang the unit, and keep it for further reference.
Convoy Technologies 6409 Highview Drive | Fort Wayne, IN 46808 | Ph (888) 565-2583
Owner’s / Installaon Manual
Installaon Notes
Troubleshoong
Specicaons Warranty and Support Informaon
Subject to the provisions described below, this CT product is protected for 1
year against defects in material and workmanship. Should a product fail to
perform as described above within the warranted period, it will be repaired or
replaced with the same or funconally equivalent product by CT. This warrant
does not apply if , in the judgement of CT, the product fails due to damage
from shipment, handling, storage, accident, abuse or misuse, or if it has been
used or maintained in a manner not conforming to product manual instruc-
ons, has been modied in any way. Repair by anyone other than CT or an ap-
proved agent will void this warranty. The maximum liability of CT under this
warranty is limited to the purchase price of the product covered by the warran-
ty. All defecve products should be returned to CT with shipping charges pre-
paid. CT will not accept collect shipments.
Symptom possible Causes/Soluons
No picture. No sound Improper connecon of automobile adapter. Use of un-authorized power supply. Power switch is on OFF posion
No picture Check whether locking cable is properly connected.
No sound Check whether locking cable is properly connected, or the volume is set too low
Dark picture Check whether brightness and contrast are adjusted correctly, and note if the temperature is at or below –10°C.
No color Adjust the color sengs.
No reversing funcon
(i.e. Picture) Check the wires (black/ red/ blue) that may be loose
Performance Series
RVM-0734
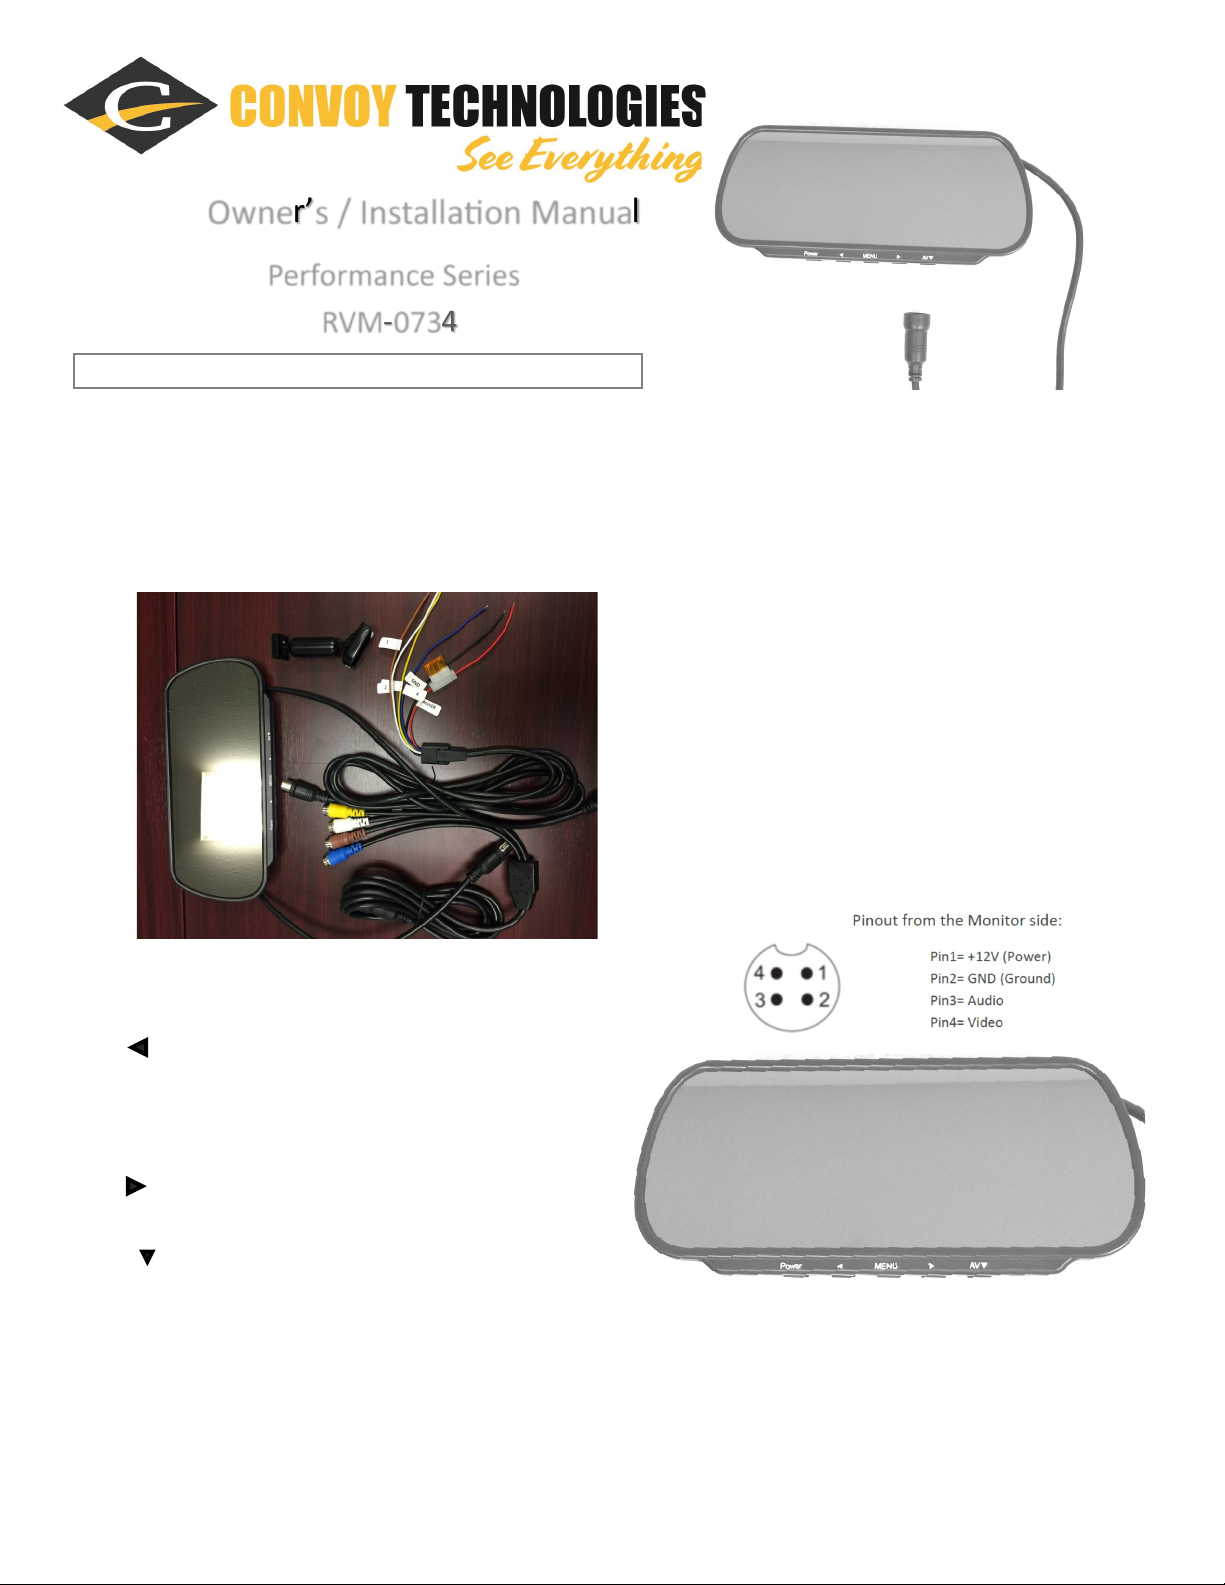
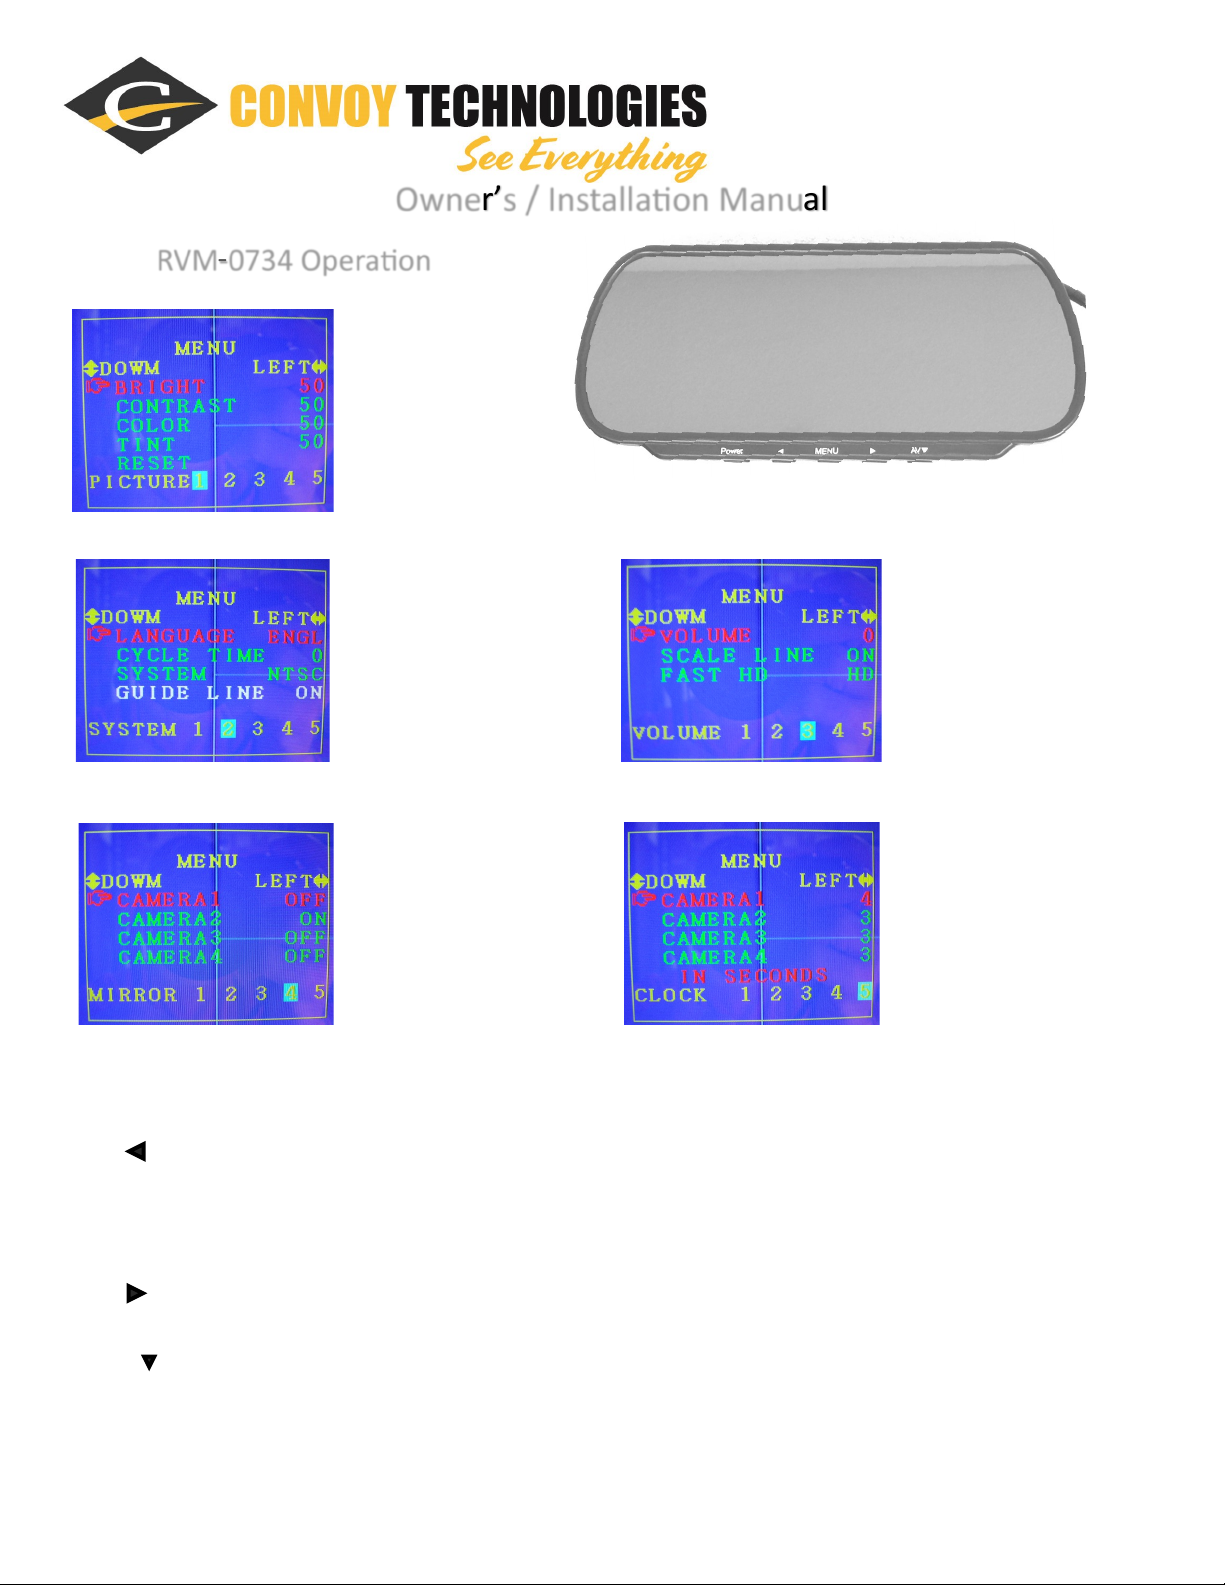
• 12v to the trigger wire will turn the monitor and camera on, and focus on that camera. When trigger voltage is removed,
monitor will turn o, or go back to its previous state.
• AV1 does not have a trigger wire. There is a distance grid superimposed on AV2, for the backup camera view.
• Trigger delay mes on Menu Page 5 are useful if you install sideview cameras triggered by turn signals. If you connect your
12v trigger wire to a pulsing wire, increasing the delay will keep the camera turned on instead of turning on and o when the
turn indicators ash, allowing the driver to view the camera on the inside of the turn unl the turn is complete.
7” TFT-LCD Color Monitor
Audio Output: 0.5 W
Loudspeaker: 1ea 15x40mm
Power Supply: 10-24V
Power Consumpon: 6.6W Max, 260mA
Outer Dim (WxHxD): 9-⁷⁄₈”x 4-¼”x 1-¼”
Resoluon: 800W x 480H
Contrast: 300:1
Brighness: 500cd/m²
Viewing Angle: 40°V x 60°H
Operang Temperature: -10°- +60°C, RH90%
Storage Temperature: -20° - +70°C, RH90%
This manual suits for next models
1
Table of contents
Popular Automobile Accessories manuals by other brands

Rhino-Rack
Rhino-Rack T7-SLRS manual

Motorola
Motorola VC70N0 Quick reference guide

Whelen Engineering Company
Whelen Engineering Company MirrorBeam MBDI02 Series installation manual

Custom Dynamics
Custom Dynamics CD-LR-06-R installation instructions

Black & Decker
Black & Decker PI500BB instruction manual

XG Cargo
XG Cargo Platform A XG-326 user manual