manuals.online logo
Brands
  1. Home
  2. •
  3. Brands
  4. •
  5. Metra Electronics
  6. •
  7. Automobile Accessories
  8. •
  9. Metra Electronics 99-3026B User manual

Metra Electronics 99-3026B User manual

CAUTION!
All accessories, switches, climate
controls panels, and especially air bag indicator
lights must be connected before cycling the
ignition. Also, do not remove the factory radio
with the key in the on position, or while the
vehicle is running.
Metra. The World’s Best Kits.®MetraOnline.com © COPYRIGHT 2018 METRA ELECTRONICS CORPORATION REV. 6/28/18 INST99-3026B
INSTALLATION INSTRUCTIONS
99-3026B
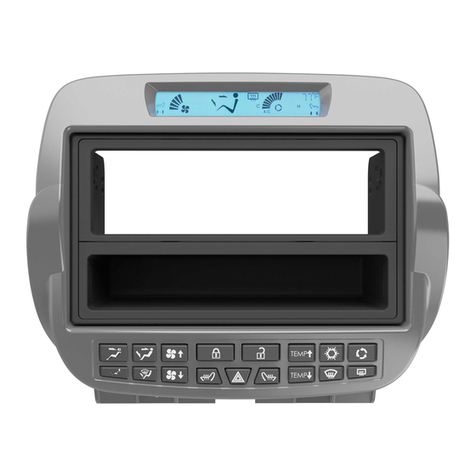
KIT FEATURES
• ISO DIN radio provision with pocket
• ISO DDIN radio provision
• Complete center dash panel for a factory look
• Painted matte black
KIT COMPONENTS
• A) Radio/climate control panel • B) Radio brackets • C) Climate control trim panel A (04-05) • D) Climate control trim panel B (06-09)
• E) Pocket • F) (6) Panel clips • G) (12) #8 x 3/8” Phillips screws
TOOLS REQUIRED
• Panel removal tool • Phillips screwdriver
• 9/32” Socket wrench
TABLE OF CONTENTS
Dash Disassembly ...............................................2-3
Kit Preparation ...................................................4-5
Kit Assembly
–ISO DIN radio provision with pocket ..................6
–ISO DDIN radio provision .....................................7
WIRING & ANTENNA CONNECTIONS
Wiring Harness: TBA
Antenna Adapter: 40-GM10
Steering wheel control interface: • ASWC-1
(sold separately)
A B C
GF
D E
Cadillac XLR 2004-2009
1.800.221.0932
|
MetraOnline.com
2
1. On the bottom of the shifter, pull the
chrome trim downward, and then
remove (1) screw exposed. Pull up on
the shifter to remove it. (Figure A)
2. Unclip the shifter trim plate, then set to
the side. (Figure B)
Continued on the next page
DASH DISASSEMBLY
(Figure B)(Figure A)
REV. 6/28/2018 INST99-3026B 3
DASH DISASSEMBLY (CONT.)
(Figure A)
3. Unclip, unplug, and remove the radio/
climate control panel. (Figure C)
4. Remove (4) 9/32” screws securing the
radio. Slide the radio out, then unplug
and remove the radio. (Figure D)
Continue to Kit Preparation
(Figure D)(Figure C)
1.800.221.0932
|
MetraOnline.com
4
KIT PREPARATION
From the factory radio/climate control panel:
1. Unclip and remove the a/c vents.
(Figure A)
2. Unclip and remove the hazard switch.
(Figure A)
3. Remove (4) screws securing the climate
controls, then remove the controls.
(Figure A)
Continued on the next page
(Figure A)
REV. 6/28/2018 INST99-3026B 5
KIT PREPARATION (CONT.)
4. Secure the appropriate
climate control
trim panel
to the
99-3026B radio/
climate control panel
using the (4)
#8 x 3/8” Phillips screws provided. The
climate control panel
part number is
stamped onto the back of the panel.
CH-3026-1 - 2004-2005
CH-3026-2 - 2006-2009 (Figure A)
To the 99-3026B radio/climate control panel:
5. Secure the (6) included
panel clips
to the
radio/climate control panel
(factory clips
can also be used if desired) (Figure B)
6. Clip in the factory a/c vents. (Figure C)
7. Clip in the hazard switch. (Figure C)
8. Secure the climate controls to the panel
using the (4) #8 x 3/8” Phillips screws
provided. (Figure C)
Continue to Kit Assembly
(Figure A) (Figure B) (Figure C)
1.800.221.0932
|
MetraOnline.com
6
KIT ASSEMBLY
ISO DIN radio provision with pocket
1. Secure the
radio brackets
to the
pocket
using the (4) #8 x 3/8” Phillips screws
provided. (Figure A)
2. Remove the metal DIN sleeve and trim
ring from the aftermarket radio.
3. Slide the radio into the bracket/pocket
assembly, then secure it to the assembly
using the screws supplied with the
radio. (Figure B)
4. Locate the factory wiring harness and
antenna connector in the dash and
complete all necessary connections to
the radio. Metra recommends using the
proper mating adapter from Metra and/
or Axxess. Test the radio for
proper operation.
5. Secure the radio assembly to the dash
using the factory screws.
6. Reassemble the dash in reverse
order of disassembly to complete the
installation.
(Figure A) (Figure B)
REV. 6/28/2018 INST99-3026B 7
(Figure A)
ISO DDIN radio provision
1. Secure the
radio brackets
to the radio
using the screws supplied with the
radio. (Figure A)
2. Locate the factory wiring harness and
antenna connector in the dash and
complete all necessary connections to
the radio. Metra recommends using
the proper mating adapter from Metra
and/or Axxess. Test the radio for proper
operation.
3. Secure the radio assembly to the dash
using the factory screws.
4. Reassemble the dash in reverse
order of disassembly to complete the
installation.
KIT ASSEMBLY
KNOWLEDGE IS POWER
Enhance your installation and fabrication skills by
enrolling in the most recognized and respected
mobile electronics school in our industry.
Log onto www.installerinstitute.com or call
800-354-6782 for more information and take steps
toward a better tomorrow.
®
Metra recommends MECP
certified technicians
IMPORTANT
If you are having difficulties with the installation of this product,
please call our Tech Support line at 1-800-253-TECH. Before
doing so, look over the instructions a second time, and make
sure the installation was performed exactly as the instructions
are stated. Please have the vehicle apart and ready to perform
troubleshooting steps before calling.
Metra. The World’s Best Kits.®MetraOnline.com © COPYRIGHT 2018 METRA ELECTRONICS CORPORATION REV. 6/28/18 INST99-3026B
INSTALLATION INSTRUCTIONS
99-3026B

Other Metra Electronics Automobile Accessories manuals
Metra Electronics 99-3107S User manual

Metra Electronics

Metra Electronics 99-3107S User manual

Metra Electronics 99-8201 User manual

Metra Electronics

Metra Electronics 99-8201 User manual

Metra Electronics 99-9303 User manual

Metra Electronics

Metra Electronics 99-9303 User manual

Metra Electronics 99-7863 User manual

Metra Electronics

Metra Electronics 99-7863 User manual

Metra Electronics 99-7617HG User manual

Metra Electronics

Metra Electronics 99-7617HG User manual

Metra Electronics 99-5500 User manual

Metra Electronics

Metra Electronics 99-5500 User manual

Metra Electronics 95-5810 User manual

Metra Electronics

Metra Electronics 95-5810 User manual

Metra Electronics 2004-2006 Chrysler Pacifica User manual

Metra Electronics

Metra Electronics 2004-2006 Chrysler Pacifica User manual

Metra Electronics 99-7500 User manual

Metra Electronics

Metra Electronics 99-7500 User manual

Metra Electronics 95-7504 User manual

Metra Electronics

Metra Electronics 95-7504 User manual

Metra Electronics KIA OPTIMA 99-7324 User manual

Metra Electronics

Metra Electronics KIA OPTIMA 99-7324 User manual

Metra Electronics 99-3306 User manual

Metra Electronics

Metra Electronics 99-3306 User manual

Metra Electronics XIAH-FD4 User manual

Metra Electronics

Metra Electronics XIAH-FD4 User manual

Metra Electronics 99-7337B User manual

Metra Electronics

Metra Electronics 99-7337B User manual

Metra Electronics 99-3400 User manual

Metra Electronics

Metra Electronics 99-3400 User manual

Metra Electronics 95-7378B User manual

Metra Electronics

Metra Electronics 95-7378B User manual

Metra Electronics 99-7352B User manual

Metra Electronics

Metra Electronics 99-7352B User manual

Metra Electronics 99-3010S User manual
Metra Electronics

Metra Electronics 99-3010S User manual

Metra Electronics 99-8244HG User manual

Metra Electronics

Metra Electronics 99-8244HG User manual

Metra Electronics 99-9001 User manual

Metra Electronics

Metra Electronics 99-9001 User manual

Metra Electronics 107-HY1 User manual

Metra Electronics

Metra Electronics 107-HY1 User manual

Metra Electronics 99-7316 User manual

Metra Electronics

Metra Electronics 99-7316 User manual

Metra Electronics 99-3303 User manual

Metra Electronics

Metra Electronics 99-3303 User manual

Metra Electronics 95-5025 User manual

Metra Electronics

Metra Electronics 95-5025 User manual

Popular Automobile Accessories manuals by other brands

Steren AUT-090 quick start guide

Steren

Steren AUT-090 quick start guide

Parkmate MCPK-043BT quick start guide

Parkmate

Parkmate MCPK-043BT quick start guide

Menabo PROFESSIONAL FIX 606FP Fitting instructions

Menabo

Menabo PROFESSIONAL FIX 606FP Fitting instructions

Fishbone Offroad FB21114 installation instructions

Fishbone Offroad

Fishbone Offroad FB21114 installation instructions

Speedsignal B-339VW02 installation guide

Speedsignal

Speedsignal B-339VW02 installation guide

ARP Fridge Defend user guide

ARP

ARP Fridge Defend user guide

Directed DS3+ installation guide

Directed

Directed DS3+ installation guide

AMP Research 75135-01A installation guide

AMP Research

AMP Research 75135-01A installation guide

Witter MZ60U Fitting instructions

Witter

Witter MZ60U Fitting instructions

iPark IPTSF407 manual

iPark

iPark IPTSF407 manual

Twiins HANDSFREE 2.0 instruction manual

Twiins

Twiins HANDSFREE 2.0 instruction manual

Thule Kit 1242 Fitting instructions

Thule

Thule Kit 1242 Fitting instructions

Skoda iV Charger manual

Skoda

Skoda iV Charger manual

Parrot CK 3000 Evolution user guide

Parrot

Parrot CK 3000 Evolution user guide

HUSKY LINERS 8931 Care and use instructions

HUSKY LINERS

HUSKY LINERS 8931 Care and use instructions

Digitus DA-11001 Quick installation guide

Digitus

Digitus DA-11001 Quick installation guide

Shell NewMotion Home Advanced 2.1 Quick installation guide

Shell

Shell NewMotion Home Advanced 2.1 Quick installation guide

Car Solutions LAND ROVER FREELANDER 2   TOUCH MONITOR user manual

Car Solutions

Car Solutions LAND ROVER FREELANDER 2 TOUCH MONITOR user manual

manuals.online logo
manuals.online logoBrands
  • About & Mission
  • Contact us
  • Privacy Policy
  • Terms and Conditions

Copyright 2025 Manuals.Online. All Rights Reserved.