Cook's essentials Technique DYB350 Quick guide

Model # DYB350
DIGITAL
PRESSURE
COOKER
Instructions & Recipe Guide
V5 01/01/06
ONE YEAR LIMITED WARRANTY
This product is warranteed to be free from defects in materials and workmanship under
normal household use for a period of one year from the date of purchase. During this period,
such defects will be repaired or the product replaced at the manufacturer°Øs option without
charge. This warranty does not cover exterior or interior finish or damage caused by misuse,
accident, or negligence.
A purchase receipt or other proof of date of original purchase will be required before warranty
service is rendered.
If a problem with this product develops during or after the warranty period, please contact the
manufacturer for service.
Any appliance submitted for repair must be sent (transportation charges prepaid) to:
Innovative Products
50 North Harrison Street
York, PA 17403
If you have any questions concerning the use and care of this product or comments regarding
your experience with the product, please write a letter explaining the nature of your concern.
If Service is Required:
Send a brief letter explaining the problem. Be sure to include your name, address, and
phone number.
For faster service, call (800) 699-6998
Most service problems are resolved by replacing a broken or defective part. If this is not the
case,we will give you instructions for returning the unit.
Neither the retailer nor any other company involved in the sale or promotion of this product is
a co-warrantor of this manufacturer’s warranty.

Introduction . . . . . . . . . . . . . . . . . . . . . . . . . . . . . . . . . . . . . .3
Important Information and Tips . . . . . . . . . . . . . . . . . . . . . . . . . .3
Parts & Assembly . . . . . . . . . . . . . . . . . . . . . . . . . . . . . . . . . .4
Accessories . . . . . . . . . . . . . . . . . . . . . . . . . . . . . . . . . . . . . .4
Pressure Cooking Assembly . . . . . . . . . . . . . . . . . . . . . . . . . . . . .4
Important Safeguards . . . . . . . . . . . . . . . . . . . . . . . . . . . . . . . .5
Before Using Pressure Cooker . . . . . . . . . . . . . . . . . . . . . . . . . . .7
Basic Cooking Tips . . . . . . . . . . . . . . . . . . . . . . . . . . . . . . . . . .7
The Control Panel . . . . . . . . . . . . . . . . . . . . . . . . . . . . . . . . . .7
How To Use Your Pressure Cooker . . . . . . . . . . . . . . . . . . . . . . . .8
Cooking Power Modes . . . . . . . . . . . . . . . . . . . . . . . . . . . . . .9
Care and Cleaning Instructions . . . . . . . . . . . . . . . . . . . . . . . . . .10
Pressure Cooker Cooking Times . . . . . . . . . . . . . . . . . . . . . . . . . .11
Recipes . . . . . . . . . . . . . . . . . . . . . . . . . . . . . . . . . . . . . . . .14
Warranty . . . . . . . . . . . . . . . . . . . . . . . . . . . . . . . . . . . . . . .23
TABLE OF CONTENTS
READ ALL INSTRUCTIONS & SAFETY INFORMATION CAREFULLY
BEFORE USING YOUR PRESSURE COOKER

18 3
Congratulations on your purchase of the Technique Pressure Cooker. We know you will enjoy the
convenience of cooking with this new and innovative cookware. The recipes that are included were
developed to help you make gourmet meals quickly and easily. Since individual tastes vary you may need to
adjust cooking times and recipe ingredients to accommodate your personal preference.
———— IMPORTANT INFORMATION AND TIPS ————
READ ALL INSTRUCTIONS & SAFETY INFORMATION CAREFULLY BEFORE USING YOUR TECHNIQUE PRESSURE COOKER
Basic steps for your new Technique Pressure Cooker:
• To use as a pressure cooker, use low or high pressure mode. Press timer arrow up to adjust minutes to
cook. Place pressure lid on pot. Once pressure has been reached, the minutes will automatically start to
count down. Once the timer reaches zero, the cooker will automatically switch to warm mode and stay
warm for four hours. It will automatically turn itself off at that point. Everything is automatic with this
digital pressure cooker, so you don’t have to wait around for the pressure to build or turn it off.
• Low or medium cook mode is used for slow cooking with the glass lid. High cook mode is used to brown
your meats before pressure cooking and to reduce stocks after pressure cooking to make sauces or gravies.
When browning meats use a little oil in the pan first.
• If extra tenderness is desired when cooking meats, omit meat rack and place meat directly in inner pot, add
liquid to cover meat, making sure you do not exceed the max fill line.
• The recipes included in this booklet are to get you started. Once you begin using the pressure cooker, you
will be able to adapt your own recipes for a faster and healthier way of cooking.
• The Technique Pressure Cooker works like a traditional pressure cooker by confining the steam of what
you are cooking. By preventing the steam from escaping, you will increase the temperature of the vessel by
38 degrees. Raising the boiling point of the liquid decreases the amount of time needed to cook all your
favorite foods. Plus the steam creates a pressure which breaks down the fibers in food you’re cooking. This
makes for melt-in-your-mouth food that retains all of the water soluble nutrients, flavors,
and colors.
• Since the Techniqe Pressure Cooker is electric, there is a temperature and pressure regulator which controls
the internal temperature of the pot.. This eliminates a lot of the guess work of traditional pressure cooking
that used to result in burning or over cooking. Plus it comes with a timer. The timer starts counting
backwards once the optimum level of pressure is reached. You no longer need to stand around waiting for
the pressure cooker to reach the pressure to start the cooking timer. Plus when the cooking cycle is
finished, the Technique Pressure Cooker automatically switches over to keep a warm mode until the
pressure cooker is turned off.
• The heating element allows for quick heating and constant proper cooking pressure throughout the entire
cooking cycle.
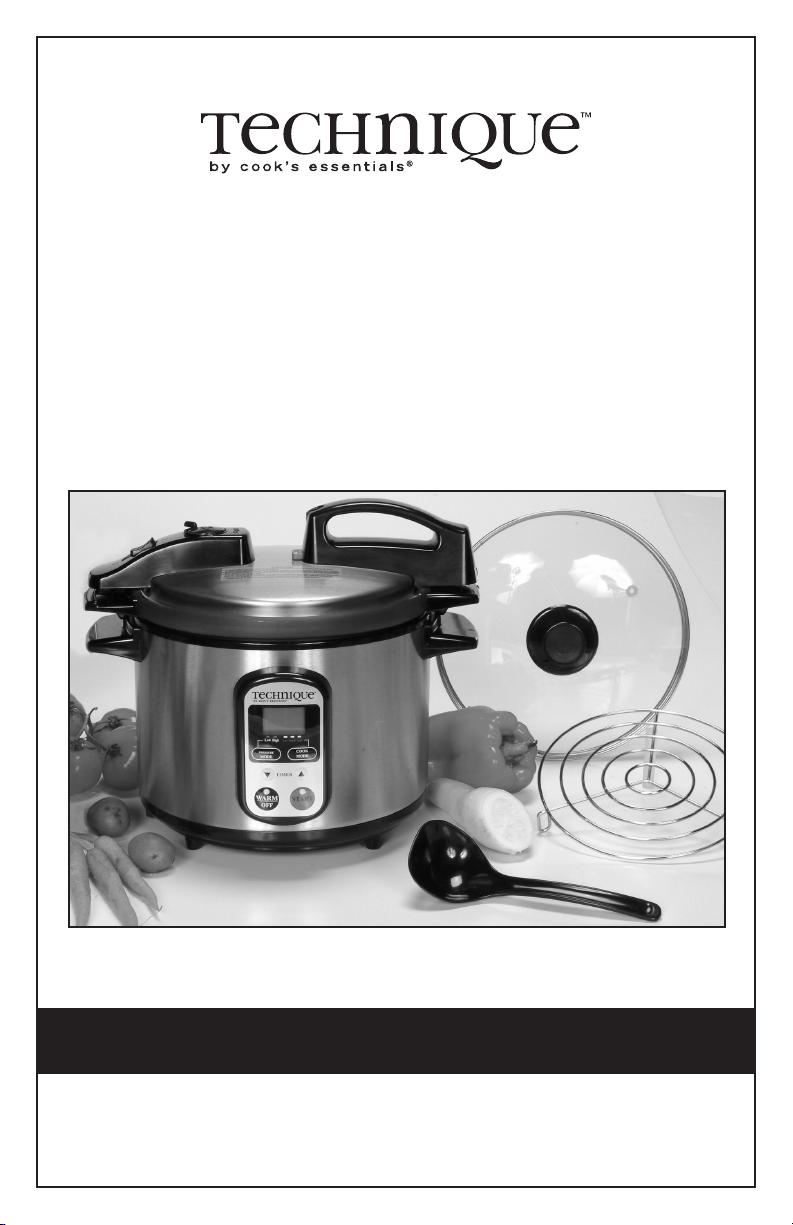
• The 5 quart capacity pot is a removable pot made of heavy duty, anodized aluminum.
• The Technique Pressure Cooker has a 3 choice temperature cook mode that allows you to: Brown and sear
meat in the high cook mode. Or to use for rapidly reducing stocks for gravies or sauces. The high cook
mode works great for bringing liquid to a boil faster to cut back on the amount of time needed to bring
food to pressure. The medium and low cook modes are for making foods that require lower heats like in
slow cooking and you still have the ability to set the timer which begins counting back right away. This too
will switch into keep warm until attended to.
• The rapid release button is a wonderful feature which allows you to release all the steam and pressure in
the pot during the cook cycle so the additional ingredients may be added. This cuts back on the time
needed to naturally allow the pressure to drop.
• The stainless finish on the outside of the electric housing is an attractive addition to any kitchen decor. Not
only is it beautiful to look at, it is easy to keep clean… just use glass cleaner and a soft towel.
• The lid design on the Technique Pressure Cooker allows for right or left handed users to easily lock. The
lid handle can go in either direction.
TECHNIQUE PRESSURE COOKER
Delicious Baby Back Ribs
3 slabs lean baby back ribs
2 cups ginger ale
1 tablespoon liquid smoke flavoring
DRYRUB:
1 tablespoon ground cumin
1 tablespoon of ground coriander
1 tablespoon of ground onion powder
1 tablespoon of garlic powder
1 tablespoon of kosher salt
1 tablespoon of ground black pepper
1 jar barbecue sauce
Rub dry barbecue seasoning all over the ribs, front and back. Place the rack inside of the
pressure cooker. Stand the three slabs of ribs on the rack inside of the pressure cooker. Add
the ginger ale and the liquid smoke to the pressure cooker. If the ribs are too tall, you can
remove the rack and stand the ribs on the bottom of the pot. Secure the lid by turning clock
wise as far as it will go. Make sure the float valve is free (listen for the noise that indicates it is
free). Lock the handle. Set the pressure mode to high. Set the timer for 15 minutes. At the end
of the 15 minute cooking time, pour barbecue sauce all over the ribs and make sure the sauce
thoroughly coats the ribs all over. If you so desire, you may add several ears of corn to the
contents of the pressure cooker. It makes an excellent side dish to the ribs! Place the lid back
on the pot. Set the timer for another 5 minutes. After 5 minutes, the ribs (and corn) are done.
If you would rather, you can skip the last 5 minute cooking cycle and finish cooking the ribs
on a grill. Baste well with barbecue sauce and turn frequently. It all depends on how much
time you have and the results you want.
Chicken & Rice
One 4-5 lb. chicken, skinned and cut into pieces
3 3/4 tablespoons olive oil
2/3 cup white wine
1 large onion
3 garlic cloves, minced
1 red bell pepper, diced
1 large ripe tomato
1 1/4 cup uncooked long grain white rice
2/3 cup frozen peas
3 3/4 cups low-sodium chicken broth
1 teaspoon salt
salt and pepper to taste
Season chicken pieces with salt and pepper. Heat 3 tablespoons oil in cooker over medium
heat. Place chicken in cooker and brown, in batches. Add wine to chicken in cooker. Cook
2-3 minutes. Remove chicken and juices and set aside. Heat remaining oil in cooker. Add
onion, garlic, red pepper, and tomato. Cook until onion is softened. Add rice and cook for
about 2 minutes. Add peas, broth, salt, chicken and juices. Stir well. Place lid on cooker and
lock. Set at high pressure for 9 minutes. Release steam. Remove lid. Mix so rice looks fluffy,
and serve. Serves 5-6.

17
4
PARTS & ASSEMBLY
PRESSURE COOKING ASSEMBLY
Inner Pot
Inner
Pot
Tabs
Pressure Lid
Pressure
Lid
Locking
Tabs
Red Float
Valve
Cleaning
Pin
Rapid Release
Button
Pressure
Valve
Power Cord Control Panel
Gasket
Gasket
Main Housing Unit
Main Housing
Unit
Red
“Lock”
Button
Cook
Mode
Start
Cooking
Cooking
Time
Pressure
Selection
Warm/Off
Digital
Display
Window
ACCESSORIES
Corned Beef and Cabbage
4-lb. corned beef brisket with pickling spice packet
2 2/3 cups water
1/8 cup red wine vinegar
2 medium onions, peeled and chopped
5 medium red-skinned potatoes, scrubbed
5 medium carrots, cut in half lengthwise
1 medium head green cabbage, cut into wedges
Rinse corned beef and do NOT trim excess fat. Tie pickling spices in double thickness of
cheesecloth. Place rack in pressure cooker. Add water, vinegar, onions, garlic, and pickling
packet. Place corned beef in pot. Place lid on cooker and lock. Set at high pressure for 1 hour
and 10 minutes. Release steam. Remove lid and transfer meat to platter. Transfer onions to
large bowl. Cover both with aluminum foil. Place potatoes and carrots in pot with cooking
liquid. Place cabbage on top, submerging if possible. Place lid on cooker and lock. Set at high
pressure for 6 minutes. Release steam. Remove lid and transfer vegetables to bowl with onions.
Slice beef across grain and serve with vegetables. Makes 6–8 servings.
Beef Pot Roast
1 1/3 tablespoons olive oil
4-lb. rump roast, trimmed leaving some fat on
2 cloves garlic minced
1/3 teaspoon salt, plus more to taste
1/3 teaspoon ground black pepper, plus more to taste
1 large onion, chopped
2 bay leaves
1/4 cup red wine
2 2/3 cups canned beef broth
2 2/3 tablespoons unsalted butter, room temperature
2 2/3 tablespoons all-purpose flour
In cooker, heat oil over medium heat. Season meat with salt and pepper. Put meat in cooker,
fattier side down. Cook, tuning occasionally, until fully browned. Transfer roast to plate. Pour
off all but 1 tablespoon of fat from cooker. Add onion, garlic and cook until softened. Add bay
leaves. Pour in stock, red wine and loosen any bits that may be stuck on bottom of cooker.
Return meat to cooker. Place lid on cooker and lock. Set cooker to high pressure and cook for
1 hour 10 minutes. Release steam. Remove lid and transfer meat to serving platter. Cover meat
loosely with aluminum foil to keep warm. Remove bay leaves from liquid and let liquid stand
for 5 minutes. Skim fat from liquid. In separate bowl, work butter and flour together until
smooth. Whisk 1 cup of cooking liquid into butter/flour mixture to form thin paste. Bring
skimmed cooking liquid to boil over medium heat. Whisk in thin paste and cook until
thickens into gravy. Season with salt and pepper if desired. Slice meat and pour some gravy
over top of roast. Serve with mashed potatoes and gravy on side. Serves 6.
Spoon
Glass Lid
Metal
Rack
Small Gasket
(3)

16 5
• This appliance cooks under pressure. Improper use may result in scalding injury.
Make certain unit is properly closed before operating.
• ALWAYS USE INNER POT WHEN OPERATING THIS COOKER. NEVER PUT FOOD OR
LIQUID IN THE MAIN HOUSING.
• NEVER PUT ANYTHING BUT THE INNER POT IN THE MAIN HOUSING UNIT.
• NEVER ATTEMPT TO OPEN THE PRESSURE COOKER. If you need to open the pressure
cooker, press the stop button and slide the quick release lever down to release the building
pressure inside the cooker. Do not attempt to open the lid until all the steam has escaped the
cooker and the red float valve retreats into the handle. Turn the handle counter clockwise.
Always open the lid away from you to avoid any excess heat and steam.
• DO NOT UNDER ANY CIRCUMSTANCES TRY TO FORCE THE LID OFF UNTIL ALL
STEAM AND PRESSURE HAS BEEN RELEASED. ALWAYS OPEN THE LID WITH THE
OPENING FACING AWAY FROM YOU SO THAT ANY REMAINING STEAM MAY ESCAPE.
• DO NOT POUR COLD WATER INTO A HOT PRESSURE COOKER.
• The gasket must always be in place when using.
• Never operate the pressure cooker under pressure without any liquid inside the inner pot.
• Always make sure the red float valve is down before opening. Do not open the pressure cooker
until the pressure has been reduced and the floating piece drops.
• Always make sure to release all pressure from the pot with the rapid release button or naturally
before opening the lid.
• Always check pressure valve and vent nozzle for clogging before use.
• To avoid injury, do not touch heating element inside main housing unit at any time.
• Unplug from outlet when not in use and before cleaning. Allow to cool before putting on
or taking off parts.
• To protect against electrical hazards do not immerse cord, power plugs or main housing
unit in water or any other liquid.
• If your pressure cooker is dropped, damaged in any way or dropped into water, have a qualified
appliance repair person check and repair it before using.
• Do not overfill unit. Special care should be taken for dried vegetables, beans etc. which expand
during cooking. Refer to “How To Use Your Technique Pressure Cooker” section.
• Never fill above the maximum line. When cooking legumes like black beans never let liquid
and beans come up above halfway.
• During operation inner pot gets extremely hot. To remove inner pot from the main housing
unit grasp inner pot by the handles only using PROTECTIVE cooking mitt. Do not touch
surface with hands or body parts to avoid burning, scalding or injury.
• Regularly clean all safety valves and pressure regulators.
• Always remove pressure valve after each use and clean with pin to remove any debris that may
have become lodged in the valve during the cooking process.
•Check gasket for cleanliness—make sure there are no tears.
• Extreme caution must be used when moving an appliance containing hot liquids.
IMPORTANT SAFEGUARDS
READ ALL INSTRUCTIONS & SAFETY INFORMATION CAREFULLY BEFORE USING YOUR PRESSURE COOKER
Beef Stew
2 1/2 tablespoons olive oil, plus more if needed
2 pounds beef chuck, cubed
1/2 teaspoon salt
1/4 teaspoon ground black pepper
1 medium onion, chopped
2 garlic cloves, minced
1 shallot, minced
1/2 cup beef stock
1 can crushed tomatoes
1/2 teaspoon parsley
5 medium carrots, sliced
5 medium red-skinned potatoes, scrubbed and cubed
1 cup sweet peas
In pressure cooker, heat 1 tablespoon oil over high heat. In batches, add beef to brown,
turning occasionally (about 4 minutes). Add more oil as needed. Transfer beef to plate and
season with salt and pepper. Pour off fat in cooker. Add remaining oil to cooker and heat over
medium heat. Add onion, shallot and garlic. Cook until onion begins to soften, stirring
occasionally (about 2 minutes). Stir in beef stock, tomatoes, and parsley. Return the beef and
juices on plate to cooker. Place lid on cooker and lock. Set at high pressure for 20 minutes.
Release steam. Open lid and let stand for 5–7 minutes. Skim off any fat from liquid. Add
carrots, potatoes, and peas. Replace lid and lock in place. Set a high pressure for 5 minutes.
Release steam. Remove lid Serve with toast points or crust rolls Makes 6–8 servings.
Butternut Squash Soup
2 lbs. butternut squash, quartered and seeded
3 tablespoons olive oil
4 cloves garlic, coarsely chopped
1 large yellow onion, finely chopped
1 carrot, chopped
2 apples, peeled and seeded
1 tablespoon chopped fresh sage
1 teaspoon salt
1/8 cup brown sugar
4 cups chicken stock
1 cup heavy cream
pinch ground nutmeg, to top
Place squash, cut side down, on rack in pressure cooker. Pour in 1 cup chicken stock. Place lid
on cooker and lock. Set for high pressure for 7 minutes. Let sit for 3 minutes to finish cooking.
Release steam. Transfer squash to plate. When cooker is cool enough to handle, rinse and dry.
Heat oil in cooker. Add garlic, onion, apples and sage, cooking about 6 minutes while stirring
occasionally. Scrape squash meat off skin. Chop squash meat and add to garlic, apples and
onion mixture. Add salt and stock. Lock lid in place and set for high pressure for 10 minutes.
Let sit another 10 minutes to finish cooking, add heavy cream and brown sugar. Serves 4.

156
This appliance is for household use only and may be plugged into any standard 3-prong
grounded electrical outlet (ordinary household current). Do not use any other electrical outlet.
Note: This product must be grounded. If it should malfunction or break down, grounding
provides a path of least resistance for electric current to reduce the risk of electric shock.
This product is equipped with a cord having an equipment grounding conductor and a
grounding plug. The plug must be plugged into an appropriate outlet that is properly installed
and grounded in accordance with all local codes and ordinances.
WARNING: Improper connection of the equipment grounding conductor can result in a risk of
electric shock. Check with a qualified electrician or serviceman if you are in doubt as to whether
the product is properly grounded. Do not modify the power plug provided with the product -
if it will not fit the outlet, have a proper outlet installed by a qualified electrician. A short power-
supply cord is provided to reduce the hazards resulting from becoming entangled in or tripping
over a longer cord. Longer cord sets or extension cords are available and may be used if care is
exercised in their use. If a long cord set or extension is used, the marked electrical rating of the
cord set or extension cord should be at least as great as the electrical rating of the appliance. If
the appliance is of the grounded type, the extension cord should be of the grounding type three-
wire cord, and the longer cord should be arranged so that it will not hang over the countertop or
tabletop where it can be pulled on by children or tripped over accidentally.
POWER CORD SAFETY TIPS
1. To insert power cord, grasp it firmly with dry hands only and press it into outlet.
2. To disconnect appliance, grasp power cord with dry hands only and remove it from outlet.
Do not pull or yank on the power cord or appliance.
3. Before each use, inspect the power cord for cuts or marks. If any are found, this indicates
that the appliance should be serviced and the power cord replaced. DO NOT OPERATE
APPLIANCE IF THE POWER CORD SHOWS ANY DAMAGE. HAVE A QUALIFIED
APPLIANCE REPAIR PERSON CHECK AND REPAIR BEFORE USING.
• Use power cord only in standard 3-prong grounded outlets
• Always attach plug to appliance first, then plug cord into the wall outlet.
To disconnect turn all controls to “off”, then remove plug from wall outlet.
• Do not use the gasket when cooking with the glass lid.
• Do not operate any appliance with a damaged cord or plug or after the appliance
malfunctions, or has been damaged in any manner. Have a qualified appliance repair person
check and repair unit before using it.
• Do not unplug by pulling or tugging on the cord. Grasp the plug with dry hands to
remove the plug from the outlet.
• Extreme caution must be used when moving the pressure cooker.
• Do not place pressure cooker main housing unit on or near a hot gas or electric burner,
or in a heated oven.
• Do not let cord hang over edge of table or counter, or touch hot surfaces.
• Do not use outdoors.
• The use of accessory attachments not recommended by the appliance manufacturer may
cause hazards.
• Do not touch hot surfaces. Use handles or knobs.
• Do not use abrasive cleaners or materials to clean this product. This could cause scratching
and damage to the finish.
• Use only wood, plastic or coated utensils with your pressure cooker.
• Always remove power cord if malfunction is detected.
• Do not use appliance for other than intended use.
• This product is intended for household use.
• Always keep all these instructions in mind.
• Close supervision is necessary when any appliance is used by or near children.
• When using electrical appliances, basic safety precautions should always be followed.
Whole Lemon-Garlic Chicken
3-lb. chicken
1 teaspoon granulated garlic
1 teaspoon granulated onion
1 tablespoon dried thyme
1 tablespoon dried rosemary
1 tablespoon paprika
juice of 1 lemon
2 tablespoons olive oil
2 cups chicken broth
ground black pepper to taste
cooked egg noodles, buttered and parsleyed
In bowl, combine garlic, onion, thyme, rosemary, and paprika. Rub half of mixture inside
chicken. Rub inside with 1 tbsp. lemon juice. In cooker, heat oil. Add chicken and brown on
all sides. Pour in broth and remaining lemon juice. add remaining garlic mixture. Place lid on
cooker and lock. Set at high pressure for 30 minutes. Release steam. Season with black pepper
to taste and serve. Serve accompanied with buttered egg noodles. Makes 6–8 servings.
Chicken Soup
1 1/2 tablespoons olive oil
1 1/2 lbs. boneless chicken thighs, skinned
1 medium onion, chopped
2 small carrots, sliced into 1/2-inch pieces
2 medium celery stalks with leaves, cut into 1/4-inch slices
3 cups water
1 1/2 cups canned chicken broth
1/8 teaspoon poultry seasoning
1 small bay leaf
3/8 teaspoon salt, plus more to taste
1/8 teaspoon ground black pepper, plus more to taste
3/4 cup orzo
1 1/2 tablespoons chopped fresh parsley
In cooker, heat 1 tablespoon of oil over medium heat. Add chicken and brown, turning once,
about 5 minutes. Transfer chicken to plate. Add remaining oil to cooker and heat. Add onion,
carrots, and celery. Cook until vegetables begin to soften, stirring occasionally. Stir in water,
broth, poultry seasoning, bay leaf, salt and pepper. Scrape off bits that may be stuck to bottom.
Return chicken to cooker. Place lid on cooker and lock. Set to high pressure for 8 minutes.
Release steam. Remove lid and transfer chicken to cutting board. Skim any fat from cooking
liquid. At high heat, bring to boil, uncovered. Season to taste with salt and pepper. Stir in orzo
and parsley. Reduce heat to medium and cook until orzo are al dente. Cut chicken into small
pieces. Return to soup and heat through. Serve hot. Makes 6–10 servings.

14 7
Before Using Technique Pressure Cooker
• Read the following instructions and useful tips carefully before using.
• Carefully unpack the pressure cooker, and remove all packaging materials and labels,
if any, from carton.
• Wipe base with a damp cloth, and wash inner pot, glass lid and meat rack in hot,
soapy water, using a sponge. Rinse and dry thoroughly. Do not wash main housing unit
or power cord.
• All types of heat-resistant plastic, rubber or wooden cooking tools may be used with
the pressure cooker. Coated utensils are recommended to avoid scratching the unit or
it’s components.
• To ensure that the gasket fits correctly, fill inner pot 2/3 full with water, and run the unit
in the “High” pressure mode for 15 minutes. Wait until pressure goes down and open the
cooker. Remove inner pot, rinse and dry. The pressure cooker is now ready for use.
Basic Cooking Tips
• After becoming accustomed to using your Technique Pressure Cooker you may want to
experiment with your own recipes. Remember to have 1 cup of liquid for the first 15
minutes of high pressure, than add 1⁄3cup of liquid for each subsequent 15 minute interval.
• The recipe times are only a guide. If you find that desired tenderness has not
been achieved add additional cooking time of 10 minutes for meats and poultry 2–3
minutes for vegetables.
• To decrease the amount of time it takes to come to pressure always use thawed meats
and sear them, plus bring the liquid to a boil. This can cut the amount of time to come
to pressure in half. On the average using cold liquid and frozen meats the pressure cooker
will take 20–30 minutes to come to pressure.
• The keep warm cycle will last for a period of 41⁄2hours. After that time the food will keep
warm for approximately an hour.
The Control Panel
WARM/OFF
• The keep warm function holds and keeps cooked
food warm for a period of time. The pressure cooker
automatically switches to keep warm mode when
the timer reaches zero after any cooking cycle.
• One must press the off button when the warm
button is lit to cancel that function. If not,
no other function can be operated.
PRESSURE MODE
• When you press the pressure mode button the arrow indicator
will light up under low or high. To change the pressure setting press button again. When
using high pressure mode, you may set the timer from 1 minute to 2 hours. After selecting
pressure mode, set the timer in accordance to the recipe. Then press start.
• To cancel cooking cycle at any time, press the stop button.
• If you need to access the contents of the pressure cooker either let the pressure drop
naturally or use the rapid release button. DO NOT UNDER ANY CIRCUMSTANCES TRY
TO FORCE THE LID OFF UNTIL ALL STEAM AND PRESSURE HAS BEEN RELEASED.
ALWAYS OPEN THE LID WITH THE OPENING FACING AWAY FROM YOU SO THAT
ANY REMAINING STEAM MAY ESCAPE.
Cook
Mode
Start
Cooking
Cooking
Time
Pressure
Selection
Warm/Off
Digital
Display
Window
Chicken & Pasta
1/3 tablespoon olive oil
1 (2 lb.) frying chicken, cut in pieces
1 small white onion, sliced thin
1 small red bell pepper, cut into strips
1 small green bell pepper, cut into strips
4 ounces small Portobello mushrooms, cleaned, stemmed, and cut into pieces
3 garlic cloves, minced
1/3 cup dry white wine
1 (14 oz.) can diced tomatoes
2/3 tablespoon large capers, drained
1 tablespoon chopped fresh rosemary
2/3 tablespoons chopped fresh oregano
1/3 teaspoon salt
1/3 teaspoon ground black pepper
Preheat pressure cooker over medium heat and slowly add the oil. Brown a few pieces of
chicken at a time on both sides, about 8–10 minutes. Transfer browned chicken to a plate. Add
onion, peppers, mushrooms, and garlic to pressure cooker. Cook until mushrooms are soft,
stirring constantly (about 3 minutes). Add wine and cook for about a minute while stirring to
remove browned bits from bottom of cooker. Add tomatoes, capers, rosemary, oregano, salt,
and black pepper. Lock pressure cooker cover in place, and set to low pressure. Set timer for
15 minutes. Let steam escape before opening lid. Serve mixture over chicken. Serves 4.
Paella
1/3 pound bacon, chopped
3 large onions, sliced
1/3 cup olive oil
4 garlic cloves, crushed
2 1/3 cups long grain white rice
8 chicken pieces
6 1/2 cups low-sodium chicken broth
1/3 cup plus 2 tablespoons tomato paste
2/3 cup bottled clam juice
4 tablespoons fresh lemon juice
3 tablespoons sherry
1 1/3 tablespoons brown sugar
1/3 cup chopped parsley
In cooker, saute bacon until crisp. Add onions and cook for about 2 minutes. Add garlic, rice,
and chicken. Cook, stirring frequently, about 1 minute. Add broth, tomato paste, clam juice,
lemon juice, sherry, brown sugar, parsley, salt, saffron, paprika, pepper flakes, oregano, and bay
leaves. Stir well and place lid on cooker. Lock in place. Set at high pressure for 10 minutes.
Release steam. Remove lid. Add bell pepper, scallops, and shrimp to cooker. Stir well. Replace
lid and lock. Cook at pressure for 4 minutes. Release steam. Remove lid and stir mixture. Add
peas and olives and stir. Discard bay leaves. Season to taste and serve, garnished with lemon
slices. Makes 8 servings.

8
COOK MODE
• When choosing to use the cook mode you press cook mode and an arrow will light up under
each choice: low, medium and high. Press the button again until the desired cook mode is lit up.
• When using the cook mode, you do not have to have the lid on.
• During high cook made you may brown or sear meats, pop popcorn (using glass lid) even
make bread pudding also using glass lid. The high cook mode is also great for bringing
liquid to a boil which reduces the amount of time it takes for food you are cooking to come
up to pressure.
• Also after cooking a roast for example the high cook mode is great for boiling stock for
reductions or making gravy.
• To operate cook mode, press the button until the arrow indicator lights up under the desired
function. Set the timer for a specific amount of time. Then press start.
• To stop at any time during the cooking cycle, simply press off.
• The Technique Pressure Cooker will allow you to change cook modes and times during a
cooking cycle by simply pressing the desired arrow (up arrow for more time, down arrow for
less time).
COOK TIME
• Use the timer when using the cook mode or the pressure mode. Simply press the up/down
arrow buttons until the desired time lights up in the display window.
START
• After choosing desired cooking program (High pressure/low pressure, high cook mode etc.)
set the appropriate cook time, then press start to begin the cooking process.
BEFORE YOU BEGIN COOKING EACH TIME:
• For best results always wipe off excess water on the outside of the inner pot.
• Put the gasket in groove. Make sure the gasket is clean and dry with no tears.
• Always check that the pressure release valve and float valve are in good working order.
Make sure there is nothing blocking the valve opening.
• Check that the pressure regulator is free and properly seated in lid.
HOW TO USE YOUR
TECHNIQUE PRESSURE COOKER
OPERATING AS A PRESSURE COOKER:
1. Set the inner pot into the main housing unit by lining up the handles together (set the inner
pot handle protrusion into the housing handle indention).
2. Attach the power cord into the main housing unit and plug the power cord into your
household electrical outlet.
3. Load the inner pot with the ingredients you wish to cook. Take care to remove any food
debris you leave behind from the groove on the top edge of the inner pot (this could result
in a steam leak). Never load cooker above the maximum ingredient level mark. Foods that
expand while cooking (for instance legumes), should never go above the half way level of
the inner pot.
4. Place the gasket in the groove on the top edge of the inner pot. Always examine the gasket
before installing each time making sure it is in good working order and free of any cuts or tears.
5. Place the pressure lid on the inner pot by lining up the arrow on the lid with either arrow
on the handles. It doesn’t matter which direction the handle is turned to (left or right), as
long as the arrows are lined up properly. Press down firmly on the lid and turn clockwise
until you hear a click. Be sure the red “LOCK” button is showing on the pressure lid handle.
13
Minestrone Soup
5 1/4 cups low-sodium chicken broth
2 cups cabbage, chopped coarsely
28 oz. can tomatoes, drained and chopped coarsely
6 oz. green beans, cut into 1/2-inch pieces
1 large onion, chopped
2 medium carrots, diced
3 cloves garlic
1/4 teaspoon salt, plus more to taste
1/8 teaspoon dried oregano
1/8 teaspoon dried rosemary
1/4 teaspoon ground black pepper, plus more to taste
1 medium zucchini, cut into 1/2-inch pieces
1/4 cup chopped fresh basil
1/4 cup ditalini pasta, if desired
15 oz. can kidney beans, drained and rinsed
grated parmesan cheese
In cooker, put chicken broth, cabbage, tomatoes, green beans, onion, carrots, garlic, salt,
oregano, rosemary, and pepper. Place lid on cooker and lock. Set to high pressure for 8
minutes. Release steam. Remove lid and add zucchini, basil, and pasta. Cook without lid over
medium heat on stovetop until pasta is tender, about 10 minutes. Add kidney beans and cook
about 1 minute to heat through. Serve hot, sprinkled with parmesan cheese. Serves 6–8.

9
How to Use Your Technique Pressure Cooker Cont.
6. Slide the rapid release button to the closed position. Make sure the pressure regulator
is not stuck and moves about freely. The pressure regulator should be situated so that the
“tail” of the regulator is pointing to the rapid release button.
7. Setting the Pressure: Press the pressure mode button on the front panel display.
The indicator light will come on above either the low or high pressure setting. To change
between high and low pressure, just press the pressure selection button again.
8. Setting the Timer: Press the up or down arrow keys to increase or decrease the cooking
time by one minute increments, until the desired cooking time is illuminated in the
display window.
9. Starting the Cook Cycle: Press the start button. The button should glow red when the
cook cycle has been started. Note: The timer will not starting counting down until
pressure has been built. The proper pressure level is reached when the red float valve pops
up and is flush with the handle. This may take a few minutes.
WARNING: DO NOT ATTEMPT TO OPEN THE PRESSURE COOKER. if you need to open
the pressure cooker, press the stop button and slide the quick release lever down to release the
building pressure inside the cooker. Do not attempt to open the lid until all the steam has
escaped the cooker and the red float valve retreats into the handle. Turn the handle counter
clockwise. Always open the lid away from you to avoid any excess heat and steam.
OPERATING AS A SLOW COOKER:
1. Seat the inner pot into the housing by lining up the handles together (set the inner pot
handle protrusion into the housing handle indentation). Remove the gasket from the pot
and use the glass lid.
2. Attach appliance plug into housing unit and put the power plug into your household
electrical outlet.
3. Load desired ingredients into the inner pot. Never load cooker above the maximum
ingredient level line. Foods that expand while cooking (for instance legumes), should never
go above the half way level of the inner pot.
4. Press the cooking power mode button. The indicator light will come under low, medium or
high. Pressing the cooking power button again will change the cooking level.
5. Set the timer by pressing the up/down arrow keys until the desired amount of cooking time
is visible in the display window. Time setting range on the slow cook cycle: 1 minute to
8 hours. Note: To adjust the pressure or cooking time while cooking,
press “Keep warm/off
” button and reset the desired cook temperature or time.
6. Press start button to begin the cook cycle. When the cook time has elapsed on the timer, the
Technique Pressure Cooker will automatically switch over to the
“Keep Warm” mode until it is
turned off.
Cooking Power Modes
• Medium cook mode; the temperature is approximately 250–300° (high on a traditional slow cooker).
In this mode, use your favorite slow cook recipe’s for excellent results.
• High cook mode; used mostly for browning, searing, and reducing. You must remember to set the timer
in this mode. Even if you are just browning a piece of meat you should set the timer for at least 10 or
15 minutes. This will give the pressure cooker ample time to warm to temperature and then brown
meat properly. Once you have browned the meat, just press the “off” button to stop the cooker and
then you can reset it. Long term cooking in the high mode is not recommended.
12
Rice Pudding
2 2/3 cups milk, plus more as needed
1 cup medium grain rice, unrinsed
3/4 cup sugar
zest of 1/2 lemon
1/3 teaspoon salt
pinch of nutmeg
1 1/3 teaspoons vanilla extract
pinch ground cinnamon
blueberries and dried cranberries to garnish
In pressure cooker, mix 2 2/3 cups milk with rice, sugar, lemon zest, and salt. Lock lid in
place, and set to low pressure. Set timer for 11 minutes. Let steam escape. If rice isn’t tender,
place lid on cooker and let stand 8–10 minutes. Add cinnamon and nutmeg stir in. Transfer to
serving dish, if serving warm. If desired, chill pudding in refrigerator for 2 hours. Top with
blueberries and dried cranberries, or a few tablespoons milk. Makes 4–6 servings.
Split Pea Soup
1 large yellow onion, chopped
1 1/2 large carrots, peeled and chopped
2 stalks celery, chopped
1 lb. ham bone
3/4 pound dried green split peas
4 1/2 cups water
_ teaspoon ground clove
1/3 teaspoon ground black pepper
1/8 teaspoon salt
croutons, to top
Combine onions, carrots, celery, ham bone, split peas, and water in pressure cooker. Cover,
lock, and bring to high pressure. Cook for 12 minutes. Release steam. Remove ham bone from
cooker and stir in remaining ingredients well. If desired, cut any meat off bone and put in
cooker. Stir in thyme, pepper and salt. Top with croutons. Serves 6.

11
CARE AND CLEANING INSTRUCTIONS
CLEANING THE SAFETY DEVICES:
In addition to the gasket, the other safety devices on the pressure cooker must also be cleaned
after each use.
TOCLEAN:
After using, unplug unit and allow to cool completely before attempting to clean. The
Technique Pressure Cooker must be cleaned thoroughly after each use in order to avoid
staining caused by a build-up of food or grease residues.
DO NOT POUR COLD WATER INTO A HOT PRESSURE COOKER.
Note: To ensure safe operation of this pressure cooker, strictly follow the cleaning and
maintenance instructions after each use, as a tiny fragment of food (such as a grain of rice or
pea shell) allowed to remain in the unit could prevent the safety devices from operating during
subsequent use.
IMPORTANT; Always remove the pressure valve and clean the opening with pin to remove
any blockage that might have occurred during the cooking process. This must be done after
each use. Cooking pot and lid are immersible for cleaning. Rinse cooking pot and lid under
hot running water. Use only a mild liquid detergent and a soft cloth, sponge or nylon scrubber
for cleaning. Do not use abrasive powders, bicarbonate of soda or bleach. Do not use scouring
pads. The meat rack may be washed with hot, soapy water and a sponge or cloth.
WIPE BASE AFTER EACH USE WITH A SOFT, DAMP CLOTH OR SPONGE, MAKING SURE
ALL FOOD RESIDUE IS REMOVED. DO NOT IMMERSE BASE IN WATER
• Unplug and let the pressure cooker cool to room temperature before cleaning.
• Wash the removable pot with warm, soapy water and clean with a soft cloth or sponge.
Rinse off with clean water and towel dry.
• Remove the rubber gasket from the underside of the self-locking lid, Wash both with warm,
soapy water and clean with a soft cloth or sponge. Rinse off with clean water and towel dry.
• The rubber gasket must always be properly positioned on the underside of the lid.
Check periodically to make sure that it is clean, flexible and not torn. If damaged, do not
use this appliance.
• Wipe the brushed finished outer housing with a damp soft cloth or sponge (glass cleaner
gives housing a brilliant luster).
• Never use harsh chemical detergents, scouring pads or powders on any of the parts
or components.
• Always check that the pressure and float valves are in good working order and debris free.
Note: Gasket may also need replacing if pressure cooker is not used for a long period of time,
as it can harden from disuse, making it unable to form an airtight seal. Gasket must be
replaced only with another one of the correct type and size for this pressure cooker.
White Chocolate Cheesecake
1 lb cream cheese
1⁄2cup powdered sugar
3 Eggs
6 one oz. squares white chocolate-melted in the microwave till smooth
1 tablespoon vanilla
pinch salt
In mixing bowl, cream together sugar and cream cheese with an electric mixer until smooth.
Add eggs one at a time. Add vanilla, salt, and melted chocolate. Prepare a spring from pan by
putting parchment paper (or wax paper) on the bottom of pan. Wrap the spring around the
paper coated bottom. Spray the interior of the pan with non-stick cooking spray. Pour cake
mixture into prepared spring formed pan. Cover cheese cake with paper towel and wrap entire
spring form pan with aluminum foil. Place the smallest rack in the pressure cooker. Pour two
cups of water into bottom of pressure cooker. Place cake mix into springform pan in the
pressure cooker, on the rack. Put the lid securely on cooker. Set for high pressure. Set the
timer for 30 minutes.
Per Serving (excluding unknown items): 2886 calories; 230g Fat (68.9% calories from fat);
57g Protein; 176g carbohydrate; 9g Dietary Fiber; 1059mg Cholesterol; 1536mg Sodium.
Exchanges: 71⁄2Lean Meat; 42 Fat; 11 Other Carbohydrates.
RECIPES
10

Pressure Cooker Cooking Times
Meat/Poultry
•
•
•
Always cook meat or poultry with at least 1/2 cup of liquid. If the cooking time
exceeds 15 minutes, use 2 cups of liquid. Preserved or salted meats should
be covered (immerse the meat in the water).
Exact cooking times for meat and poultry vary according to the quality and
quantity of meat or poultry being cooked.
Unless indicated, the cooking times given below are for 3 pounds of meat or
poultry. Also, the denser the cut, the longer the cooking time should be.
Seafood
•
•
Cooking times may vary according to the kind of seafood being cooked.
Cook seafood on the cooking rack (also called steamer basket) with trivet on
bottom of pot, and add at least 3/4 cup of liquid. Lightly grease cooking rack
with vegetable oil when cooking fish.
Type of Meat Approximate Cooking
Minutes
Pressure
Setting
Beef/Veal, roast or brisket
Beef Meatloaf, 2 lbs.
Beef, meatballs, 1-2 lbs.
Beef, Corned
Pork, roast
Pork, ribs, 2 lbs.
Pork, ham shank
Lamb, leg of
Chicken, whole, 2-3 lbs.
Chicken, pieces, 2-3 lbs.
Cornish Hens, two
Meat/Poultry Soup/Stock High
High
High
High
High
High
High
High
High
Medium
High
High
10-15
8-10
8-10
12-15
35-40
20-25
15
40-45
50-60
5-10
10-15
35-40
Type of Seafood Approximate Cooking
Minutes
Pressure
Setting
Clams
Crabs
Lobster, 1 1/2 - 2 lbs.
Mussels
Shrimp
Fish, whole, gutted
Fish, Soup or Stock
Medium
High
Medium
Medium
Medium
Medium
2-3
2-3
2-3
5-6
5-6
1-2
2-3
Medium
11

Vegetables
•
•
•
Cook vegetables in steamer basket, using 1/2 - 2/3 cup of water (never use
more than 2/3 cup of water).
Add 1-2 additional minutes to cooking time when using frozen vegetables.
Use the quick-release (also called "cold water") release method at the end of
cooking time so vegetables will not become soggy.
Type of Vegetable Approximate Cooking
Minutes
Pressure
Setting
High
High
High
High
High
High
High
High
High
High
High
High
High
High
High
High
High
High
High
High
Asparagus, thick whole
Asparagus, thin whole
Beans, fava, shelled
Beans, green, whole
Beans, lima, shelled
Beets, small whole
Beets, large whole
Beets, 1-inch slices
Broccoli, flowerets
Brussel sprouts, whole
Carrots, 1-inch chunks
Carrots, 1/4-inch slices
Cauliflower, flowerets
Corn, on-the-cob
Escarole, coarsely chopped
Kale, coarsely chopped
Okra, small pods
Onions, whole
Potatoes, 11/2-inch chunks
Potatoes, new, small whole
Potatoes, sweet and yams,
whole, medium
Potatoes, sweet and yams,
2" chunks
Spinach, fresh, coarsely
chopped
Squash, acorn, halved
Squash, butternut, 1-inch
chunks
Squash, summer, zucchini
or yellow, 1/2-inch slices
Turnips, small quartered
Turnips, 1 1/2 inch chunks
High
High
High
High
High
High
High
High
1-2
1 -1 1/2
4
2-3
2
1-2
20
4
2
4
4
1
2-3
3
1-2
1-2
2-3
2
6
5
10-11
6-7
2
7
4
2
3
3
12

Type of Grain Approximate Cooking
Minutes
Pressure
Setting
High
High
High
High
High
High
Grains
Before cooking, soak grains, such as wheat berries and pearl barley, in four
times their volume of lukewarm water for at least four hours before cooking, or
overnight. Do not add salt to water since it will toughen the grains and inhibit
hydration.
Do not soak rice.
Rinse under lukewarm water (this also applies to rice)
Cook each cup of grain in the amount of water specified.
•
•
•
High
Barley, pearl 3 cups
Rice, basmati 1 1/2 cups
Rice, converted 1 1/2 cups
Rice, long grain 1 1/2 cups
Rice, brown 1 1/2 cups
Rice, wild 3 cups
Wheat, berries 3 cups 15
22-25
15-20
5-7
5-7
5-7
15-20
13

10
CARE AND CLEANING INSTRUCTIONS
CLEANING THE SAFETY DEVICES:
In addition to the gasket, the other safety devices on the pressure cooker must also be cleaned
after each use.
TOCLEAN:
After using, unplug unit and allow to cool completely before attempting to clean. The
Technique Pressure Cooker must be cleaned thoroughly after each use in order to avoid
staining caused by a build-up of food or grease residues.
DO NOT POUR COLD WATER INTO A HOT PRESSURE COOKER.
Note: To ensure safe operation of this pressure cooker, strictly follow the cleaning and
maintenance instructions after each use, as a tiny fragment of food (such as a grain of rice or
pea shell) allowed to remain in the unit could prevent the safety devices from operating during
subsequent use.
IMPORTANT; Always remove the pressure valve and clean the opening with pin to remove
any blockage that might have occurred during the cooking process. This must be done after
each use. Cooking pot and lid are immersible for cleaning. Rinse cooking pot and lid under
hot running water. Use only a mild liquid detergent and a soft cloth, sponge or nylon scrubber
for cleaning. Do not use abrasive powders, bicarbonate of soda or bleach. Do not use scouring
pads. The meat rack may be washed with hot, soapy water and a sponge or cloth.
WIPE BASE AFTER EACH USE WITH A SOFT, DAMP CLOTH OR SPONGE, MAKING SURE
ALL FOOD RESIDUE IS REMOVED. DO NOT IMMERSE BASE IN WATER
• Unplug and let the pressure cooker cool to room temperature before cleaning.
• Wash the removable pot with warm, soapy water and clean with a soft cloth or sponge.
Rinse off with clean water and towel dry.
• Remove the rubber gasket from the underside of the self-locking lid, Wash both with warm,
soapy water and clean with a soft cloth or sponge. Rinse off with clean water and towel dry.
• The rubber gasket must always be properly positioned on the underside of the lid.
Check periodically to make sure that it is clean, flexible and not torn. If damaged, do not
use this appliance.
• Wipe the brushed finished outer housing with a damp soft cloth or sponge (glass cleaner
gives housing a brilliant luster).
• Never use harsh chemical detergents, scouring pads or powders on any of the parts
or components.
• Always check that the pressure and float valves are in good working order and debris free.
Note: Gasket may also need replacing if pressure cooker is not used for a long period of time,
as it can harden from disuse, making it unable to form an airtight seal. Gasket must be
replaced only with another one of the correct type and size for this pressure cooker.
White Chocolate Cheesecake
1 lb cream cheese
1⁄2cup powdered sugar
3 Eggs
6 one oz. squares white chocolate-melted in the microwave till smooth
1 tablespoon vanilla
pinch salt
In mixing bowl, cream together sugar and cream cheese with an electric mixer until smooth.
Add eggs one at a time. Add vanilla, salt, and melted chocolate. Prepare a spring from pan by
putting parchment paper (or wax paper) on the bottom of pan. Wrap the spring around the
paper coated bottom. Spray the interior of the pan with non-stick cooking spray. Pour cake
mixture into prepared spring formed pan. Cover cheese cake with paper towel and wrap entire
spring form pan with aluminum foil. Place the smallest rack in the pressure cooker. Pour two
cups of water into bottom of pressure cooker. Place cake mix into springform pan in the
pressure cooker, on the rack. Put the lid securely on cooker. Set for high pressure. Set the
timer for 30 minutes.
Per Serving (excluding unknown items): 2886 calories; 230g Fat (68.9% calories from fat);
57g Protein; 176g carbohydrate; 9g Dietary Fiber; 1059mg Cholesterol; 1536mg Sodium.
Exchanges: 71⁄2Lean Meat; 42 Fat; 11 Other Carbohydrates.
RECIPES
14

9
How to Use Your Technique Pressure Cooker Cont.
6. Slide the rapid release button to the closed position. Make sure the pressure regulator
is not stuck and moves about freely. The pressure regulator should be situated so that the
“tail” of the regulator is pointing to the rapid release button.
7. Setting the Pressure: Press the pressure mode button on the front panel display.
The indicator light will come on above either the low or high pressure setting. To change
between high and low pressure, just press the pressure selection button again.
8. Setting the Timer: Press the up or down arrow keys to increase or decrease the cooking
time by one minute increments, until the desired cooking time is illuminated in the
display window.
9. Starting the Cook Cycle: Press the start button. The button should glow red when the
cook cycle has been started. Note: The timer will not starting counting down until
pressure has been built. The proper pressure level is reached when the red float valve pops
up and is flush with the handle. This may take a few minutes.
WARNING: DO NOT ATTEMPT TO OPEN THE PRESSURE COOKER. if you need to open
the pressure cooker, press the stop button and slide the quick release lever down to release the
building pressure inside the cooker. Do not attempt to open the lid until all the steam has
escaped the cooker and the red float valve retreats into the handle. Turn the handle counter
clockwise. Always open the lid away from you to avoid any excess heat and steam.
OPERATING AS A SLOW COOKER:
1. Seat the inner pot into the housing by lining up the handles together (set the inner pot
handle protrusion into the housing handle indentation). Remove the gasket from the pot
and use the glass lid.
2. Attach appliance plug into housing unit and put the power plug into your household
electrical outlet.
3. Load desired ingredients into the inner pot. Never load cooker above the maximum
ingredient level line. Foods that expand while cooking (for instance legumes), should never
go above the half way level of the inner pot.
4. Press the cooking power mode button. The indicator light will come under low, medium or
high. Pressing the cooking power button again will change the cooking level.
5. Set the timer by pressing the up/down arrow keys until the desired amount of cooking time
is visible in the display window. Time setting range on the slow cook cycle: 1 minute to
8 hours. Note: To adjust the pressure or cooking time while cooking,
press “Keep warm/off
” button and reset the desired cook temperature or time.
6. Press start button to begin the cook cycle. When the cook time has elapsed on the timer, the
Technique Pressure Cooker will automatically switch over to the
“Keep Warm” mode until it is
turned off.
Cooking Power Modes
• Medium cook mode; the temperature is approximately 250–300° (high on a traditional slow cooker).
In this mode, use your favorite slow cook recipe’s for excellent results.
• High cook mode; used mostly for browning, searing, and reducing. You must remember to set the timer
in this mode. Even if you are just browning a piece of meat you should set the timer for at least 10 or
15 minutes. This will give the pressure cooker ample time to warm to temperature and then brown
meat properly. Once you have browned the meat, just press the “off” button to stop the cooker and
then you can reset it. Long term cooking in the high mode is not recommended.
Rice Pudding
2 2/3 cups milk, plus more as needed
1 cup medium grain rice, unrinsed
3/4 cup sugar
zest of 1/2 lemon
1/3 teaspoon salt
pinch of nutmeg
1 1/3 teaspoons vanilla extract
pinch ground cinnamon
blueberries and dried cranberries to garnish
In pressure cooker, mix 2 2/3 cups milk with rice, sugar, lemon zest, and salt. Lock lid in
place, and set to low pressure. Set timer for 11 minutes. Let steam escape. If rice isn’t tender,
place lid on cooker and let stand 8–10 minutes. Add cinnamon and nutmeg stir in. Transfer to
serving dish, if serving warm. If desired, chill pudding in refrigerator for 2 hours. Top with
blueberries and dried cranberries, or a few tablespoons milk. Makes 4–6 servings.
Split Pea Soup
1 large yellow onion, chopped
1 1/2 large carrots, peeled and chopped
2 stalks celery, chopped
1 lb. ham bone
3/4 pound dried green split peas
4 1/2 cups water
_ teaspoon ground clove
1/3 teaspoon ground black pepper
1/8 teaspoon salt
croutons, to top
Combine onions, carrots, celery, ham bone, split peas, and water in pressure cooker. Cover,
lock, and bring to high pressure. Cook for 12 minutes. Release steam. Remove ham bone from
cooker and stir in remaining ingredients well. If desired, cut any meat off bone and put in
cooker. Stir in thyme, pepper and salt. Top with croutons. Serves 6.
15

8
COOK MODE
• When choosing to use the cook mode you press cook mode and an arrow will light up under
each choice: low, medium and high. Press the button again until the desired cook mode is lit up.
• When using the cook mode, you do not have to have the lid on.
• During high cook made you may brown or sear meats, pop popcorn (using glass lid) even
make bread pudding also using glass lid. The high cook mode is also great for bringing
liquid to a boil which reduces the amount of time it takes for food you are cooking to come
up to pressure.
• Also after cooking a roast for example the high cook mode is great for boiling stock for
reductions or making gravy.
• To operate cook mode, press the button until the arrow indicator lights up under the desired
function. Set the timer for a specific amount of time. Then press start.
• To stop at any time during the cooking cycle, simply press off.
• The Technique Pressure Cooker will allow you to change cook modes and times during a
cooking cycle by simply pressing the desired arrow (up arrow for more time, down arrow for
less time).
COOK TIME
• Use the timer when using the cook mode or the pressure mode. Simply press the up/down
arrow buttons until the desired time lights up in the display window.
START
• After choosing desired cooking program (High pressure/low pressure, high cook mode etc.)
set the appropriate cook time, then press start to begin the cooking process.
BEFORE YOU BEGIN COOKING EACH TIME:
• For best results always wipe off excess water on the outside of the inner pot.
• Put the gasket in groove. Make sure the gasket is clean and dry with no tears.
• Always check that the pressure release valve and float valve are in good working order.
Make sure there is nothing blocking the valve opening.
• Check that the pressure regulator is free and properly seated in lid.
HOW TO USE YOUR
TECHNIQUE PRESSURE COOKER
OPERATING AS A PRESSURE COOKER:
1. Set the inner pot into the main housing unit by lining up the handles together (set the inner
pot handle protrusion into the housing handle indention).
2. Attach the power cord into the main housing unit and plug the power cord into your
household electrical outlet.
3. Load the inner pot with the ingredients you wish to cook. Take care to remove any food
debris you leave behind from the groove on the top edge of the inner pot (this could result
in a steam leak). Never load cooker above the maximum ingredient level mark. Foods that
expand while cooking (for instance legumes), should never go above the half way level of
the inner pot.
4. Place the gasket in the groove on the top edge of the inner pot. Always examine the gasket
before installing each time making sure it is in good working order and free of any cuts or tears.
5. Place the pressure lid on the inner pot by lining up the arrow on the lid with either arrow
on the handles. It doesn’t matter which direction the handle is turned to (left or right), as
long as the arrows are lined up properly. Press down firmly on the lid and turn clockwise
until you hear a click. Be sure the red “LOCK” button is showing on the pressure lid handle.
Minestrone Soup
5 1/4 cups low-sodium chicken broth
2 cups cabbage, chopped coarsely
28 oz. can tomatoes, drained and chopped coarsely
6 oz. green beans, cut into 1/2-inch pieces
1 large onion, chopped
2 medium carrots, diced
3 cloves garlic
1/4 teaspoon salt, plus more to taste
1/8 teaspoon dried oregano
1/8 teaspoon dried rosemary
1/4 teaspoon ground black pepper, plus more to taste
1 medium zucchini, cut into 1/2-inch pieces
1/4 cup chopped fresh basil
1/4 cup ditalini pasta, if desired
15 oz. can kidney beans, drained and rinsed
grated parmesan cheese
In cooker, put chicken broth, cabbage, tomatoes, green beans, onion, carrots, garlic, salt,
oregano, rosemary, and pepper. Place lid on cooker and lock. Set to high pressure for 8
minutes. Release steam. Remove lid and add zucchini, basil, and pasta. Cook without lid over
medium heat on stovetop until pasta is tender, about 10 minutes. Add kidney beans and cook
about 1 minute to heat through. Serve hot, sprinkled with parmesan cheese. Serves 6–8.
16

7
Before Using Technique Pressure Cooker
• Read the following instructions and useful tips carefully before using.
• Carefully unpack the pressure cooker, and remove all packaging materials and labels,
if any, from carton.
• Wipe base with a damp cloth, and wash inner pot, glass lid and meat rack in hot,
soapy water, using a sponge. Rinse and dry thoroughly. Do not wash main housing unit
or power cord.
• All types of heat-resistant plastic, rubber or wooden cooking tools may be used with
the pressure cooker. Coated utensils are recommended to avoid scratching the unit or
it’s components.
• To ensure that the gasket fits correctly, fill inner pot 2/3 full with water, and run the unit
in the “High” pressure mode for 15 minutes. Wait until pressure goes down and open the
cooker. Remove inner pot, rinse and dry. The pressure cooker is now ready for use.
Basic Cooking Tips
• After becoming accustomed to using your Technique Pressure Cooker you may want to
experiment with your own recipes. Remember to have 1 cup of liquid for the first 15
minutes of high pressure, than add 1⁄3cup of liquid for each subsequent 15 minute interval.
• The recipe times are only a guide. If you find that desired tenderness has not
been achieved add additional cooking time of 10 minutes for meats and poultry 2–3
minutes for vegetables.
• To decrease the amount of time it takes to come to pressure always use thawed meats
and sear them, plus bring the liquid to a boil. This can cut the amount of time to come
to pressure in half. On the average using cold liquid and frozen meats the pressure cooker
will take 20–30 minutes to come to pressure.
• The keep warm cycle will last for a period of 41⁄2hours. After that time the food will keep
warm for approximately an hour.
The Control Panel
WARM/OFF
• The keep warm function holds and keeps cooked
food warm for a period of time. The pressure cooker
automatically switches to keep warm mode when
the timer reaches zero after any cooking cycle.
• One must press the off button when the warm
button is lit to cancel that function. If not,
no other function can be operated.
PRESSURE MODE
• When you press the pressure mode button the arrow indicator
will light up under low or high. To change the pressure setting press button again. When
using high pressure mode, you may set the timer from 1 minute to 2 hours. After selecting
pressure mode, set the timer in accordance to the recipe. Then press start.
• To cancel cooking cycle at any time, press the stop button.
• If you need to access the contents of the pressure cooker either let the pressure drop
naturally or use the rapid release button. DO NOT UNDER ANY CIRCUMSTANCES TRY
TO FORCE THE LID OFF UNTIL ALL STEAM AND PRESSURE HAS BEEN RELEASED.
ALWAYS OPEN THE LID WITH THE OPENING FACING AWAY FROM YOU SO THAT
ANY REMAINING STEAM MAY ESCAPE.
Cook
Mode
Start
Cooking
Cooking
Time
Pressure
Selection
Warm/Off
Digital
Display
Window
Chicken & Pasta
1/3 tablespoon olive oil
1 (2 lb.) frying chicken, cut in pieces
1 small white onion, sliced thin
1 small red bell pepper, cut into strips
1 small green bell pepper, cut into strips
4 ounces small Portobello mushrooms, cleaned, stemmed, and cut into pieces
3 garlic cloves, minced
1/3 cup dry white wine
1 (14 oz.) can diced tomatoes
2/3 tablespoon large capers, drained
1 tablespoon chopped fresh rosemary
2/3 tablespoons chopped fresh oregano
1/3 teaspoon salt
1/3 teaspoon ground black pepper
Preheat pressure cooker over medium heat and slowly add the oil. Brown a few pieces of
chicken at a time on both sides, about 8–10 minutes. Transfer browned chicken to a plate. Add
onion, peppers, mushrooms, and garlic to pressure cooker. Cook until mushrooms are soft,
stirring constantly (about 3 minutes). Add wine and cook for about a minute while stirring to
remove browned bits from bottom of cooker. Add tomatoes, capers, rosemary, oregano, salt,
and black pepper. Lock pressure cooker cover in place, and set to low pressure. Set timer for
15 minutes. Let steam escape before opening lid. Serve mixture over chicken. Serves 4.
Paella
1/3 pound bacon, chopped
3 large onions, sliced
1/3 cup olive oil
4 garlic cloves, crushed
2 1/3 cups long grain white rice
8 chicken pieces
6 1/2 cups low-sodium chicken broth
1/3 cup plus 2 tablespoons tomato paste
2/3 cup bottled clam juice
4 tablespoons fresh lemon juice
3 tablespoons sherry
1 1/3 tablespoons brown sugar
1/3 cup chopped parsley
In cooker, saute bacon until crisp. Add onions and cook for about 2 minutes. Add garlic, rice,
and chicken. Cook, stirring frequently, about 1 minute. Add broth, tomato paste, clam juice,
lemon juice, sherry, brown sugar, parsley, salt, saffron, paprika, pepper flakes, oregano, and bay
leaves. Stir well and place lid on cooker. Lock in place. Set at high pressure for 10 minutes.
Release steam. Remove lid. Add bell pepper, scallops, and shrimp to cooker. Stir well. Replace
lid and lock. Cook at pressure for 4 minutes. Release steam. Remove lid and stir mixture. Add
peas and olives and stir. Discard bay leaves. Season to taste and serve, garnished with lemon
slices. Makes 8 servings.
17

6
This appliance is for household use only and may be plugged into any standard 3-prong
grounded electrical outlet (ordinary household current). Do not use any other electrical outlet.
Note: This product must be grounded. If it should malfunction or break down, grounding
provides a path of least resistance for electric current to reduce the risk of electric shock.
This product is equipped with a cord having an equipment grounding conductor and a
grounding plug. The plug must be plugged into an appropriate outlet that is properly installed
and grounded in accordance with all local codes and ordinances.
WARNING: Improper connection of the equipment grounding conductor can result in a risk of
electric shock. Check with a qualified electrician or serviceman if you are in doubt as to whether
the product is properly grounded. Do not modify the power plug provided with the product -
if it will not fit the outlet, have a proper outlet installed by a qualified electrician. A short power-
supply cord is provided to reduce the hazards resulting from becoming entangled in or tripping
over a longer cord. Longer cord sets or extension cords are available and may be used if care is
exercised in their use. If a long cord set or extension is used, the marked electrical rating of the
cord set or extension cord should be at least as great as the electrical rating of the appliance. If
the appliance is of the grounded type, the extension cord should be of the grounding type three-
wire cord, and the longer cord should be arranged so that it will not hang over the countertop or
tabletop where it can be pulled on by children or tripped over accidentally.
POWER CORD SAFETY TIPS
1. To insert power cord, grasp it firmly with dry hands only and press it into outlet.
2. To disconnect appliance, grasp power cord with dry hands only and remove it from outlet.
Do not pull or yank on the power cord or appliance.
3. Before each use, inspect the power cord for cuts or marks. If any are found, this indicates
that the appliance should be serviced and the power cord replaced. DO NOT OPERATE
APPLIANCE IF THE POWER CORD SHOWS ANY DAMAGE. HAVE A QUALIFIED
APPLIANCE REPAIR PERSON CHECK AND REPAIR BEFORE USING.
• Use power cord only in standard 3-prong grounded outlets
• Always attach plug to appliance first, then plug cord into the wall outlet.
To disconnect turn all controls to “off”, then remove plug from wall outlet.
• Do not use the gasket when cooking with the glass lid.
• Do not operate any appliance with a damaged cord or plug or after the appliance
malfunctions, or has been damaged in any manner. Have a qualified appliance repair person
check and repair unit before using it.
• Do not unplug by pulling or tugging on the cord. Grasp the plug with dry hands to
remove the plug from the outlet.
• Extreme caution must be used when moving the pressure cooker.
• Do not place pressure cooker main housing unit on or near a hot gas or electric burner,
or in a heated oven.
• Do not let cord hang over edge of table or counter, or touch hot surfaces.
• Do not use outdoors.
• The use of accessory attachments not recommended by the appliance manufacturer may
cause hazards.
• Do not touch hot surfaces. Use handles or knobs.
• Do not use abrasive cleaners or materials to clean this product. This could cause scratching
and damage to the finish.
• Use only wood, plastic or coated utensils with your pressure cooker.
• Always remove power cord if malfunction is detected.
• Do not use appliance for other than intended use.
• This product is intended for household use.
• Always keep all these instructions in mind.
• Close supervision is necessary when any appliance is used by or near children.
• When using electrical appliances, basic safety precautions should always be followed.
Whole Lemon-Garlic Chicken
3-lb. chicken
1 teaspoon granulated garlic
1 teaspoon granulated onion
1 tablespoon dried thyme
1 tablespoon dried rosemary
1 tablespoon paprika
juice of 1 lemon
2 tablespoons olive oil
2 cups chicken broth
ground black pepper to taste
cooked egg noodles, buttered and parsleyed
In bowl, combine garlic, onion, thyme, rosemary, and paprika. Rub half of mixture inside
chicken. Rub inside with 1 tbsp. lemon juice. In cooker, heat oil. Add chicken and brown on
all sides. Pour in broth and remaining lemon juice. add remaining garlic mixture. Place lid on
cooker and lock. Set at high pressure for 30 minutes. Release steam. Season with black pepper
to taste and serve. Serve accompanied with buttered egg noodles. Makes 6–8 servings.
Chicken Soup
1 1/2 tablespoons olive oil
1 1/2 lbs. boneless chicken thighs, skinned
1 medium onion, chopped
2 small carrots, sliced into 1/2-inch pieces
2 medium celery stalks with leaves, cut into 1/4-inch slices
3 cups water
1 1/2 cups canned chicken broth
1/8 teaspoon poultry seasoning
1 small bay leaf
3/8 teaspoon salt, plus more to taste
1/8 teaspoon ground black pepper, plus more to taste
3/4 cup orzo
1 1/2 tablespoons chopped fresh parsley
In cooker, heat 1 tablespoon of oil over medium heat. Add chicken and brown, turning once,
about 5 minutes. Transfer chicken to plate. Add remaining oil to cooker and heat. Add onion,
carrots, and celery. Cook until vegetables begin to soften, stirring occasionally. Stir in water,
broth, poultry seasoning, bay leaf, salt and pepper. Scrape off bits that may be stuck to bottom.
Return chicken to cooker. Place lid on cooker and lock. Set to high pressure for 8 minutes.
Release steam. Remove lid and transfer chicken to cutting board. Skim any fat from cooking
liquid. At high heat, bring to boil, uncovered. Season to taste with salt and pepper. Stir in orzo
and parsley. Reduce heat to medium and cook until orzo are al dente. Cut chicken into small
pieces. Return to soup and heat through. Serve hot. Makes 6–10 servings.
18

5
• This appliance cooks under pressure. Improper use may result in scalding injury.
Make certain unit is properly closed before operating.
• ALWAYS USE INNER POT WHEN OPERATING THIS COOKER. NEVER PUT FOOD OR
LIQUID IN THE MAIN HOUSING.
• NEVER PUT ANYTHING BUT THE INNER POT IN THE MAIN HOUSING UNIT.
• NEVER ATTEMPT TO OPEN THE PRESSURE COOKER. If you need to open the pressure
cooker, press the stop button and slide the quick release lever down to release the building
pressure inside the cooker. Do not attempt to open the lid until all the steam has escaped the
cooker and the red float valve retreats into the handle. Turn the handle counter clockwise.
Always open the lid away from you to avoid any excess heat and steam.
• DO NOT UNDER ANY CIRCUMSTANCES TRY TO FORCE THE LID OFF UNTIL ALL
STEAM AND PRESSURE HAS BEEN RELEASED. ALWAYS OPEN THE LID WITH THE
OPENING FACING AWAY FROM YOU SO THAT ANY REMAINING STEAM MAY ESCAPE.
• DO NOT POUR COLD WATER INTO A HOT PRESSURE COOKER.
• The gasket must always be in place when using.
• Never operate the pressure cooker under pressure without any liquid inside the inner pot.
• Always make sure the red float valve is down before opening. Do not open the pressure cooker
until the pressure has been reduced and the floating piece drops.
• Always make sure to release all pressure from the pot with the rapid release button or naturally
before opening the lid.
• Always check pressure valve and vent nozzle for clogging before use.
• To avoid injury, do not touch heating element inside main housing unit at any time.
• Unplug from outlet when not in use and before cleaning. Allow to cool before putting on
or taking off parts.
• To protect against electrical hazards do not immerse cord, power plugs or main housing
unit in water or any other liquid.
• If your pressure cooker is dropped, damaged in any way or dropped into water, have a qualified
appliance repair person check and repair it before using.
• Do not overfill unit. Special care should be taken for dried vegetables, beans etc. which expand
during cooking. Refer to “How To Use Your Technique Pressure Cooker” section.
• Never fill above the maximum line. When cooking legumes like black beans never let liquid
and beans come up above halfway.
• During operation inner pot gets extremely hot. To remove inner pot from the main housing
unit grasp inner pot by the handles only using PROTECTIVE cooking mitt. Do not touch
surface with hands or body parts to avoid burning, scalding or injury.
• Regularly clean all safety valves and pressure regulators.
• Always remove pressure valve after each use and clean with pin to remove any debris that may
have become lodged in the valve during the cooking process.
•Check gasket for cleanliness—make sure there are no tears.
• Extreme caution must be used when moving an appliance containing hot liquids.
IMPORTANT SAFEGUARDS
READ ALL INSTRUCTIONS & SAFETY INFORMATION CAREFULLY BEFORE USING YOUR PRESSURE COOKER
Beef Stew
2 1/2 tablespoons olive oil, plus more if needed
2 pounds beef chuck, cubed
1/2 teaspoon salt
1/4 teaspoon ground black pepper
1 medium onion, chopped
2 garlic cloves, minced
1 shallot, minced
1/2 cup beef stock
1 can crushed tomatoes
1/2 teaspoon parsley
5 medium carrots, sliced
5 medium red-skinned potatoes, scrubbed and cubed
1 cup sweet peas
In pressure cooker, heat 1 tablespoon oil over high heat. In batches, add beef to brown,
turning occasionally (about 4 minutes). Add more oil as needed. Transfer beef to plate and
season with salt and pepper. Pour off fat in cooker. Add remaining oil to cooker and heat over
medium heat. Add onion, shallot and garlic. Cook until onion begins to soften, stirring
occasionally (about 2 minutes). Stir in beef stock, tomatoes, and parsley. Return the beef and
juices on plate to cooker. Place lid on cooker and lock. Set at high pressure for 20 minutes.
Release steam. Open lid and let stand for 5–7 minutes. Skim off any fat from liquid. Add
carrots, potatoes, and peas. Replace lid and lock in place. Set a high pressure for 5 minutes.
Release steam. Remove lid Serve with toast points or crust rolls Makes 6–8 servings.
Butternut Squash Soup
2 lbs. butternut squash, quartered and seeded
3 tablespoons olive oil
4 cloves garlic, coarsely chopped
1 large yellow onion, finely chopped
1 carrot, chopped
2 apples, peeled and seeded
1 tablespoon chopped fresh sage
1 teaspoon salt
1/8 cup brown sugar
4 cups chicken stock
1 cup heavy cream
pinch ground nutmeg, to top
Place squash, cut side down, on rack in pressure cooker. Pour in 1 cup chicken stock. Place lid
on cooker and lock. Set for high pressure for 7 minutes. Let sit for 3 minutes to finish cooking.
Release steam. Transfer squash to plate. When cooker is cool enough to handle, rinse and dry.
Heat oil in cooker. Add garlic, onion, apples and sage, cooking about 6 minutes while stirring
occasionally. Scrape squash meat off skin. Chop squash meat and add to garlic, apples and
onion mixture. Add salt and stock. Lock lid in place and set for high pressure for 10 minutes.
Let sit another 10 minutes to finish cooking, add heavy cream and brown sugar. Serves 4.
19

4
PARTS & ASSEMBLY
PRESSURE COOKING ASSEMBLY
Inner Pot
Inner
Pot
Tabs
Pressure Lid
Pressure
Lid
Locking
Tabs
Red Float
Valve
Cleaning
Pin
Rapid Release
Button
Pressure
Valve
Power Cord Control Panel
Gasket
Gasket
Main Housing Unit
Main Housing
Unit
Red
“Lock”
Button
Cook
Mode
Start
Cooking
Cooking
Time
Pressure
Selection
Warm/Off
Digital
Display
Window
ACCESSORIES
Corned Beef and Cabbage
4-lb. corned beef brisket with pickling spice packet
2 2/3 cups water
1/8 cup red wine vinegar
2 medium onions, peeled and chopped
5 medium red-skinned potatoes, scrubbed
5 medium carrots, cut in half lengthwise
1 medium head green cabbage, cut into wedges
Rinse corned beef and do NOT trim excess fat. Tie pickling spices in double thickness of
cheesecloth. Place rack in pressure cooker. Add water, vinegar, onions, garlic, and pickling
packet. Place corned beef in pot. Place lid on cooker and lock. Set at high pressure for 1 hour
and 10 minutes. Release steam. Remove lid and transfer meat to platter. Transfer onions to
large bowl. Cover both with aluminum foil. Place potatoes and carrots in pot with cooking
liquid. Place cabbage on top, submerging if possible. Place lid on cooker and lock. Set at high
pressure for 6 minutes. Release steam. Remove lid and transfer vegetables to bowl with onions.
Slice beef across grain and serve with vegetables. Makes 6–8 servings.
Beef Pot Roast
1 1/3 tablespoons olive oil
4-lb. rump roast, trimmed leaving some fat on
2 cloves garlic minced
1/3 teaspoon salt, plus more to taste
1/3 teaspoon ground black pepper, plus more to taste
1 large onion, chopped
2 bay leaves
1/4 cup red wine
2 2/3 cups canned beef broth
2 2/3 tablespoons unsalted butter, room temperature
2 2/3 tablespoons all-purpose flour
In cooker, heat oil over medium heat. Season meat with salt and pepper. Put meat in cooker,
fattier side down. Cook, tuning occasionally, until fully browned. Transfer roast to plate. Pour
off all but 1 tablespoon of fat from cooker. Add onion, garlic and cook until softened. Add bay
leaves. Pour in stock, red wine and loosen any bits that may be stuck on bottom of cooker.
Return meat to cooker. Place lid on cooker and lock. Set cooker to high pressure and cook for
1 hour 10 minutes. Release steam. Remove lid and transfer meat to serving platter. Cover meat
loosely with aluminum foil to keep warm. Remove bay leaves from liquid and let liquid stand
for 5 minutes. Skim fat from liquid. In separate bowl, work butter and flour together until
smooth. Whisk 1 cup of cooking liquid into butter/flour mixture to form thin paste. Bring
skimmed cooking liquid to boil over medium heat. Whisk in thin paste and cook until
thickens into gravy. Season with salt and pepper if desired. Slice meat and pour some gravy
over top of roast. Serve with mashed potatoes and gravy on side. Serves 6.
Spoon
Glass Lid
Metal
Rack
Small Gasket
(3)
20
Table of contents
Other Cook's essentials Electric Pressure Cooker manuals

Cook's essentials
Cook's essentials K41143/EPC-678 User manual

Cook's essentials
Cook's essentials K44020 User manual

Cook's essentials
Cook's essentials K41143 User manual

Cook's essentials
Cook's essentials K42027 User manual

Cook's essentials
Cook's essentials 99725 Owner's manual

Cook's essentials
Cook's essentials EPC460 User manual

Cook's essentials
Cook's essentials CEPC800 User manual

Cook's essentials
Cook's essentials 99731 Assembly instructions

Cook's essentials
Cook's essentials 99602 Owner's manual

Cook's essentials
Cook's essentials 99731 User manual