Cook's essentials CEPC800 User manual

WARM BROWN
STEAM HIGH
LOW
COOK
MODE
COOK
TIME DELAY
TIME
STOP
START
PROGRAMMABLE
PRESSURE
COOKER
PRESSURE
MODE
UNLOCK
LOCK
8-QUART OVAL
STAINLESS STEEL
PROGRAMMABLE
PRESSURE COOKER
MODEL CEPC800
OWNER’S MANUAL
®
COOK’S ESSENTIALS
®
WARRANTY
This Cook’s Essentials®product warranty extends to the original consumer purchaser of
the product.
Warranty on Coating: This Cook's Essentials®product features DuPont®SilverStone®
Select with ScratchGuard™. This superior, non-stick coating is guaranteed to be free
from defects in materials and workmanship for as long as you own this product. Under
normal household use, it will never chip, crack, or peel.
Warranty Duration: All materials and workmanship, other than the non-stick coating, are
warranted to the original consumer purchaser for a period of one (1) year from the origi-
nal purchase date.
Warranty Coverage: This product is warranted against defective materials or workman-
ship. This warranty is void if the product has been damaged by accident, in shipment,
unreasonable use, misuse, neglect, improper service, commercial use, repairs by unau-
thorized personnel or other causes not arising out of defects in materials or workman-
ship. This warranty is effective only if the product is purchased and operated in the USA,
and does not extend to any units which have been used in violation of written instruc-
tions furnished by Cook’s Essentials®, or to units which have been altered or modified or
to damage to products or parts thereof which have had the serial number removed,
altered, defaced or rendered illegible.
Warranty Disclaimers: This warranty is in lieu of all warranties expressed or implied and
no representative or person is authorized to assume for Cook’s Essentials®any other lia-
bility in connection with the sale of our products. There shall be no claims for defects or
failure of performance or product failure under any theory of tort, contract or commer-
cial law including, but not limited to, negligence, gross negligence, strict liability, breach
of warranty and breach of contract.
Warranty Performance: During the above one-year warranty period, a product with a
defect will be either repaired or replaced with a reconditioned comparable model (at
Cook’s Essentials®option). Contact Consumer Service for return authorization. The
repaired or replacement product will be in warranty for the balance of the one-year war-
ranty period and an additional one-month period. No charge will be made for such repair
or replacement. Service and Repair
Should the appliance malfunction, you should first call toll-free 1-800-233-9054 between
the hours of 8:00 am and 5:00 pm Central Standard Time and ask for
CONSUMER SERVICE
stating that you are a consumer with a problem. Please refer to Model #CEPC800 when
you call. To contact Consumer Service by mail, write to:
ATTN: Repair Department
550 Business Center Drive
Mt. Prospect, Illinois 60056
In-Warranty Service: For an appliance covered under the warranty period, no charge is
made for service or postage. Please call for return authorization.
Out-of-Warranty Service: A flat rate charge by model is made for Out-of-Warranty
service. Please include $10.00 (U.S.) for return shipping and handling.
Cook’s Essentials®cannot assume responsibility for loss or damage during incoming ship-
ment. For your protection, carefully package the product for shipment and insure it with
the carrier. Be sure to enclose the following items with your appliance: any accessories
related to your problem, your full name and return address and daytime phone number, a
note describing the problem you experienced, a copy of your sales receipt or other proof
of purchase to determine warranty status. C.O.D. shipments cannot be accepted.
®is a trademark of QVC, Inc.
© 2001 Printed in China 2/01 P/N 60658

When using electrical appliances, basic safety precautions should always be
followed including the following:
1. Read all instructions before using appliance.
2. Do not touch hot surfaces. Use handles or knobs.
3. To protect against fire, electrical shock, and injury to persons, do not
immerse Cord, Plug or Pressure Cooker Housing in water or other liquid.
4. Close supervision is necessary when any appliance is used near children.
This appliance is not for use by children.
5. Unplug appliance from outlet when not in use and before cleaning. Allow
to cool before putting on or taking off parts, and before cleaning the appli-
ance.
6. Do not operate any appliance with a damaged cord or plug or after the
appliance malfunctions, or has been dropped or damaged in any manner.
Contact Consumer Service.
7. The use of accessory attachments not recommended by the appliance
manufacturer may result in fire, electric shock, or injury to persons.
8. Do not use outdoors.
9. Do not let cord hang over edge of table or counter, or touch hot surfaces.
10. Do not place on or near a hot gas or electric burner, or in a heated oven.
11. To disconnect, press the START/STOP Button until the Red STOP Light
illuminates and the Pressure Cooker beeps. Then remove plug from wall
outlet
12. Do not use appliance for other than intended use.
13. Extreme caution must be used when moving an appliance containing hot
oil or other hot liquids.
14. Oversized foods, metal foil packages, or utensils must not be inserted in
the appliance, as they may involve a risk of fire or electric shock.
15. A fire may occur if the appliance is covered or touching flammable materi-
al, including curtains, draperies, walls, and the like, when in operation.
16. Do not attempt to dislodge food when the appliance is plugged in.
17. Do not fill the unit above the MAX Fill Line. When cooking foods that
expand during cooking, such as rice or dried vegetables, do not fill the
unit over 1/2 full. See "Cooking with Your Pressure Cooker".
18. Do not cook foods such as applesauce, cranberries, pearl barley, oatmeal
or other cereals, split peas, noodles, macaroni, rhubarb, or spaghetti.
These foods tend to foam, froth and sputter, and may block the Steam
Release Valve.
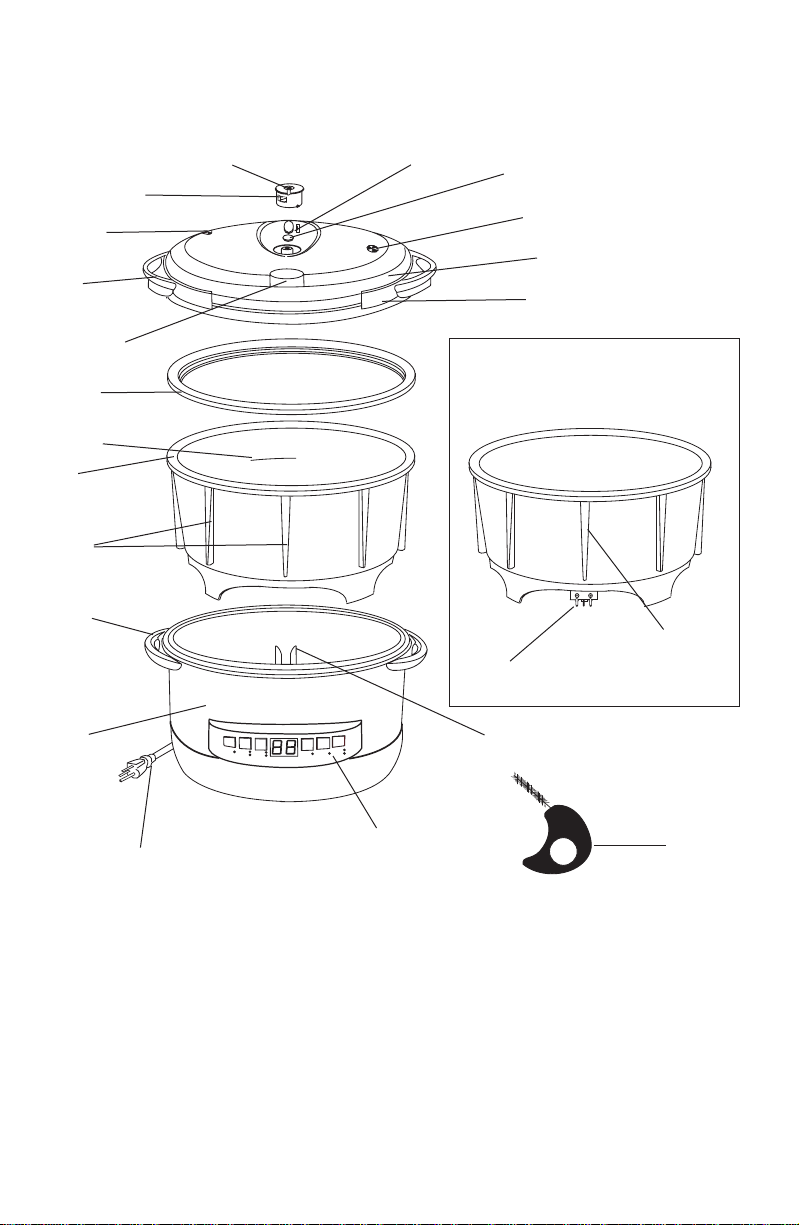
19. CAUTION: To reduce the risk of electric shock, cook only in the
Removable Cooking Pot.
SAVE THESE INSTRUCTIONS
FOR HOUSEHOLD USE ONLY
IMPORTANT SAFEGUARDS
239
LEMON CHEESECAKE (35 minutes, high pressure)
To make this dense and delicious cheesecake, you'll need a 7-inch springform
pan and aluminum foil (preferably extra-wide, heavy duty).
Butter for greasing springform pan
1/2 cup chocolate cookie or graham cracker crumbs
Two 8-ounce packages Philadelphia cream cheese (see Cook's Notes below)
1 cup sugar
1/2 cup sour cream or plain yogurt
2 tablespoons flour
Zest of 1 large lemon
2 1/2 tablespoons freshly squeezed lemon juice
3 large eggs
Garnishes: sliced strawberries, blueberries, or raspberries
1. Liberally butter springform pan. Coat sides with cookie crumbs and spread
remaining crumbs evenly on bottom. Set aside.
2. In a food processor, blend cream cheese, sugar, sour cream, lemon zest
and juice. Scrape down sides of bowl. Add eggs and process just until
blended in.
3. Pour mixture into prepared pan. Place pan in center of a sheet of aluminum
foil about 2 1/2 feet long. (If not heavy duty, use a double layer.) Press foil
tightly against sides of pan. Bring two longer ends up to meet, then fold
over to seal, creating a tent to allow space on top for cheesecake to puff
up. Use another sheet of foil, if needed, so that pan and cheesecake are
entirely enclosed.
4. Set rack in cooker and gently place pan on top. Pour in enough water to
reach halfway up sides of pan.
5. Pull lid handles apart and set lid on cooker. Slide safety lock to LOCK posi-
tion. Point pressure regulator knob to PRESSURE.
6. Set pressure mode for HIGH and cook time for 35 MINUTES. Press START.
7. When cooker beeps three times, STOP light will illuminate. Allow pressure
to come down naturally until red Pressure Indicator Rod drops, about 20
minutes.
8. Slide safety lock to UNLOCK. Pull handles apart and remove lid.
9. Let cheesecake cool for a few minutes, then transfer to a cooling rack set
over a plate to catch dripping water. Open foil seal. Use a paper towel to
blot up any moisture on top of cheesecake. While cheesecake is still hot,
gently smooth off top if necessary.
10. When cooled to room temperature, cover with plastic wrap and refrigerate
at least 6 hours or overnight. (You may also freeze for up to 2 months.)
When ready to serve, release and remove sides of springform pan. Leave
base in place and set cheesecake on a platter. Arrange berries decoratively
on top.
Serves 8
Cook's Notes: This recipe was tested with traditional cream cheese and sour
cream. Low-fat or fat-free versions may prevent the cheesecake from setting
properly.
All recipes copyright Lorna Sass, 2001.

3
ADDITIONAL IMPORTANT
SAFEGUARDS
WARNING: This appliance generates heat and escaping steam during
use. Use proper precautions to prevent risk of burns, fires, or other
injury to persons or damage property.
1. Keep hands and face away from Steam Release Valve when releasing
pressure.
2. Use extreme caution when removing the Lid after cooking. Serious burns
can result from steam inside.
3. Never remove the Lid while the unit is in operation.
4. Do not use without the Removable Cooking Pot in place.
5. Do not cover the Pressure Valves with anything as an explosion may
occur.
6. Do not touch the Removable Cooking Pot, any removable parts, or heat-
ing parts immediately after using. Let the unit cool completely first.
7. To reduce the risk of electric shock, cook only in the removable cooking
pot. Do not pour liquid into the Cool-to-the-Touch Housing.
8. Clean all parts thoroughly after each use.
9. Do not lift the Removable Cooking Pot containing food by using Upper
Handles on Lid.
38
EASY APPLESAUCE (1 minute, high pressure)
Cooking the apples with their skins on not only saves time, but gives the
applesauce a pale, rosy hue. For a more complex flavor, try using a variety of
apples.
1 cup water
4 pounds apples, rinsed and quartered (see Cook's Notes below)
Sugar or maple syrup if needed
1. Place water and apples in cooker.
2. Pull lid handles apart and set lid on cooker. Slide safety lock to LOCK
position. Point pressure regulator knob to PRESSURE.
3. Set pressure mode for HIGH and cook time for 1 MINUTE. Press START.
4. When cooker beeps three times, STOP light will illuminate. Allow pressure
to come down naturally for 10 minutes. Quick-release any remaining pres-
sure by holding down Quick Steam Release Button until red Pressure
Indicator Rod drops.
5. Slide safety lock to UNLOCK. Pull handles apart and remove lid.
6. Lift cooked apples with a slotted spoon and pass through a food mill, dis-
carding pits and peels as you go.
7. Sweeten applesauce, if you wish. Refrigerate until needed, up to 10 days,
or freeze up to 4 months.
Cook's Notes: If you prefer a chunky applesauce, core and seed apples after
you quarter them. Eliminate step 6. Any leftover cooking liquid may be stirred
into the applesauce or used to make a fruit compote.
Makes about 6 cups

3-PRONG GROUNDED TYPE PLUG
This appliance is equipped with a grounded type 3-wire cord (3-prong plug).
This plug will only fit into an electrical outlet made for a 3-prong plug. This is
a safety feature. If the plug should fail to fit the outlet, contact an electrician
to replace the obsolete outlet. Do not attempt to defeat the safety purpose
of the Grounding Pin part of the 3-prong plug.
SHORT CORD INSTRUCTIONS
A short power supply cord is provided to reduce the risk resulting from
becoming entangled in or tripping over a longer cord.
Longer detachable power-supply cords or extension cords are available
and may be used if care is exercised in their use.
If a longer detachable power-supply or extension cord is used, (1) the
marked electrical rating of the cord set or extension cord should be at least
as great as the electrical rating of the appliance, and (2) the cord should be
arranged so that it will not drape over the countertop or tabletop where it
can be pulled on by children or tripped over accidentally.
The extension cord should be a grounding-type 3-wire cord.
ELECTRIC POWER
If the electric circuit is overloaded with other appliances, your appliance may
not operate. It should be operated on a separate electrical circuit.
CAUTION: To prevent Plasticizers to migrate from the finish of the counter
top or table top or other furniture, place NON-PLASTIC coasters or place-
mats between the appliance and the finish of the counter top or table top.
Failure to do so may cause the finish to darken, permanent blemish-
es may occur or stains can appear.
4 37
RISOTTO WITH SMOKED MOZZARELLA AND
SUN-DRIED TOMATOES (4 minutes, high pressure)
Risotto normally takes about a half hour of constant stirring to prepare in the
conventional way, but in the pressure cooker it's done in just a few minutes.
This sophisticated Italian rice dish makes a fine substitute for pasta.
1 tablespoon olive oil (or use oil from sun-dried tomatoes)
3/4 cup chopped shallots or onions
2 cups Arborio rice (see Cook's Notes below)
2/3 cup dry white wine or vermouth
4 1/2 to 5 1/2 cups chicken or vegetable broth
6 ounces smoked mozzarella, grated (about 1 1/4 cups tightly packed)
2/3 cup coarsely chopped sun-dried tomatoes (oil-packed)
3 tablespoons chopped parsley
Salt and freshly ground pepper
Garnish: chopped parsley
1. Press BROWN and START. Heat oil in cooker and cook shallots for 1
minute. Stir in rice, taking care to coat grains with oil.
2. Add wine and cook until most of it evaporates.
3. Stir in 4 1/2 cups broth.
4. Pull lid handles apart and set lid on cooker. Slide safety lock to LOCK
position. Point pressure regulator knob to PRESSURE.
5. Set pressure mode for HIGH and cook time for 4 MINUTES. Press START.
6. When cooker beeps three times, STOP light will illuminate. Quick-release
any remaining pressure by holding down Quick Steam Release Button until
red Pressure Indicator Rod drops.
7. Slide safety lock to UNLOCK. Pull handles apart and remove lid.
8. Press BROWN and START. Stir risotto vigorously as it boils until rice is
tender but still chewy. If the mixture becomes dry, gradually add more
broth as needed. (Risotto should be slightly soupy.) Stir in mozzarella, sun-
dried tomatoes and parsley. Season with salt and pepper to taste.
9. Ladle into large, shallow pasta or soup bowls. Garnish individual portions
with parsley, and serve immediately.
Cook's Notes: Arborio is a plump Italian short-grain white rice traditionally
used to make risotto. It is available in gourmet shops and many supermarkets.
Carnaroli and Maratelli are two other types that may be substituted.
Serves 4 as main dish or 6 as appetizer
A Note Regarding Your Cook's Essentials®Programmable
Electric Pressure Cooker featuring DuPont®SilverStone®Select
Congratulations on your purchase of Cook's Essentials®Programmable
Electric Pressure Cooker featuring DuPont®SilverStone®Select
ScratchGuard™. The special coating on the Removable Cooking Pot has
been designed to add durability and ease of use and cleaning. It has been
specially formulated for selected premium performance appliances.
SilverStone®Select offers increased scratch and abrasion protection, while
still maintaining the convenience of no-stick cooking and easy cleaning. It is
great for the health conscious, allowing you to cook without fats or oils.
Care and cleaning of your Programmable Electric Pressure Cooker is a
snap with the SilverStone®Select coating, as it has been designed to be
completely non-stick. Washing or rinsing with warm, soapy water and a
sponge or a cloth is all that is needed. Do not use steel wool, course scour-
ing pads or harsh abrasives on any surface coated with SilverStone®Select.
Not only are they unnecessary, but they may damage the coating.

36 5
Introduction
Congratulations! You are about to learn how to cook and prepare deli-
cious, home made meals in a fraction of the time it normally takes, without
sacrificing flavor or nutrition. Your Cook's Essentials®Programmable
Pressure Cooker is quick, safe and easy to use. And best of all, it can
shorten the traditional cooking time of most foods by up to 70 percent.
1. Your Programmable Pressure Cooker cooks like a traditional Pressure
Cooker by combining steam heat and pressure for faster cooking
times. Since an air tight seal is formed when the Lid is closed and
locked, the heat and steam stay trapped inside the Removable
Cooking Pot. As the steam builds and the pressure rises, the cooking
temperature will get as hot as 250º F, which is 38º F hotter than when
food is cooked in a standard pot with liquid. This combination of high
heat and pressure cooks the food faster while retaining water soluble
nutrients and flavor.
2. Your Cook's Essentials®Pressure Cooker takes the guesswork out of
cooking under pressure. A built-in Thermostat knows exactly when low
or high pressure is reached inside the Removable Cooking Pot and
automatically adjusts the heat and triggers the timer to begin. These
computerized functions eliminate the need to make heat adjustments,
necessary when using a stovetop cooker.
3. The 1500 watt Heating Element allows for quick heating and for main-
taining even cooking temperature and pressure.
4. The large, 8-quart capacity, heavy-duty, non-stick, aluminum
Removable Cooking Pot heats up quickly and evenly.
5. The Cook's Essentials®Programmable Pressure Cooker has a
BROWN Function that allows you to sauté or brown food in the
Removable Cooking Pot before cooking under pressure.
6. The Quick Steam Release Feature allows you to release pressure with
the simple push of a button. Press this release button in short bursts
to prevent ejection of hot liquid along with steam.
7. The STEAM Function heats cooking liquid in the Removable Cooking
Pot to a boil in a matter of minutes for steaming an endless variety of
foods like vegetables and shellfish (as well as rice).
8. The software incorporates a CANCEL feature for both COOK TIME
and DELAY TIME during setup. If it becomes necessary to cancel or
reset the time before cooking has begun, simply press the COOK
TIME and START/STOP Buttons simultaneously to reset the Cook
Time to "01"; or press the DELAY TIME and START/STOP Buttons
simultaneously to reset the Delay Time to "00".
9. The WARM Function holds and keeps cooked food warm for an unlim-
ited period of time.
10.The sturdy, brushed stainless steel and molded, Cool-to-the-Touch
Housing of your Cook's Essentials®Programmable Pressure Cooker is
both attractive and functional.
CURRIED CHICKPEAS WITH SPINACH
(18 minutes, high pressure)
Serve this flavor-packed vegetarian curry over rice, with a dollop of mango
chutney on the side.
1 pound (2 1/2 cups) dried chickpeas, soaked overnight in ample water to
cover
2 cups vegetable broth or water
One 13.5-ounce can coconut milk
2 tablespoons Madras-style mild curry powder (see Cook's Notes below)
Two 10-ounce packages frozen chopped spinach
2 large (about 1 pound) red onions, peeled and cut into eighths
One 15-ounce can diced tomatoes with chilies (including liquid)
Salt to taste
Garnishes: sour cream or yogurt and chopped cilantro
1. Drain chickpeas. Blend broth, coconut milk, and curry powder in cooker.
Add chickpeas and set frozen blocks of spinach and onions on top. Pour
tomatoes over spinach and onions.
2. Pull lid handles apart and set lid on cooker. Slide safety lock to LOCK
position. Point pressure regulator knob to PRESSURE.
3. Set pressure mode for HIGH and cook time for 18 MINUTES. Press
START.
4. When cooker beeps three times, STOP light will illuminate. Quick-release
pressure by holding down Quick Steam Release Button until red Pressure
Indicator Rod drops.
5. Slide safety lock to UNLOCK. Pull handles apart and remove lid.
6. Stir well and add salt, if needed. Curry will quickly thicken as it stands, but
if you wish to thicken immediately, mash some chickpeas against side of
cooker with a fork and stir them in.
7. Garnish individual portions with a dollop of sour cream and a sprinkling of
cilantro.
Serves 7 to 8
Cook's Notes: One good brand of Madras curry powder is Merwanjee
Poonjiajee & Sons, available in gourmet shops and many supermarkets. The
blend contains salt.
Table of contents
Other Cook's essentials Electric Pressure Cooker manuals

Cook's essentials
Cook's essentials 99602 Owner's manual

Cook's essentials
Cook's essentials K43547 User manual

Cook's essentials
Cook's essentials K44020 User manual

Cook's essentials
Cook's essentials 99725 Owner's manual

Cook's essentials
Cook's essentials EPC460 User manual

Cook's essentials
Cook's essentials K42027 User manual

Cook's essentials
Cook's essentials K41143/EPC-678 User manual

Cook's essentials
Cook's essentials Technique DYB350 Quick guide

Cook's essentials
Cook's essentials K41143 User manual

Cook's essentials
Cook's essentials 99731 Assembly instructions