Cook's essentials K44020 User manual

4Qt. Electric
Pressure Cooker
Model K44020
INSTRUCTION MANUAL
Before operating your new appliance,
please read all instructions carefully and keep for future reference.

IMPORTANT SAFEGUARDS
When using pressure cookers, basic safety precautions should always be followed:
1. Read all instructions before operation.
2. Do not touch hot surfaces. Use handles or knobs and a potholder.
3. This appliance should not be used by or near children or individuals with
certain disabilities.
4. NEVER ATTEMPT TO OPEN LID WHILE THE UNIT IS OPERATING. Do not open the
pressure cooker until the unit has cooled and all internal pressure has been released.
If lid is difficult to rotate, this indicates that the cooker is still pressurized. Do not
force it to open. Any pressure in the cooker can be hazardous. See "OPERATING
INSTRUCTIONS" section in this manual.
5. Do not place the pressure cooker in a heated oven or on any stovetop.
6. Extreme caution must be used when moving a pressure cooker containing hot
liquids.
7. Do not use pressure cooker for other than intended use.
8. This appliance cooks under pressure. Improper use may result in scalding injury.
Make certain unit is properly closed before operating. See "INSTRUCTIONS FOR USE"
section in this manual.
9. To protect against electrical shock, do not immerse cord, plugs, or outer vessel in
water or other liquids.
10. Do not fill unit over 2/3 full. When cooking foods that expand during cooking such
as rice, legumes, beans, or dried vegetables, do not fill the unit over 1/2 full.
Overfilling may cause a risk of clogging the pressure limiting valve and developing
excess pressure. Failure to follow this procedure can result in injury to person(s)
and/or damage to the unit. See "INSTRUCTIONS FOR USE" section in this manual.
11. Be aware that certain foods, such as applesauce, cranberries, pearl barley, oatmeal
or other cereals, split peas, noodles, macaroni, rhubarb, or spaghetti can foam, froth,
and sputter, and clog the pressure release device (steam vent). These foods should
not be cooked in a pressure cooker unless following a Maxi-Matic® approved
pressure cooker recipe.
12. Always check the pressure release devices for clogging before use.
13. Do not use this pressure cooker for pressure frying oil.
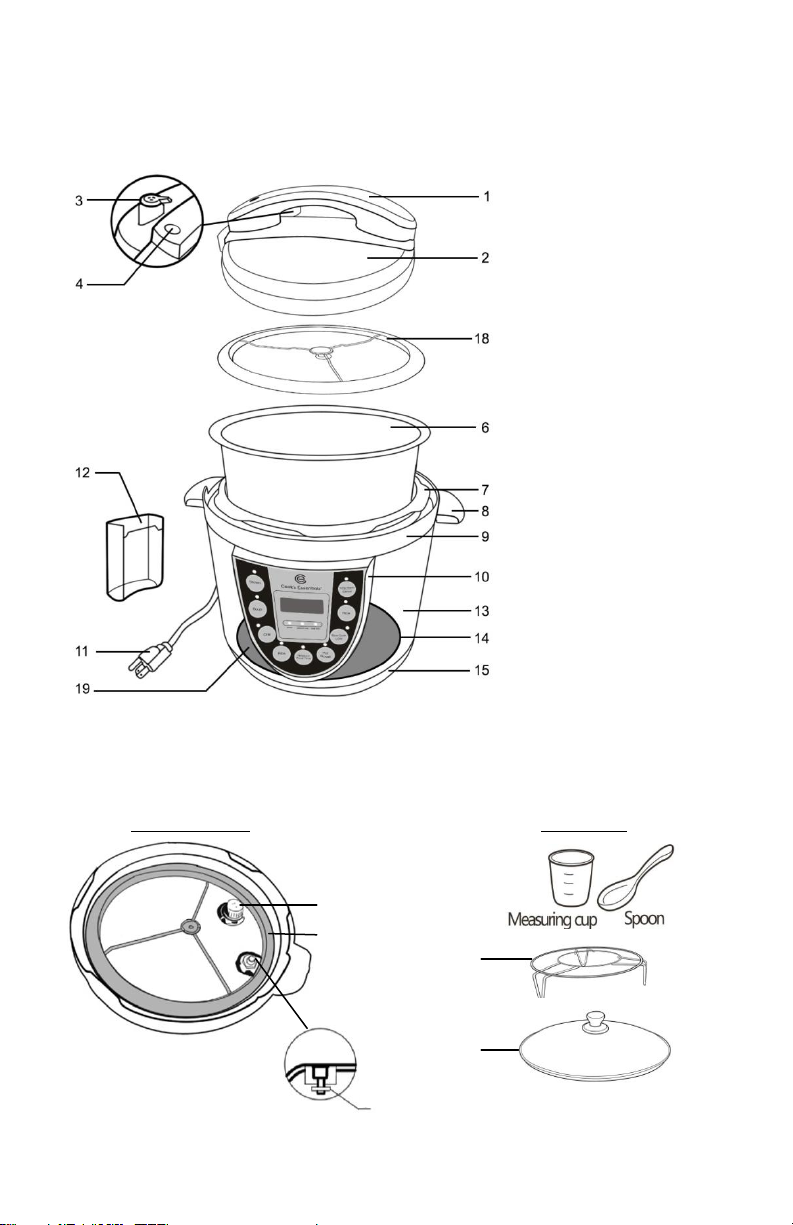
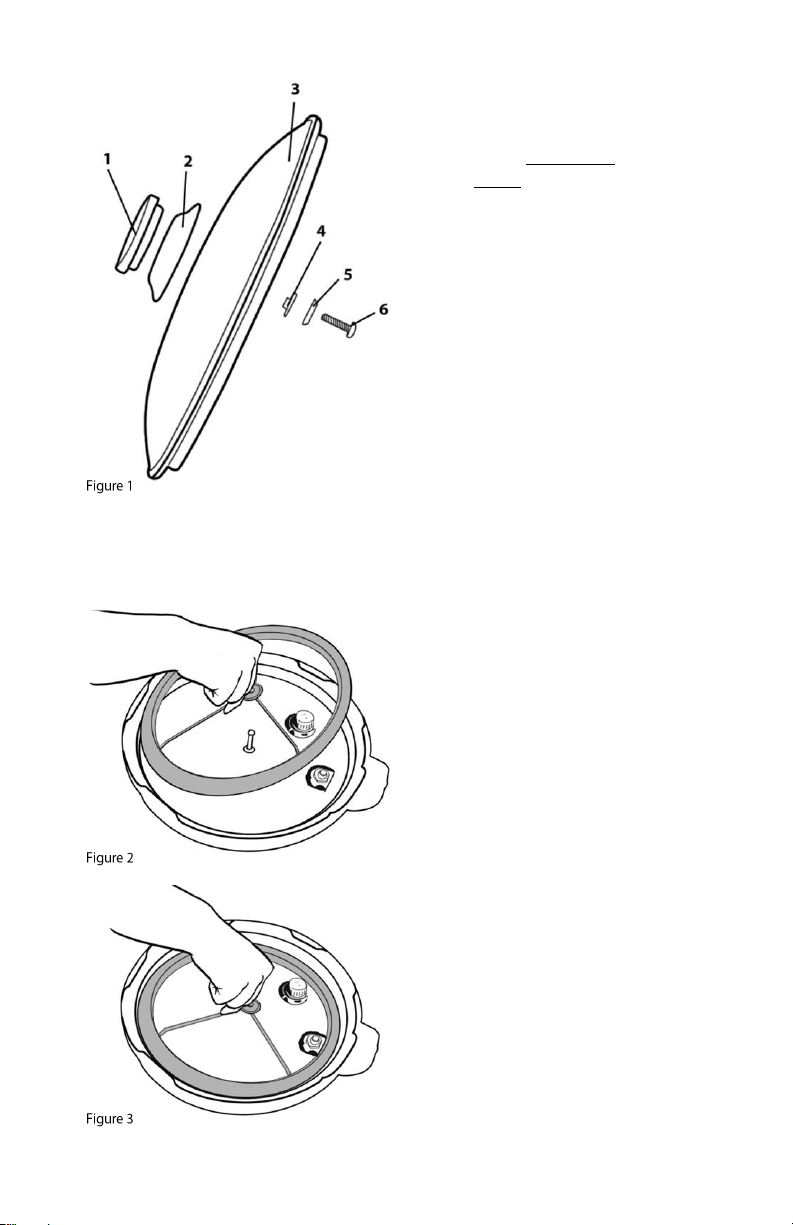
14. DO NOT tamper with the Steel Ring in the Lid (2) with any tools or external forces. If
the Steel Ring is damaged, please stop using immediately and replace the Lid.
15. Clean the Filter (17) regularly to keep the cooker clean.
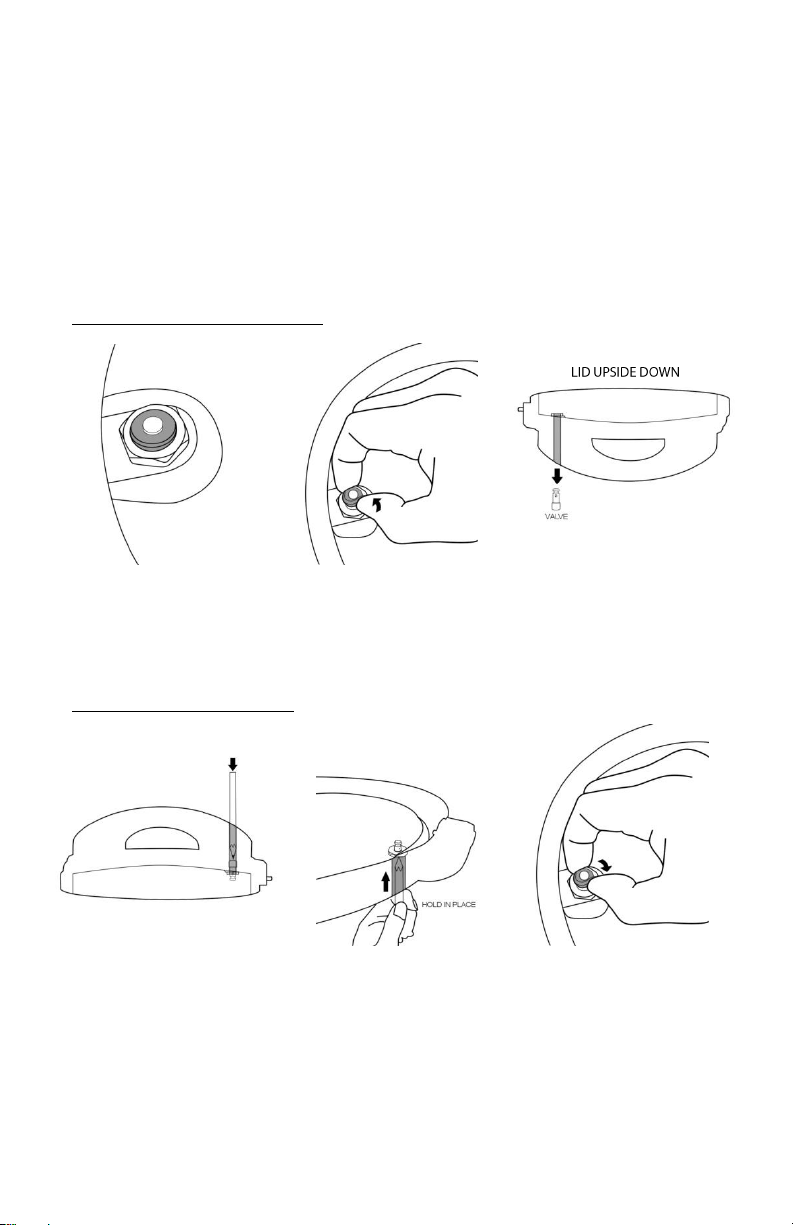
16. NEVER use additional weight on the Pressure Limiting Valve (3) or replace the
Pressure Limiting Valve (3) with anything not intended for use with this unit.
17. The surface of contact between the Inner Pot (6) and the Electronic Heater (14)
should always be clean. DO NOT use the Inner Pot with other heating sources. DO
NOT replace the Inner Pot with a container other than what is recommended by the
manufacturer.
18. The Inner Pot consists of a non-stick layer surface. To avoid scratching the non-stick
surface, please use wooden or plastic utensils.
19. Unplug from outlet when not in use and before cleaning. Allow to cool before
putting on or removing parts.
1

20. Do not operate this appliance with a damaged cord or plug or after it malfunctions
or has been damaged in any manner. Return appliance to the nearest authorized
service facility for examination, repair or electrical or mechanical adjustment.
21. Always attach plug to appliance first, then plug cord into the wall outlet. To
disconnect, turn control to off, then remove plug from wall outlet.
22. Do not use outdoors.
23. The use of accessories not specifically recommended by Maxi-Matic® may cause
injuries or damage to the unit.
24. Some countertop and table surfaces, such as Corian®, wood and / or laminates, are
not designed to withstand prolonged heat generated by certain appliances. It is
recommended by countertop manufacturers and Maxi-Matic® thata hot pad or
trivet be placed under your appliance to prevent possible damage to the surface.
25. Do not use under hanging cabinets; steam from pressure release may cause
damage.
26. Do not operate your appliance in an appliance garage or under a wall cabinet. When
storing in an appliance garage always unplug the unit from the electrical outlet. Not
doing so could create a risk of fire, especially if the appliance touches the walls of
the garage or the door touches the unit as it closes.
SAVE THESE INSTRUCTIONS
FOR HOUSEHOLD USE ONLY
GROUNDING INSTRUCTIONS: This appliance must be grounded. It is equipped with a 3-
prong cord having a grounded plug. The plug must be plugged into an outlet which is
properly installed and grounded.
Warning: Improper use of the grounded cord can result in the risk of electric shock.
Consult a qualified electrician if necessary. Do not attempt to defeat this safety feature
by modifying plug.
A short power-supply cord is provided to reduce the hazards resulting from
entanglement or tripping over a longer cord. If it is necessary to use an extension cord, it
should be positioned such that it does not drape over the counter or tabletop where it
can be pulled on by children or tripped over and:
A. Use only 3-prong extension cord with 3-blade grounding plug.
B. The marked rating of the extension cord must be equal to or greater
than the rating of this appliance. The electrical rating is listed on the
bottom of this unit.
2

ABOUT PRESSURE COOKING
This digitally controlled and automatic pressure cooker uses advanced technology so you
and your family can enjoy the benefits of better, faster and healthier cooking. Your
Cook's Essentials Pressure Cooker seals in steam to cook hotter and faster while
maintaining important nutrients for healthier meals. Cooking fast and with less water
saves vital natural resources and energy! The unit features easy touch-button settings, a
countdown timer, and a cooking pot big enough for family gatherings! It’s the easiest
pressure cooker to use on the market. It may seem like a complicated unit but rest
assured, this pressure cooker is simple to use, makes meals quick and easy, and overall it
saves you money! Please accept our thanks for purchasing a Cook's Essentials Pressure
Cooker and Enjoy!
ELECTRICAL SAFETY WARNING
There is a potential risk of fire, electric shock or injury to persons if the product is not
used as instructed. Protection against electric shock is assured only if the main
power cord is connected to a properly grounded 120V | 60Hz power receptacle.
This product is to be used in an indoor environment only and is not intended for
commercial use. Dry locations only.
All parts and accessories for this appliance must be used properly according to the
instructions. All parts and accessories must be the original provided from
manufacturer. All other parts or accessories that is not intended for use with this
appliance is strictly prohibited.
The use of an extension cord, power adapter or other electric devices is highly not
recommended.
LED ERROR INDICATOR
If any of the below error codes appear on the pressure cooker display, unplug the
power cord and re-plug after 10 minutes. If the error code remains, contact the
manufacturer for a replacement part.
See Troubleshooting on page 18 for instructions regarding an E4 error.
Indicator Code
Problems/Causes
E1
Open Circuit of the Sensor
E2
Short Circuit of the Sensor
E3
Overheating
E4
Signal Switch Malfunction
3

TABLE OF CONTENTS
IMPORTANT SAFEGUARDS 1-2
ABOUT PRESSURE COOKING 3
ELECTRICAL SAFETY WARNING 3
E1 - E4 ERROR INDICATOR 3
PARTS IDENTIFICATION 5
Glass Lid/Rubber Seal Ring Assembly 6
Pressure Cooker Lid Markings/Pressure Limiting Valve Warning 7
Condensation Cup Assembly 7
Float Valve Assembly 8
ADDITIONAL SAFETY TIPS 9
BEFORE FIRST USE 10
Lid assembly 10
INSTRUCTIONS FOR USE 11
OPERATING INSTRUCTIONS 12-15
How to use the menu buttons 12
How to use the pressure cook time button 12-13
Auto-keep warm feature 13
Reset/Cancel function 13
Removing the lid after cooking 13-14
Preparing White Rice 14
How to brown/sauté with your pressure cooker 14
How to use the slow cook function 15
SAFETY FEATURES 15
HOW TO COOK WITH FROZEN FOODS 16
CLEANING AND MAINTENANCE 16
TROUBLESHOOTING 17-18
HELPFUL TIPS 19
COOKING TIME CHART 20-23
4

PARTS IDENTIFICATION
1. Lid Handle
2. Lid
3. Pressure Limiting Valve
4. Float Valve (external view)
5. Float Valve (internal view)
6. Inner Pot*
7. Outer Pot
8. Side Handles
9. Upper Ring
10. Control Panel
11. Power Cord
12. Condensation Collector
13. Outer Body
14. Heating Plate
15. Bottom Ring
16. Seal Ring for Float Valve
17. Filter
18. Rubber Seal Ring
19. Sensor
20. Stainless Steel Rack
21. Tempered Glass Lid
* The Inner Pot (6) consists of a
non-stick surface. To avoid
scratching the non-stick surface,
please use wooden or plastic
utensils.
UNDERSIDE OF LID
5
16
17
18
ACCESSORIES
20
21
Float Valve
is Red
5

GLASS LID ASSEMBLY
**Your Pressure Cooker is equipped with
a Tempered Glass Lid (21) that can be
used with the SLOW COOK function.
Please do not use this Glass Lid (21) with
any other functions on this Pressure
Cooker.
Assembly of the Knob on the Glass Lid
will require a Phillips Screwdriver (not
included).
Follow the diagram (Figure 1) to
assemble the knob on the Glass Lid (21).
1. Handle
2. Handle Base
3. Glass Lid Body
4. Silicon Gasket
5. Gasket
6. M4 Screw
RUBBER SEAL RING ASSEMBLY
Always ensure the Rubber Seal Ring (18)
is securely fitted onto the metal Y-
shaped ring in the interior of the Lid (2).
Make sure the crease in the Rubber Seal
Ring (18) meets with the outside of the
Y- Ring all the way around. Then place
the Y-Ring and Rubber Seal Ring (18)
back into the Lid (2) making sure the
hole in the center of the Y-Ring's cross-
section is lined up with the metal pin in
the center of the Lid (2). Press down
firmly until the Y-Ring is secured onto
the Lid (2) (Figures 2-3).
6

PRESSURE COOKER LID MARKINGS
Please note the "UNLOCK" and "LOCK"
markings on the rim of the pressure
cooker body (13) and the“ ”on the rim
of the Lid (2). To properly close and
secure the pressure cooker Lid (2),
always line up the "LOCK" marking on
the Upper Ring (9) and the “ ”on the
rim of the Lid (2) (see Figure 4).
PRESSURE LIMITING VALVE
WARNING
WARNING: Avoid serious injury. Always
use tongs or a long kitchen tool to set
the valve to EXHAUST.
CAUTION HOT STEAM: KEEP HANDS AND
FACE AWAY FROM THE PRESSURE
LIMITING VALVE WHEN ROTATING TO
EXHAUST.
CONDENSATION CUP ASSEMBLY
The Condensation Cup is the clear plastic
piece that snaps into the back side of the
pressure cooker as shown on the left.
Place condensation cup in rear of the
unit until it locks into place (shown in
Figure 6; it is part 12 in the diagram on
page 5).
7

FLOAT VALVE ASSEMBLY
If there is steam escaping from the Lid and the Pressure Limiting Valve (3) on top of the
Lid is in the Airtight position please see Troubleshooting on pages 17-18.
It is also important to ensure the Float Valve (4) is assembled correctly. Incorrect
assembly may cause steam to escape from the sides or prevent pressure from building.
The Float Valve (4) should be able to move up and down freely only stopping when the
Seal Ring (16) meets the Lid (2). It is however normal for condensation to appear in the
condensation collector. See illustration below for assembly.
DIS-ASSEMBLY OF FLOAT VALVE (4)
ASSEMBLY OF FLOAT VALVE (4)
Hold Lid (2) upside down to
locate the Float Valve (4).
Ensure that there is something
underneath the Lid (2) that
can catch the Float Valve.
Grasp and pull off the Seal
Ring for Float Valve (16) .
The Float Valve (4) will drop out
from the Lid (2). Check and clean
the hole, the Seal Ring (16) and
the FloatValve (4).
Insert fluted end of Float Valve
(4) into the hole in the Lid (2)
and use a pencil or other slim
tool to hold in place.
Flip the Lid (2) upside down
while using the pencil to hold
the FloatValve (4) in place.
Place the Seal Ring (16) onto
the fluted end ofthe Float
Valve (4) so it sits in the
groove. The Float Valve (4)
should be able to move up and
down freely only stopping
when the Seal Ring (16) meets
the Lid (2).
8

ADDITIONAL SAFETY TIPS
Always keep hands and face away from Pressure Release Device when releasing
pressure.
Use extreme caution when removing the lid after cooking. Always tilt the lid away
from you, so any remaining steam is away from your face.
Never attempt to open lid while cooking, or before the Red Float Valve (4) has
dropped. Do not attempt to defeat this safety feature by forcing lid open.
Do not cover or block the pressure valves.
Do not touch the pot or lid except for the handle immediately after using.
To avoid burns, allow food to cool before tasting. The temperature of the food gets
considerably hotter than with conventional cooking.
Ensure that the gasket is properly in place and is free of food particles or is not
damaged in any way.
WARNING! Do not release steam manually with recipes containing lots of liquid,
such as soups and stews. Make sure the "KEEP WARM" indicator light is on and
unplug the cooker. Allow to sit until the lid turns without any resistance.
Do not fill unit over 2/3 full. When cooking foods that expand during cooking such
as rice, legumes, beans, or dried vegetables, do not fill the unit over 1/2 full.
Overfilling may cause a risk of clogging the pressure limiting valve and developing
excess pressure. Failure to follow this procedure can result in injury to person(s)
and/or damage to the unit. See "INSTRUCTIONS FOR USE" section in this manual.
Be aware that certain foods, such as applesauce, cranberries, pearl barley, oatmeal
or other cereals, split peas, noodles, macaroni, rhubarb, or spaghetti can foam, froth,
and sputter, and clog the pressure release device (steam vent). These foods should
not be cooked in a pressure cooker unless following a Maxi-Matic® approved
pressure cooker recipe.
This appliance cooks under pressure. Improper use may result in scalding injury.
Make certain unit is properly closed before operating. See "INSTRUCTIONS FOR USE"
section in this manual.
Always check the pressure release devices for clogging before use.
Do not use the pressure cooker without liquid; this could damage the pressure
cooker severely.
Do not use pressure cooker for storage purposes nor insert any utensils.
This is NOT a Stovetop Pressure Cooker. Under NO circumstances should this
Pressure Cooker or any of its parts or components be placed ON or NEAR a Stovetop,
Range, or Open Flame. Doing so will cause serious damage to the Pressure Cooker
and/or injury to person.
9

BEFORE FIRST USE
1. Remove packaging materials such as cardboard, plastics or Styrofoam and discard
appropriately.
2. Clean all the parts by wiping with a soft damp cloth or sponge and dry thoroughly.
3. Thoroughly clean the cooking pot in the dishwasher or with warm soapy water.
Rinse, towel or air-dry, and place in the pressure cooker.
LID ASSEMBLY:
the handle (1) and close it downwards at the Opened Lid position (Figure 9). Turn
counter-clockwise until you reach the "LOCKED" position (Figure 10). (A clampingsound
can be heard. Note: To ensure you are properly closing the lid (2), make sure the pressure
limiting valve (3) is on your left side when you are facing the front of the pressure cooker
(when facing the control panel (10)).
WATER TEST
For the first use, to ensure correct assembly of the Rubber Seal Ring(18),it is
recommended to read the following instructions and fill the Inner Pot (6) with water to
the 2/3 line and program to pressure cook for 30 minutes. Once completed, pour out the
water. Rinse and towel dry the Inner Pot (6). The pressure cooker is now ready for use.
How to open the lid: Hold the handle (1)
firmly, turn the lid (2) clockwise until it
loosens and lift vertically (Figures 7-8).
Note: For new units, the seal of the lid (2)
may be slightly stronger than normal and
may be slightly difficult to unlock. Once the
lid (2) has been opened and closed several
times, it will loosen up.
How to close the lid: Observe the Rubber
Seal Ring (18) inside the lid (2) and ensure
that it is fitted onto the outer part of the Y-
Ring all the way around. (Caution: If the
rubber seal ring is damaged, do not use the
pressure cooker. Contact Customer Service
to repair or replace). To lock lid in place,
remove any food residue from upper rim of
cooking pot to ensure a proper seal. Hold
10

INSTRUCTIONS FOR USE
COOKING POT MARKINGS
Inside the removable cooking pot are two sets of markings. One side is marked "2/3 MAX
PRESSURE COOK", which indicates the maximum fill line when cooking any food, other
than rice in the pressure cooker. The other marking is MAX RICE CUP and is used when
cooking rice. When pressure cooking rice, never fill the pressure cooker with water past
the 4 cup marking.
1. Open lid, remove cooking pot from pressure cooker and
add food and liquids as the recipe directs.
NOTE: The total volume of food and liquid must not
exceed 2/3 of the capacity of the cooking pot (Figure
11). For foods such as dried vegetables and beans, or
rice and grains, the total volume must not exceed 1/2
the capacity (Figure 12). Overfilling may clog the
pressure limit valve, which can cause excess pressure to
develop. Always use at least ½ cup liquid when
pressure cooking.
WARNING: To avoid a serious burn injury when cooking
foods other than rice, never exceed the 2/3 MAX
PRESSURE COOK mark of the combined volume of
liquids and solids.
2. Be certain the inner receptacle, where the heating plate
(14) is located, is clean and dry before inserting the
Inner Pot (6) into the pressure cooker and adjust the pot
left and right to ensure optimal contact between the
Inner Pot and the heating plate (14) (Figure 13).
3. Close and "LOCK" the lid.
4. Adjust the Pressure Limiting Valve (3) to the “Airtight”
position , and ensure that the Red Float Valve (4) sinks.
5. When adjusting the Pressure Limiting Valve (3) to either
the "Airtight" or the "Exhaust" positions, line up the
marking on the Pressure Limiting Valve (3) with the
arrow on the Handle (1) as shown in Figures 14 and 15.
6. Plug the power cord into the pressure cooker and then
into the wall outlet. The LED display will show 00 00.
16
12
11

OPERATING INSTRUCTIONS
With the lid secured, unit on and the LED displayed, select the button for the desired
cooking function. The function light will flash.
There are six MENU BUTTONS programmed for your pressure cooker. They are BROWN, SOUP, CHILI, RIBS, POT
ROAST, SLOW COOK (LOW), and RICE. The default times are programmed for quick and easy cooking for small
portions of food less than 3lbs. When cooking food that is more than 3lbs. use the Custom PRESSURE COOK
TIME function. Each of the default times is programmed to detect the weight of food being cooked and how
much liquid is inside the pot during the cooking cycle. The unit will automatically build up the pressure, cook
the food and go to KEEP WARM when cooking is complete.
MENU BUTTON
DEFAULT COOKING TIME
COOKING TIME RANGE
BROWN
8 MIN
N/A
SOUP
25 MIN
N/A
CHILI
20 MIN
N/A
RIBS
40 MIN
N/A
POT ROAST
60 MIN
N/A
SLOW COOK (LOW)
6 HOURS
0.5-9.5 HOURS
RICE
6 MIN
N/A
PRESSURE COOK TIME
1 MIN
1-99 MIN
After Selecting SOUP, CHILI, RIBS, POT ROAST, or RICE
1. The Default Cook Time will display for the selected setting. For example, if RICE is
selected, the display will show P06. There is no need to press any other button.
2. The RICE Indicator will blink five times and the unit will begin heating.
3. As the unit heats up and pressure builds, the Red Float Valve (4) will rise. The
amount of liquid and other ingredients in the pressure cooker determines the
length of time needed for full pressure to build - generally 5 to 40 minutes,
depending on the recipe.
4. Using the same RICE example, while the unitis building up pressure the LED display
will show a scrolling 00 06.The LED screen will not begin to countdown until the
pressure has built up to capacity. Once it begins to pressure cook, the LED display
will show a solid P:06 and begin countdown.
5. The raised Red Float Valve (4) indicates you are cooking under pressure. The lid is
now locked and cannot be opened. YOU SHOULDNEVER ATTEMPT TO OPEN THE LID
WHILE PRESSURE COOKING.
After Selecting PRESSURE COOK TIME
1. Each press of the PRESSURE COOK TIME button increases the cooking time by 1
minute. Hold the button down for rapid increase of cooking time up to 99 minutes.
The desired cook time will show on the display. For example, if 70 minutes of cook
time is selected, the display will show P70. There is no need to press anyother
button.
12

TIP: If you cannot adjust the PRESSURE COOK TIME, it is because too much time
has passed since you first pressed the PRESSURE COOK TIME button. Cancel the
cooking process and start over.
2. The indicator light will blink five times and the unit will begin heating.
3. Follow steps 3-5 from page12.
Auto-Keep Warm Feature
When cooking has completed, the pressure cooker will beep 3-times and automatically
go to KEEP WARM. The KEEP WARM indicator light will illuminate and the display will
show bb.
NOTE: The KEEP WARM setting should not be used for more than 4hours. The quality
and texture of food will begin to change after 1 hour on KEEP WARM. A bit of
condensation in the upper ring during KEEP WARM is normal. To set the cooker to KEEP
WARM, press the KEEP WARM/CANCEL button until the display shows bb.
To Reset or Cancel
User can reset or cancel any function at anytime by pressing the KEEP WARM/CANCEL
button until the display shows 00 00.
Removing Lid after Pressure Cooking
When pressure cooking cycle has completed, the unit will automatically switch to KEEP
WARM. At this point you may release pressure in one of two ways - Natural Pressure
Release or Quick Pressure Release.
1. Natural Release: Following pressure cooking, allow the unit to remain on KEEP
WARM. The pressure will begin to drop - time for pressure to drop depends on the
amount of liquid in the cooker and the length of time that pressure was maintained.
Natural Release can take from 15 to 30 minutes.
During this time cooking continues so it is recommended for certain cuts of meats,
soups, rice, and some desserts. When pressure has fully released, the Red Float
Valve (4) will drop and the lid will unlock to open.
As a safety feature, the lid will not open unless all pressure is released. Do not force
the lid open. If the lid feels tight, please allow additional time for pressure to fully
release before attempting to open the lid.
2. Quick Release (recommended for foods that should be Medium or Medium-Rare):
Following pressure cooking the cooker will beep 3 times and go to KEEP WARM.
Press the KEEP WARM/CANCEL button and the display will show 00 00. Using an
oven mitt or long utensil, carefully turn the Pressure Limiting Valve (3) to the
“Exhaust” position to release pressure until the Red Float Valve (4) sinks (Figure 16).
CAUTION HOT STEAM –RISK OF SCALDING: USE TONGS OR LONG UTENSIL TO
TURN THE VALVE. KEEP HANDS AND FACE AWAY FROM PRESSURE LIMITING
VALVE (3) WHILE IN THE EXHAUST POSITION. FAILURE TO COMPLY MAY CAUSE
SERIOUS INJURY (Figures 17-18) DO NOT RELEASE PRESSURE UNDER HANGING
CABINETS WHICH CAN BE DAMAGED BY STEAM.
Always use an oven mitt to reduce risk of injury. Failure to comply may cause
serious injury.
To avoid liquid splatter, do not use Quick Release for foods with a high volume
of liquid (Stews, soups, porridges, etc.).
13

Steam will immediately begin releasing from the Pressure
Limiting Valve (3). When pressure is fully released, the Red
Float Valve (4) will sink and the lid will unlock to open.
As a safety feature, the lid will not open unless all pressure is
released. Do not force the lid open. If the lid feels tight,
please allow additional time for pressure to fully release
before attempting to open the lid. If there is any resistance
in opening the lid it indicates that your Pressure Cooker is
still under pressure and can
cause injury if forced open.
When the Red Float Valve is
completely down, turn lid
clockwise and lift to remove.
Always open the lid away from
you to avoid skin contact with
any remaining heat or steam.
Preparing White Rice
When measuring rice, ONLY USE THE RICE MEASURE CUP PROVIDED; DO NOT USE A
STANDARD MEASURING CUP. Use the Rice Measure Cup, along with the pot markings to
make perfect rice every time. For example, when making 3 cups of rice, use 3 rice cup
measures of rice and fill with water to the "3" mark. As a general rule, when cooking 2
cups (or less) of uncooked rice, use 1 tablespoon of butter or oil. For measurements
greater than 2 cups, use 2 tablespoons of butter or oil. This will prevent foaming during
the cooking process.
When cooking rice, the maximum amount of rice allowed for this 4 quart pressure
cooker is 4 cups of uncooked rice.
Normally one cup of rice requires one cup of water. This may vary according to
taste.
For best results rinse measured rice until the water becomes relatively clear.
How to BROWN/SAUTÉ
This setting allows cooking over high heat, without the lid, before pressure cooking.
Most recipes will benefit from the golden color, richer flavors and moist results gained
from Browning/Sautéing.
To Brown or Sauté your meats or vegetables prior to pressure cooking:
1. Make sure lid (2) is not on the unit.
2. Press BROWN.
3. Add oil or butter as directed in your recipe and place food into the Inner Pot (6).
4. Stir or turn food as needed until desired color and consistency is reached.
5. Press the KEEP WARM/CANCEL button if you want to cancel the BROWN function
before the timer finishes counting down.
Allow the unit to rest 2-3 minutes after cancelling the BROWN function before
beginning to pressure cook. If the unit will not begin pressure cooking, allow it
to cool for a longer period after BROWNING before selecting another function.
18
14

How to SLOW COOK
1. Place glass lid (21) onto the cooker.
The SLOW COOK function is used without pressure (turn Pressure Limiting
Valve (3) to EXHAUST).
2. Press the SLOW COOK button once and the display will show the default SLOW
COOK time of 06:00. Quickly continue to press the SLOW COOK button to increase
cook time in increments of 30 minutes.
3. Hold the SLOW COOK button down for rapid increase of cooking time.
NOTE: The longest SLOW COOK time allowed is 9.5 hours.
TIP: If you cannot adjust the SLOW COOK time, it is because too much time has
passed since you first pressed the SLOW COOK BUTTON. Cancel the cooking
process. Then press the SLOW COOK button continually until you've reached
the desired cook time.
4. There is no need to press any other button.
5. The SLOW COOK indicator will blink five times and then illuminate solid once it
begins operation.
The unit may take between 5~20 minutes to reach temperature before
beginning count down.
6. When cooking is complete, the cooker will beep 3-times and automatically go to
KEEP WARM. The display will show bb during KEEP WARM.
7. The KEEP WARM indicator light will illuminate. Press CANCEL to end the operation.
SAFETY FEATURES
There are seven safety devices installed in the pressure cooker to assure its reliability.
1. Open-and-Close Lid Safety Device
The lid cannot be opened if the appliance is filled with pressure.
2. Pressure Control Device
The correct pressure level is automatically maintained during cooking cycle.
3. Pressure Limiting Valve (3)
The pressure limiting valve will release air automatically when the pressure inside
exceeds the preset temperature.
NOTE: Overfilling the pressure cooker (see Instructions for Use) may clog the pressure
limiting valve, which can cause excess pressure to develop.
4. Anti-Block Cover
Prevents food material from blocking the pressure limiting valve (3).
5. Pressure Relief Device
When the cooker reaches the maximum allowable pressure and temperature, the
cooking pot will move down until the lid separates from the sealing ring, releasing
air pressure.
6. Thermostat
The power will auto-shut-off when the cooking pot temperature reaches the
preset value, or the pressure cooker is heating without enough liquid inside.
7. Thermal Fuse
The circuit will be opened when the pressure cooker reaches the maximum
temperature.
15

Cooking Frozen Foods:
Cooking frozen food inside a pressure cooker is quick and easy but has certain restrictions.
Only cook individual cuts of frozen meats that are up to 1 inch thick, the cooking time
does not need to be altered. Pressure will not be achieved until the internal temperature
has reached a preset level. If the recipe states the meat should be cooked for 10 minutes
after pressure has been achieved, it will still be the same, but it will take longer to reach
the required pressure point.
It is not recommended to pressure cook larger cuts of frozen meats such as a whole roast,
a block of frozen ground meat or a whole chicken. Larger cuts will require increased
cooking times of up to one third more, and the results may not be the same when
compared to meats that were thawed (or at least partially thawed) and browned before
cooking.
CLEANING & MAINTENANCE
1. Always make sure the Pressure Cooker is unplugged, depressurized and completely
cooled down before dismantling.
2. Use a non-abrasive sponge or damp wash cloth to clean the outer body (13). NEVER
immerse the outer body (13) in any liquids or pour liquid into it.
3. Remove the condensation cup (12) and rinse it thoroughly and let dry. Clean the
upper ring (9) with a damp sponge or wash cloth.
4. Remove the pressure limiting valve (3) by gripping and firmly pulling upwards.
Rinse with warm water and dry.
5. Clean the lid (2) with warm soapy water, including the rubber seal ring (18), filter
(17), vent, float valve (5) and let dry thoroughly.
6. On the underside of the lid below the pressure limiting valve (3), is a small metal
filter (17) which can be easily removed to clean (Figure 19).
7. Let parts dry completely before reassembling.
8. Wash the inner pot, (6), wire rack (20) and glass lid (21) with a non-abrasive sponge
and allow to air dry or use a towel. It is not recommended to use any type of
scouring pad that can scratch the non-stick surface of the Inner Pot (6).
9. Store the inner pot inside of the Pressure Cooker. Store Pressure Cooker in a cool,
dry location.
10. Do not store pressure cooker with lid on tightly. This saves on gasket wear and tear.
NOTE: Any other servicing should be performed by an authorized service
representative or from the original manufacturer or distributer.
How to Clean the Filter:
To clean the filter (17), remove it by pulling vertically. To re-
attach, simply line up the
filter (17) and press down to secure the filter (Figure 19).
16

TROUBLESHOOTING
PROBLEM
SOLUTION
Is the Pressure
Limiting Valve (3) on
the lid (2) supposed
to be loose?
Yes even though it will have a loose fit it is safely secured. It will turn 360
degrees. When pressure has built up, and the Valve is set to “Airtight”
properly, it will resemble a bobble head.
When I choose a
Menu Button (ex:
POT ROAST), nothing
happens? What’s
wrong?
Nothing is wrong. Make sure the pressure limiting valve (3) is set to Airtight
and the Lid (2) is locked securely. Once you have selected the Menu Button,
simply leave the unit alone and it will start to heat up and build up pressure.
Once the unit has built up enough pressure, the display will change to a
countdown timer that displays your desired cooking time of the Menu
Button you selected. This is the time the unit will start cooking the food.
Pressurizing can take anywhere from 5 minutes up to 40 minutes depending
on the quantity of food you are cooking.
After I set the
pressure cooker it will
begin to heat up, but
in about 5-minutes
the unit beeps 3
times and goes to
Keep Warm and my
food did not cook
completely. What is
happening?
The unit is detecting that not enough liquid has been added to your recipe.
The pressure cooker has an automatic over-heat protection sensor that will
automatically set itself to OFF or Keep Warm when it detects that not
enough liquid ispresent so that it does not over-heat. Make sure all pressure
is released, open the lid and add in increments of 1/2 cups of liquid until the
unit will properly build up pressure and cook.
The unit is detecting that there is a leak in the pressure and that it is not
sealed properly. Firmly push down on the lid to help the seal form or release
any built up pressure and safely remove the lid to check the unit thoroughly.
Make sure the rubber gasket ring is in place, the lid is securely locked, and
that the Valve on top of the lid is set to the “Airtight” position. Reset the unit
by unplugging it. Wait 10-seconds and plug it back in. Program the unit
again.
Both of the above solutions will cause some liquid to have evaporated and it
is recommended to add back in any liquid that has evaporated otherwise
you will keep encountering the same issue.
Steam is being
released around the
rim of the lid during
the pressurizing
sequence. How do I
fix this?
Please note that steam escaping from the Valve (3) or around the lid is
normal for the first 5minutes or so during the Pressurizing process. If it
continues beyond 10minutes or steam is still releasing when the timer has
begun counting down it may mean that the Rubber Seal Ring (18) did not
form a tight seal when the Lid (2) was locked. This can happen to brand new
units. Try pressing down firmly on the Lid (2). This should allow the Rubber
Seal Ring (18) to seal and stop any more steam from releasing.
If this does not fix the issue, press the KEEP WARM/CANCEL button and
follow the instructions to release all pressure before removing the lid to
check the Red Float Valve (4) or the Rubber Seal Ring (18). See page 11 on
how to install the Rubber Seal Ring (18). Rub a wet cloth along it to make
sure it is clean of debris and it is smooth. Note that the Red FloatValve (4) is
properly assembled and you are able to pull it up and down with ease by
grasping the Float Valve Seal Ring (16). Reposition and secure the lid. Start
the cooking process again.
17

PROBLEM
SOLUTION
Steam is being
released from the
Pressure Limiting
Valve (3) during the
pressurizing
sequence. How do I
fix this?
This may happen during the initial start-up of the Pressurizing Sequence and
is normal. If it continues for more than 10minutes, the Valve (3) may not be
positioned properly. Simply use tongsor similar utensil and oven mitt and
carefully adjust the valve by gently tapping it side to side until it seals
properly. If the steam continues to release, you may need to press the KEEP
WARM/CANCEL button. Follow the instructions to release all pressure before
opening the lid to remove the Pressure Limiting Valve and check the thin
wire spring on the underside of it. Make sure it is not bent or loose. If steam
still continues to escape, the Valve may be faulty and replacement or repair
may be necessary. Please contact customer service at (800) 365-6133 ext.
120/107/105.
Steam is being
released from the
Float Valve (4) area
during the
pressurizing
sequence. How do I
fix this?
This may happen during the initial start-up of the Pressurizing Sequence and
is normal. If it continues for more than 10 minutes, simply use tongs or
similar utensil and oven mitt to carefully adjust it so it is seated properly.
This will help settle the lid and all the valves properly. The pressure will
quickly push up on the Float Valve and seal properly to finish the
pressurizing sequence.
My food is finished
cooking and all the
pressure is released,
but I cannot unlock
and open my lid.
What is stuck?
Make sure all the pressure and steam has been completely released. Make
sure the Red Float Valve (4) is no longer in the up position. It may be stuck in
the UP position, simply tap the lid gently to make it go back down. Then
turn the lid clockwise to unlock the lid. If it is still stuck, unplugging the unit
may help.
What is the clear
plastic part that came
with my pressure
cooker?
It is the Condensation Cup: Refer to part (12) on pages 5 and 7 to attach the
condensation cup to the back of the pressure cooker.
I've programmed the
pressure cooker to
cook but it's just
sitting there and
nothing appears to
be happening.
The unit is still building pressure. This can take between 5-40 minutes
depending on the quantity of food.
The unit is DEAD or
has NO POWER.
The fuse in the unit has shorted out. This happens if the unit is cooked
without enough liquid in the inner pot or if there is too much electrical
current going to the cooker. Please contact customer service at (800) 365-
6133 ext. 120/107/105 for a replacement fuse.
The LED display
shows E4 error.
Unplug the power cord from the wall outlet. Wait approximately 15
minutes. Plug the power cord back into the wall outlet. Press "CANCEL"
button on the pressure cooker. Select cooking process to begin cooking. If
problem persists, contact customer service at (800)365-6133ext.
120/107/105 for a replacement thermofuse.
My food is burned at
the bottom of the
inner pot.
There is not enough liquid in the inner pot. Addmore liquid to your inner
pot contents.
18

HELPFUL TIPS
Read this manual thoroughly and follow all instructions.
Be familiar with the recipe and have all ingredients prepped before you begin.
Be sure the lid is secured and locked properly before beginning.
You may wish to brown some meats before cooking with other ingredients. To do so, follow
instructions on page 14.
Cut foods into equal-sized pieces to promote even cooking. In recipes thatcall for multiple
ingredients, cut those that cook more quickly into larger pieces and those that cook more
slowly into smaller pieces.
Many different cooking liquids canbe used in a pressure cooker: wine, beer, bouillon, fruit
juices, water, broth and more.
After becoming familiar with your pressure cooker, you can readily adapt conventional
recipes to be used with a pressure cooker. In general, cut cooking times by two thirds. The
amount of liquid used may also have to be reduced because there is very little evaporation in
the pressure cooker. Reduce the required liquid so there is only about 1/2 cup more than
desired in the finished product. Remember, however, there must always be some liquid in the
pressure cooker to produce the necessary steam. Try using this rule; 1 cup of liquid for the
first 15 minutes of pressure cooking then 1/3 cup of liquid for each subsequent 15 minutes.
This can still vary, so if your unit will not build pressure you will have to add more liquid until
it is able to build pressure. (See 3rd down in Troubleshooting).
Since flavors are more intense, reduce the amounts of herbs and seasonings when adapting
from conventional recipes. Fresh herbs are better for pressure cooking than dried.
In general, pressure cookers cook foodsin about 1/3 the time of conventional cooking
methods.
Increase cooking times by about 10%when cooking in high altitudes of over 3,500 feet.
If you wish to cook food in less time than the pre-programmed amount, observe the timer
and press CANCEL when desired cooking time has elapsed.
Always check tomake sure your gasket and float valve are clean, unobstructed and in good
working order.
When cooking under pressure, never fill above the fill line of the inner pot markings.
If you are making soup and you are at the fill line, do not release pressure manually because
hot liquid could spray out.
Never attempt to open lid while under pressure and while Red Float Valve (4) is still up!!!
Always open pressure cooker with the lid facing away from you.
When manually releasing pressure, evaporation of some liquid may occur (i.e. when making
rice or risotto). This is normal, but caution must be used to prevent injury.
When cooking soups or stews with hearty ingredients such aspotatoes or meat, as much as 5
or 6 cups of liquid must be used to prevent ingredients from over-cooking or burning.
Never exceed the Maximum Fill Amount of the pressure cooker.
Make sure lid is on firmly and tightly and moved as far counterclockwise as it will go to allow
proper locking.
Hot foods/liquids will come to pressure more quickly than cold foods/liquids.
When pressure cooking is completed, follow recipe instructions for Quick of Natural Release.
More nutrients are preserved during pressure cooking than with traditional cooking methods,
as less liquid is used and thus fewer nutrients are lost to evaporation.
Remember that itwill take approximately 5 to 40 minutes (depending on the recipe) for
pressure to build and pressure cooking to begin.
19
Table of contents
Other Cook's essentials Electric Pressure Cooker manuals

Cook's essentials
Cook's essentials 99731 Assembly instructions

Cook's essentials
Cook's essentials K41143 User manual

Cook's essentials
Cook's essentials Technique DYB350 Quick guide

Cook's essentials
Cook's essentials K43547 User manual

Cook's essentials
Cook's essentials 99725 Owner's manual

Cook's essentials
Cook's essentials EPC460 User manual

Cook's essentials
Cook's essentials 99602 Owner's manual

Cook's essentials
Cook's essentials K41143/EPC-678 User manual

Cook's essentials
Cook's essentials K42027 User manual

Cook's essentials
Cook's essentials CEPC800 User manual