Cool Energy R500/80-200JT-W User manual

MANUAL INSTRUCTIONS
HEATER
PLEASE READ AND SAVE THESE INSTRUCTIONS

IMPORTANT SAFETY INSTRUCTIONS:
This appliance can be used by children aged from 8 years and above and persons
with reduced physical, sensory or mental capabilities or lack of experience and
knowledge if they have been given supervision or instruction concerning use of the
appliance in a safe way and understand the hazards involved.
Children shall not play with the appliance. Cleaning and user maintenance shall not
be made by children without supervision.
Children of less than 3 years should be kept away unless continuously supervised.
Children aged from 3 years and less than 8 years shall only switch on/off the
appliance provided that it has been placed or installed in its intended normal
operating position and they have been given supervision or instruction concerning
use of the appliance in a safe way and understand the hazards involved. Children
aged from 3 years and less than 8 years shall not plug in, regulate and clean the
appliance or perform user maintenance.
CAUTION-Some parts of this product can become very hot and cause burns.
Particular attention has to be given where children and vulnerable people are
present.
If the supply cord is damaged, it must be replaced by the manufacturer, its service
agent or similarly qualified persons in order to avoid a hazard.
The heater must not be located immediately below an electrical socket-outlet.
Don’t use this heater in the immediate surroundings of a bath, a shower or a
swimming pool.
Do not use this heater with a programmer, timer, separate remote-control system or
any other device that switches the heater on automatically, since a fire risk exists if
the heater is covered or positioned incorrectly.
WARNING: In order to avoid overheating, do not cover the heater.
Keep the device at a minimum distance of one meter from flammable objects such as
curtains, textiles ...
CAUTION: In order to avoid a hazard due to inadvertent resetting of the thermal
cut-out, this appliance must not be supplied through an external switching device,
such as a timer, or connected to a circuit that is regularly switched on and off by the
utility.
This heater is filled with a precise quantity of special oil. Repairs requiring opening
of the oil container are only to be made by the manufacturer or his service agent who
should be contacted if there is an oil leak.
When scrapping the heater, follow the regulations concerning the disposal of oil.
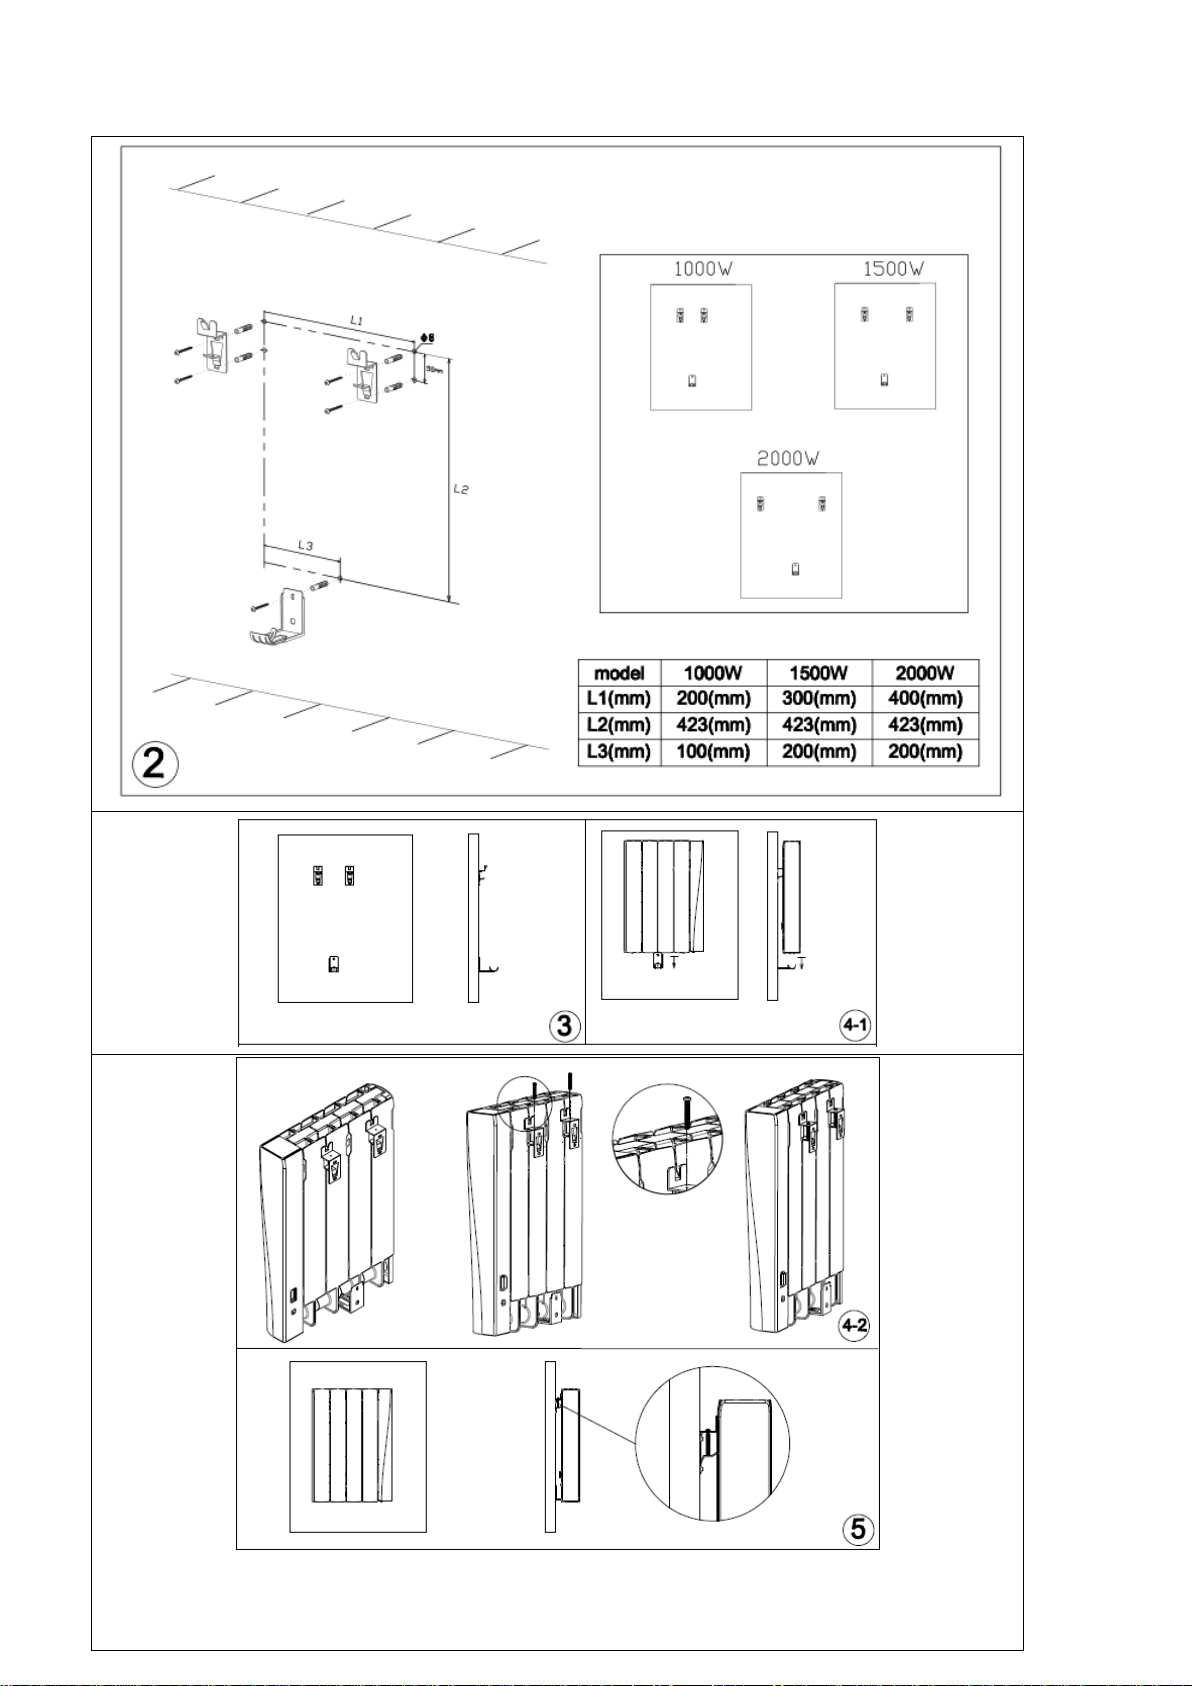
Regarding the instructions for fixed installation, thanks to refer to the below
paragraph of the manual.
Means for disconnection having a contact separation in all poles must be
incorporated in the fixed wiring in accordance with the wiring rules.

I / ELECTRICAL CONNECTION
Your heater must only be installed in a fixed position in accordance with national
installation rules (for France, NFC 15100)
INDOORS USE ONLY
This installation must be done by a qualified electrician to avoid any danger.
Attention: Connect the three conductors of the supply cable to a connection box in
respecting the polarities as below:
- Live: Brown
- Neutral: Blue
-Black: Pilot wire
Warning: this product shall be installed in the outside volume only according the
national wiring rules (For France NF C 15-100)
Note: The above drawing is for reference only.
We suggest that you to contact a professional electrician for assistance.
If you are not sure, we suggest that you to contact a professional electrician for
assistance.
Mounting the device
To install your device:
Make sure distances to walls and objects are respected.
1 - Use the screws, dowels and brackets supplied by the manufacturer.
2 - For drilling dimensions, see the drilling template.
3 - Read the instructions for the steps on the installation as shown on the next page.
Outside volume
Ground
Hidden volume

Caution: Before switching on the appliance make sure that the radiator is correctly
fixed to the wall.


II / Technical specifications
Power supply: 230V~ 50Hz
Power: 1000W, 1500W, 2000W,
Radiator’s technical characteristics :
Under Wire control modes, there are 6 available modes: 1、COMFORT MODE, 2、COMFORT-1 MODE,3、
COMFORT-2 MODE ,4、ECONOMIC MODE, 5、ANTIFREEZE MODE, 6、POWER OFF MODE.
- Minimum temperature setting value: +/- 0.5ºC
- Temperature range setting:+ 7ºto + 30ºC
The technical characteristics of the Wireless module:
a)
Frequency band in which the radio equipmentoperates;
--2.4G band WiFi device, 2400-2483.5MHz.
--5.8G band motion sensor device,5725MHz-5875MHz
b)
Maximum radio-frequency power transmitted in the frequency band(s)in which the radio
equipmentoperates.
--2.4G band WiFi device, Max. radio-frequency power transmitted17.21dBm (52.6mW) < 20dBm(100mW)
--5.8G band motion sensor device, Max. radio-frequency power transmitted5.28
dBm (mW) < 13.98dBm (25mW)
Ⅲ/Operation Instruction
1. Control panel description
Power on/off button
Mode button
+ used to set

When using, confirm that the mechanical switch is in the open state first, short press ON / OFF button
to turn on or turn off the radiator.After pressing the button,the radiator enters the original shutdown
mode.
1.1.1 Select mode :Press button, show as below : COMFORT MODE→ECONOMIC
MODE→ANTIFREEZE MODE→TIMING MODE→SENSOR MODE→PROGRAMMING
MODE.
1.1.2 Mode switching : Slide the screen to the left or right side to switch the mode.
COMFORT MODE→ECONOMIC MODE→ANTIFREEZE MODE→TIMING
MODE→SENSOR MODE→PROGRAMMING MODE.
2 LED Display
Icon
Description
Icon
Description
Time
PROGRAMMING MODE
Week(1 to 7)
WIFI icon
Program (P1 to P7)
Window open icon
Temperature display
Child lock (except power button )
COMFORT MODE
Heating icon
ECONOMIC MODE
Left slide screen:Icon for switch
mode from left side appears.
ANTIFREEZE
MODE
Right slide screen:Icon for switch
mode from right side appears.
TIMING MODE
COMFORT MODE(0 to 24h)
SENSOR MODE
ECONOMIC MODE(0 to 24h)
CHILDREN ANTI
IRONING
temperature and time.
- used to set temperature
and time

FUNCTION
2.1 COMFORT MODE
This is the COMORT MODE. The radiator runs until the room temperature reaches the set
temperature set before. The setting temperature is 19 ºC . When the room is occupied, the radiator is
in COMORT MODE .
2.2 ECONOMIC MODE
This is ECONOMIC MODE, compare with COMORT MODE, temperature setting should not be
higher than COMORT MODE. The setting temperature is 15.5 ºC . When the room is empty, the
radiator works in ECONOMIC MODE.
If you want to adjust the temperature for COMFORT MODE and ECONOMIC MODE .Press
or to change the temperature, adjusting range 7~30℃, stepping by 0.5℃.
2.3 ANTIFREEZE MODE
Your radiator is set to ensure the lowest indoor temperature is 7 C, so that any frost risk can be
avoided. When the room is empty for long time, (such as vacation), please use this mode. Note that
the temperature cannot be set.
2.4 PROGRAMMING MODE
The radiator is controled by external control box. Under PROGRAMMING MODE, 6 modes are
available: 1) Comfort, 2) Comfort-1, 3) Comfort-2, 4) Economic, 5) Anti-frozen 6) Power off.
2.5 TIMING MODE
For the first time or for a long time without using the radiator (or after power failure), you must
set the time, week and P program (modify program):
2.5.1、Time and week set up, illustrations as below :
1.Press mode
button, select to
TIMING MODE,
press mode button
for 5 secons,till
hour
icon(“00”)ficker, If
there is no
operation in 30
seconds, it
automatically
jumps to the minute
settings.
2. Press+ button and
–button to set
hour( “09”). If there
is no operation in 30
seconds, it
automatically jumps
to the minute
settings.

3. Short press mode
button, till
mintute
icon(“00”)ficker,
Press+ key and
–key to set
mintue(“00”)If
there is no
operation in 30
seconds, it
automatically
jumps to the
week settings.
4. Short press mode
button, week icon
flicker( “1”)
Press+and-button to
select
week.1=Mond
ay,2=Tuesday,
3=
Wednesday,
4=Thursday,5
=Friday,6=Sat
urday,7=Sund
ay,
Press mode button
jump to P
program
settings.
If there is no operation
in 30 seconds,
it
automatically
jumps to the P
program
setting.
5. The P1 program
switches between
programs by
press + and -
key.select
program
(P1-P7).1=M
onday, then press
mode key to
7(Sunday),exit.If
there is no
operation in 30
seconds, it
automatically
jumps to the
home page..
6. After selecting the
program on the
seventh day
(Sunday), press the
mode button to
return to the timing
master interface.
7、Illustration :
Icon
Description
Heating
COMFORT MODE works.
Current time
Monday
TIMING MODE
Current working location: a
solid bar flicker one second.
2.5.2、Edit modify program (P1 to P7) and week. Example: modify P1 program and set up week.

Illustration shows below:
1、Press the mode
button for 3
seconds until the
time flicker ("09").
2、Then press the
mode button.
Flicker ("30").
3、Press mode
button.
Flicker("1") then
press + key to set to
Tuesday.
4、Press mode button.
5、Press the mode
button for 5
seconds. Until 1
becomes
"00" .Press + and-
key to modify the
P1 program.
(Press+to operate
COMFORT
MODE, press—
button to operate
ECONOMIC
MODE .)
6、After modify the
program, press mode
button to exit.
7、Then press the
mode button to
view or modify
other programs
(P1-P7).
1=Monday, press
mode key to
7(Sunday),press+an
d—button to
modify other
programs, press
mode button to exit.
If there is no
operation in 30
seconds, it
automatically
jumps to the home
page..
8、Press the mode
button to return to the
timing master interface.

9、Illustration :
Icon
Description
The icon is off, indicate no heating.
ECONOMIC MODE works
Current time
Tuesday
TIMING MODE
Under ECONOMIC MODE, one
second to open, two seconds to
close, a solid bar flicker.
2.5.3、P1-P7 Program
P1: COMFORT
MODE
6:00to22:00(The
rest time is
ECONOMIC
MODE)
P2: COMFORT
MODE 19:00 to
6:00(The rest time
is ECONOMIC
MODE)
P3: COMFORT
MODE 6:00 to
9:00 and 16:00to
22:00(The rest
time is
ECONOMIC
MODE)
P4:COMFORT
MODE 6:00to
9:00,12:00 to
14:00and 16:00to
22:00(The rest
time is
ECONOMIC
MODE)
P5:
ECONOMIC
MODE 0:00 to
24:00
P6:COMFORT
MODE 0:00 to
24:00,
P7:
COMFORT
MODE 16:00to
22:00(The rest
time is
ECONOMIC
MODE)

2.6 SENSOR MODE
When radiator switches to microwave induction mode, if no human or moving objects are detected,
the radiator will automatically shift to a more energy-efficient mode. If detected human or moving
objects , it automatically jumps to the SENSOR MODE interface. If you want to use microwave body
induction function, you need to open microwave induction system inside the radiator. The choice time
is: "0", "15", "30", "45" and "60".
2.7 CHILD LOCK
The CHILD LOCK function can be used to avoid maloperation. To activate the screen lock, press
and buttons simultaneously for 5 seconds until you see appears in the screen. The
screen is locked and all the buttons make no response (except button). To release child lock
function, press and in the same time,till off.
Internal setup and function description :
一、In standby mode, press for 5 seconds, enter internal setup page, then press to
switch modes, press to set up . Temperature compensation(F0)→Induction function(F1)
→Window open function(F2)→Children anti ironing function(F3)→WIFI function(F4) →standby
function.Select “0” to close this function.
F0 Temperature compensation : Press to increase temperature, press to decrease
temperature, adjusting range is -5~5 ℃, stepping by 1℃. After set up, press to switch
function.
F1 Induction function : Press to add time items, press to reduce time item, totally 5 time
items exist: “0”, “15”, “30”, “45”, “60”min. If user want to set 15 minutes ,press after set
up.
F2 Window open function:Press to open Window open functio, press to 0, Window open
function is closed, re-open heating time can be set, “0”、“65”、“90” minutes are available,press
after set up.
Under heating condition, when ambient temperature suddenly drops 2 ℃in five minutes, it means
the window is open in this room, radiator switches to ANTIFREEZE MODE, it stops heating,
will re-heat after 65 minutes, if temperature keeps dropping, radiator will stop heating again, and
repeat the cycle.
F3 Children anti ironing function:Press to add temperature option, press to reduce
temperature option, totally there are 6 temperature options: “0”, “40”, “45”, “50”, “55”, “60”.
After set up, press to continue function select.
Example:If user set up 50℃,when it reaches parameter 50℃, will stop heating by means of PCB
control radiator.(Remark:Parameters can not represent the actual surface temperature of the
radiator, but can only be used as a reference).
F4 WIFI function:Press button to“on”, WIFI function is opened ;Press to “off”, WIFI
functiom is closed. Press after set up , and then exit internal setting.
Wifi Function

FONCTION WIFI (Seulement pour les modèles avec fonction wifi)
APP name:Radistar in Apples store or Radistar in Google play
Please download App from Apple store or Google Paly firstly.
Open Wifi Function:
1、Open radiator WIFI Function, WIFI icon flickers.
2、Mobile phone can download APP on certain web,(Mobile phone:Android、Iphone‘s
different IOS version will affect part of APP function, also will cause APP not work)
3、Download APP, open APP then register an account)
4、Add radiator into APP, and connect to WIFI.
5、Long press to connect WIFI,60 seconds for connect the WIFI, then enter APP to bund
radiator, WIFI icon will turn on after configures the radiator, turn back to homepage.
6、Set up on APP home page, it has Adding radiator、Temperature、Timer、Mode…options
7、If APP can’t connect radiator:
a. Check the internet works or not, bad internet will effect connecting to radiator, the distance
should be in 10 meter, no wall to stop internet(Suggest to use in same room);
b. Make sure mobile phone’s WIFI function has opened and connected to the internet;
c. Make sure register to the APP successfully. Make sure the radiator bound to the same WIFI
with the mobile phone;
d. Open APP to bound radiator, mobile phone needs to synchronize with devices, the time is
limited.
Illustration of APP as below:
1、Register APP
account.
2、Register
succesfuly, enter to
APP homepage.(If
fail to
register,register
again with your right
information)

3、Add device
4、Set up current
WIFI and password.
5、When radiator
isin standby state,
icon
flickering on
LCD.
6、Long press
7、Connect to
WIFI, time starts
counting down
from 60 59
58….00.
8、Press the confirm
key to set up the
current WIFI and
password.

9、APP
connecting
10、APP connect
successfuly.
11、Radiator
connect
successfuly.
12、Return to
standby state,LCD
show time and is
on.
Operate instruction for APP homepage fuction:
1、Press
key.
2、Enter to APP
homepage

2.1、Illustration :
Icon
Description
Trademark
Select the device name by slide left or
right.
Press COMFORT MODE icon,
COMFORT MODE works,
current setting temperature is
30℃.
The heating icon is on, indicate heating.
Current radiator ambient temperature is
14.0℃.
Temperature set up : check temperature
for COMFORT/ ECONOMIC/
ANTIFREEZE MODE, modify
the COMFORT/ ECONOMIC
MODE’s temperature.
ECONOMIC MODE: set up to
19℃.
ANTIFREEZE MODE: set up to
7 ℃.
WIRE CONTROL MODE
TIMING MODE, can edit timed
program.
SENSOR MODE
ON / OFF button
Home page button
Device list checking button
Adding device button
EXIT button

Temperature setting
1、Temperature
settings, press the
temperature
setting icon,then
switch to the
temperature
setting interface.
1.1、Press+ /―key to
set temperature for
COMFORT and
ECONOMIC
MODE,after set up,
press conform key,
exit to home page.
2 Timer set up and modify
1、Press timming
key.
2、Switch to timed
mode interface.
Picture shows:
Tuesday,
ECONOMIC
MODE.
3、Select timing P
programe.
Picture shows :
Tuesday, P1
program.
4、Set up a multi day
timer and select the
same P program.
Picture
shows :Monday to
Sunday, P1 program.

5、Modify P
program.
Select the P
program you want
to change. Draw a
circle outside the
time by hand. The
inner display
changes from the
selected time to
the stop time.
After the
modification, the
circle color will
change to gray.
Picture
shows :Tuesday,P
1 program
changed.
5.1、Select timing
mode
After loosening the
hand, the middle
time will disappear.
COMFORT/
ECONOMIC/
ANTIFREEZE
MODE icon appear
in the same time.
5.2、Select
Antifreeze mode
and press the
Save key, then
exit to home
page.
Picture
shows :Tuesday,
P1 program
change to
Antifreeze Mode.
6、Set up and return
to the home page.
7、After APP
modified LCD
displays.
7.1、Only in timing
mode, all the
operation keys are
locked,except
button.
Picture shows:After
pressing the ,
the timer program
works on the
radiator, and the key
lock is cancelled.

7.2、a、To recover
controling
radiator APP by
Timing mode, can
be achieved by
switching mode
on the home page.
Picture shows:
Switch to Sense
Mode,then switch
to timing mode
again.
7.2、b、Then press
the timing icon,
appear timed page,
press` save button,
can also achieve
APP to controlthe
radiator.
3Internal parameter settings and device deletion
1、APP
homepage
2、Press the device
key and switch to
the device list.
a. The status of each
device can be
reviewed.
b.Open and close
other devices.
c. Select a device
name, slide left to set
the internal
parameter settings
separately.
2.1、Slide to left,
setting internal
parameters
separately.
2.2、Press , switch
to device internal
parameter setting
list.
a. Temperature
compensation, Sense
function setting,
Window open
setting, Children anti
ironin setting
b.Press to
adjust.
c.After set up, slide
up,press confirm
key.

2.3、Turn back to
devide list.
2.4、Delete divice.
a.Confirm to delete
device.
b.Cancle to delete
device.
3、Press logout
key a.Cancel
b.Confirm
3.1 Exit logon.
a. Original login
account saved.
b. The password
needs to be re
entered
Power down memory function:
If power failure occurs, the last work setting will be saved, and it will return to the settings before
power failure when the power is on again, no need to reset.
Reset to Defaults:
When plugged to the power source, press button for 10 seconds to reset your radiator and
reinstall the original factory configuration. Full screen display for 3 seconds to power off status, press to turn on
the radiator, display COMFORT temperature is 19℃,ECONOMIC temperature is 15.5℃, time displays “0000”, day
of week displays “1”, timing is blank, P1-P7 is default setting, data for temperature compensation is“-2”, time for
Induction function is “0”,time for Window open function is “0”, temperature for Children anti ironing functions is
“0”,WIFI function is ”OF”.
I High and low temperature alarm
This manual suits for next models
1
Table of contents