COLUMN ELECTRIC
Controls
Electronic control
Operating modes
Pilot Wire (n/a in the UK) Comfort Night / Eco Anti-freeze Child safety
Chrono
Adaptive Start Control Energy saving Override Open window
Keypad lock Temperature set point change Reset LED on / off Standby
Use
REGULATION AND OPERATION
The appliance is designed to heat rooms. When operating normally, the
surface of the appliance becomes very hot and may cause burns. Avoid
contact with parts of the body. Pay particular aention when children
are present.
Keep combustible or flammable materials or pressure vessels (e.g. spray
cans, fire extinguishers) at least 50 cm from the appliance. Do not vaporise
any type of substance on the surface of the appliance.
Do not wet the electronic control unit with water or other fluids. If this
occurs, disconnect the mains power supply and allow the appliance to
dry completely.
When the appliance is installed at high altitude, the air will be hoer than
the set temperature.
Possible traces of oil noted on the boom of the radiator during mounting
or the first times you turn the appliance on may be left from the fabrication
process. Clean the part with proper precautions at intervals of a couple
of days. If the problem reoccurs, follow the instructions in Chapter
Remote control.
In cold conditions, the radiator may emit metallic sounds when turned on.
This is due to the expansion of the materials.
}
PHASE=BROWN/RED
Appliance cable
Two possible cases
Case 1:Installation
without Pilot Wire Terminate and insulate
the wire
Connect to the Pilot Wire
control unit or transmission box
Case 2:Installation
with Pilot Wire
NEUTRAL=GREY/BLUE Household mains
PHASE
NEUTRAL
PILOT WIRE=BLACK
FIG. 8
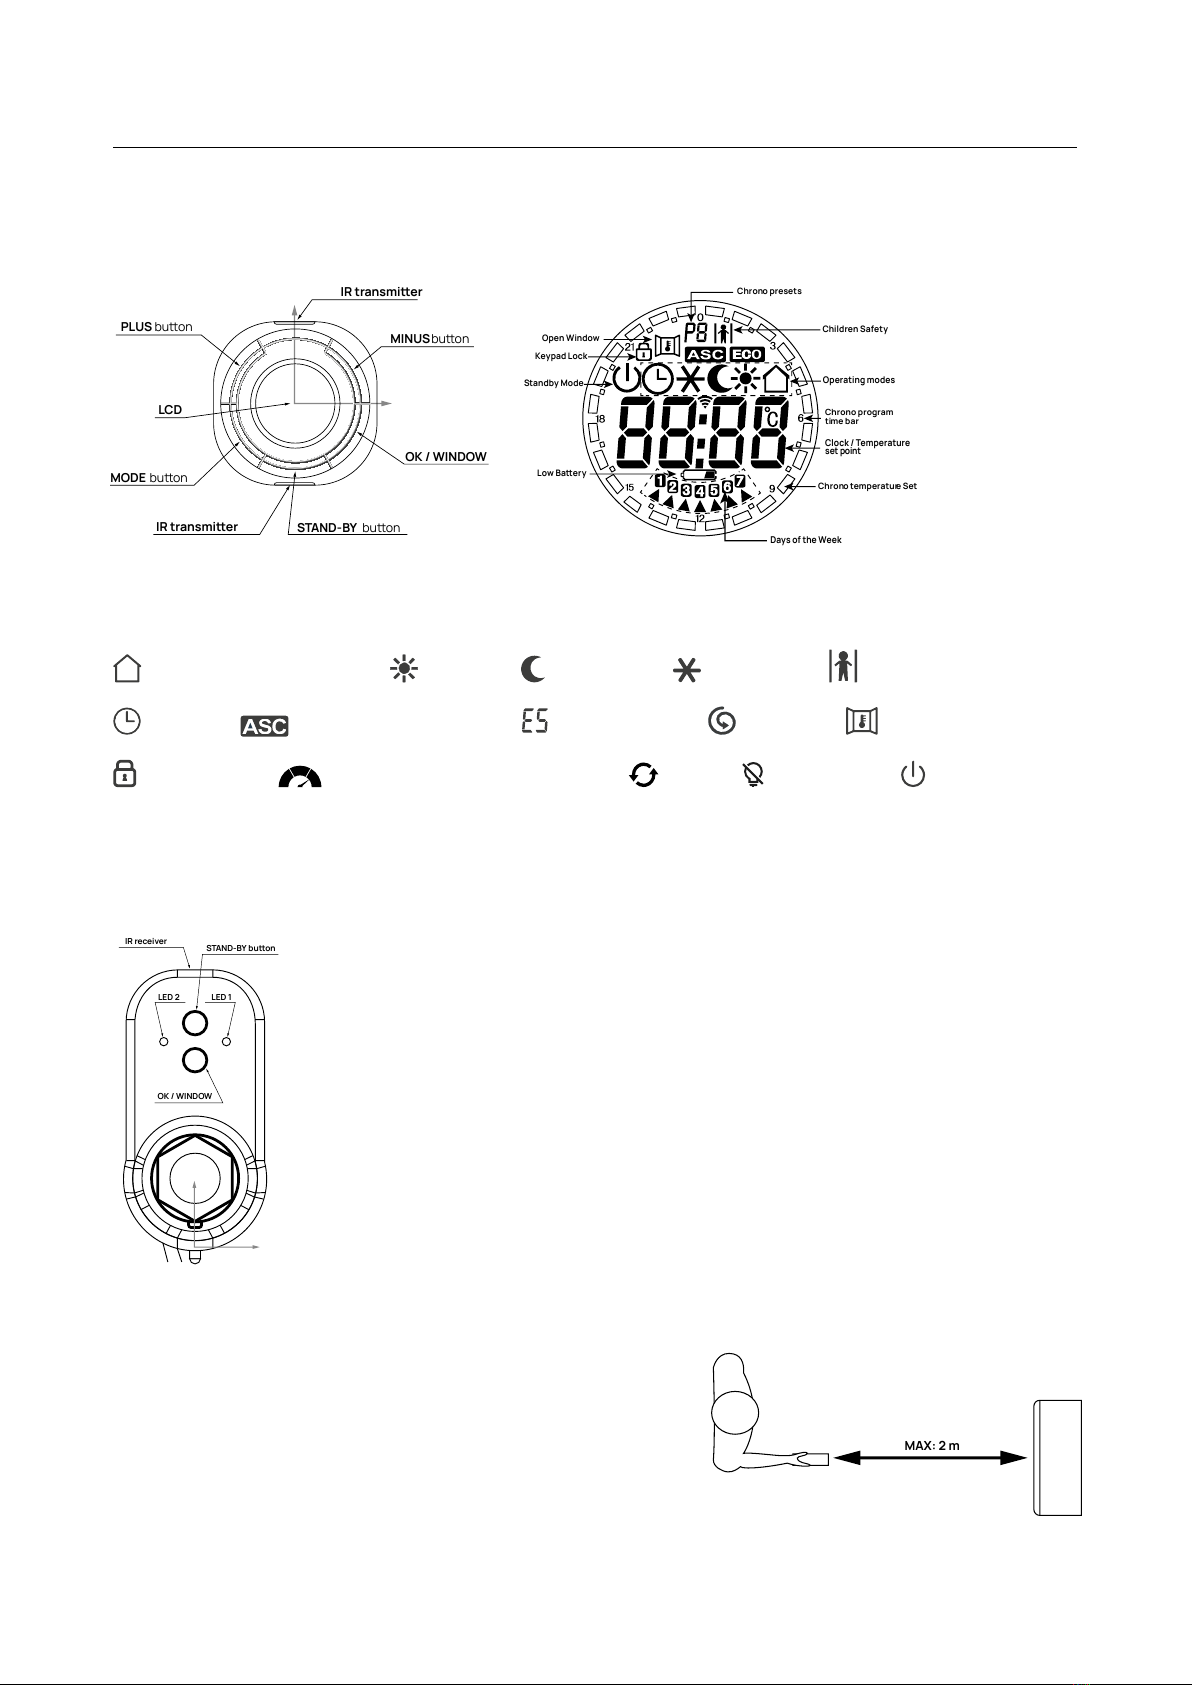
ELECTRONIC CONTROL
Remote Control
PLUS buon
LCD
MODE buon
MINUSbuon
IR transmier STAND-BY buon
OK / WINDOW
IR transmier
Keypad Lock
Open Window
tandby Mode
Low Baery
Operating modes
Chrono program
time bar
Clock / Temperature
set point
Chrono temperatur
Children Safety
Chrono presets
POWER UNIT
LED 2
IR receiver STAND-BY buon
OK / WINDOW
LED 1
REMOTE CONTROL
INFRARED REMOTE CONTROL
The remote control communicates with the appliance by infrared rays.
For efficient communication, point the remote control at the receiver on
the appliance (Fig. 10). The distance between the remote control and the
receiver must not be more than 2 m.
The appliance responds to the commands received from the remote
control with a beep.
26
26
Use
REGULATION AND OPERATION
The appliance is designed to heat rooms. When operating normally, the
surface of the appliance becomes very hot and may cause burns. Avoid
contact with parts of the body. Pay particular aention when children
are present.
Keep combustible or flammable materials or pressure vessels (e.g. spray
cans, fire extinguishers) at least 50 cm from the appliance. Do not vaporise
any type of substance on the surface of the appliance.
Do not wet the electronic control unit with water or other fluids. If this
occurs, disconnect the mains power supply and allow the appliance to
dry completely.
When the appliance is installed at high altitude, the air will be hoer than
the set temperature.
Possible traces of oil noted on the boom of the radiator during mounting
or the first times you turn the appliance on may be left from the fabrication
process. Clean the part with proper precautions at intervals of a couple
of days. If the problem reoccurs, follow the instructions in Chapter
Remote control.
In cold conditions, the radiator may emit metallic sounds when turned on.
This is due to the expansion of the materials.
}
PHASE=BROWN/RED
Appliance cable
Two possible cases
Case 1:Installation
without Pilot Wire Terminate and insulate
the wire
Connect to the Pilot Wire
control unit or transmission box
Case 2:Installation
with Pilot Wire
NEUTRAL=GREY/BLUE Household mains
PHASE
NEUTRAL
PILOT WIRE=BLACK
FIG. 8
ELECTRONIC CONTROL
Remote Control
PLUS buon
LCD
MODE buon
MINUSbuon
IR transmier STAND-BY buon
OK / WINDOW
IR transmier
Keypad Lock
Open Window
tandby Mode
Low Baery
Operating modes
Chrono program
time bar
Clock / Temperature
set point
Chrono temperatur
Children Safety
Chrono presets
POWER UNIT
LED 2
IR receiver STAND-BY buon
OK / WINDOW
LED 1
REMOTE CONTROL
INFRARED REMOTE CONTROL
The remote control communicates with the appliance by infrared rays.
For efficient communication, point the remote control at the receiver on
the appliance (Fig. 10). The distance between the remote control and the
receiver must not be more than 2 m.
The appliance responds to the commands received from the remote
control with a beep.
26
26
Power unit / receiver
Use
REGULATION AND OPERATION
The appliance is designed to heat rooms. When operating normally, the
surface of the appliance becomes very hot and may cause burns. Avoid
contact with parts of the body. Pay particular aention when children
are present.
Keep combustible or flammable materials or pressure vessels (e.g. spray
cans, fire extinguishers) at least 50 cm from the appliance. Do not vaporise
any type of substance on the surface of the appliance.
Do not wet the electronic control unit with water or other fluids. If this
occurs, disconnect the mains power supply and allow the appliance to
dry completely.
When the appliance is installed at high altitude, the air will be hoer than
the set temperature.
Possible traces of oil noted on the boom of the radiator during mounting
or the first times you turn the appliance on may be left from the fabrication
process. Clean the part with proper precautions at intervals of a couple
of days. If the problem reoccurs, follow the instructions in Chapter
Remote control.
In cold conditions, the radiator may emit metallic sounds when turned on.
This is due to the expansion of the materials.
}
PHASE=BROWN/RED
Appliance cable
Two possible cases
Case 1:Installation
without Pilot Wire Terminate and insulate
the wire
Connect to the Pilot Wire
control unit or transmission box
Case 2:Installation
with Pilot Wire
NEUTRAL=GREY/BLUE Household mains
PHASE
NEUTRAL
PILOT WIRE=BLACK
FIG. 8
ELECTRONIC CONTROL
Remote Control
PLUS buon
LCD
MODE buon
MINUSbuon
IR transmier STAND-BY buon
OK / WINDOW
IR transmier
Keypad Lock
Open Window
tandby Mode
Low Baery
Operating modes
Chrono program
time bar
Clock / Temperature
set point
Chrono temperatu r
Children Safety
Chrono presets
POWER UNIT
LED 2
IR receiver STAND-BY buon
OK / WINDOW
LED 1
REMOTE CONTROL
INFRARED REMOTE CONTROL
The remote control communicates with the appliance by infrared rays.
For efficient communication, point the remote control at the receiver on
the appliance (Fig. 10). The distance between the remote control and the
receiver must not be more than 2 m.
The appliance responds to the commands received from the remote
control with a beep.
26
26
ELECTRIC RADIATORS
27
MAX: 2 m
FIG. 10
Always handle the remote control with great care and place it within the
special plastic container for wall mounting, included in the packaging.
Do not drop the remote control nor leave it exposed to direct sunlight. Do
not spray water or other liquids onto the remote control. Do not place the
remote control on top of the appliance or close to intense sources of heat.
INSERTING OR REPLACING THE BATTERIES
1) Remove the cover on the back of the remote control.
2)Insert two “AAA” LR03 1.5 V alkaline baeries. When inserting the
baeries, always respect the polarity (+ and -) indicated on the baery
and the appliance. Baeries not included.
3) Put the cover back.
Never use flat baeries and new baeries together, always use baeries
of the same type and brand.
Flat baeries must be removed from the appliance immediately and
disposed of appropriately. When replacing the baeries or disposing
of the remote control, the baeries must be removed and disposed
of in compliance with current legislation as they are harmful to the
environment. Never throw baeries into a fire.
Keep baeries away from children. Children may change baeries only if
supervised by an adult. Remove the baeries if you will not be using the
appliance for a long period. Take appropriate precautions when handling
leaking baeries!
Avoid contact with the skin, eyes and mucous membranes.
If you come into contact with the baery liquid, rinse the parts aected
immediately with plenty of water and seek medical advice immediately.
OPERATION
STAND-BY STATE BY RC
In “Standby” mode the LCD displays the Standby icon, the hour and day of
the week.
All the operating modes are suspended (“Pilot Wire” included), but the
appliance is powered and waiting for command reception. To turn on or
o the appliance, press the “Standby” key. The radiators turns on in the
previously selected operating mode and emits a beep.
In “Chrono” mode the display shows the time, in the other modes the
temperature seing is displayed.
The entry into “Standby” mode is signalled by means of a double beep, the
exit from “Standby” mode by means of a long beep.
TURNING ON FOR THE FIRST TIME
After inserting the baeries, set the year, month, day of the week and time.
Adjust the day of the week by using the “+” and “-” keys (1=MON, 2=TUE,…
7=SUN), then confirm by pressing the “Mode” selection key. The hour starts
flashing. In the same way, adjust the hour by using the “+” and “-” keys and
confirm with “Mode” selection key. Repeat the same procedure for the
minutes. The year of start is 2019.
PILOT WIRE
TO ACTIVATE THE “PILOT WIRE” MODE
Press the “Mode” selection key until the
icon appears on the LCD .
Users can only set the “Comfort” temperature on the appliance. Select the
desired temperature set point by using the “+” or “-” keys.
The home must be fied with an automation system supporting this type
of technology. In this case, correct transmission of the programming
commands can be verified using the following diagram according to the
mode set: (see table 1).
The icon showing the mode selected on the control unit (Standby,
Comfort, Night/Eco, Anti-Freeze) is displayed together with the icon.
If the Pilot Wire programmer is not connected, “Comfort” operating mode
is selected automatically.
Mode Comfort Night/
Eco
(Comfort
-3,5 °C)
Anti-
Freeze
Standby Comfort
-1°C
Comfort
-2°C
Signal to be
transmied
Voltage
between
Pilot Wire
and neutral
wires
XXX volt 230 volt 115 volt
Negative
115 volt
Positive
230 volt
For an
interval
of 3 s
230 volt For
an interval
of 7 s
COMFORT
The “Comfort” temperature corresponds to the temperature desired by
the user. All “Pilot Wire” commands are disabled.
Press the “Mode” selection key until the icon appears on the LCD.
Select the desired temperature set point by using the “+” or “-” keys.
The temperature can be choosen in the interval between 13 °C and 30 °C.
The behavioural indicator allows you to check if the chosen temperature
set point is aligned with the recommended guidelines, in order to avoid the
waste of energy and reduce the energy consumption.
An arrow will appear by one of the three colored bars that represent
the energy consumption in a qualitative way, according to the
following scheme:
(a)Green Dark:The chosen temperature set point is already lower than
the recommended. Heating on.
(b)Green Light:The chosen temperature set point is adequate, but it would
be beer to further decrease it. Heating on.
Red:The chosen temperature set point is high, it would be beer to
decrease it. Heating on.
(d)Green Dark Flashing:The chosen temperature set point is already
lower than the recommended. Heating o.
(e)Green Light Flashing:The chosen temperature set point is adequate,
but it would be beer to further decrease it. Heating o.
(f)Red Flashing :The chosen temperature set point is high, it would be
beer to decrease it. Heating o.
NIGHT/ECO
In “Night/Eco” mode the temperature set point must not be higher than
“Comfort” temperature set point.
If the “Comfort” temperature is set below the “Night/Eco” temperature,
the laer will be automatically adjusted accordingly.
Press the “Mode” selection key until the icon appears on the LCD.
Select the desired temperature set point by using the “+” or “-” keys.
The use of this operating mode is recommended in nighime hours and
in case no people are in the room for more than 2 hours. Default night is T
comfort -3°C.
ANTI-FREEZE
In “Anti-Freeze” mode the temperature set point is fixed at 7 °C. The appliance
starts heating when room temperature goes under 7 °C and with low energy
consumption it prevents the room temperature from reaching freezing point.
Use
Remote control
The remote control communicates with the appliance by
infrared rays. For efficient communication, point the remote
control at the receiver on the appliance). The distance
between the remote control and the receiver must not be
more than 2m.
The appliance responds to the commands received from the
remote control with a beep lasting about 2 seconds.


