Cool-Living CL-D025BA-35PT User manual

DEHUMIDIFIER
Owner’s Manual
KEEP THESE INSTRUCTIONS FOR FUTURE REFERENCE
CL-D025BA-35PT
CL-D026BA-50PT


THANK YOU
Thank you for purchasing a COOL-LIVING Dehumidifier. This User
Manual is intended to provide you with important information needed
to set up, operate, maintain and troubleshoot this product.
Please take a few moments to read the instructions and familiarize
yourself with all the operational aspects of your new COOL-LIVING
Dehumidifier.
SAFETY WARNINGS
When using the unit, please read the following safety instructions:
DO NOT touch the dehumidifier or the electrical plug with wet hands.
Always ensure effective grounding. Incorrect grounding may cause electric
shock.
Do NOT exceed the rating of the power outlet or connection device.
Never use or store gasoline or other flammable vapor or liquid near this
unit unless instructed by this manual.
Disconnect the power if strange sounds, smell, or smoke comes from the
dehumidifier.
Always unplug the dehumidifier before emptying the water bucket.
You should never try to take apart or repair the dehumidifier by yourself.
1

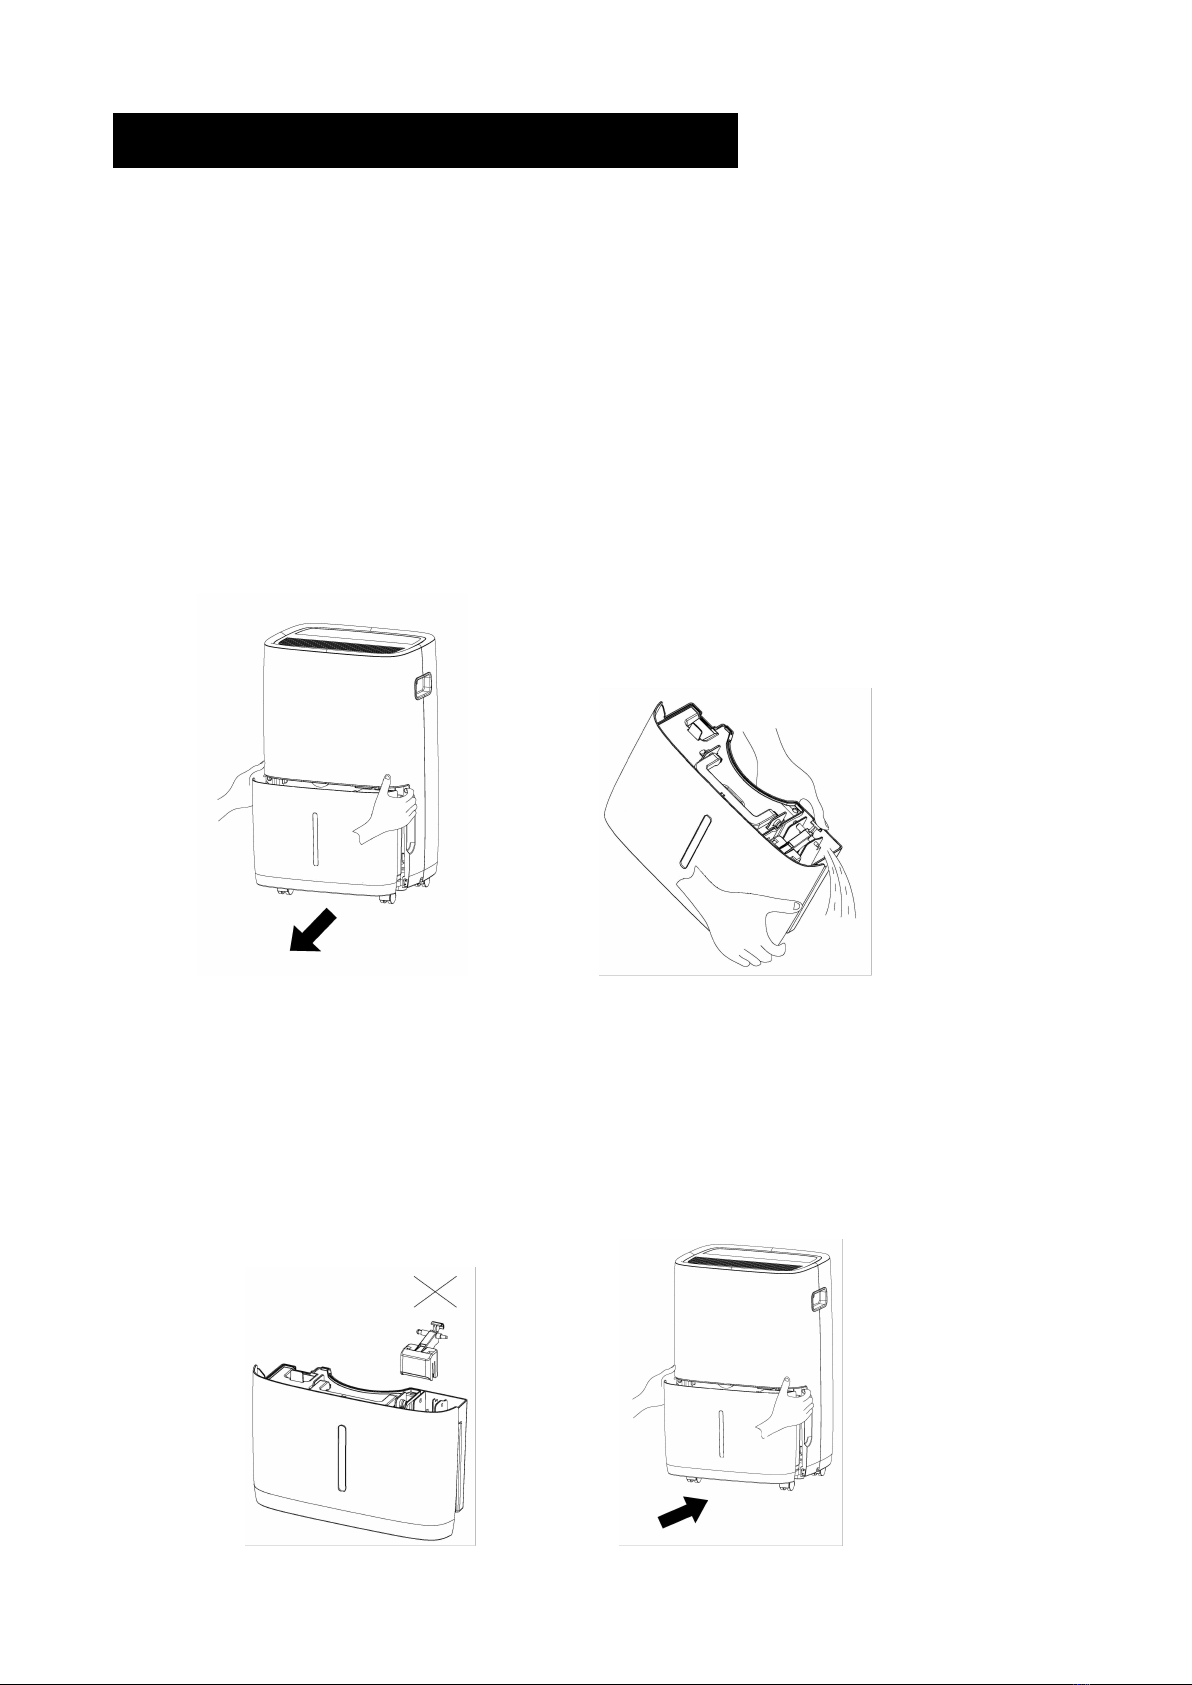
Do NOT take the water bucket out while the dehumidifier is working.
This appliance has been manufactured for use in domestic environments
and must not be used for other purposes.
Maintain a 12-18 inch clearance space around this unit. Do not block or
cover air inlet or outlet grilles.
Never insert your finger or other foreign objects into grills or openings.
Take special care to warn children of these dangers.
If the unit is damaged or it malfunctions, do not continue to operate it.
Unplug the product from the electrical outlet. Refer to the troubleshooting
section and contact the customer support center.
DO NOT cover the air inlet or outlet on the appliance as this may cause the
unit to fail.
Do NOT place flower vases or other water containers on top of the unit.
Water may spill inside the unit, causing insulation failure and electrical
shock or fire.
To reduce the risk of fire or electric shock, do not use this dehumidifier with
any solid-state speed control device.
Risk Of Fire Or Explosion. Flammable Refrigerant Used. To Be Repaired Only By Trained
Service Personnel. Do Not Puncture Refrigerant Tubing.
Risk Of Fire Or Explosion. Dispose Of Properly In Accordance With Federal Or Local
Regulations. Flammable Refrigerant Used.
•
•
2

FEATURES
Powerful Dehumidifying Capability
Taking advantage of refrigeration technology, the dehumidifier powerfully removes moisture
from the air to decrease the humidity level of the room and keep the indoor air dry and
comfortable.
Unique Portable Design
The dehumidifier is built to be compact and lightweight. The casters on the bottom of the unit
make it easy to move from room to room.
Adjustable Humidistat
Different dehumidification levels can be selected according to different room requirements.
Save Money
This dehumidifier is Energy-Star rated, and could quickly remove moisture from the air without
running up your utility bill. Energy Star units not only save energy for the environment, but also
cost 30% less to save your money comparing to non-Energy Star units.
Automatic Defrost
When frost builds up on the evaporator coils, the compressor will cycle off and the fan will
continue to run until the frost disappears. When the coils are completely defrosted, the
compressor or fan (depending on the model) will automatically restart and dehumidification
will resume.
PRODUCT OVERVIEW
1. Control Panel 2. Handle 3. Water bucket
4. Air Filter 5. Air Outlet Grille 6. Drain Hose Outlet
7. Power Cord 8. Power Cord Buckle 9. Caster
3

OPERATING INSTRUCTIONS
Press to turn the dehumidifier on and off.
When the Filter Alert Light is ON, it is time to clean the filter. Switch the unit OFF and
carefully remove the filter from the unit and clean. Replace the filter and switch ON the unit.
Press to cycle through High, Medium, or Low fan modes. Higher fan speeds lead to
increased moisture removal. When humidity has been reduced or quiet operation is
preferred, set the fan to Medium or Low.
POWER Button
FILTER Button
FAN SPEED Button
When the unit is switched ON, the Display Screen shows the current humidity percentage.
Press ▲ or ▼ to select your preferred humidity level. The humidity is adjusted in
increments of 5% by pressing ▲ or ▼. The adjustable Relative Humidity (RH) range is
between 35% RH to 80% RH. If you want the dehumidifier to operate continuously
regardless of the room humidity, press the MODE button until you see “CO” on the digital
display. This will enable continuous operation and the “Continuous” indicator will light up on
the control panel.
Preset humidity level settings allow the user to easily move the dehumidifier room-to-room
and select the corresponding mode for the location in which the dehumidifier is operating
for optimum performance. Press the MODE button to choose from comfort and basement.
HUMIDITY Button
MODE Button
4

●Timer Auto On - To program the unit to automatically turn on, press the TIMER button
when the unit is off. Press ▲or to increase or decrease the timer in 30 min increments (.5
hours) up to 10 hours. After 10 hours, each press of the ▲or ▼buttons will increase the
timer in 1 hour increments up to 24 hours. Once the desired time is reached, the unit will
automatically turn on.
●Timer Auto Shut-Off - To program the unit to automatically turn off, press the TIMER
button when the unit is on. Each press of the ▲ or ▼ buttons will change the timer setting in
30 min increments ( .5 hours) up to 10 hours. After 10 hours, each press of the ▲ or ▼
buttons will increase or decrease the timer in 1 hour increments up to 24 hours. Once the
desired time is over, the unit will automatically power off.
●Child-Lock Mode - To lock the control panel, press and hold the TIMER button for 3
seconds. Locking the control panel prevents someone from accidentally changing the
settings. When locked, the LOCK indicator will light up. Press and hold the TIMER button
for 3 seconds to unlock the control panel.
TIMER Button
5

REMOVING COLLECTED WATER
There are 2 options to remove water collected by your dehumidifier.
●Option 1: Drain Bucket.
When the drainage bucket is full, the bucket full indicator light will turn on, the operation will
stop automatically and the buzzer will beep 3 times to alert the user, that the water need to
be emptied from the drainage bucket.
Emptying the Drainage bucket
1. Lightly press on the sides of the bucket with both hands and pull the bucket out gently.
2. Drain the collected water.
NOTE
1. Do not remove the float from the water bucket. The water full sensor will no longer be
able to detect the water level correctly without the float and water may leak from the water
bucket.
2. If the drainage bucket is dirty, wash it with cold or lukewarm water. Do not use detergent,
scouring pads, chemically treated dust cloths, gasoline, benzene, thinner, or other
solvents, as these can scratch and damage the bucket and cause water leakage.
3. When replacing the drainage bucket, press the bucket firmly into place with both hands.
6

●Option 2: Continuous Drainage
Garden Hose Installation Setup
Water can be automatically emptied by attaching a garden hose to the continuous drainage
port on the back of the dehumidifier. This will allow the unit to run continuously (depending
on the selected humidity level) without having to empty the water bucket. To drain, simply
attach a standard garden hose (not included). The thread standard for garden hoses in the
US and its territories is known as GHT or "garden hose thread" which has an outer
diameter of 1 1/16 inches (1.0625 inches or 27.0 mm) and a pitch of 11.5 TPI.
• Place dehumidifier on a level surface
• Unscrew the cap on the back of the unit to access the garden hose nozzle
• Thread a garden hose (not included) onto the accessible nozzle, lead to a floor drain and
cut to length
• Make sure that there are no kinks or knots in the garden hose (See picture below)
• Turn on the unit and press the MODE button until set to CONTINUOUS
Garden Hose Installation Reference Guide
IMPORTANT NOTES:
Placing the dehumidifier on an uneven surface or improper hose installation may result in
water filling up the bucket and cause the unit to shut off. Empty bucket if shut-off occurs,
then check dehumidifier location and hose for proper setup. The bucket must be in place
and securely seated for the dehumidifier to operate.
7

CLEANING & MAINTENANCE
WARNING: Always switch OFF the dehumidifier and unplug it from the electrical outlet
before attempting any cleaning or maintenance of this product.
● Clean the Grill and Case
Use water and a mild detergent. Do not use bleach or abrasives.
● Clean the bucket
Every few weeks, clean the bucket thoroughly to prevent growth of mold, mildew and
bacteria. Partially fill the bucket with clean water and mild detergent. Swish it around in the
bucket, empty and rinse.
● Clean the air filter
1. To remove the filter, pull filter outwards.
2. Wash the filter with clean water then dry.
3. Re-install the filter, replace bucket.
● Storing the dehumidifier
1. Before storing the unit, let it rest for one full day so that the system can dry out naturally.
2. Clean the unit, water bucket and air filter.
3. Wrap the cord with the power cord buckle.
4. Cover the unit with a plastic bag.
5. Store the unit upright in a dry, well-ventilated area.
8

TROUBLESHOOTING
Problem
Solutions
Dehumidifier does not start
Make sure the dehumidifier’s plug is pushed completely into the outlet.
Check the house fuse / circuit breaker box and replace fuse or reset breaker.
Dehumidifier has reached its preset level or bucket is full.
Water bucket is not in the proper position
There is a protective time delay (up to 3 min.) to prevent trip ping of the
compressor overload. For this reason, the unit may not start normal
dehumidification for 3 min. after it is powered back on.
Dehumidifier does not dry
the air as it should
Not enough time to remove the moisture.
Make sure there are no curtains, blinds, or furniture blocking the front or back of
the dehumidifier.
The humidity control may not be set low enough.
Check that all doors, windows and other openings are securely closed.
Room temperature is too low, below 5°C (41°F).
There is a water vapor source in the room.
The unit makes a loud noise
when operating
Air filter may be dirty. Clean filter. Refer to Care and Cleaning section.
The unit is tilted instead of upright as it should be.
The floor surface is not level.
Frost appears on the coils
This is normal. The dehumidifier has Auto defrost feature.
Water on floor
Hose to connector or hose connection may be loose.
Intended to use the bucket to collect water, but the back drain plug is removed.
Continuous Mode is on, but
water is draining in bucket Garden hose must be used while operating Continuous Mode.
SELF-DIAGNOSING CODES
CODE
POSSIBLE CAUSE
E1
Compressor Overheat Protection
E2
Condenser Overheat Protection
EH
Humidity Sensor Malfunction
9

Page: 16/17
Warranty & Information
6 MONTH LIMITED WARRANTY
To utilize the warranty, you must register your purchase within 30 days from the date of purchase.
The manufacturer warrants this unit against defects in materials and workmanship on functional parts, for a
period of 6 months from the original date of purchase. Your sales receipt showing the date of purchase of the
product is your proof of purchase. Keep sales receipt in a safe place for future reference. this product is made
with the highest quality materials and is warranted to be free from defects in materials and workmanship at the
time of purchase. This limited warranty applies to products manufactured or distributed by the manufacturer, are
delivered in the continental United States, and extends to the original purchaser, or gift recipient. This warranty
becomes valid at the time of purchase and terminates either by the specified time frame listed above and or
owner transfer. Any refunds or monetary compensations must be claimed through the place of purchase
(retailer), and not through the manufacturer. Any extended warranties (Warranties that cover above and beyond
this manufacturer warranty) that are sold through a retailer or third party, are not directly correlated with this
product’s limited warranty, and may be redirected to said retailer or third party for coverage. This warranty
extends through the manufacturer of the product and covers functional parts only. Cosmetics are not covered,
unless unequivocally determined it is a workmanship defect. Shipping damage should be addressed with the
shipping company, retailer, or place of purchase, not the manufacturer unless the manufacturer was the direct
shipper. The manufacturer's sole obligation under this warranty shall be limited to furnishing the original
purchaser replacement parts for units deemed repairable by the supplier's warranty department. The purchaser is
responsible for purchasing insurance on any parts shipped or returned if desired. The purchaser is responsible
to prepay any shipping charges (both ways) including, but not limited to taxes and duties. All exchanged
parts and products replaced under this warranty will become the property of the manufacturer. The
manufacturer reserves the right to change manufactures of replacement parts or products for use, to cover any
existing warranty. The purchaser may be asked to provide the supplier with proof of purchase documents
including the date of purchase. Any evidence of alteration, erasing or forgery of proof of purchase documents
will be justified cause to void this limited warranty. Products, in which the serial number has been defaced or
removed, are not eligible for warranty coverage. This warranty does not apply if the unit has been subject to
negligence, fabrication, misuse, abuse or repairs, alteration by non-manufacturer authorized personnel,
inappropriate installations, or any case beyond the control of the manufacturer. Examples of warranty
invalidation may also include, but are not limited to: Use of lacquer or paints in (and around) the unit
Electrical requirement deficiencies (see manual for specific electrical requirements) Use with extension
cords/timers/surge protectors/GFCI Outdoor Applications Normal wear /tear/weathering Pet / Consumer
accidents
The manufacturer shall not be liable for any loss due to use (or misuse) of the unit or other incidental or
consequential costs, expenses, or damage without irrefutable foundations. Under no circumstances shall the
manufacturer or any of its representatives be held liable for injury to any person or damage to any property,
however arising. Any implied warranty shall have duration equal of the applicable warranty stated above.
Specifications are subject to change without notice or obligation. This limited warranty gives the original
purchaser specific legal rights. Other rights may vary from state to state. To utilize the warranty, you must
register your purchase within 30 days from the date of purchase.

Page: 17/17
PRODUCT REGISTRATION
Registration must be completed online at WWW.COOLLIVINGPRODUCTS.COM or complete and mail the
attached registration card to:
KMS INC.
ATTN: CUSTOMER SERVICE
811 E WATERMAN
WICHITA, KS 67202
For questions or part(s) on your Cool Living air conditioner please visit our website at
WWW.COOLLIVINGPRODUCTS.COM or email CUSTOMERSERVIC[email protected] If you have no online access
please call 800-752-5262 X 251
For Parts, please provide the model number, copy of receipt from purchase, name/part number and a brief
description of the part needed, your name and the mailing address where you would like the replacement
part to be sent. If you are unable to register your warranty online at WWW.COOLLIVINGPRODUCTS.COM
Please fill out and mail the attached registration card to the address listed above. Keep the rest of this
information in a safe place for reference.
This manual suits for next models
1
Table of contents
Popular Dehumidifier manuals by other brands

Parker Hiross
Parker Hiross ATT140 user manual

Orbegozo
Orbegozo DH 1039 instruction manual

MSW Motor Technics
MSW Motor Technics MSW-DEH4050H user manual

Olimpia splendid
Olimpia splendid AQUARIA SLIM 14 P Instructions for installation, use and maintenance

Zanussi
Zanussi 864500 Technical data

Philips
Philips DE5206 user manual