Coolingstyle Technology CS-MRC-Q420AC01 User manual

1
User manual
Applicable product model:
CS-MRC-Q420AC01
CS-MRC-Q420AC02
CS-MRC-Q580AC01
CS-MRC-Q580AC02
Shenzhen Coolingstyle Technology Co., Ltd.

1
Contents
1. APPEARANCE................................................................................................ 2
2. BASIC PARAMETERS...................................................................................... 3
3. OPERATION INSTRUCTIONS .......................................................................... 4
3.1 INSTALLATION........................................................................................................................... 4
3.2 DISPLAY SETTING ...................................................................................................................... 5
3.3 DATA INTERFACE DESCRIPTION(OPTIONAL)...................................................................................... 8
3.4 FAULT CODE AND OUTPUT PORT DESCRIPTION ................................................................................. 8
4. PRECAUTIONS ............................................................................................ 10
5. SIMPLE TROUBLESHOOTING ....................................................................... 12
6. DAILY MAINTENANCE ................................................................................. 14
7. STANDARD FACTORY LIST............................................................................ 14

2
1. Appearance

3
2. Basic parameters
Model
CS-MRC-Q420AC01
CS-MRC-Q580AC01
CS-MRC-Q580AC01
CS-MRC-Q580AC02
Rated Voltage / Frequency /
Phase
220V/50Hz/1Φ
Rated Power
250W
260W
280W
300W
Maximum Power
320W
330W
350W
370W
Nominal Cooling Capacity
420W
580W
Temperature Range
10~35℃
Temp Accuracy
±0.1℃
Refrigerant
R134a
Pump Head
13m
20m
20m
25m
Maximum Flow of Water
Pump
23L/min
24L/min
24L/min
25L/min
Type of Liquid can be Used
Water/Glycol Aqueous Solution
Working Temperature
0~45℃
Storage Temperature
-10℃~60℃
Size (without handle)
345mm(L)×248mm(W)×215mm(H)
Package Size
410mm(L)×313mm(W)×273mm(H)
Net Weight
10kg
10.5kg

4
3. Operation instructions
3.1 Installation
Please follow the steps when the chiller is used for the first time:
1. Open the package and check if the machine is in good condition and the accessories are
complete.
2. Open the cap and add water. Add pure water or other clean antifreeze until it is above the
minimum liquid level. In order to achieve better performance, it is recommended to reach
as close as possible to the highest liquid level, and the maximum water injection amount is
about 1.8L.
3. Be sure to connect the external waterway before starting operation. The water inlet and
outlet are all G1/2 internal threads, and users can prepare quick couplings or pagoda joints
with G1/2 external threads for connection.
4. Connect the chiller to 220V power, and press the switch to power on. After power on, the
chiller is in a stopped state. You need to operate the display screen to boot up, see the next
section for details.
5. If the external pipeline is long, the water level will drop slightly after the first start-up. You
can replenish a proper amount of fluid from the water injection port.

5
3.2 Display Setting
The display screen is divided into a display area and an operation area, as shown in the figure above.
Display area includes: RUN, STOP, ERROR, CHILLING, HEATING. Etc.
Working indication: when lit, it means the chiller is on (the AUTO indicator in the
upper right corner lights up at the same time, indicating that the water temperature is under
automatic control);
Stop indication: when lit, it indicates that the chiller is in the shutdown state
(including power off and fault status);
Flow indication: indicates that the following number is water flow value;

6
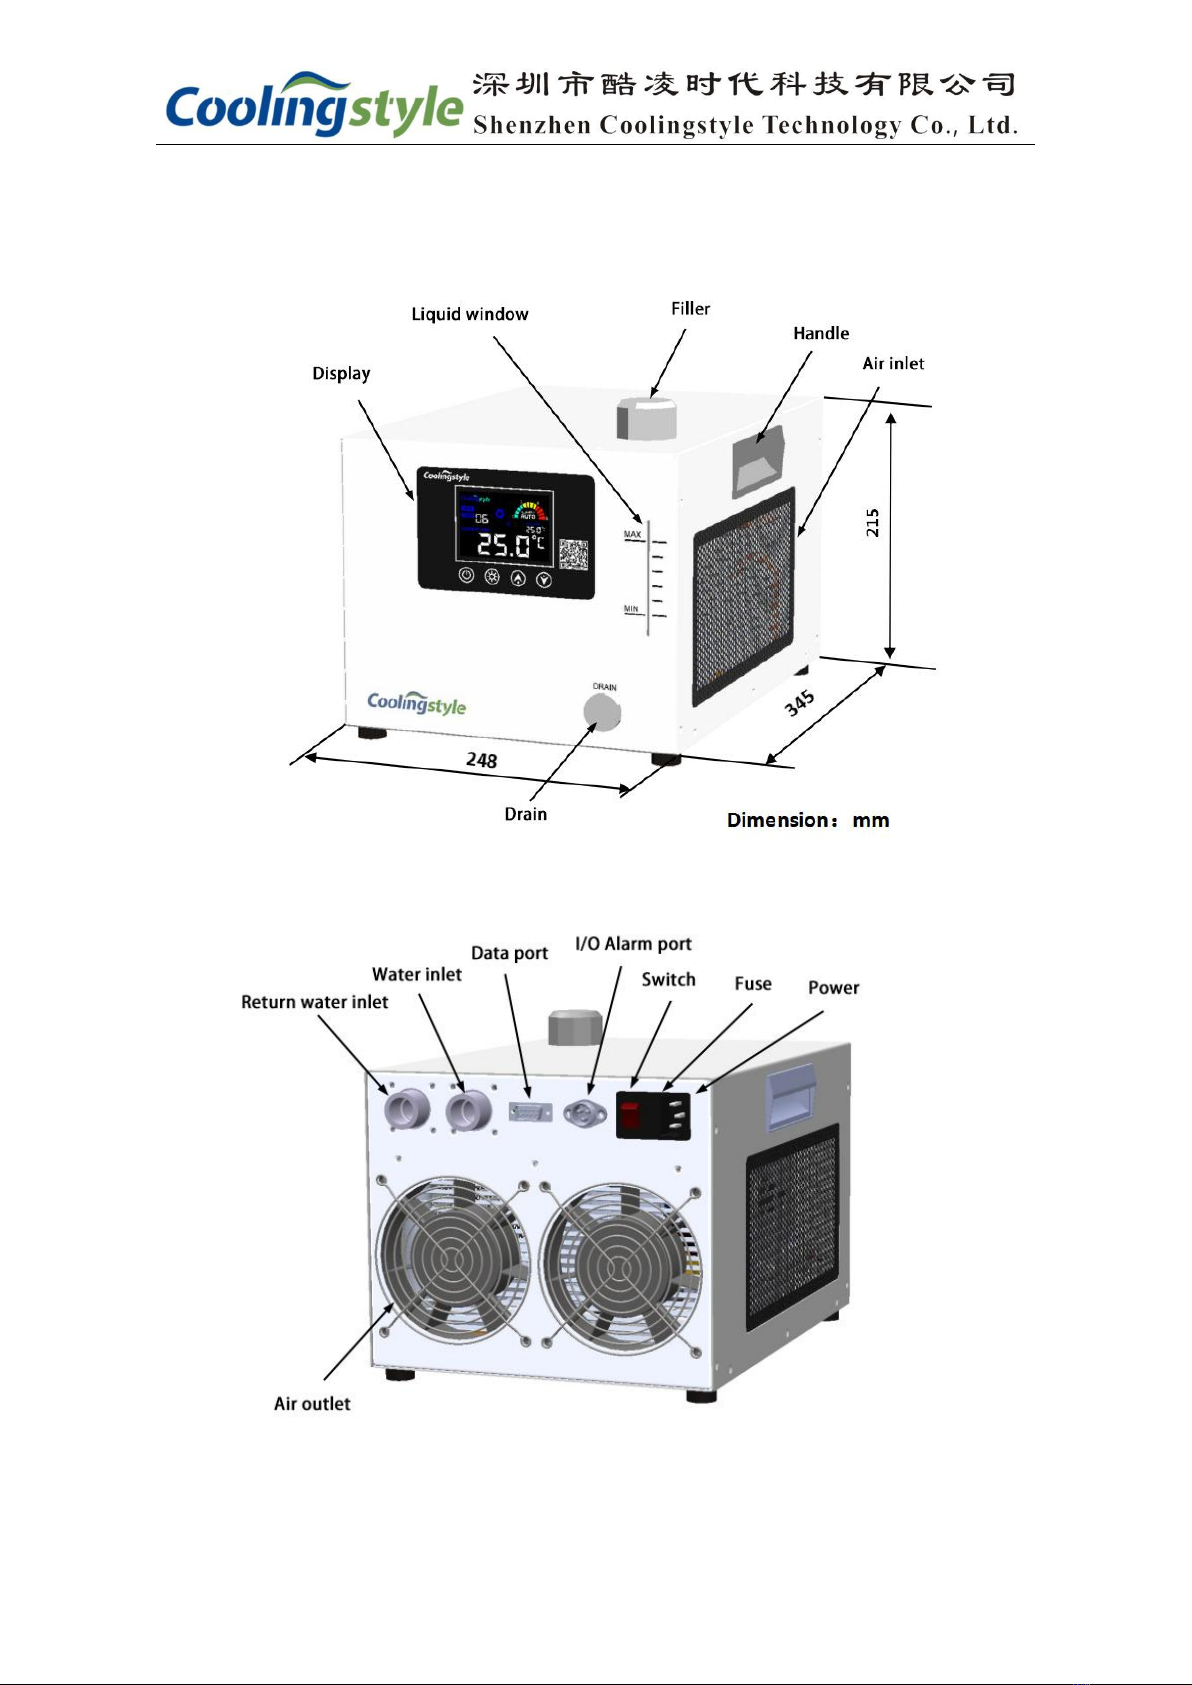
(For products without flow monitoring function, this mark will not light up).
This area displays 2 types of contents:
a) During normal operation, the real-time flow will be displayed; for example: "06" means the
flow is 6.0~6.9L/min, press the "up" key to display one decimal place.
b) In the fault state, the fault code is displayed.
Fault indication: when lit, it indicates that the chiller is in a fault state;
Dynamic flow indication: when the flow rate is not zero, the 3 arc-shaped icons will
cyclically light up; when the flow rate is zero, all 3 arc-shaped icons will flash;
Compressor speed indication: When the chiller uses a DC compressor, this icon
indicates the compressor speed; when an AC compressor is used, the fixed speed is displayed here.
Cooling indication: when lit, the compressor is working and the chiller is in the cooling
state;
Heating indication: when lit, it indicates that the internal heating device is in working
condition;
High temperature alarm indication: when lit, it means that the water temperature
exceeds the high temperature alarm threshold;
Setting value: Under normal circumstances, display the set target temperature;
when setting the flow alarm threshold, display the flow threshold;
Real-time water temperature: indicates the current water temperature.
Operation area: There are 4 buttons. The buzzer will emit a short "beep" sound when pressed
effectively, and there will be no response when pressed invalid. The specific instructions are as

7
follows:
On/Off button: Press to turn on/off the chiller.
Setting button: click to enter the setting interface. The real-time flow area
shows: “F0”, and each time pressing the set button, this area will cycle to display “F0”,
“F1”, “F2”, “F3” these 4 codes. "F0" means that the target temperature can be set at
this state; "F1" means that the high temperature alarm value can be set at this state;
"F2" means that the low temperature alarm value can be set at this state; "F3" means
that the flow alarm threshold can be set at this state. The set value will be displayed at
this area . Press the setting button again on the "F3" interface, and the
display will return to the normal display state. Stay on any setting interface of "F0",
"F1", "F2", "F3" for more than 10 seconds without any operation, the display will also
return to the normal display state. Specific instructions are shown in the following
table:
Code
Set item
Range
Factory default setting
Remarks
F0
Set temperature
10-35℃
25℃
Target temperature
F1
High temperature
alarm threshold
0-10℃
3℃
When the water temperature is
higher than F0+F1, it will alarm and
the alarm code will display "E5"
F2
Low temperature
alarm threshold
0-10℃
3℃
When the water temperature is
lower than F0-F2, it will alarm and
the alarm code will display "E6"
F3
Flow alarm
threshold
1-10L/min
3L/min
When the water flow rate is less
than F3, it will alarm, and the alarm
code will display "E4"
Note: Chiller without flow monitoring function have no F3 setting function.
In the setting interface, click this button, the setting value (F0-F3) will increase, and
the value will increase continuously when you press and hold it.

8
There are 2 functions of this button:
a) In the setting interface, click this button, the set value (F0-F3) will decrease, and the value will
decrease continuously when pressed for a long time.
b) In the state of E5 or E6 failure (see section 3.4), click this button, the buzzer alarm will be
turned off for 10 minutes (the fault code displayed on the screen will not be eliminated, only the
sound will be turned off).
3.3 Data interface description(optional)
The data interface is on the back cover of the chiller and it is a 9-pin serial port. When used for
RS485 communication, the pins are defined as follows:
Function
Pins
RS485
3——A, 8——B, 5——GND
3.4 Fault code and output port description
When the chiller is in a fault or alarm state, the fault status indicator on the display is lit, the flow
display area shows the fault code, and the buzzer alarms. At the same time, the signal
interface outputs corresponding on-off signals. There are 2 signal ports (3-pin aviation plug) on the
back cover of the chiller. The two output signals are exactly the same. By default, only signal port 1
has an output. You can customize both to output at the same time. The fault code description is
shown in the following table:

9
Error code
Failure description
Buzzer
Signal pin 1, 2
Signal pin 1, 3
Normal
Disconnection
Connection
E1
Temperature sensor
failure
Alarm repeating
Connection
Disconnection
E2
Temperature sensor
failure
2 times alarm
repeating
Connection
Disconnection
E3
Insufficient liquid
level in water tank
3 times alarm
repeating
Connection
Disconnection
E4 (Flashing
alternately with
real-time traffic)
The flow is lower than the
set flow threshold (no
shutdown)
4 times alarm
repeating
Connection
Disconnection
E4 (long light)
Flow rate is less than
1.7L/min
(Shutdown)
4 times alarm
repeating
Connection
Disconnection
E5
Water temperature is
higher than high
temperature alarm
threshold
5 times alarm
repeating
Connection
Disconnection
E6
Water temperature is lower
than the low temperature
alarm threshold
6 times alarm
repeating
Connection
Disconnection
Definition of signal interface pins and wiring
colors
Pin 1: red or brown; pin 2: blue; pin 3: yellow or yellow-green

10
4. Precautions
Please ensure that the working voltage of the machine is stable, the power frequency is
matched, the rated voltage of the machine is 220-240V, and the frequency is 50HZ.
Make sure that the power outlet is in good contact and that the ground wire is reliably
grounded.
The system can use pure water or deionized water, do not let impurities fall into the water
tank, it will affect the service life of the pump, and prohibit running the water pump without
water.
The external connection pipe of the machine shall be free of wrinkles and folding, and the
clamp shall be fixed at the interface.
The internal tank volume of the machine is about 1.8L. Please pay attention to add slowly
when adding water to prevent a large amount of overflow;
It is strictly forbidden if the chiller is working when water level is under minimum liquid
level.
The ambient temperature of the refrigeration system should not exceed 50℃, and should not
be used in corrosive gas or liquid environment, so as not to affect the product life.
Pay attention to keep the air inlet and outlet of the chiller unobstructed. The air outlet behind
the chiller should be more than 50cm away from the obstacle, and the front air inlet should be
more than 30cm away from the obstacle.
When the water temperature is lower than the ambient temperature and the ambient
humidity is high, condensation water will be generated on the circulating water pipe and the
surface of the device to be cooled. When the above situation occurs, it is recommended to raise
the water temperature or make thermal insulation for the water pipe and the device to be cooled.
The air inlet filter should be cleaned regularly (once a month).

11
Replace the circulating water every 45 days (to be drained in the shutdown state).
Touch display is made of glass, do not press hardly to prevent the display from shattering.
When shutting down, please turn off the chiller by the button first, then cut off the power
after the pump stops.
If the machine has serious abnormal sound or other abnormal working conditions, please
stop it and cut the power off. For technical problems, please contact the after-sales department;
Do not disassemble the machine without permission. Do not modify the machine for other
purposes.
This product is an industrial device and should not be operated by non-professionals

12
5. Simple Troubleshooting
Fault
Reason
Troubleshooting
Turn on the chiller but the power
is not connected
Power contact is not
good
Check the power connector, whether the
power cord plug is plugged in and in
good contact.
Glass fuse tube is
blown
Replace the fuse inside the power
connector on the back of the machine
Flow alarm (E4 Error code is
displayed), directly connect the
water outlet with a water pipe,
no water flow at the return water
outlet
Water tank water
level is too low
Check the liquid window, add water to
the minimum liquid level line; check if
the water circulation line leaks, and if the
water joint is loose
It shows flow alarm when the
chiller is connected with
power(E4 Error code is
displayed), but when the water
pipe is directly connected to the
water outlet and there is water
flow, and the flow alarm is
disappeared.
There is blockage of
the water circulation
pipeline or the
water pipe is bended
Check the water circulation line
It shows over-high temperature
alarm (E5 error code is
displayed)
The filter is blocked
and the heat
dispassion is not
good.
Remove the filter and clean it regularly
The ventilation is
not good of the air
outlet or air inlet
Ensure that the air inlet and outlet are
well ventilated
The voltage is
severely low or
unstable
Improve power supply lines or use a
voltage regulator
Heat load exceeded
Reduce heat load, or choose a larger
cooling capacity chiller

13
It shows over-low temperature
alarm (E6 error code is
displayed)
The set temperature
is too high when the
power is turned on,
and the water
temperature in the
water tank is too
low.
The system will adjust automatically
Condensed water condensation is
serious
The water
temperature is much
lower than the
ambient temperature
and the humidity is
high.
Increase the set temperature or make
thermal insulation for the water pipe
Drainage is slow when changing
water
The water inlet is
not opened
Open the water inlet

14
6. Daily Maintenance
1. Clean the air inlet filter regularly, once a month is recommended;
2. Regularly replace the circulating water, once every 45 days is recommended. The drain port
is a quick-connect female connector. Open the cap of the filler and connect the standard male
connector to the drain port to perform drainage operation. When draining, carry out pipeline
cleaning work at the same time, you can perform the operation of "add water-running the chiller at
a short time -drain", repeat 2 to 3 times; or use compressed air to blow and clean the remaining
water in the pipeline.
7. Standard Factory List
No.
Name
Unit
Qty
Note
1
Chiller
unit
1
2
Power cable
unit
1
3
Signal cable
unit
1
I/O alarm signal line, DB9 signal line
(optional)
4
User manual
unit
1
5
Warranty card
pcs
1
6
Quality
certificate
pcs
1

15
Shenzhen Coolingstyle Technology Co., Ltd.
BLDG H, Gangzhilong Technology Center, Longhua Area, Shenzhen, Guangdong, China.
Tel: +86 29952987
Website: www.coolingstyle.com
Email: [email protected]
This manual suits for next models
3
Table of contents
Popular Accessories manuals by other brands

Elkay
Elkay Flexi-Guard LZS WSVR 3KSA Series Installation, care & use manual

Marantz
Marantz NA-7004 Command reference

turck
turck RU10 M08 Series quick start guide

Elko
Elko iNels RFSC-61N quick start guide

aci
aci A/SCTA Series Installation & operation instructions

Manitowoc
Manitowoc K00370 installation instructions