Cooper Atkins McDonald's NSP0223 User manual

Quality Assurance
Temperature Measurement Kits
Place this chapter in the Small Equipment / Miscellaneous section of the Equipment Manual
NSP0223 NSP0828
Manufactured exclusively for
McDonald’s®
by
Cooper-Atkins Corporation
33 Reeds Gap Road • Middleeld, CT 06455 U.S.A.
860-347-2256 • www.cooper-atkins.com
ISO 9001 Registered
This manual is for the exclusive use of licensees and employees of McDonald’s Systems, Inc. ©2011 McDonald’s Corporation. All rights reserved. Printed in the U.S.A. 2011
NSP1413-1 32311-K

Introduction . . . . . . . . . . . . . . . . . . . . . . . . . . . . . . . . . . . . . . . . . . . . . . . . . . . . . . . . . 3
Warranty . . . . . . . . . . . . . . . . . . . . . . . . . . . . . . . . . . . . . . . . . . . . . . . . . . . . . . . . . . . 3
Ordering and Service Information . . . . . . . . . . . . . . . . . . . . . . . . . . . . . . . . . . . . . . . 3
Return Policy . . . . . . . . . . . . . . . . . . . . . . . . . . . . . . . . . . . . . . . . . . . . . . . . . . . . . . . 3
Temperature Monitoring Kits . . . . . . . . . . . . . . . . . . . . . . . . . . . . . . . . . . . . . . . . . . . . 4
Parts Identication and Function . . . . . . . . . . . . . . . . . . . . . . . . . . . 4
• Model NSP0223 . . . . . . . . . . . . . . . . . . . . . . . . . . . . . . . . . . . . . . . . 4
• Model NSP0828 . . . . . . . . . . . . . . . . . . . . . . . . . . . . . . . . . . . . . . . . 4
Digital Thermocouple Thermometer . . . . . . . . . . . . . . . . . . . . . . . . . . . . . . . . . . . . . . 4
• Model NSP1413 . . . . . . . . . . . . . . . . . . . . . . . . . . . . . . . . . . . . . . . . 4
Parts Identication and Function . . . . . . . . . . . . . . . . . . . . . . . . . . 5
Specications . . . . . . . . . . . . . . . . . . . . . . . . . . . . . . . . . . . . . . . . 5
Operating Instructions . . . . . . . . . . . . . . . . . . . . . . . . . . . . . . . . . . 5-6
Battery Replacement . . . . . . . . . . . . . . . . . . . . . . . . . . . . . . . . . . . 7
Digital Thermocouple Thermometer . . . . . . . . . . . . . . . . . . . . . . . . . . . . . . . . . . . . . . 7
• Model 32311-K . . . . . . . . . . . . . . . . . . . . . . . . . . . . . . . . . . . . . . . . . 7
Parts Identication and Function . . . . . . . . . . . . . . . . . . . . . . . . . . 7
Specications . . . . . . . . . . . . . . . . . . . . . . . . . . . . . . . . . . . . . . . . 8
Operating Instructions . . . . . . . . . . . . . . . . . . . . . . . . . . . . . . . . . . 8
Battery Replacement . . . . . . . . . . . . . . . . . . . . . . . . . . . . . . . . . . . 8
Standard Probes . . . . . . . . . . . . . . . . . . . . . . . . . . . . . . . . . . . . . 8-9
Cleaning the Surface Probe . . . . . . . . . . . . . . . . . . . . . . . . . . . . . 9
Optional Probes . . . . . . . . . . . . . . . . . . . . . . . . . . . . . . . . . . . . . . 9
Instrument Calibration . . . . . . . . . . . . . . . . . . . . . . . . . . . . . . . . . . . . . . . . . . . . . . . . . 10
Troubleshooting Guide . . . . . . . . . . . . . . . . . . . . . . . . . . . . . . . . . . . . . . . . . . . . . . . . 10
Table of Contents
2 Quality Assurance Temperature Measurement Kits

The Quality Assurance Temperature Measurement Kit consists of a digital thermometer with
4 probes (the fry-vat probe, the needle product probe, the grill probe, and the oven probe).
The Model 32311-K thermometer operates on (3) AAA alkaline batteries. The Model NSP1413
recording thermometer operates on (2) AAA alkaline batteries. The probes are plugged
directly into the instrument and used to measure the temperature of products, equipment,
or air. Some kits contain additional probes and the UHC probe for operators who have a
Universal Holding Cabinet.
Cooper-Atkins warrants this package to be free from defects for a period of 1 year, and
warrants the instrument free from defects for a period of 5 years, commencing on the date
of shipment from Cooper-Atkins.
The liability of the seller is limited to the repair or the replacement of the product if, and only
if, failure occurs during the warranty period. Warranty handling can only be conrmed after
inspection at the factory.
Defective instruments or probes should be returned to Cooper-Atkins. All return products
should include RMA# issued by Cooper-Atkins, full store return address, phone number,
contact and a brief description of the problem. All charges and handling expenses will be the
responsibility of the buyer. If conrmed by the factory to be covered by warranty the product
will be repaired or replaced by the factory and shipped at no charge to the buyer.
No agent is authorized to take any liability for or make any written or verbal warranty or
obligations beyond those set forth.
Phone Cooper-Atkins at (800) 835-5011 for technical assistance or to order replacement
parts. You may also call your approved local supplier for Cooper-Atkins replacement
parts, probes or instruments. Use only genuine Cooper-Atkins replacement parts in this
thermometer kit. Use of parts other than those supplied with this thermometer kit will void the
warranty.
If you need to return a thermometer for service, obtain RMA# and return the thermometer
directly to:
Cooper-Atkins Corporation
33 Reeds Gap Road
Middleeld, CT 06455
It is important to include the store return address, phone number, contact and a brief
description of the problem.
Introduction
Warranty
Ordering and
Service Information
Return Policy
Quality Assurance Temperature Measurement Kits 3

Temperature
Monitoring Kits
Thermometer Model NSP1413-1
4 Quality Assurance Temperature Measurement Kits
Item Model Description Qty Function
1 NSP1413-1 AquaTuff Recording Thermometer 1 Displays temperature measured
2 50014-K Grill Probe 1 Measures surface temperatures
3 50208-K Fry Vat Probe 1 Measures shortening temperatures in fry vats
4 50306-K Oven Probe 1 Measures ambient air temperatures
5 50207-K Needle Product Probe 1 Measures product and soft drink temperatures
6 50004-K UHC Probe 1 Measures equipment temperatures on
universal holding cabinets
7 10055-K Patch Cord 1 Connects to installed thermocouples
8 PD0366-19 Carrying Case 1 Storage of kit
9 PD0408-0 Grill Probe Brush 1 Cleans grill probe
10 PD1241-2 1.5V AAA Alkaline Batteries 2 Spare battery
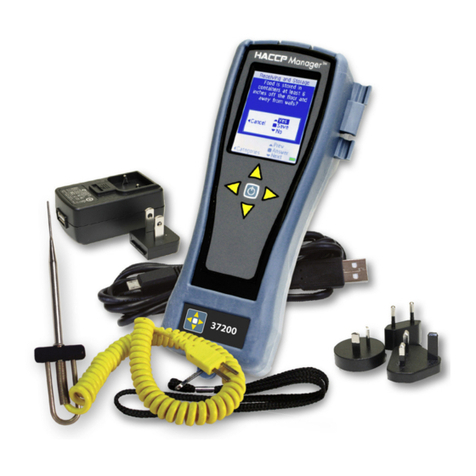
NSP0223 Standard QA Kit (NSP1413-1, with UHC Probe)
NSP0828 Economy QA Kit (with 32311-K and UHC Probe)
1
2
3
4
5
6
7
8
9
10
Digital Thermocouple
Thermometer
Model NSP1413-1
2
3
4
56
1
8
7
Parts Identication and Function
Item Model Description Qty Function
1 32311-K Economy Thermometer 1 Displays temperature measured
2 50014-K Grill Probe 1 Measures surface temperatures
3 50208-K Fry Vat Probe 1 Measures shortening temperatures in fry vats
4 50306-K Oven Probe 1 Measures ambient air temperatures
5 50207-K Needle Product Probe 1 Measures product and soft drink temperatures
6 50004-K UHC Probe 1 Measures equipment temperatures on
universal holding cabinets
7 10055-K Patch Cord 1 Connects to installed thermocouples
8 PD0366-19 Carrying Case 1 Storage of kit
9 PD0408-0 Grill Probe Brush 1 Cleans grill probe
10 PD1241-2 AAA Alkaline Battery 3 Spare battery
*Only for restaurant back-up and should not be used as the primary Pyrometer
1
2
3
4
5
6
7
8
9
10
Thermometer Model 32311-K

Quality Assurance Temperature Measurement Kits 5
Item Description Qty Function
1 Thermocouple
Connector
1 Connection point for probe. Yellow male plug of probe is
inserted into female connector.
2 Digital Display 1 Displays temperature readings in °F or °C
3 ON / OFF Switch 1 Turns the instrument ON and OFF
4 °F / °C Switch 1 Selects °F or °C temperature scale
5 Scroll (CLR) 1 Scrolls through / clears memory contents
6 Record / ITS 1 Selects ITS Mode / Records temperature data
7 Operating Instructions 1 Instrument operating instructions
8 Battery Access Door 1 Allows battery replacement
Parts Identication and Function
Range Type K Thermocouple -100° to 999°F (-73° to 537°C)
Resolution 1°F (.1°C)
Accuracy ±1F° (±0.5C°) from -100°F to 999°F (-73°C to 537°C) at ambient
temperatures between 68°F and 86°F (20°C and 30°C)
Ambient
Temperature Limits
32°F to 122°F (0°C to 50°C) operating; -13°F to 158°F
(-25°C to 70°C) storage
Broken / Open Probe “Prob” shown on display
Display 3 digit, 1/2” (12.7 mm) LCD display
Auto Off Turns off unit after 10 minutes of keypad inactivity
Power 1.5V AAA Alkaline batteries QTY 2
Battery Life 1500 hours (typical)
Low Battery A battery icon on display then “LbAt”
Specications
Operating Instructions
To operate as a standard thermometer:
1. Insert Type K thermocouple probe into connector on top of instrument. Observe correct
polarity when connecting probe (indicated by “+” and “-” markings).
2. Press button to turn unit on.
3. Press F / C button to select either Fahrenheit or Celsius temperature scale. Instrument
has whole degree resolution in Fahrenheit display and tenth degree resolution in Celsius.
4. Instrument will measure and display real-time temperature.
5. To turn instrument off, press and hold button momentarily.
To operate as a recording thermometer:
In ITS™ (Intelligent Temperature Stabilization™) RECORD MODE, the NSP1413 will store (4)
readings and the instrument will record temperatures in the range of 120° to 210°F (49° to 99°C).
The display will indicate whether the temperature being measured is within this range by displaying
“ “ on the left side of the display if the temperature is within acceptable limits.
If the temperature is lower than 120°F (49°C), recording is not allowed and the display will
show “ “. If the temperature is higher than 210°F (99°C), recording is not allowed and the
display will show “ “.
IMPORTANT : WHEN RECORD BUTTON IS PRESSED, F / C BUTTON IS
DISABLED. SELECT TEMPERATURE SCALE BEFORE START OF RECORDING.
1. Perform steps 1-4 above.
2. To enter ITS RECORD MODE press REC button. The display will momentarily show “itS”
(ITS mode), followed by “- -”. NOTE: WHEN ITS MODE IS ACTIVE, ITS ICON WILL
APPEAR AT TOP OF DISPLAY.

3. Insert probe into product being measured. If temperature is within allowable temperature
range when the reading has stabilized, the temperature will ash on the display. Remove
probe from product and press REC button to store reading. Display will momentarily show
“r001”, followed by “- - “ to indicate the unit is awaiting next temperature to stabilize.
4. Insert probe into next product to be measured and display will ash temperature when reading
has stabilized. Remove probe from product and press REC button to store temperature reading.
Display will momentarily show “r002” followed by “- - “. Repeat these steps for the remaining
two readings. When the last reading is stored (r004), the instrument will automatically exit ITS
MODE and display real-time temperatures. With 4 readings in memory, pressing the REC
button again will display “FULL” indicating full memory contents.
Specic details concerning ITS RECORDING MODE:
• Intelligent Temperature Stabilization will only occur in the allowable temperature range
between 120° to 210°F (49° to 99°C). If the temperature measured is outside of this range,
the temperature will not be displayed and “- -” will continue to appear on the display until a valid
temperature is stabilized.
• Once the display ashes indicating stabilization, the reading shown on the display will not
change, even if the probe temperature changes again, until the REC button is pressed to
store the reading. NOTE: THE PROBE DOES NOT NEED TO REMAIN IN THE ITEM
BEING MEASURED ONCE STABILIZATION HAS OCCURRED.
• IF THE TEMPERATURE BEING MEASURED DOES NOT CHANGE BETWEEN READINGS,
THE DISPLAY WILL SHOW “- - -” (3 DASHES). To continue recording, remove probe from
product to allow temperature to change (display will show 2 dashes) and then proceed with
recording steps above. This prevents stabilization in the same item twice.
To view temperature readings:
In SCROLL MODE, the user can view temperature readings stored in the NSP1413 instrument.
This allows the user to view temperature data ofine without a probe attached to instrument.
1. Press the SCROLL button to view temperature readings stored in instrument. The unit
will show the reading number “r001-r004”, followed by the temperature recorded for each
reading. The recorded temperature reading will remain on the display until the SCROLL
button is pressed again to view the next reading. NOTE: THE MEM ICON WILL APPEAR AT
THE TOP OF DISPLAY WHEN SCROLL BUTTON IS PRESSED AND TEMPERATURE
DATA IS STORED IN MEMORY.
IMPORTANT: WITH FULL MEMORY, WHEN SCROLL BUTTON IS PRESSED,
THE REAL-TIME TEMPERATURE MODE IS DISABLED AND ONLY MEMORY
CONTENTS CAN BE VIEWED. IF NEEDED, TURN UNIT OFF AND BACK ON TO
VIEW REAL-TIME TEMPERATURES.
2. Continue pressing the SCROLL button until all temperature readings have been
reviewed. When the last reading is displayed (r004), pressing the SCROLL button will
display the rst reading (r001) again.
To clear data from instrument:
1. To clear memory with full memory contents, press and hold the REC button (display will show
”FULL” to indicate full memory). While holding the REC depressed, press and hold the SCROLL
(CLR) button until the display shows “CLr”. The memory contents will be erased.
2. To clear memory with partial memory contents, turn unit OFF. Press and hold the SCROLL
(CLR) button. While keeping the SCROLL (CLR) button depressed press the button. The
display will show “On”, “CLr”, and then real-time temperature. The instrument can now be
used in standard mode or as a recording thermometer.
6 Quality Assurance Temperature Measurement Kits

Quality Assurance Temperature Measurement Kits 7
Fig. 1
Battery Replacement
The instrument uses (2) AAA 1.5V alkaline batteries. A battery icon will appear on the display
when it is time to replace the battery. When the battery voltage falls too low to operate, “LbAt”
appears on the display and the unit will shut-off and not operate until batteries are replaced.
1. Using a suitable coin, insert coin into slot on battery door knob and turn battery door knob
counter-clockwise until rotation stops. The arrow on the knob will point towards the
unlock icon.
2. Pull battery door knob to remove battery door assembly. Remove batteries.
3. Referring to battery polarity drawing on rear label, install (2) AAA alkaline batteries as shown.
4. To install battery door assembly, ensure that battery door knob is turned fully counter-clockwise
and arrow on battery door is pointed towards unlock icon. Push inward on battery door
assembly until battery door knob is seated against housing. Rotate battery door knob clockwise
until rotation stops. The arrow on battery door knob will point towards lock icon .
2
3
4
5
6
1
7
Item Description Qty Function
1 Thermocouple Connector 1 Connection point for probe. Yellow male plug of probe
is inserted into female connector
2 Digital Display 1 Displays temperature readings
3 °F / °C Switch 1 Selects °F or °C temperature scale
4 ON / OFF Switch 1 Turns the instrument ON and OFF
5 Operating Instructions 1 Operating Information
6 Battery Access Hatch 1 Allows battery replacement
7 Rubber Boot 1 Provides impact resistance
Parts Identication and Function
Digital Thermocouple
Thermometer
Model 32311-K
*Only for restaurant back-up
and should not be used as
the primary Pyrometer

8 Quality Assurance Temperature Measurement Kits
Range Type K Thermocouple -40° to 500°F (-40° to 260°C)
Resolution 1°
Accuracy ±2F° (±1C°)
Broken / Open Probe “LO” shown on display
Display 3-1/2 digit, 0.4” (10 mm) LCD display
Power (3) AAA alkaline batteries
Battery Life 4500 hours (typical)
Low Battery A battery icon on display then “bAtt”
Case High Strength ABS
Rubber Boot Impact resistant elastomer
Specications
Operating Instructions
Select the proper probe and insert probe plug into the probe jack of the digital thermometer.
Match the + and - on the plug and instrument. One prong is larger than the other, so it will only
t one way. Do not force the plug in.
Turn the thermometer ON, pressing the button labeled .
Press the F / C button to select Fahrenheit or Celsius Temperature scale. Auto-off features
turns instrument off after 10 minutes of keypad inactivity to conserve battery life.
Battery Replacement
A battery icon will appear on the display when it is time to replace the batteries. Typical battery
life is 4500 hours. When the batteries are completely depleted, the display will show “bAtt”
and will shut off and not operate until the batteries are replaced. Install 3 AAA alkaline batteries,
ensuring the correct polarity is indicated by the battery markings + and - inside the battery
compartment.
1. Remove the battery access hatch from the back of the thermometer (see Fig.2).
2. Remove the (3) AAA alkaline batteries.
3. Replace with new batteries, matching the + and - markings located inside the battery
compartment.
4. Replace the battery access hatch.
IMPORTANT: FAILURE TO INSTALL BATTERIES CORRECTLY CAN CAUSE
DAMAGE TO THE INSTRUMENT.
Fig. 2
50208-K
Fry-Vat Probe
50207-K
Needle Probe
Standard Probes
Measures shortening temperatures.
Fits in the holder on McDonald’s approved fry-vats.
For product and drink temperatures.

Measures air temperatures of ovens and coolers.
Measures temperatures on equipment with
thermocouples installed.
50306-K
Oven Probe
10055-K
Thermocouple
Patch Cord
50004-K
UHC Probe
Measures temperatures of surfaces.
Cleaning the Surface Probe
50014-K
Use the brush to remove material from the edges of the sensor area. If any dirt or material
remains, loosen the screws and use brush on back side of retention ring.
Measures frozen product temperatures.
50014-K
Surface Probe
Measures equipment temperatures on
universal holding cabinets
50101-K
Frozen Product Probe
Quality Assurance Temperature Measurement Kits 9
50001-K
Right Angle
Surface Probe
Measures surface temperatures
on heat chutes, platens, etc.
Optional Probes

10 Quality Assurance Temperature Measurement Kits
Troubleshooting
Guide
Problem Probable Cause Corrective Action
Display reads “LO” or “Prob” Damaged or faulty probe Replace probe
Battery icon Display The battery is low Replace battery
No display Unit not on
Battery dead
Turn unit on
Replace battery
Missing digits LCD has bad connection Return thermometer for repair
Unit reads too low when
reading high temperatures
Shorted probe Replace probe
IMPORTANT: INSPECTION, TESTING AND REPAIR OF ELECTRICAL
EQUIPMENT SHOULD BE PERFORMED ONLY BY QUALIFIED PERSONNEL.
Instrument Calibration Cooper-Atkins thermocouple instruments are factory calibrated in an ISO 9001 registered
facility using N.I.S.T. traceable test equipment. Under normal operating conditions, the
instrument should not require recalibration. If you would like your instrument recalibrated
or if a certicate of calibration is needed, please contact Cooper-Atkins customer service or
an authorized repair facility.

Aseguramiento de Calidad
Equipo de Medición de Temperatura
Coloque este capítulo en la sección de Equipos Pequeños / Misceláneo del Manual de Equipos
NSP0223 NSP0828
Fabricado exclusivamente para
Por:
McDonald’s®
Cooper-Atkins Corporation
33 Reeds Gap Road • Middleeld, CT 06455 U.S.A.
860-347-2256 • www.cooper-atkins.com
Registrado ISO 9001
Este manual es para el uso exclusivo de concesionarios y empleados de McDonald’s Systems, Inc. ©2011 McDonald’s Corporation. Todos los derechos reservados.
Impreso en E.U.A. 2011
NSP1413-1 32311-K

Índice
2 Equipo de Medición de Temperatura para Aseguramiento de Calidad
Introducción . . . . . . . . . . . . . . . . . . . . . . . . . . . . . . . . . . . . . . . . . . . . . . . . . . . . . . . . 3
Garantía . . . . . . . . . . . . . . . . . . . . . . . . . . . . . . . . . . . . . . . . . . . . . . . . . . . . . . . . . . . 3
Información de Pedidos y Servicio . . . . . . . . . . . . . . . . . . . . . . . . . . . . . . . . . . . . . . 3
Política de Devoluciones . . . . . . . . . . . . . . . . . . . . . . . . . . . . . . . . . . . . . . . . . . . . . . 3
Equipo de Monitoreo de Temperatura . . . . . . . . . . . . . . . . . . . . . . . . . . . . . . . . . . . . 4
Identicación de Partes y Funciones . . . . . . . . . . . . . . . . . . . . . . . . . . 4
• Modelo NSP0223 . . . . . . . . . . . . . . . . . . . . . . . . . . . . . . . . . . . . . . . . 4
• Modelo NSP0828 . . . . . . . . . . . . . . . . . . . . . . . . . . . . . . . . . . . . . . . . 4
Termómetro Termopar Digital . . . . . . . . . . . . . . . . . . . . . . . . . . . . . . . . . . . . . . . . . . . 4
• Modelo NSP1413 . . . . . . . . . . . . . . . . . . . . . . . . . . . . . . . . . . . . . . . . 4
Identicación de Partes y Funciones . . . . . . . . . . . . . . . . . . . . . . . . 5
Especicaciones . . . . . . . . . . . . . . . . . . . . . . . . . . . . . . . . . . . . . . . 5
Instrucciones de Operación . . . . . . . . . . . . . . . . . . . . . . . . . . . . . . . 5-6
Reemplazo de Pilas . . . . . . . . . . . . . . . . . . . . . . . . . . . . . . . . . . . . . . 7
Termómetro Termopar Digital . . . . . . . . . . . . . . . . . . . . . . . . . . . . . . . . . . . . . . . . . . 7
• Modelo 32311-K . . . . . . . . . . . . . . . . . . . . . . . . . . . . . . . . . . . . . . . . . 7
Identicación de Partes y Funciones . . . . . . . . . . . . . . . . . . . . . . . . 7
Especicaciones . . . . . . . . . . . . . . . . . . . . . . . . . . . . . . . . . . . . . . . . 8
Instrucciones de Operación . . . . . . . . . . . . . . . . . . . . . . . . . . . . . . . 8
Colocación De La Batería . . . . . . . . . . . . . . . . . . . . . . . . . . . . . . . . . 8
Sondas Estándar . . . . . . . . . . . . . . . . . . . . . . . . . . . . . . . . . . . . . . . 8-9
Limpieza de la Sonda de Supercie . . . . . . . . . . . . . . . . . . . . . . . . 9
Sondas Opcionales . . . . . . . . . . . . . . . . . . . . . . . . . . . . . . . . . . . . . . 9
Calibración de Instrumentos . . . . . . . . . . . . . . . . . . . . . . . . . . . . . . . . . . . . . . . . . . . 10
Guía de Localización de Fallas . . . . . . . . . . . . . . . . . . . . . . . . . . . . . . . . . . . . . . . . . 10

El Equipo de Medición de Temperatura para Aseguramiento de Calidad consiste de un termómetro
digital con 4 sondas (la sonda de recipiente de freír, la sonda de aguja de producto, la sonda
de parrilla, y la sonda de horno). El termómetro Modelo 32311-K funciona con (3) pilas alcalinas
AAA. El termómetro de registro Modelo NSP1413 funciona con (2) pilas alcalinas AAA. Se
enchufan las sondas directamente al instrumento y se utilizan para medir la temperatura de
los productos, equipos o aire. Algunos equipos vienen con sondas adicionales y la sonda UHC
para operarios con un Gabinete Universal de Conservación (UHC por sus siglas en inglés).
Cooper-Atkins garantiza que este paquete estará libre de defectos durante un período de 1
año y garantiza que el instrumento estará libre de defectos durante un período de 5 años, a
partir de la fecha de envío de Cooper-Atkins.
La responsabilidad del vendedor se limita a la reparación o reemplazo del producto en caso
de que y siempre que una falla ocurriere durante el período de garantía. La aplicabilidad de la
garantía solamente puede conrmarse después de inspección en la fábrica.
Se deberán devolver las sondas o los instrumentos defectivos a Cooper-Atkins. Todos los
productos devueltos deberán incluir el No. RMA emitido por Cooper-Atkins, la dirección
completa de la tienda remitente, el número telefónico, el contacto y una breve descripción del
problema. Todos los cobros y gastos de manejo serán responsabilidad del comprador. Si la
fábrica conrma la cobertura de la garantía, la fábrica reparará o reemplazará el producto y lo
enviará sin costo para el comprador.
Ningún agente tiene autorización para asumir responsabilidad alguna ni extender ninguna
garantía ni compromiso, ya sea verbal o por escrito, más allá de lo indicado aquí.
Llame a Cooper-Atkins al (800) 835-5011 para asistencia técnica o para pedir repuestos.
También puede llamar a su surtidor local aprobado para repuestos, sondas o instrumentos de
Cooper-Atkins. Use solamente repuestos genuinos de Cooper-Atkins para este equipo de
termómetro. El uso de partes que no sean las que se suministran con este termómetro
invalidará la garantía.
Si necesita devolver un termómetro para el servicio, obtenga el No. RMA y devuelva
directamente el termómetro a:
Cooper-Atkins Corporation
33 Reeds Gap Road
Middleeld, CT 06455
Es importante incluir la dirección de la tienda remitente, el número telefónico, el contacto y
una breve descripción del problema.
Introducción
Garantía
Información de
Pedidos y Servicio
Política de Devoluciones
Equipo de Medición de Temperatura para Aseguramiento de Calidad 3

Equipos de Monitoreo
de Temperatura
Termómetro Model NSP1413-1
Ítem Modelo Descripción Cant. Función
1 NSP1413-1 Termómetro de Registro AquaTuff 1 Muestra la temperatura medida
2 50014-K Sonda de Parrilla 1 Mide las temperaturas de supercie
3 50208-K Sonda de Recipiente de Freír 1 Mide las temperaturas de la manteca en los
recipientes para freír
4 50306-K Sonda de Horno 1 Mide las temperaturas ambientales
5 50207-K Sonda de Aguja de Producto 1 Mide las temperaturas de los productos y refrescos
6 50004-K Sonda UHC 1 Mide las temperaturas de equipos en
gabinetes universales de conservación
7 10055-K Latiguillo 1 Conecta a los termopares instalados
8 PD0366-19 Estuche 1 Para guardar el equipo
9 PD0408-0 Cepillo para Sonda de Parrilla 1 Limpia la sonda de parrilla
10 PD1241-2 Pilas alcalinas de 1.5V AAA 2 Pila de recambio
NSP0223 Equipo Estándar de Aseguramiento de Calidad
(NSP1413-1, con Sonda UHC)
NSP0828 Equipo de Aseguramiento de Calidad Económico
(con 32311-K y Sonda UHC)
Termómetro
Termopar Digital
Modelo NSP1413-1
4 Equipo de Medición de Temperatura para Aseguramiento de Calidad
1
2
3
4
5
6
7
8
9
10
Identicación de Partes y Funciones
Ítem Modelo Descripción Cant. Función
1 32311-K Termómetro Económico 1 Muestra la temperatura medida
2 50014-K Sonda de Parrilla 1 Mide las temperaturas de supercie
3 50208-K Sonda de
Recipiente de Freír
1 Mide las temperaturas de la manteca en los
recipientes para freír
4 50306-K Sonda de Horno 1 Mide las temperaturas ambientales
5 50207-K Sonda de Aguja de Producto 1 Mide las temperaturas de los productos y refrescos
6 50004-K Sonda UHC 1 Mide las temperaturas de equipos en gabinetes
universales de conservación
7 10055-K Latiguillo 1 Conecta a los termopares instalados
8 PD0366-19 Estuche 1 Para guardar el equipo
9 PD0408-0 Cepillo para Sonda de Parrilla 1 Limpia la sonda de parrilla
10 PD1241-2 Pila Alcalina AAA 3 Pila de recambio
*Solamente para su uso como respaldo para restablecer y no debe usarse como
pirómetro primario.
1
2
3
4
5
6
7
8
9
10
Termómetro Modelo 32311-K
2
3
4
56
1
8
7

Rango Termopar Tipo K de -73° a 537°C (-100° a 999°F)
Resolución: .1°C (1°F)
Precisión Operación: 0°C a 50°C (32°F a 122°F); almacenamiento: -25°C a
70°C (-13°F a 158°F)
Límites de Temperatura Ambiental 0°C to 50°C (32°F to 122°F) operating; -25°C to 70°C
(-13°F to 158°F) storage
Sonda rota / abierta Se muestra “Prob” en la pantalla
Pantalla Pantalla LCD de 3 dígitos, 12.7 mm (1/2”)
Apagado Automático Apaga la unidad después de 10 minutos sin actividad del teclado
Alimentación Pilas alcalinas 1.5V AAA, CANT. 2
Vida de las Pilas 1500 horas (típicamente)
Pila Baja Un icono de pila en la pantalla y luego “LbAt”
Especicaciones
Ítem Descripción Cant. Función
1 Conector de Termopar 1 Punto de conexión para la sonda. Se inserta el enchufe
macho amarillo en el conector hembra.
2 Pantalla Digital 1 Muestra las lecturas de temperatura en °C o °F
3 Interruptor de Apagado / Encendido 1 Apaga y enciende el instrumento
4 Selector °C / °F 1 Selecciona la escala de temperatura °C o °F
5 Scroll [Desplazamiento] (CLR) 1 Se desplaza por el contenido de la memoria o lo borra
6 Grabación / ITS 1 Selecciona el Modo ITS / Grabar los datos de temperatura
7 Instrucciones de Operación 1 Instrucciones de operación para el instrumento
8 Puerta de Acceso a las Pilas 1 Permite reemplazar las pilas
Identicación de Partes y Funciones
Equipo de Medición de Temperatura para Aseguramiento de Calidad 5
Instrucciones de Operación
Para operar como un termómetro estándar:
1. Inserta la sonda termopar Tipo K en el conector en la parte superior del instrumento.
Observe la polaridad correcta al conectar la sonda (indicada por marcas de “+” y “-“).
2. Oprima el botón para ENCENDER la unidad.
3. Oprima el botón F / C para seleccionar la escala de temperatura Fahrenheit o Celsius. El instrumento
tiene una resolución de grado entero en Fahrenheit y de un décimo de grado en Celsius.
4. El instrumento mide y muestra la temperatura en tiempo real.
5. Para apagar el instrumento, oprima y mantenga oprimida un momento el botón .
Para operar como un termómetro de registro:
En el MODO DE GRABACIÓN ITSMR (Estabilización Inteligente de TemperaturaMR por las
siglas en inglés), el NSP1413 guarda (4) lecturas y el instrumento guarda temperaturas en el
rango de 49° a 99°C (120° a 210°F).
La pantalla indica si se está midiendo la temperatura en este rango al mostrar “ “ al lado
izquierdo de la pantalla cuando la temperatura está dentro de los límites aceptables.
Si la temperatura es inferior a 49°C (120°F), no se permite que se guarde y se muestra “ ”
en la pantalla. Si la temperatura es superior a 99°C (210°F), no se permite que se guarde y
se muestra “ ” en la pantalla.
IMPORTANTE: CUANDO SE OPRIME EL BOTÓN DE GRABACIÓN, SE
DESACTIVA EL BOTÓN F / C. SELECCIONE LA ESCALA DE
TEMPERATURA ANTES DE COMENZAR A GRABAR.
1. Realice los pasos 1-4 indicados anteriormente.
2. Para entrar en el MODO DE GRABACIÓN ITS, oprima el botón REC. La pantalla mostrará
momentáneamente “itS” (modo ITS), seguido por “- -”. NOTA: CUANDO EL MODO ITS
ESTÁ ACTIVO, SU ICONO APARECE EN LA PARTE SUPERIOR DE LA PANTALLA.

6 Equipo de Medición de Temperatura para Aseguramiento de Calidad
3. Inserta la sonda en el producto que se está midiendo. Si la temperatura está dentro del rango
de temperatura permisible cuando se haya estabilizado la lectura, la temperatura parpadeará
en la pantalla. Quite la sonda del producto y oprima el botón REC para guardar la lectura.
La pantalla mostrará momentáneamente “r0001”, seguido por “- -“ para indicar que la
unidad está esperando la próxima temperatura por estabilizar.
4. Inserta la sonda en el siguiente producto por medirse y la temperatura parpadeará en la
pantalla cuando se haya estabilizado la lectura. Quite la sonda del producto y oprima el botón
REC para guardar la lectura. La pantalla mostrará momentáneamente “r002” seguido por “- -“.
Repita estos pasos para las últimas dos lecturas. Al guardar la última lectura (r004), el instrumento
saldrá automáticamente del MODO ITS y mostrará las temperaturas en tiempo real. Con 4
lecturas en la memoria, si se oprime otra vez el botón REC, se mostrará la indicación “FULL”,
indicando que la memoria está llena.
Detalles especícos acerca del MODO DE GRABACIÓN ITS:
• La Estabilización Inteligente de Temperatura sólo ocurrirá en el rango de temperatura
permisible de 49° a 99°C (120° a 210°F). Si se mide la temperatura fuera de este rango,
no se mostrará la temperatura y seguirá apareciendo “- -“ en la pantalla hasta que se
estabilice una temperatura válida.
• Una vez que se parpadee la pantalla, indicando la estabilización, no cambiará la lectura
que se muestra en la pantalla, aunque cambie de nuevo la temperatura de la sonda, hasta
que se oprima el botón REC para guardar la lectura. NOTA: UNA VEZ QUE SE HAYA
ESTABILIZADO LA TEMPERATURA, LA SONDA NO NECESITA QUEDARSE EN EL
ARTÍCULO QUE SE ESTÁ MIDIENDO.
• SI LA TEMPERATURA QUE SE ESTÁ MIDIENDO NO CAMBIA ENTRE LAS LECTURAS,
SE MOSTRARÁN TRES GUIONES (“- - -”) EN LA PANTALLA. Para seguir grabando,
quite la sonda del producto para permitir que la temperatura cambie (se mostrará 2 guiones
en la pantalla) y luego siga con los pasos de grabación in dicados anteriormente. Esto
impide que la estabilización ocurra dos veces en el mismo producto.
Para ver las lecturas de temperatura:
En el MODO DE DESPLAZAMIENTO (SCROLL), el usuario puede ver las lecturas de temperatura
guardadas en el instrumento NSP1413. Esto permite que el usuario vea los datos de temperatura
sin una sonda conectada al instrumento.
1. Oprima el botón SCROLL (desplazamiento) para ver las lecturas de temperatura guardadas
en el instrumento. La unidad mostrará el número de lectura “r001-r004”, seguido por la
temperatura guardada para cada lectura. La lectura de temperatura guardada seguirá en la
pantalla hasta que se oprima de nuevo el botón SCROLL para ver la siguiente lectura.
NOTA: EL ICONO “MEM” APARECERÁ EN LA PARTE SUPERIOR DE LA PANTALLA AL
OPRIMIR EL BOTÓN SCROLL (DESPLAZAMIENTO) Y AL GUARDAR LOS DATOS DE
TEMPERATURA EN LA MEMORIA.
IMPORTANTE: CUANDO LA MEMORIA ESTÁ LLENA, AL OPRIMIR EL BOTÓN
SCROLL, SE DESACTIVA EL MODO DE TEMPERATURA EN TIEMPO REAL Y
SOLAMENTE SE PUEDE VER EL CONTENIDO DE LA MEMORIA. SI SE NECESITA,
APAGUE LA UNIDAD Y VUELVA A ENCENDERLA PARA VER LAS TEMPERATURAS
EN TIEMPO REAL.
2. Siga oprimiendo el botón SCROLL hasta que se hayan visto todas las lecturas de
temperatura. Al mostrarse la última lectura (r004), si se oprime el botón SCROLL, se
mostrará de nuevo la primera lectura (r001).
Para borrar los datos en el instrumento:
1. Para borrar la memoria cuando está llena, oprima y mantenga oprimido el botón REC (se
muestra “FULL” en la pantalla para indicar que la memoria está llena). Al mantener oprimido
REC, oprima y mantenga oprimido el botón SCROLL (CLR) hasta que la pantalla muestre
“CLr”. Se borrará el contenido de la memoria.
2. Para borrar la memoria cuando no está llena, apague la unidad. Oprima y mantenga oprimido
el botón SCROLL (CLR). Al mantener oprimido el botón SCROLL (CLR), oprima el botón .
La pantalla mostrará “On”, “CLr” y luego la temperatura en tiempo real. Ahora se puede
usar el instrumento en el modo estándar o como termómetro de registro.

Equipo de Medición de Temperatura para Aseguramiento de Calidad 7
Figura 1
Reemplazo de Pilas:
El instrumento usa (2) pilas alcalinas 1.5V AAA. Un icono de pila aparecerá en la pantalla
cuando se necesite reemplazar la pila. Cuando el voltaje de las pilas caiga al punto en que el
instrumento ya no puede funcionar, “LbAt” aparece en la pantalla y se apaga la unidad y no
funcionará hasta que se reemplacen las pilas.
1. Usando una moneda apropiada, inserta la moneda en la ranura en la puerta de pilas y gire
en sentido contrario al reloj hasta que se pare la rotación. La echita en la perilla
apuntará al símbolo de abierto .
2. Jale la perilla de la puerta de pilas para sacar el ensamblaje de la puerta de pilas.
Saque las pilas.
3. Al consultar el dibujo de la polaridad de las pilas en la etiqueta trasera, instale (2) pilas
alcalinas AAA tal y como se muestra.
4. Para instalar el ensamblaje de la puerta de pilas, asegure que la perilla de la puerta de pilas
se haya girado en sentido contrario al reloj hasta su límite y la echita en la puerta de pilas
apunte al icono de abierto . Empuje hacia adentro el ensamblaje de la puerta de pilas hasta
que la perilla de la puerta de pilas entre en contacto con la caja. Gire la perilla de la puerta
de pilas en el sentido del reloj hasta que no se pueda girar más. La echita en la perilla de
la puerta de pilas apuntará al icono de cerrado .
2
3
4
5
6
1
7
Ítem Descripción Cant. Función
1 Conector de Termopar 1 Punto de conexión para la sonda. Se inserta el enchufe
macho amarillo en el conector hembra
2 Pantalla Digital 1 Muestra las lecturas de temperatura
3 Selector °C / °F 1 Selecciona la escala de temperatura °C o °F
4 Interruptor de Apagado / Encendido 1 Apaga y enciende el instrumento
5 Instrucciones de Operación 1 Información Operativa
6 Puerta de Acceso a las Pilas 1 Permite reemplazar las baterías
7 Base de Hule 1 Proporciona resistencia al impacto
Identicación de Partes y Funciones
Termómetro
Termopar Digital
Modelo 32311-K
*Solamente para su uso
como respaldo para
restablecer y no debe
usarse como pirómetro
primario.

8 Equipo de Medición de Temperatura para Aseguramiento de Calidad
Rango Termopar Tipo K de -40° a 260°C (-40° a 500°F)
Resolución: 1°
Precisión ±1C° (±2F°)
Sonda rota o abierta Se muestra “LO” en la pantalla
Pantalla Pantalla LCD de 3_ dígitos, 10 mm (0.4”)
Alimentación (3) pilas alcalinas AAA
Vida de las Pilas 4500 horas (típicamente)
Pila Baja Un icono de pila en la pantalla y luego “bAtt”
Estuche ABS de Alta Resistencia
Base de Hule Elastomer resistente al impacto
Especicaciones
Instrucciones de Operación
Seleccione la sonda apropiada e inserta el enchufe de la sonda en el conector de sonda del
termómetro digital. Asegúrese que haya correspondencia de “+” y “-“ entre el enchufe y el
instrumento. Una punta es más grande que la otra, así que solamente cabrá de una sola
manera. No fuerce el enchufe.
Encienda el termómetro, oprimiendo el botón etiquetado con .
Oprima el botón C / F para seleccionar la escala de temperatura Celsius o Fahrenheit.
El apagado automático apaga el instrumento después de 10 minutos sin actividad del teclado
para conservar las pilas.
Colocación De La Batería
Un icono de pila aparecerá en la pantalla cuando se necesite reemplazar las pilas. La vida típica
de las pilas son 4500 horas. Cuando las pilas estén completamente agotadas, se mostrará “bAtt”
en la pantalla y se apagará y no funcionará hasta que se reemplacen las pilas. Instale 3 pilas
alcalinas AAA de acuerdo con la polaridad correcta indicada con las marcas “+” y “-” dentro
del compartimiento de pilas.
1. Quite la puerta de acceso a las pilas de la parte trasera del termómetro (véase la Figura 2).
2. Saque las (3) pilas alcalinas AAA
3. Reemplácelas con nuevas pilas, de acuerdo con las marcas “+”+ y “-“ dentro del
compartimiento de pilas.
4. Coloque de nuevo la puerta de acceso a las pilas.
¡IMPORTANTE! Si no se instalan correctamente las pilas, se puede dañar
el instrumento.
Figura 2
50208-K
Sonda de Recipiente
de Freír
50207-K
Sonda de Aguja
Sondas Estándar
Mide las temperaturas de manteca.platens, etc. Se monta en
el sostenedor de recipientes para freír aprobados por McDonald’s.
Para las temperaturas de productos y refrescos

Mide la temperatura de productos congelados.
50101-K
Sonda de Productos
Congelados
Equipo de Medición de Temperatura para Aseguramiento de Calidad 9
Mide las temperaturas en equipos con termopares instalados.
Mide temperaturas de aire en hornos y enfriadores.
50306-K
Sonda de Horno
10055-K
Latiguillo de
Termopar
Mide las temperaturas de supercies.
50001-K
Sonda de Supercie
de Ángulo Recto
50014-K
Sonda de Supercie
Mide las temperaturas de
supercie en rampas de
calor, platinas, etc.
50004-K
Sonda UHC
Limpieza de la Sonda de Supercie
50014-K
Use el cepillo para quitar material de los bordes del sensor. Si se queda mugre o material,
aoje los tornillos y cepille la parte trasera del anillo de retención.
Sondas Opcionales
Mide las temperaturas en equipos en
gabinetes universales de conservación

10 Equipo de Medición de Temperatura para Aseguramiento de Calidad
Guía de Localización
de Fallas
Problema Causa Probable Acción Correctiva
Pantalla dice “LO” o “Prob” Sonda dañada o con fallas Reemplazar la sonda
Icono de pila en pantalla Las pilas están bajas Reemplazar pilas
No se ve nada en la pantalla Unidad apagada
Pila descargada
Encender la unidad
Reemplazar pilas
Faltan dígitos Conexión mala de LCD Regresar termopar para su reparación
Unidad muestra temperatura baja
al leer temperaturas altas
Cortocircuito en la sonda Reemplazar la sonda
IMPORTANTE: SOLAMENTE PERSONAL CALIFICADO DEBERÁ
INSPECCIONAR, PROBAR Y REPARAR EL EQUIPO ELÉCTRICO.
Calibración de
Instrumentos
Los instrumentos de termopar Cooper-Atkins son calibrados en fábrica en una facilidad registrada
de ISO 9001 utilizando equipos de prueba N.I.S.T. Bajo las condiciones de operación normal,
el instrumento no debe requerir recalibración. Si usted quiere que se recalibre su instrumento
o necesita un certicado de calibración, favor de contactar el servicio al cliente de
Cooper-Atkins o un centro de reparaciones autorizado.
This manual suits for next models
1
Table of contents
Languages:
Other Cooper Atkins Measuring Instrument manuals