Cooper Lighting Solutions
1121 Highway 74 South
Peachtree City, GA 30269
P:770-486-4800
www.cooperlighting.com
Printed in Malaysia
Sensitivity Adjustments
Ultrasonic Sensitivity(GreenLED)–Usingasmallflatheadscrewdriverturnthe
greenpotentiometersothatthearrowpointsU P.
1. Standindifferentareasoftheroomandwaveyourhands.
2. IftheGreenLEDdoesnotturnON,increasetheUSsensitivitybyturningthe
greenpotentiometerclockwiseinsmallincrements.RepeatStep1.
3. Standstillthreetofourfeetawayfromsensorforfiveseconds.LEDshould
notturnON.
4. IfGreenLEDturnsONwithoutmotionorisconstantlyON,decreasethe
USsensitivitybyturninggreenpotentiometercounter-clockwiseinsmall
decrements.RepeatStep3.
Note:DoNotadjustsensitivityhigherthannecessary.
PIR Sensitivity
1. Standindifferentareasoftheroomandwaveyourhands.
2. IftheRedLEDdoesnotturnON,checkforanyobstructions.
3. Standstillthreetofourfeetawayfromsensorforfiveseconds.LEDshouldnotturnON.
4. IfRedLEDturnsONwithoutmotionorisconstantlyONadjustPIRsensitivityto50%bymovingDIPSwitch5up.
Field-of-view outside the space
1. AdjustPIRsensitivityto50%bymovingDIPSwitch5up.
2. Usenon-reflectivetapestripstocovertheportionsofthesensorlensthatviewoutsidethespace.
3. AdjustUltrasonicSensitivity.
ON/OFF Disabled Feature
1. ON/OFFButtonDisableOption–Whenselectedthis
optiondisablestheON/OFFbuttonandsensorbecomes
automaticonlycontrolregardlessofthesettingfor
automaticormanualactivation.Thisfeaturewillnot
allowsomeonetoturnlight(s)OFFviathepushbutton
whilepeopleareincommonareassuchasrestroom,
breakroom,andcopyroomareas.
Daylight Adjustments
TheDaylightingfeaturepreventsthelightsfromturningONwhentheroomisadequatelyilluminatedbynaturallight.Ifthereis
enoughlightintheroomregardlessofoccupancy,thesensorwillholdthelightsOF F.Ifthereisnotenoughlightintheroom,the
sensorwillallowthelightstoturnONwhenoccupied.ThesensorwillnotallowtheDaylightingfeaturetoturntheloadOFFuntilthe
spaceisvacantorthelightlevelrisesabovethesetpointandthetimedelayexpires.WhileinManualActivationMode,ifsomeone
attemptstoturntheloadONandthereissufficientdaylightavailabletheDaylightingfeaturewillholdthelightsOF F.
1. Setthelightlevelwhentheambientlightisatthelevelwherenoartificiallightisneeded.Ifthisfeatureisnotneeded,leavethe
lightlevelatmaximum(fullyCW).
2. Withtheload(s)ON,putthesensorintoTestMode.ToplaceintoTestMode,toggleDIPSwitch8outofitscurrentposition,wait
3secondsandthenbackintoitsoriginalposition.
3. SettheLightleveltominimum(fullyCCW).
4. LetthesensorTime-outsolightsareOF F.EnterthespaceandlightsshouldremainOFF.
5. MakesurenottoblockthesensorfromthedaylightsourceandadjustthelightlevelpotentiometerCWinsmallincrements.
(Pause5secondsbetweeneachadjustment)
6. LightswillnotturnONuponoccupancyactivation,whentheambientlightlevelexceedsthedaylightthresholdsetting.
Time Delay Adjustments
Peoplewhoremainverystillforlongperiodsoftime
mayneedalongertimedelaythanthedefaultsettingof10
minutes.Aslongastheself-adjustingfeatureisenabled,the
switchwillrespondtoeachpairoffalse-OFFswithnonormal
OFFinbetween,byalternatelymakingslightadjustmentsto
eithertimedelay(by2minuteincrements)orsensitivity,so
thereshouldbenoneedformanualadjustment.Ifmanual
adjustmentisdesired,refertoTimeDelaysettingsinDIP
Switchlegend.
ResetsensortimedelaytofactorysettingsbymovingDIP
Switches1and2down.(IfDIPSwitches1and2arealreadydown,toggleDIPSwitch1outofitscurrentposition,wait3seconds,
andthenbacktoitsoriginalposition)
Override
TheOverridesettingallowsthesensortooperateasaserviceswitchintheunlikelyeventoffailure.
1. MoveDIPSwitch12up.
2. ThepushbuttoncanbeusedtomanuallyturnlightsONorOFF.
Warranties and Limitation of Liability
DIP Switch Settings
Troubleshooting
Pleaserefertowww.cooperlighting.comundertheLegalsectionforourtermsandconditions.
Checkout and Adjustment
LOAD 1
BLACK BLUE
NEUTRAL
THREE-WAY WIRING DIAGRAM:
LIGHTS WILL TURN OFF, WHEN UNIT THAT WAS TURNED ON LAST AND/OR DETECTED MOTION LAST TIMES-OUT.
GROUND
GREEN
VAC
BLACK
BLUE
GROUND
GREEN
WIRES
Wiring Diagram 3: 120/277 VAC single level single circuit three-way wiring diagram
CAUTION: If a room is wired for two circuits using two separate hot leads, it is very important to connect only one circuit
per relay. Both circuits must be fed from the same phase.
Issue Possible Causes Suggestions
Lights
Will Not
Turn ON
automatically
SensorisinManualONmode Presspushbutton.IfAutoMode
isdesiredchangeActivationModetoAuto.
SensorwasturnedOFFmanually.Ifthe
SensorwasturnedOFFmanuallybefore
thetimedelayexpired,lightswillremain
OFFfortheremainderofthetimedelay.
PressthepushbuttontoturnthelightsbackON.
DaylightingFeatureEnabled IfalllightsarerequiredtoturnON
adjustdaylightpotentiometer.
Powerinterruption Checkincomingvoltageand/orwiring
Lights
Will Not
Turn ON
manually
DaylightingFeatureEnabled IfalllightsarerequiredtoturnON
adjustdaylightpotentiometer.
Powerinterruption Checkincomingvoltageand/orwiring
ON/OFFButtonDisabled MoveDIPSwitch7down
If lights will still not turn ON, set sensor to override mode and call Technical Services at 1-800-553-3879
Lights
Will Not
Turn OFF
automatically
Override MakesuresensorisnotinOverrideMode.(DIPSwitch8up)
Self-Adjust
IfsensorisinSelf-AdjustMode,itmaybepossibleforthe
unittohaveincreasedthetimedelaytoa30minutedelay.
IfthelightsdonotturnOFFafter30minutesfollownextstep.
30MinuteDelay
Maximumtimedelayis30Minutes.CheckDIP
SwitchestoverifyDIPSwitchsettings.Iflightsdo
notturnOFFatthesetTimeDelay,checknextstep.
UltrasonicSensitivitysetHigh Lowersensitivitybyturninggreen
potentiometerCCWinsmalldecrements.
PIRactivatedbyheatsourceotherthanoccupant MoveDIPSwitch5up.
Lights
Will Not
Turn OFF
manually
CallTechnicalServices
ON/OFFButtonDisabled MoveDIPSwitch7down
If lights will still not turn OFF, call Technical Services at 1-800-553-3879
12345678
5 Minutes
15 Sec Test/Auto*
Time Delay
DIP Switch
Activation PIR Sensitivity Not UsedOverrideMaintain Lights On Not Used
Relay 1 Not Used
ON/OFF ButtonWalk-Through Mode
15 Minutes
12
DIP Switch Legend
121196
Disable
Enable
43
Auto
Manual
5
Full
50%
8
Enable
Disable
7
Disable
Enable
10
Either
Both
Default =
30 Minutes
*Self-Adjusts to
10 min. user
mode
9101112
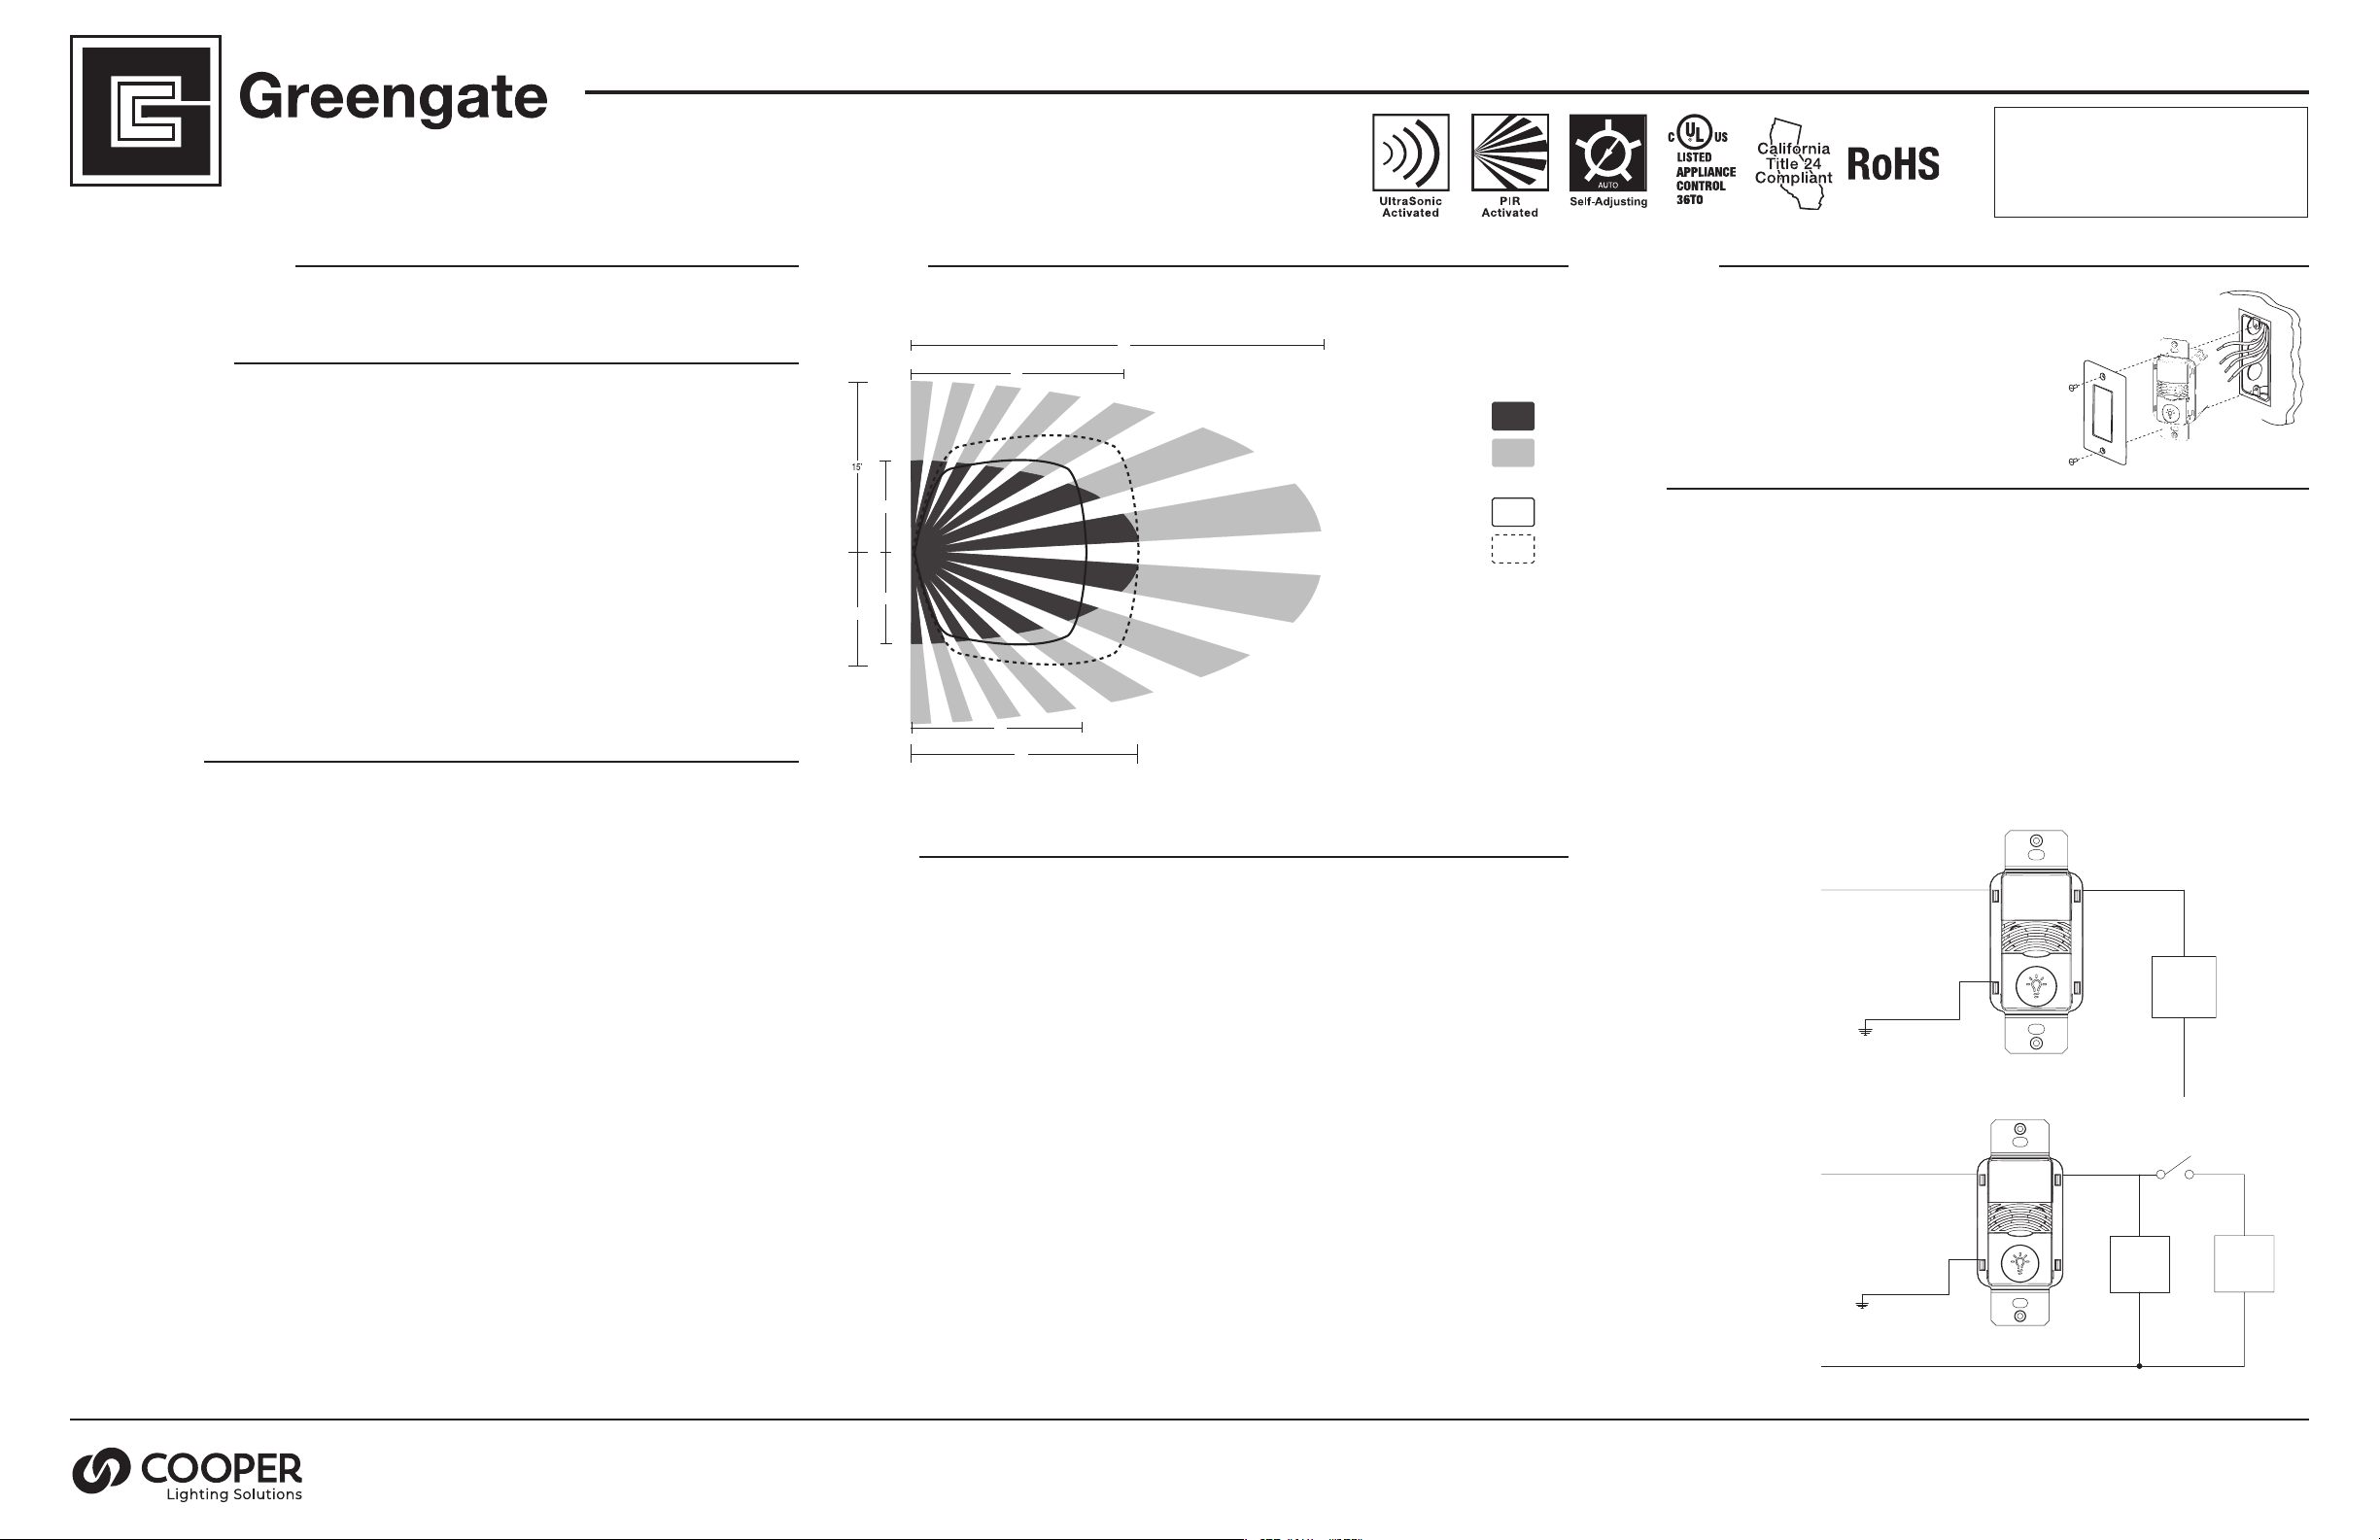
AdjustmentsshouldbemadewiththeHVACsystemONsothattheinstallerwillbeabletodetecttheeffectofairflowonthe
operationoftheONW-D-1001-MV.Useonlyinsulatedtoolstomakeadjustments.
Immediatelyafterapplyingpowertothelightingcircuit,waitapproximatelytwominutesfortheswitchtopower-upandstabilize.
Self-Adjust
Sensorisshippedinself-adjustmode.Thisappliestotime
delay,USandPIRsensitivity.InpreparationfortheInstaller
Test,thetimedelayissetto15seconds,afterthesensoris
installed,poweredONandhasstabilized,theunitwilltime-
out15secondsafterthelastmotiondetected.Coverageand
sensitivitycanbeconfirmedbywatchingtheGreen(US)and
Red(PIR)indicatorLEDsonthefrontofthesensor,while
movingaroundtheroom.
1. WalkaroundtheroomandmonitorLEDs.
2. Standindifferentpartsoftheroomandwaveyour
hands.LEDsshouldonlyturnONforonesecondwith
eachmotion.(IfLEDsdonotturnON,gotoInstaller
Adjustments–SensitivityAdjustmentSection)
3. Standstillthreetofourfeetawayfromsensorforfive
seconds.LEDsshouldnotturnON.(IfanyLEDturnsON,
noteLEDandgotoInstallerAdjustments–Sensitivity
Adjustmentssection)
4. Walkoutsidetheroomandwait15secondsforthelightstoturnOFF.(IflightsdonotturnOFFgotoInstaller
AdjustmentsSection)
5. Re-entertheroomtoactivatesensor.(IflightsdonotturnONgotoTroubleshootingSection)
6. Atthispointyoucanexittheroomandletthesensortime-out.Whenthesensortimes-outandisOFFwithpowerONforfive
minutes,theunitwillgotoa10minuteTimeDelayusermodesetting.
Note:ToplaceintoTestMode,toggleDIPSwitch12outofitscurrentposition,wait3seconds,andthenbackintoitsoriginalposition.
ON/OFF Button
PIR Lens
DIP Switches
Ultrasonic Detection
Daylight
Sensor Level
Adjustment Ultrasonic
Sensitivity
Adjustment
Red (PIR) & Green (US)
Detection LEDs
1 and 2 12345678
9101112
12345678
9101112
Installer Adjustments