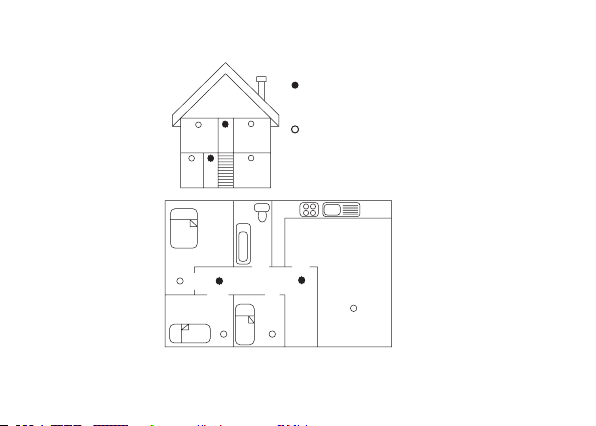
Cooper Security Scantronic 720r User manual

1
720r UK
NL
Fr
It
Dk
N
Sv
De
Es
Pt
Fi

2
Part No. 497365 Issue 2
This product complies with the requirements of European Directive: 1995/5/EC (Radio
&Telecommunications Terminal Equipment Directive).
Dit product is conform de normen van de Europese Richtlijn 1995/5/EC (R&TTE Richtlijn)
Questo prodotto è conforme ai requisiti della Direttiva Europea: 1995/5/EC (Radio&Teleco
mmunications Terminal Equipment Directive).
Dette produkt er i overensstemmelse med kravene i EU-direktivet: 1995/5/EF (Direktiv om
radio- og teleterminaludstyr).
Dette produktet overholder kravene i EU-direktivet: 1995/5/EC (Radio &Telecommunica-
tions Terminal Equipment Directive, R&TTE).
Den här produkten uppfyller kraven i EU-direktivet: 1995/5/EG (direktivet för radioutrustning
och teleterminalutrustning).
Dieses Produkt erfüllt die Anforderungen der europäischen Richtlinie 1995/5/EG (Richtlinie
für Funkanlagen und Telekommunikationsendeinrichtungen).
Este producto cumple con los requisitos de la Directiva Europea 1995/5/CE (Directiva de
equipo de terminal de radio y telecomunicaciones).
Este produto está conforme os requisitos da Directiva Europeia: 1995/5/CE (Directiva so-
bre Equipamento de Radiocomunicações e Terminal de Telecomunicações).
Tämä tuote täyttää EU:n direktiivin 1995/5/EY (Radio- ja telepäätelaitedirektiivi) asettamat
vaatimukset.

3
UK: 1. Test button and activity LED
NL: 1. Testknop en activiteiten-LED
Fr: 1. Bouton test et voyant d’activité
It: 1. Pulsante di test e LED di attività
Dk: 1. Testknap og aktivitets-LED
N: 1. Testknapp og LED for aktivitet
Sv: 1. Testknapp och aktivitetslysdiod
De: 1. Testknopf und Aktivitäts-LED
Es: 1. Botón de prueba y LED de actividad
Pt: 1. Botão de teste e LED de actividade
Fi: 1. Testipainike ja toiminnan merkkivalo
1
Fig. 1, Abb. 2, Kuva 1

4
UK: 1. Hole for mounting flange
2. Battery
3. Learn LED
NL: 1. Gat voor montageplaat
2. Batterij
3. Leer-LED
Fr: 1. Trou oblong de fixation sur la plaque de montage
2. Pile
3. Voyant d’apprentissage
It: 1. Foro per il montaggio della flangia
2. Batteria
3. LED di apprendimento
Dk: 1. Hul til monteringstap
2. Batteri
3. Registrerings-LED
N: 1. Hull til montasjeflens
2. Batteri
3. LED for læring
Sv: 1. Hål för monteringsfläns
2. Batteri
3. Inlärningslysdiod
De: 1. Loch für Befestigungsflansch
2. Batterie
3. Lern-LED
1
2
3
Es: 1. Agujero para pestaña de montaje
2. Pila
3. LED de aprendizaje
Pt: 1. Orifício para a flange de montagem
2. Bateria
3. LED de detecção
Fi: 1. Reikä asennuslaipalle
2. Paristo
3. Ohjelmoinnin merkkivalo
Fig. 2, Abb. 2, Kuva 2

5
UK: 1. Mounting flange
2. Fixing hole (two sizes)
NL 1. Montageplaat.
2. Montagegat (twee afmetingen)
Fr: 1. Plaque de montage
2. Trous oblongs de fixation (deux tailles)
It: 1. Flangia
2. Fori di fissaggio
Dk: 1. Monteringstap
2. Huller til fastgøring (to størrelser)
N: 1. Montasjeflens
2. Festehull (to størrelser)
Sv: 1. Monteringsfläns
2. Hål för fastskruvning (två storlekar)
De: 1. Befestigungsflansch
2. Befestigungsloch (zwei Größen)
Es: 1. Pestaña de montaje
2. Agujero de fijación (dos agujeros)
Pt: 1. Flange de montagem
2. Orifício de fixação (dois tamanhos)
Fi: 1. Asennuslaippa
2. Kiinnitysreikä (kaksi kokoa)
2
21
Fig. 3, Abb. 3, Kuva 3

6

7
UK
INTRODUCTION
The 720r Smoke Detector is designed to work with Scantronic 868MHz narrow band trans-
mitters. The unit contains an integrated radio transmitter.
SPECIFICATION
Part No. 720rEUR-00
Power Supply 9VDC PP3 Alkaline battery (Energiser 522, Duracell MN1604)
Low voltage alarm: 7.2V
RF Immunity: 10V/m
Dimensions: 105mm x 105mm x 34mm (HxWxD)
Operating Frequency: 868,6625 MHz
RF Transmitter Power 10mW
Specification subject to change without notice.
COMPATIBLE EQUIPMENT
7500rEUR Homelink 75
762r Two channel radio receiver
768r/769r Eight channel radio receiver and expander
9960 RFX 16 zone radio receiver
9955 RFX 8 zone radio receiver

8
INSTALLATION
Insert Battery
Remove the mounting plate (if fitted) and connect a 9V (PP3) battery.
The activity LED flashes and the detector sounder gives a loud tone for one second. This
tone indicates that the detector is working.
Note: If the sounder clicks once a second then a fault has occurred or the battery is totally
exhausted. Replace the battery and check that the sounder gives a one second tone.
Learning
Put the receiver into learn mode (consult the relevant section in the receiver’s Installation
and Programming Guide.)
Radio Learning: Press and hold the test button for seven seconds.
IR Learning: Hold the detector so that the IR learn LED points at the learn sensor
on the receiver. Make sure the learn LED on the detector is no more
than 25mm from the learn sensor on the receiver. Press and hold the
test button for three seconds.
While you are holding the test button down, after 3 seconds the detector gives five rapid
clicks as it transmits its identity.

9
UK
Siting
Best protection is obtained by installing a smoke alarm in the middle of a ceiling in every
room. However, there should be at least one alarm outside the bedrooms. If the bedrooms
are situated in different parts of the home, several alarms should be installed. In a house
with more than one floor, there should be at least one alarm on each floor.
Always check that the alarm can easily be heard from the bedrooms. If necessary, install
an alarm in the bedroom itself. The smoke alarm should be placed in the middle of the ceil-
ing, at least 15 cm from a wall or a corner. If the alarm is installed on a wall, it should be 15
cm from the ceiling; for attics with a roof ridge, 90 cm from the centre.
To avoid false alarms, the alarm should not be installed where naturally combustible parti-
cles are found (for example: in garages, badly ventilated kitchens, beside open fireplaces).
Nor should it be placed near by fans or ventilators. Do not install smoke alarms in dusty or
dirty places, or near by fluorescent lighting. Temperature and humidity of the room should
be normal. The alarm must not be painted. Do not install smoke alarm in temperature be-
low 0°C or more than 40°C or above 85% relative humidity.

10
Bedroom
Bedroom
Bedroom
Kitchen
Dining room
Living room
Mimimum protection (every storey, every sleep-
ing area)
Maximum protection (all rooms except kitchens
and bathrooms)

11
UK
Do NOT mount the unit:
Over a radiator.
Near the floor.
Close to or on large metal structures.
Closer than one metre to mains wiring and metal water or gas pipes.
Inside steel enclosures.
Next to electronic equipment, particularly computers, photocopiers or other radio
equipment.
Closer than 2m to fluorescent light fixture.
Note: Radio conditions and interference can change over time, therefore no guarantee can
be given about a specific transmission range.
Physical Installation
Use the mounting plate as a template to mark and drill two screw holes in the position
where you wish to fit the detector. Fix the the mounting plate into position. Mount the detec-
tor on the mounting plate.
OPERATION
During normal operation the detector is silent.
If smoke is present in the atmosphere then the unit may take up to 9 seconds to detect
the smoke, go into alarm and operate its siren. The detector sends a radio signal to the
receiver every time it goes into alarm.

12
If the unit’s internal circuits detect a fault (for example a low battery), then the sounder
gives five rapid beeps and the unit sends a radio signal to the receiver.
Silencing an Alarm
To silence the siren on the smoke detector press the Test button once briefly. The detector
stays silenced until it can no longer detect heat or smoke, and then returns to normal
mode.
Reducing Sensitivity
If you wish to reduce the sensitivity of the detector for a short time, for example when cook-
ing may start a false alarm, then press the test button once briefly. If the detector is not
already in alarm then the sounder will give two short beeps to signal that it is in reduced
sensitivity. After 10 minutes the detector will set itself back to normal sensitivity.
If you wish to set the detector back to normal sensitivity then touch the Test button briefly
once more. The sounder gives three short beeps to signal normal sensitivity.
TESTING.
1. Put the control unit/receiver into walk test.
2. Press and hold the Test button for six seconds. The siren operates at the end of the six
seconds.
3. Make sure the panel receives the alarm.
4. Chose another site for the detector if the panel does not receive the signal.
5. Stop the walk test at the control unit/receiver.

13
UK
MAINTENANCE
Test the smoke alarm every week, for example when doing the vacuuming, by pressing
the test button for at least 10 seconds. The alarm signal is a penetrating, rapidly pulsating
signal. The alarm sounds as long as the test button is pressed or there is smoke in the
detector. When the alarm goes off, always check carefully to see that there is no fire and
never remove the battery from the alarm except when changing it! Always test the alarm
immediately after returning from holiday or after a longer period of absence. Under the test
button, there is a red control lamp which twinkles once a minute. This shows that the bat-
tery is correctly connected. If the alarm does not sound when testing, the battery must be
replaced. The alarm should be dusted and cleaned regularly with a slightly damp cloth. In
connection with annual battery change or when required, for example after a false alarm,
clean and vacuum the alarm carefully using a soft brush. The battery lasts approximately
one year. About a month before the battery is completely flat, the alarm emits a short sig-
nal once a minute. This is the signal that the battery needs changing. The alarm works as
normal during this time. The battery should be an alkaline 9 Volt battery: Energiser 522 or
Duracell MN1604. Always test the alarm after changing the battery.
Service
If the sounder gives burst of five clicks then a fault has occurred or the battery is totally ex-
hausted. Replace the battery and check that the activity LED is working normally.
If the sounder still gives bursts of five clicks after inserting a good battery then the unit has
a fault. Return the unit to your supplier.

14
© Cooper Security Limited 2005
Every effort has been made to ensure that the contents of this leaflet are correct . How-
ever, neither the authors nor Cooper Security Limited accept any liability for loss or dam-
age caused or alleged to be caused directly or indirectly by this leaflet. The contents of this
leaflet are subject to change without notice.
Printed and published in the U.K.
Product Support (UK) Tel: +44 (0)870 757 5400
Available between:
08:15 and 17:00 Monday to Thursday,
08:15 to 12:45 Friday,
Emergency service only 12:45 to 17:00 Friday
Product Support Fax: (01594) 545401

15
NL
INTRODUCTIE
Rookdetector 720r is speciaal ontworpen voor de 868MHz smalband zenders van Scant-
ronic.
De detector bevat een integrale draadloze zender.
SPECIFICATIES
Artikelnummer: 720rEUR-00
Voeding: 9VDC PP3 Alkaline batterij (Energiser 522 of Duracell MN1604)
Batterij-laag alarm: 7,2V
RF Immuniteit: 10V/m
Afmetingen: 105mm x 105mm x 34mm (HxBxD)
Werkfrequentie: 868,6625 MHz
Zendvermogen: 10mW (optimaal)
De specificaties kunnen zonder voorafgaande aankondiging worden gewijzigd.
SYSTEEMMOGELIJKHEDEN
7500rEUR Homelink 75
762r Twee-kanaals draadloze ontvanger
768r/769r Acht-kanaals draadloze ontvanger en uitbreiding
9960 RFX draadloze ontvanger voor 16 zones
9955 RFX draadloze ontvanger voor 8 zones

16
INSTALLATIE
Zo plaatst u de batterij
Verwijder de montageplaat (indien aanwezig) en sluit een 9V (PP3) batterij aan.
De activiteiten-LED knippert en de zoemer geeft gedurende een seconde een luid signaal.
Hiermee geeft de detector aan dat hij werkt.
Opm.: Als de detector eens per seconde klikt, wijst dat op een fout, of de batterij is leeg.
Vervang de batterij en controleer of de detector gedurende een seconde een signaal geeft.
Zo laat u de ontvanger leren
Zet de ontvanger in de leer-stand (raadpleeg het betreffende hoofdstuk in de Installatie-
handleiding van de ontvanger).
Draadloos leren: Druk de testknop gedurende zeven seconden in.
Infrarood leren: Richt de detector met de IR-LED op de leer-sensor van de ontvanger.
Let op dat de LED en de sensor niet meer dan 25mm van elkaar
verwijderd zijn. Druk de testknop gedurende drie seconden in.
Terwijl u de testknop ingedrukt houdt, geeft de detector na drie seconden vijf snelle klikjes
waarmee de identiteitscode wordt overgeseind.

17
NL
Zo projecteert u de detector
U krijgt het beste resultaat als u in iedere kamer een rookdetector in het midden van het
plafond plaatst. Echter, er behoort tenminste een detector buiten de slaapkamers geplaatst
te worden. Als de slaapkamers in verschillende delen van het huis zijn, dienen een aantal
detectoren te worden geplaatst. In een gebouw met meerdere verdiepingen dient minimaal
een detector op elke verdieping geïnstalleerd te worden.
Controleer altijd of de alarmmelding makkelijk gehoord kan worden vanuit de slaapkamers.
U plaatst de rookdetector in het midden van het plafond, in elk geval op 15 cm van een
muur of uit een hoek. Als u de detector op een muur monteert, moet u minimaal 15 cm
onder het plafond blijven. Voor zolders met een nokdak geldt 90 cm vanuit het midden.
Om onnodige alarmmeldingen te voorkomen kunt u de detector beter niet installeren in
ruimtes waar een enigszins vervuilde lucht kan voorkomen (bijvoorbeeld in garages, slecht
geventileerde keukens of naast een open haard). U mag hem ook niet vlakbij ventilatoren
plaatsen. Plaats geen rookdetector in stoffige of vuile ruimtes, of bij TL- of neon verlichting.
De temperatuur van de ruimte kan het best normaal zijn; Installeer daarom in ieder geval
geen detector in ruimtes met een temperatuur lager dan 0°C of hoger dan 40°C, of met
een relatieve luchtvochtigheid van meer dan 85% . De detector mag niet geschilderd of
gewit worden.

18
Slaapkamer
Slaapkamer
Slaapkamer
Keuken
Eetkamer
Woonkamer
Mimimale beveiliging (elke verdieping, elke
slaapruime)
Maximale beveiliging (alle kamers behalve de
keuken en badkamer)

19
NL
Monteer de detector NIET:
Boven een radiator.
Vlak boven de vloer.
Dichtbij of op grote metalen constructies.
Op minder dan een meter van hoofdleidingen voor gas, water of elektriciteit.
In stalen behuizingen.
Naast elektronische apparatuur speciaal computers, fotokopieerapparaten en draadloze
apparatuur.
Op minder dan 2m van TL- en/of neon verlichting.
Opm.: Draadloze signaaloverdracht is sterk afhankelijk van de lokale omstandigheden.
Daarom kan geen garantie worden gegeven voor een specifiek bereik.
Zo installeert u de rookdetector
Gebruik de montageplaat als mal om de twee schroefgaten op de gewenste plaats te
markeren en te boren. Monteer de montageplaat en monteer de detector op de montage-
plaat.
WERKING
Onder normale omstandigheden geeft de detector geen geluid.
Als er rook in de lucht is kan het 9 seconden voordat de detector de rook heeft gede-
tecteerd en een alarmmelding geeft. Elke keer als de detector in alarm gaat zendt hij een
signaal naar de ontvanger.

20
Als het circuit van de detector een fout signaleert (bijvoorbeeld een zwakke batterij), dan
geeft de detector vijf snelle piepjes en zendt een signaal naar de ontvanger.
Zo zet u het alarm af
Om de sirene van de rookdetector af te zetten drukt u een keer kort op de testknop. De
sirene van de detector blijft uitgeschakeld totdat er geen hitte of rook meer wordt gede-
tecteerd. Daarna schakelt hij automatisch over naar de normale werkstand, klaar voor een
volgende melding.
Zo beperkt u de gevoeligheid
Als u voor korte tijd de gevoeligheid van de detector wilt beperken, bijvoorbeeld tijdens het
koken, dan drukt u een keer kort op de testknop. Als de detector nog geen alarmmelding
geeft, dan zal de sirene als bevestiging van deze instelling twee korte piepjes geven. Na 10
minuten schakelt de detector automatisch weer terug naar de standaard gevoeligheid.
Als u de detector handmatig naar de standaard gevoeligheid wilt terugzetten, dan drukt u
eenmaal kort op de testknop. Als bevestiging geeft de detector drie korte piepjes.
TESTEN
1. Zet het controlepaneel of de ontvanger in de looptest.
2. Houdt de testknop zes seconden ingedrukt. Na zes seconden reageert de sirene.
3. Controleer of het controlepaneel de melding heeft ontvangen.
4. Kies een andere lokatie voor de detector als het paneel niet op de melding heeft gerea-
geerd.
5. Schakel de looptest uit op het controlepaneel of de ontvanger.
Other manuals for Scantronic 720r
1
Table of contents
Languages:
Other Cooper Security Smoke Alarm manuals
Popular Smoke Alarm manuals by other brands

Johnson Controls
Johnson Controls DH300PL Installation and maintenance instructions

Universal
Universal SS-776-CAN quick start guide

Simplex
Simplex SafeLINC 4020 Operating instruction

LST
LST MCP5A Series Specifications

FireBlitz
FireBlitz FH700HIA Installation and Maintenance

Siemens
Siemens FDL241-9 Mounting, Commissioning

ESL
ESL 700 Series Installation sheet

BASETech
BASETech BT-NO-218C operating instructions

Kidde
Kidde 0910UK user guide

Elmes Electronic
Elmes Electronic MTS-166/9V quick start guide

jablotron
jablotron JA-60SR quick start guide

Silent Call Communications
Silent Call Communications SD4-SS Installation and operation manual