Coopers of Stortford 9255 User manual

3 in 1 Garden Vacuum 9255 Instructions for Use
Please read and retain these instructions for future reference v005: 17/04/19
Leaf Blower-Vac/Patio Cleaner
Technical Specifications
Model GY 8113
Rated voltage 230V-240V
Rated frequency 50Hz
Rated power consumption 3000W
Mains fuse(delayed action) 13A
Speed 15000 rpm
Max air speed 270km/h
Max.air volume 13.2m³/min
Bag volume 35L
Weight 7.3kg (net)
Measured LpA at operator’s position 88.3dB(A), uncertainty K=3dB(A)
Measured LwA of the machine: max 99.8dB(A), K=2.0dB (A), guaranteed LwA: 102dB(A)
Vibration max. 1.29m/s2, K = 1.5m/s2

3 in 1 Garden Vacuum 9255 Instructions for Use
Please read and retain these instructions for future reference v005: 17/04/19
Contents
Technical Specifications.......................................................................................................................................1
List of components ...............................................................................................................................................3
Operative range....................................................................................................................................................3
Start assembly ......................................................................................................................................................3
Mounting the handle............................................................................................................................................4
Before starting......................................................................................................................................................4
WORKING IN VACUUM MODE..............................................................................................................................6
WORKING IN BLOWER MODE...............................................................................................................................6
Dismantling the bag..............................................................................................................................................6
EMPTYING THE BAG .............................................................................................................................................7
ATTACHING THE COLLECTING BAG (Fig. 6)...........................................................................................................8
COLLECTING BAG..................................................................................................................................................8
SAFETY AND INTERNATIONAL SYMBOLS ..............................................................................................................8
Proper use ............................................................................................................................................................9
SAFETY INSTRUCTIONS ...................................................................................................................................... 10
MAINTENANCE AND STORGE ............................................................................................................................ 11
REMOVING OBSTRUCTIONS FORM THE VACUUM OPENING............................................................................ 11
VACUUM AND BLOWER FUNCTION SWITCH..................................................................................................... 12
DISPOSAL ........................................................................................................................................................... 12

3 in 1 Garden Vacuum 9255 Instructions for Use
Please read and retain these instructions for future reference v005: 17/04/19
List of components
1Ergonomic handle
2ON/OFF switch
3Collecting bag
4Electric motor
5Impeller
6Function switch
7Wheel
8Blower outlet
9Vacuum inlet
10 Handle release button
11 Collecting bag release button
12 Grip handle
Operative range
This 3 in 1 garden vacuum device mainly serves to clean hard surfaces such as paved paths, courtyards and
terraces. It is only suitable for vacuuming or blowing dry, light materials such as grass, leaves, small twigs and
pieces of paper. DO NOT USE for heavy materials such as metal, stones, branches, broken glass, and wet
leaves.
Start assembly
Connect top assembly (A) with
lower assembly (B) and lock
with two knobs where
indicated.

3 in 1 Garden Vacuum 9255 Instructions for Use
Please read and retain these instructions for future reference v005: 17/04/19
Mounting the handle
Fig. 1
To mount the handle press the button at
the rear top of the vacuum/blower unit,
pull the upper handle arm upwards until
it locks in position.
Adjust the telescopic handle. Turn the
height adjustment knob anti-clockwise
and adjust handle height to proper
position. Hand tighten the knob by
turning it clockwise –see below:
Before starting
Fig. 2
MAKE SURE NOT TO DAMAGE THE
MAINS CABLE. ( Fig.2 A)
It is recommended to connect the
machine to the mains supply over a
residual current operated device with a
maximum breaking current of 30mA.
Always use a weatherproof extension
cable with high-performance insulation
approved for outdoor use.
1. Make sure that the handle is properly attached and is firmly seated in the chassis (see Fig. 1).
2. Always make sure that the collecting bag is attached and locked into position before you switch on the
device (both in vacuum and blower mode) If it is not locked into position, the garden vacuum will NOT
start(see Attaching the Collecting Bag).
3. Your wheeled vacuum/blower unit is controlled via the on/off switch (Fig.2) at the handle (2). Make sure
that the switch is in the Off position.
4. Connect the unit to an extension cable. Lead the extension cable through the handle and around the
strain relief(Fig.2).

3 in 1 Garden Vacuum 9255 Instructions for Use
Please read and retain these instructions for future reference v005: 17/04/19
5. Always direct the cable backwards, away from the device.
6. If a cable should be damaged during operation, switch the device off and disconnect the mains cable
from the mains supply. Do not touch the cable, before you have interrupted the voltage supply.
7. Never operate the unit from the mains supply:
8. Disconnect the unit from the mains supply
If you leave the unit unattended
Before removing a blockage
Before inspecting, cleaning, or working on the unit.
If the unit vibrates abnormally
9. Operate the unit in daylight or sufficient artificial lighting only.
10. Do not bend forward too far, and always take care to keep your balance.
11. Make sure to have a safe footing, when working on inclines.
12. Move forward by walking - never run!
The front roller is height adjustable for use on
different thickness’ leaves.
There are 2 grooves for roller height adjustment.
Fig. 3

3 in 1 Garden Vacuum 9255 Instructions for Use
Please read and retain these instructions for future reference v005: 17/04/19
WORKING IN VACUUM MODE(Fig.3)
Make sure that the unit is switched off (on/off switch in Off position).
Turn the function switch (6) clockwise until the arrow of the switch is aligned with the arrow of the vacuum
mode(VAC).
Switch on the device at the handle –always stand in an upright position if you do so. Never switch the device
on, when you are kneeling or sitting next to it.
Vacuum waste by moving the vacuum unit over the area you wish to clean.
WORKING IN BLOWER MODE(Fig.3)
1Make sure that the garden vacuum is switched off(on/off switch in off position)
2Turn the function switch (6) anticlockwise until the arrow of the switch is aligned with the arrow of the
blower mode (BLOW).
3Blow debris away by moving forward with the blower making sweeping movements.
4Never blow debris into the direction of onlookers.
5Avoid moving the unit backwards over unclean surfaces in blower mode.
Dismantling the bag
Fig. 4
Grab the bag handle and press the
locking button to release the
support.

3 in 1 Garden Vacuum 9255 Instructions for Use
Please read and retain these instructions for future reference v005: 17/04/19
Fig. 5
Fig. 6
EMPTYING THE BAG(Fig.5-6-7)
1If the bag is full, switch off the vacuum at the handle and pull the plug.
2Loosen the locking ring(Fig.5) on the collecting bag release button(12).
3Grab the grip handle (13), as shown in Fig. 5 and pull back.
4Lift the upper part of the bag frame away from the unit, and put the bag on the ground.
5Use both hands to carry the filled bag to your dustbin or compost heap, make sure that the bag’s
opening is directed upwards when carrying it(Fig.7).
6Turn the bag around to empty the mulched debris into the dustbin/onto the compost heap. If debris
should get stuck in the bag, open the two hook and loop fasteners at the top of the bag and turn it inside
out.
Fig. 7

3 in 1 Garden Vacuum 9255 Instructions for Use
Please read and retain these instructions for future reference v005: 17/04/19
ATTACHING THE COLLECTING BAG (Fig. 6)
1. Insert the lower two feet of the bag’s frame into the supports at the rear end of the chassis.
2. Turn the bag’s frame into the correct position until the bag locks in place.
COLLECTING BAG
As with all bags of this kind, the material gets clogged with small particles during operation. Therefore, some
simple routine maintenance steps are required to maintain the unit’s performance.
After each use, the bag should be cleaned by shaking it. This will maintain the bag’s proper filtering function.
If the bag should be clogged by moist particles, let it dry before cleaning.
The collecting bag can be cleaned using a garden hose. Always splash the bag at its exterior side. You can
turn the bag, when it is still moist. Always make sure that the bag is completely dry, before you store or use
it. The collecting bag is subject to a high amount of wear and tear, and may require to be replaced from time
to time. Replace a worn-out bag immediately. To avoid unnecessary wear and tear of the collecting bag,
prevent the bag from being dragged over the ground, when using the unit. Spare bags are available under
item code 9267.
SAFETY AND INTERNATIONAL SYMBOLS
In the following, you will find the description of safety symbols as well as international symbols and
pictograms that may appear on your device. It is required that you read all safety notes before you operate
the device. If you do not use this device properly, personal injuries through fire, electric shock of cutting
parts or property damages may occur.
Please keep these Operating Instructions carefully!
SYMBOL
DESCRIPTION
WARNING SYMBOL
Indicates danger, safety notes or causes for particular
caution. This symbol may occur in combination with other
symbols or pictograms.
READ THE OPERATING INSTRUCTION
If you do not observe the operating and safety notes of the
Operating Instructions, serious injuries may occur. Read
the Operating Instructions before you switch on and
operate this device.

3 in 1 Garden Vacuum 9255 Instructions for Use
Please read and retain these instructions for future reference v005: 17/04/19
SYMBOL
DESCRIPTION
Disconnect mains plug before carrying out any repairs!
If the cable is damaged, disconnect from the mains
immediately and replace cable!
KEEP OTHER PERSONS IN DISTANCE
WARNING: When operating the device, take care that no
other persons are nearby (safe distance: 5m). This is
particularly valid for children and animals.
WEAR EYE AND EAR PROTECTION
WARNING: Thrown-about objects may lead to serious
injuries of the eyes, heavy noise may lead to hearing
losses. Always wear eye and ear protection when
operating this device.
OPERATION AND STORAGE
Do not use the device in humid weather and store it in a
dry location.
Proper use
To preserve your warranty rights and to ensure product safety, please strictly adhere to the Safety
Instructions. For reasons in connection with the machine’s technical design, it is impossible to
exclude all remaining risks.
Attention! When using the machine, the Safety Instructions must be adhered to.
Please observe these instructions for your own safety and the safety of other persons, before you
start operating the machine. Make sure to keep these instructions for future reference.
Attention: Noise protection ! Please observe the local regulations when operating
your device.

3 in 1 Garden Vacuum 9255 Instructions for Use
Please read and retain these instructions for future reference v005: 17/04/19
SAFETY INSTRUCTIONS
1NEVER ALLOW PERSONS, WHO ARE NOT FAMILIAR WITH THESE INSTRUCTIONS, TO USE THE
DEVICE.
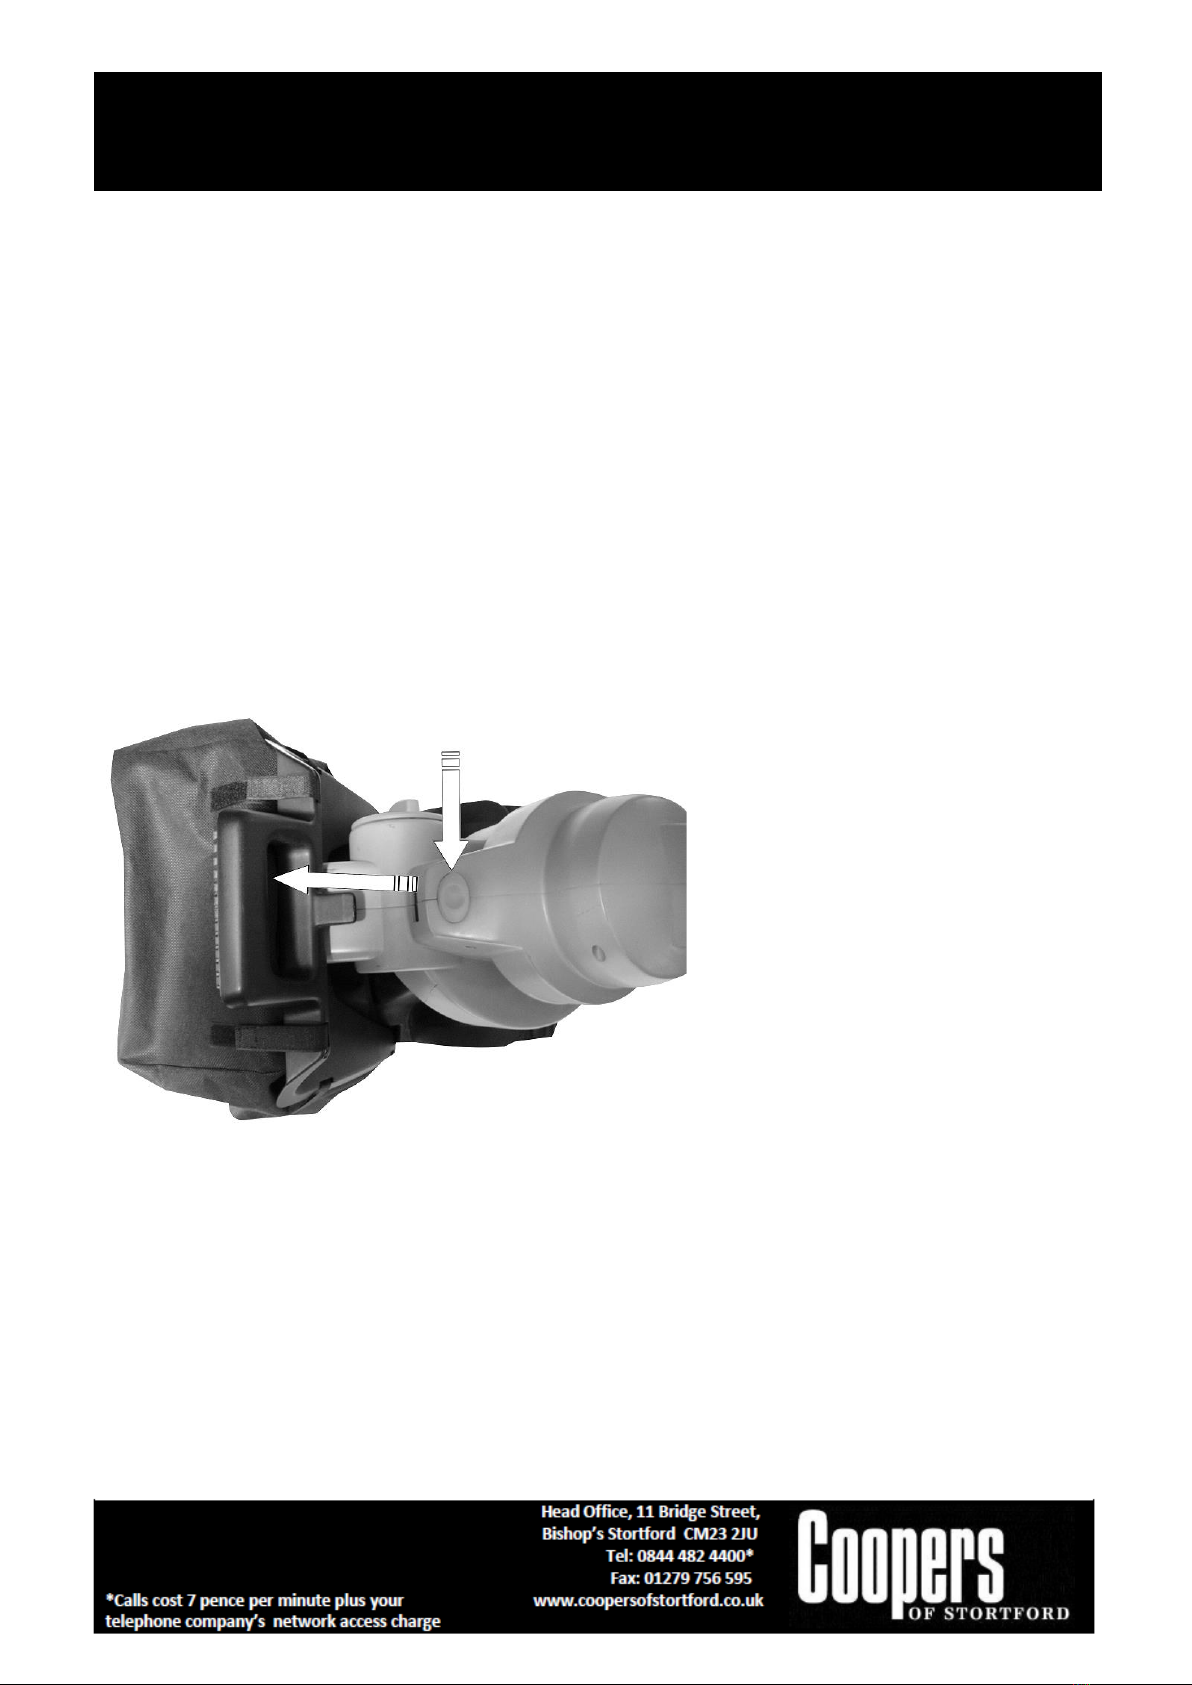
2DO NOT OPERATE THE GARDEN VAC WITHOUT THE COLLECTION BAG PROPERLY ATTACHED. IF
THE COLLECTION BAG IS NOT PROPERLY ATTACHED, THE MACHINE MAY UNINTENTIONALLY
MOVE FORWARDS AND THROW OUT OBJECTS THROUGH THE BLOWOUT OPENING. THROWN
OUT OBJECTS MAY CAUSE INJURY.
3THE OPERATOR IS RESPONSIBLE FOR ACCIDENTS OR RISKS TO THIRD PARTIES OR THEIR
PROPERTY.
4MAKE SURE THAT YOUR POWER OUTLET IS PROPERLY EARTHED, AND THAT YOUR EXTENSION
CABLE MEETS THE ELECTRIC REQUIREMENTS, IS IN GOOD WORKING CONDITION AND
WEATHERPROOF.
5HAVE YOUR GARDEN VAC SERVICED BY AN AUTHORISED WORKSHOP OR QUALIFIED
TECHNICIAN IF :
(1) THE MOTOR, CABLE OR SWITCH MUST BE REPAIRED OR SERVICED.
(2) THE MACHINE RUNS ABNORMALLY OR ROUGHLY.
(3) THE SWITCH DOES NOT WORK PROPERLY, OR THE MOTOR RELEASES A BURNING SMELL OR
SPARKS.
(4) IT FELL DOWN OR HAS BEEN DAMAGED IN ANY OTHER WAY.
(5) SHOULD THE MACHINE FALL INTO THE WATER, THERE IS THE HAZARD OF AN ELECTRIC SHOCK!
SWITCH THE MACHINE OFF AND PULL THE PLUG IMMEDIATELY.
(6) DO NOT ALLOW CHILDREN TO USE THE MACHINE. SMALL CHILDREN SHOULD BE UNDER
SUPERVISION TO MAKE SURE THAT THEY DO NOT PLAY WITH THE MACHINE.
(7) NEVER WEAR LOOSE CLOTHES OR JEWELLERY. THESE MAY GET SUCKED INTO THE AIR INLET.
KEEP LONG HAIR AWAY FROM THE AIR INLETS.
(8) PREVENT CORDS, PLASTIC BAGS, OR SIMILAR MATERIALS FROM GETTING SUCKED IN, AS THESE
MIGHT WRAP AROUND THE FAN WHEEL, WHICH MAY CAUSE AN OVERLOAD OR BLOCKING OF THE
MOTOR. IN SUCH A CASE, SWITCH THE WHEELED SUCTION SWEEPER OFF. DO NOT LEAVE THE
SUCTION SWEEPER SWITCHED ON WITH THE MOTOR OVERLOADED OR STALLED.
(9) ALWAYS OPERATE THE MACHINE IN AN UPRIGHT POSITION. DO NOT OPERATE IT, IF THE
MACHINE IS TILTED TO ONE SIDE OR EVEN UPSIDE-DOWN.

3 in 1 Garden Vacuum 9255 Instructions for Use
Please read and retain these instructions for future reference v005: 17/04/19
(10) IT IS RECOMMENDED TO CONNECT THE MACHINE TO THE MAINS SUPPLY OVER A RESIDUAL
CURRENT OPERATED DEVICE WITH A MAXIMUM BREAKING CURRENT OF 30MA.
(11) USE ONLY EXTENSION CABLES THAT ARE APPROVED FOR OUTDOOR USE AND ARE NOT
LIGHTER THAN RUBBER-SHEATHED CABLES OF TYPE H07 RN-F ACCORDING TO DIN/VDE 0282 WITH
A DIAMETER OF AT LEAST OF 1.5 SQ.MM. THE CABLES MUST BE SPLASH-PROOF.
MAINTENANCE AND STORGE
Make sure that all nuts, bolts and screws are firmly tightened to ensure the safe operation of the
device.
Regularly check the collecting bag for signs of wear and tear.
Replace worn or damaged parts.
Only use original parts and accessories.
Store the device in a dry place.
REMOVING OBSTRUCTIONS FORM THE VACUUM OPENING
Twigs and long objects may cause obstructions to develop in the vacuum opening on the bottom side of the
vacuum unit. If this should be the case try to slightly shake the unit during operation. If this should not solve
the problem, switch the unit off and pull the plug. Remove the obstruction using a stick or another long, thin
object (don’t use metal objects).
To avoid objects that cause an obstruction from being repeatedly sucked in, it may be necessary to move the
unit slower over the debris to be cleaned up.
The top and bottom parts
of the tubes can be
disassembled (see Fig. A),
if the collection bag has
become too heavy.
Rotate 2 knobs (see Fig.
B).
Fig A
Fig B

3 in 1 Garden Vacuum 9255 Instructions for Use
Please read and retain these instructions for future reference v005: 17/04/19
After removing the tubes, the
garden vacuum can be rotated
(Fig. C) to facilitate cleaning of the
tubes especially on the inside.
Fig C
VACUUM AND BLOWER FUNCTION SWITCH
If the VACUUM/BLOWER function switch should be blocked, operate the switch(Fig.3), when the unit is
running. Turning the switch several times while air is flowing through the unit should remove the blockage.
Make sure that you are not standing in front of the blower nozzle, when you operate the switch.
DISPOSAL
•Dispose of all packaging, paper, cartons, plastic and plastic bags in accordance with your local
recycling regulations.
•At the end of the product’s lifespan please dispose of it at an authorised household WEEE waste
recycling centre.
DECLARATION OF CONFORMITY
Coopers of Stortford that the 3 in 1 Garden Vacuum 9255, (Model No. GY 8113)
Conforms to the following European Directives and standards
Machinery Directive 2006/42/EC
Low Voltage Directive 2014/35/EU
RoHS Directive 2011/65/EU
The Technical file in accordance with 2006/42/EC is available from:
Coopers of Stortford, 11 Bridge Street, Bishop’s Stortford,
Hertfordshire, CM23 2JU
EMC Directive 2014/30/EU
EN55014-1:2006/A2:2011
EN55014-2:2015
EN61000-3-2:2014
EN61000-3-3:2013
Noise Directive 2000/14/EC & 2004/88/EC
This manual suits for next models
1
Table of contents
Other Coopers of Stortford Blower manuals