COOSPO BC107 User manual

All About Passio n
BC107-RTN-I1-2150
Scan to Get More Languages
USER MANUAL

- 2 -
Button function
Short Press: Page turning
Hold for 2 seconds: setting mode
(Short press in setting mode: switch setting
options / switch the numerical)
Right Button
Left Button
Mid Button
Short Press: Pause / Continue (Short
press to start recording after power on)
Hold for 2 seconds: save the exercise
record and exit the exercise
(Short press in setting mode: enter the
current setting / switch the number of digits)
Short Press: Mark a new lap
Hold for 2 seconds: Power off
(Power on: short press the button)
(Short press in setting mode: exit / return and save the setting)

- 3 -
Status Icons
Distance
Ascend Distance
Calories
Cadence
Heart Rate
LAP
Maximum
Sport time
Altitude
Odometer (Total distance)
Gradient
Time
No satellite signal
Satellite signal level
Accessory connecting status
Manual pause
Connected with App by BLE
Temperature
Battery level
Under exercising
Increased & Decreased
Power
Average
Miles per hour
Kilometers per hour
KMH
MPH
LAP
HRM
CAD
GRA
TIME
AST
ODO
DST
A LT
CAL
PWR
Time zone
UTC

- 4 -
Standard accessories
Main Device x 1
Big size rubber ring x 2
Small size rubber ring x 2
User Manual x 1
Standard bike
mount x 1
Rubber pad for
standard bike mount x 1
Charging Cable x 1

- 5 -
1. Install the rubber pad onto
the mount
2. Tie the mount onto the bar
with the rubber rings
3. Tie up the mount
4. Install the main device onto
the mount
5. Rotate the main device for
90 degrees
6. Installation completed
How to Install
Standard Mount Installation

- 6 -
Charging
Open the rubber cover,
connect the device with
usb cable to charge
USB DC 5V power adaptor / Computer
1
2
3During the charging, the battery icon will flash until fully charged.
Please use DC 5V power adaptor for charging.
Please charge the device before first time use.

- 7 -
Acquiring Satellite Signals, Time Setting and Auto Backlight
Auto Backlight
This device will automatically calculate the sun rise and sun set time, from the time half an hour before
sun set to half an hour after sun rise, the backlight will be automatically lighten up, in the rest of the
time, the backlight will be turned off if no operation detected in 15 seconds.
Acquiring Satellite Signals
Please make sure the device is outdoor and under a clear view of sky. Usually it may take 15~90
seconds to locate satellite signals, remain stationary when acquiring satellite signals. This device can
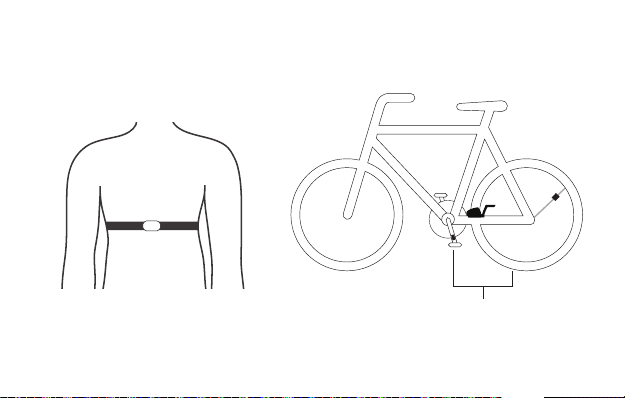
use speed sensor or GPS for speed tracking, when the speed sensor is not connected, the device will
use GPS for speed tracking, and will use speed sensor when the sensor is connected.
Time Setting
The time and date will be calibrated automatically after locate the satellite signals when the device is
powered on (Please set the time zone correctly, refer to the time zone setting chapter) or connect the
device to the App (CoospoRide) to sync the time.

- 8 -
Connecting with ANT+ Sensors
Please make sure the sensors are in wake-up mode(For example, the heart rate monitor should be
worn on properly, and the speed cadence and power meter should be awakened by turning the pedals
or wheels).
Wear it correctly,
wake up the heart rate belt The speed cadence and power meter are
awakened by turning the pedals or wheels
1.

- 9 -
Press
Hold
Save and get back
to the last pages(if
no device found in
20 seconds, the
device will get back
to the last pages
automatically)
2.1 Hold the to get into setting mode;
2.2 There are 5 settings pages available (P1 ~ P5), press the to switch to P1;
2.3 Press to select to enter;
2.4 The computer automatically searches for ANT+ peripherals, and automatically connects after searching
for ANT+ peripherals;
2.5 Press to save the found accessories and return. If no ANT+ accessory is found, the device will return
to the last pages automatically (When a power device is connected during riding, the computer will
display power data first, and when there is no power device, it will display GRA slope data).
Press: Switch between P1~P5

- 10 -
Press
Setting the Wheel Size
1.1 Hold the to get into setting mode;
1.2 There are 5 settings pages available (P1 ~ P5), press the to switch to P2;
1.3 Press to select to enter;
1.4 Press to select the setting digit, press the to set the numbers;
1.5 Press to save and exit (Automatically exit in 6 seconds if no operation detected).
Set the number
Select the digit
(The selected digit will flash)
Save and get back (Automatically exit if
no operation detected in 6 seconds)

- 11 -
Common wheel size and circumference(Wheel Size L (mm)
12 × 1.75 935mm
14 × 1.5 1020mm
14 × 1.75 1055mm
16 × 1.5 1185mm
16 × 1.75 1195mm
18 × 1.5 1340mm
18 × 1.75 1350mm
20 × 1.75 1515mm
20 × 1-3/8 1615mm
22 × 1-3/8 1770mm
22 × 1-1/2 1785mm
24 × 1 1753mm
24×3/4 Tubular 1785mm
24 × 1-1/8 1795mm
24 × 1-1/4 1905mm
26 × 1-3/8 2068mm
26 × 1-1/2 2100mm
26 × 1.40 2005mm
26 × 1.50 2010mm
27 × 1 2145mm
27 × 1-1/8 2155mm
27 × 1-1/4 2161mm
27 × 1-3/8 2169mm
27.5×1.75 2114mm
27.5×2.125 2174mm
27.5×1.5 2074mm
27.5×1.95 2146mm
29×2.1 2288mm
29×2.2 2298mm
29×2.3 2326mm
24 × 1.75 1890mm
24 × 2.00 1925mm
24 × 2.125 1965mm
26 × 1.75 2023mm
26 × 1.95 2050mm
26 × 2.00 2055mm
26 × 2.10 2068mm
26 × 2.125 2070mm
26 × 2.35 2083mm
26 × 3.00 2170mm
26 × 7/8 1920mm
26 × 1(59) 1913mm
26 × 1(65) 1952mm
26 × 1.25 1953mm
26 × 1-1/8 1970mm
650× 35A 2090mm
650 × 38A 2125mm
650 × 38B 2105mm
700 × 18C 2070mm
700 × 19C 2080mm
700 × 20C 2086mm
700 × 23C 2096mm
700 × 25C 2105mm
700 × 28C 2136mm
700 × 30C 2170mm
700 × 32C 2155mm
700C Tubular 2130mm
700 × 35C 2168mm
700 × 38C 2180mm
700 × 40C 2200mm

- 12 -
Press
Time Zone Setting
1.1 Hold the to get into setting mode;
1.2 There are 5 settings pages available (P1 ~ P5), press the to switch to P3;
1.3 Press to select to enter (Default time zone: UTC/GMT + 08:00);
1.4 Press to select the setting digit, press the to set the numbers;
1.5 Press to save and exit (Automatically exit in 6 seconds if no operation detected).
Set the number
Select the digit
(The selected digit will flash)
Save and get back (Automatically exit if
no operation detected in 6 seconds)

- 13 -
Setting Metric and Imperial Units
KMH
Press
Save and get back (Automatically exit if
no operation detected in 6 seconds)
There are 5 settings pages available (P1 ~ P5), press the to switch to P4.
Press to enter(Default: KMH).
press the to switch.
Press to save and exit (Automatically exit in 6 seconds if no operation detected).
Hold the to get into setting mode.
Set the KMH/MPH
1.1
1.2
1.3
1.4
1.5

- 14 -
Press
Save and get back (Automatically exit if
no operation detected in 20 seconds)
Recalibrate
1.1 Hold the to get into setting mode;
2.1 There are 5 settings pages available (P1 ~ P5), press the to switch to P5, it will automatically calibrate;
2.2 Short press to recalibrate, the value flashes during the calibration, the value does not flash after the
calibration is successful;
2.3 After the calibration is successful, press to save and exit(Automatically exit in 20 seconds if no
operation detected).
Power calibration

- 15 -
GPS searching is Auto after power on. Please start cycling after the GPS positioning is successful.
GPS Positioning
No satellite signal
No signal
Weak
Normal
Strong
No Speed data display
1.
If you start riding when the GPS is not positioned successfully (speed sensor not connected), the
speed data(real-time, average, maximum) will be displayed as'' '', and the rest of the data remains
the same.
2.
Tips: You can stand still 3-5 minutes to get more connections with satellites for better GPS signal.
Note: Please make sure you are outdoor when positioning. Bad weather and dense forest may affect
GPS signal.
3.

- 16 -
Cycling
Press
Press: Mark
a new lap
Press: Pause/continue
Hold: Stop exercise and save the riding data
Press: Switch
the display
Turn on the device, press to start an exercise and recording(During the cycling, when the
cycling speed is 0, the device will pause automatically, if no data get for speed, cadence and heart
rate in 15 minutes the device will turn into sleep mode, press to resume).

1
- 17 -
* Bluetooth Connection
* Compatible with
Any Bluetooth 4.0 enabled Android device with Android 4.3 and above
iOS 9.0 version and above, iphone 4s and above
Download CoospoRide in Google Play or App Store

- 18 -
Bind
XXX
XXX
BC107
2 3
2
3Open the CoospoRide App, enter the binding computer step, select the BC107
computerin the device list to bind the device, (the phone needs to turn on Bluetooth
and allow Bluetooth permissions);
Power on the bike computer;

- 19 -
In the activity page of the App, click on the connected device to enter the record
synchronization operation page (through the authorization to Strava in the App more
settings, the computer data can be synchronized to the Strava platform at the same
time);
ID:x
Connected
Cycling
Activity
More
No record
xxxxxxx
xxxxxxx
xxxxxxx
xxxxxxx
xxxxxxx
Cycling
Activity
More
4
5
4 5
Select the record to be synchronized and click Sync, and the record on the
computer will be deleted automatically after synchronization.

- 20 -
The water resistant level of the bicycle computer is IPX7. It can be used in the rain if you close the
protective cover on the back tightly. It is recommended to take down the bicycle computer and put it into
waterproof bag if it rains heavily.
Attentions
Responsibility Disclaimer
Save and get back (Automatically exit if
no operation detected in 20 seconds)
The information contained in this manual just for reference. The product described above may be
subject to alteration owing to the manufacturer's continuing research and development plans, without
making an announcement in advance.
We shall not bare any legal responsibility for any direct or indirect, accidental or special damages,
losses and expenses arising from or in connection with this manual or the contained product.
Basic Parameters
Wireless ANT+ & Bluetooth
FSTN Screen, 2.3 inch
Yes
GPS & BDS
Yes
.fit
IPX7
64g
English
1000mAh
PC+ABS+TPU
81x54x20.6 mm
Bluetooth (Specified App Compatible)File Transfer
Accessories
Supported
Dimension
Material
Battery Life 28 hours for a single use after fully charged
Battery Capacity
Language
ANT+ peripherals (Heart Rate Monitor,
Speed Sensor, Cadence Sensor, Speed
and Cadence 2 in 1 Sensor, Power Meter)
Weight
Water Resistance
Storage Format
Lap Count
Locate mode
Backlight
Display
Table of contents