manuals.online logo
Brands
  1. Home
  2. •
  3. Brands
  4. •
  5. Copernicus
  6. •
  7. Science Education Product
  8. •
  9. Copernicus UV Tech Tub User manual

Copernicus UV Tech Tub User manual

FTT-UV - Revision A - Released September 25, 2020 - Copernicus Educational Products Inc.
•This product is meant to be assembled by an adult.
•In its unassembled state, small parts present a hazard.
•To be used under direct supervision of an adult.
WARNING
®
UV Tech Tub
FTT-UV
Please Recycle
For assistance, please contact us:
1-800-267-8494
Email [email protected]om
Have your packing slip ready for reference
User Manual
FTT-UV_2020_A
Check out our other products online at
www.copernicused.com
FTT-UV - Revision A - Released September 25, 2020 - Copernicus Educational Products Inc. 2
For assistance, please contact us:
1-800-267-8494
Email [email protected]om
Have your packing slip ready for reference
We do not inherit the
earth from our ancestors,
we borrow it from our
children.
NORTH AMERICAN
PROVERB
Change is the end result
of all true learning.
LEO BUSCAGLIA
What you leave behind is
not what is engraved in
stone monuments, but
what is woven into the
lives of others.
PERICLES
Education is the most
powerful weapon which
you can use to change the
world.
NELSON MANDELA
User Manual
FTT-UV_2020_A
Check out our other products online at
www.copernicused.com
®
UV Tech Tub
FTT-UV
Dear Educator,
Thank you for purchasing the . We hope it meets all your expectations and you and your students
®
UV Tech Tub
enjoy using it your school. in
If you have any questions, concerns or ideas on how we can improve please let us know by contacting our
Customer Solutions Ninjas at 1-800-267-8494 or info@copernicused.com.
Happy teaching,
Kaylyn Belcourt
President
Register your Product
Registering your warranty ensures we have all the information we need to make any future warranty claims quick and
easy. Please visit and complete the form within 10 business days from product www.copernicused.com/warranty
assembly. By registering your product, you will be entered into a draw to win Copernicus product.
Make a Warranty Claim
We offer a Lifetime Warranty on almost everything we make. Please call 1-800-267-8494 or email
[email protected]om to start your warranty claim. Proof of purchase will be required upon warranty claim (i.e. copy
of invoice).
1
Year
UV Bulb
Warranty
Lifetime
Tub
Warranty
1
Year
Electrical
Components
Warranty
FTT-UV - Revision A - Released September 25, 2020 - Copernicus Educational Products Inc. 3
Important Safeguards
When using an electrical appliance, especially when
children are present, basic precautions should always be
followed, including the following:
READ ALL INSTRUCTIONS BEFORE
USING THIS PRODUCT
DANGER - To reduce the risk of electrocution:
Always unplug this product immediately after using.
Always unplug this furnishing from the electrical outlet before
cleaning or servicing.
WARNING - To reduce the risk of burns,
electrocution, fire, or injury to persons:
Eye damage may result from directly viewing the light
produced by the lamp in this apparatus. Always ensure that
lamps are off before opening door.
This door is provided with an interlock to reduce the risk of
excessive ultraviolet radiation. Do not defeat its purpose or
attempt to service.
This cabinet is designed for use with germicidal lamps and
must be installed in compliance with competent technical
directions to prevent the user's eye and bare skin from
exposure to harmful ultraviolet radiation.
Turn off power switch before unplugging. Unplug from outlet
before putting on or taking off parts.
Do not allow to be used as a toy. Close supervision is
necessary when this product is used by, on, or near children,
invalids, or disabled persons.
Use this product only for its intended use as described in this
manual. Do not use attachments not recommended by
the manufacturer.
Never operate this product if it has a damaged cord or plug, if it
is not working properly, if it has been dropped or damaged, or
dropped into water. Contact Copernicus customer service to
arrange examination and repair.
Never drop or insert any object into any opening.
Do not pull or carry by cord, use cord as a handle, close a door
on cord, or pull cord around sharp edges or corners.
Do not use outdoors.
Do not rest and/or operate appliance on cord. Keep the cord
away from heated surfaces.
Do not unplug by pulling on cord. To unplug, grasp the plug,
not the cord.
SAVE THESE INSTRUCTIONS
Important Safeguards Continued
Do not handle plug or appliance with wet hands.
This product may create small amounts of ozone during
disinfection. Ensure that the concentration of ozone in the
room where equipment is used is limited to a safe value.
Do not connect more than three UV Tech Tub®s.
This product is intended to be used, stored and operated on an
elevated surface (countertop, table, etc.) that is more than 30
inches (76.2 cm) above the floor, regardless of single, double
or triple configurations.
This product cannot be stored or operated on the floor in a
single, double, or triple configuration. Failure to follow this
instruction could lead to injury and/or damage to the product.
Do not load the inner rack with more than 5 lb (2.27 kg) in
weight.
Grounding Instructions
This product should be grounded. In the event of an electrical
short circuit, grounding reduces the risk of electric shock by
providing an escape wire for the electric current. This product
is equipped with a cord having a grounding wire with a
grounding plug. The plug must be plugged into an outlet that is
properly installed and grounded.
DANGER - Improper use of the grounding plug
can result in a risk of electric shock.
Check with a qualified electrician or service person if the
grounding instructions are not completely understood, or if in
doubt as to whether the product is properly grounded.
This product is factory equipped with a specific electric cord
and plug to permit connection to a proper electric circuit. Make
sure that the product is connected to an outlet having the same
configuration as the plug. No adapter should be used with this
product. Do not modify the plug provided - if it will not fit the
outlet, have the proper outlet installed by a qualified electrician.
If the product must be reconnected for use on a different type
of electric circuit, the reconnection should be made by qualified
service personnel.
If it is necessary to use an extension cord, use only a three
wire extension cord that has a three-blade grounding plug, and
a three-slot receptacle that will accept the plug on the product.
Replace or repair a damaged cord.
GROUNDING
PIN
GROUNDING
OUTLET
GROUNDING
OUTLET
BOX
FIGURE 1
Important Safety Instructions
This product conforms to the applicable provisions of applicable US Federal requirements, including 21 CFR, Chapter 1, Subchapter J.Radiological Health.
FTT-UV - Revision A - Released September 25, 2020 - Copernicus Educational Products Inc. 4
Mesures de protection importantes
Lors de l'utilisation d'appareils électriques, en particulier en
présence d'enfants, des précautions de sécurité de base
doivent toujours être prises, notamment:
LIRE TOUTES LES DIRECTIVES AVANT
D'UTILISER CE PRODUIT
DANGER - Pour réduire le risque d'électrocution:
Toujours débrancher ce produit immédiatement après l'emploi.
Toujours débrancher cet appareil de la prise électrique avant de
procéder à des travaux de nettoyage ou d'entretien.
AVERTISSEMENT – Pour réduire le risque de
brûlure, d'électrocution, d'incendie ou de
blessure:
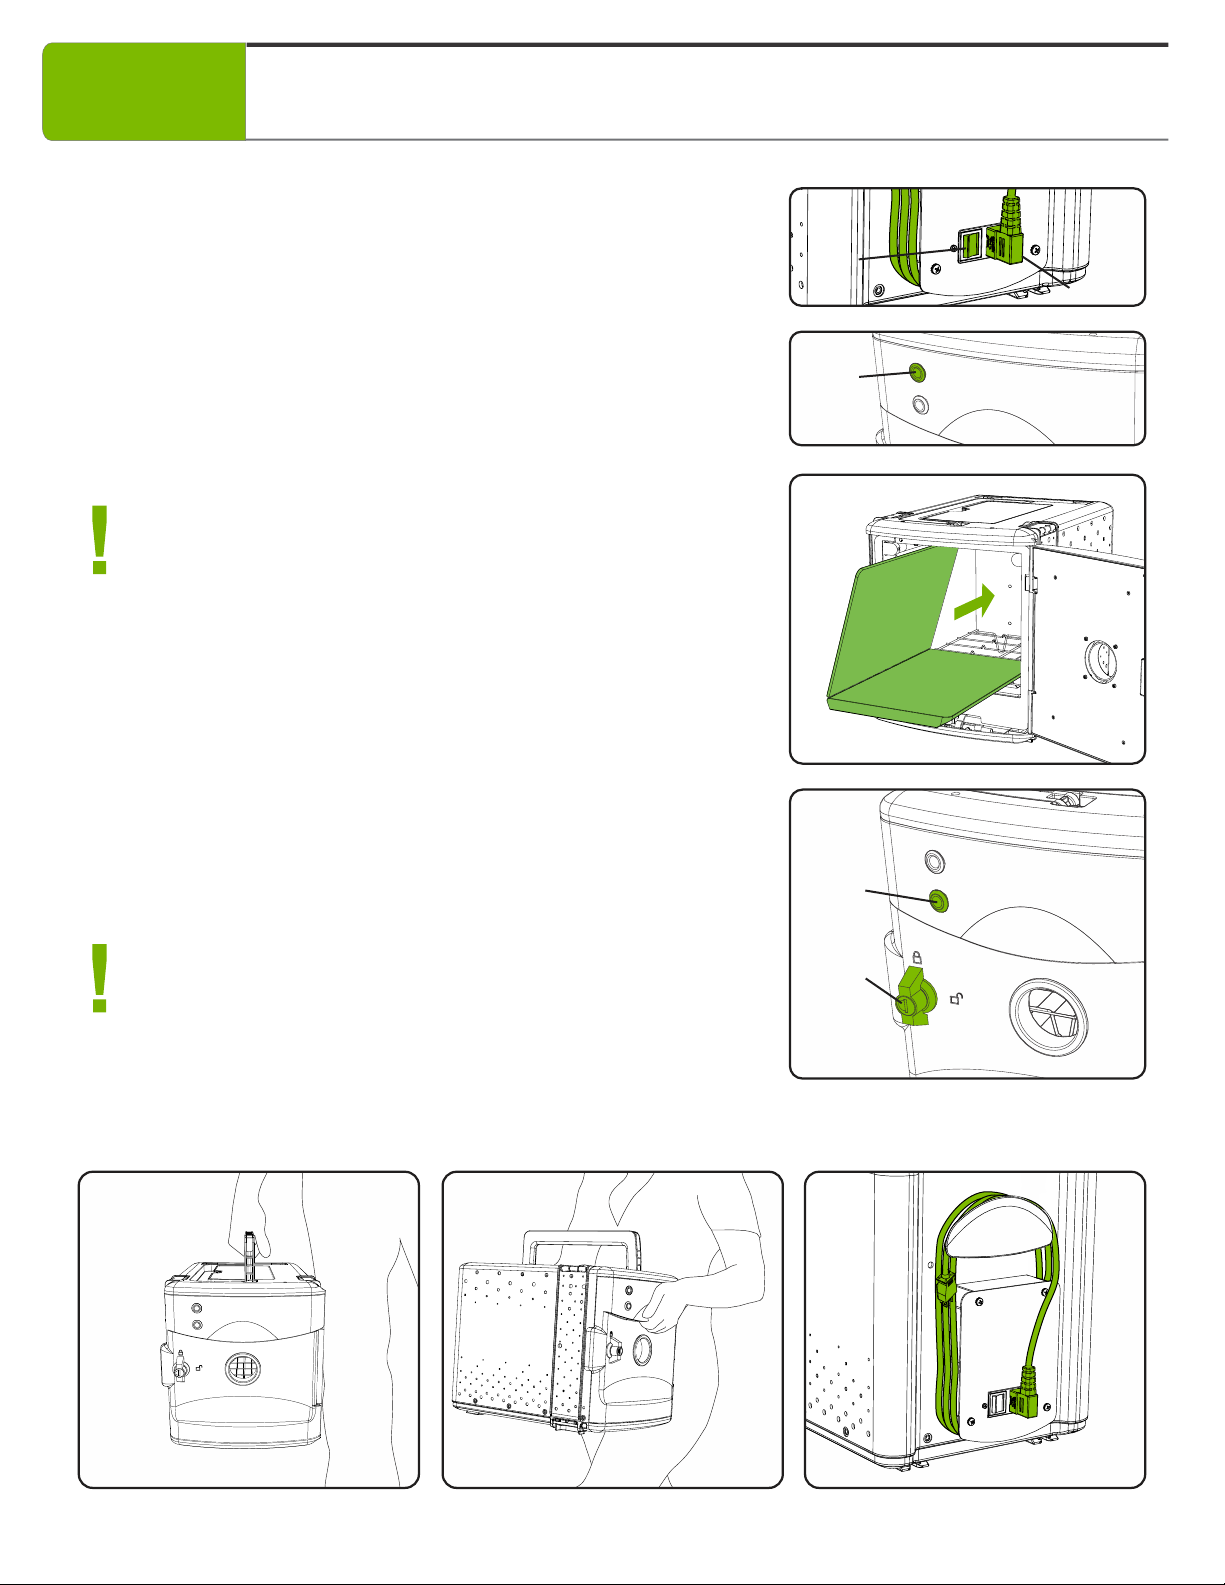
Des lésions oculaires peuvent résulter de la visualisation directe
de la lumière produite par la lampe dans cet appareil. Éteignez
toujours la lampe avant d'ouvrir la porte.
Cette porte est dotée d'un verrouillage pour réduire le risque de
rayonnement ultraviolet excessif. N'allez pas à l'encontre de son
objectif et n'essayez pas de réparer.
Ce luminaire est conçu pour etre utilisé avec des lampes
germicides et doit etre installé en stricte conformité avec les
instructions afin d'éviter que les yeux ou la peau de l'utilisateur ne
soient exposés aux effets néfastes des rayons.
Éteignez l'interrupteur d'alimentation avant de débrancher.
Toujours débrancher le produit de la prise avant d'ajouter ou de
retirer des pièces.
Ne jamais permettre que l'appareil soit utilisé comme un jouet.
Une surveillance étroite est nécessaire lorsque ce produit est
utilisé par, sur ou près d'enfants, d'invalides ou de personnes
handicapées.
Utiliser uniquement ce produit pour l'usage auquel il est destiné,
tel que décrit dans ce manuel. Ne pas utiliser d'accessoires non
recommandés par le fabricant.
Ne jamais utiliser ce produit si son cordon d'alimentation ou sa
fiche sont endommagés, s'il ne fonctionne pas correctement, s'il
est tombé ou a été endommagé, ou s'il est tombé dans l'eau.
Contacter le service à la clientèle de Copernicus pour le faire
inspecter et réparer.
Ne jamais laisser tomber ni insérer d'objet dans une ouverture.
Ne pas tirer sur le produit ou le transporter par le cordon
d'alimentation, utiliser le cordon comme une poignée, refermer
une porte sur le cordon ou faire passer le cordon par des bords ou
des coins tranchants. Ne pas laisser reposer ou faire fonctionner
l'appareil sur le cordon d'alimentation. Tenir le cordon à l'écart des
surfaces chauffées.
Ne pas utiliser le produit à l'extérieur.
CONSERVER LES PRÉSENTES DIRECTIVES
Mesures de protection importantes – Suite
Ne pas manipuler la fiche ou l'appareil avec les mains mouillées.
Ne pas débrancher le produit en tirant sur le cordon d'alimentation.
Pour débrancher le produit, saisir la fiche et non le cordon.
Ce produit peut créer de petites quantités d'ozone pendant la
désinfection. Assurez-vous que la concentration d'ozone dans la
pièce où l'équipement est utilisé est limitée à une valeur sûre.
Ne connectez pas plus de trois UV Tech Tub®.
Ce produit est destiné à être utilisé, stocké et utilisé sur une
surface surélevée (comptoir, table, etc.) à plus de 30 pouces (76,2
cm) au-dessus du sol, quelles que soient les configurations
simples, doubles ou triples.
Ce produit ne peut pas être stocké ou utilisé au sol dans une
configuration simple, double ou triple. Le non-respect de ces
instructions peut entraîner des blessures et / ou endommager le
produit.
Ne chargez pas le panier intérieur avec un poids supérieur à 5 lb
(2,27 kg).
Directives de mise à la terre
Ce produit doit être mis à la terre. En cas de court-circuit
électrique, la mise à la terre réduit le risque de choc électrique en
fournissant un fil d'échappement pour le courant électrique. Ce
produit est équipé d'un cordon d'alimentation ayant un fil de mise
à la terre avec une fiche de mise à la terre. La fiche doit être
branchée dans une prise correctement installée et mise à la terre.
DANGER - Une mauvaise utilisation de la fiche de
mise à la terre peut entraîner un risque de choc
électrique.
Vérifier auprès d'un électricien ou d'un technicien qualifié si les
directives de mise à la terre ne sont pas complètement comprises
ou en cas de doute quant à la mise à la terre du produit.
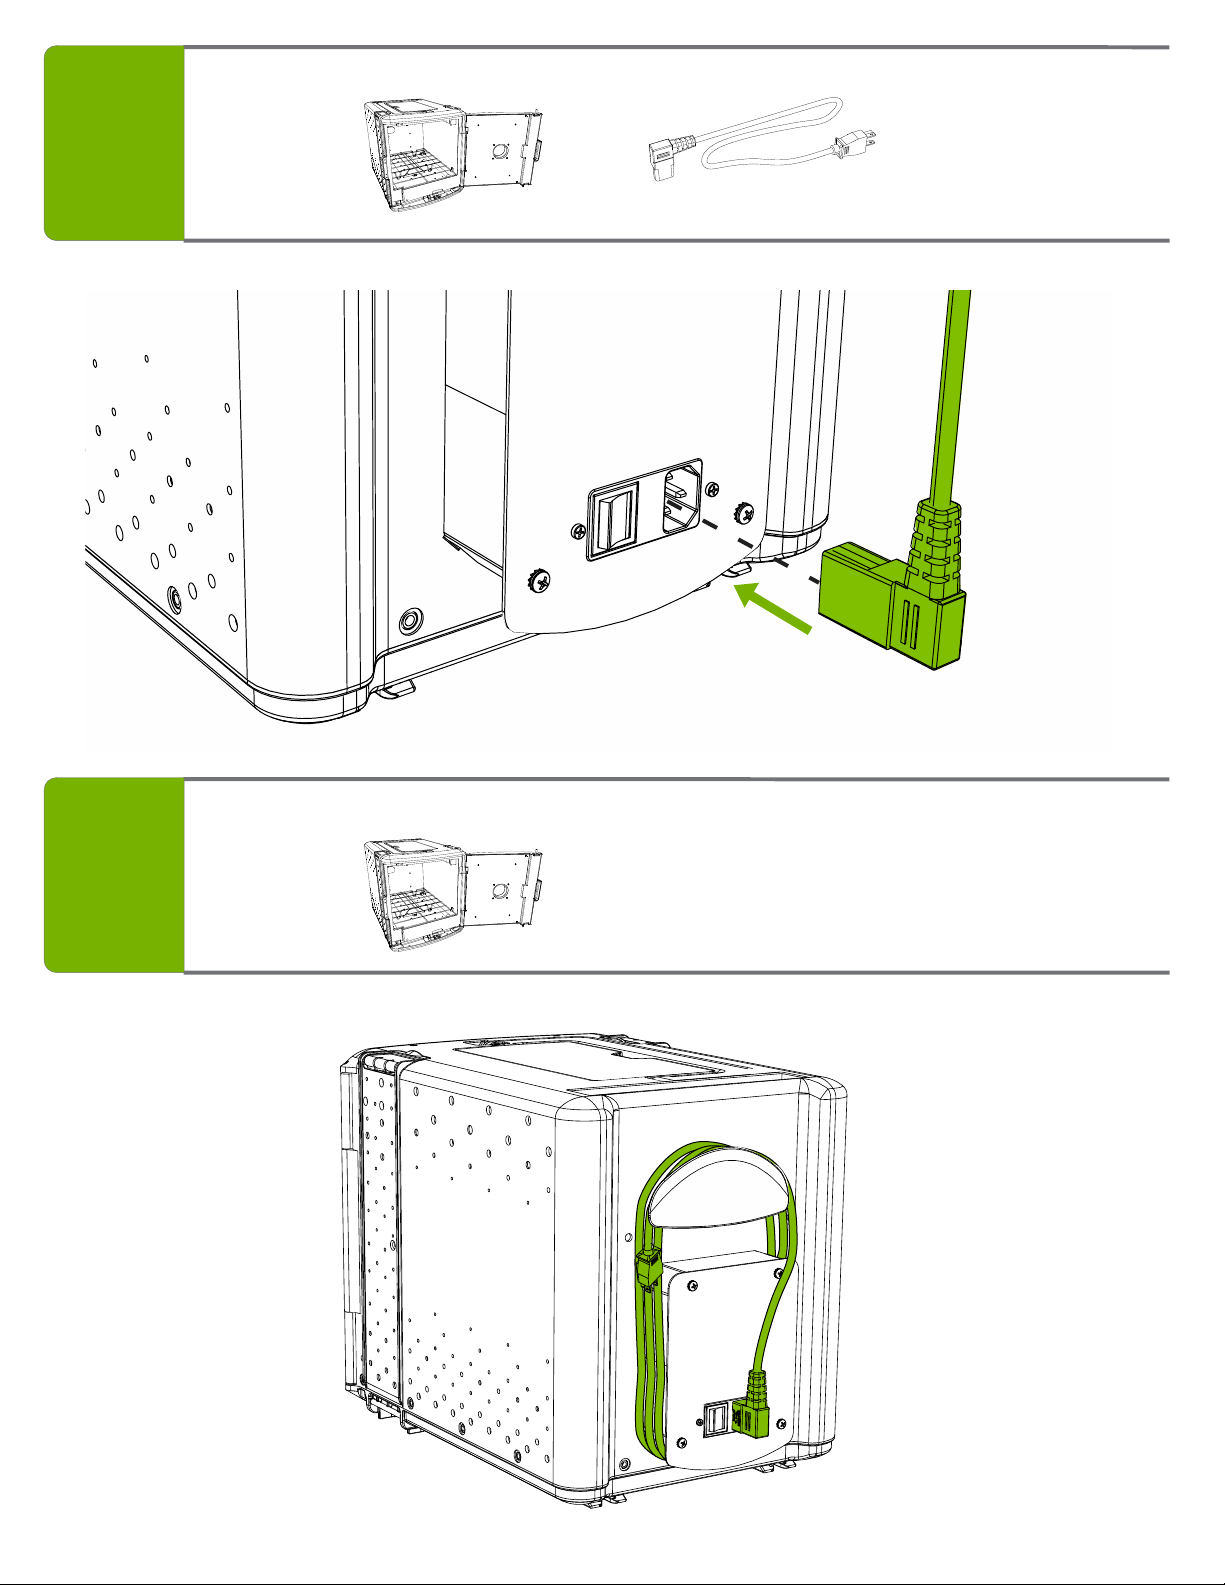
Ce produit est équipé en usine avec un cordon d'alimentation et
une fiche électrique spécifiques pour permettre le branchement à
un circuit électrique adéquat. S'assurer que le produit est branché
à une prise de même configuration que celle de la fiche. Aucun
adaptateur ne doit être utilisé avec ce produit. Ne pas modifier la
fiche fournie - si elle ne s'adapte pas à la prise, faire installer une
prise adéquate par un électricien qualifié. Si le produit doit être
rebranché pour être utilisé sur un circuit électrique différent, le
branchement doit être effectué par un personnel qualifié.
S'il est nécessaire d'utiliser une rallonge, utiliser uniquement une
rallonge à trois fils dotée d'une fiche de mise à la terre à trois
lames et une prise à trois fentes qui acceptera la fiche du produit.
Remplacer ou réparer un cordon d'alimentation endommagé.
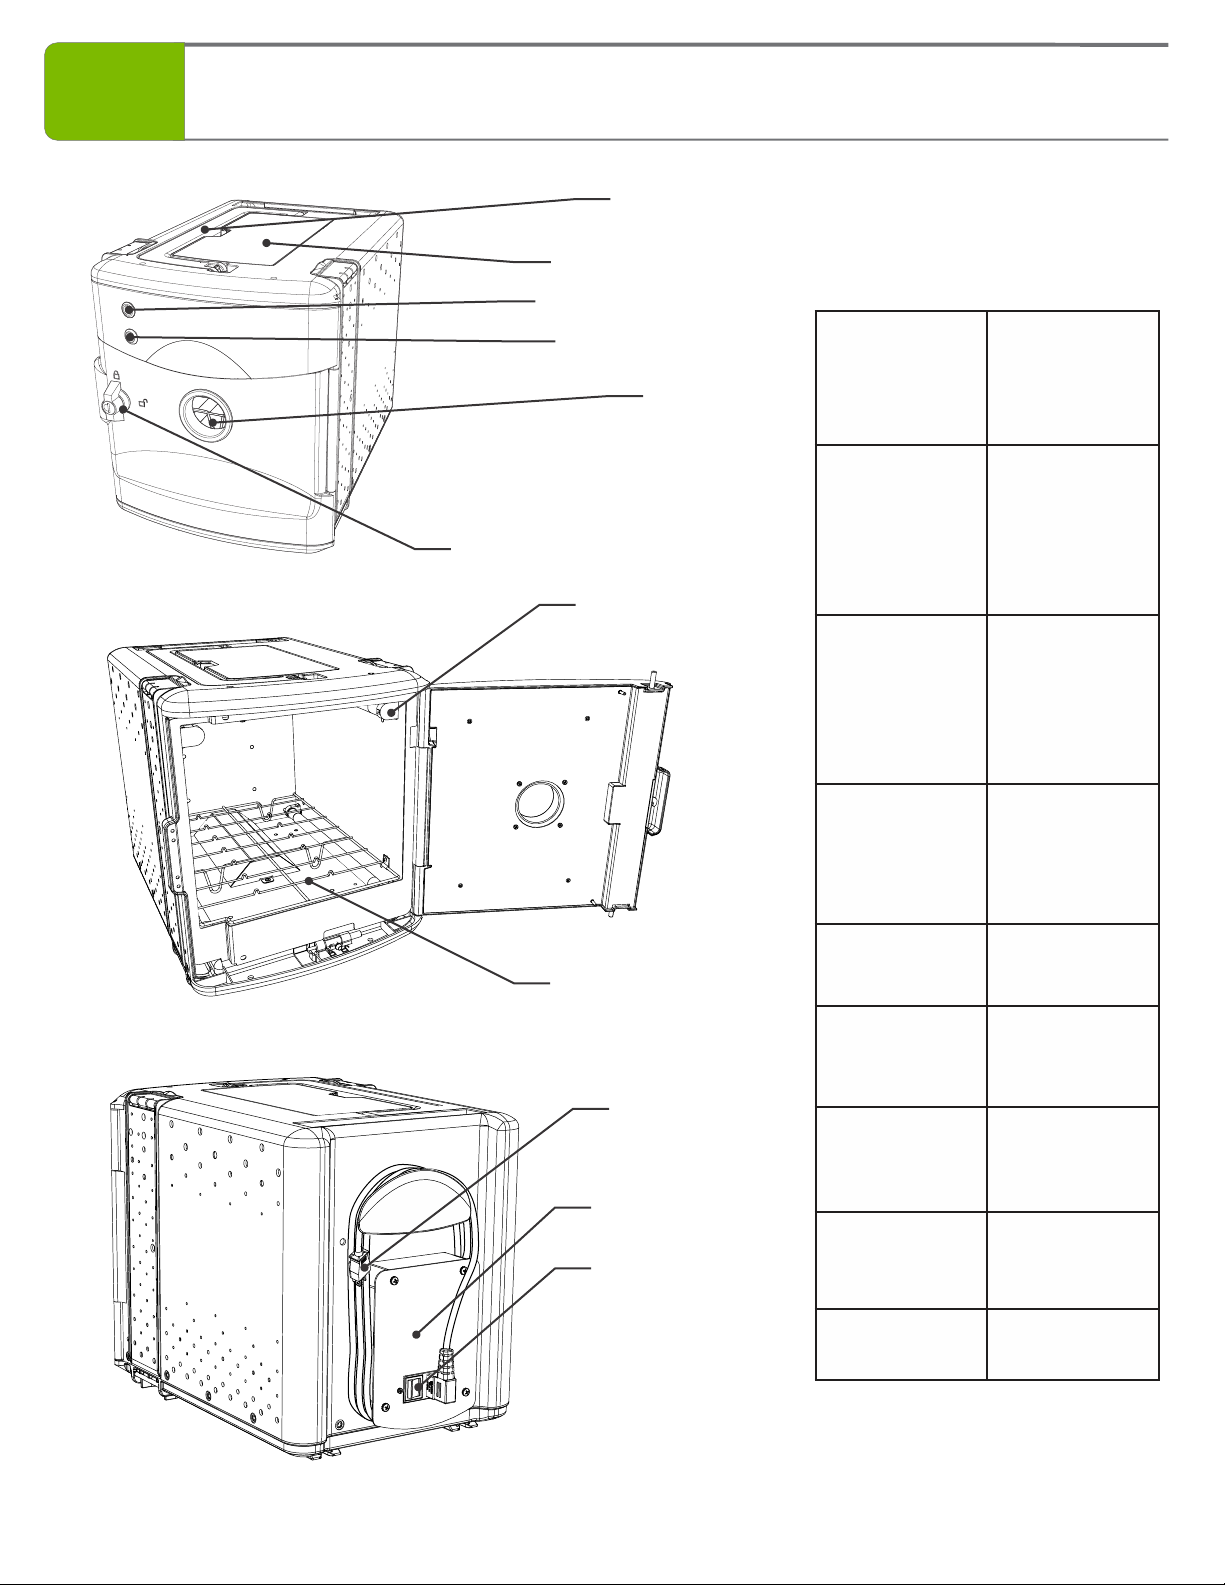
BROCHE DE TERRE
PRISE DE
TERRE
BOÎTIER DE
PRISES
DE TERRE
FIGURE 1
Directives de sécurité importantes
Ce produit est conforme aux dispositions applicables des exigences fédérales américaines applicables, dont la règlementation 21 CFR,
chapitre 1, sous-chapitre J. Santé radiologique.
FTT-UV - Revision A - Released September 25, 2020 - Copernicus Educational Products Inc. 5
Product Specifications
Top Handle x1
Top Compartment x1
Power Indicator Light x1
Cycle Start Button x1
Latch x1
Window x1
Lamp x4
Wire Rack x1
Power Plug x1
Rear Enclosure x1
Power Switch x1
Product
Weight
(Empty, fully
assembled)
15.2lbs (6.9kg)
External
Dimensions
(H x W x D)
13 1/8" x 11 3/4"
x 17 7/8”
33.4 cm x 30.0 cm
x 45.5 cm
Inside
Chamber
Dimensions
(H x W x D)
8 ½” x 9 ½”
x 12 ¾”
21.0 cm x 24.5 cm
x 32.0 cm
Bulb Type
Bulb Life
11,000 hours per
bulb
Power Input
120VAC
60 Hz
1.25A
Fuse
Time-delay
1.25A
250VAC
Disinfection
Cycle Time
1 minute
Certification
UL 962
CSA C22.2
4x
Philips TUV 8W
with
shatterproof
sleeve
FTT-UV - Revision A - Released September 25, 2020 - Copernicus Educational Products Inc. 6
FTT-UV
Before beginning, you should have:
Contents
UV Tech Tub
1x
Power Cord
1x
25527
Keys
2x
430446
Dosimeter Test Cards
12x
26100
Watch for This Helpful Symbol
Assembly Instructions
Watch for this symbol throughout this user manual.
Wherever you see it, pay close attention to ensure it is
done correctly.
Before You Begin
As You Assemble the Unit
Lay out and identify all of the included parts.
Read the assembly guide over once to familiarize yourself
with them.
Please note that in its unassembled state, this product
contains parts that can be hazardous to small children.
This product should be assembled by an adult.
Follow the steps in sequence.
Before beginning each step, find the part(s) that you
need for that step.
Pay attention to the labels on the parts; they are there to
help direct you at certain stages.
The title of each step states what you will be doing.
Review the text and the pictures as you build the unit.
Customer Service
For missing parts and other issues regarding your
product, please contact Customer Service, where we will
be happy to help.
1-800-267-8494. Monday - Friday 8:00am - 4:30 pm EST.
OR
Email at info@copernicused.com
Need Tech Support?
Have a Question?
Email our Tech Support Service www.copernicused.com
Check out some of our
other great products!
FTT-UV - Revision A - Released September 25, 2020 - Copernicus Educational Products Inc. 7
Plug in power cord
1You will need: Power Cord
1x
Wrap power cord
2You will need:
UV Tech Tub
1x
UV Tech Tub
1x
FTT-UV - Revision A - Released September 25, 2020 - Copernicus Educational Products Inc. 8
®
Using the UV Tech Tub
How to disinfect an item
To use the UV Tech Tub® for surface disinfection, first ensure that the product is
plugged in (A) and the power switch (B) is turned on.
Once the power switch has been turned on, the green power indicator light (C)
on the door will illuminate, indicating the unit is on.
Place the item (laptop shown) on the rack in the center of the chamber.
Be careful to not hit the lamps in the upper corners.
Ensure that items like laptops are open so that the display and keyboard
are exposed. Ensuring that all surfaces are exposed as much as possible is
critical for proper surface disinfection. Surfaces that do not receive UV
radiation will not be disinfected.
If visibly soiled, wipe down prior to running disinfection cycle. Dirt, dust,
and debris can impact disinfection effectiveness.
Close the door and ensure that the latch (D) is fully engaged. A disinfection cycle
cannot be started if the door is not closed fully.
With the power indicator light (C) illuminated, press the red cycle start button (E)
to begin 1-minute disinfection cycle. During the cycle, the red cycle start button
light will remain illuminated and the UV bulbs inside will turn on.
The red cycle start button light (E) and bulbs inside the chamber will turn off
when the disinfection cycle is complete.
Your item has now been disinfected!
If the door is opened during the disinfection cycle, the lights will
immediately shut off. Restart the disinfection cycle by closing the door
and pressing the cycle start button.
(D)
(E)
®
How to carry the UV Tech Tub
®
There are two ways to carry the UV Tech Tub : the flip-up handle on the top (F) or the two handles on the door and back (G).
®
Ensure that the power cord is unplugged and wrapped around the cable hooks on the back of the UV Tech Tub (H).
(G)(F) (H)
(C)
FTT-UV
(A)
(B)
(F)
FTT-UV - Revision A - Released September 25, 2020 - Copernicus Educational Products Inc. 9
UV Bulb Information
®
About the UV bulbs used in UV Tech Tub
The UV Tech Tub® uses four Philips TUV 8W bulbs.
The UV bulbs have shatterproof sleeves to prevent glass and mercury from
escaping in the event the bulb’s glass tube is damaged or broken.
In the event that a bulb is damaged or broken, follow the steps below to
remove and dispose of the bulb.
If a bulb is damaged or broken:
Before cleanup, have people and pets leave the room to avoid accidental
exposure to mercury or broken glass.
To remove the damaged bulb (or bulbs), rotate the bulb(s) 90-degrees and
remove from bulb holders. Depending on the level of damage, a bulb may not
require 90-degree rotation to be removed. Careful attention should be paid.
Inspect the interior of the UV Tech Tub® to ensure no fragments broke away
from the bulb and out of the shatterproof sleeve.
FTT-UV
Intact bulb
Damaged bulb
Replacement bulbs:
WARNING – Risk of Fire or Electric Shock. Replace ultraviolet (UV) lamp only with type TUV 8W by Philips
AVERTISSEMENT - Risque d'incendie ou d'électrocution. Remplacez la lampe ultraviolette (UV) uniquement par le type
TUV 8W de Philips
To purchase replacement bulbs, please call Copernicus Educational Products atPhilips 8W TUV bulb with shatterproof sleeve
1-800-267-9494 or visit www.copernicused.com.
Replacement bulbs must be purchased through Copernicus Educational Products and approved selling partners. The use of
replacement bulbs from alternative sources will void the warranty of this product.
It is recommended that when one undamaged bulb is no longer emitting stable light (ickering, dimming, etc.), that the
malfunctioning bulb and all other bulbs be replaced. In many cases, if one bulb requires replacement then the remaining bulbs
will likely require replacement in a short period of time. It is critical that all bulbs in this product are performing at the same,
proper level of operation.
•Bulbs often break when thrown in a landfill and recycling prevents the release of mercury into the environment.
•Other materials in the bulbs get reused.
•Your area may prohibit disposal and/or require recycling.
Many government and environmental agencies have developed collection/exchange programs for mercury-containing devices
such as fluorescent and UV bulbs. Some counties and cities also have household hazardous waste collection programs. For
information about these programs, contact your local officials to find out when and where a collection will be held in your area.
Recycling and disposal:
Do not throw damaged bulbs into the garbage - recycle them! The UV bulbs
in this product can be recycled just like fluorescent bulbs.
Here are some reasons to recycle these bulbs:
FTT-UV - Revision A - Released September 25, 2020 - Copernicus Educational Products Inc. 10
Window Visual Inspection
The UV Tech Tub is equipped with a glass window that allows the end user to ®
visually inspect the working status of each Philips TUV bulb during a
disinfection cycle.
To inspect the bulbs of the UV Tech Tub®, follow these steps:
1. Start a disinfection cycle.
2. During the cycle, peer through the window at each bulb. If all bulbs are
illuminated, then the device is functioning normally. If a bulb, some bulbs, or
all of the bulbs are not illuminated, please proceed to the TROUBLESHOOTING
section for next steps.
Note: Although this window blocks harmful levels of radiation energy,
extended eye exposure is not recommended. Do not peer through this
window for more than 1 minute at a time.
Dosimeter Test Cards
The UV Tech Tub includes twelve medical grade testing cards to check the
®
effective germicidal UVC energy levels emitted by the UV Tech Tub . These ®
testing cards are commonly used in hospitals for UV room disinfection to
ensure proper patient care by reducing the spread of pathogens.
The photosensitive region on the testing card changes color when exposed to
UVC radiation. more radiation the card receives, the more the color region The
changes. These testing cards give UV Tech Tub users the confidence that the ®
product is operating .effectively
To check that the bulbs in the UV Tech Tub effective germicidal ® are emitting
UVC radiation, follow these steps:
1. Cut the dosimeter card down the middle as shown in Figure 2. This will
extend the amount of testing cards for checking your germicidal radiation.
Cutting the card will not impact the card’s function.
2. Empty chamber of UV Tech Tub , items inside will impact test results. ®
Remove the adhesive backing on the test card (Figure 3) and apply to the rear
wall of the chamber in the UV Tech Tub® as shown in Figure 4.
3. Close door and begin 1-minute disinfection cycle.
4 . After cycle is complete, peel card off wall. Compare the color of the test card
( ) to the color reference chart found on the top cover of yourA UV Tech Tub®
(Figure 5).
5 as indicated by. If the color region on the test card matches the correct color
the color reference chart (B) then your UV Tech Tub® is working normally. If the
color region on the test card does not match, please proceed to the
TROUBLESHOOTING section for next steps.
Note:
Monthly checks are recommended to ensure that the product is disinfecting
properly Keep testing cards in sealed bag, out of light until use.. Testing cards
are single use only. Testing cards expire after two years. Replacement testing
cards are available at www.copernicused.com
Figure 1 - Inspect bulbs through window
Date:
Location:
Name:
50 mJ/cm
100 mJ/cm
Figure 2 - Cut dosimeter down the middle
UV Disinfection Check
FTT-UV
Date:
Location:
Name:
50 mJ/cm
Figure 3 - Peel off backing
Date:
Location:
Name:
50 mJ/cm
Figure 4 - Apply test card to rear chamber wall
Figure 5 - Compare color of card to chart
(A)
(B)
FTT-UV - Revision A - Released September 25, 2020 - Copernicus Educational Products Inc. 11
UV Tech Tub® Cleaning Tips
Ensure that the UV Tech Tub® is turned off and unplugged from wall
receptacle before cleaning.
Clean the exterior and interior of the UV Tech Tub® with a cloth dampened
with a small amount of water.
Do not use any solvent to clean the equipment.
Stubborn stains may be removed with a cloth slightly moistened with a
solution of mild soap and warm water.
Dry with a clean, non-abrasive cloth. Allow time to dry before plugging in
and turning back on.
Window Cleaning Tips
Clean the tempered glass surface with a soft cloth dampened with a small
solution of mild soap and warm water.
Do not use any solvent to clean the equipment.
Take a sponge or soft cloth and use it to remove the soap-water mixture.
Dry with a new, clean non-abrasive cloth and wipe the glass dry.
Disinfecting the UV Tech Tub®
The UV Tech Tub® features several touchpoints that require frequent
disinfection.
Remember to clean and disinfect the latch knob (A), the cycle start button
(B), the flip-up handle (C), and the two handles on the door and back (D, E).
It is important to disinfect these high touch areas to avoid decontaminating
disinfected items.
UV Testing Card Storage
Keep and store your unused UV testing cards in the provided resealable bag.
This bag must be stored inside of the top compartment (F) and out of
daylight until use.
Ensure that the top compartment door is closed when not in use.
Window cleaning
Clean and disinfect these areas
(E)
(C)
(B)
(D)
(A)
Store UV testing cards in top compartment
(F)
FTT-UV Maintenance and Care Instructions
FTT-UV - Revision A - Released September 25, 2020 - Copernicus Educational Products Inc. 12
2Insert back feet of upper tub into slot on top of lower tub
3Insert front feet of upper tub into holes on top of lower tub
4
Connect upper and lower tub using side Flip Locks
6
Open the front door of upper tub and slide locking pin through metal tab
5
®
Close and lock front door of UV Tech Tub to secure devices
Flip up Locking Tab and Open side Flip Locks on lower tub
1
FTT-UV Connecting UV Tech Tub®s
ATTENTION! Do not connect more than three UV Tech Tub®s. Failure to follow
these instructions could lead to injury or damage to your units.
FTT-UV - Revision A - Released September 25, 2020 - Copernicus Educational Products Inc. 13
Troubleshooting
Malfunction
Reason
Solution
One (or multiple) bulbs do not illuminate
when cycle is started
Door is not fully closed.
Close door completely.
Bulbs are burned out.
Replace burned out bulbs with new
bulbs. Call customer service for
replacement bulbs.
Issue with ballast.
Call customer service for further
troubleshooting.
None of the bulbs illuminate
Door is not fully closed.
Close door completely.
Power switch is not switched to “On”.
Check that plug is pushed into receptacle
on both ends.
Turn power on.
Bulbs are burned out.
Replace burned out bulbs with new
bulbs. Call customer service for
replacement bulbs.
Issue with ballast or control circuit.
Call customer service for further
troubleshooting.
Power switch is not switched to “On”.
Fuse is blown.
Inspect fuse. Call customer service for
replacement fuse if blown.
Start Cycle Light does not illuminate or
start cycle
Power switch is not switched to “On”.
Turn power on. Ensure door is closed.
Check that plug is pushed into receptacle
on both ends.
Bulbs do not turn off when door is open
Malfunction of safety kill switches.
Close door immediately. Turn off power
and unplug from wall.
Call customer service for further
troubleshooting.
Testing card color region is showing low
energy levels
Bulbs are burned out.
Replace burned out bulbs with new
bulbs. Call customer service for
replacement bulbs.
Issue with ballast.
Call customer service for further
troubleshooting.
Disinfection cycle is longer than 1 minute
Issue with timer module.
Call customer service for further
troubleshooting.
If these troubleshooting steps did not solve the issue you are experiencing, please call Copernicus
Customer Service, where we will be happy to help.
Telephone 1-800-267-8494 Monday - Friday 8am - 4:30 pm EST. or email at info@copernicused.com
Power Indicator Light does not illuminate
Check that plug is pushed into
receptacle on both ends. Turn power on.

Popular Science Education Product manuals by other brands

3B V2006 manual

3B

3B V2006 manual

Alga Science AQUATIMER manual

Alga Science

Alga Science AQUATIMER manual

laerdal Little Anne Directions for use

laerdal

laerdal Little Anne Directions for use

BW SENSING BW-IMU730 Series Technical manual

BW SENSING

BW SENSING BW-IMU730 Series Technical manual

Pitsco Education SunZoon Lite user guide

Pitsco Education

Pitsco Education SunZoon Lite user guide

KOKEN LM-092 instruction manual

KOKEN

KOKEN LM-092 instruction manual

iKarus Trio Gyro quick start guide

iKarus

iKarus Trio Gyro quick start guide

KOKEN LM-094B instruction manual

KOKEN

KOKEN LM-094B instruction manual

Eastern Voltage Research microBrute DRSSTC Tesla Coil KiT instruction manual

Eastern Voltage Research

Eastern Voltage Research microBrute DRSSTC Tesla Coil KiT instruction manual

FUTABA CGY760R instruction manual

FUTABA

FUTABA CGY760R instruction manual

DAGU Arexx SOLAR E CAR JSR-SC2 instruction manual

DAGU

DAGU Arexx SOLAR E CAR JSR-SC2 instruction manual

Eastern Voltage Research Advanced RGB LED 1.0 instruction manual

Eastern Voltage Research

Eastern Voltage Research Advanced RGB LED 1.0 instruction manual

manuals.online logo
manuals.online logoBrands
  • About & Mission
  • Contact us
  • Privacy Policy
  • Terms and Conditions

Copyright 2025 Manuals.Online. All Rights Reserved.