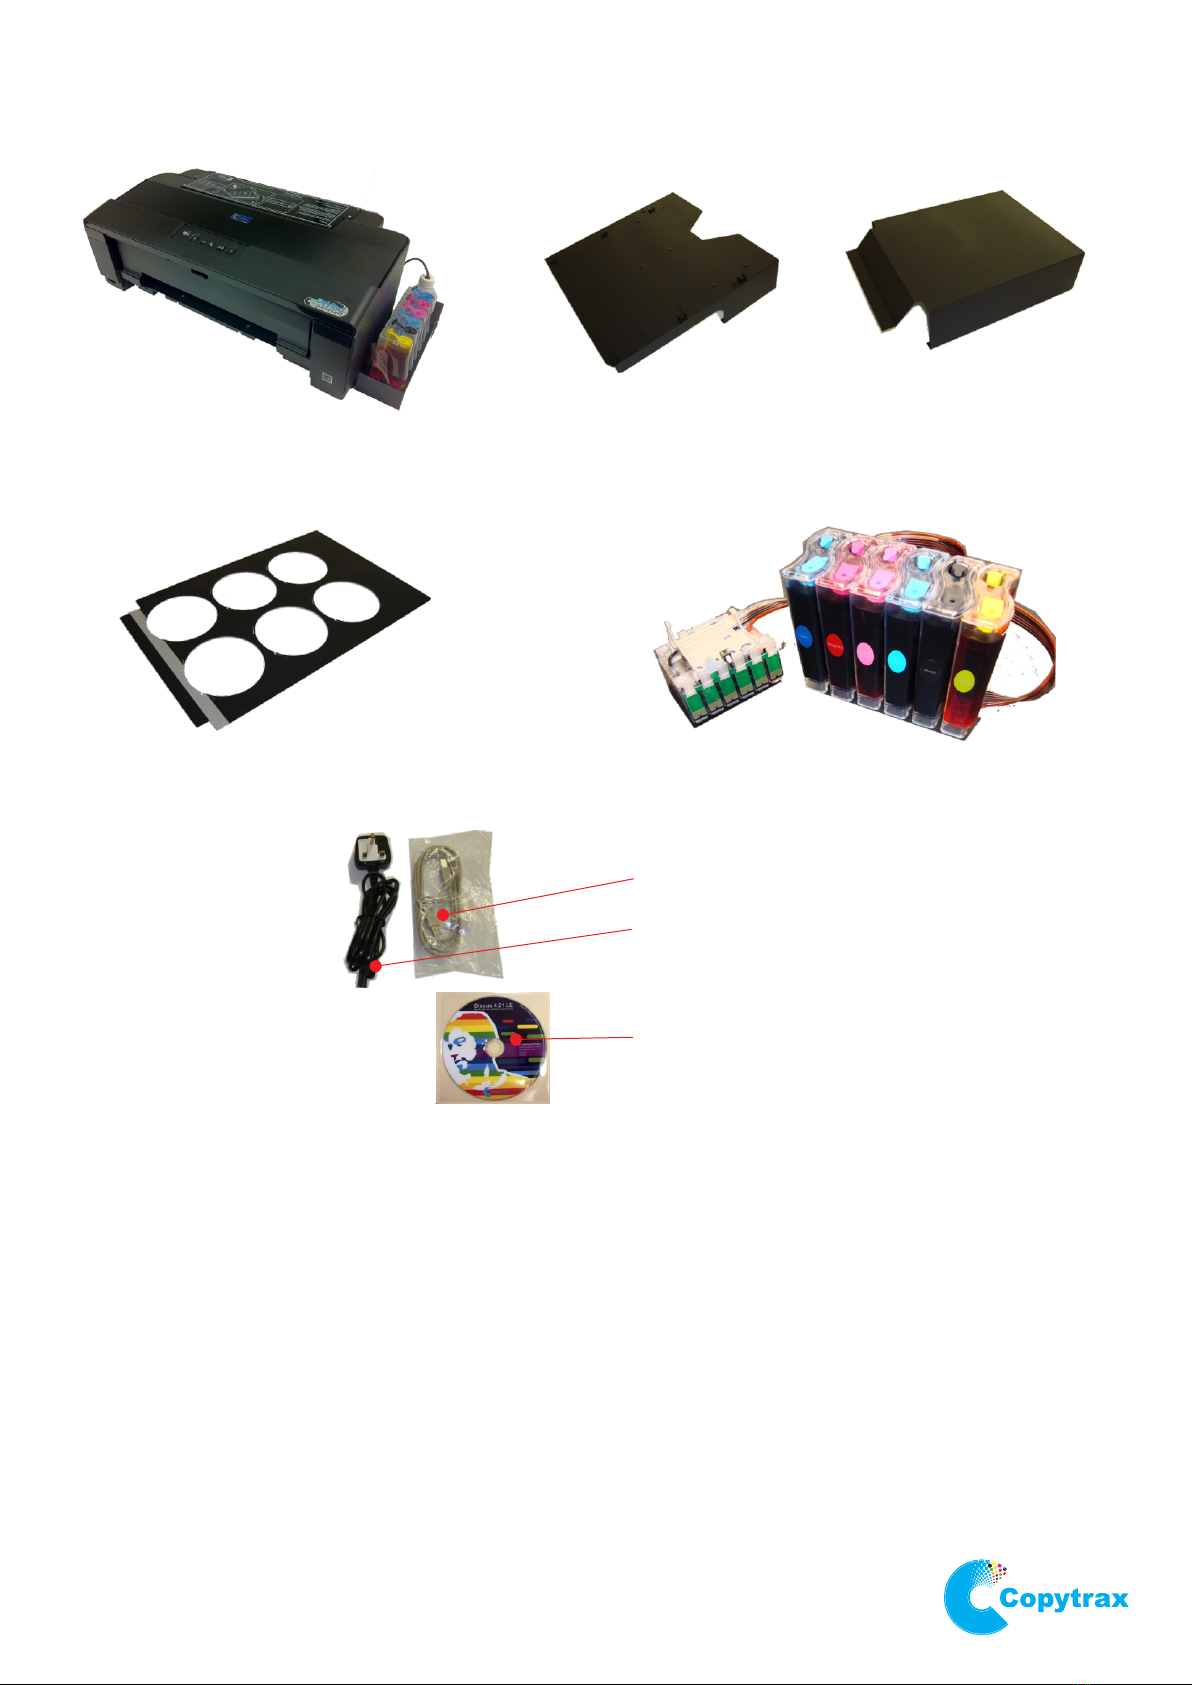
Copytrax DaVinci Pro 6-6W User manual


Version 1.0 26/09/2012 First Release JR
Version 1.1 18/01/2013 Updated JR
Version 1.2 20/02/2013 Updated JR
Version 1.3 01/04/2014 Updated JR

WARNING
To avoid electrical shock hazard s, unit covers should only be
removed by authorised personnel.
©
COPYRIGHT
This document is the property of Copytrax Technologies UK Ltd and
it may not be reproduced, copied or exhibited without permission
from Copytrax.
ENVIRONMENTAL PROTECTION
Waste electrical products should not be thrown away with household
waste. Please recycle where facilities exist or call us and we can
arrange collection (Uk only) and disposal.
Copytrax reserve the right to amend or modify the specifications and design criteria
applying to these products.

DaVinci Pro 6-6W CD printer.
Contents.
Unpacking.
Preparing the ink Tanks.
Installing the ink system.
Setting up.
Space to work.
Connecting the cables.
Fitting the input guide.
Fitting the output support.
Connection and software
installation(windows).
Connection.
Installing the printer driver.
Connection and software
installation(Macintosh).
Connection.
Installing the printer driver.
Printer installation.
Control panel functions.
Discus setup
Discus installation.
Discus Quick start
Quick start.
Discus Image Import
Importing an image into Discus.
Printing Quick Start
Quick print setup.
Printer settings (Advanced).
Changing the printer settings for CD
printing.
Setting the print area.
Optimizing print quality.
Printing software & template.
Image software.
Printing CDs.
Positioning the CD tray.
Loading the tray with Cds.
Adjusting the fit of the CD.
Printing.
Ink Filling
Error Indications.
Warranty & Support

DaVinci Pro 6-6W CD printer.
Unpacking.
1. Unpacking.
Prepare a clean area of desk space to unpack the printer parts.
Check that all of the parts shown are included in the box.
Note.
*Ink system design may vary from picture.
**Free bundled image software may vary, depending on stock at time of order/shipping.
Do not discard the box but store it safely in case the printer should ever need to be returned for any
reason.
Printer Input guide Output support
CD tray
Packing checklist
Bulk ink system (CISS)*
Already fitted
Image software**
Printer driver
User manual
Mains cable
USB cable
Reset Utility

12
34
56
78
Foam packaging removed ready for ink installation. Carefully lift the supply bottles out of the cradle.
Remove the bubble wrap from the supply bottles. Peel off the packing tape from the top of the supply bottles .
Make sure all plugs are closed. Tip the supply bottles forward to fill the front
compartment with ink .
DaVinci Pro 6-6W CD printer.
Ink System Installation.

The rear section of the supply bottles should now have
a small air gap (necessary for normal operation). Open the smaller plugs for each colour.
Insert the six supplied air filters.
Open the top lid of the printer and remove the
packing tape from the top of the cartridges.
The printer will start up and show an
‘ink out’ led indication. Press the ink button.
Connect the power lead to the printer and press the power
button on the keypad. .DO NOT CONNECT THE USB CABLE YET
Place the supply bottles back into the cradle
910
11 12
13 14
15 16
DaVinci Pro 6-6W CD printer.
Ink System Installation continued.

The cartridge carriage will stop in the
‘change cartridge’ position.
Carefully lift the six cartridges.
Tip the six cartridges as shown above. Move the six cartridges to the left of the carriage and
remove the two strips of packing material.
Refit the six cartridges into the carriage Press down on each of the six cartridges until you hear a
‘click’ sound from each cartridge.
When each cartridge is installed properly
the clips are locked in place.
Press the ink button. The carriage should return to its home
position and all ink lights will go out.
Ink system installation is now complete
17 18
19 20
21 22
23 24
DaVinci Pro 6-6W CD printer.
Ink System Installation continued.

Mains USB
DaVinci Pro 6-6W CD printer.
Setting up.
1. Space to work.
Prepare an area of desk space to set up the
printer. A space of 135cm wide x 62 cm deep
is required.
The desk should be stable and level, in a
place free from dust, humidity, movement,
vibrations and away from direct sunlight.
Place the printer in the centre of the desk
space with the control end of the printer
nearest the front of the desk.
When using the printer you will be working
from the side of the printer and not from the
front as desktop printers are conventionally
used.
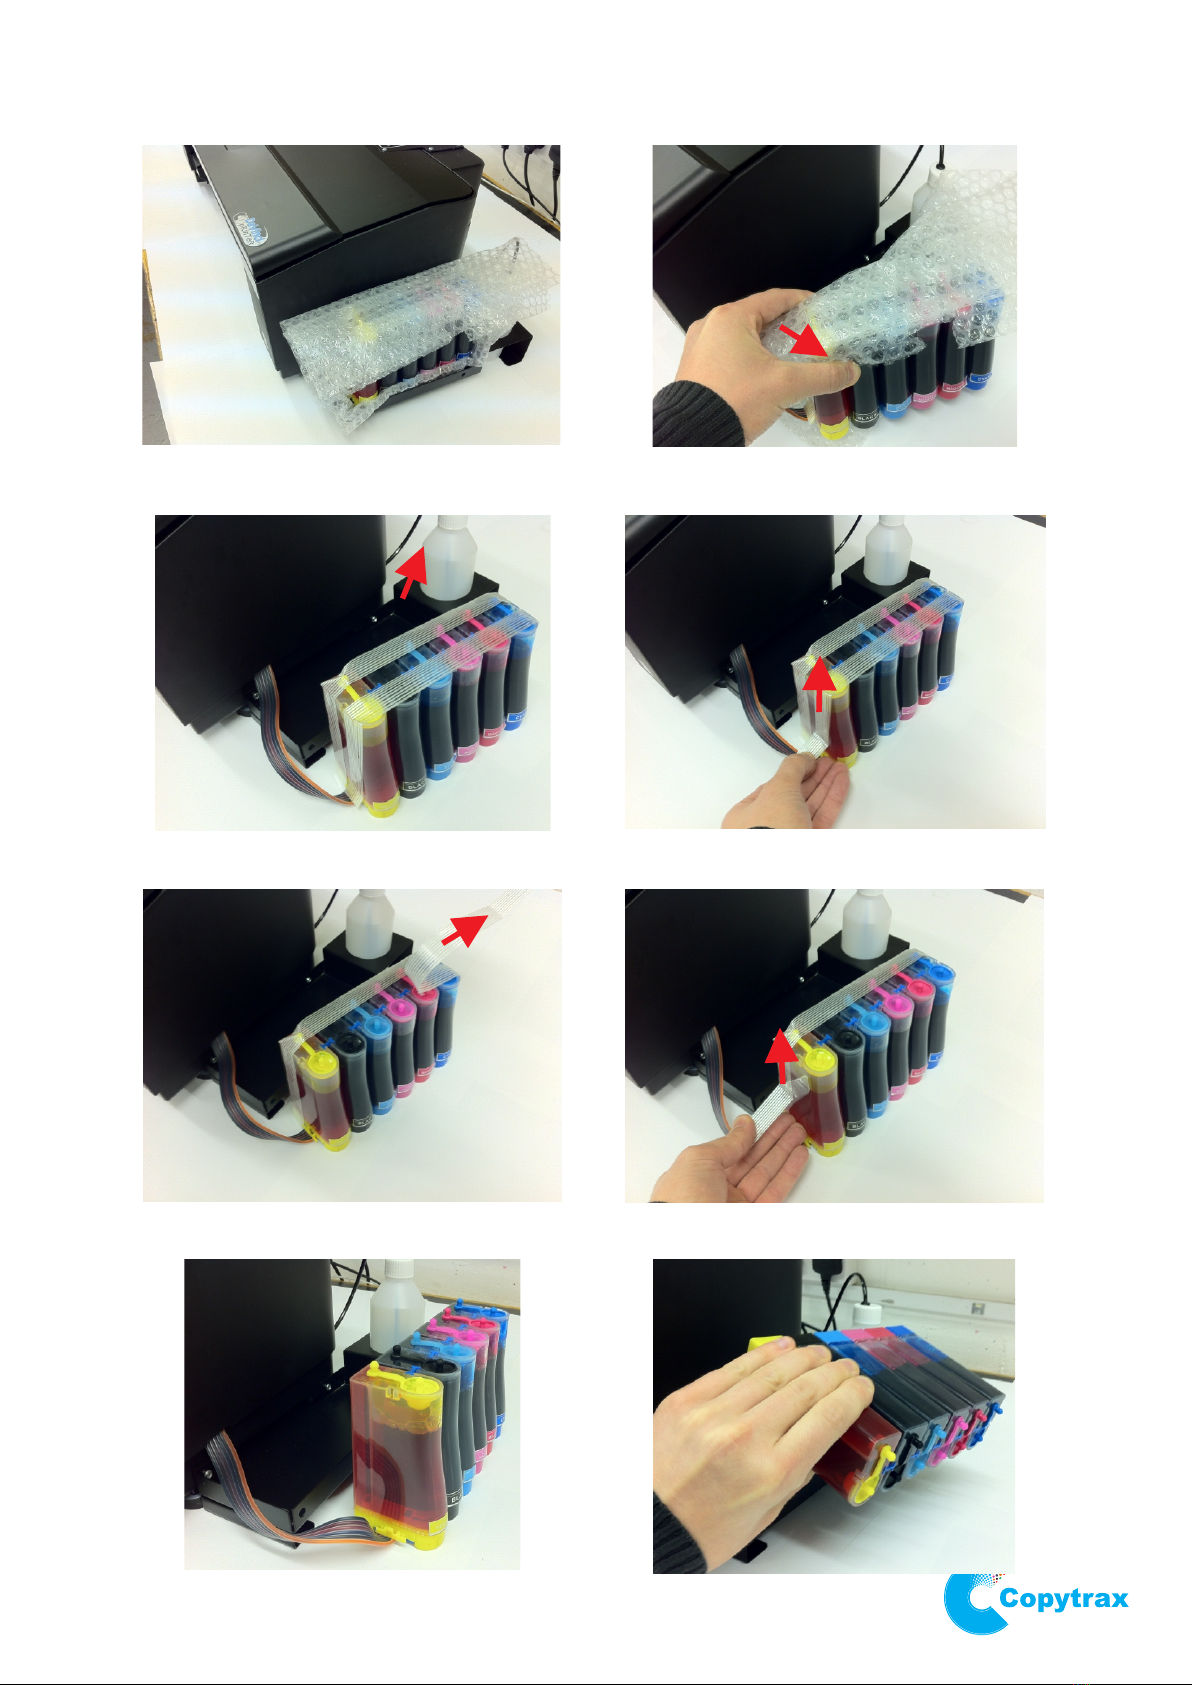
2. Connecting the cables.
Move the input guide aside. Do not connect
the mains cable to the mains supply at this
point, but plug it into the rear of the printer.
Plug the USB cable into the rear of the
printer.
3. Fitting the input guide.
Locate the 2 pins on the underside of the
input guide into the location holes on the
metalwork on the rear of the printer.
Ensure that the input guide is sitting level on
the desk top and that the cables pass through
the opening in the side of the input guide and
are not trapped underneath it.
4. Fitting the output support.
Locate the 2 pins on the end of the output
support & fit them into the 2 location holes in
the front of the printer body.
Ensure that the support sits level on the
desktop and nothing is trapped underneath it.
Input guide
Output support
Pins under
input guide
input guide
Location holes
Pins
1
2
3
4
Output support

DaVinci Pro 6-6W CD printer.
Connection and software installation .(Windows)
1. Connection.
Connect the USB cable to your PC.
Connect the mains plug to the mains supply.
If the printer comes on when you plug in the
mains cable turn it OFF by pressing the
on/off button.
2. Installing the printer driver.
After connecting the printer and PC you need
to install the printer driver from the suppled
DVD.
A. Make sure the printer is off, then turn on
your computer. Turn off any virus protection
software and cancel any set-up wizard or the
‘New hardware found’ window if it has
opened.
B. Insert the printer software DVD. If the
Installer dialog box does not appear click on
‘my computer’, click on the DVD rom icon,
then click ‘open’. Then double-click on
Autorun.exe.
C. Select ‘Install Driver & WiFi Setup’. WiFi
setup is optional and requires an available
wireless network.
D. The driver installation setup will open.
Agree to the Terms and Conditions and select
‘Next’ to continue the installation.
ON/OFF

E. Only check the boxes for ‘Epson Driver and
Utilities’ and ‘Epson Network Utilities’*.
Uncheck all other options before selecting
‘Install’.
F. The installation will now begin. If your PC is
connected to the internet the latest driver will
be found and downloaded. The time this
process takes will depend on your network
speeds.
G. Select your desired connection type and
select ‘Next’. The printer can be connected
directly to the PC by USB cable, or wirelessly
over your local network*.
* Wireless network required.
DaVinci Pro 6-6W CD printer.
Connection and software installation continued (Windows).

DaVinci Pro 6-6W CD printer.
Connection and software installation continued (Windows).
H. Select ‘Yes:First time setup’ and and ‘Next’.
Follow the onscreen instructions to complete
the installation.
I. Select ‘Finish’ to complete the installation.
Printing the test page is not necessary, but
should you wish to do so place a piece of
paper on the print tray before loading it into
the printer. For printing instructions refer to
the ‘Printing’ section of this manual.
J. Do not participate in the Epson Customer
Research. Select ‘Do not install’ and ‘Next’.
The printer is now installed. Select ‘Finish’ to
close the setup window.
It is recommended you rename the printer to
‘PrintMaster Dali’. The printer can be renamed
in the ‘Devices and Printers’ section of
Windows control panel.

DaVinci Pro 6-6W CD printer.
Connection and software installation .(Macintosh)
1. Connection.
Connect the USB cable to your mac.
Connect the mains plug to the mains supply.
If the printer comes on when you plug in the
mains cable turn it OFF by pressing the
on/off button.
2. Installing the printer driver.
After connecting the printer and mac you
need to install the printer driver from the
DVD-ROM.
A. Make sure the printer is off, then turn on
your Macintosh. Turn off any virus protection
software.
B. Insert the printer software DVD. The driver
is located in the following folder:
Autoplay/MAC. Open the file within this folder
to begin the installation. Follow the onscreen
instructions. The following installation
example may not be relevant to all MAC
users.
C. If the Install Printer Driver/Utility folder
appears in the Epson folder, open it and
double click on the installer icon.
D. At the initial screen, click ‘Easy Install’.
Then the installer dialogue box appears.
E. The installer will show what items are to be
installed, then click ‘install’.
F. Installation will start. A progress bar will
show the status of installation.
G. When a message appears to inform you
that the software was successfully installed,
click ‘Quit’.
ON/OFF

DaVinci Pro 6-6W CD printer.
Connection and software installation continued .(Macintosh)
3. Printer Installation.
Once the driver installation is complete the
printer connection window will appear.
Turn on the printer by pressing the power
button on the front of the printer.
Click ‘Next’.
The next window gives you instructions on
how to add a printer to the printer list. The
printer list should be open on the desktop.
Click ‘Add’. This will open the printer browser
window.
From the printer browser window select
‘Stylus Photo 1500’
Click ‘Add’
The printer list window will now show the
Stylus Photo 1500.
Click ‘Next’ & the installer window will appear.
Click ‘Install’
In the Applications software install window,
uncheck the first three boxes & click ‘Install’
On the final window click ‘Exit’.
Your printer is now installed.
ON/OFF

WiFi
DaVinci Pro 6-6W CD printer.
Control panel functions.
Printer status indicator light.
A. On solid when the printer is on but GREEN
inactive.
B. Flashing when the printer is active.GREEN
On/Off button
A. Used to turn the printer on and off.
B. Used to clear the printers memory if pressed
twice while the printer is on.
Feed button / indicator light.
A. On solid when the printer is RED
ready for the CD tray, or paper
tray, to be pushed in. (After
spooling the image).
B. On solid if the printer is RED
jammed during printing.
C. Feeds in the CD tray or paper
tray.
D. Ejects the CD tray or paper tray.
Clean button / indicator light.
A. Flashing when an ink cartridge level is RED
low.
B. On solid when an ink cartridge is empty.
C. Cleans the print head when pressed for 3
seconds with the Feed/ink status light off and
the CD tray out.
D. Moves the print head to the cartridge change
position when an ink cartridge is empty.
Info button
Place a piece of paper on the print tray.
Press and hold button for three seconds.
An information page will be printed*
containing the WPS-PIN code for network
connectivity.
*For instructions on printing see the Printing
section of this user guide.
WiFi button (for use with WPS push button
compatible routers)
Press the WPS push button on your router.
Press and hold WiFi button for three seconds.
It may take several minutes for the printer to
connect to your network.
When both WiFi lights come on the setup is
complete.

DaVinci Pro 6-6W CD printer.
Discus Setup. 1. Discus Installation.
Windows.
Insert the printer software DVD. (If the
installer dialog box does not appear click on
‘my computer’, click on the DVD rom icon,
then click ‘open’. Then double-click on
autorun.exe).
Select ‘Install Discus Label Software’.
Quicktime is required to run Discus label
software. If it is not already installed on your
PC the installation for Quicktime will start.
MAC.
Discus label software (and Quicktime if
required) is located in the following location
on the software DVD:
Autoplay/Programs/Discus v4.22 LE.
When Discus is run for the first time It will
prompt for a serial number. This number is
made up of three sets of three digits. This
number can be found on the DVD face. Enter
the serial number to continue.
Click choose layout to select the first
template.
In the ‘Choose a kind’ menu, select CD/DVD
& in the ‘Choose a Layout’ menu select
Copytrax Da Vinci pro 6-6W. You will see a
thumbnail image of the 6 disc tray on the
right.
Click OK.
You can now see the Print window showing
the layout of the 6 disc’s. Each disc can be
made Print or Non Print by double clicking on
the tick box in the centre of each disc.
At the bottom left you will see the adjustable
sliders for the outside & inside diameters of
the print mask. The four arrows allow for fine
adjustment of the whole template printing
position as due to manufacturing tolerances,
each printer will differ slightly so some
adjustment may be needed. These settings
will be held for future printing & can be
adjusted at any time.

DaVinci Pro 6-6W CD printer.
Discus Quick Start. 1. Quick Start.
Open Discus & select the Copytrax Da Vinci
pro 6-6W template.
Click on the ‘Canvas’ Tab top left of the
window.
To choose a background from the default
supplied images, click the ‘Show all’ button
bottom left.
Scroll through the pages & select the desired
image.
You will now see the selected image in the
disc area of the main screen.
Text, Symbols etc can be added by selecting
the tabs to finish the design.
Click the ‘Print’ tab to show the layout of the
discs on the 6 disc tray.
You are now ready to print.

DaVinci Pro 6-6W CD printer.
Discus Image Import. 1. Importing an Image into Discus.
Open Discus print software & select the
Copytrax Da Vinci pro 6-6W template.
Click on the ‘Photo’ tab top left.
Click the ‘Add’ button to bring up the ‘Open’
dialogue box.
Supported image formats are: BMP, GIF, JPG,
PCT, PNG.
Select your image & click ‘Open’.
Your image will now be displayed in the
printable area. Resize if needed & drag the
image into place.
Click the ‘Print’ tab to show the 6 disc tray
layout. You are now ready to print..

DaVinci Pro 6-6W CD printer.
Printing Quick Start. 1. Quick Print Setup.
This section is a Quick guide to demonstrate
the printing process from the supplied
Discus’s software.
Your design should already be created in
Discus, when you are ready to print click the
Print button.
In the Print window select the Stylus Photo
1500 printer.
Click ‘Preferences’. A Printing Preferences
window will open.
In the ‘Printing Preferences’ window select:
Quality Option = Best Photo
Paper Options:
Source = Sheet
Type = Epson Photo Quality Ink Jet
Size = A3+ 329mm x 483mm
Print Options = PhotoEnhance
Orientation = Portrait
Click OK.
PLEASE NOTE:
The above settings are suggested by
Copytrax. However, they can be altered as
desired to achieve different results e.g. a
faster print/lower resolution, slower
print/higher resolution and for colour
adjustments. The only settings that must be
set as shown are ‘Source=Sheet’, ‘Size=A3+’
and ‘Orientation=Portrait’.

DaVinci Pro 6-6W CD printer.
Printer settings Windows (Advanced).
1. Changing the printer settings for CD
printing.
In the Windows control panel select Printers
and Devices.
Select the Epson Stylus Photo 1500, right
click and select Printer Properties. In the
window type ‘DaVinci Pro 6-6W’ and click OK.
Select the DaVinci pro 6-6W and right click
and select Printing preferences
2. Optimizing print quality.
Enter the advanced section of the Printer
preferences.
Configure the necessary settings as follows:
Paper & Quality Options
Feed = Sheet
Paper type = Epson Photo Quality Inkjet
Resolution = Best Photo
Paper size = A3+ 329 x 483 mm
Orientation = Portrait
Print Options
High speed = Off (unchecked)
To save this setup for future use select Save
Settings...
Give the setup a name and select Save.
The drop down list to the left of Save
Settings... will hold all saved custom setups
you choose to create.
Click OK to finish.
PLEASE NOTE:
The above settings are suggested by Copytrax. However,
they can be altered as desired to achieve different results
e.g. a faster print/lower resolution, slower print/higher
resolution and for colour adjustments. The only settings
that must be set as shown are ‘Source=Sheet’,
‘Size=A3+’ and ‘Orientation=Portrait’.
Table of contents
Other Copytrax Printer manuals